Quantcast
Channel: Sage X3 – Tips, Tricks and Components
Viewing all 1515 articles
Browse latest View live

Greytrix Integrated Shipping App for Sage X3 

$
0
0
Shipping App for Sage X3

It seems like a perfect shipping cycle that you would want for your business, doesn’t it? Well, if so, look no further than the Shipping App for Sage X3. This powerful solution is designed exclusively for your Sage X3 system. It aims to help elevate the shipping experience and allow the warehouse staff to get more products out the door faster.  

The Shipping App with Sage X3 is a solution that is more than just about enhanced efficiency. In this post, we’ll explore all the benefits that you can seek out of the Shipping App for Sage X3 and revolutionize your shipping game.  

So, here we go!  

What is the Greytrix Shipping App? 

Greytrix Shipping App for you—the best shipping app for Sage X3! With a user-friendly interface, the App offers comprehensive freight management and handles all the crucial tasks, from generating quotes to managing return processes.  

This native solution caters to the modern needs of logistics or distribution businesses. Hence, it is compatible with top carriers like USPS, FedEx and UPS for a smooth and seamless shipping experience. 

With Greytrix Shipping App with Sage X3, you don’t have to hop from one platform to another to ensure successful shipping – everything you need is seamlessly integrated into this shipment solution. 

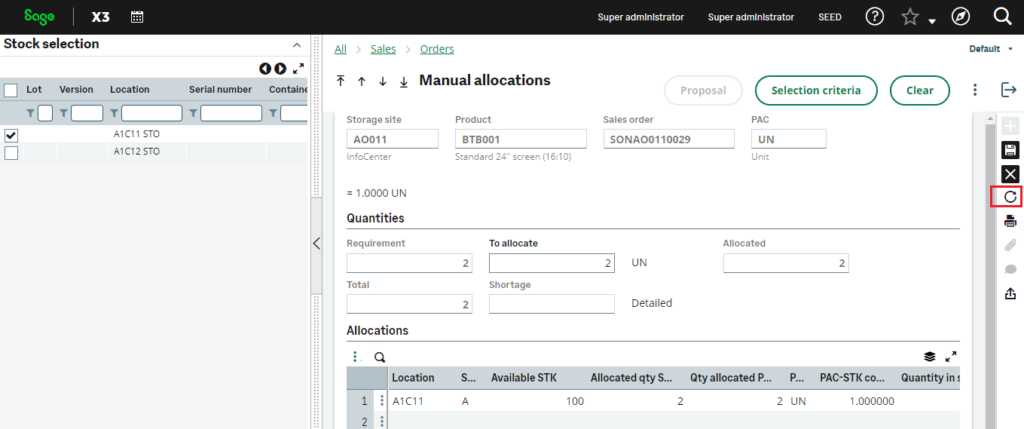
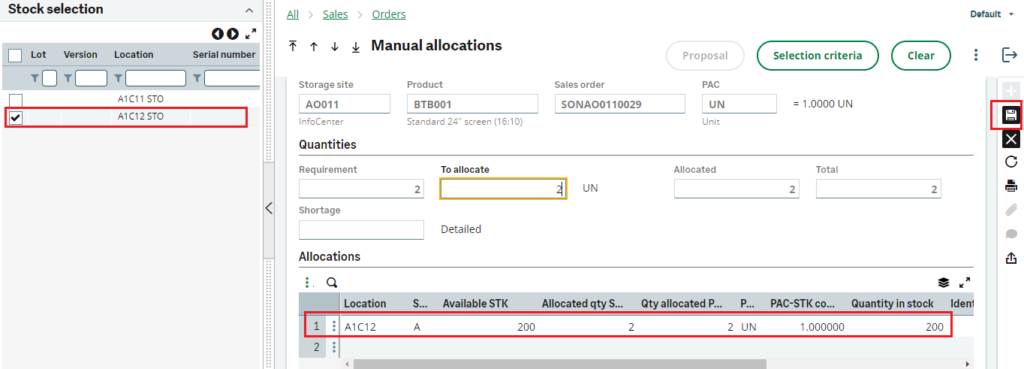
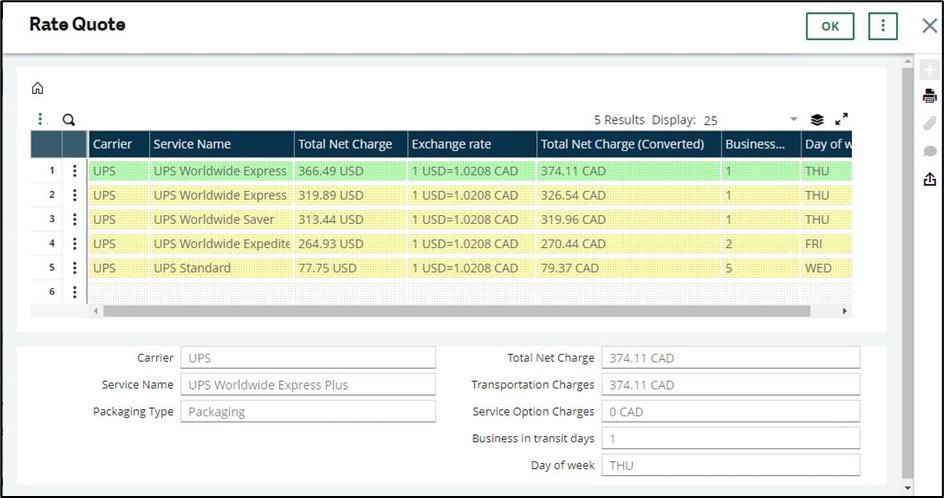
  •  Optimal Carrier Selection 

The Shipping App has a user-friendly interface that makes it easier for users to use the tool. You can easily generate shipments from your preferred carriers and record tracking information instantly to keep customers informed about their shipments. Furthermore, you can also verify information and get quotes for packages from different carriers, such as FedEx, UPS, USPS, and more. Based on their quotation, you can choose the carrier best suits your budget and requirements. As a result, you not only save time but also reduce shipping costs. 

Rate Quote In Sage X3
  • Instant Label Generation 

With the Shipping App, you don’t have to wait around for shipping labels to get updated. The tool allows you to create shipping labels instantly. This feature comes in handy regardless of the size of the package, as it speeds up the shipping process. 

Carrier Labels Generation in Sage X3
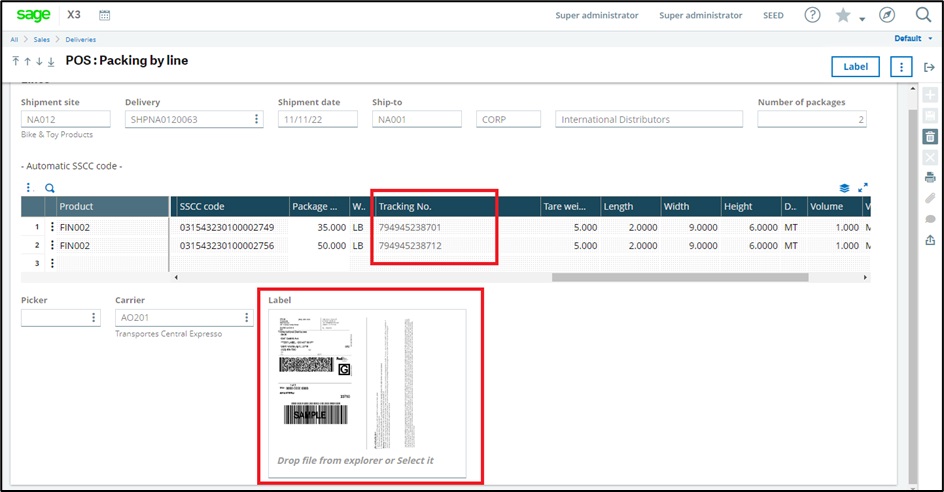
  • Automated Tracking and Documentation 

One of the amazing advantages of this Sage X3 Shipping Software is the ability to fetch real-time information for your shipments automatically and instantly through batch processing. In addition, the app can automatically send labels to the picker, boosting the entire shipping process. As a result, your dependencies on manual tasks are reduced, facilitating higher accuracy and no delays. 

Track Shipment in Sage X3
  • Address Validation 

The Greytrix Shipping App was built to minimize shipping errors. One of the most common mistakes is in shipping addresses. The app addresses this issue through its address validation feature to ensure that your package reaches the right destination with no delays. Consequently, you not only save operational costs but also create a sense of satisfaction in customers’ minds by reducing the chances of delayed shipments. 

Greytrix Shipping App is all about offering you a streamlined shipping experience. It comes with a comprehensive suite of features that cater to all your different shipping needs.  

  • Native Solution 

Shipping App is Greytrix’s native solution, and it can be easily integrated with your Sage X3 ERP without any compatibility issues. This reduces your team’s learning curve and ensures a seamless user experience. 

  • Multi-Currency Support 

Multi-currency support is one feature that distinguishes the Gretrix Shipping App from others. It allows you to generate quotes quickly. With multi-currency support, you can expand your operations globally and provide accurate shipping quotes regardless of the currency. 

  • Freight Auditing & Analytics 

The Shipping App comes with robust freight auditing capabilities, allowing you to verify bills for any discrepancies. With a comprehensive audit of invoices, you not only can identify mistakes, but also rectify any billing errors or overcharges, resulting in enhanced cost efficiency. 

You can also leverage advanced analytics with the Shipping App. It comes with integrated analytics tools that provide useful insights into shipping data, helping businesses monitor key performance indicators (KPIs) such as shipping costs, delivery times, carrier performance, and more.  

  • Return Shipment Process 

With the Shipping App, returning an order is as seamless as getting it. The app simplifies the return process with a streamlined return management system. You can easily generate return labels, track return shipments, and process exchanges or refunds. This helps in ensuring a hassle-free return shipment experience for users, enhancing customer satisfaction and loyalty. 

  • Multi-Carrier Support 

This shipping solution gives you plenty of options when it comes to choosing the right carrier to ship the package. The app has partnered with multiple carriers, allowing businesses to request quotes and choose the one that best suits their budget and requirements. 

So, that was a comprehensive picture of Greytrix Shipping App as your one-stop shipping management solution. So, are you ready to transform your shipping operations? If so connect with Greytrix and get your hands on the Shipping App for your Sage X3 and experience the future of shipping today! 


How to Setup Up User Security for Sales Order and Pick Tickets

$
0
0

To prevent the customer care agent from creating a pick ticket from the sales order screen, follow these instructions to set up your functional profile for them.
A button that displays the order’s life is located in the right upper panel of the sales order screen. These are known as validation links or buttons.

Fig 1: Sales Order Panel

This right top panel allows you to:

• Allocate/reserve your lot and quantities to your order

• Prepare/create the pick ticket for your warehouse

• Deliver/create the documents for your shipments

• Invoice the order once the delivery has occurred

• Create a pro forma for international shipments

• Close the order

Currently, you have to discover the user in the user security function and determine the functional authorization code associated with it in order to prevent them from filing a pick ticket.

STEP 1 – Go to Setup > Users > Users to find the function profile.

Fig 2: User Setting

You can easily jump to the configuration of that function profile using ESC F9 as a shortcut while in the field.

Step 2: Once there, look for the authorizations button in the right panel. This will take you to the settings panel, where you can manage the buttons that are permitted and prohibited.

Fig 3:User Function Profile

STEP 3 – Search for the sales order function or GESSOH

Fig 4: Access section

On this screen, in the options section, you can read the letters that are giving you access to the functionality in the right panel of the sales order. The options are:

Fig. 5: Option Selection

STEP 4 – In this list, in the selection column of the grid, you must remove R. You must also ensure that the functions GESSPRH and GESSPRH2 (these are for collection tickets) are not functions that can be used by customer representatives. In theory, this last step is an extra precaution, but if the user is good with Sage X3, they can invoke these functions using the Google search bar; For auditing purposes, you want to make sure they can’t actually get the tickets.

Fig. 6 : Function search

This is what it should look like when you’re done.

With this change, when the agent logs into the system again, the Done link is still there, but when they try to click it, they get the full information of the abbreviation ABCD options.

Fg. 7: Option field after save

By following the steps outlined in the text, you can configure the functional profile for customer service representatives to prevent them from creating a pick ticket from the sales order screen. This involves adjusting the user’s functional authorization codes and removing access to specific functions related to pick tickets to ensure they cannot access them.

Adding a Left-List page navigation in Sage X3

$
0
0

In Sage X3, for any Object or Miscellaneous window we can add several browsers or left-list objects that serve the purpose of entry selections and data linking. However, sometimes the object table when loaded fully can cause performance issues in loading of records.

For this Sage X3 has provided a way to limit the number of records showing by introducing the concept of Pagination. Follow the below steps on how to add page navigation.

New Stuff: How to Setup Up User Security for Sales Order and Pick Tickets

For this we’re referencing following paths and screenshots below:

Window dictionary: All > Development > Script dictionary > Windows (GESAWI)
Product master: All > Common Data > Products > Product (GESITM)

Fig. 1 - Left-list showing having no page browsers
Fig. 1 – Left-list showing having no page browsers

-As shown in Fig. 1 we’re in the Product master window and here we can see for the Product main selection browser there is no pagination due to which the user has to manually search the product code.

Fig. 2 - Left-list browser pointers
Fig. 2 – Left-list browser pointers

-Now first we’ll have to navigate over to the Windows dictionary and jump to our Product window. In the window dictionary we’ve a tab screen called Browser as shown where we can see the ITM object that is our Products left-list. We need to scroll over to the Pointers column and have to set it to YES as shown in Fig. 2.

Fig. 3 - Left-list showing page browsers
Fig. 3 – Left-list showing page browsers

-After setting the pointers status, then we proceed with the window validations and can go back to check the Products master screen. We can see the page navigators are showing on the left-list as shown in Fig 3.

This way we can add pagination to left-lists in Sage X3.

About Us

Greytrix – a globally recognized and one of the oldest Sage Development Partners is a one-stop solution provider for Sage ERP and Sage CRM organizational needs. Being acknowledged and rewarded for multi-man years of experience and expertise, we bring complete end-to-end assistance for your technical consultations, product customizations, data migration, system integrations, third-party add-on development, and implementation competence.

Greytrix has some unique integration solutions developed for Sage CRM with Sage ERPs namely Sage X3Sage IntacctSage 100Sage 500, and Sage 300. We also offer best-in-class Sage ERP and Sage CRM customization and development services to Business Partners, End Users, and Sage PSG worldwide. Greytrix helps in the migration of Sage CRM from Salesforce | ACT! | SalesLogix | Goldmine | Sugar CRM | Maximizer. Our Sage CRM Product Suite includes addons like  Greytrix Business ManagerSage CRM Project ManagerSage CRM Resource PlannerSage CRM Contract ManagerSage CRM Event ManagerSage CRM Budget PlannerGmail IntegrationSage CRM Mobile Service SignatureSage CRM CTI Framework.

Greytrix is a recognized Sage Champion Partner for GUMU™ Sage X3 – Sage CRM integration listed on Sage Marketplace and Sage CRM – Sage Intacct integration listed on Sage Intacct Marketplace. The GUMU™ Cloud framework by Greytrix forms the backbone of cloud integrations that are managed in real-time for the processing and execution of application programs at the click of a button.

For more information on our integration solutions, please contact us at sage@greytrix.com. We will be glad to assist you.

How to Control Approval Triggers in Sage X3 with Custom Buttons

$
0
0

In Sage x3, there is a functionality that allows sending an entry to one or multiple levels of user approval. This process is triggered once the workflow for any screen is activated and an entry for that screen is created or modified. However, a client expressed concern about the signature workflow being triggered immediately after clicking the create/save button. At that time, whenever a user created or modified an entry, it was automatically assigned to a particular user for the approval process, and an email was sent to the user’s email address each time.

To address this, the client requested a custom button on the sales order screen. This would enable users to create and modify entries as needed and then send the entry for approval by clicking the custom button. Here are the steps we implemented to address this concern:

Step 1: Add a Custom Button on the Sales Order Screen

  • Navigate to: Development -> Windows -> OSOH -> Buttons/Menus.
  • Add a button with the ‘w’ code.

New Stuff: Adding a Left-List page navigation in Sage X3

Fig 1 : OSOH Window
Fig 1 : OSOH Window
  • Perform global validation of the window.
  • Validate all the sales order transactions from setu
Fig 2 : Sales Order Screen

Step 2: Modify the Workflow Rule

  • Change the operation from ‘CM’ (Creation and Modification) to ‘w’ (the workflow will be called once the custom button is clicked) in the SOHSIG workflow rule.
  • Save and validate the workflow rule.
Fig 3 : SOHSIG Workflow rule

By following these steps, the workflow is only triggered when the custom button (Workflow) is clicked, giving users more control over when entries are sent for approval. This change helps to prevent unnecessary email notifications and ensures that entries are only sent for approval when the user decides it is necessary.

Conclusion – By implementing this customization, we successfully fulfilled the client’s requirement, providing a more flexible and controlled approval process in Sage X3. This improvement not only enhances user experience but also meets the specific needs and expectations of the client.

About Us

Greytrix – a globally recognized and one of the oldest Sage Development Partners is a one-stop solution provider for Sage ERP and Sage CRM organizational needs. Being acknowledged and rewarded for multi-man years of experience and expertise, we bring complete end-to-end assistance for your technical consultations, product customizations, data migration, system integrations, third-party add-on development, and implementation competence.

Greytrix has some unique integration solutions developed for Sage CRM with Sage ERPs namely Sage X3Sage IntacctSage 100Sage 500, and Sage 300. We also offer best-in-class Sage ERP and Sage CRM customization and development services to Business Partners, End Users, and Sage PSG worldwide. Greytrix helps in the migration of Sage CRM from Salesforce | ACT! | SalesLogix | Goldmine | Sugar CRM | Maximizer. Our Sage CRM Product Suite includes addons like  Greytrix Business ManagerSage CRM Project ManagerSage CRM Resource PlannerSage CRM Contract ManagerSage CRM Event ManagerSage CRM Budget PlannerGmail IntegrationSage CRM Mobile Service SignatureSage CRM CTI Framework.

Greytrix is a recognized Sage Champion Partner for GUMU™ Sage X3 – Sage CRM integration listed on Sage Marketplace and Sage CRM – Sage Intacct integration listed on Sage Intacct Marketplace. The GUMU™ Cloud framework by Greytrix forms the backbone of cloud integrations that are managed in real-time for the processing and execution of application programs at the click of a button.

For more information on our integration solutions, please contact us at sage@greytrix.com. We will be glad to assist you.

How to Display All Data In The Left Lists Selection in Sage X3

$
0
0

Sage X3 provides the functionality to display either partial or full data in the left list selection of the screen. By default, it is set to partial because setting it to total causes the screen to take longer to refresh and load

We are using the manual allocation screen as an example, where we can select multiple lots and allocate them to the product. Previously, to access all the data, we had to press the ‘Next’ button, as shown in the picture below

New Stuff: How to Control Approval Triggers in Sage X3 with Custom Buttons

Fig01- Manual Allocation Screen

Follow the steps given below to load the complete data in the left list

Step 1 : Please follow this path All > Development > Windows

After opening the windows for that particular screen, scroll down and go to the ‘Objects’ tab. In that tab, scroll to the right, and you will see a drop-down field named ‘Preloading.’ The ‘Preloading’ field has three options: No, Partial, and Total. Refer to the picture shown below.

Fig02 -Windows screen

Step 2: Set the preloading field to ‘Total,’ it will load all the data in the left list selection on a single page, as shown in the picture below.

Fig03 -Objects tab in window

By following the above steps, we can display all data in the left list selection in Sage X3

About Us

Greytrix – a globally recognized and one of the oldest Sage Development Partners is a one-stop solution provider for Sage ERP and Sage CRM organizational needs. Being acknowledged and rewarded for multi-man years of experience and expertise, we bring complete end-to-end assistance for your technical consultations, product customizations, data migration, system integrations, third-party add-on development, and implementation competence.

Greytrix has some unique integration solutions developed for Sage CRM with Sage ERPs namely Sage X3Sage IntacctSage 100Sage 500, and Sage 300. We also offer best-in-class Sage ERP and Sage CRM customization and development services to Business Partners, End Users, and Sage PSG worldwide. Greytrix helps in the migration of Sage CRM from Salesforce | ACT! | SalesLogix | Goldmine | Sugar CRM | Maximizer. Our Sage CRM Product Suite includes addons like  Greytrix Business ManagerSage CRM Project ManagerSage CRM Resource PlannerSage CRM Contract ManagerSage CRM Event ManagerSage CRM Budget PlannerGmail IntegrationSage CRM Mobile Service SignatureSage CRM CTI Framework.

Greytrix is a recognized Sage Champion Partner for GUMU™ Sage X3 – Sage CRM integration listed on Sage Marketplace and Sage CRM – Sage Intacct integration listed on Sage Intacct Marketplace. The GUMU™ Cloud framework by Greytrix forms the backbone of cloud integrations that are managed in real-time for the processing and execution of application programs at the click of a button.

For more information on our integration solutions, please contact us at sage@greytrix.com. We will be glad to assist you.

How to Generate E-Way Bill for Sales Invoice, Sales Delivery, and Customer BP Invoice Using E-Way Bill Generation Screen in Sage X3

$
0
0

Generating E-Way Bills for various types of transactions like sales invoices, sales deliveries, and customer BP invoices is crucial for compliance with Goods and Services Tax (GST) regulations. Sage X3 provides an efficient E-Way Bill Generation screen that allows users to create multiple E-Way Bills and modify the From and To addresses from a single interface. Here is a step-by-step guide on how to generate E-Way Bills using this feature.

Step 1: Accessing the E-Way Bill Generation Screen
To begin, navigate to the Goods and Services Tax (GST) module within Sage X3. On the navigation page, locate the E-Way Bill Generation Screen. This is your starting point for generating E-Way Bills.

New Stuff:- How to Display All Data In The Left Lists Selection in Sage X3

Fig 1 Navigation Screen

Step 2: Utilizing the Filters
On the E-Way Bill Generation screen, you will see several filters to help you locate the necessary data:

Company
Site
Date
Customer
Entry Type
Entry Number

These filters allow you to refine your search and find the specific entries you need.

Fig 2 E-Way Bill Generation Screen - Filters
Fig 2 E-Way Bill Generation Screen – Filters

Step 3: Selecting the Entry Type
In the Entry Type filter, you have three options:

Sales Invoice
Sales Delivery
Customer BP Invoice

Choose the appropriate entry type for which you want to generate the E-Way Bill.

Fig 3 E-Way Bill Generation Screen - Filters - Entry Type
Fig 3 E-Way Bill Generation Screen – Filters – Entry Type

Step 4: Searching for Entries
After selecting the desired filters, click the Search button. The system will fetch and display the entries that match your criteria.

Fig 4 Search Button
Fig 4 Search Button

Step 5: Selecting Entries
In the details section, you have the option to Select All entries or select individual entries using the normal select option. This flexibility allows you to manage multiple entries efficiently.

Fig 5 E-Way Bill Generation Screen - Select
Fig 5 E-Way Bill Generation Screen – Select

Step 6: Modifying Address Data
Once the entries are selected, you can modify the From and To address data as needed. This is useful for ensuring that all addresses are accurate and up to date.

Fig 6 E-Way Bill Generation Screen - Modifing field
Fig 6 E-Way Bill Generation Screen – Modifing field

Step 7: Saving the Data
After making the necessary modifications, click the Save button to save your changes.

Fig 7 Save Button
Fig 7 Save Button

Step 8: Generating the E-Way Bill
Finally, click the Generate button to create the E-Way Bill. The system will process the request and, if successful, display a “Done” message along with the E-Way Bill number. If there are any issues, an error message will be displayed on the E-Way Bill Generation screen and the respective entry screens.

Fig 8 Generate Button
Fig 9 E-Way Bill Generation Screen - Error Message
Fig 9 E-Way Bill Generation Screen – Error Message
Fig 10 E-Way Bill Generation - After E-Way Bill Generation
Fig 10 E-Way Bill Generation – After E-Way Bill Generation
Fig 11 Entry Screen - After E-Way Bill Generation
Fig 11 Entry Screen – After E-Way Bill Generation

By following these steps, you can efficiently generate E-Way Bills for your sales invoices, sales deliveries, and customer BP invoices using the E-Way Bill Generation screen in Sage X3. This streamlined process ensures compliance with GST regulations and helps maintain accurate records.

About Us

Greytrix – a globally recognized and one of the oldest Sage Development Partners is a one-stop solution provider for Sage ERP and Sage CRM organizational needs. Being acknowledged and rewarded for multi-man years of experience and expertise, we bring complete end-to-end assistance for your technical consultations, product customizations, data migration, system integrations, third-party add-on development, and implementation competence.

Greytrix has some unique integration solutions developed for Sage CRM with Sage ERPs namely Sage X3Sage IntacctSage 100Sage 500, and Sage 300. We also offer best-in-class Sage ERP and Sage CRM customization and development services to Business Partners, End Users, and Sage PSG worldwide. Greytrix helps in the migration of Sage CRM from Salesforce | ACT! | SalesLogix | Goldmine | Sugar CRM | Maximizer. Our Sage CRM Product Suite includes addons like  Greytrix Business ManagerSage CRM Project ManagerSage CRM Resource PlannerSage CRM Contract ManagerSage CRM Event ManagerSage CRM Budget PlannerGmail IntegrationSage CRM Mobile Service SignatureSage CRM CTI Framework.

Greytrix is a recognized Sage Champion Partner for GUMU™ Sage X3 – Sage CRM integration listed on Sage Marketplace and Sage CRM – Sage Intacct integration listed on Sage Intacct Marketplace. The GUMU™ Cloud framework by Greytrix forms the backbone of cloud integrations that are managed in real-time for the processing and execution of application programs at the click of a button.

For more information on our integration solutions, please contact us at sage@greytrix.com. We will be glad to assist you.

Implementing and Support Electronic Data Interchange

$
0
0

Implementing and Support Electronic Data Interchange (EDI) in ERP (Enterprise Resource Planning) systems can significantly enhance efficiency and streamline business operations.

Introduction to EDI

Electronic Data Interchange is exchanging data in EDI Encrypted format with the Customer, Supplier, or Warehouse.

This Integration process caused the bug-free and automated process without manual Intervention. Errors handling in exchanging of data is updated automatically to the respective person

Architecture of EDI And ERP

Fig 1. Architecture of EDI

EDI Implementation in ERP Systems

In the EDI Implementation process, 2 most crucial factors play a key role as follows:

  1. EDI Maps
  2. EDI Transaction

To Initiate the implementation, we need to understand the transaction that needs to be brought into the communication channel. According to the transaction the Maps need to be designed that will be used for Transaction.

Maps Designing:

EDI Maps need to be designed according to the standard EDI translator templates.

But this mapping does hold minor changes from customer-to-customer EDI structure. These changes hold minor structural changes, Cross reference, and logical calculation level changes.

These structural changes need to be implemented for each of the customer (Trading partner in EDI) Edi files.

The Mapping process needs maintenance periodically to inherit the latest changes in EDI files. As the business grows, the number of customers using EDI as an exchange of transactions will increase. According to each customer’s EDI files, EDI maps will improve.

 Basic Mapping Components:

  1. Cross Reference
  2. Replacing the existing value
  3. Applying Multiple formula
  4. Setting up the data type
  5. Mapping the field with the existing ERP
  6. Conditional Usage of flow
  7. Indicator of fields.
  8. Length and start of fields

Transaction:

The transactions in EDI transmission are divided into two parts:

Inbound

a. 850In:

     This transaction is used to create the Sales Order in ERP. The Purchase Order, which Order, transmitted by the Vendor is received in the 850 Format on the receiver side.

b. 860In:

       This transaction is used to update the Sales Order which was created  in the 850in process. Any modification in the  Sales Order that is already transmitted will bring the changes in the 860In Format

c. 945In   

    This transaction is used to create the Sales Delivery in ERP. This is communication received by the Warehouse to indicate the stock dispatched against the order.

  Outbound

a. 850out:

    This document acknowledges that the vendor using the file has been successfully received.

b. 856Out (Automatic Shipment Notice):

     This document indicates the vendor about the list of products with details.

c. 810Out:

    After successfully creating the delivery and Invoice, the invoice also needs to be sent through EDI.

Once this process is set in the ERP System, we need to train the user to monitor the flow and trace the error. Training employees on using EDI features effectively.

Support to the existing implemented EDI process:

        As far as the growth of the business, the communication channel needs to be increased in terms of below components:

  1. New Vendor:

 Each customer will have its own format, so make the setup in that format and make the business process more efficient.

Execute the Test flow and confirm the mapping. Once things get confirmed we can plan for live.

2. Map Level changes:

Map level changes also occur periodically, which we must implement in the existing ERP system.

This will make the ERP compatible with the latest encryption.

3. Additional Transaction:

Additional transactions will also be implemented for various internal or external flows.

Each transaction will have its own Maps and complexity that must be managed.

Greytrix has worked on multiple EDI Translator like spscommerce, editaps,  Truecommerce and Ecgrid.

Greytrix did the “SPSCommerce” EDI development and support for Sage X3 ERP for an extended time period. In this ERP, we have mapped 850In and 945IN Transaction for multiple trading partners and Warehouse trading partners.

In the case of EDGRID, enter development and implementation with End-to-End training was carried out by Greytrix with Go live support and post-live support.

Contact us for more information …!!!

About Us

Greytrix – a globally recognized and one of the oldest Sage Development Partners is a one-stop solution provider for Sage ERP and Sage CRM organizational needs. Being acknowledged and rewarded for multi-man years of experience and expertise, we bring complete end-to-end assistance for your technical consultations, product customizations, data migration, system integrations, third-party add-on development, and implementation competence.

Greytrix has some unique integration solutions developed for Sage CRM with Sage ERPs namely Sage X3Sage IntacctSage 100Sage 500, and Sage 300. We also offer best-in-class Sage ERP and Sage CRM customization and development services to Business Partners, End Users, and Sage PSG worldwide. Greytrix helps in the migration of Sage CRM from Salesforce | ACT! | SalesLogix | Goldmine | Sugar CRM | Maximizer. Our Sage CRM Product Suite includes addons like  Greytrix Business ManagerSage CRM Project ManagerSage CRM Resource PlannerSage CRM Contract ManagerSage CRM Event ManagerSage CRM Budget PlannerGmail IntegrationSage CRM Mobile Service SignatureSage CRM CTI Framework.

Greytrix is a recognized Sage Champion Partner for GUMU™ Sage X3 – Sage CRM integration listed on Sage Marketplace and Sage CRM – Sage Intacct integration listed on Sage Intacct Marketplace. The GUMU™ Cloud framework by Greytrix forms the backbone of cloud integrations that are managed in real-time for the processing and execution of application programs at the click of a button.

For more information on our integration solutions, please contact us at sage@greytrix.com. We will be glad to assist you.


Working with Crystal Report connector in Sage X3

$
0
0

In Sage X3, there are several ways to build reports, whether using the in-build query tools or deploying external crystal reports in the application server folder.

External crystal reports provide so much freedom of design choices to the developers to build complex reportings for client’s requirement. However, when working on a Live production environment, access to the application server often raises security concerns from the client side so to make modifications on reports in such cases we need to use Sage X3 crystal report connector.

For this we’re referencing following paths and screenshots below:

Administration addons: All > Administration > Utilities > Installation > Crystal report connector
Users: All > Setup > Users > Users (GESAUS)
Report dictionary: All > Development > Script dictionary > Reports (GESARP)

New Stuff: Implementing and Support Electronic Data Interchange

Fig. 1 - Crystal Report Connector addon
Fig. 1 – Crystal Report Connector addon

-To begin with we should be having a proper version of SAP Crystal Reports software which is compatible with the addon, most widely used are 2013 and higher editions.
-Once the software requirement is completed, then as shown in Fig. 1 we need to navigate over to the Administration utilities path to download the Crystal Report Connector. Follow the on-screen instructions and complete the addon setup.

Fig. 2 - User parameters
Fig. 2 – User parameters

-Now we need to navigate over to Users (GESAUS) setup to configure our development user for report development. For this under the selected user, we need to jump into the Development parameters as shown in FIg. 2.

Fig. 3 - Setting DEVCRY to Yes
Fig. 3 – Setting DEVCRY to Yes

-After setting the Report development parameter (DEVCRY) to Yes as shown in Fig. 3, we are all set for development.

Fig. 4 - Transfer Option in Report Dictionary
Fig. 4 – Transfer Option in Report Dictionary

-Now head over to the Reports dictionary (GESARP) and for the respective report, under the report grid when we click on the 3 dot action button we get a list of options showing the Transfer button as shown in Fig. 4.

Fig. 5 - Status Change
Fig. 5 – Status Change

-Once we click the transfer button the Status on the grid for the report changes to Transfer request as shown in Fig. 5 and we can click on Save button to start the transfer request from server. Follow the prompts and the system should automatically open the Crystal Reports with the report file.

Fig. 6 - Sandbox status options
Fig. 6 – Sandbox status options

-Once we’re done taking the backup of the file and making the modifications, we can Commit back the local report file to the server using the same process as shown in Fig. 6.

This way we can make use of Sage X3 Crystal Reports Connector addon to work on report development without access to the server.

About Us

Greytrix – a globally recognized and one of the oldest Sage Development Partners is a one-stop solution provider for Sage ERP and Sage CRM organizational needs. Being acknowledged and rewarded for multi-man years of experience and expertise, we bring complete end-to-end assistance for your technical consultations, product customizations, data migration, system integrations, third-party add-on development, and implementation competence.

Greytrix has some unique integration solutions developed for Sage CRM with Sage ERPs namely Sage X3Sage IntacctSage 100Sage 500, and Sage 300. We also offer best-in-class Sage ERP and Sage CRM customization and development services to Business Partners, End Users, and Sage PSG worldwide. Greytrix helps in the migration of Sage CRM from Salesforce | ACT! | SalesLogix | Goldmine | Sugar CRM | Maximizer. Our Sage CRM Product Suite includes addons like  Greytrix Business ManagerSage CRM Project ManagerSage CRM Resource PlannerSage CRM Contract ManagerSage CRM Event ManagerSage CRM Budget PlannerGmail IntegrationSage CRM Mobile Service SignatureSage CRM CTI Framework.

Greytrix is a recognized Sage Champion Partner for GUMU™ Sage X3 – Sage CRM integration listed on Sage Marketplace and Sage CRM – Sage Intacct integration listed on Sage Intacct Marketplace. The GUMU™ Cloud framework by Greytrix forms the backbone of cloud integrations that are managed in real-time for the processing and execution of application programs at the click of a button.

For more information on our integration solutions, please contact us at sage@greytrix.com. We will be glad to assist you.


Approval Status on GRN in Sage X3

$
0
0

In Sage X3, we had a requirement from one of our clients to add a dropdown in the GRN (Goods Received Note) or Purchase Receipt screen and restrict further transactions for receipts with an “Unapproved” status.

The Purchase Receipt screen is used to debit the stock account. Once the stock is debited in the system, the raw material is used for further transactions such as creating a Purchase Invoice, stock change transactions, and Quality Control, etc.

Let’s understand the functionality in detail.

New Stuff: Working with Crystal Report connector in Sage X3

Fig 1- GRN Approved Status

As shown in the screenshot above, we have added a dropdown field in the Purchase Receipt screen with two options: “Approved” and “Unapproved.”
If the user chooses the “Unapproved” option in the Approval Status dropdown, the system will restrict the user from performing further transactions.

Fig 2 - Restriction on transaction of quality screen
Fig 2 – Restriction on transaction of quality screen

When the user tries to create a Quality screen transaction, the system throws a pop-up message: “RESTRICTED USE: Kindly approve the receipt entry before proceeding” with the receipt number.
As a result, if the user has selected “Unapproved” for the Approval Status against that purchase receipt, they will be restricted from performing further transactions. The user must change the Approval Status in the Purchase Receipt screen to “Approved.” Only then will the system allow the user to create the quality transaction.

About Us

Greytrix – a globally recognized and one of the oldest Sage Development Partners is a one-stop solution provider for Sage ERP and Sage CRM organizational needs. Being acknowledged and rewarded for multi-man years of experience and expertise, we bring complete end-to-end assistance for your technical consultations, product customizations, data migration, system integrations, third-party add-on development, and implementation competence.

Greytrix has some unique integration solutions developed for Sage CRM with Sage ERPs namely Sage X3Sage IntacctSage 100Sage 500, and Sage 300. We also offer best-in-class Sage ERP and Sage CRM customization and development services to Business Partners, End Users, and Sage PSG worldwide. Greytrix helps in the migration of Sage CRM from Salesforce | ACT! | SalesLogix | Goldmine | Sugar CRM | Maximizer. Our Sage CRM Product Suite includes addons like  Greytrix Business ManagerSage CRM Project ManagerSage CRM Resource PlannerSage CRM Contract ManagerSage CRM Event ManagerSage CRM Budget PlannerGmail IntegrationSage CRM Mobile Service SignatureSage CRM CTI Framework.

Greytrix is a recognized Sage Champion Partner for GUMU™ Sage X3 – Sage CRM integration listed on Sage Marketplace and Sage CRM – Sage Intacct integration listed on Sage Intacct Marketplace. The GUMU™ Cloud framework by Greytrix forms the backbone of cloud integrations that are managed in real-time for the processing and execution of application programs at the click of a button.

For more information on our integration solutions, please contact us at sage@greytrix.com. We will be glad to assist you.

How to print dynamic Company Logo on Sage X3 Reports

$
0
0

Crystal report is a business intelligence application used to design and generate reports from a wide range of data source. It supports connectivity to various data sources such as Microsoft excel, SQL server, Oracle and more. It includes major features such as formulas, cross-tab reports, sub-reports, and conditional formatting etc. In crystal report sub-reports are used to embed one report within another. Sub-reports can be helpful when you need to display related or supplementary information alongside the main report.

New Stuff: Approval Status on GRN in Sage X3

In Sage X3, the client wants a logo on every transaction report. We could directly add a hardcoded logo to the reports, but this would create issues in the future when the client changes the company logo, as we’d need to update the hardcoded logo in every report. It is better to use a dynamic approach. Sage X3 offers a built-in option in the application to add or select the company logo in the company master. By using this feature, we can include a dynamic logo in each report.

Figure 1 -Company Master

To achieve the above requirement, follow the steps below:
Step 1: Open your main report in Crystal Reports and insert a new sub-report into the page header, placing it on the left or right side of the section according to the client’s preference for the logo. You can create a simple query-level or table-level report, as you only need to fetch one field from the table. Refer to the screenshot below for guidance.

Figure 2- LOGO Sub-report

Step 2: We have created a table-level sub-report where we have used the BLOB_0 field from the ABLOB table. This field stores the path/name of the company logo from the company master. Drag and drop this field into the report footer section of the sub-report and add suppress blank section condition on report footer section. Refer the below figure for reference.

Figure 3 – LOGO field position

Step 3: You can adjust the logo size according to the client’s requirements. To set the size of the logo or picture, right-click on the BLOB_0 field, select the “Format Graphic” option, then go to the “Picture” tab. There, you can set the height and width of the logo using the available options. You can also set a border for the logo by using the “Border” tab, which is located next to the “Picture” tab. Refer to the screenshot below for guidance.

Figure-4-Format-Graphic

Step 4: Save the sub-report and link it to the main report. Deploy the updated report to the desired folder, and you will get the desired output on the report.

Figure 5 - Output
Figure 5 – Output

In this way, we can print dynamic Company Logo on Sage X3 Reports by following simple steps as mentioned in this blog.

About Us

Greytrix – a globally recognized and one of the oldest Sage Development Partners is a one-stop solution provider for Sage ERP and Sage CRM organizational needs. Being acknowledged and rewarded for multi-man years of experience and expertise, we bring complete end-to-end assistance for your technical consultations, product customizations, data migration, system integrations, third-party add-on development, and implementation competence.

Greytrix has some unique integration solutions developed for Sage CRM with Sage ERPs namely Sage X3Sage IntacctSage 100Sage 500, and Sage 300. We also offer best-in-class Sage ERP and Sage CRM customization and development services to Business Partners, End Users, and Sage PSG worldwide. Greytrix helps in the migration of Sage CRM from Salesforce | ACT! | SalesLogix | Goldmine | Sugar CRM | Maximizer. Our Sage CRM Product Suite includes addons like  Greytrix Business ManagerSage CRM Project ManagerSage CRM Resource PlannerSage CRM Contract ManagerSage CRM Event ManagerSage CRM Budget PlannerGmail IntegrationSage CRM Mobile Service SignatureSage CRM CTI Framework.

Greytrix is a recognized Sage Champion Partner for GUMU™ Sage X3 – Sage CRM integration listed on Sage Marketplace and Sage CRM – Sage Intacct integration listed on Sage Intacct Marketplace. The GUMU™ Cloud framework by Greytrix forms the backbone of cloud integrations that are managed in real-time for the processing and execution of application programs at the click of a button.

For more information on our integration solutions, please contact us at sage@greytrix.com. We will be glad to assist you.

How can the error “Customer BP not authorized for the control account” addressed in Sage X3?

$
0
0

Sage X3 provides an organized list of all the accounts that a company uses to document its financial transactions is called a chart of accounts (COA). Various account types, including assets, liabilities, equity, revenue, and expenses, are usually included in the COA. In order to guarantee consistency and accuracy of financial information.

Chart of Accounts plays a vital role in sage x3 as it facilitates the preparation of financial statements such as the balance sheet, cash flow statement, and income statement by grouping similar accounts.

While creating a sales invoice, the system expects a cohesive relationship between the business partner (e.g., customer) and the control account. If the control account specified for the business partner is not compatible with the type of transaction being conducted (in this case, a sales invoice), it can trigger the error message.

When encountering the error message “Customer BP nor authorized for the control account” in Sage X3 while create a sales invoice, it indicates an issue with the configuration between the business partner and the control account associated with the transaction. This error typically occurs when there is a mismatch or inconsistency in the settings, causing the Sage X3 to halt the process.

In the below blog we are going to find out the best possible ways to solve “Customer BP not authorized for the control account” error.

To create Sales Invoice:

Navigation page > Sales > Invoices > invoices

  1. The system displays an error message when the user chooses the Purchase Ledger – Current Cre (320000) account and in the Chart code “BRI” in Charts of Account while preparing the sales invoice.

Fig.1. Select Accounts

Fig. 2 Error Box

To resolve the issue of “Customer BP nor authorized for the control account” in Sage X3 when creating a sales invoice, follow the below steps:

  1. Navigation Page > Common Data > General Accountings > Account

Fig.3 Navigation

2. Select the account and chart code that were chosen during the creation of the sales invoice.

Fig.4 Accounts

3. Proceed to the “Miscellaneous” tab within Sage X3. Locate the option for “BP authorization” and toggle it from “NO” to “YES” for the Customer category. Once done, ensure to save the modifications.

Fig.5 Miscellaneous Tab

Once you’ve implemented these adjustments, try creating the invoice again. You’ll observe that the system no longer produces any error message.

This blog provides insights into resolving the issue of encountering “Customer BP not authorized for the control account” when generating invoices in Sage X3.

Multi-Company Period Opening(TRTPERMC)

$
0
0

Do you resent the opening periods for each and every organization when the new year begins? Do you avoid opening for only one month at a time due to the work required? If you have many companies, it can be tiresome and time-consuming. Do you want a faster way to open periods?

To tackle this issue Sage X3 contains a new time-saving feature called Multi-company period opening (TRTPERMC).

In the below blog we are going to find out the best and the quickest ways to open periods for multiple companies together SageX3.

Multi-Company period opening(TRTPERMC) can be found under the below path:

Navigation Page > Common Data > General Accounting Tables > Analytical > Multi-Company Period Opening

Fig1: Navigation Page

Multi-company period opening eliminates the need to open periods for one company at a time and deselect or select particular periods. This new function allows you to open either all companies and their ledgers or a subset of them. You have the option to open all periods or just one. You can also run this either on demand or on a set schedule.

Note: This function was added in v12.0.21 but only processes one ledger at a time until v12.0.22.

Company NA20’s fiscal year is open till 2021 for Ledger Types: Ledger, Analytical, IAS, and Group. Periods are open until 12/2020. Refer the below screenshot:

Fig2: Fiscal year for NA20

Company NA10 has fiscal years open till 2023 with just Ledger Type: Ledger. Periods are open until 12/20. Refer the below screenshot:

Fig3: Fiscal year for NA10

Now we will look at the Multi-company period opening (TRTPERMC) function. We have the option of selecting All Companies, Groups, or a specific set of companies. We can select one or more Ledger Types, as well as a Period date.

In the following example, we will go from company NA10 to company NA20, all Ledger Types, and a Period date of 9/30/22. We choose all Ledger Types, but NA10 only has Ledger Type as Ledger. For the period ending 9/30/22, NA20 only has years available through 2021. Refer the below screenshot:

Fig4: Multi-Company Period Opening(TRTPERMC)

The below log indicates that all periods were unlocked for NA10. It also indicates that there were no Analytical, IAS, or Group ledgers for this organization:

Fig5: Log file for NA10

For company NA20, the below log indicates that periods in 2022 cannot be opened because the year has not yet been opened:

Fig6: Log file for NA20

Even though the fiscal year was closed, the function continues and opens the 2021 periods for the other ledgers:

Hope the above blog helps you with opening Period for multiple companies at once. Using the above mentioned ways, you can optimize your work and have a smooth experience, making it easier to open periods for multiple companies, saving time and boosting the productivity.

How to Access the Sage X3 Online Help Center

$
0
0

In today’s fast-paced business world, using Sage X3 for managing finances and operations can be challenging without support. Online Sage X3 help acts like a guide on your device, offering answers, discovering new features, and fostering community tips. It keeps users efficient and teams productive, ensuring quick issue resolution and system optimization for business success in a competitive environment.

The Sage X3 Online Help Center is a valuable resource that provides users with specific information to assist in effectively using Sage X3. Available 24/7, it offers the same content utilized by Sage Support; ensuring users have access to comprehensive guidance whenever they need it.

How do I access the Online Help Center?

Users logged into Sage X3 can access the Online Help Center by clicking on the question mark icon located in the top right corner of the toolbar. This action opens a new web page in a separate browser tab.

Sage X3 login page
Fig01: Login page
login page help
Fig02: login page help
Online help center
Fig03: Online help center

If you are not logged into Sage X3, you can still reach the help center directly through the URL: [https://online-help.sageerpx3.com] (https://online-help.sageerpx3.com).

Online help page
Fig04: Online help page

Documentation Available

Once in the Online Help Center, users can explore various categories of documentation to enhance their understanding and proficiency with Sage X3.

  1. Home: This section features the latest how-to guides and tutorials. It includes a History section to easily revisit recently viewed articles and a Favourites section where users can bookmark important resources.
  • What’s new: Users can find release notes specific to their version of Sage X3, detailing new features and changes. Links to Readme documents are also provided for further information.
  • Technical help: This section is particularly useful for understanding data relationships, such as those found in the Data module, which aids in report creation and analysis.
  • Product help: Offers functional explanations of Sage X3 features, including the purpose of each function, the tables it interacts with, and explanations for common errors that may occur.
  • Quick start: Provides short, step-by-step guides with screenshots for tasks like setting up Sales Representatives or running specific inquiries. These guides are invaluable for both new users and those needing a quick refresher.
  • How to: Contains detailed guides on implementing various aspects of Sage X3, such as Sales tax management, Project Management, Payment Solutions, and legislative updates. These guides are version-specific and continuously updated to provide the latest information.
  • Tutorials: Features short videos covering a range of topics related to Sage X3 functionalities, such as Project Job Management (PJM) and Asset Inventory. New tutorials are regularly added to keep users informed about recent updates and improvements.
  • Knowledgebase: This section offers procedural articles that provide practical solutions to common issues and challenges users may encounter while using Sage X3.

Enhancing User Experience

The Sage X3 Online Help Center is designed not only to assist individual users but also to support team productivity and efficiency. By leveraging these resources, businesses can resolve issues promptly, optimize their systems, and empower employees to utilize Sage X3 to its fullest potential.

Additional Resources

For further insights and updates beyond the Online Help Center, users are encouraged to visit the Sage X3 Insider Center. This platform offers additional resources such as tips, tricks, feature videos, module explanations, and solutions from third-party providers.

In conclusion, the Sage X3 Online Help Center is an indispensable tool for businesses seeking to maximize their use of Sage X3. It ensures users have access to up-to-date information and support whenever they need it, thereby facilitating smooth operations and driving business growth in a competitive environment.

Error: Local Menu Lines Limitation in Sage X3

$
0
0

We know that local menu in Sage X3 is nothing but the list of options provided to the user to select any one from them. For example, if there is a field which requires numerous options to be listed then you may come across an error regarding line limitation while entering values for local menu in Sage X3. Refer below screenshot.

Error
Fig01: Error

By default, Sage X3 allows to enter 123 options for local menu/dropdown list. In case, you need to enter more than 123 values for a particular dropdown, you need to follow below steps.

  1. Navigate to: Development > Data and Parameters > Tables > Tables
  2. Enter table name as “APLSTD”.
  3. Modify the Length for the field “LANMES” from 123 to the required number of options. However, you can not increase the length beyond 250 being it is of datatype Alphanumeric.
  4. Save the changes and Validate the table with “Forced validation” button.

Refer below screenshot for better understanding.

Message
Fig02: Message

Now, when you will enter new option or value in local menu standard will not show any error regarding line limitation and you will be able to enter values up to defined limit.

local menu values
Fig03: Local menu values

Thus, we can increase number of options for any local menu or dropdown up to 250.

The folder version is different from the version of the root folder V11

$
0
0

You’re encountering a versioning issue with your Sage X3 application server after reinstalling it. Here’s a step-by-step guide to help resolve the “folder version is different” error:

Figure 1. Folder Screen

  1. Access Sage X3 Environment:
    • Log in to your Sage X3 environment using the admin account.
  2. Navigate to Setup:
    • Once logged in, navigate to Setup in the top menu.
  3. Access Folders (GESADS):
    • Under Setup, find and click on Folders (GESADS).
  4. Find the PILOT Folder:
    • Look for the specific PILOT folder that is causing the version mismatch error.
  5. Folder Validation:
    • Within the PILOT folder settings, locate and click on the “Folder Validation” button. This action validates and potentially updates the folder to match the current version of the root folder.
  6. Confirmation:
    • After validating the folder, confirm the action and wait for the process to complete.
  7. Check DEV Folder:
    • After a day or so, check the DEV folder under Administration > About to ensure that the versioning error has been resolved. This step verifies that the folders are now synchronized correctly.

Figure 2. About Screen

Additional Tips:

  • Database Table Updates: In Sage X3V12, the traditional method of updating the AUPDATE table might not apply directly. Folder validation through the GUI (Graphical User Interface) should handle the necessary updates internally.
  • Consult Documentation: If issues persist or if you’re unsure about specific steps, refer to the Sage X3 documentation or consult with Sage X3 support for further assistance.

By following these steps, you should be able to address the version mismatch error between the PILOT folder and the root folder in your Sage X3 environment effectively.


Adding a Data Model Parameter in Sage Enterprise Intelligence (SEI)

$
0
0

In Sage Enterprise Intelligence (SEI), Data Model Parameters serve as dynamic variables essential for scripting and enhancing flexibility within your data management processes. Whether you’re customizing reports or fine-tuning queries, understanding how to integrate these parameters can significantly streamline your workflow.

Step-by-Step Guide to Adding a New Parameter

Follow these steps to seamlessly add a new parameter to your data model:

1. Access Data Models and Views:

   – Start by navigating to the Data Models and Views tab within SEI.

Figure.1. Manage Data Model Parameters

2. Manage Data Model Parameters:

   – Right-click on the specific Data Model where you wish to add the parameter.

   – From the context menu, select “Manage Data Model Parameters.”

3. Initiate Parameter Addition:

   – Click on the “+” icon to begin defining a new parameter.

4. Parameter Details:

   – Name: Enter a descriptive name for your parameter.

   – Description: Optionally, provide additional context for clarity.

   – Translation: If needed, add translations by clicking on the language icon.

   – Value: Choose an appropriate global variable from the dropdown list.

   – Global Parameters: Select a parameter from the available list, if applicable.

   – Once details are set, click “Confirm” to proceed.

Let’s illustrate the process with an example:

– Suppose you need to add a “Month” parameter that dynamically fetches the current month’s value. By selecting the @@UDM_CURMONTH global variable, SEI automatically generates this dynamic variable. You can then utilize this parameter seamlessly within the SQL Scripts Builder found in the Design Data Model window.

Figure.2. Month Parameter

Setting Parameters for Use

After defining parameters, follow these steps to apply them effectively:

1. Opening a Worksheet:

   – Right-click on the Data Model associated with your parameter.

   – Select “Set Data Model Parameters.”

2. Confirmation:

   – Confirm your parameter settings to finalize the setup.

Figure.3. Setting Parameters

3. Handling Defaults:

   – If necessary, opt to “Skip” values in the Data Model Parameters window during setup.

This blog post aims to provide a comprehensive guide on integrating Data Model Parameters within Sage Enterprise Intelligence. By following these steps, you can enhance your scripting capabilities and streamline data management processes effectively.

How to manually select allocation Location on Sales Order in Sage X3

$
0
0

In this demonstration, we will explore how to manually issue a product from different locations.

If you need to allocate your product from a specific location, Sage X3 offers a feature that allows users to allocate products from any required location, including multiple locations.

Please follow below steps:

Create an Order.

Fig 1: Sales Order

Fig 2: Sales Order Line

Allocate the Order by clicking on the Allocation button.

Fig 3: Allocation

View the Allocation and we can see the product is allocated from “A1C11” Location

Fig 4: Allocation View

Click on the action 3 dots at line level and select Manual Allocation

Fig 5: Manual Allocation

Click on the refresh icon from right side. you will see All the Locations on left side

Fig 6: Manual Allocation Screen

Deselect current location and select different location from the stock selection left panel, automatically the lines in Allocation section is changed to Location A1C12. Click on save button.

Fig 7: Allocation Change screen

Now come back to Order screen and in the Allocation, button view the Allocation Location. We can see below the Location is changed to A1C12.

Fig 8: Changed Allocation Location

This way the allocation Location is changed.
Thus, we have checked the steps in which we can issue a product from required Location manually.

Email-Based Self-Service Password Reset for Sage X3 Users

$
0
0

Introducing the new feature of Sage X3 V12 in new patch: “Email-Based Self-Service Password Reset for Sage X3 Users.” Now, resetting your password is simpler than ever. With this feature, Sage X3 users can easily recover their passwords using their email addresses. It’s secure, convenient, and puts you in control of your account’s security.

For Email-based self-service password reset you need to follow the below steps:

Step 1: Notification server setup

First you need to configure the notification server to send the email to the Sage X3 user for password reset. You can refer the below Greytrix blog to configure the Notification server to send mail.

https://www.greytrix.com/blogs/sagex3/2023/08/28/using-notification-server-with-workflow/

Step 2: Global setting changes

  • After successful configuration, make sure the Notification Server is set up in global settings to ensure smooth email relay to your mail server. Refer figure 1.

Figure 1: Global settings to allow website domain for password reset via e-mail

  • Configure global settings to initiate the ‘forgot password’ email.

Authentication: Basic, Password policy: SAGE, forgot password token validity: 5 days, Website Domain: https://[yourServer]/auth/forgetPassword/page, Mailer: Notification server name as shown in the figure 2.

Figure 2: Global settings for password reset via e-mail

Step 3: Assign E-mail ID in the user. Users need a valid email address linked to a Sage X3 User account, and the email domain must be included in the approved list of website domains. Refer figure 3.

Figure 3: Assigned E-mail ID in the user

Step 4: User login password reset.

Login to the system and click on the Forgot password link on the log in page and enter the Sage X3 user email address which has added in step 3 and simply click on the button “Send reset instructions”. Refer figure 4.

Figure 4: Forgot password mail sent to user

This will send the email of password reset to your mail. Open that mail and simply click on the “Click on this to set a new password”. Refer figure 5.

Figure 5: Sage X3 forgot password mail.

This will open the page to set the new password. Enter the new password and retype it again and click on the “Set new password” button. This will login to your account using new password.

Figure 6: Set up of new password.

Additional Points to Note:

  • Validity Period Expiration:

Users need to be mindful that clicking the reset link after the specified validity period (as outlined in global settings and noted in the email) will result in an expired message. It is crucial to complete the password reset within the designated timeframe.

  • Mail Server Requirements:

If no mail server is defined in global settings, users who click ‘forgot password’ will receive a notification stating that this feature is disabled. It is essential to configure the mail server correctly to enable the password reset functionality.

Figure 7: Validity period expiration and not feature enabled

In summary, implementing an email-based self-service password reset for Sage X3 users offers significant benefits. It enhances security by allowing users to reset passwords securely via email verification, reduces IT support workload, and improves user satisfaction through convenient, independent password management. This approach aligns with modern cyber security practices, promoting efficiency and user empowerment within the organization.

How can we identify if there are any customizations in my installation?

$
0
0

As a partner or customer, you may reach a point where you want to know if any changes have been made to screens, windows, etc. This information is crucial when planning an upgrade or patch installation. Even for something as straightforward as running a folder validation, you might be concerned about unprotected changes made without an activity code.

Ideally, you expect that the proper process has been followed, with all changes protected by a custom activity code. In this case, you only need to search for that activity code to identify all the changes.

1. Navigate to the X3 folder.

2. Access Development > Utilities > Miscellaneous > Run processes.

3.Input “ACTLSPE” in the script field and click Ok.

Fig:1 Process execution

4. On the screen, select your folder, set X3 as the parent folder, and check the “impacted elements” box.

Fig: 2 Customization audit

5. Click Ok and wait for the process to complete and the log results to display.

Fig 3: Operation in progress

6. Here is an example of the log output, demonstrating how this tool can save you time and effort.

Fig: 4 Log Reading

7.The log shows that in this specific installation, the reference field on the SIH0, SQH2 and SOH0 screen has been modified to a larger length and a custom field was added, without protection by an activity code.

As previously mentioned, you can use ACTLSPE to check for any changes that may have occurred.

Thus, the demonstration will allow you to track the number of modifications made to the selected folder, enabling you to upgrade, install patches, and make changes as needed.

Error ‘@X3.TRTGLOBIENS$adx(1427) Error 56 Date Error Incorrect’ prompted while opening FA screen in Sage X3

$
0
0

Sage X3 Fixed Assets offers extensive features such as simplified depreciation calculations, comprehensive tracking, construction-in-progress management, and easy customized reporting

New stuff: How can we identify if there are any customizations in my installation?

However, one of our client encountered a error “@X3.TRTGLOBIENS$adx (1427) Error 56 Date Error Incorrect d JenkinsSlave.”, while opening Fixed Asset screen as shown in below screenshot.

Fig 1. Error prompted while opening FA screen

The problem occurs because there is an inconsistency in the current period index of the company.

To solve the issue, follow the steps below:

Step 1: Take note of the current fiscal year and the period in the context of depreciation.
Step 2: Now navigate to Development -> Utilities -> Maintenance -> In Lines and open the In Lines screen. Enter the FISCYEAR in the table selection and click the OK button, as shown in the screenshot below:

Fig 2. Open in line utility for FISCYEAR table

Step 3 : Click on “Selection” again from the right menu, and enter “CPY = ‘company'” (where ‘company’ is the entity experiencing the issue). Once the entry is populated, navigate to the current fiscal year as shown in the screenshot below:
Note: To identify the current fiscal year, locate the field STAFIY with the value 2.

Fig 3. Open current fiscal year using selection option

Step 4 : Now, search for the INDCURPER field and verify the value available in the field. INDCURPER shows the value of the current period. For example, if today’s date is 1st July 2024, the current period should be 7. Verify if the value is correct; if not, correct it and save the changes.
Step 5 : Ensure that the INDCURPER field value for the next fiscal year, which has the value for STAFIY = 3, is set to INDCURPER = 1, which is the default value for a closed fiscal year.
By following these steps, the FA screen error will be resolved, and you will be able to open the FA screen without any errors.

About Us

Greytrix – a globally recognized and one of the oldest Sage Development Partners is a one-stop solution provider for Sage ERP and Sage CRM organizational needs. Being acknowledged and rewarded for multi-man years of experience and expertise, we bring complete end-to-end assistance for your technical consultations, product customizations, data migration, system integrations, third-party add-on development, and implementation competence.

Greytrix has some unique integration solutions developed for Sage CRM with Sage ERPs namely Sage X3Sage IntacctSage 100Sage 500, and Sage 300. We also offer best-in-class Sage ERP and Sage CRM customization and development services to Business Partners, End Users, and Sage PSG worldwide. Greytrix helps in the migration of Sage CRM from Salesforce | ACT! | SalesLogix | Goldmine | Sugar CRM | Maximizer. Our Sage CRM Product Suite includes addons like  Greytrix Business ManagerSage CRM Project ManagerSage CRM Resource PlannerSage CRM Contract ManagerSage CRM Event ManagerSage CRM Budget PlannerGmail IntegrationSage CRM Mobile Service SignatureSage CRM CTI Framework.

Greytrix is a recognized Sage Champion Partner for GUMU™ Sage X3 – Sage CRM integration listed on Sage Marketplace and Sage CRM – Sage Intacct integration listed on Sage Intacct Marketplace. The GUMU™ Cloud framework by Greytrix forms the backbone of cloud integrations that are managed in real-time for the processing and execution of application programs at the click of a button.

For more information on our integration solutions, please contact us at sage@greytrix.com. We will be glad to assist you.

Viewing all 1515 articles
Browse latest View live


<script src="https://jsc.adskeeper.com/r/s/rssing.com.1596347.js" async> </script>