Quantcast
Channel: Sage X3 – Tips, Tricks and Components
Viewing all 1515 articles
Browse latest View live

How to print report directly on duplex printer in Sage X3

$
0
0

In Sage X3, reports play a crucial role in representing transactions and records for analysis and growth perspectives. Reports can be printed by navigating to the Reports module, as well as by writing script files using 4GL code in Sage X3. The reports printed via both of these methods typically result in Excel or PDF files.
Recently, one of our clients had the requirement to print the report directly on the printer after clicking on the print button, instead of first downloading the PDF or Excel file. To achieve this, we need to follow the steps outlined below
Step 1:- Setup destination in Sage X3

Navigate to AllSetup—>Destination Destination.

Create the Destination as Printer.
1.Add the Code, Description and short description.
2.Check the Active check box.
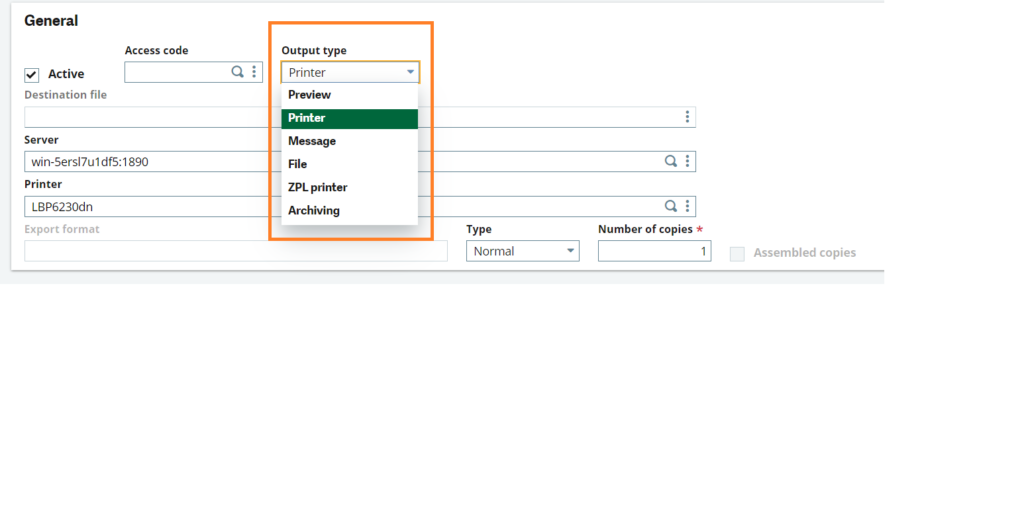
3.Select the Output type as Printer as shown in figure 2.
4.Select the server name.
5.Select the Printer that is configured on the server.

New Stuff: How to assign different titles to dimension fields in Sage X3
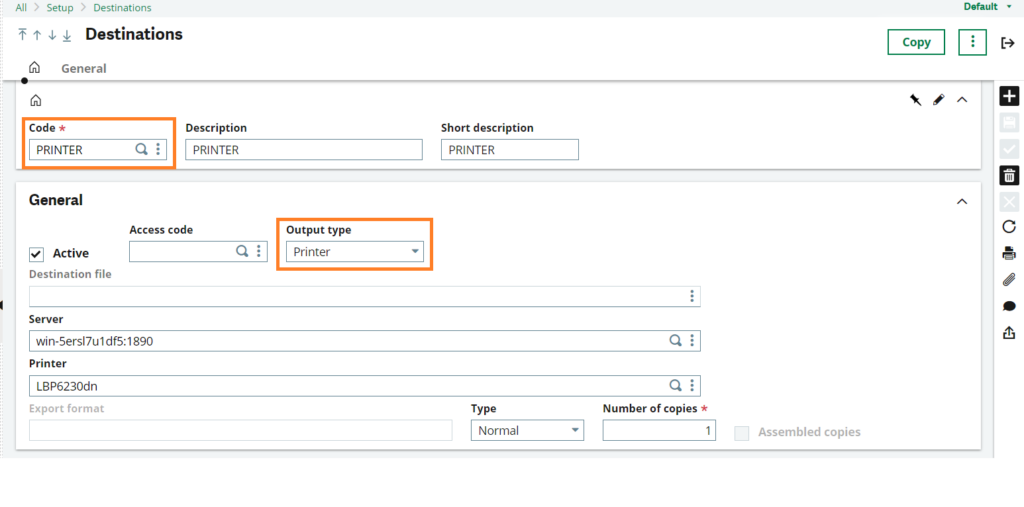
Figure 1 Destination

Figure 2 Output Type drop down

Step 2:-
Navigate to All Development—>Script Dictionary Reports.


Set the destination in reports module of the report as PRINTED as created before as shown below.
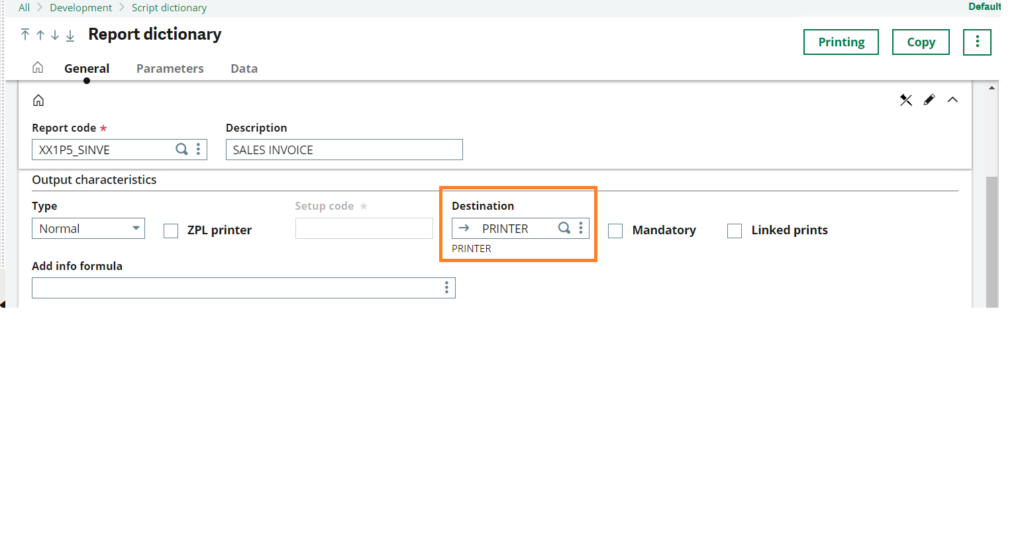
Figure 3 Reports
Figure 3 Reports

Step 3:-
Go to Crystal designer software and open the report.
Select the Page Setup under File tab
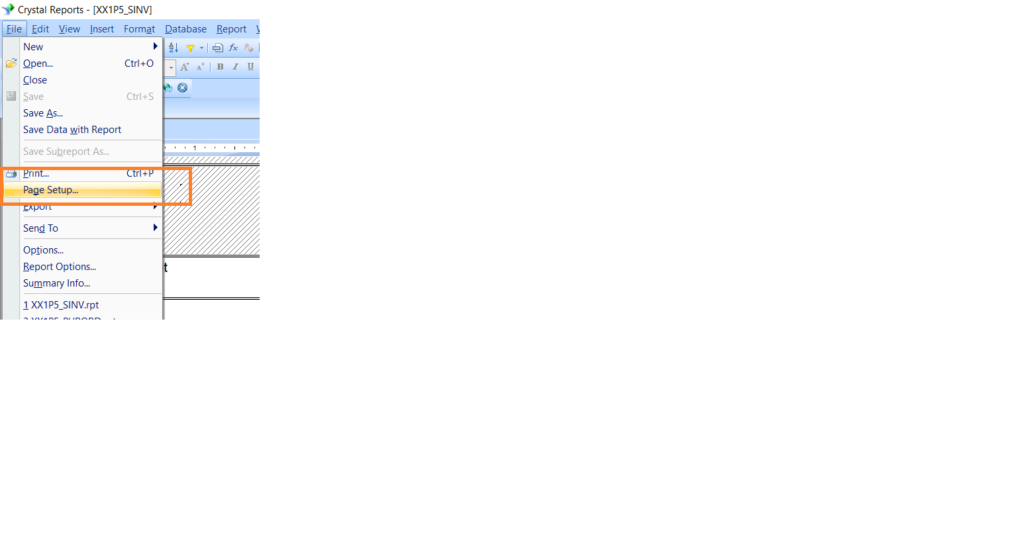
Figure 4 File
Figure 4 File

Under Page Setup as shown in Figure 5
1. Set Print option as Microsoft Print to PDF
2. Set Page Options as Legal or A4
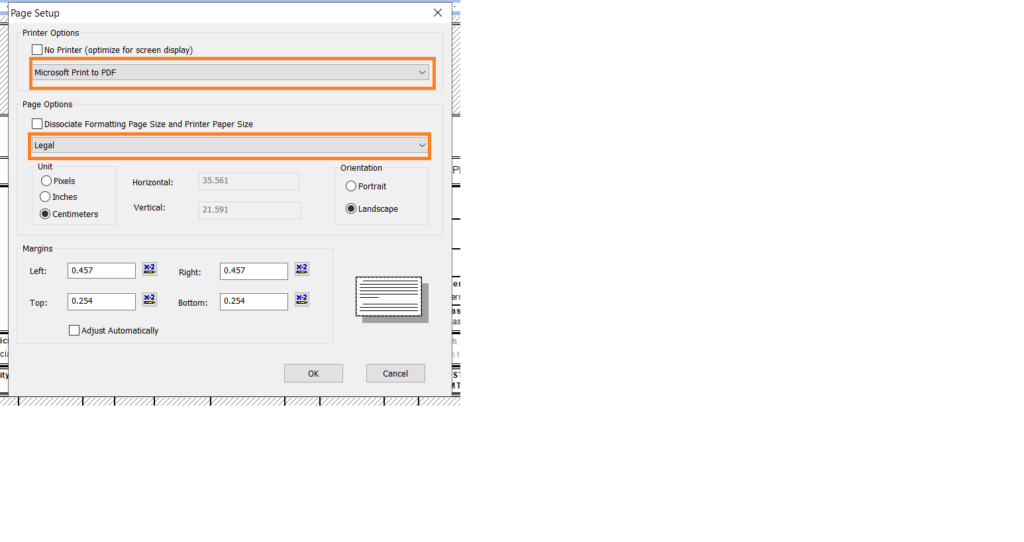
Figure 5 Page Setup
Figure 5 Page Setup

Step 4:-
After following above steps give the Print command for the report, the report will print directly on the printer.

About Us

Greytrix – a globally recognized and one of the oldest Sage Development Partners is a one-stop solution provider for Sage ERP and Sage CRM organizational needs. Being acknowledged and rewarded for multi-man years of experience and expertise, we bring complete end-to-end assistance for your technical consultations, product customizations, data migration, system integrations, third-party add-on development, and implementation competence.

Greytrix has some unique integration solutions developed for Sage CRM with Sage ERPs namely Sage X3Sage IntacctSage 100Sage 500, and Sage 300. We also offer best-in-class Sage ERP and Sage CRM customization and development services to Business Partners, End Users, and Sage PSG worldwide. Greytrix helps in the migration of Sage CRM from Salesforce | ACT! | SalesLogix | Goldmine | Sugar CRM | Maximizer. Our Sage CRM Product Suite includes addons like  Greytrix Business ManagerSage CRM Project ManagerSage CRM Resource PlannerSage CRM Contract ManagerSage CRM Event ManagerSage CRM Budget PlannerGmail IntegrationSage CRM Mobile Service SignatureSage CRM CTI Framework.

Greytrix is a recognized Sage Champion Partner for GUMU™ Sage X3 – Sage CRM integration listed on Sage Marketplace and Sage CRM – Sage Intacct integration listed on Sage Intacct Marketplace. The GUMU™ Cloud framework by Greytrix forms the backbone of cloud integrations that are managed in real-time for the processing and execution of application programs at the click of a button.

For more information on our integration solutions, please contact us at sage@greytrix.com. We will be glad to assist you.

Folder SVG extraction in Sage X3

$
0
0

Data extraction is the process of retrieving data out of data sources for further data processing or data storage (data migration).

In Sage X3, there folder which consists of this data backup is called as “SVG”. This folder is available in the below-mentioned path:

Sage X3 Installation Folder> \<Folder Name>\ SVG

To carry out the process of data export We will perform the following steps:

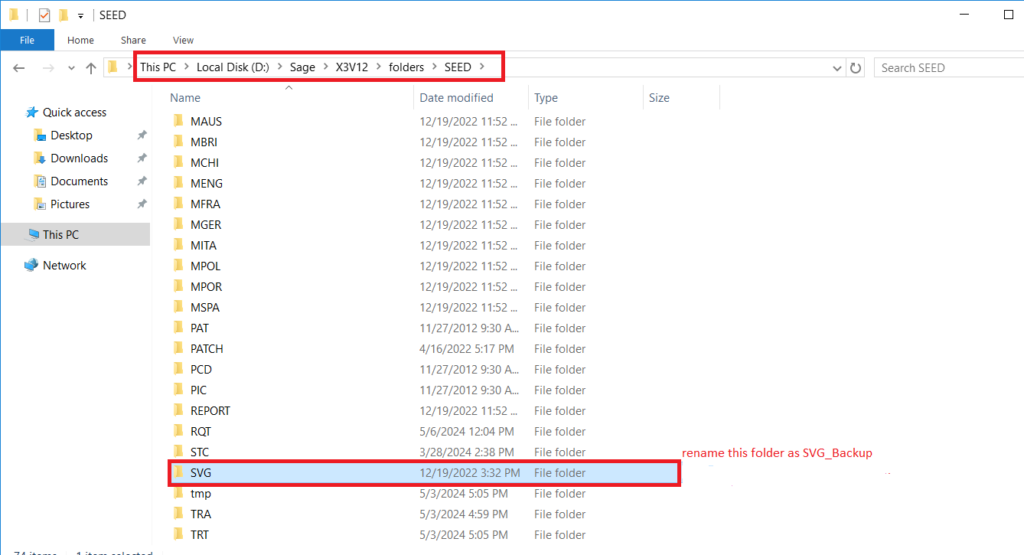
  1. Navigate to the backend folder path. Rename the existing SVG folder name and create new folder manually with name as ‘SVG’.

Sage X3 Installation Folder> \<Folder Name>\ SVG

Folder SVG path
Fig01: Folder SVG backend path

2. Now, access the Sage X3 application. And login in X3 folder.

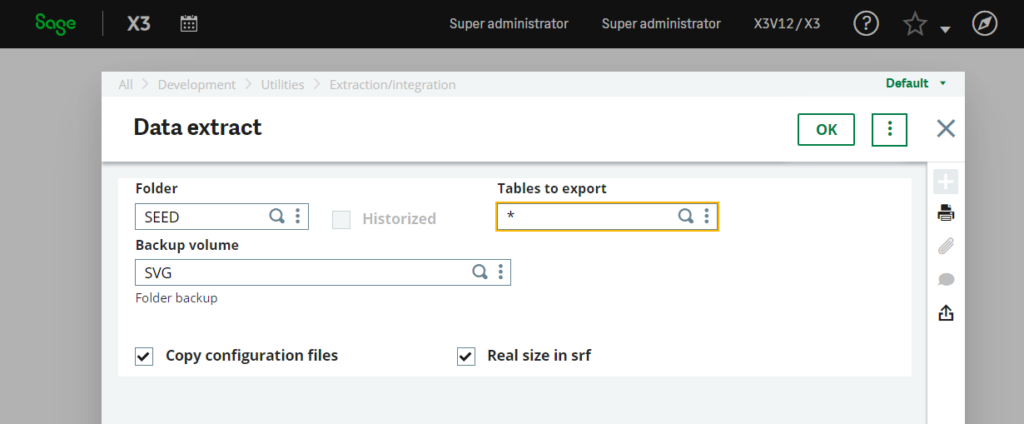
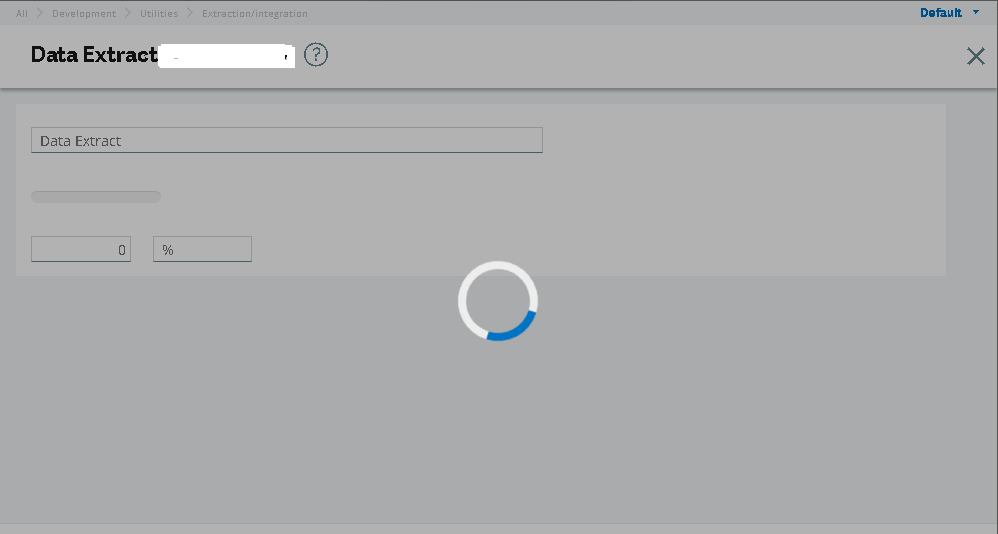
3. Then navigate to: Development > Utilities > Extraction/Integration > Data Extraction. We will find a screen like the following:

Data Extraction
Fig02: Data Extraction

Note: User can take the SVG from respective folder as well.

Now in this screen, each fields indicates as:

  1. Folder: enter folder name whose data needs to be extracted.
  •  Table to export: enter * in it to extract all tables .
  •  Backup volume: this should be set as ‘SVG’.
  • Copy configuration files: The box of Copy configuration files is checked when you want the file with extension .cfg from the FIL directory to be copied to the extraction directory (SVG in this case).
  • Real size in srf: The box actual size in srf is marked when you want the file with the .srf extension, which contains the sizing elements for the tables, to be created taking into account the actual size of the tables and not the expected one.

Once the necessary fields are filled in, press Okay. This generates a process in which the backup is made in the SVG folder in the backend folder path.

SVG process
Fig03: SVG extraction process

In this way, user can process a data extraction (SVG) for the specific folder in Sage X3.

How to Setup and Control Sales Rep Access in Sage X3

$
0
0

In the competitive world of sales, having up-to-date sales data is crucial for sales representatives. Equally important is maintaining strict control over which accounts each rep can access. Sage X3 provides a straightforward solution to manage user access while ensuring that reps can still handle transactions related to their assigned accounts. This article delves into the step-by-step process of configuring a sales rep profile and linking it to a specific X3 user ID, offering a comprehensive guide to streamline user management within the system.

Creating a Sales Rep ID involves the following steps:

1. Navigate to the “Common data” section.

2. Select “BPs” (Business Partners), then choose “Sales Rep.”

3. Click on the “New” button to create a new Sales Rep entry.

4. Enter a unique Sales Rep ID along with other pertinent information such as name, contact details, and any additional relevant data.

5. Once all required information is entered, click on the “Create” button to finalize the creation of the Sales Rep ID.

This process ensures that a new Sales Representative is properly registered within the system, allowing for effective management and tracking of sales-related activities.

Sales Rep Creation
Fig01: Sales Rep Creation

Assign Row Level Permissions:

Assigning Row Level Permissions involves configuring settings to control which data rows users can access based on predefined rules and values. By setting up Row Level Permissions, users are restricted to viewing only the data that corresponds to their assigned criteria. For example, if a user is assigned to a specific sales representative, they will only be able to see customers, quotes, orders, deliveries, and invoices associated with that sales rep. This ensures that users have access to relevant data while maintaining data security and privacy.

Configuring user settings involves the following steps:

1. Navigate to “Setup,” then “Users,” and select the specific user ID to be assigned.

2. Access the “Organization” tab.

3. In the “Row Level Permissions” section, input the permission code “REP – Representative.”

4. Specify the Sales Rep code assigned to the user in the “Key” field.

These steps ensure that the user is appropriately associated with the designated Sales Representative role, enabling access to relevant data and functionalities based on their assigned permissions.

Sales Rep Access
Fig02: Sales Rep Access

Linking a Sales Rep to a User involves the following steps:

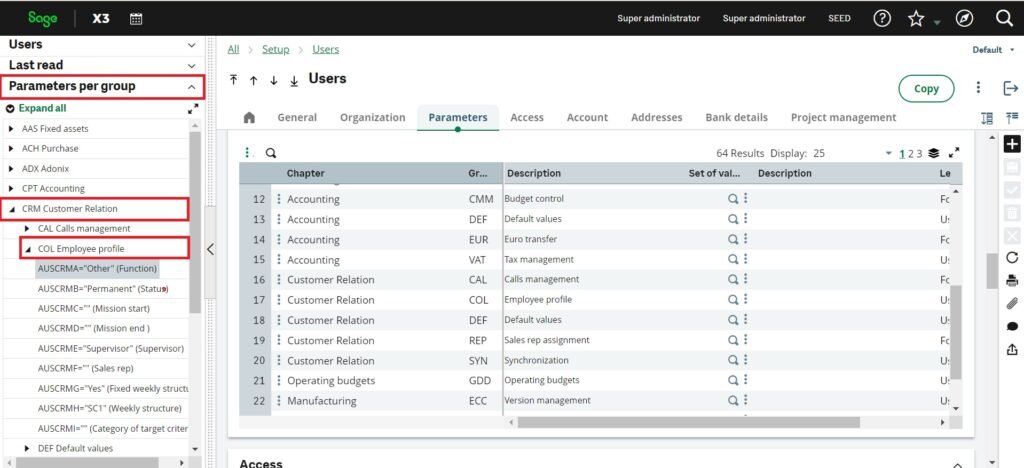
1. Access the user entry screen and navigate to “Parameters Per Group” in the left-hand navigation menu.

2. Choose “CRM Customer Relations.”

3. Select “COL Employee Profile” and click on the first parameter to access the detailed settings for Sales Rep Access, specifically for Sage X3.

This process ensures that the user is properly associated with the Sales Rep profile, allowing them to access relevant information and functionalities within the CRM system, particularly related to Sage X3.

Assign Parameters:

Assigning parameters involves defining specific details within the parameter chapter to link a user with a sales rep in Sage X3. These details facilitate the integration and functionality between the user and the created sales rep business partner. The key parameters to define include:

1. Function: Specifies the role or function of the user, such as “Sales Engineer.”

2. Mission Start Date: Indicates the date of the user’s hire or assignment start date.

3. Sales Rep Number: Refers to the unique Sales Rep ID created in the sales rep function within the common data module.

4. Weekly Structure: Defines the weekly work schedule, such as SC1 representing 5 days of work, with 8 hours per day.

By accurately defining these parameters, the linkage between users and sales reps is established, enabling seamless operations and data management within Sage X3.

Sales Rep Access
Fig 2.1: Sales Rep Access

Row level permissions can function independently without being directly linked to a sales rep ID code. However, by associating the user ID with a specific sales rep, the user’s actions become tied to that sales representative. This linkage allows the user to leverage Sage X3 enhancements tailored specifically for the sales team. By connecting user activities to sales reps, organizations can better manage and track sales-related processes, enabling more effective sales operations within Sage X3.

In the competitive world of sales, access to real-time sales data and precise control over account access are paramount. Sage X3 offers a user-friendly solution, allowing effective management of user access while ensuring sales reps can efficiently handle transactions. This article provides a step-by-step guide to configuring sales rep profiles and linking them to specific X3 user IDs, streamlining user management within the system.

Dashboard Filtering in Sage Enterprise Intelligence(SEI)

$
0
0

One of the most valuable features within SEI is dashboard filtering, a dynamic function that allows users to customize their data views to meet specific analytical needs. Dashboard filtering in SEI for SAGE X3 provides users with the flexibility to focus on the most relevant data, thereby transforming vast datasets into actionable insights. Whether you are monitoring sales performance, inventory levels, or financial metrics, mastering dashboard filtering can significantly enhance your ability to make informed decisions swiftly and accurately. There might be scenarios where it gets difficult to filter dashboards in SEI.

In the below blog we are going to find out the best possible ways to filter a dashboard in Sage Enterprise Intelligence. Dashboard views can be filtered in below ways:

1. Filtering Panel.

2. Filtering using the Selection Page.

3. Filtering using the External Link.

4. Filtering on Click.

1. Filtering Panel:

          One of the quickest ways to filter your dashboard, based on the list of the possible values of a field.

Note: For a Filtering Panel to be functional, at least one Global Parameter has to exist in the system. The Global parameter has to exist with a field within the data models where the dashboards views originate.

Follow the below steps to use Filtering Panel:

  1. In the Setting menu on the right panel, click on the icon (Edit Dashboard) to enter into edit mode.
  2. In the Edit menu, select Dashboard Properties.
  3. Open the Filtering Panel section of the Properties menu to view the filters. From here you can add, edit, remove or reorder the filters.

The remaining views in the dashboard can now be filtered automatically.

2. Filtering using the Selection Page:

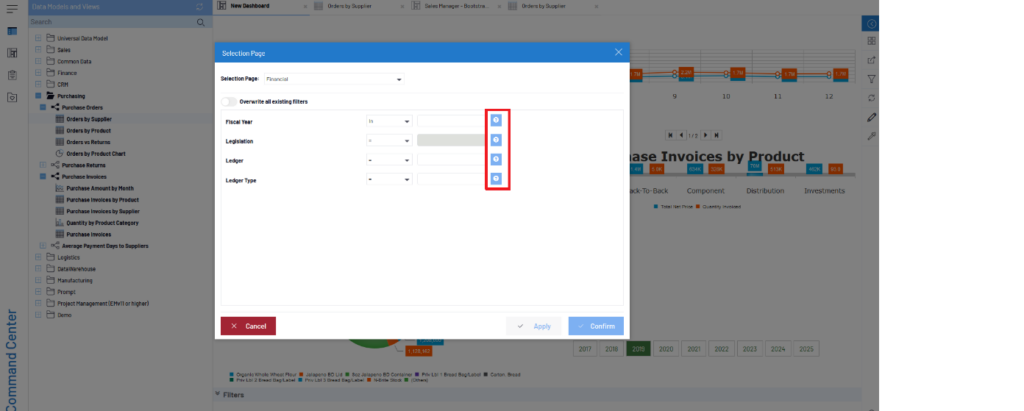
          The dashboard can also be filtered via the Selection Page window by clicking on next to the prompts or by setting a prompt in the Prompt on open property of the dashboard. Refer the below screenshot:

Filtering using Selection Page
Fig01: Filtering using Selection Page

3. Filtering using the External Link:

          To filter a dashboard by year, insert the external link received at the end of the URL; for example: ‘&F=Year=2018’, Refer the below screenshot.

The dashboard will be updated with the specified year’s data only.

Filtering using the External Link
Fig02: Filtering using the External Link

4. Filtering on Click:

          It is possible to filter the content of the Dashboard by clicking on any value of any type of View that has been predefined in the Dashboard Designer.

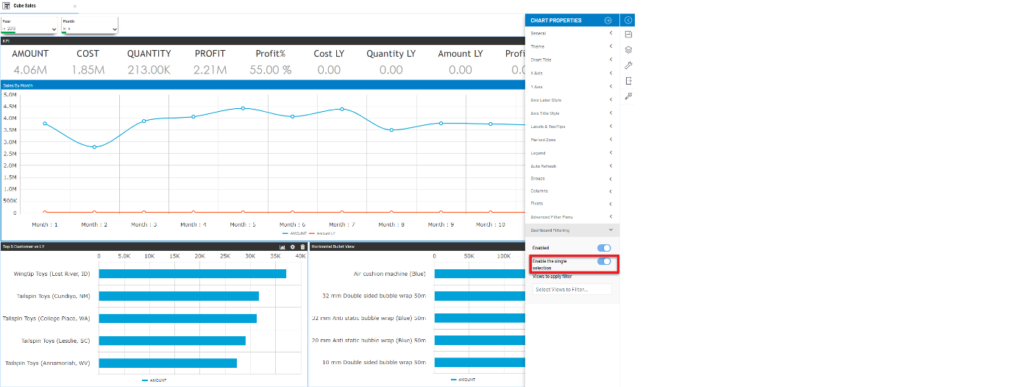
Note: Toggle the single-click selection in your dashboard to swiftly apply filters across different views (except Maps), enhancing your data analysis without disrupting your current view’s configuration. Refer the below screenshot.

Filtering on Click
Fig03: Filtering on Click

Hope the above blog helps you with filtering your dashboard views. Using the above mentioned ways, you can filter your dashboard views and have a smooth experience making it easier to create customized SEI views that highlights the most important information, saving time and boosting the productivity.

Crystal Reports: Time cut off from date-time field

$
0
0

Crystal Reports is a business intelligence tool that creates custom reports by capturing data from multiple sources. The tool offers features such as data access, report design, data formatting, report viewing, and application integration. In Sage X3, we have various standard reports for almost every screen, which are developed in Crystal Reports.
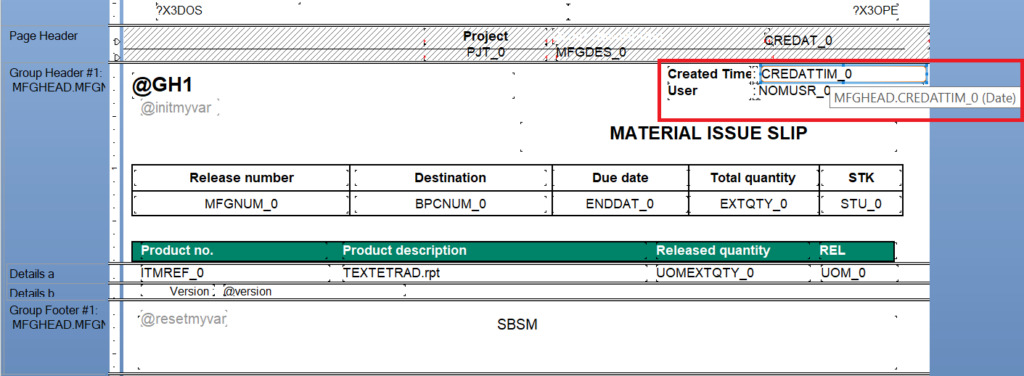
Recently, we had a requirement from one of our client in Sage X3. They wanted the work order creation date and time in the Material Issue Notes (BSM) standard report. In the database, there is already a field named ‘CREDATTIME’ with a date-time data type. We are trying to fetch this field in the report, but only the date part is being displayed. We tried to format this field in Crystal Reports, but it does not show any option to display the time.
When we tried adding the same database date-time field in a newly created report, the field displayed both the date and time parts correctly. The above-mentioned issue occurs when a report was created in Crystal Reports 8 or earlier, and the report option “Convert Date-Time Field” was set to only show the date.
The report option to convert a date-time field to a date or a string no longer exists in Crystal Reports 9 and above. However, if the report was created in an older version and this option was used, it will honor the setting and display it in those reports.
To modify the setting, follow the steps below:


New Stuff: Dashboard Filtering in Sage Enterprise Intelligence(SEI)

Fig 01 MATERIAL ISSUE NOTES (BSM) REPORT

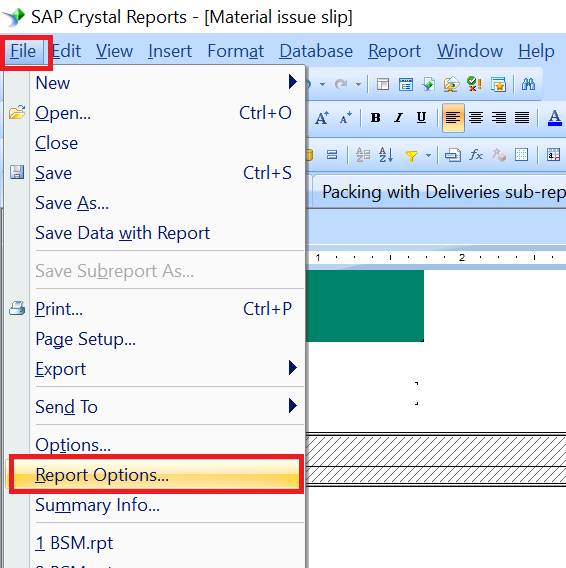
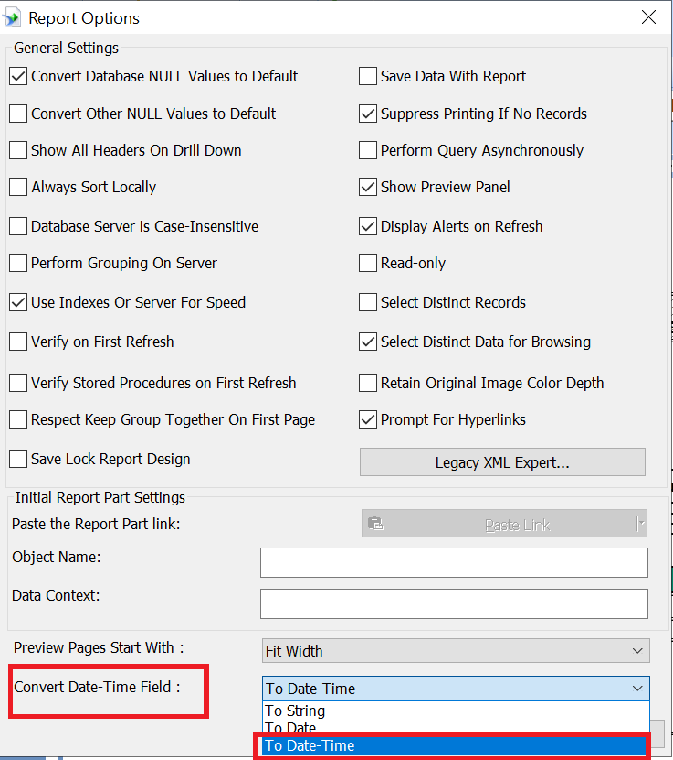
Step 2: Go to the File menu, and under the File menu, select the “Report” option. In the “Report Options” window, for the option “Convert Date-Time Field”, select “To Date-Time”. Now the field will appear on the report with the date-time data type. For better understanding refer the below screenshots.

Fig 02 File menu - Report Options
Fig 02 File menu – Report Options

Fig 03 Report Options

Step 3: Click on “OK”. Save the report and deploy it in desired folder you will get a desired output as shown in below figure.

Fig 04 Output
Fig 04 Output

In this way, we can display both date and time part in older version of crystal report by following simple steps in crystal report as mentioned in this blog.

About Us

Greytrix – a globally recognized and one of the oldest Sage Development Partners is a one-stop solution provider for Sage ERP and Sage CRM organizational needs. Being acknowledged and rewarded for multi-man years of experience and expertise, we bring complete end-to-end assistance for your technical consultations, product customizations, data migration, system integrations, third-party add-on development, and implementation competence.

Greytrix has some unique integration solutions developed for Sage CRM with Sage ERPs namely Sage X3Sage IntacctSage 100Sage 500, and Sage 300. We also offer best-in-class Sage ERP and Sage CRM customization and development services to Business Partners, End Users, and Sage PSG worldwide. Greytrix helps in the migration of Sage CRM from Salesforce | ACT! | SalesLogix | Goldmine | Sugar CRM | Maximizer. Our Sage CRM Product Suite includes addons like  Greytrix Business ManagerSage CRM Project ManagerSage CRM Resource PlannerSage CRM Contract ManagerSage CRM Event ManagerSage CRM Budget PlannerGmail IntegrationSage CRM Mobile Service SignatureSage CRM CTI Framework.

Greytrix is a recognized Sage Champion Partner for GUMU™ Sage X3 – Sage CRM integration listed on Sage Marketplace and Sage CRM – Sage Intacct integration listed on Sage Intacct Marketplace. The GUMU™ Cloud framework by Greytrix forms the backbone of cloud integrations that are managed in real-time for the processing and execution of application programs at the click of a button.

For more information on our integration solutions, please contact us at sage@greytrix.com. We will be glad to assist you.
How to grant access to the Data Models in SEI

$
0
0

In this blog, we’ll explore the step-by-step process to grant access to the data model in sage enterprise intelligence (SEI).

This option is used to grant access to the Data Models, to groups or users.

  • In the Administration section, click on the Security drop-down menu in the left pane.
  • Select Data Model Authorizations.

There are three different ways of adding authorization to a Data Model and you can toggle from one to the other by changing the value of the Manage drop-down list.

You can manage the authorization by Users, Groups or Data Models.

Here, we chose to manage the authorizations by Users.

Fig. 1. Security process

A list of users will be displayed and from that list, you can select a user to see the Data Models that this specific user is authorized to access.

  • From the Data Models section, select the required Data Model and click on Add.

Note:-

  • The Authorized Data Models section contains those authorized specifically for the selected user and not part of the member group.
  • The same functions are accessible by selecting Groups or Data Models in the Manage drop-down list. Use the more convenient one.

By default, when adding authorizations to a Data Model, the Data Model Role,

Authorization Display Level and Authorization Edit Level will be the default value configured for the User or Group. These values can be overridden at the Data Model level.

Fig. 2. Security process add

As mentioned earlier, the authorization should always be configured at the Group level, not the User level.

If a user is part of multiple groups and if all of these groups are authorized to the same Data Model, the highest level of authorization for the group will be granted to the user (display and edit level), and all the roles will be merged.

In our blog, we explored the process of granting access to the data model in sage enterprise intelligence (SEI).

Adding controls to fields in Sage X3

$
0
0

One more feature of Sage X3 that frequently gets overlooked is the capability of adding controls to a specific field within the system without requiring knowledge of the 4GL language, which is Sage X3’s exclusive coding language.

After realizing that they were continuously using the control action to add custom logic to standard or custom fields, developers made the decision to provide a feature that allowed users to easily add controls to fields via an intuitive interface.

Any field on a screen can have any control added to it. But be advised that after your control is evaluated, the standard logic can sometimes take over and may even override your configuration. This is especially valid for controls that you would include in a standard field.

Key Features:

Here’s how to add controls to fields in Sage X3:

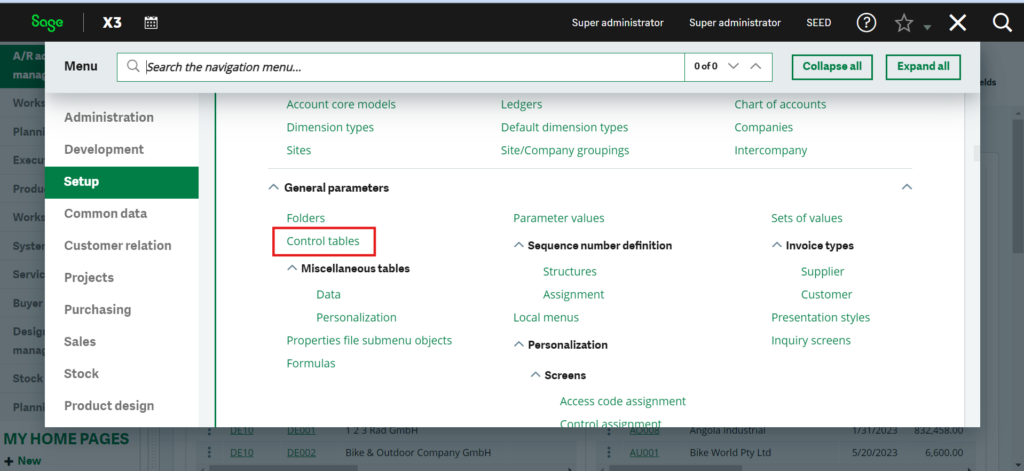
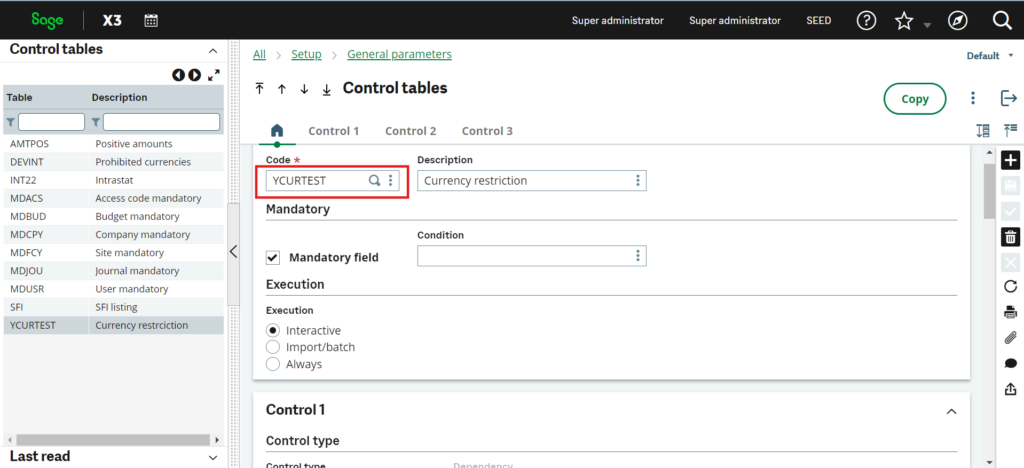
Navigate to : Setup -> General parameters -> Control tables

Fig . 1 – Control table

Observe the following points on this screen:

  • For the same fields, three controls are configurable. Sequentially, from tab Control 1 to tab Control 3, they will be assessed.
  • You can include a control that indicates whether a field is required and under what circumstances.
  • The control can be made available upon import, upon entry, or on both occasions.
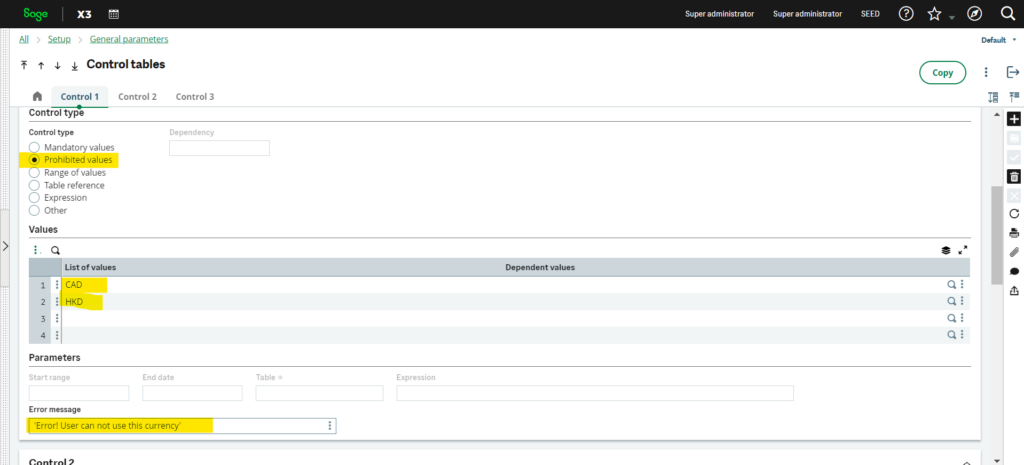
  • The different control types are as follows:
    • Mandatory value: only one of the values defined in the control table is authorized.
    • Prohibited value: all values are authorized, except the values listed in the control table.
    • Range of values: the authorized values are defined within a range.
    • Table reference: the value must correspond to a principal key value in a table defined elsewhere.
    • Expression: a logical expression built with the formula wizard that must be verified by a control value.
  • At the bottom of the screen, you enter the message that will be displayed if the condition is met.

It might be a good idea to add a control to the sales order screen’s currency field.

The majority of currencies are preconfigured in Sage X3, a genuine multi-currency program. You still have control over which values can be entered into a specific currency field without having to remove each currency one at a time.


 Fig. 2 – Create currency restriction control
  

Fig. 3 – Set conditions

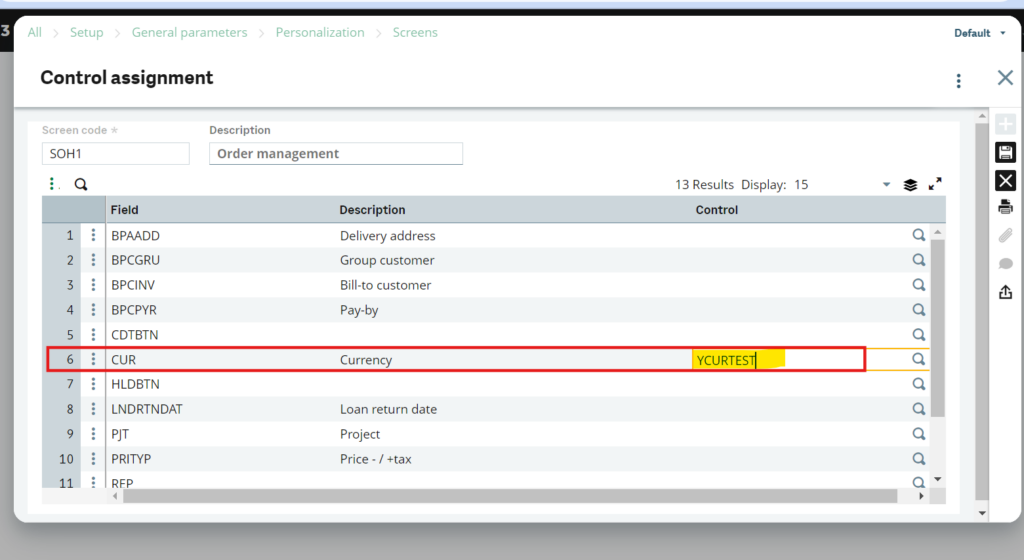
There is a specific function called control assignment that you can use to associate the control you just created with the field on the screen:

Navigate to : Setup → General Parameters → Control assignment

     Fig. 4 – Create Control assignment

Once you save the above, you will need to validate the entry transactions you use in your system because the sales order is an entry transaction driven screen.

Suppose you are utilizing the ALL entry transaction exclusively. To validate the ALL entry transaction,

Navigate to : Setup → Sales → Entry transactions → Orders and then validate the ALL entry transaction.

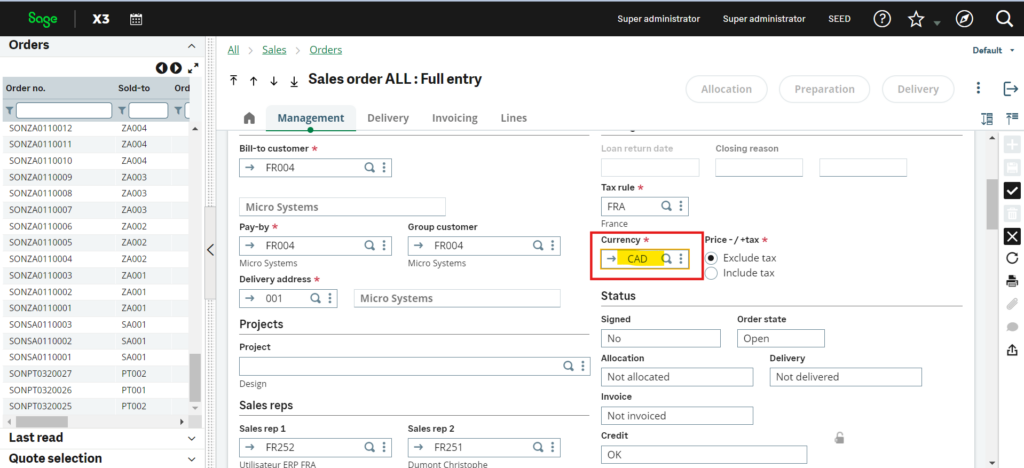
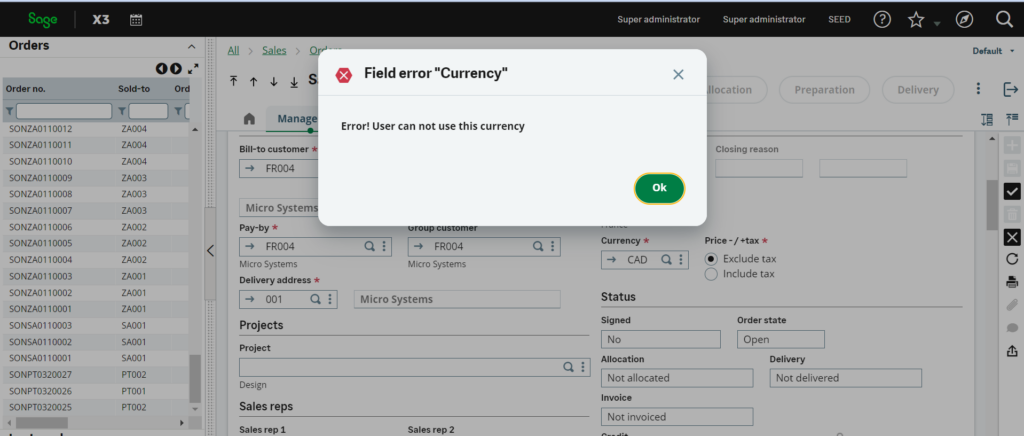
Now, if you go to the sales order and enter the CAD currency, you should get a blocking control that prevents you from selecting it and giving you an error message when you try.

Fig. 5 – Create Sales order with CAD currency

Fig. 6 – Error message

Adding controls to fields in Sage X3 can significantly enhance data accuracy, streamline processes, and improve overall system usability. By implementing robust controls, such as validation rules, default values, and field-level security, organizations can ensure data integrity and consistency. These controls help minimize errors, prevent unauthorized access to sensitive information, and guide users towards accurate data entry. Ultimately, the incorporation of controls fosters efficiency, reliability, and compliance within Sage X3, empowering businesses to make informed decisions based on reliable data.

Feature: Use of Supersession/Substitution product field on Product master in Sage X3

$
0
0

Introduction: As we know, business processes like sales, manufacturing, and logistics, require a functionality where you can substitute one product with another. In Sage X3, there is a concept of supersession product or substitute product. The name substitute refers to a product or service that consumers see as essentially the same or similar-enough to another product. A substitute product is any alternative, replacement, or backup of primary goods in the market that serves the same purpose as another product in the market in normal circumstances.

Substitution process is triggered when the requested item is unavailable due to various factors like out-of-stock, out-of-maintenance, newer version availability, manufacturing changes in market and item cannot be sold in the region.

In Sage X3, the Supersession Product field (SBSITM) is used to automatically replace the current product with a new product upon sales entry (after the substitution date).

Follow below steps for better understanding.

  1. Navigate to: Common data > Products > Products
  2. Enter product name for which Supersession product details to be set.
  3. Enter Supersession product and Supersession date for particular product.

For example, A customer ordered product A. However, product A is unavailable because it is out of stock. On agreement with the customer, the supplier delivers a substituted product (product B) which has similar form, fit, and function. The supplier substitutes product A with product B, and delivers it to the customer.

Refer below screenshot where the Supersession product is set as BMS004 and Supersession date is set to 30/05/24 for the Product BMS001.

The Supersession date is used to replace a product from a certain date.

Fig 1. supersession fields

Now, when you will create sales order for the product BMS001 from 30th may 2024, the product will be automatically replaced by supersession/substitute product BMS004 as per the setup done on Product master screen above.

Below is the example, where order date is 30th May, 2024.

Fig 2. sales order

Now, when we enter product BMS001 at line level, we get the below information popup giving substitution product details.

Fig 3. replacement message

If you are creating sales order with the date less than 30th May then the product BMS001 will not be substituted with BMS004 as it has Substitution date as 30th May.

Thus, we can make use of Supersession/Substitution product and Supersession/Substitution date field to replace the particular product after certain date.


How to Run Fiscal Closing On Multiple Companies at Once in Sage X3

$
0
0

Fiscal closing is a critical process for any business. Doing Fiscal Year end, marking the end of a financial period and getting the company’s financial records ready for the next one. For businesses using Sage X3, this process can be streamlined, even when handling multiple companies simultaneously.

At times, users may want to run the closing process for multiple companies, so X3 allows you to do this with its functionality. No longer will users have to spend countless hours manually closing multiple companies’ fiscal periods. Before starting the fiscal closing process, ensure all data is accurate and complete. This includes reconciliation of accounts, ensuring all transactions are posted, and taking a backup of your database to prevent any data loss.

With the Multi-company Period Closing function, all fiscal periods across various companies’ ledgers can be closed at once. This revolutionary feature is not only a huge time saver but also a game-changer in terms of efficiency. Say goodbye to the tedious and time-consuming process of closing fiscal periods individually, and say hello to the future of smarter, faster accounting.

To use the Multi-company period closing function please follow the steps below :

Step 1: Please follow this path: All > Common data > General accounting tables > Multi-company period opening

New stuff:- Feature: Use of Supersession/Substitution product field on Product master in Sage X3

Fig01 : Path Describing

Step 2 : Here, you can tick the “All Companies” section, or you can select the range “From Company” to “To Company.” In the “Period Date Until” field, enter the last period you would like to close for each company. Then, click on the “OK” button as shown in the below picture .

Fig02 : Multi-company period opening screen.

Step 3 : After clicking the “OK” button, a log will display all the companies with their completion status or any issues that prevented the closing process from completing, as shown in the picture below.

Fig03 : Log File
Fig03 : Log File

By following the above steps we can Run Fiscal Closing On Multiple Companies at Once in Sage X3.

About Us

Greytrix – a globally recognized and one of the oldest Sage Development Partners is a one-stop solution provider for Sage ERP and Sage CRM organizational needs. Being acknowledged and rewarded for multi-man years of experience and expertise, we bring complete end-to-end assistance for your technical consultations, product customizations, data migration, system integrations, third-party add-on development, and implementation competence.

Greytrix has some unique integration solutions developed for Sage CRM with Sage ERPs namely Sage X3Sage IntacctSage 100Sage 500, and Sage 300. We also offer best-in-class Sage ERP and Sage CRM customization and development services to Business Partners, End Users, and Sage PSG worldwide. Greytrix helps in the migration of Sage CRM from Salesforce | ACT! | SalesLogix | Goldmine | Sugar CRM | Maximizer. Our Sage CRM Product Suite includes addons like  Greytrix Business ManagerSage CRM Project ManagerSage CRM Resource PlannerSage CRM Contract ManagerSage CRM Event ManagerSage CRM Budget PlannerGmail IntegrationSage CRM Mobile Service SignatureSage CRM CTI Framework.

Greytrix is a recognized Sage Champion Partner for GUMU™ Sage X3 – Sage CRM integration listed on Sage Marketplace and Sage CRM – Sage Intacct integration listed on Sage Intacct Marketplace. The GUMU™ Cloud framework by Greytrix forms the backbone of cloud integrations that are managed in real-time for the processing and execution of application programs at the click of a button.

For more information on our integration solutions, please contact us at sage@greytrix.com. We will be glad to assist you.
Automatic Packaging configuration at Product Site level

$
0
0

When the packaging capacity isn’t configured at the site level and there are multiple products involved in Sales Order Packaging, the process of manually setting up automatic packaging for each product can be incredibly time-consuming.

To streamline this and prevent the need for manual automatic packing at the packaging level, Sage X3 offers a feature that allows users to configure packaging settings directly at the product site level.

Below is the demonstration of process when the Packaging Capacity is “not set” at Site Level:

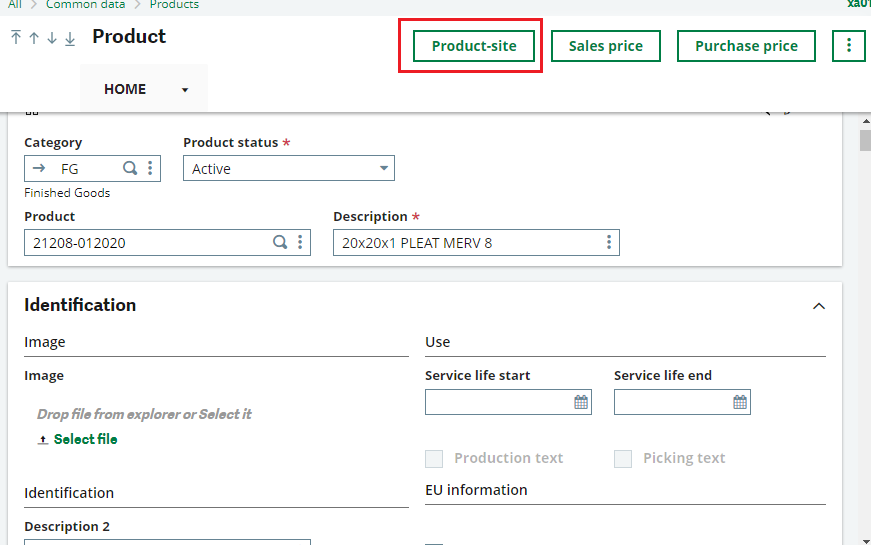
Go to Product Site

Fig 1: Product Site Navigation

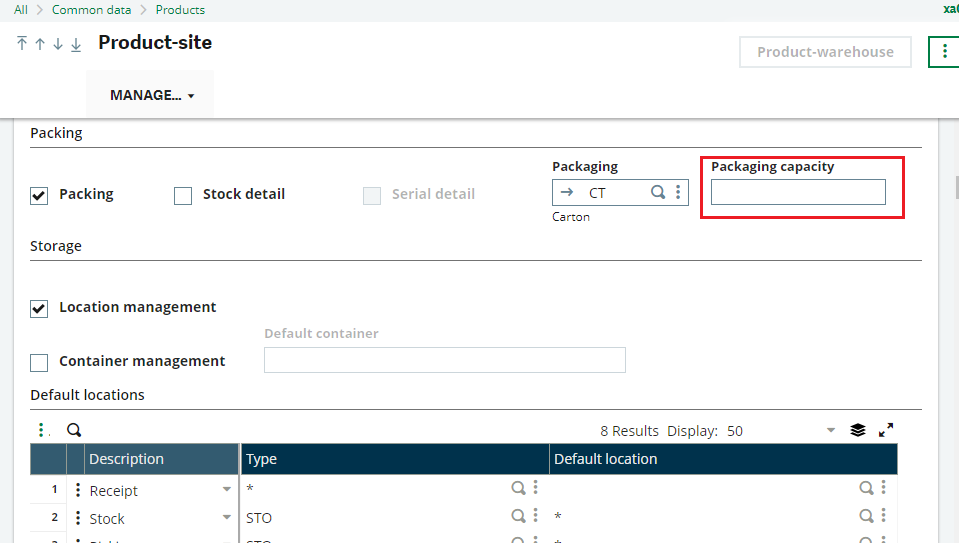
We can see the Packaging Capacity is not set.

Fig 2: Packaging Capacity Blank

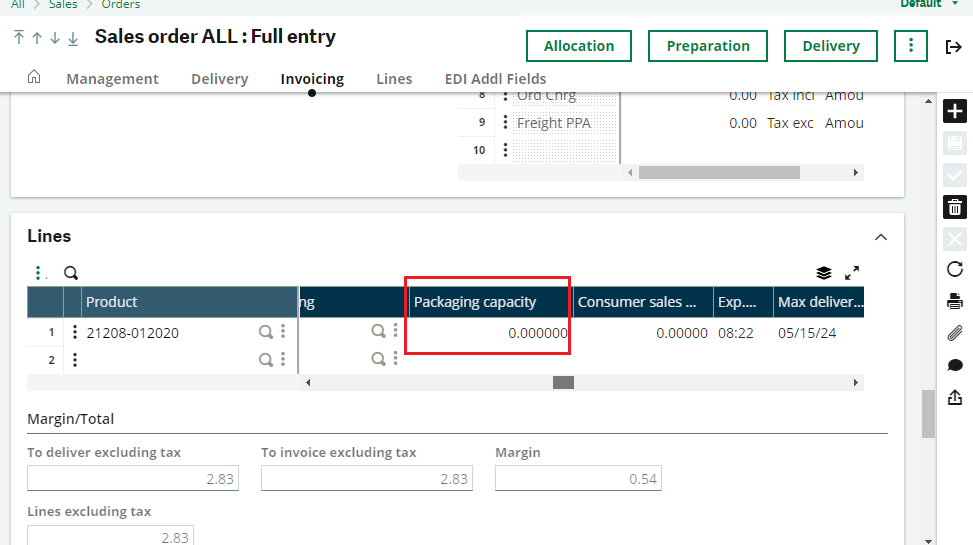
Now Create Order and on Order level the Packaging Capacity will show 0.

Fig 3: Packaging Capacity at Order Line Before Configuration

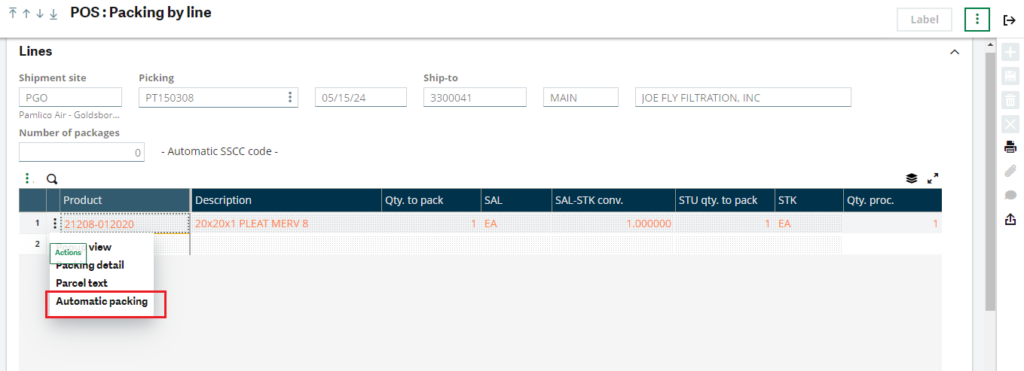
Allocate, Create Pick Ticket and create Packaging. On Packaging it will show in red.

Fig 4: Packing line in red

You would require to click on the three dots and select Automatic packing.

Fig 5: Automatic Packing

And then the packaging is done.

Fig 6: After Automatic Packing

Below is the demonstration of the process when the Packaging Capacity is “set” at Site Level:

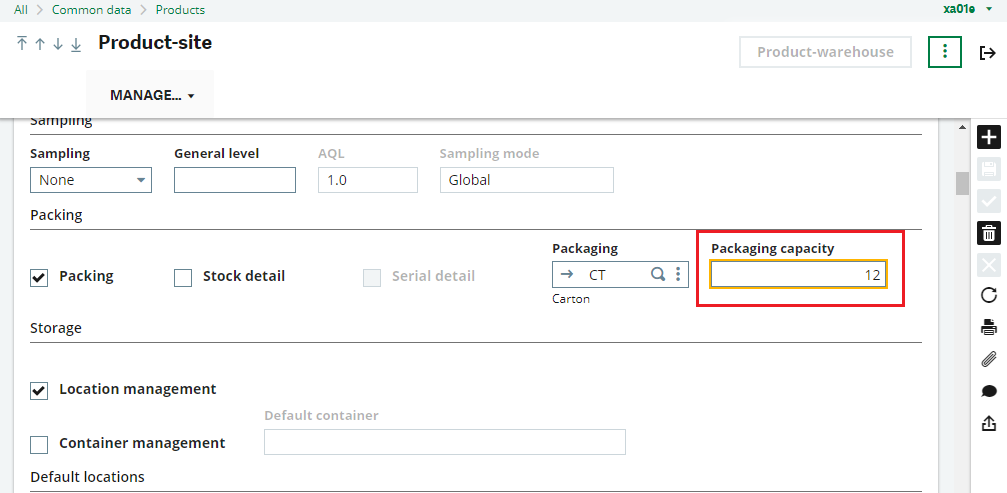
Go to Product Site and set the Packaging Capacity and save as shown below.

Fig 7: Set Packaging Capacity

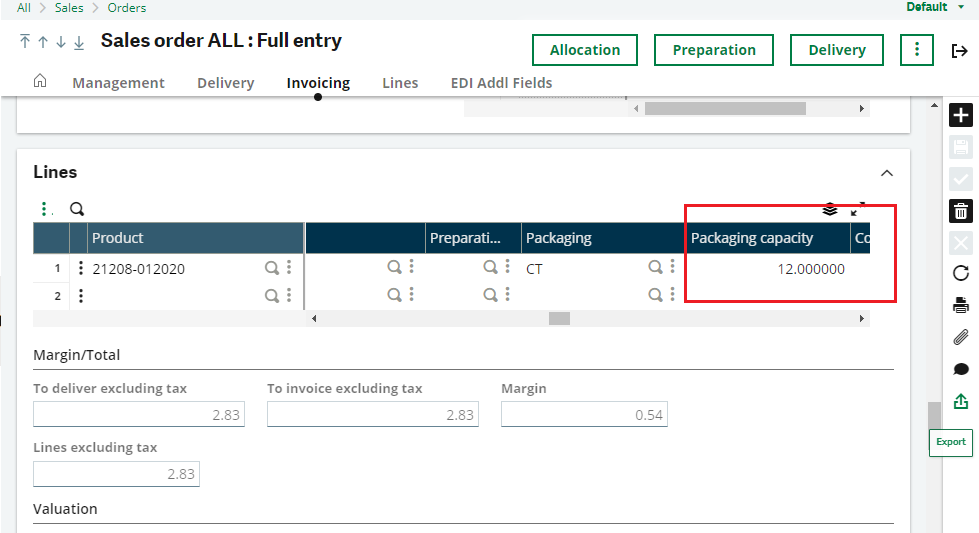
While Order creation the Packaging Capacity is auto populated at Order line.

Fig 8: Packaging Capacity at Order Line After Configuration

After this at the Packaging the Package is automatically done.

Fig 9: Packing lines in green

Thus, we have seen how we can set the Packaging capacity at site level. By implementing this feature, businesses can efficiently manage their packaging processes, saving time and resources while ensuring optimal operations in packaging of multiple products.

How can we add new fields to the Inquiries screen without using standard lecture code

$
0
0

In Sage X3, the inquiries screen refers to a user interface where users can view and analyze data stored in the system. This screen typically provides a way for users to query and retrieve information about various aspects of the business, such as sales orders, purchase orders, inventory levels, customer information, supplier information, and financial data. The inquiries screen often includes search filters, customizable columns, and options to drill down into details for deeper analysis. It serves as a central hub for accessing critical business data and gaining insights into different operations within the organization.

Here’s a step-by-step description of how we can add new fields to the Inquiries screens, such as Stock by site, Stock by product, Stock by lot, Detailed stock, Obsolete stock, Available stock, Dedicated location, Stock to count, etc., without using standard lecture code in Sage X3 :

STEP-1

As shown in the screenshot below, we have added the field ‘Description 4’ on the stock to count inquiry screen. First, we need to add the field on the stock to count screen. Go to Development >> Screen >> Enter new field >> Save >> Validate the screen. Refer to the screenshot below as Fig. 1.

                                   Fig1. Screen dictionary

STEP-2

As shown in the screenshot below, open the window management screen of stock to count and jump to the Inquiry screen. Go to Development —>> Window —>> Jump to the Inquiry. Refer to the screenshot below as Fig. 2. 

  Fig2. Window management

STEP-3

As shown in the screenshot below, The inquiries screen is open . We need to jum to the defauly screen code, its a standard screen . Refer to the screenshot below as Fig. 3.

  Fig3. Inquiries screen

STEP-4

As shown in the screenshot below, we need to set the sequence number of description 4 filed. We set the order number where we want to be set on the stock to count screen. Here we set the order number of description 4 field . Refer to the screenshot below as Fig. 4.

            Fig4. Default STD Screen

When all the process is completed. Validate the inquiries screen, Defualt screen, and stock to count window.

STEP-5

As shown in the screenshot below. After that we follow the all the steps are step by step , the successfully added the new fields Description 4 on the stock to count inquiry screen .

Fig5.Field added

STEP-6

As shown in the screenshot below, open the stock to count inquiries script file, such as ‘CNSSIISPE’, which is a standard script file. We need to write the code to display the product description 4 on the screen when the user selects the product site, from product, to product, and clicks on the search button. All the data regarding the product with the newly added Description 4 field will be displayed. We need to use the AV_AFFICHE action to display the data on the newly added field. Refer to the screenshots below as Fig. 6. The AV_AFFICHE action is used to display the data on the newly added field.

The data display code is written in the inquiry script file such as ‘CNSSIISPE’, which is the stock to count inquiry script file name.

<<——————————————————————————->>

$ACTION

 Case ACTION

  When “AV_AFFICHE” :Gosub AV_AFFICHE

 Endcase

Return

$AV_AFFICHE

##Here  we can write the code to display Product Description 4 on the grid.

Return

<<——————————————————————————->>

 Fig6. Stock to count

This blog helps us understand how to add the new fileds on the all the inquiries screen such as a Stock by site,stock by product,stock by lot , detailed stock,obsolete stock, available stock.dedicated location , stock to count etc. Sage X3.

.

License Plate Numbers in Sage X3

$
0
0

Step1. How to create and set up the various license plate numbers?

Sequence number creation

Open: Setup > General parameters > Sequence number definition > Structures

Before creating the license plate number, you must create a sequence number.

This sequence number can include up to 18 characters.

Fig 1. Sequence Number

Link the Sequence code to the respective container on

Common data >> logistic table >> container

Step 2. Creating an Internal type container

There are two container types: Internal containers are used for logistics operations within the warehouse, and Freight containers are used for shipments and transportation (Purchasing logistics).It must be set to the Internal type.

The license plate numbers are generated from a container, based on the sequence number assigned to it.

Fig 2. Create an internal container

To create an internal container:

  • Click the Create action.
  • Set the container code.
  • Select the container type: pallet, pack, barrel, big bag, (etc.). These values are contained in a dedicated local menu available for setup.
  • Enter the sequence number. If the sequence number is not entered, this implies that you want to enter the number of the container when you create it.
  • Specify whether this is a single-product or single-lot container. You can modify these characteristics if needed during the license plate number generation stage.
  • Enter the report code for the bar code labels to be printed. A standard report code is delivered by default: ETIQLPN (LPN for License plate number and ETIQ for label (‘Etiquette’ in French)).
  • Enter the physical characteristics of the container: Size and capacity. This data is for information only.
  • You can also add a picture and a description.

Step. 3 How to set up products to be managed in stock on logistics units?

Product categories

Open: Common Data > Products > Product categories

  • Click New.
  • Enter the information required to create the product category, in particular, in the Management section.
  • The product must be managed in stock.
  • Enable the Location management.
  • Enable the License plate number management (LPNMGTCOD field in the ITMCATEG table). The License plate number management can only be accessed when the Location management is enabled.
  • Click Create.

Products

Open: Common Data > Products > Products

  • Click New.
  • Select a product category that authorizes the management of license plates.
  • Enter the information required to create the related product record.
  • Click Create.

Product-sites

Open: Common Data > Products > Product-sites

  • Click New.
  • Enter the information required to create the related product record for a given site.
  • The product setup and product category are recovered on the product-site.
  • Check that the license plate number management is enabled. It can be enabled or disabled at the level of the product-site record. It can only be enabled if the Location management is enabled.
  • Enter the Default container (TCTRDEF field). This information is optional, but this value will be initialized on the document line when a product is received into stock.
  • Enter the container capacity table, as shown below:

          Container   Unit           No. of units per container

          Selection of internal containers: only Internal type containers can be selected.

  1. Selection of the existing unit for the product: stock or packaging unit
  2. Entry of a number of units for the container

Step.4 How to define a stock receipt with or without a license plate number?

Stock management rules

Open: Setup > Stock > Stock management rules

The stock management rules are used to indicate if the license plate number is mandatory or optional, for each receipt movement.

This applies to the following receipt movement types:

  • Miscellaneous receipt
  • Supplier receipt
  • Receipt for subcontract
  • Delivery return
  • Loan delivery return
  • Delivery return for subcontract

Only Internal and Dock locations use license plate numbers.

Customer and Subcontractor locations cannot track license plate numbers. If the stock movement is for a ‘Customer’ or ‘Subcontractor’ location, the license plate number is lost. This is the case when validating a loan delivery for example.

Product categories

Open: Common Data > Products > Product categories

The setup of Stock management rules is used on the Product category. It can be modified for each category.

The product category can also be set by site. In this case, the setup can even be adjusted to each product-site category.

In the Receipts section, indicate if the license plate number is mandatory or optional for each stock receipt movement of the product:

If the license plate number is mandatory, then it must be entered on the document line or line details.

If the license plate number is Optional, then it is optional on the document line or line details. The document is generated with no license plate number.

Step. 5 How to create license plate numbers?

Mass creation

Open: Stock > License plate numbers > License plate number creation

From the menu dedicated to the management of license plate numbers, you can launch a utility for mass creating license plate numbers.

  • Enter the relevant storage site
  • The container from which the numbers will increment. Only Internal containers can be selected.
  • Specify if the license plate numbers need to be active or not.
  • Active license plate numbers can be viewed and used. Inactive license plate numbers are not displayed for selection.
  • Specify if the generated license plate numbers must be for single-products and/or single-lots.

Fig 3. Mass License Plate Number Creation

  • Specify the location if you need to locate the license plate number as soon as it is created. You can only enter a location of the Internal or Dock type.
  • Enter the number of license plate numbers to be created.
  • To print the bar code labels:
  • Select the Printing check box.
  • Specify the format of the labels to be printed and the destination printer. This information is preloaded based on the presetting.
  • Click OK.
  • A log file is displayed. It lists all the license plate numbers that were created.
  • These records are loaded in the LPN table.

Unit creation

You can create license plate numbers per unit.

Open: Stock > License plate numbers > License plate numbers

  • Click New.
  • Enter the license plate number, or leave blank to apply the sequence number
  • The relevant storage site
  • The internal container used

Fig 4. License Plate Number Unit Creation

  • The location, if you need to locate the license plate number as soon as it is created
  • Specify if the license plate number must be set to single-product or multi-product. For single-product, specify if the license plate number must be single-lot or multi-lot.
  • Click Create:
  • The container license plate number is incremented based on the container sequence number. The record data is loaded in the LPN table.
  • The LPN status is Free, which means it is not linked to any product.

User Broadcasts functionality in Sage X3

$
0
0

Sage X3’s User Broadcast feature facilitates streamlined communication within your organization. It enables administrators to send targeted messages directly to users or groups, ensuring timely dissemination of important information such as maintenance alerts, updates, and reminders. This functionality enhances collaboration and efficiency by keeping everyone informed and aligned with critical activities.

In Sage X3, the User Broadcasts functionality allows administrators to send messages directly to specific users or groups of users within the system. These messages can be used for various purposes such as announcements, reminders, or important updates. User Broadcasts ensure that important information reaches the intended recipients promptly, improving communication and collaboration within the organization.

The User Broadcast feature within the Administration platform enables administrators to create messages that appear prominently at the top of the browser window for a specified duration.

Utilize this functionality to:

  • Inform users ahead of time about planned maintenance, ensuring they are aware of system unavailability.
  • Send reminders to users regarding necessary actions before closing a period, facilitating smooth operations.

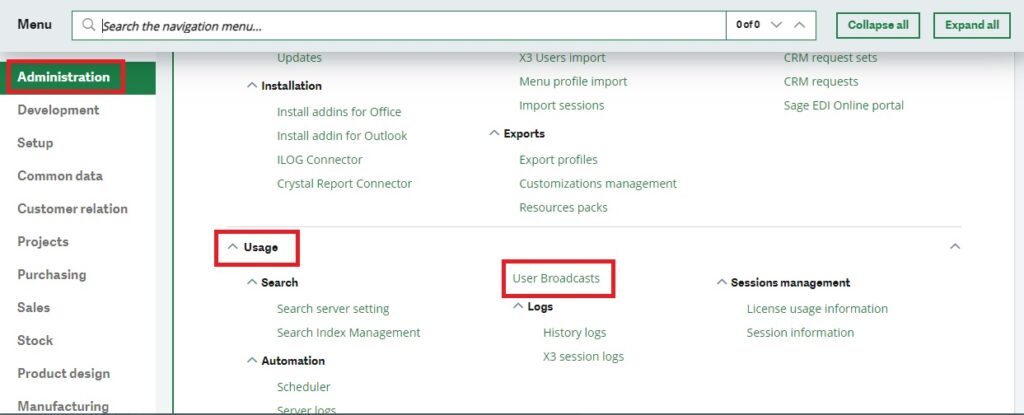
For this, you need to navigate to:

Administration -> Usage -> User broadcasts

Figure 1: Navigation for User broadcasts

When you access this screen, you can access a list of message types, alerts, and other communications that you’ve previously sent.

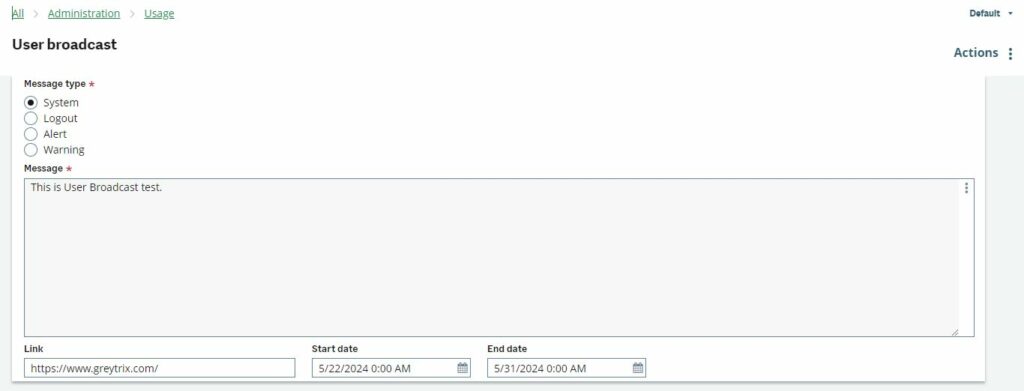
For creating new user broadcast, you need to select “create broadcast” from action button. You will jump to the creation screen. See figure 2.

Figure 2: User broadcast creation

  1. Message Type: Choose the category of your user broadcast message. Options include:
    • System
    • Logout
    • Alert
    • Warning
      System and Warning messages are presented in an informational style, while Logout and Alert messages adopt a warning style.
  2. Message: Enter the content of your message here.
  3. Link: Include a hyperlink that directs users to a supplementary web page for further details.
  4. Start Date: Specify the commencement date and time for your message.
  5. End Date: Determine the conclusion date and time for your message.

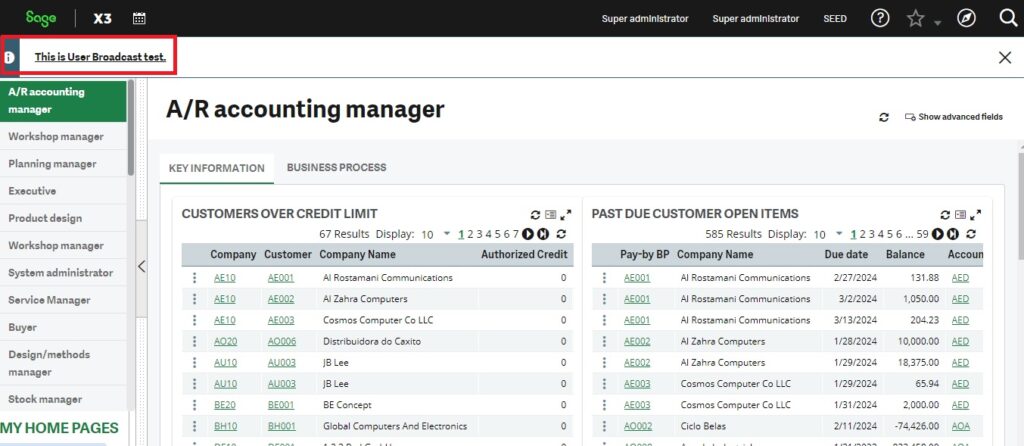
Figure 3: User broadcast message after login to the Sage X3 system

I have given an example of a system message having a link attached to it. Refer to figure 2, and the result of this broadcast is shown in figure 3, which will display when login to the system and show the message on the homepage.

In summary, User Broadcasts in Sage X3 provide a structured and efficient means of internal communication. By empowering administrators to send targeted messages to specific users or groups, this feature ensures timely dissemination of critical information such as maintenance alerts, updates, and reminders.

How to change the status of multiple work orders at once.

$
0
0

In Sage X3, a work order is a document that details the production activities required to manufacture a specific quantity of a product or item. It serves as a set of instructions for the production team, outlining the necessary tasks, resources, and timelines to complete the manufacturing process.

After running MRP and checking Enterprise planning, you can see work-in-progress orders based on demand. When work orders are suggested, use the Automatic release function “FUNMAUTR” in Sage X3 to change their status to planned or firm work orders. This function is located under Manufacturing, Batch processes.

Navigate to: Manufacturing –> Batch Process –> Automatic Release.

After launching the function, you need to enter a production site. Then, you will have two options to choose from for processing the work orders.

You can choose between Suggested work orders or Planned work orders. After making your selection, you’ll need to set a New status, either Planned or Firm. You can also select a range of work orders, a project, or a sales order number. Additionally, this function can be executed based on a specific product or start date.

Fig1: Automatic Release

After selecting the work order number, clicking the View button will display a list of all suggested or planned work orders ready for processing. In this example, the product appears in red, indicating that the order’s start date is in the past.

Fig2: View

Once the data is changed to current date or future date, the product color changes to black, and then it is possible to click the Include button to include all planned or suggested work orders.

Fig3: Include button

After clicking the OK button, a log will be generated showing the new firmed or planned work order numbers. These newly created work orders can be accessed in Manufacturing under Planning and then Work Orders.

Fig4: Log Reading

How to automatically adjust shortages of outstanding sales order with recording of stock receipts

$
0
0

In order to make sure effective stock allocation and order fulfillment, integrating inventory management with sales order processing in Sage X3 is necessary for automating the adjustment of shortages in outstanding sales orders. In order to manage supply shortages more efficiently overall, you can eliminate errors, cut down on manual intervention, and set up automated systems.

Benefits of Automation:

  • Efficiency: Automation streamlines the process of adjusting shortages and reduces the need for manual intervention, saving time and resources.
  • Accuracy: Automated processes help minimize errors associated with manual data entry and allocation, ensuring accurate stock allocation to sales orders.
  • Improved Customer Service: By automatically fulfilling sales orders with available stock, you can enhance customer satisfaction by meeting delivery commitments and reducing order fulfillment lead times.

Key Features:

Prerequisites:

  1. Parameter values (ADPVAL) –
    • Chapter-STO ,Group-MIS ,Parameter-GENSHT (Generate shortages) set to Yes.
    • Chapter-VEN ,Group-SAL ,Parameter-INIALLORD (Init qty to allocate to order) set to Yes.
  2. Customer setup should allow Partial Delivery so that it can automatically generate shortages if there is insufficient stock.

Setup :
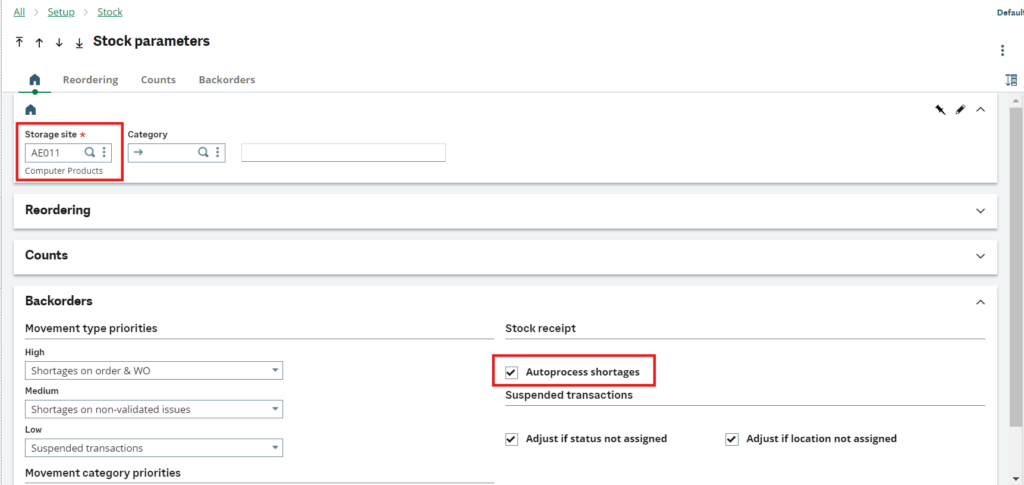
Navigate to : Setup -> Stock -> Stock Parameters

Check ‘Autoprocess shortages’ under Backorders Tab in Stock Parameter for any site.

Fig. 1 – Setup for Stock Parameters

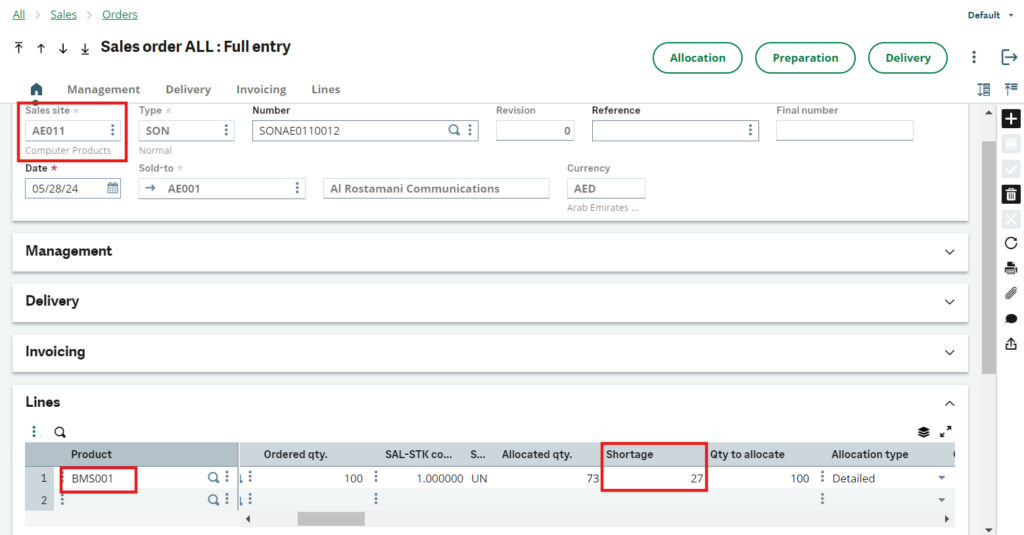
Create Sales order (GESSOH)-

Fig. 2 – Create sales order with Stock shortage

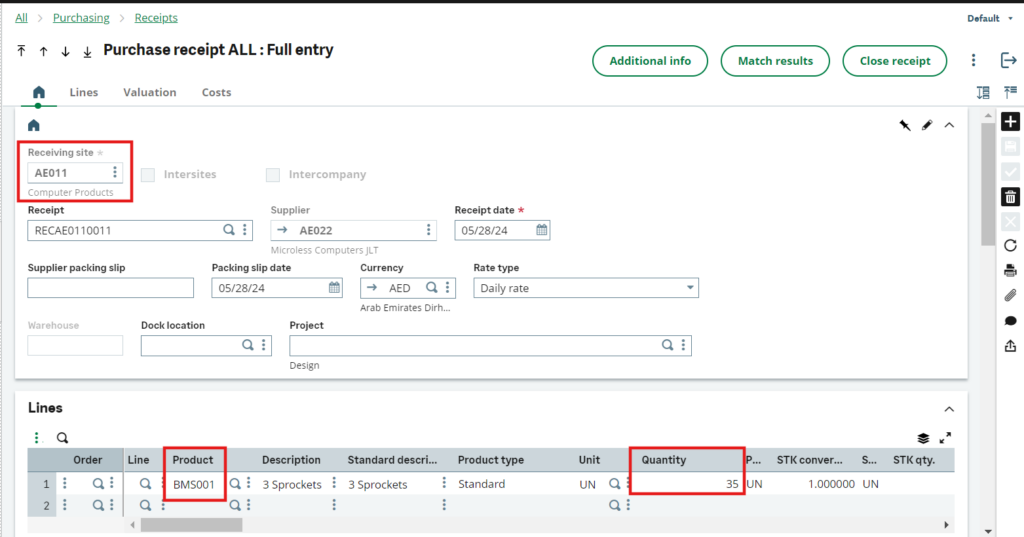
  1. Create Purchase Receipt(GESPTH2) –

Fig. 3 – Create Purchase receipt for the Product

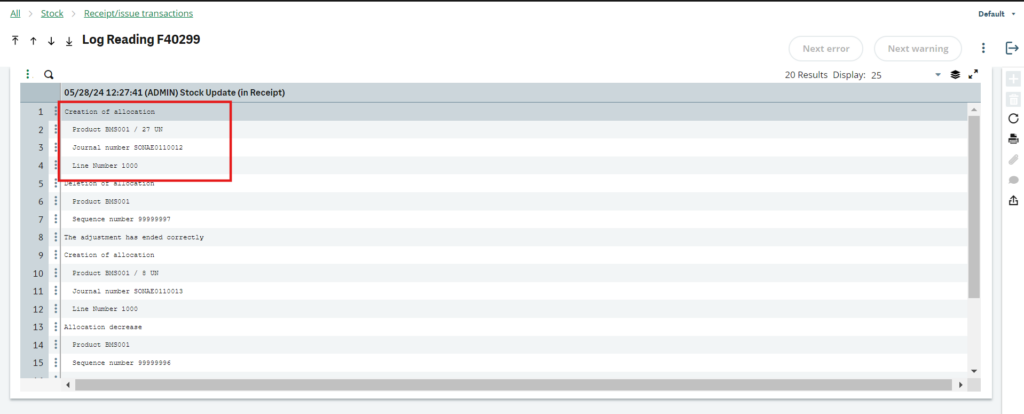
Verify allocation log file to confirm stock is getting allocated against outstanding sales order when you save the stock receipt 

Fig. 4– log file

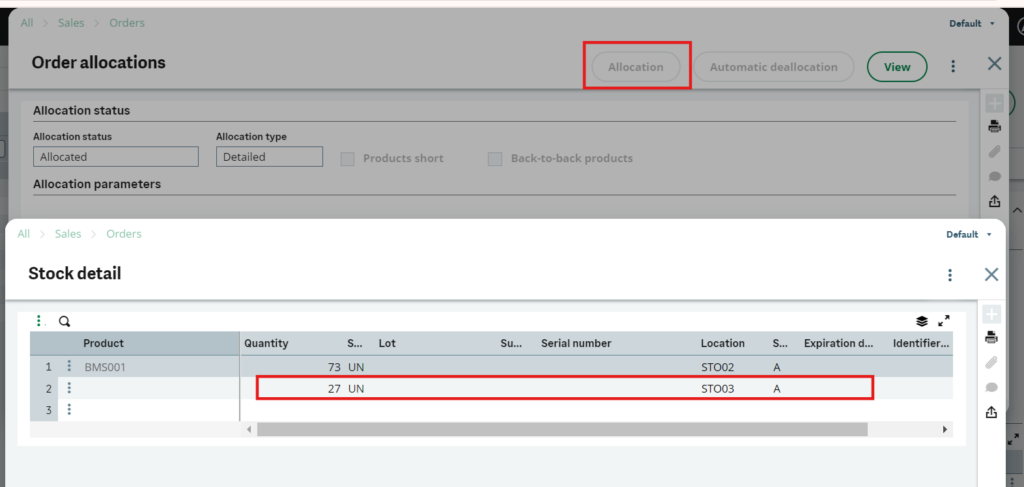
Verify Sales order (GESSOH) Stock is automatically allocated.

Fig. 5– Stock allocation

The essential component to streamlining inventory control and order fulfillment procedures is automating the correction of shortages in outstanding sales orders with the recording of stock receipts in Sage X3. Businesses can better manage stock shortages and fulfill sales orders by utilizing the automation features in Sage X3. This will increase efficiency, accuracy, and satisfaction with clients.  


Task Management in Sage X3.

$
0
0

This function serves two main purposes. First, it allows users to create new batch tasks from scratch. Second, it enables users to modify the characteristics of tasks that already exist.

Each batch task has a unique code for identification and several technical characteristics that define the process to be executed. A batch task can be one of the following types:

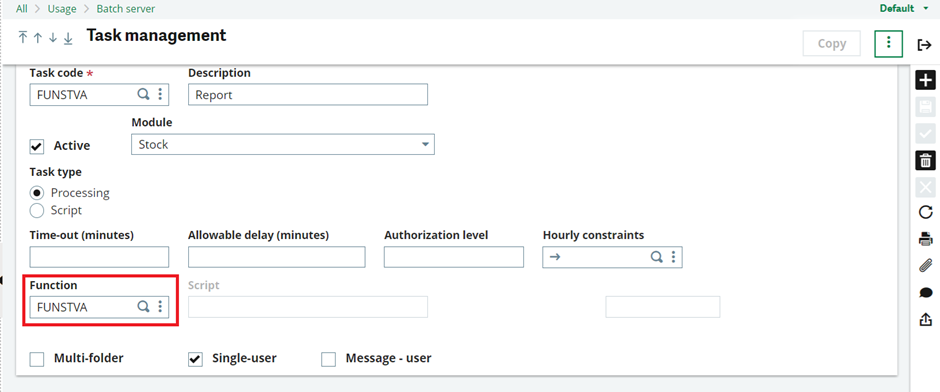
  1. Using the Process (For functions).

Fig 1. Function based batch task.

  • Print reports.

Fig 2. Report based batch task.

  • To read or execute the process from the scripts.

Fig 3. Script based batch task.

This setup allows users to efficiently manage and execute various types of tasks from one central location and for the given time.


The following fields are available on this tab:

  1. Task Code: This field contains the unique code assigned to the batch task.

    A “batch” task refers to a program that can be executed by the server either on a periodic basis or upon a user’s request. This means that the server can run the task automatically at set intervals, or a user can manually initiate the task whenever needed. Batch tasks are designed to automate processes and can include functions such as data processing, report generation, or system maintenance.

    2. Description: Enter the description to know what the task code indicates.

    3. Active: Select this check box to activate the current record. Disabled records keep their content and setup but cannot be used by recalling their code.

    4. Module :  Select a Module for a setup

    5. Task type : Specify whether it is an Adonix process or a script executed in the operating

    System. When defining a batch task, you need to indicate the type of task. We can use task type for

    a. Using the Process (For functions)

    b. Print reports

    c. To read or execute the process from the scripts.

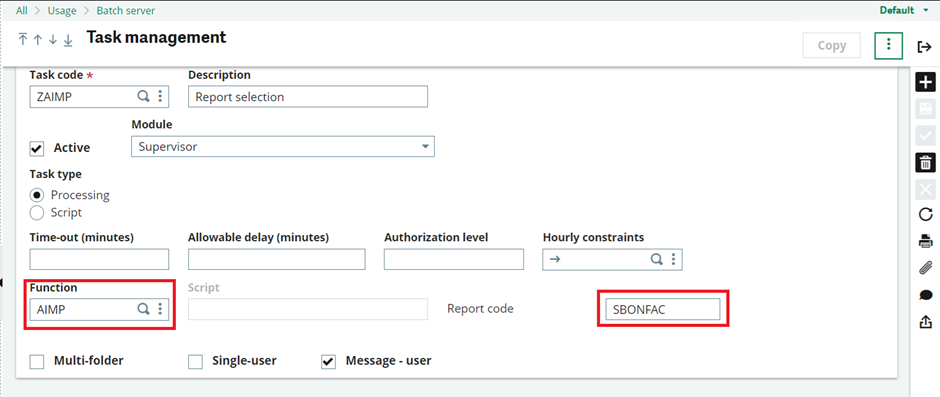
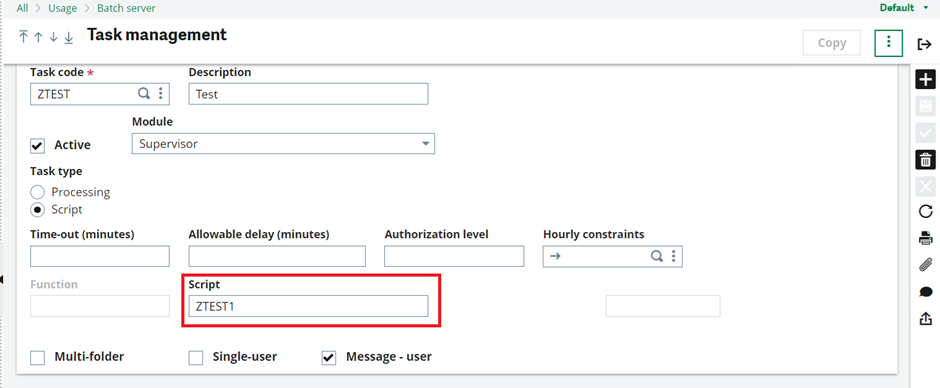
    Refer above images.

    6. Time-out (minutes): This allows you to set a maximum execution time for the task in minutes. If the task exceeds this time, the server will terminate it. Setting the time to 0 means there is no time limit.

    Note: This duration is the minimum. The actual delay before stopping the task also depends on the server’s general settings, as the task stop is checked at regular intervals defined by these parameters.

    7. Allowable delay (minutes): You can set a delay for when requests should start. If a request does not start by the planned time plus the specified delay, it is marked ‘out of time’. Requests might not start on time due to various reasons like server stoppage, low priority compared to other pending tasks, or being blocked by a group. A zero delay means the task is not constrained by a lead-time.

    8. Authorization level: The authorization level will be checked against each user’s access level when they try to start the task. If the user’s level is too low, the task will be denied.

    9. Hourly constraints: This code sets a time constraint for when tasks can be executed directly on the batch server.

    10. Function: This section defines batch tasks for executing functions. It is used to set up the context and check access rights.

    11. Script: Enter the process or system script name here if the task is not defined by a function code.

    12. Multi-folder: If “Multi-folder” is checked, the task can be launched from a folder other than the current one. You will need to specify the folder and user code when launching the request.

    13. Single-user: if this parameter is set to “YES”, a single user can only run the task. It will not execute if switching to single-user mode is not possible.

    14. Message – user: Answering “yes” to this question will alert the user who launched the task about whether it completed correctly or not.

    How to resolve ‘The order was not converted No supplier’s error message while creating a back-to-back order against the sales order in Sage X3

    $
    0
    0

    In Sage X3, a back-to-back order refers to a specific procurement and sales process where a sales order is created directly from a purchase order to fulfil a customer’s demand for a particular product. This method is commonly employed when a company receives a customer order for an item that it doesn’t currently have in stock, so it needs to procure the item from a supplier to fulfil the customer’s request.

    By using the back-to-back order process in Sage X3, companies can efficiently manage procurement and sales operations, ensuring timely fulfilment of customer orders while effectively managing inventory levels and supplier relationships.

    Here’s a step-by-step description of how to resolve ‘The order not converted. No supplier’s error message while creating a back-to-back order against the sales order in Sage X3:

    STEP-1

    As shown in the screenshot below, when we are trying to create the back-to-back order for the sales order, we are facing the error message that is ‘The order was not converted. No supplier’. Refer to the screenshot below as Fig. 1. and Fig. 2.

    Fig1. Back-to-back order

    When we clicked on the back-to-back order button, the below log was generated to determine whether the back-to-back was created or not.

    Fig2. Error Message

    Below are the steps for how to solve this error message when we try to create the back-to-back order against the sales order.

    STEP-2

    As shown in the screenshot below, we need to add the supplier name for the line-level product that is used in the sales order. Back to the sales order screen –>> jumb to line-level product –>>The product master screen is open. Refer to the screenshot below as Fig. 3.

      Fig 3. Product

    STEP-3

    As shown in the screenshot below, after we follow step 2, we are on the product master screen. Now we need to go to the supplier tab of the product screen. Refer to the screenshot below as Fig. 4.

    Fig 4. Supplier tab

    STEP-4

    As shown in the screenshot below, we need to add the supplier name to the highlighted suppliers tab, and we clicked on the save button. Refer to the screenshot below as Fig. 5.    

    Fig 5. Add suppliers   

    STEP-5

    As shown in the screenshot below, after following all the steps,. Now we have created a back-to-back order successfully. Refer to the screenshot below as Fig. 6. The order is generated without an error message.

     Fig6. Result

    STEP-6

    As shown in the screenshot below, when the back-to-back order is successfully created without any error message, go to the line level on the sales order screen and go to the back-to-back order no. column. The back-to-back order no. is populated on that column. Refer to the screenshot below as Fig. 7.

    Fig7.Back-to-back Order created

    This blog helps us understand How to resolve the ‘The order was not conveyed. No supplier’ error message while creating a back-to-back order against the sales order in Sage X3.

    How to Add a Hyperlink in Sage Enterprise Intelligence (SEI)

    $
    0
    0

    In this tutorial, we’ll walk through the step-by-step process of creating a hyperlink from a database in Sage Enterprise Intelligence (SEI).

    Steps:

    1. Prepare the URL Link in Your Database Tables:

    Ensure that your database tables contain the necessary URL links that you want to use as hyperlinks.

    Fig. 1.Database Tables

    2. Create a Data Model:

    Open the “Data Models and Views” tab.

    Right-click and select “New Data Model” to create a new data model.

    In the Data Model Designer, set up the “Format” field

    Under the “Categories” section, select “Hyperlink.”

    Click “OK.”

    Fig. 2. Set Hyperlink

    3. Save the Data Model:

    In the upper left-hand corner, click “File” and select “Save Data Model.

    4. Create a New View:

    Go back to the “Data Models and Views” tab.

    Create a new view based on the data model where you set up the “Format” field.

    Choose the “Worksheet” option.

    5. Add Hyperlink (URL) Fields:

    In the worksheet grid, add the relevant hyperlink fields.

    When users click the link, a new window will open to display the URL in a browser.

    Fig. 3. Add Hyperlink

    In this blog post, we explored the process of creating hyperlinks from a database in Sage Enterprise Intelligence (SEI). By following these steps, you can enhance your reports and dashboards with clickable links to external resources.

    How to enable prepayment option in Sales order in Sage X3

    $
    0
    0

    Prepayments are amounts paid by a customer in advance of the goods or services being received later on. Any payment made in advance can be considered a prepayment.

    Prepayment of an order takes place when a seller receives a form of payment from the customer at the time of order entry. Many types of prepayments are available for a customer to use, such as cash, check, and credit card. When you make any type of prepayment, the system records transaction information for each order detail line, and indicates the payment on the invoice.

    In some scenario there must be some cases where user sets the prepayment option on sales order as disable in Sage X3.

    Prepayment option
    Fig01: Prepayment option

    To enable this option on Sales Order, please follow below steps:

    1. Navigate to : Setup -> General Parameters -> Parameter Values
    2. Head to Chapter TC/Common data. -> Folders
    3. Now select INV groups from grid section.
    4. Now under this, set parameter PREFUN (Prepayment Management) to “Prepayment”.
    5. Save the values .
    Parameter Values
    Fig02: Parameter Values

    Now Go to Sales Order screen:

    Navigate to : Sales -> Orders -> Orders

    Check the same sales order transaction’s prepayment option , it will be now enable.

    SO prepayment option
    Fig03: SO prepayment option

    Hence by following all the above steps user can enable prepayment option in Sales Order.

    Identifying Your Customer in Sage X3

    $
    0
    0

    Customer relation  in business includes various factors to streamline the process including business partner details. And to achieve this various details about customer business and their various location and company sites , contact details, description etc.

    Thankfully the Sage X3 has a new function involved  under customer relations named Identify. To navigate to this screen follow the steps as shown in figure01.

    Navigation
    Fig01: Navigation

    The home page for this customer relations function catches personal detail of customer that will be associated with business. The home page for the following function is shown in figure below.

    HomePage
    Fig02: HomePage

    The header screen involves the prerequisites regarding the customer in question like Company name , Postal code , City , Name etc.

    The detail level shows the following details regarding business partners.

    • Postal Code
    • City
    • Telephone
    • Description
    • Country

    These details are populated if any filters are applied in headers on click on Search button and  the details buttons directly takes you to Customer function in Sage x3, as shown in Fig02

    Buttons
    Fig03: Buttons

    Furthermore the details can also be altered if following filters are applied as shown in figure below.

    Leads Filter
    Fig04: Leads Filter

    These details manipulate data as per changes made on screen.

    Using a single window, it is possible to identify or search for a BP or contact record based on the following information:

    For a BP search, the following can be used:

    • The start or the entire company name
    • The start or all of the post code
    • The start or all of the town/city name where the BP is located

    It is possible to filter the BPs depending on their address by default.

    For a BP search, the following can be used:

    • The start or all of the words making up the surname of the contact
    • The start or all of the words making up the first name of the contact

    Each of these criteria can be used in an independent fashion.

    • In the case of BPs, each of the three BP selection criteria can be used in combination with another.
    • In the case of the contacts, the two Contact criteria can be used in combination.

    From the Search results grid, it is possible by using the contextual menus to view the History or Customer base for the selected BP or Contact.

    This can be traced as shown in figure below.

    Details
    Fig05: Details
    Viewing all 1515 articles
    Browse latest View live


    <script src="https://jsc.adskeeper.com/r/s/rssing.com.1596347.js" async> </script>