This blog refers to the scenario where we would find out how to add components such as Destinations, Inquiry screens and Database Mass Update while creating a patch. Follow to the below steps to add the mentioned components while creating a patch:
Our aim with this blog is to provide practical guidance for enhancing your workflow by incorporating additional components like destinations, inquiry screens, and database mass updates into your patch files. By implementing these additions, we anticipate that you’ll experience a more seamless and efficient work process.
In order to track time spent on a project, the budgeted time that was invested and employee time sheets must be reconciled. This requires that one must be able to determine if there are missing employee time sheets at all and if the correct time sheets were entered for all project employees at the location .
A Time Verification function(CONSVTE) to check whether any employee has missed the time sheet or any incorrect timesheet has been entered , this is now available in the Project management menu.The screen has tab of result where graphical representation can easily draw conclusion of time spent and capacity of individual and if it was breached which would be confirmed with visual aid.
The menu item can be located at Projects>Time Management>Inquiries>Time Verification
SCREEN DETAILS
The screen consists of many filters in order to segregate the data for employees such as , by hours , month , site , year , start date , end date , period etc.
This filter helps to further add filters on outcome as implicated by their name.For example the data when by hour is involved it will show the capacity with which that particular employee/role/site is managed to show the input from personnel as in invested time on project for that given period.
With two buttons namely Search and Criteria , where search shows you data that were requested and criteria showing detailed filters that are to be applied.
Assigned Project:The filter where data on lines is for the project this tab alone.
Group By :This field enables to group the data with options Employee , Site and Company that when applied filters data accordingly.
Start and End Date : Filters data between these dates.
Time Unit : Shows time capacity of the employee according to which data gets filtered.
Period to Control : Filters data with period defined in this field where it will show capacity within that period like for Week it will capture data with respect to weeks.
Source of Data
The Time sheet of each employee is where his/her record of working on invested hours or period is defined at site or at company.
The time sheets entered by an employee are compared to the employee’s capacity. If there is a difference between the two it means some time sheet may not have been captured or the employee was engaged in non-project activity. A dummy project can be created to account for no-project related activities.
This time verification is crucial for time and staff control and optimisation of resources for the project.
The employee capacity is defined by the total number of hours an employee is available for project activities. This is defined on the X3 user function(GESAUS), Project Management tab by the weekly structure, capacity variation (such as annual or sick leave), site default working days and Unavailable days of the year such as national holidays.
Fig1: ProjectManagement
The data here is recorded and displayed wherever the time capacity for particular user is required. For each user project management tab has data accordingly with several filters as shown in figure above like Role , Hourly rate , Currency , Cost type , Main site , Weekly Structure , Time category.
Fig2: Sites tab With working days at the site
The Time Verification display is color coded to indicate various employee time utilization on the project.
Green (normal situation): The Time spent on projects is equal to their capacity.
Orange (Warning): The Time spent on projects is greater than their capacity.
Red (Alert): The Time spent on projects is less than their capacity.
Fig3: End result with graphical representation
This data in particular is applied so as by Employee PJABI , this can also be shown without giving employee name on the tab and it will show all the data available.
Ready to break free from the constraints of traditional business management? Sage X3 Cloud ERP is your ticket to smooth operations, freeing up your team from time-consuming tasks. Enter a world where complexity is simplified, and strategic goals take the spotlight.
In a landscape marked by swift changes, adaptability is key. Sage X3 Cloud ERP steps up as the driving force for transformation, streamlining once complex tasks effortlessly. Whether it’s managing resources or keeping a close eye on finances, Sage X3 empowers your team to handle complexity adeptly, unlocking fresh avenues for growth and innovation. Explore a future where productivity knows no limits, guided by Sage X3 Cloud ERP.
As a trusted Sage Partner, we offer agile Sage X3 ERP solutions that fulfill your business needs and improve visibility. Sage X3 ERP system combines operational and technical functionalities to enhance business performance. With its powerful features, Sage X3 ERP software streamlines operations, so your business can thrive in today’s dynamic market.
Let’s look at the Sage X3 Cloud ERP benefits that help companies enhance operational efficiency.
Benefits of SageX3
1.Streamlined Workflow: Sage X3 software turbocharges your business processes, making procurement and delivery easier. Whether production, warehousing, sales, or customer relationships, Sage X3 ensures seamless and efficient operations.
2.Adaptable to New Technologies: Sage X3 is a tech-friendly ERP system with an open architecture that seamlessly integrates with leading technologies. It’s easy to add plugins and connect third-party systems, making your business operations more efficient and future-proof.
3.Flexible and Responsive: Sage X3 has unique features that meet your every unique business challenge. Plus, you can manage everything from the cloud, anytime, anywhere, and on any device. With all your vital business data stored in one place, you have complete control over your IT strategy.
4.Customer Relationships: Happy customers mean a thriving business, and Sage X3 helps you keep them satisfied. Employees can effortlessly access comprehensive information about orders and products, enabling better customer service, stronger relationships, and more effective marketing campaigns.
Simplify Complexity, Amplify Growth with Sage X3 capabilities
Supply Chain Management Track your inventory in real-time. Stay on top of consumer demand by ensuring stock never dips below the set threshold. Manage costs efficiently with this ERP software.
Sales Management
Inventory Management
Customer Service
Purchasing
Financial Management Effectively manage your finances with real-time global visibility. Plus, it meets local demands with exceptional precision.
Reporting & Analytics
Accounting & Budgeting
Fixed Asset Management
Production Management Increase production speed and rapidly bring new products to market to meet consumer demand effectively.
Project management
BOM planning
Shop floor control
Quality control
Industries finding value in our business management and intelligence offerings. The list of our Sage X3 offerings to fine-tune your business management is long. Contact our certified Sage X3 experts for more insights on how we can help you!
So, are ready to accelerate your business growth with Greytrix as your Sage X3 Partner?
Retrieving data from a single table for the Sage X3 dashboard is straightforward. However, if you require data from multiple tables or linked tables, attempting to add a field from those tables triggers an error message: “Standard Query ‘QUERY_CODE’: Links not possible.” In our recent blog post, we’ve provided a clear solution to address this issue.
Step 1:The error that appears when you add a field from a different table is as follows.
Fig 1: Error 1_Linked not possible
Fig 2 Error 2_Record de-activated
This issue will appear when you add a field from another table without linking it to an existing table. To resolve it, save the flow and select “YES” when prompted. Your query tool will then be immediately deactivated. refer below image.
Fig 3_Query tool
To activate and make tables usable, correctly link them using the “Link” section in the Advanced tab.
Begin by incorporating the required fields from another table into the fields tab grid, as indicated in the following additions. This step simplifies the linking process and extends the functionality of the tables.
Fig 4_Fields
We’ve included the ‘TEXTE’ field from the ATEXTRA table to showcase additional descriptions on the dashboard. This enhancement simplifies the process while expanding the information available for display.
Step 2 :
Once you’ve added the necessary fields from other tables, proceed to link them with the tables whose data or fields will be displayed on the dashboard. This step streamlines the process and broadens the scope of information available for display.
To establish the connection between tables, you’ll require the index key of another table. Follow the process outlined below to effectively link the tables. This method simplifies the task and ensures seamless data integration.
To link tables, navigate to the “Links” section found in the Advanced tab.
Input the index key of the other table to establish a link between tables. For example, as shown in the image above, we’ve linked the PREQUIS table with the ATEXTRA table. This process streamlines data connectivity and facilitates seamless interaction between tables.
The data used for linking tables.
Index key of ATEXTRA table :
[F:AXX]AXX0 = CODFIC + ZONE + LAN + IDENT1 + IDENT2
ITMMASTER = It will display the data in which ITMMASTER is present in the field of CODFIC
DES1AXX = It will display the data in which DES1AXX is present in the field of ZONE
ENG = It will display the data in which ENG is present in the field of LAN
IDENT1 = It will display the data in which IDENT1 is present in the field of IDENT1
IDENT2 = It will display the data in which IDENT2 is present in the field of IDENT2
To link tables, use the index keys as demonstrated in the image.
After inputting the index key details to link the tables, you should save and validate the query tool. If the linking is correct, no errors will be displayed. However, if there’s an issue, an error message indicating “Links not possible” will appear. This step ensures the integrity of the linking process and identifies any potential errors for resolution.
Once you’ve successfully validated the query tool without encountering any errors, log out of Sage X3 and then log back in. Upon logging in again, you’ll find the required fields that you added from another table through linking data with index keys. This process ensures that the modifications made to the data display are properly reflected after re-logging into the system.
Now, you can view the necessary data from another table that you added to the fields of the query tool. You have successfully accessed the fields and data you needed.
When you look at raw data, it can be hard to understand what it all means because it’s just a bunch of numbers or information. It’s difficult to see patterns or trends when the data is in this simple form.
One tool that helps with visualizing data is called conditional formatting. This tool makes it easier to see patterns and trends in your data by applying different formats to cells based on their values. For example, you can set rules so that cells with high values are highlighted in one colour while those with low values are highlighted in another colour. This way, you can quickly identify areas of interest in your data. Conditional formatting turns raw data into a visual map, making it easier to read and analyse your data.
CONDITIONAL FORMATTING IN SAGE X3
Step 1
Define the criteria and the style. Enter a unique code, enter a description, and fill out the lines accordingly.
1. Fill Out the Lines Accordingly: This involves specifying how the information should be displayed based on whether the criteria are met. This could include setting the colour, text size, or other visual elements.
For example:
– Line 1: This line specifies the visual style when the price is greater than zero.
– Line 2: This line specifies the visual style when the price is less than or equal to zero.
Fig.1: Conditional Styles
Step 2
Other Styles: In addition to the default styles that may be provided, there could be other options for you to try out. These options could include different colours, fonts, sizes, or other visual changes that alter the appearance of the information on your screen.
Setup > General Parameters > Presentation Styles: Another way to access and customize styles is through a setup menu in the application. You can navigate to the “Setup” section, then choose “General Parameters,” and finally go to “Presentation Styles.” Here, you may find a range of options that let you modify how information is displayed in the application.
Fig.2: Presentation Styles
Step 3
Assign the style to the field. Go to Setup–>General Parameters–>Personalization–>Screen–>Conditional Style assignment.
Screen Personalization: Inside the Screen section, look for an option called “Conditional Style assignment” This is where you can customize the appearance of specific screens in the application.
Enter the Screen Code: To customize a specific screen, you’ll need to enter the code or identifier for that screen.
Assign the Style to the Field: Once you’ve entered the screen code, you can assign a specific style to a field on that screen. This might involve choosing a colour, font, size, or other visual elements to change how the field looks.
By assigning a style to a field, you can make that information stand out more or make it easier to read and understand.
Fig.3: Screen Personalization
Step 4
In our example scenario, we’ve set up a rule where the gross price field will display in green if the price is greater than zero. Conversely, if the price is not greater than zero, the gross price field will be displayed in red. By viewing the style in action, you’ll be able to confirm whether the applied rules are working as intended.
Fig.4: Sales Order Screen
Thus, conditional formatting in Sage X3 streamlines data visualization by allowing users to define criteria and styles, assign them to fields, and observe their impact on data interpretation. This process enhances data analysis by visually highlighting patterns and trends, making it easier to identify areas of interest within the dataset.
Sage X3 offers functionality allowing the consolidation of multiple orders into a single delivery. If your business process requires limiting such entries to prevent confusion during invoice report printing, follow the steps below:
While creating Order there exist an option of Invoicing Mode, with choices including 1/Order, 1/Shipment, and 1/Invoice. Choose the ‘1/Order’ option. Users should ensure that the invoicing mode is set to ‘1/Order’.
If a user attempts to create a delivery by combining multiple sales orders, Sage X3 will trigger a validation error.
Below is the demonstration of the same:
This is the first Order.
Fig1: First Order
When making an order, choose “1/Order” in the Invoicing Mode options. This tells the system to keep orders separate.
Fig 2: Invoicing Mode for First Order
This is the second order
Fig 3: Second Order
Fig 4: Invoicing Mode for Second Order
Try to create delivery by selecting multiple orders. Go to Sales > Deliveries
Fig 5: Deliveries Navigation
Click on Add icon from right panel. Enter Site and customer. Now from left menu click on Order Selection and select first order.
Fig 6: Selecting First Order
The first Order lines are added to the Delivery.
Now try to add second order. Click on the second order Sage X3 below first Order, Sage X3 will throw validation error as the order is restricted to 1 Invoice/Order.
Fig 7: Validation Error
This way we can restrict the single delivery creation for multiple orders.
Thus, we have checked how we can prevent combining orders into one delivery in Sage X3, keeping your invoices clear and organized.
Sage X3 is enterprise resource planning (ERP) product which help organization to manage all the operation of organization and database into a single software solution. Sage X3 contains list of modules like sales, purchase, inventory, project, financial and many more.
One of our clients is encountering an error “Field BPAADD(Alphanumeric) : mid$ Function not defined for the value given” when extracting the Excel export from the Purchasing Receipt Line Inquiry screens as shown in the screenshot below :
Fig01- Error on Receipt line inquiry screen while exporting the excel file
We have rectified the error and discovered that when the user opens a receipt line inquiry screen and fills in the necessary parameters to extract the output, the company name field contains junk characters. This discrepancy was not visible in the application, but upon further investigation, we found that it contained a trailing blank space in the application back-end server, as shown in the screenshot below :
Fig02- Receipt line inquiry screen
We have solved this error by accessing the application backend server and removed the trailing blank space from the supplier name(A V POLYMERS ) using an update query in the BPSUPPLIER and BPARTNER tables corresponding to the supplier (S0000000001) selected by the user
We have successfully resolved the error encountered during the extraction of the Excel export from the Purchasing Receipt Line Inquiry screens
About Us
Greytrix – a globally recognized and one of the oldest Sage Development Partners is a one-stop solution provider for Sage ERP and Sage CRM organizational needs. Being acknowledged and rewarded for multi-man years of experience and expertise, we bring complete end-to-end assistance for your technical consultations, product customizations, data migration, system integrations, third-party add-on development, and implementation competence.
Greytrix is a recognized Sage Champion Partner for GUMU Sage X3 – Sage CRM integration listed on Sage Marketplace and Sage CRM – Sage Intacct integration listed on Sage Intacct Marketplace. The GUMU Cloud framework by Greytrix forms the backbone of cloud integrations that are managed in real-time for the processing and execution of application programs at the click of a button.
For more information on our integration solutions, please contact us at sage@greytrix.com. We will be glad to assist you.
In Sage X3, we may come across this error ‘The certificate chain was issued by an authority that is not trusted’’ while trying to configure Application in the console. This issue occurs when you upgrade runtime to any version 95.2.85 and greater.
Fig01: PowerShell error
Cause:
Runtime version is 95.2.85 and greater for patch upgaradtion.
Old version of Powershell is installed in the server which is not compatible with Runtime 95.2.85 or greater.
Sage X3 has an accompanying Excel add-in that you can use to export data from grids in Sage X3 into a Microsoft Excel spreadsheet. In this blog, we will run through the steps involved in installing the add-in and using it for a simple export.
Integrating an Excel add-in with Sage X3 can be a useful way to enhance functionality and streamline processes.
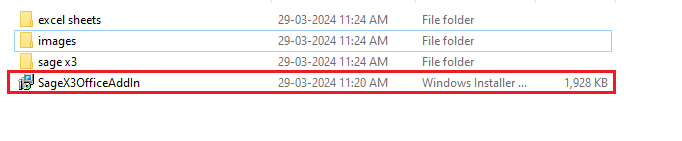
Navigate to: Administration–> Utilities–> Installation–> Install the add-in for office.
When you click on this menu item the add-in install file ‘SyracuseOfficeAddinsSetup.exe’ will be downloaded to the Downloads folder on your workstation.
Fig1: Add-in install file
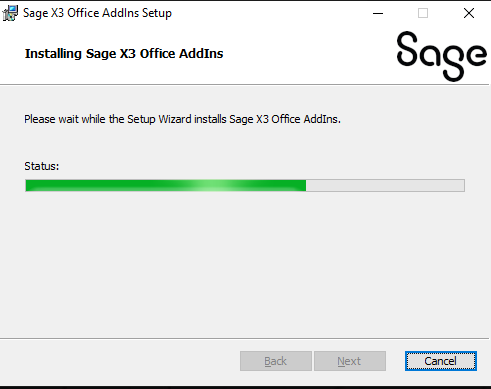
You can then launch the installation by double-clicking on the ‘SyracuseOfficeAddinsSetup.exe’ file and the installation will start.
Fig2: Installation setup
If you have UAC (windows user access control) enabled, you may receive a warning during the installation, click yes to proceed.
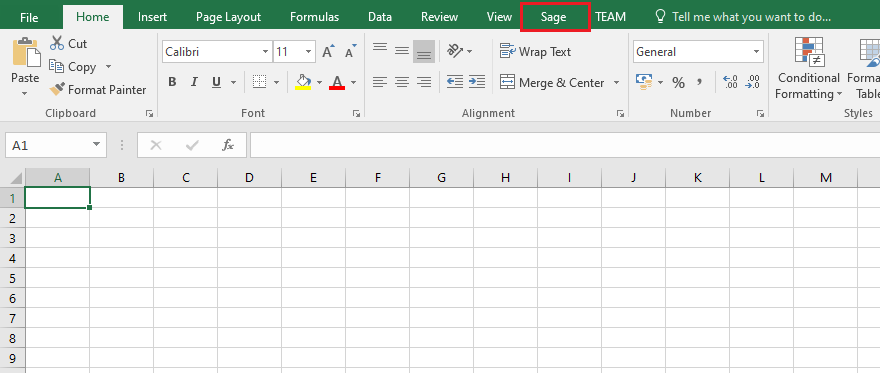
The Excel add-in is now installed on your workstation, when you launch Microsoft Excel, you will see Sage as an option in the ribbon.
Fig3: Microsoft Excel
Now that the add-in is installed you can export data from the grids in X3 to Excel for example.
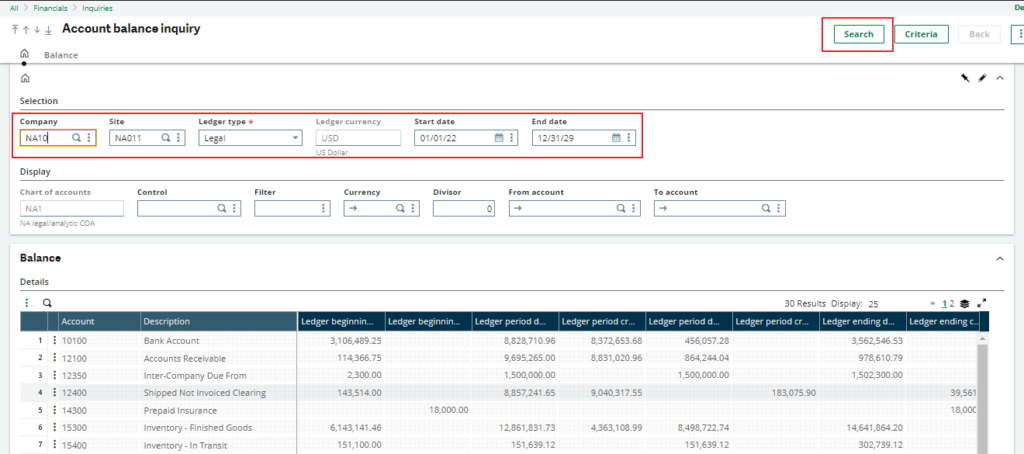
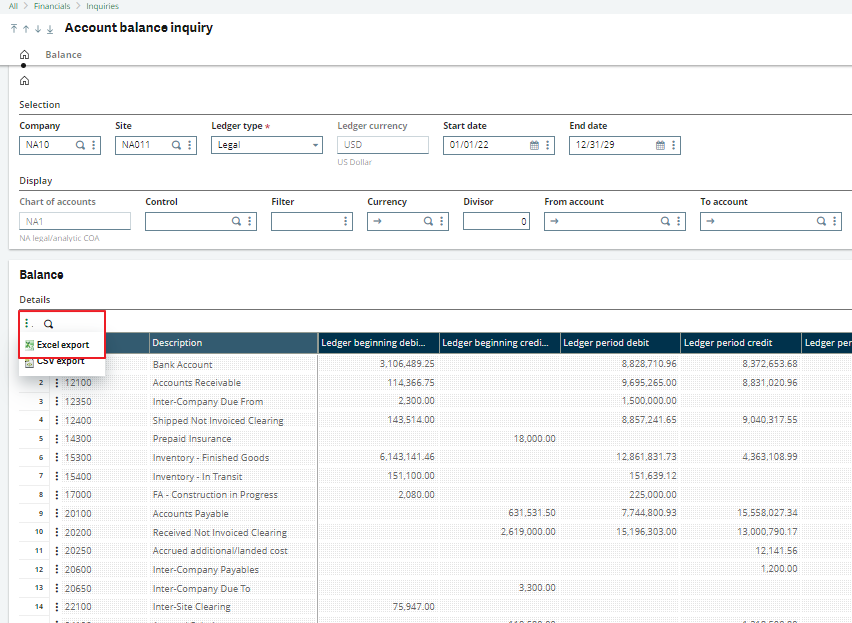
Navigate to : Financial–> Inquiries–> Account Balance.
Enter suitable parameters and press search to retrieve data.
Fig4 Account balance inquiry screen
We can now export the results in the grid to Excel by pressing the ‘Export to Excel’ below search results grid select ‘Excel export’.
Fig5: Export button
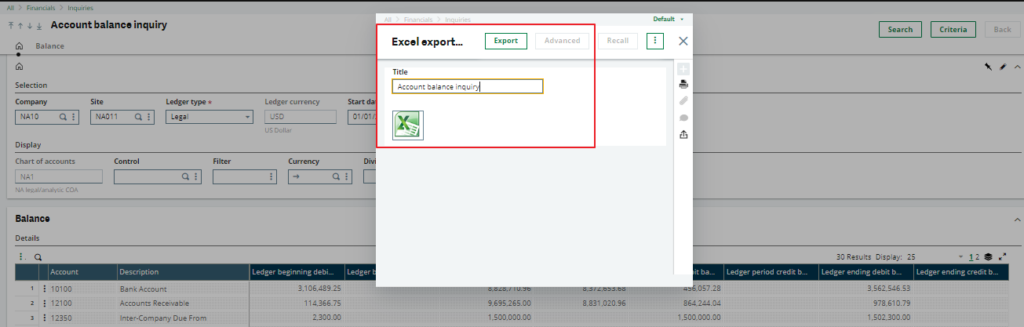
When you select either of these export options you will be presented with the Export Excel window, add a title/name for your export press export and then click the Excel Icon.
Fig6: Excel export
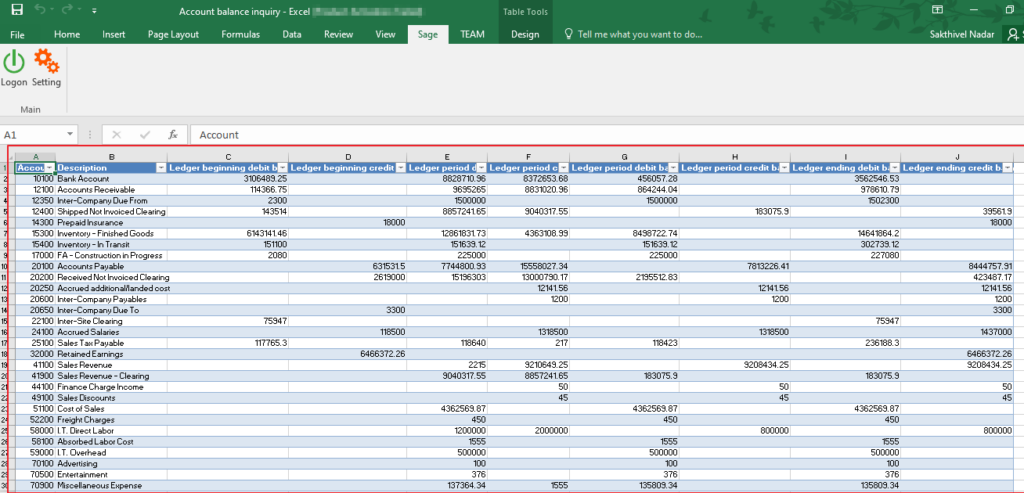
Your export will initiate, and Excel will launch on the workstation you may see this ‘protected view’ message when Excel starts in that case press ‘enable editing’.
Fig7: Enable editing button
You can now see your exported data in Excel and you are free to manipulate your data as needed.
In Sage X3, workflows are used to automate and streamline business processes by defining a sequence of tasks that need to be performed in a specific order. These tasks can involve approvals, reviews, or other actions necessary for the completion of a business process. Workflows in Sage X3 help organizations enforce consistency, reduce manual intervention, and improve efficiency.
In Sage X3, you can assign multiple signatures in a workflow on different objects to implement a multi-level approval process. This allows for more complex and controlled workflows, where different users or groups need to review and approve various stages of a business process. But when we create the custome workflow the signature history is not getting the proper flow the flags are not updated.
Here’s a step-by-step description of how to update the fields in the signature history table for a custom workflow in Sage X3:
STEP 1:-
Workflow Setup: First, you need to define the workflow itself. Go to the –>>”Workflow Setup” screen in Sage X3, where you can create and configure the workflow according to your business requirements.
Specify the objects for which you want to implement the workflow, such as purchase orders, sales orders, or expense reports.
STEP2:
After clicking on workflow rules,
Jump to: Assignment Rule: Create a New Assignment Rule
Signature Assignment: Once you have defined the signature levels, you can assign the relevant users or user groups to each level. This is done based on the roles and responsibilities of the users in your organization. Sage X3 allows you to easily select the appropriate users or groups from your system’s user database
STEP 3:-
-After clicking on the Assignment Rule display below the
-Enter the name of the assignment rule, the data model, and Number of ignatures.
-The “number of signatures” field specifies how many signatures will be used throughout the approval process.
Fig1.Add values
STEP 3:
After all the creation processes Save and validate the assignment rule and workflow rule.
Fig2.Add users
STEP 4:- After completing all the creation processes and successfully triggering the workflow to the next user, such as ‘TEST2,’ we observed in the signature history, as shown in Figure 4, that the signed flag was updated to ‘To sign.’ However, when the user modified the order and saved it, the workflow was triggered again with the updated order, and the signed flag was updated to ‘Cancelled,’ and the reason flag was updated to ‘Document modified.’ However, for the custom workflow, the signatures history table is not updated automatically, as is the case with the standard workflow. Therefore, we need to manually update the flag in the table.
Fig 3.Signature historyFig4. signature table
STEP 5: The signatures history data is stored in the ‘AWRKPARF’ workflow rules (signature) table. Therefore, we need to write code to update the flag during the modification process. After writing the code, the ‘Signed’ and ‘Reason’ flags are updated successfully. Refer to the below Figure 6.
Fig5.Workflow signature tableFig 6.Result
This blog help us to know about the use By implementing multiple signatures in workflows on different objects, Sage X3 enables you to create sophisticated approval processes that align with your organization’s specific requirements. This promotes better control, compliance, and efficiency in handling critical business operations an how to update the signature history table flags for the custom workflow .
We are able to produce reports, dashboards, and views with Sage Enterprise Intelligence. Additionally, SEI makes data analysis simple. Users may choose to view data in SEI in a different format at times. This blog post will explain how to see data in various formats within SEI. Figure 1 illustrates how only the data code is visible when a column is added to SEI dashboards and views.
Fig01: SEI data record
But occasionally, a user might like to add a code, a description, a title, or a mix of all four. Therefore, we need to take the actions listed below in order to accomplish that.
The following are steps to display data in different formats.
As seen in fig. 2, you must first access the data model screen in SEI and choose the field from the column screen.
Fig02: Data model screen
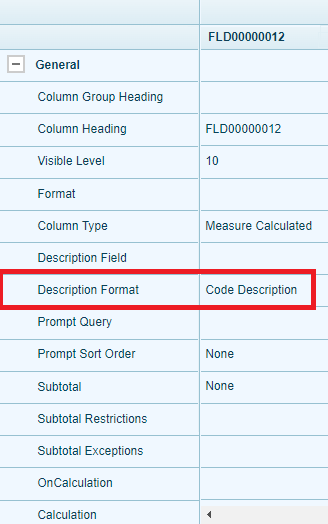
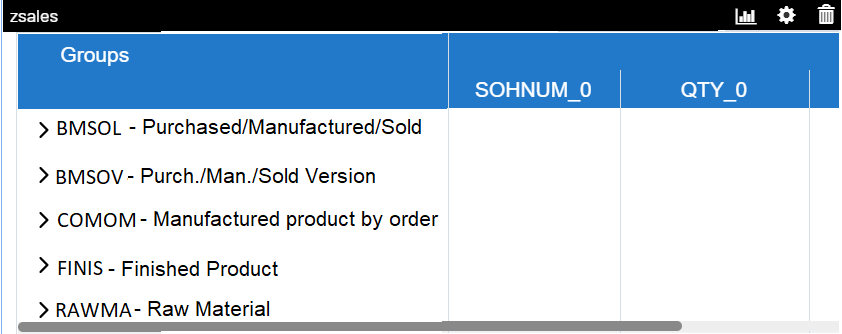
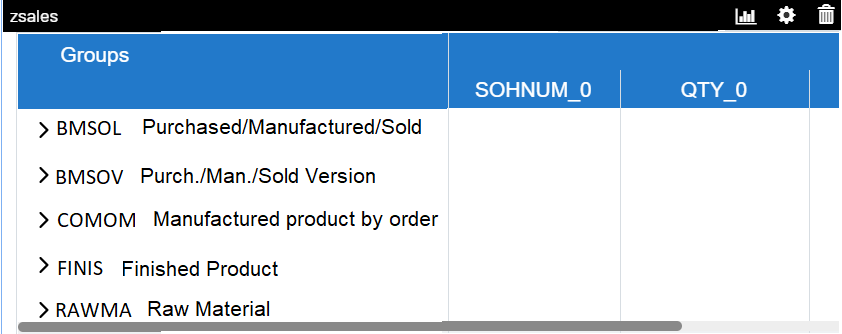
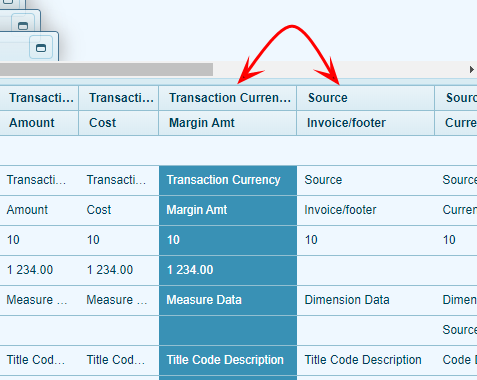
2. The following step is to choose the description format from the field where you want to enter the title or description code, as seen in fig 2. 3. As you can see, data is shown in several formats. Title code description: When using this format, the field name, code, and description for that specific field will be displayed with a space between them. Code for title description: Code is shown with a space between it and the title description. Only the title and code are displayed, separated by a space. Title and description only are displayed, separated by white space. Description of code: Just the code and a space are displayed. Code: Only Code and a space are displayed. Only the description is shown, separated by space. Code for description: Code is shown first, followed by a space. Title-Code-Description: Shows the code, description, and title together with
After setting the description format save the data model and add that field in dashboard or view. You can see the data as follows:
As shown in figure 3, how data will be display in Code-description format.
Fig03: Code description format
In fig 4 you can see that how data will be display in code description.
Fig04: Data
We can analyze data easily in SEI. In this blog we will see how to view data in different format in SEI. However, on sometimes, a user wants to add a title, a description, a code, or a combination of all four. Therefore, in order to do that, we must take the steps described above. 1. 2. you can see different formats to display data as follows. After setting the description format save the data model and add that field in dashboard or view.
One of our clients asked that the validation be added to the UTR number field in Sage X3 for the payment screens listed below.
“ADVP Payment Against Advance” and “PAYMT Payment Against Invoice”. The “POST” button for these payment windows shouldn’t be enabled until the required UTR number has been entered.
Typically, “UTR number” denotes the “Unique Transaction Reference’ number. Will get the UTR number from a bank while making the payment. so that It helps in tracking payments and is often used in banking and financial transactions for reconciliation purposes. On the recipient bank statement, the UTR number is visible on the received transfer. The exact format of the number can differ according to payment method.
Let’s examine the functionality in more detail:
The Payment Against Advance transaction entry “ADVP2404101000002” initially created by the user. The UTR no field is blank and because of that, our POST button is disabled as per our requirement. as seen in below screenshot.
Navigate to : AP-AR-Accounting-> Payments->Payment/Receipts entry-> Payment Against Advance
Now, User adds the data in UTR no field and saves the transaction entry. See the below screenshot, Post button is automatically enabled as per our requirement.
Fig 2 Payment against advance1
According to this, the same validation is working for the “PAYMT Payment Against Invoice” screen.
About Us
Greytrix – a globally recognized and one of the oldest Sage Development Partners is a one-stop solution provider for Sage ERP and Sage CRM organizational needs. Being acknowledged and rewarded for multi-man years of experience and expertise, we bring complete end-to-end assistance for your technical consultations, product customizations, data migration, system integrations, third-party add-on development, and implementation competence.
Greytrix is a recognized Sage Champion Partner for GUMU Sage X3 – Sage CRM integration listed on Sage Marketplace and Sage CRM – Sage Intacct integration listed on Sage Intacct Marketplace. The GUMU Cloud framework by Greytrix forms the backbone of cloud integrations that are managed in real-time for the processing and execution of application programs at the click of a button.
For more information on our integration solutions, please contact us at sage@greytrix.com. We will be glad to assist you.
In Sage X3, one of our client’s requirements was to have a way to get their attachments auto-tag to their respective transactions in a regular interval of time.
For this we’ve developed a customization in place that’ll not only fulfill the requirement with minimal user efforts but also take in consideration of several validations and redundant file attachments.
For this we’re referencing following paths and screenshots below:
Screen dictionary: All > Development > Script dictionary > Screens (GESAMK) Window dictionary: All > Development > Script dictionary > Windows (GESAWI)
-As shown in Fig. 1 we’ve created a folder “ATTACHMENTS-DROPBOX” within the application folder root directory which is where sub-directories for different transactions exist.
Fig. 2 – Original Attachment status in entry
-For reference we’ll be taking a Sales Order transaction, and as we can see the entry doesn’t have any attachments as shown in Fig. 2.
Fig. 3 – Sub-directories for transactions
Fig. 4 – Files deployed within the SO dropbox folder
-Now the user will have to drop all their attachment files within the respective transaction directories as shown in Fig. 3 and Fig. 4.
Note: The files will only be auto-attached if they follow below guidelines:
-The file name should be the same as Transaction entry no. with no special characters other than “-”. For example: If the entry no. is SOH/2024/ABC-1 then the file name will be SOH2024ABC-1.pdf -The file should be of known file formats only such as PDF, Excel, Txt. -Per transaction only 1 file will be considered till the file is auto-attached.
Fig. 5 – Files automatically removed after routine run
-Now once the user has properly deployed the files within the folders then the system will run the periodic routine and auto-attach the files to their entries. And once the routine runs its course then the attached files will be removed from the folders automatically as shown in Fig. 5.
Fig. 6 – Files shown within the transaction attachments list
-The attachments can then be previewed from the Transaction entry attachments list as shown in Fig. 6.
-If in case the files are deployed without the guidelines then the routine will skip their attachment process informing the user to correct the files.
This way we’ve the customization to provide a solution to manual attachments tagging in Sage X3.
About Us
Greytrix – a globally recognized and one of the oldest Sage Development Partners is a one-stop solution provider for Sage ERP and Sage CRM organizational needs. Being acknowledged and rewarded for multi-man years of experience and expertise, we bring complete end-to-end assistance for your technical consultations, product customizations, data migration, system integrations, third-party add-on development, and implementation competence.
Greytrix is a recognized Sage Champion Partner for GUMU Sage X3 – Sage CRM integration listed on Sage Marketplace and Sage CRM – Sage Intacct integration listed on Sage Intacct Marketplace. The GUMU Cloud framework by Greytrix forms the backbone of cloud integrations that are managed in real-time for the processing and execution of application programs at the click of a button.
For more information on our integration solutions, please contact us at sage@greytrix.com. We will be glad to assist you.
This blog article will guide you through creating a workflow aimed at sending email notifications containing log files in the event of issues occurring within the Stock Accounting Interface or the WIP Accounting Interface. These problems typically stem from integration conflicts with the Stock or WIP interface or from operator queries disrupting other Sage X3 operations. Please note that only system administrators have the necessary permissions to construct these workflows.
1] Navigate to Usage > Batch Server > Task Management. Select the task for which you want to apply. Tick the Message-User checkbox.
Fig01: Task Management
2] Create notification to generate an email, go to setup > workflow > Notification. Create notification, active and validate.
Fig02: Notifications
This will allow us to keep track of errors in query management.
In Sage X3, adjustment rules for daylight saving time (DST) typically involve configuring the system to automatically adjust for changes in time when DST begins or ends. This ensures that date and time calculations within the system remain accurate despite the shift in local time.
Utilize this feature to establish transition guidelines for Daylight Saving Time (DST) across various global time zones.
Global time zones serve to convert dates and times transmitted to the Production Scheduler into the standard time reference “UTC” (Coordinated Universal Time).
Fig01: Navigation Page
Navigate to:
Common data -> Common data -> Time zones -> Adjustment rules of daylight saving time
Fig02: Daylight saving time
For creation, we need to select Create button from action or you can edit the rule from previous created rules.
The regulations governing the commencement and conclusion of Daylight Saving Time (DST) can vary, with changes occurring annually in some time zones. To ensure accurate conversion between time zones and UTC for Production Scheduler, you must input and update time zone details using a specified procedure. This involves adhering to the following sequence of steps:
1. Establish global time zones within the Time zones function (TIMEZONEINFO).
2. Once configured, set the PSTIMEZONE – Server time zone parameter (found in the EXAPP chapter, MIS group) to the time zone where your server is located.
3. Specify Daylight Saving Time (DST) transition guidelines for global time zones in the Change to daylight saving time function (TIMETRANS).
4. Define the transition rules for Daylight Saving Time (DST) within this function (TIMEADJUST).
Fig03: Adjustment rule setup
Importance of every field has elaborated below:
Code:
This field serves to designate a time zone identifier. It must correspond to the name of a time zone specified in the Daylight saving time field (TADCOD) within the Time zones function.
A time zone identifier typically denotes the local time of a region or country. For instance, “ACWST” or “Aus Central W. Standard Time”.
Description:
This field is utilized to provide a description of Daylight Saving Time (DST) for the respective time zone. It may include the time zone identifier along with a seasonal reference, such as “ACWST – Aus C W Std Summer” or “AUS Fall Central West Std Time”.
Start date:
This field is employed to define the effective date of this transition rule.
Time zone difference:
Input the number of hours the time will adjust by on the specified start date. If the time zone transitions to an earlier time, precede the figure with a minus sign (“-“).
Daylight saving time start:
This field is essential for defining a Daylight Saving Time (DST) transition rule code.
For example, a DST transition occurring on the 4th Monday of November at 03:00 am would be represented by the code NOV_MON_4_3. A change to DST at 02:00 am on the 4th of March indefinitely would be denoted by the code MAR_FXD_4_2.
Day of the week:
This field automatically displays the day of the week when the transition takes place, based on the selected Daylight saving time start (TTRCODSTR) transition rule.
Month:
This field automatically displays the month when the transition occurs, based on the selected Daylight saving time start (TTRCODSTR) transition rule.
Time:
This field automatically displays the time of day when the transition happens, based on the selected Daylight saving time start (TTRCODSTR) transition rule.
Week:
This field automatically displays the week of the month when the transition occurs, based on the selected Daylight saving time start (TTRCODSTR) transition rule.
Daylight saving time end:
This field is necessary for defining a Daylight Saving Time (DST) transition rule code for the end of DST.
For instance, a DST transition on the 4th Monday of March at 03:00 am would be represented by the code MAR_MON_4_3. A change to DST at 02:00 am on the 4th of November indefinitely would be denoted by the code NOV_FXD_4_2.
Similar to TTRCODSTR, even if the time zone does not transition to DST, a transition rule code must be defined. This can be a fixed code like JAN_FXD_1_0, indicating a permanent (non-) change to DST occurring on the 1st of January at midnight.
It’s crucial to follow the specific guidelines and recommendations provided in the Sage X3 documentation or consult with your system administrator to ensure that DST adjustment rules are correctly configured for your organization’s needs. Incorrect DST settings can lead to discrepancies in date and time calculations, potentially affecting various aspects of system functionality.
In this blog, I’ll demonstrate how to allow X3 to access specific directories beyond its default folders. These external storages are useful places to keep documents.
Below are the steps, simplified to the fullest extent.
Step 1: You can find the directory at (…\runtime\cfg). Inside this directory, you’ll see a file named configRuntime. Before making any modifications to this file, it’s crucial to create a backup copy and store it on a separate drive.
Fig01: configRutime path
Step 2: Once you’ve successfully backed up the configRuntime.json file, proceed to modify the original. Using a standard text editor. Copy the following example and input your path while ensuring the structure remains intact and save the file
Example:
{
“path”: “c:\\Documents”,
“extensions”: [“*”],
“writable”: true
},
As illustrated in the image below.
Fig02: config custom path
Note: Using “*” in the extensions signifies that it grants access to any file within the specified path. If you wish to limit access to specific file types, you can replace “*” with the names of those types, such as “pdf” or “doc”. Remember to separate the types using commas. Ensure to include double backslashes in your path; it’s essential.
Step 3: Navigate to Usage > Usage > X3 Storage Areas and include the path within the Storage Areas, as illustrated below:
Fig03: Create volume Fig04: Volume root directory
Afterward, input the Volume name, which will be visible on the File List, along with a descriptive Description. Finally, provide the Root path.
Fig05: File listFig06: File list access
After returning to the File List section, you’ll notice the Test volume generated in this demonstration. Simply click on the Test link to designate that volume. Next, navigate to the right side of the Volume screen and select File List to display the roster of files housed within that directory.
Using the X3 Storage Areas functionality, we can access directories located outside of the default Sage directory. This capability enables us to easily access and read files stored on other drives.
In Sage X3, the concept of “annual envelopes” refers to predefined budgets or allocations that are set aside for specific purposes within an organization, typically on an annual basis. These envelopes are often used to manage expenses, track spending, and allocate resources effectively across various departments or cost centers.
The renewal of annual envelopes in Sage X3 involves the process of extending the validity or availability of these envelopes for another year. This renewal process is essential for ensuring that organizations can continue to utilize these budgetary allocations effectively over time, aligning with their financial planning and operational requirements.
The renewal process typically involves updating the envelope records within Sage X3 to reflect the new validity period or budget allocation for the upcoming year. This may include adjusting parameters such as the expiration date, renewal date, budget amounts, and any associated cost centers or projects.
This function is designed to facilitate the creation of the new fiscal year budget by duplicating envelopes, budgets, and annual budget lines to streamline data entry processes:
– When renewing, the budgeted amounts are presented:
– At the same level as before renewal.
– Adjusted by a percentage, which can be specified only after selecting the envelope for renewal.
The renewal of annual envelopes involves two stages:
1. Select envelopes for renewal:
Choose the annual envelopes to renew and specify selection criteria.
Envelopes eligible for renewal are those with statuses like “Entered,” “To approve,” or “Approved,” marked as “Renewable.”
Figure 2. Selection envelops for renewal
2. Selection results:
After applying selection criteria and activating the “Display/Refresh” button.
Selected annual envelopes are shown in a grid for renewal.
Columns display information like Level, Envelope, Description, Currency, Amount, Reserve, and Account.
The “Renew” column allows envelope selection, and the “Evolution of amounts in %” column facilitates generating new envelopes, budgets, and budget lines with adjustments.
Figure 3: Selection results.
The renewal process for annual envelopes does not automatically close budget lines from the previous fiscal year. Instead, the renewal utilizes the amounts from the envelope, budget, and budget line during the renewal process as the basis for calculation.
The renewal process includes the following updates:
In the issuing envelope:
The “Renewable” flag is checked and disabled.
A message “Renewal (code of the new created envelope) on xx.xx.xxxx” is displayed.
In the receiving envelope:
New envelopes display the code of the original envelope alongside their new code.
A message “Renewed envelope (code of the original envelope) since xx.xx.xxxx” is shown.
The total pre-committed, committed, achieved, and consumed amounts of the original envelope are cleared.
Figure 4: Renewable flag from Budget envelopes
The renewal creates new envelopes, budgets, and lines based on amounts from the original envelopes. These amounts may be adjusted by a specified factor.
Envelopes, budgets, and lines are in the “Entered” status and can be modified as needed before approval.
Figure 5. Results
Renewal annual envelopes in Sage X3 is a critical aspect of financial management and planning, as it allows organizations to maintain accurate and up-to-date budgetary information, track expenses, and ensure compliance with financial regulations and policies. By renewing annual envelopes on a regular basis, organizations can effectively manage their financial resources, make informed decisions, and achieve their strategic objectives.
In logistics and supply chain management, internal containers refer to the various types of packaging or storage units used to transport and store goods within a facility or during transportation. These containers can include pallets, boxes, packs, big bags, barrels, bins, and others.
Assigning unique identifiers, such as license plate numbers, to these internal containers is a common practice. These identifiers help in tracking and managing the movement of goods within the supply chain. The use of barcodes on labels facilitates efficient scanning and identification of the containers, which is essential for inventory management, order fulfilment, and other logistical operations.
The functional scope of internal logistics units in Sage X3 covers several key aspects related to the management of internal containers within the stock data. These aspects include:
Managing Internal Containers in Stock Data:
Creating unique license plate numbers and linking them to products.
Ensuring uniqueness of license plate numbers across all sites and companies.
Validating that each container is associated with only one location at a time.
Tracking stock movements related to internal container handling.
Creating Internal Containers during Stock Receipts:
Generating license plate numbers dynamically during stock receipts.
Associating stock receipts with existing license plate numbers.
Handling License Plate Numbers:
Moving products between different license plate numbers (either new or existing containers).
Consolidating products from multiple containers into a single container (either new or existing).
Printing labels containing barcode and other relevant information.
Accessing and viewing the contents of an internal container.
Managing license plate numbers within existing workflows.
By encompassing these functionalities, Sage X3 facilitates efficient management of internal containers throughout various stages of the logistics and supply chain processes, including receipt flows and internal transactions. This comprehensive approach helps organizations streamline their inventory management, enhance traceability, and improve overall operational efficiency.
Details of License plate number:
Will be created from a sequence number (mass creation) or, entered manually
It can be active or inactive.
if no product is linked to it, it will set to the Free status, or to the In stock status if at least one product is linked to it.
Is defined by stock site, which can be modified when the status is Free. It is unique at the folder level (site and company).
Can be set to single-product and/or single-lot management. This setup can be modified as long as the license plate number is Free.
Displays the first use date as soon as stock is associated with it.
Displays the last use date once the container has been used and is set to Free again.
Is displayed in the Stocks table (STOCK) and in the Stock movements table (STOJOU).
Can be deleted or reused as soon as it is set to Free again.
In the next blog we will see the detailed configuration of License Plate Numbering in sage X3.
In this blog, we’ll explore the step-by-step process of creating data models, linking tables, adding fields.
Once the tables have been added and linked, fields can be added to the Data Model.
Click on the to open the Fields.
Right-click on the Field to access to these options:
Add Column,
Join to Specific Values,
Remove from Columns.
Fig. 1. Add column
Note:
Fields that have already been added and joined will be highlighted in blue.
Fields highlighted in blue with bold black font means they are added but not joined.
Fields can be removed from the Data Model by right-clicking on the Field name and selecting Remove from Columns. It is possible to select multiple Fields by holding the Ctrl key and add them at the same time.
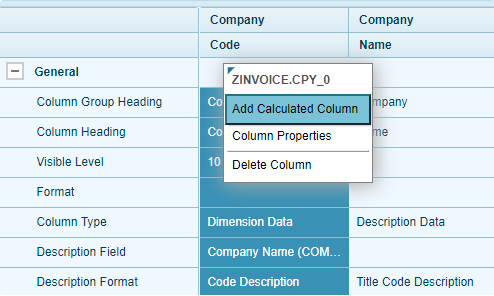
Calculated fields can also be added to a Data Model by selecting Add Calculated Column from the Insert drop-down menu or by clicking on the Add Calculated Column in the tool bar or by right-clicking in the Fields Table Section and selecting Add Calculated Column.
Fig. 2. Add Calculated Column
And also multiple fields were added by double-clicking on them.
Fig. 3. Add multiple fields
The Fields will always be added at the end of the list.
You can easily re-order them by doing a drag and drop.
Fig. 4. Re-order
The following three buttons in the toolbar can be used to resize the columns.
Thus, we explored adding, removing, and creating calculated fields within the data model.
In Sage X3, when we add a field with dimensions, it will display a description only for the first field/dimension, while the others remain blank, as shown in the following figure. Here, we’ll explore a step-by-step guide on how to change the headings of dimension fields in Sage X3, utilizing local menus and evaluated titles.
Fig 2 Window Preview – Before Assigning Multiple Titles
Step 1: Creating Local Menu – Message
The first step involves creating a Local Menu – Message corresponding to the number of dimensions you want to assign headings to.
For instance, if you have a field named ‘ZTEST’ with three dimensions, you’ll need to create a Local Menu – Message with three values, each representing a dimension header.
Fig 3 Local Menu Screen
Step 2: Modifying Field Descriptions
Navigate to the development screen and select the dimension field whose heading you want to change. Replace the description with a ‘$’.
Fig 4 Development Screen – $ Description
Step 3: Setting Evaluated Title
After changing the description to ‘$’, click on the three dots next to the field and select the ‘Evaluated title’ option. This action will open a new screen where you can enter a formula in the ‘Evaluated title’ field.
Fig 5 Development Screen – Evaluated Title
Formula Example:
#mess(Local Menu Code, Local Menu Chapter, 1)
In the formula, the mess function is used to print the title. It takes three parameters:
The Local Menu Code.
The Local Menu Chapter.
A value (0 or 1) to access the Adonix message file or otherwise.
For instance, if we have a formula like #mess((indice+1), 21999, 1), the first parameter (indice+1) will iterate through all Local Menu Codes, the second parameter (21999) assigns the Local Menu Chapter, and the third parameter (1) denotes the currently selected language.
Fig 6 Evaluated title entry screen
Step 4: Saving and Previewing Changes
After adding the formula, click ‘OK’ and save the changes. Validate your screen, then navigate to the Window menu and preview your screen. You should now see the different title headers for dimensions as per the Local Menu – Message values set earlier.
Fig 7 Window Preview – After Assigning Multiple Titles
By following these steps, you can effectively customize the headings of dimension fields in Sage X3, ensuring clarity and ease of use for users interacting with your system. This simple customization can significantly improve the user experience and streamline data management processes.
About Us
Greytrix – a globally recognized and one of the oldest Sage Development Partners is a one-stop solution provider for Sage ERP and Sage CRM organizational needs. Being acknowledged and rewarded for multi-man years of experience and expertise, we bring complete end-to-end assistance for your technical consultations, product customizations, data migration, system integrations, third-party add-on development, and implementation competence.
Greytrix is a recognized Sage Champion Partner for GUMU Sage X3 – Sage CRM integration listed on Sage Marketplace and Sage CRM – Sage Intacct integration listed on Sage Intacct Marketplace. The GUMU Cloud framework by Greytrix forms the backbone of cloud integrations that are managed in real-time for the processing and execution of application programs at the click of a button.
For more information on our integration solutions, please contact us at sage@greytrix.com. We will be glad to assist you.


 Sage X3 – Sage CRM integration listed on