Quantcast
Channel: Sage X3 – Tips, Tricks and Components
Viewing all 1515 articles
Browse latest View live

Exporting Navigation page in Sage X3

$
0
0

In the previous blog, we learned how to export menu items using customization management. In this blog, we will learn how to export a navigation page using customization management. Which we can import into the desired environment.

Follow the below steps to achieve this functionality:

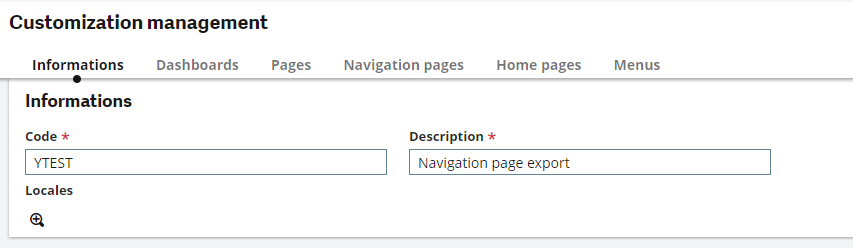
  1. Create Customization management:

Follow the below patch to access ‘Customization Management’:

Navigation page > Administration > Utilities > Exports > Customizations management.

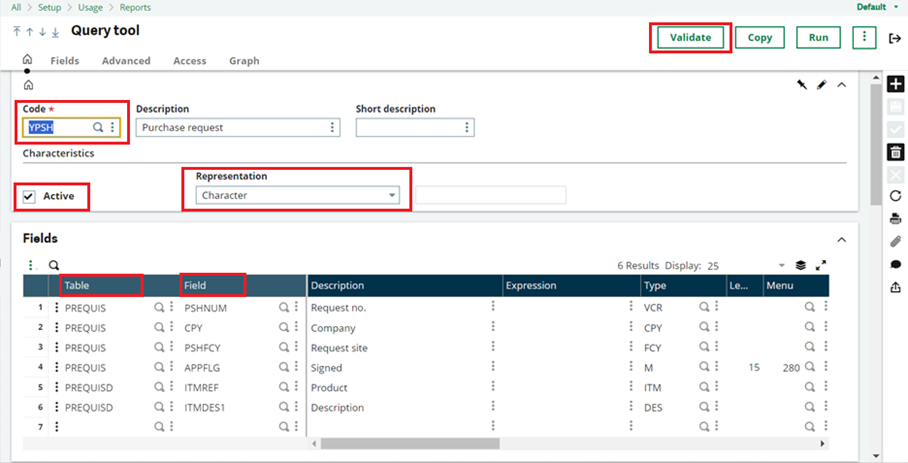
Create new code, description and select the navigation page checkbox options export as shown in the below screenshot.

Creating Customization management
Fig01: Creating Customization management
Navigation Pages
Fig02: Select Navigation pages

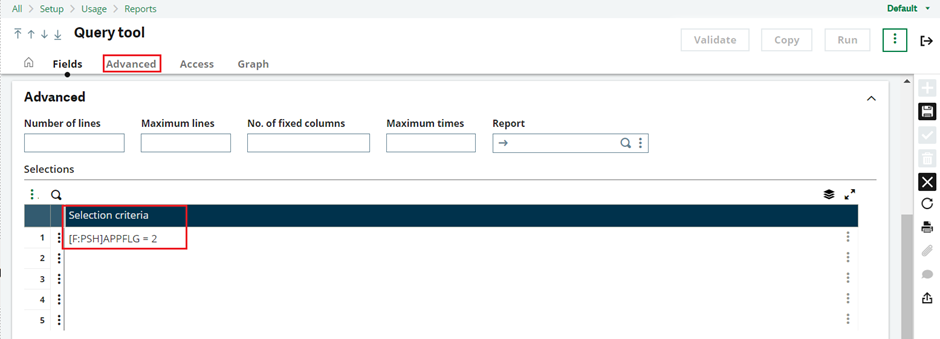
Fill in the filters as desired.

  1. Export the customization

After creation of the Customization, Click the below shown button and Select ‘Export Customization’.

Export Customization
Fig03: Export Customizations

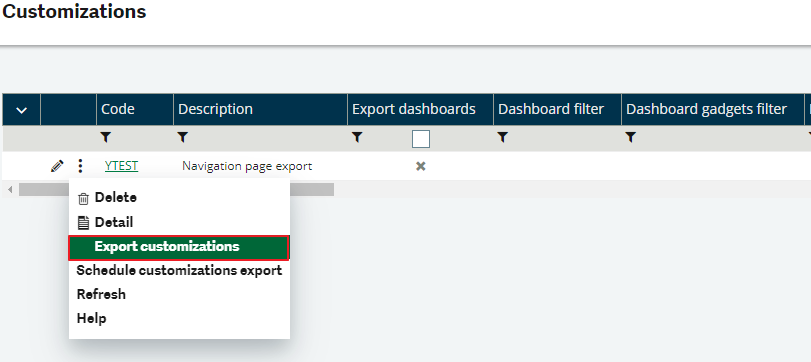
Choose the format of export and click ‘OK’

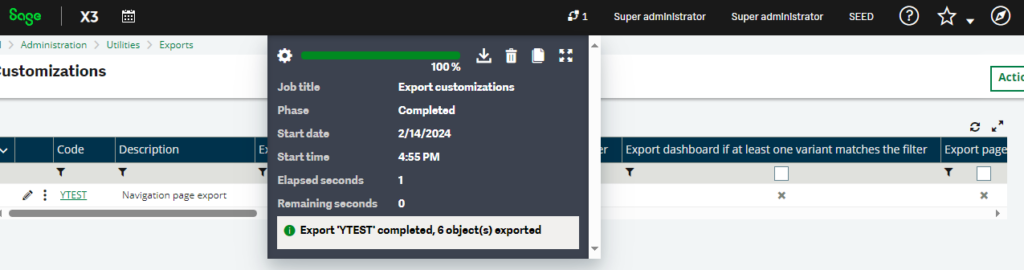
After successfully creating the customization, proceed to click the designated button and select ‘Export Customization.’

Choose the desired export format and confirm your selection by clicking ‘OK.’ Once the export process is complete, download the generated file by clicking on the download icon, as illustrated in the accompanying screenshot.

Download file
Fig04: Download the file

This file encapsulates the navigation page ready for seamless transfer.

In conclusion, the two blogs provide a comprehensive guide on how to use customization management in exporting, Menu items and navigation pages. This process is crucial as it allows these elements to be seamlessly imported into the desired environment, Ensuring consistency and efficiency.

About Us

Greytrix – a globally recognized Premier Sage Gold Development Partner is a one-stop solution provider for Sage ERP and Sage CRM needs. Being recognized and rewarded for multi-man years of experience, we bring complete end-to-end assistance for your technical consultations, product customizations, data migration, system integrations, third-party add-on development and implementation expertise.

Greytrix caters to a wide range of Sage X3 (Sage Enterprise Management) offerings – a Sage Business Cloud Solution. Our unique GUMU™ integrations include Sage X3 for Sage CRMSalesforce.com and Magento eCommerce along with Implementation and Technical Support worldwide for Sage X3 (Sage Enterprise Management). Currently we are Sage X3 Implementation Partner in East Africa, Middles East, Australia, Asia. We also offer best-in-class Sage X3 customization and development services, integrated applications such as POS | WMS | Payment Gateway | Shipping System | Business Intelligence | eCommerce and have developed add-ons such as Catch – Weight  and Letter of Credit for Sage X3 to Sage business partners, end users and Sage PSG worldwide.

Greytrix is a recognized Sage Rockstar ISV Partner for GUMU™ Sage X3 – Sage CRM integration also listed on Sage Marketplace; GUMU™ integration for Sage X3 – Salesforce is a 5-star app listed on Salesforce AppExchange.

For more information on Sage X3 Integration and Services, please contact us at x3@greytrix.com. We will be glad to assist you.


Understanding Class Management in Sage X3

$
0
0

Have you ever wondered how software systems like Sage X3 efficiently manage data entities, such as customers, products, and sales orders? The answer lies in the concept of classes, a crucial component of the Sage X3 ecosystem. In this blog, we will explore the intricacies of class management within Sage X3 and how it plays a pivotal role in structuring and handling data entities.

Introduction:

At the heart of Sage X3’s data management lies the concept of classes. A class serves as a blueprint for managing various entities, ranging from customers to general ledger entries, products, sales orders, and more. In this blog, we will delve into the details of class management, its components, and its significance within Sage X3.

Class Essentials:

In Sage X3, classes are essential for structuring and managing data entities. The information within a class is organized into distinct sections, each serving a specific purpose. These sections include:

1. Header Information:

   – Contains details for identifying the class, including header code, description, and type.

2. General Section:

   – Describes the primary information related to the class, including management mode, type, and more.

3. Main Table:

   – Defines the primary database table used when the class is persistent and details about the main index.

4. Additional Information:

   – Includes activity codes, technical module associations, cache settings, search-ability, and more.

5. Collection:

   – Describes class collections, their attributes, and settings.

6. Scripts:

   – Adding custom code related to supervisor events, especially for CRUD (Create, Read, Update, Delete) management.

7. Methods Section:

   – Defines additional methods and operations available for the class, distinguishing between operations and methods.

8. Standard Methods Section:

   – Describes the availability of standard CRUD methods and other methods supported by the supervisor layer on the class.

9. Properties Section:

   – Lists and defines the properties associated with the class, including data types, menus, control tables, and more.

10. Mapping Section:

    – Specifies how CRUD operations are linked to the database tables, including the main table and child classes.

11. Miscellaneous Section:

    – Contains additional information for access rights, filters, history, and linked objects.

Class Management:

Class management in Sage X3 involves configuring the class to ensure data integrity, optimize performance, and enable seamless data interactions. This section covers settings like reading, creation, modification, deletion, filters, and more.

Validation:

One of the critical aspects of class management is validation, where the class description is checked for global consistency. During validation, code generation occurs, creating scripts and business logic associated with CRUD operations. It’s important to note that any generated program should not be modified, as it will be automatically recreated during validation.

Hierarchy:

The hierarchy feature offers a visual representation of class relationships. This is particularly useful for understanding how classes are connected and how data flows within Sage X3.

In the world of Sage X3, class management is the backbone of data entity handling. Understanding the intricacies of classes and their various components is essential for optimizing data management, maintaining data integrity, and ensuring efficient data interactions within your Sage X3 system.

As you venture further into the world of Sage X3, a strong grasp of class management will empower you to harness the full potential of this powerful enterprise resource planning (ERP) solution. Whether you’re configuring classes for customers, products, or other data entities, the knowledge shared in this blog will serve as your guiding light.

About Us

Greytrix – a globally recognized Premier Sage Gold Development Partner is a one-stop solution provider for Sage ERP and Sage CRM needs. Being recognized and rewarded for multi-man years of experience, we bring complete end-to-end assistance for your technical consultations, product customizations, data migration, system integrations, third-party add-on development and implementation expertise.

Greytrix caters to a wide range of Sage X3 (Sage Enterprise Management) offerings – a Sage Business Cloud Solution. Our unique GUMU™ integrations include Sage X3 for Sage CRMSalesforce.com and Magento eCommerce along with Implementation and Technical Support worldwide for Sage X3 (Sage Enterprise Management). Currently we are Sage X3 Implementation Partner in East Africa, Middles East, Australia, Asia. We also offer best-in-class Sage X3 customization and development services, integrated applications such as POS | WMS | Payment Gateway | Shipping System | Business Intelligence | eCommerce and have developed add-ons such as Catch – Weight  and Letter of Credit for Sage X3 to Sage business partners, end users and Sage PSG worldwide.

Greytrix is a recognized Sage Rockstar ISV Partner for GUMU™ Sage X3 – Sage CRM integration also listed on Sage Marketplace; GUMU™ integration for Sage X3 – Salesforce is a 5-star app listed on Salesforce AppExchange.

For more information on Sage X3 Integration and Services, please contact us at x3@greytrix.com. We will be glad to assist you.

Roadmap to Key Sage X3 Implementation Phases

$
0
0

In today’s dynamic business environment, organizations face ongoing challenges in maintaining operational alignment, simplifying processes, and fostering sustainable growth. Regardless of size or scale, selecting an appropriate enterprise resource planning system (ERP) is pivotal in achieving desired outcomes. The quest for an impactful ERP solution, such as Sage X3, is driven by the need to enhance operational efficiency and business effectiveness.

As Greytrix, a reputable provider of comprehensive business management solutions, we recognize the significance of addressing these challenges. Serving as a certified Sage X3 Consulting & Implementation Partner, our mission is to support businesses in optimizing system performance and refining Sage X3 functionalities to drive optimal outcomes.

But wait before you start; let’s discuss how to make your Sage X3 Implementation journey a breeze.

We’ll discuss your business needs and aspirations to chart a clear path forward. Once these are clarified, the first step is to develop a solid project plan. We’ll sit with your team, assess requirements, define objectives, and ensure everyone is aligned and committed to the journey ahead.

Now that we have a concrete plan, we’ll see how to customize your Sage X3 and fit it like a glove. Our expert team will fine-tune settings, configure modules, and ensure seamless integration. Like a bespoke suit, Sage X3 will be tailored precisely to your specifications, enhancing functionality and efficiency.

We’ll thoroughly evaluate Sage X3 to guarantee optimal performance. We’ll simulate various scenarios, meticulously check all functionalities, and address any issues promptly. We aim to eliminate any potential surprises down the line, ensuring a smooth and reliable system.

With everything in place, it’s time to launch Sage X3 across your organization. We’ll oversee a seamless implementation process and provide comprehensive training to ensure your team feels confident and proficient with the new system.

Congratulations on reaching this milestone! However, the journey continues. We’ll continue to monitor performance, make necessary adjustments, and provide ongoing support to maximize Sage X3’s benefits.

Our expertise and commitment drive transformative results for your organization with Sage X3. So, why wait? Let’s start this journey together and make the most of Sage X3!

About Greyrtix:

Greytrix is a leading provider of best business management solutions. As your Sage X3 consulting and implementation partner, we can help you achieve seamless automation, higher productivity, and efficiency with our industry-driven solutions.

How to solve the error@“Period not defined or processing prohibited on this date” while validating the sales delivery.

$
0
0

Sage X3 is enterprise resource planning (ERP) product which help organization to manage all the operation of organization and database into a single software solution. Sage X3 contains list of modules like sales, purchase, inventory, project, financial and many more.

One of our clients is encountering an error “Period not defined or processing prohibited on this date” when trying to validating the sales delivery transaction, as shown in the screenshot below :

New Stuff: Roadmap to Key Sage X3 Implementation Phases

Fig01: Error on sales delivery screen

To overcome this error, please follow the steps below:

Step 1 : Please follow this path: All > Common data > General accounting tables > Periods

We identified the error and found that the Period Status is ‘open,’ but the stock status is ‘closed’ for the same month in which the sales delivery was created, as shown in the below figure.

Fig02: Fiscal year period screen(1)

Step 2 : Set the Stock Status to “open” and click on “save,” as shown in the below figure.

Fig03: Fiscal year period screen(2)

By following the above steps, we have successfully resolved the error encountered during the validation of the sales delivery transaction.

About Us

Greytrix – a globally recognized Premier Sage Gold Development Partner is a one-stop solution provider for Sage ERP and Sage CRM needs. Being recognized and rewarded for multi-man years of experience, we bring complete end-to-end assistance for your technical consultations, product customizations, data migration, system integrations, third-party add-on development and implementation expertise.

Greytrix caters to a wide range of Sage X3 (Sage Enterprise Management) offerings – a Sage Business Cloud Solution. Our unique GUMU™ integrations include Sage X3 for Sage CRM, Salesforce.com and Magento eCommerce along with Implementation and Technical Support worldwide for Sage X3 (Sage Enterprise Management). Currently we are Sage X3 Implementation Partner in East Africa, Middles East, Australia, Asia. We also offer best-in-class Sage X3 customization and development services, integrated applications such as POS | WMS | Payment Gateway | Shipping System | Business Intelligence | eCommerce and have developed add-ons such as Catch – Weight and Letter of Credit for Sage X3 to Sage business partners, end users and Sage PSG worldwide.

Greytrix is a recognized Sage Rockstar ISV Partner for GUMU™ Sage X3 – Sage CRM integration also listed on Sage Marketplace; GUMU™ integration for Sage X3 – Salesforce is a 5-star app listed on Salesforce AppExchange.

For more information on Sage X3 Integration and Services, please contact us at x3@greytrix.com. We will be glad to assist you.

Carry-forward of commitments functionality in sage X3

$
0
0

Carrying forward commitments in Sage X3 typically refers to the process of transferring or rolling over outstanding commitments from one accounting period to the next. Commitments often represent planned or anticipated expenses that have not been realized or invoiced yet.

The commitment carryforward feature transfers commitments associated with a sales order from the final period of one fiscal year to the initial period of the subsequent year.

This feature is utilized to postpone unresolved pre-commitments and commitments from the fiscal year that concludes to the beginning of the next fiscal year.

To access this function navigate to :

Financials -> Financials -> Budgets -> Carryforward of commitments

Figure 1: Navigation page

The procedure is executed through a company-specific query (BUOCMMREP) designed to identify purchase request and order lines currently in progress, not yet reconciled for a fiscal year, to carry them forward to the next fiscal year under “Operating budgets/Budget closing/Commitments deferring.”

Figure 2: Selection criteria

The header information on the screen is utilized to define the primary selection criteria: the Company and the fiscal year for which the entry manages the start and end dates. It also governs the update of the receiving fiscal year along with its start and end dates.

To refine the selection and limit the objects to be examined, additional criteria can be applied:

  1. Site Ranges: Only the sites linked to the specified company are visible in the selection.
  2. Document types: The selection can be narrowed down to either purchase orders or orders only. By default, both documents meeting the criteria are displayed.

Activating the “Display/Refresh” key reveals the list of budget envelopes corresponding to the selection in the table.

The selection is capped at a maximum of 500 lines. If this limit is exceeded, a “full grid” message signals that the selection surpasses the authorized 500 lines. Clicking “OK” displays the initial 500 lines. To reduce the selection, utilize additional criteria such as Sites and Document Types.

Figure 3: Commitments

After inputting the chosen criteria and triggering the “Display/Actualize” function, the designated purchase lines are presented in a grid, which may or may not be utilized for initiating the carry-forward process.

The displayed columns serve an informative purpose, presenting details such as document type, document number, date, commitments, envelope, entity, account, amount to defer, currency, and budget. Modification of these columns is not permitted, with the exception of the following:

  1. Defer Column: The selection of all displayed purchase lines can be executed in a single operation by clicking on “Check/Uncheck all.” This selection can be reversed using the same button.
  2. Detail column: The magnifying glass icon facilitates direct access to the purchase request or order.

Contextual buttons, accessible through a right-click and selection within the list, serve the following purposes:

  • Sorting purchase lines by document number, envelope number, entity, and account budget.
  • Accessing details related to the order, envelope, and pre-commitments or commitment.

Figure 4: Carryforward commitments

At the conclusion of a fiscal year, certain purchase requests (those not yet ordered or only partially ordered) and some orders that haven’t been invoiced or are only partially invoiced will be either ordered or invoiced in the subsequent fiscal year. To accommodate this, purchase requests and orders that have become obsolete and were closed before the fiscal year-end, along with any remaining pre-commitments and commitments, need to be deferred to the new fiscal year. This ensures the ability to:

1.Place an order based on a purchase request from the prior fiscal year,

2.Issue an invoice based on an order from the prior fiscal year, and

3.Include the corresponding budget in the budget lines of the new fiscal year.

The carry-forward process for outstanding pre-commitments and commitments involves two steps:

1.Choose the purchase lines to carry forward using the BUOCMMREP function (Operating budgets/Budget closing/Carry-forward of commitments),

2.Display the selection result in a grid, allowing the budget manager to select the pre-commitments and commitments to process.

The deferral of pre-commitments and commitments represents the third or fourth stage of budget closing, and the fiscal year-end process for GRNI can be performed either before or after the deferral of outstanding pre-commitments and commitments.

The carry forward of commitments is a vital function that facilitates the seamless transition of outstanding purchase lines from one fiscal year to the next in Sage X3. By allowing users to select and defer commitments through a user-friendly interface, this feature ensures accurate financial planning and tracking across different fiscal periods. The detailed grid display and interactive options, such as checking/unchecking all and accessing detailed information, enhance the efficiency of the carry forward process, contributing to a more streamlined and transparent budget management system.

About Us

Greytrix – a globally recognized Premier Sage Gold Development Partner is a one-stop solution provider for Sage ERP and Sage CRM needs. Being recognized and rewarded for multi-man years of experience, we bring complete end-to-end assistance for your technical consultations, product customizations, data migration, system integrations, third-party add-on development and implementation expertise.

Greytrix caters to a wide range of Sage X3 (Sage Enterprise Management) offerings – a Sage Business Cloud Solution. Our unique GUMU™ integrations include Sage X3 for Sage CRM, Salesforce.com and Magento eCommerce along with Implementation and Technical Support worldwide for Sage X3 (Sage Enterprise Management). Currently we are Sage X3 Implementation Partner in East Africa, Middles East, Australia, Asia. We also offer best-in-class Sage X3 customization and development services, integrated applications such as POS | WMS | Payment Gateway | Shipping System | Business Intelligence | eCommerce and have developed add-ons such as Catch – Weight and Letter of Credit for Sage X3 to Sage business partners, end users and Sage PSG worldwide.

Greytrix is a recognized Sage Rockstar ISV Partner for GUMU™ Sage X3 – Sage CRM integration also listed on Sage Marketplace; GUMU™ integration for Sage X3 – Salesforce is a 5-star app listed on Salesforce AppExchange.

For more information on Sage X3 Integration and Services, please contact us at x3@greytrix.com. We will be glad to assist you.

Create Refund for Overpayment

$
0
0

Overpayment by customers can present unexpected hurdles, ranging from accounting balance. In this blog, we will explore the process of resolving overpayments made by customers.

Consider a scenario where we have a $2,000 invoice and receive a payment of $3,000, which we record in Payment/Receipt Entry using the Transaction Type Check Receipts (RECCH) function located under A/P-A/R Accounting, Payments. We received $1,000 overpayment amount.

To handle the overpayment issue follow the below steps:

Step 1: We created a direct invoice for the specific customer, matching the amount of the overpayment as shown in the image below.

Fig 1. Direct Invoice

Step 2: Create a direct check against overpayment invoice. Go to

A/P-A/R accounting > Payments > Payment/Receipt entry > RECCH check receipt

Fig 2. Check receipt for overpayment

Step 3: To settle $1000 overpayment in journal entry. Go to Financials > journals > Journal entry.

Fig 3. Journal Entry transaction

Step 4: Go to Financials > Matching > Manual Matching. Select site, Account 12100 (AR) and customer. In the detail section select $2,000 invoice and the $2,000 of the payment and click on Matching button.

Step 5: Now we will create a check for the overpayment of $1000. Go to

A/P-A/R accounting > Payments > Payment/Receipt entry > PAYAT USA 

Fig 4. Check against payment

Step 6: Go to Financials > Matching > Manual Matching. Select site, Account 12100 (AR) and customer. In the detail section select $1,000 Payment and the $1,000 of the Overpayment and click on Matching button.

Fig 5. Manual Matching

By understanding the complexities surrounding overpayment and implementing proactive strategies for managing them, maintain trust with customers, and uphold their financial integrity. In a landscape where every transaction matters, handling overpayments with care is not just a matter of good business.

Automate sending reports on emails in Sage x3

$
0
0

Workflow in Sage X3 allows you to automate steps such as sending emails with attachments etc. Sage X3’s workflow function allows you to create a process that sends an email when certain conditions are met, such as fulfilling/satisfying the condition or triggering an event. This email may include attachments, such as documents or reports generated in Sage X3, which may improve communication and cooperation within your organization.

Here are the step-by-step instructions for creating an automated workflow to send reports in the mail:

1. Open Setup–>General parameters–>Parameter values:

Expand the “SUP” chapter and click on the Action button for the “WRK Group”.  Verify that an email server is entered for the parameter “SERMES”. Click OK. Click on the Action button for “RPT Group”. Verify that the “ASAIDEST” parameter is set to No.

Fig.1: Parameter Values (adpval)

  2. Open Setup–>Workflow–>Workflow rules:

 Select the “APRINT” workflow and create a new workflow called “YAPRINT” by copying “APRINT”. Set the condition on the workflow to only run when your report is printing. Click on the Recipients tab and add the Business partner or User to the recipients. On the Message tab, verify that “GFILPATH” is set under the attached documents. Save and Validate.

3. Open Common Data–>Customers–>Customers:

 Select the customer you’d like to email. Click on the Contacts tab and select the contact you want the email to go to. Set them to the same function as the workflow function.

Fig.2: Workflow rules setup (gesawa)

  4. To run this process automatically. Follow the below steps:

  First, you need to create a task to automate this process. For this, you should navigate to:

  Usage -> Usage -> Batch Server -> task management

You need to create a new task as shown in figure 3 and need to set the task type as processing and the function should be always AIMP as we are printing the report it should be the function of the reports screen. When you enter the function, it will be mandatory to assign the report code that you want to print through the batch process and save it on the server. You should check the Message-user checkbox so that the batch server will print the server in the specified path .

Fig.3: Task Management (gesabt)

  5. Next you need to create a recurring task to achieve the same as shown in the figure 3.

  You need to navigate to Usage -> Usage -> Batch Server -> Recurring task management

 You need to set up the days and time when you want to print the report. An important thing is that we need to set up the parameter for this. When you click on the parameters of the newly created recurring task where you need to set up the report printing parameters.

 When you will click on the parameter it will open the AIMP function screen to set the parameter.

Fig.4:Recurring Task Management (gesaba)

 6. In the parameter screen, you need to set up the parameter for the report that you want to print onto the server. As we required to send the file onto the mail , we need to select the destination as ‘MESSPDF‘. To create this destination, you need to navigate to Setup -> Setup -> Destinations-> Destinations or else you can use the existing destination.

The destination should have the output type as “Message”. After setting the parameters, it will run the recurring task as per the frequency when you have set the time to run. When it runs, it will send the file to the specified email which you have set in the workflow rules (Recipients tab).

Fig.5: Destination(gesaim)

IUsing Sage X3’s ‘Recurring Task management’ to trigger the workflow for sending reports via email automatically helps to communicate easily and improves accuracy, also allowing us to save time and reduce manual effort for businesses.

About Us

Greytrix – a globally recognized and one of the oldest Sage Development Partners is a one-stop solution provider for Sage ERP and Sage CRM organizational needs. Being acknowledged and rewarded for multi-man years of experience and expertise, we bring complete end-to-end assistance for your technical consultations, product customizations, data migration, system integrations, third-party add-on development, and implementation competence.

Greytrix has some unique integration solutions developed for Sage CRM with Sage ERPs namely Sage X3Sage IntacctSage 100Sage 500, and Sage 300. We also offer best-in-class Sage ERP and Sage CRM customization and development services to Business Partners, End Users, and Sage PSG worldwide. Greytrix helps in the migration of Sage CRM from Salesforce | ACT! | SalesLogix | Goldmine | Sugar CRM | Maximizer. Our Sage CRM Product Suite includes addons like  Greytrix Business ManagerSage CRM Project ManagerSage CRM Resource PlannerSage CRM Contract ManagerSage CRM Event ManagerSage CRM Budget PlannerGmail IntegrationSage CRM Mobile Service SignatureSage CRM CTI Framework.

Greytrix is a recognized Sage Champion Partner for GUMU™ Sage X3 – Sage CRM integration listed on Sage Marketplace and Sage CRM – Sage Intacct integration listed on Sage Intacct Marketplace. The GUMU™ Cloud framework by Greytrix forms the backbone of cloud integrations that are managed in real-time for the processing and execution of application programs at the click of a button.

For more information on our integration solutions, please contact us at sage@greytrix.com. We will be glad to assist you.

Truncation in screen dictionary.

$
0
0

In SageX3 do you ever face an issue where you have to hover your mouse pointer to see the full description? We found a way to display the whole text/description on the screen without using the multiline text control.

New Stuff: Automate sending reports on emails in Sage x3

Fig 1 Description before truncation

Go to the screen dictionary for which you want to make the description visible completely.
In the column Truncation set the column length to 200. Save and Global validate the window.

Fig 2 Truncation in screen dictionary

Fig 3 Description after truncation

Now when you’ll open the window you’ll see that the Description column length is increased and the description is visible.

About Us

Greytrix – a globally recognized and one of the oldest Sage Development Partners is a one-stop solution provider for Sage ERP and Sage CRM organizational needs. Being acknowledged and rewarded for multi-man years of experience and expertise, we bring complete end-to-end assistance for your technical consultations, product customizations, data migration, system integrations, third-party add-on development, and implementation competence.

Greytrix has some unique integration solutions developed for Sage CRM with Sage ERPs namely Sage X3Sage IntacctSage 100Sage 500, and Sage 300. We also offer best-in-class Sage ERP and Sage CRM customization and development services to Business Partners, End Users, and Sage PSG worldwide. Greytrix helps in the migration of Sage CRM from Salesforce | ACT! | SalesLogix | Goldmine | Sugar CRM | Maximizer. Our Sage CRM Product Suite includes addons like  Greytrix Business ManagerSage CRM Project ManagerSage CRM Resource PlannerSage CRM Contract ManagerSage CRM Event ManagerSage CRM Budget PlannerGmail IntegrationSage CRM Mobile Service SignatureSage CRM CTI Framework.

Greytrix is a recognized Sage Champion Partner for GUMU™ Sage X3 – Sage CRM integration listed on Sage Marketplace and Sage CRM – Sage Intacct integration listed on Sage Intacct Marketplace. The GUMU™ Cloud framework by Greytrix forms the backbone of cloud integrations that are managed in real-time for the processing and execution of application programs at the click of a button.

For more information on our integration solutions, please contact us at sage@greytrix.com. We will be glad to assist you.


Error:“@X3.TRT/PJMTIMEMP_CSTD_PROPERTIES$adx (994) Error 112 : Non-existent structure member PRGBILNUM” at Project module Time Entry

$
0
0

In Sage X3, the process of entering time for a project involves specifying various details such as the date, task, and the amount of time spent on the project. This can be facilitated through the use of the assignment grid, where tasks assigned to an employee are conveniently displayed at the top, allowing for accurate entry of time spent.
The time entry feature in Sage X3 serves a crucial role by systematically collecting and assessing the time allocated to different projects. This functionality aids in labor analysis, providing insights into resource utilization and helping in the effective allocation of manpower. Moreover, Sage X3’s project management module extends its utility by offering comprehensive financial analysis capabilities. This includes detailed reporting on project-wise profitability, budget utilization, and actual expenditure, thereby enabling businesses to make informed decisions regarding project management and resource allocation.

One of our clients was looking to add time summary against some project below is time entry screen with user & date parameter for your reference.

New stuff: Truncation in screen dictionary

Fig 1 Time entry screen with parameter

Once user selected the required parameter at time entry screen now user wants to add time summary, but while he is trying to enter or add a row in time summary grid, user prompted with below error “@X3.TRT/PJMTIMEMP_CSTD_PROPERTIES$adx (994) Error 112 : Non-existent structure member PRGBILNUM”.

Fig 2 Error while adding time summary

Upon thorough examination of the error message, we identified that the issue stemmed from the PJMTIMEMP class. Subsequently, we navigated to the PJMTIMEMP class located at the Development -> Data & Parameters -> Class -> PJMTIMEMP path. Upon inspection, it became evident that the PRGBILNUM field was absent from the Properties grid of the class.
To address this issue, we took manual intervention by adding the PRGBILNUM field to the grid. We assigned it an order sequence of 5050 and designated its type as A, as depicted in the screenshot below.

Fig 3 Added structure member at class

After adding the PRGBILNUM property to the properties grid of the class, we proceeded to save our modification and validate the PJMTIMEMP class. However, during this process, we encountered the warning message depicted in the screenshot below.

Fig 4 Warning message to validate more two related classes

The warning message indicated that the PJMTIMEMP class is utilized in PJMTIMEMPH and PJMTIMEMPRT. Therefore, to ensure the successful implementation of our changes, it was necessary to re-validate these two classes along with PJMTIMEMP.

Subsequently, we proceeded to validate all three classes and refreshed the session by logging in and out of the system. Following these steps, we attempted to enter a new row in the time summary grid from the Time entry screen, and this time, we encountered no errors. Thus, we successfully resolved the issue that occurred while entering time summary.

About Us

Greytrix – a globally recognized and one of the oldest Sage Development Partners is a one-stop solution provider for Sage ERP and Sage CRM organizational needs. Being acknowledged and rewarded for multi-man years of experience and expertise, we bring complete end-to-end assistance for your technical consultations, product customizations, data migration, system integrations, third-party add-on development, and implementation competence.

Greytrix has some unique integration solutions developed for Sage CRM with Sage ERPs namely Sage X3Sage IntacctSage 100Sage 500, and Sage 300. We also offer best-in-class Sage ERP and Sage CRM customization and development services to Business Partners, End Users, and Sage PSG worldwide. Greytrix helps in the migration of Sage CRM from Salesforce | ACT! | SalesLogix | Goldmine | Sugar CRM | Maximizer. Our Sage CRM Product Suite includes addons like  Greytrix Business ManagerSage CRM Project ManagerSage CRM Resource PlannerSage CRM Contract ManagerSage CRM Event ManagerSage CRM Budget PlannerGmail IntegrationSage CRM Mobile Service SignatureSage CRM CTI Framework.

Greytrix is a recognized Sage Champion Partner for GUMU™ Sage X3 – Sage CRM integration listed on Sage Marketplace and Sage CRM – Sage Intacct integration listed on Sage Intacct Marketplace. The GUMU™ Cloud framework by Greytrix forms the backbone of cloud integrations that are managed in real-time for the processing and execution of application programs at the click of a button.

For more information on our integration solutions, please contact us at sage@greytrix.com. We will be glad to assist you.

Is it possible to delete a pick ticket after a validated sales delivery is deleted?

$
0
0

In Sage X3, the pick ticket functionality is an essential part of the sales order fulfillment process. A pick ticket is a document generated by the system that instructs warehouse personnel on which items to pick from inventory to fulfill a customer’s order before they are shipped to the customers.

After creating a sales order, it is possible to generate a pick ticket for the sales order. The pick ticket status will be “In process”. Once the pick ticket status is changed to “Deliverable”, it is possible to generate a sales delivery that can be validated in the future. Once a delivery is generated, the status of the pick ticket changes to Delivered. Refer the below screenshot for better understanding.

New Stuff: Error:“@X3.TRT/PJMTIMEMP_CSTD_PROPERTIES$adx (994) Error 112 : Non-existent structure member PRGBILNUM” at Project module Time Entry

Fig 1 Pick ticket status after creating Sales order
Fig 2 After clicking Deliverable button

After validating the sales delivery, if for the any reason the delivery needs to be deleted, you can accomplish this by clicking the three dots next to the product listed in the detail line and selecting the “Modification of issue” option as shown in below figure.

Fig 3 After validating and deleting the Sales delivery

After deleting the sales delivery, going back to the pick ticket, the delete button will be grayed out and it is not possible to delete the pick ticket. However, because the delivery was deleted, now the pick ticket status has changed to the Canceled. Refer the below screenshot for your reference.

Fig 4 After deleting delivery, pick ticket status

This status becomes available after deleting a validated sales delivery. If the delivery was deleted before validating it, the status of the pick ticket will change back to Deliverable.
The status of the pick ticket is reading from local menu 2754, the last status “Canceled” is used when a validated sales delivery is deleted.

Fig 5 4 Local menu 2754

About Us

Greytrix – a globally recognized and one of the oldest Sage Development Partners is a one-stop solution provider for Sage ERP and Sage CRM organizational needs. Being acknowledged and rewarded for multi-man years of experience and expertise, we bring complete end-to-end assistance for your technical consultations, product customizations, data migration, system integrations, third-party add-on development, and implementation competence.

Greytrix has some unique integration solutions developed for Sage CRM with Sage ERPs namely Sage X3Sage IntacctSage 100Sage 500, and Sage 300. We also offer best-in-class Sage ERP and Sage CRM customization and development services to Business Partners, End Users, and Sage PSG worldwide. Greytrix helps in the migration of Sage CRM from Salesforce | ACT! | SalesLogix | Goldmine | Sugar CRM | Maximizer. Our Sage CRM Product Suite includes addons like  Greytrix Business ManagerSage CRM Project ManagerSage CRM Resource PlannerSage CRM Contract ManagerSage CRM Event ManagerSage CRM Budget PlannerGmail IntegrationSage CRM Mobile Service SignatureSage CRM CTI Framework.

Greytrix is a recognized Sage Champion Partner for GUMU™ Sage X3 – Sage CRM integration listed on Sage Marketplace and Sage CRM – Sage Intacct integration listed on Sage Intacct Marketplace. The GUMU™ Cloud framework by Greytrix forms the backbone of cloud integrations that are managed in real-time for the processing and execution of application programs at the click of a button.

For more information on our integration solutions, please contact us at sage@greytrix.com. We will be glad to assist you.

Transport Note Feature In Sage X3

$
0
0

In some situations, companies need to transfer products from one place to another that are not part of the normal distribution flow. For example, shipping a computer that needs to be repaired or shipping marketing materials to a conference or tradeshow.

The Transport Note feature in Sage X3 tracks goods that are shipped and/or delivered but does not include products that are part of the core business.

The main differences between this function and deliveries are the following:

  • No link to an existing document
  • No accounting journal
  • No invoices
  • No credit control and credit updates
  • No accounting interface
  • No returns for transportation notes are anticipated.
  • No stock management: The products can be managed in stock, but no stock movement is generated for transportation notes.
  • No control over stock availability is made even if there is no stock for a product managed in stock.
  • No picking from items in the list panel; transportation notes must be created directly with no link to orders, shortages, etc.
  • Dedicated sequence number
  • The business partner can be a customer or a supplier.

As you can see in the screenshot below, the feature is accessed from the Common Data menu and is associated with an activity code (TRSNE Transportation Notes).

Fig.1: Transport_note 1

Fig.1: Transport_note 2

The Transport Note feature in Sage X3 is a valuable tool for managing non-standard product shipments. It provides a streamlined solution for tracking goods that fall outside normal distribution flows, such as items for repair or marketing materials for events. Unlike traditional deliveries, Transport Notes do not involve linking to existing documents, accounting journals, or stock management. Accessed through the Common Data menu, this feature offers flexibility in specifying the business partner and provides a dedicated sequence number for each transaction. Overall, it ensures efficient management of diverse shipping needs within the Sage X3 environment.

HOW TO FILTER DATA ON DASHBOARD IN SAGE X3

$
0
0

In Sage X3, the term “Dashboard” typically refers to a user interface feature that visually represents the relevant data. These dashboards are customizable and can be tailored to suit the specific needs of users or departments within an organization.

Sage X3 dashboards allow users to monitor various aspects of their business in real time, such as sales figures, inventory levels, production metrics, financial performance, and more. They often incorporate charts, graphs, tables, and other visual elements to present data clearly and concisely, enabling users to quickly assess the health of their operations and make informed decisions.

NOTE:
Please use the provided link to create a dashboard in Sage X3. The following steps outline how to filter the data you wish to display on the dashboard.

https://www.greytrix.com/blogs/sagex3/2019/08/29/how-to-add-the-dashboard-in-sage-x3-version-12/

We will investigate on how to apply filters to refine the data displayed on Sage X3 dashboards, as per your request.

To ensure the dashboard shows the necessary data, we’ll set conditions in the Query tool. Specifically, we’ll focus on displaying data that’s partially signed or in part status.

To achieve this task, follow these simplified steps outlined below:

Step 1: Create a Query tool by navigating through the following path:

  • Setup -> Usage -> Reports -> Query tool.

Fig 1: Query tool

To display filtered records on dashboards, follow these simplified and extended steps:

Step 2: Add conditions to filter the data as needed. You can specify criteria to refine the dataset displayed on the dashboard.

  • To filter records, you simply enter the condition in the Query Tool screen. This allows you to precisely tailor the data displayed on the dashboard to meet your requirements.
  • Navigate to the Advanced tab. This section provides additional options and settings for fine-tuning your data filtering process, allowing for more precise control over the displayed information.
  • Locate the Selection Criteria grid and input the necessary condition you wish to showcase on the dashboards. This step allows you to specify the exact parameters for filtering the data according to your preferences, ensuring the dashboard displays the desired information accurately.
  • Currently, we’ll focus on displaying Purchase requests that are in a ‘partially signed’ or ‘in part’ status. This ensures that only relevant data meeting these criteria will be showcased on the dashboard.
  • To achieve this, we’ve set the condition in the selection criteria grid where the flag is designated as ‘2’. This ensures that only Purchase requests with the flag indicating ‘partial signing’ or ‘in part’ status are included in the data displayed on the dashboard.

Fig 2: Selection criteria

Once you’ve added the condition to the selection criteria grid, save the flow/process, and proceed to validate it by clicking on the Validate button located on the Query tool screen. This ensures that the changes made are accurately applied and the data filtering process is functioning as intended.

Step 3: After setting the conditions in the selection criteria, to view the filtered data, log out from the system and then log back in. This will ensure that the dashboard displays the records filtered based on the specified conditions you’ve set.

  • Sometimes, clicking the refresh button on dashboards may display filtered records. However, we recommend logging out and logging back in to ensure consistent and accurate filtering of data. This process guarantees that the dashboard reflects the updated records based on the specified conditions you’ve set.

Fig 3: Dashboard with condition of partially signed.

Thus, to display filtered records on dashboards, simply input the conditions in the Selection Criteria. This method ensures that the dashboard accurately presents the filtered data according to your specified conditions, facilitating better analysis and decision-making.

How do I add a new report to a function?

$
0
0

In Sage X3, you can add a new report to a function on the different objects screen. When the standard reports are not sufficient, we use an existing report and customize it according to our requirements.

We can also add the validations on report printing. For example, On the screen, the user wants to print only those supplier BP invoice reports whose credit amount is greater than ‘$500 ‘ and whose supplier BP invoice date is after June month. Follow the below steps to add a new report to a function.

Once the report is ready, we need to make it available for the user to select it from the list. In that case, this blog is very helpful for you.

In this blog, we will use the standard report codes and have them available in the GESBIS (Supplier BP Invoices) function as a selection list.

Here’s a step-by-step description of how to add a new report to a function on the different objects screen in Sage X3:

STEP-1

As shown in the below screenshot, Select the navigation menu and go to A/P-A/R accounting –>> Invoicing–>> Supplier BP invoice, select the print icon on the right, and select “List”. Refer below  screenshot as fig1.

                                                              Fig 1. Supplier BP invoice

Fig 2. Print button

It will open a default report code FACTRSF (Supplier invoice list). his code is defined in the GESAFC (Functions) function against GESBIS code.

When you launch this report, it will print the supplier invoices list.

STEP-2

Report codes are located under Development–>>Script dictionary–>>Reports.

Now that we have identified the code next let’s add it to the GESARX (Print codes) function as internal code and then assign two reports codes, XFACTRSF and ZFACTRSF. Refer below screenshot as fig3.

Reason for listing two report codes is if I use only one, it will not show as a selection list.

Fig 3. Report dictionary

STEP-3

As shown in the below screenshot, Go to the print codes function in Setup–>> Destination–>> Print code and search if the FACTRSF internal code exist.

Then add the above codes as shown below.

Fig 4. Print code

STEP-4

As shown in the below screenshot, Optionally we can use the GESARV (Default values) function to propose default values. This function is used to store values by default for the print setups.


                                                                        Fig 5. Default values

As shown in the below screenshot Finally, in Supplier BP invoices we can select a list of print codes.

                                                             Fig 6. Selection print code

This is a simple process to add a report code to a function .

This blog help us to know about the use by add a new report to a function on the different objects screen in Sage X3 .

How to distribute job history in SEI

$
0
0

In the previews blog we learned how to check the history of any job, now we are going to learn how to distribute the job history.

Steps will be similar to till checking the log of job history.

I.e. when jobs have been scheduled and run, you can view the job history in the History tab.

To access the job history:

  1. Open the Scheduler from the Administration menu
  2. Select a job entry
  3. Then click on the Job Properties icon.

Fig.1. Logs Scheduler

4. The Job Properties page gives you a quick view of the status for each run of the selected job.

5. The Result column displays whether the job was successful or failed. If there was a failure, a summary error message will be displayed.

Fig.2. History

6. You can sort the Last Job Run Date column in ascending or descending order by clicking the arrow on the top right.

7. If a distribution job failed to complete, click on below icon to view details.

Fig.3. Error details

8. Email Notifications:-

If a distribution job fails to complete, an automatic email is sent to notify of the failure.

  • OnPremise → Admin
  • CloudMode → Admin and ADMCA

Fig.4. Email notification

Thus we have demonstrated comprehensive guide on how to check job history and how to notify of the failure through an email.

Statement creation functionality in Sage X3

$
0
0

As we all know open items Open Item refers to a financial transaction or record that has not yet been fully processed, reconciled, or settled. Sage X3 provides a special function to group open items related to the operations saved for BP like invoices, credit memos etc. on a statement. We are allowed to create the statements manually or automatically by using selection criteria. We can even modify the existing statement but before validation only. Similarly, after validating the statement it leads to creation of accounting document.

Only the operations for which the “statement” field is set to “yes” in their open items are taken into account (these can be viewed using the “Open item” button in the Purchasing, Sales or AP/AR accounting by means of the contextual menu “Open items” in the Financials module). Refer below screenshot.

Fig a. open items

Fig b. statement flag

With automatic payment proposals, the management of statements is a mandatory stage in the management of open items, only the open items on a statement (if specified as such) are processed. However, we can bypass this stage by creating payment entry, managed case by case.

An open item can only be displayed on a statement if its payment method is attached to a statement code.
The automatic generation only groups open items in one statement when the payment methods contain the same statement code.

In order to create manual entry of statement creation, follow the below steps.

  • Navigate to : AP/AR Accounting > Open items > Statement creation
  • You need to enter all the required fields below.
  1. The business partner concerned
  2.  The company for which the open item has been recorded
  3. The site (if the statement is single-site. A site is always displayed by default. It is necessary to delete it when processing multi-site statements).
  4.  The control account (identical to the site) and currency.
  5. The statement date and the open item date (they belong to the statement but they are not restrictive when it comes to open items that will be accepted on the statement).
  6. The payment method (this is the payment method of the statement. This payment method can be modified and does not limit the open items accepted on this statement to a single payment method). A statement code is initialized based on the payment method.
  7.  The lines are used to specify the open items for this statement. Once the document type and the document number are selected (a contextual selection method facilitates the search for these documents), the information relative to the open item is automatically displayed. 

Fig c. statement creation

Thus, we can create a statement with group of open item transactions and that can be turned into accounting document after validation.


Work In Progress Finalization

$
0
0

In Sage X3, the Work in Progress (WIP) valuation feature is designed to provide insight into the value of products that are in the production process but not yet completed. This value includes the cost of raw materials consumed, the labor time entered, and any stock receipts related to the ongoing production. The WIP valuation is essential for tracking the value of products at various stages of the production cycle.

Sage X3’s WIP valuation feature may be integrated with other modules such as Inventory, Finance, and Costing. Verify how the WIP valuation information is reflected in other parts of the system.

As the steps and features may vary based on the specific  Sage X3 version and configuration of Sage X3 in your organization, it’s advisable to consult the system documentation, user guides, or seek assistance from your system administrator or Sage X3 support.Top of Form

Sometimes user facing a different kind of errors in some scenarios when

Work order close but not costed that time we need to run the WIP finalization to get the costing done for work order

                 Fig.1 Error on WIP finalization  

Here are general steps to access and utilize the WIP Finalization in Sage X3:

1.       Access WIP Valuation:

•        Within the Costing module, locate and click on the “WIP” option.

2.       Select WIP Valuation:

•        From the WIP menu, choose the “WIP Valuation” option.

3.       Enter Company and Site:

•        In the WIP Valuation screen, enter the name of the Company and the Site for which you want to perform the valuation.

4.       Select Type:

•        Choose the appropriate Type for the valuation. This could include options  such as “By Work Order,” “By Product,” or other relevant types based on your requirements.

5.       Enter Work Order No Range:

•        Specify the range of Work Order numbers for which you want to calculate the WIP valuation. You can enter the starting and ending Work Order numbers to define the range.

6.       Execute Calculation:

•        Once you’ve entered the necessary details, execute the calculation process. This may involve clicking on a “Calculate” button or running a specific program within Sage X3.

                                  Fig.2 WIP Finalization screen

1.       Review Results:

•        After the calculation is complete, review the results displayed on the screen. This will provide you with the calculated value of Work in Progress based on the specified parameters.

2.       Further Analysis and Actions:

•        Analyze the WIP valuation data to make informed decisions regarding production, inventory management, and financial planning. You may also take additional actions based on the results, such as adjusting production schedules or optimizing resource allocation.

3.       Documentation and Reporting:

•        Document the WIP valuation data for record-keeping and reporting purposes. Generate reports if necessary to share the information with relevant stakeholders or for audit purpose

                                                                       Fig. 3 WIP Finalization Log File

After a successful run user will get the below log file which states that valuation finishes for that particular work order.

Positive pay file generation functionality in Sage X3

$
0
0

Positive pay is a banking service designed to mitigate check fraud risks. Customers of the bank provide a file containing account numbers, check numbers, and corresponding dollar amounts for each check. If a check is presented for payment, but is not listed in this file, the bank will refrain from processing the payment and will reach out to the customer for further guidance.

In Sage X3, the positive pay file function makes a file with details about checks a company issued. This file goes to the bank. The bank checks if the checks presented for payment are valid using this file. To make a positive pay file in Sage X3, first, list the checks you’ve issued with details like the check number, date, and amount. Then, use Sage X3 to make a file in the format your bank needs.

This file usually has info about each check, like the check number, date, amount, and the payee’s name and account number. When a check is brought to the bank for payment, they use this file to check if it’s valid and issued by your company. Making a positive pay file can stop fraud by making sure only allowed checks get paid. Sage X3 has tools to help you manage issuing checks, including making positive pay files.

Navigate to access this function:

A/P-A/R accounting -> Payments -> Positive pay file generation

Figure 1: Navigation page

Utilize this function to create the Positive Pay bank file, which gathers data from Supplier payments (PAYMENTH) and the check table (CHQNUM) to generate an output file for previously unprocessed records. The file conforms to the specified file format of the bank and encompasses checks with statuses such as Issued, Voided, or Posted. Only records with a null Positive Pay sequence number are included, along with voided checks meeting the same criteria. If a check is voided subsequent to its inclusion in a previous file, the accounting cancellation process will reset the Positive Pay sequence number and creation date. It’s also possible to regenerate the file using the sequence number.

Select the criteria like select new Generate new file if you want to create new file or select Regenerate file to modify the already generated positive pay file but here you need to select sequence number. Select the Bank account, From check no. And To check no. Then, click OK. Refer figure 2.

Figure 2: Positive pay file generation selection screen.

It will generate the log as well as the positive pay file as shown in the figure 3.

Figure 3: Positive pay file creation log

 This positive pay file will look like figure 4. Which further submitted to the bank for verification process.

Figure 4: Exported positive pay file

You can explore the folder where the files are kept and check them out. You can also save the files to the “Download” folder in the client directory or save them to the server. By default, the server will save them in the “BQE” folder, but you can choose another location if needed.

You can check the file, but it might be hard to read, especially if you have a lot of files, which could take up a lot of time.

I generated Positive Pay for checks numbered 00022 to 00128. If you’re looking for 00128, there’s no need to go through more files.

Here’s an easier way: Go to Common Data, then BP Accounting Tables, then Checks, and choose the Bank. Next, on the check book line starting from 00022, click the action icon, and from the dropdown menu, choose Check Status.

Figure 5: Check status of positive pay file

The Check status displays both the Positive Pay date and the Positive Pay sequence number. It’s important to note that if any check number has a sequence number different from the others, it indicates that it was included in a different file. This distinction helps to track and manage the Positive Pay process effectively, ensuring accurate recordkeeping and fraud prevention measures.

Figure 6: Positive pay seq. number for every check number

This blogs demonstrates that the Sage X3 provides user-friendly tools and functionalities to facilitate the Positive Pay process, ensuring smoother operations.

How to get notification if an user deletes a Sales order in Sage X3

$
0
0

In Sage X3, notifications are typically used to alert users about certain events or actions within the system. These notifications can be configured to appear in various parts of the system, such as the user’s dashboard, or they can be sent via email.Notifications in Sage X3 provide a flexible and configurable way to keep users informed about important events and activities within the system, helping to improve efficiency and responsiveness in managing business processes.

Sage X3 automatically creates and sends notifications in accordance with the configured settings whenever a workflow event takes place. Notifications can be sent by email, shown on the Sage X3 user interface’s dashboard or the main screen, or both.

We’ll guide you through setting up an email notification alert triggered whenever a Sage X3 user deletes a sales order. We’ll establish the context for the email, add a basic condition, and ensure that the email is sent only when a sales order with a value exceeding $1000.00 is deleted. The email will contain details such as the sales order number, its amount, and the user responsible for deleting it.

Key Features:

1.Create the Notification:

Navigate to: Setup -> Workflow -> Notifications

Click on the New button to create a new Notification.Workflow code: ZWFN,description: Workflow notification for sales orders that have been deleted that total more than 1000. Make sure the Active checkbox is checked. Put a checkmark next to the Deletion checkbox and set the Event type to Object and Code to SOH.

Fig. 1 – Create a new Notification

If sales orders greater than $1000.00.  In the Expression box, we want to create that condition and to do that you can either enter ORDINVATI > 1000, or click the Action menu for the Expression box and select Formula Wizard.  Then expand, Screen SOH4 and locate ORDINVATI and click it and click OK.

Fig. 2 – Create condition

To add a subject and email body context for the email that will be sent to the recipient, scroll down to the Message section.. In the Object area, type the following (in between quotes) ‘Notification warning.. sales order has been deleted’.  Then in the Text area, we would like to add the sales order number, sales order create date, user who deleted the sales order, and sales order amount.

Enter the following:

Sales Order | [F:SOH]SOHNUM | created on |CREDAT| has been deleted by user: |GUSER|

Sales Order Amount-> | [F:SOH]ORDINVATI |

<Notification ZWFN_Test>

Fig. 3 – Text for Email Notification

Save the Notification and Validate it.

2. Delete the Sales order : Create and save a new sales order in the same folder as the notification. Make sure the sales order total is $1000 or higher!. Delete the sales order and after a few moments, you should see an email that looks like this:

Fig. 4 – Email Notification

Thus we have demonstrated Setting up a notification when an X3 user deletes a sales order involves configuring the system to trigger an email alert based on specific conditions. By establishing the context of the email, adding a condition related to the sales order amount, and including essential details such as the order number and the user who performed the deletion, users can stay informed about critical actions within the Sage X3 system. This setup ensures timely awareness of significant events, allowing for efficient monitoring and management of sales order processes.

How to ship the product again after creating the customer return in Sage X3

$
0
0

This function is used to record the customer returns following a delivery or a supplier return in the case of inter-site or inter-company transfers.

Once the return is carried out, the stock will be moved if necessary and it will be possible to print a return note and if required to enter a credit memo using the appropriate function.

If the Update order is set to No, the order has not been invoiced , and the order was shipped in full, the line on the order will remain closed and a new delivery cannot be processed for that product.

Sales order closed
Fig.1 Sales order closed

If the update order is set as Yes in customer return and order has been invoiced yet then sales order will change to Pending status.

Customer return creation
Fig02: Customer return creation
Delivery button on sales order.
Fig.3 Delivery button on sales order.

If we select the stock as Yes then it will affect Stock on creation of customer return by returning quantity and if it’s No used if the product is damaged and no need to send it back to stock and, in this case, it will not affect the  Stock and will not be tracked in inventory.

If the sales delivery was invoiced, the Update order will default to No and it cannot be changed to Yes, the Update stock can be Yes or No and the Credit memo field is enabled for selection.

Hence with these steps user can ship product again after creating it’s customer return.

Revision Management for Sales Orders in Sage X3

$
0
0

Revision management for sales orders was implemented to enable users to track updates made on sales orders for both headers and lines using a revision number. This new feature gives full visibility to the updates made by users to a sales order. Revision management allows you to easily and quickly track updates made on the header and on the lines for a specific sales order.

The user can quickly click on the revisions to see the history of a sales order. The changed records are highlighted in red. It is possible to print the changes in report format.

To use revision management, the SALREV parameter found in (Setup, General parameters, Parameter values, VEN Sales, ORD) must be set to ‘Managed automatically’ or ‘Managed on demand’.

When SALREV is set to Managed on Demand and a change has happened on a sales order, the user will get a message asking, ‘Change with revision’ Yes or No.

If SALREV is set to Managed automatically, the user will not be promoted for the message ‘Change with revision’ as revision management will be on all the time and the system will track the changes automatically.

Parameter values
Fig1: Parameter values

In the sales order function, there is a field for revision on the SO header, and it normally shows how many times a revision to this order has been done. If it shows zero, it means no revision was processed on this sales order.

Revision field
Fig2: Revision field

Once a change is made to a sales order and if the SALREV parameter is set to Managed on Demand, a message will appear: “Change with revision?” If the answer is yes.

Question
Fig3: Question

The revision field changes to 1, and the revision management link in the right panel is active now. Also, a record will be created in the VSORDER table if the changes are made to the header. If the changes are made to the lines, records will be created in the VSORDERP and VSORDERQ tables.

Revision Management button
Fig4: Revision Management button

Clicking on the revision management link from the right panel will open the sales order revision history, and the changes will show in red.

Changed Revision
Fig5: Changed Revision

The revision history can be printed using the sales order revision ARCREV code.

Report Code
FIg6: Report Code

The Resynchronization button in the right panel of the Revision management window allows to launch a tool to re-synchronize sales order revisions. This button checks the current revision number per document and then updates the field CURREVFLG in the revision table VSORDER with the current revision.

Resynchronization
Fig7: Resynchronization
Viewing all 1515 articles
Browse latest View live


<script src="https://jsc.adskeeper.com/r/s/rssing.com.1596347.js" async> </script>