Quantcast
Channel: Sage X3 – Tips, Tricks and Components
Viewing all 1515 articles
Browse latest View live

How to customize the trace log file for errors and success messages

$
0
0

Trace files are extensively utilized in Sage X3 software, particularly during lengthy processes like Automatic Invoice Validation or Automatic Work Order Release. When a trace file is displayed, error lines appear in red text, allowing you to navigate through the errors.

To customize a trace file, follow the below steps:

Step 1: We need to open the trace file using the ‘OUVRE_TRACE’ function, as shown in the code below.

New Stuff: How to show comma-separated value for single or multiple fields in Sage X3 reports using crystal report

[Open_Trace_Log_File_Code]
[Open_Trace_Log_File_Code]

Step 2: After opening the log file, we can insert any messages as per our requirements.

Note: To customize a trace file, it’s essential to understand the color codes associated with different messages:

0: Used to display messages in black color.
1: Used to indicate error messages in red color.
-1: Used to present messages in green color.
-2: Used to showcase messages in blue color.

Step 3: Insert a message line using the ‘ECR_TRACE’ function. This function takes two parameters: the first parameter contains the message, and the second contains the color code, as shown in the code below.

[Inserting_Message_Trace_Log_File_Code]
[Inserting_Message_Trace_Log_File_Code]

Step 4: After inserting messages, we need to close this trace file using the ‘FERME_TRACE’ function.

[Close_Trace_Log_File_Code]
[Close_Trace_Log_File_Code]

Step 5: Now we can display our trace log file using the ‘LEC_TRACE’ function.

[Display_Trace_Log_File_Code]
[Display_Trace_Log_File_Code]

Step 6: If you want to delete this trace file, you can use the ‘SUPP_TRACE’ function.

[Delete_Trace_Log_File_Code]
[Delete_Trace_Log_File_Code]

After executing this script, you can view the log file as depicted in the screenshot below.

Note: If you added an error message using the code ‘1’ in the ‘ECR_TRACE’ function, you will receive a popup indicating the number of errors before the log file.

[Number_Of_Errors]
[Number_Of_Errors]
[Log_Reading_Screen]
[Log_Reading_Screen]

By following the above steps, we can customize the trace log file for errors and success messages.


How to solve Error: “@X3.TRT/SUBSDHA$adx (2612) Error 6 : Variable Non-existent GLBDOCDAT” in Sage X3

$
0
0

Sage X3 is enterprise resource planning (ERP) product which help organization to manage all the operation of organization and database into a single software solution. Sage X3 contains list of modules like sales, purchase, inventory, project, financial and many more.

One of our clients is encountering an error when trying to open the sales delivery screen, as shown in the screenshot below.

New Stuff: How to customize the trace log file for errors and success messages

Fig 1- Error on sales delivery screen

This error occurred because the KPO activity code is currently active on the Activity Code screen, as shown in the screenshot below,

Fig 2 - Activity code screen
Fig 2 – Activity code screen

To solve the above error we made the KPO activity code inactive and clicked save button on the Activity Code screen, as shown in the screenshot below.

Fig 3 - Activity code screen_2
Fig 3 – Activity code screen_2

By following the above steps, we have successfully resolved the error occurring on the sales delivery screen.

How to set parameters for SQL Query tool report

$
0
0

In Sage X3, we may come across a situation where we need to create SQL query tool by adding fields from the table.

There was one requirement from one of our clients to add parameters (filters) for the SQL query tool in the criteria tab.

In this blog, we will explore the process of assigning parameters to the SQL query tool based on client-specific requirements. So, we have added two parameters, ‘From Date’ and ‘To Date’.

We will see this functionality in detail in this blog:

Path>>setup>>Usage>>Reports>>SQL query tool

New Stuff: How to solve Error: “@X3.TRT/SUBSDHA$adx (2612) Error 6 : Variable Non-existent GLBDOCDAT” in Sage X3

Create SQL query
Create SQL query

Initially, formulate a SQL query in accordance with the client’s requirements. When incorporating parameters into the SQL query, ensure to enclose the parameter number within %% symbols as shown in the above screen shot.

For Example:
select * from SINVOICE where SINVOICE.INVDAT_0 between %1% and %2%

Path >> setup >> Usage >> Reports >> SQL query tool >> Parameter

Set Parameter Description, Datatype, and Default Values

Navigate to the Parameters tab and add the necessary parameters, specifying the desired data type. If a default value is needed for a parameter, enter the default value in the ‘Default’ column.

We have added ‘Date From’ and ‘Date To’ to the Parameter column, assigning a default value using the current date$ function.

Validate and run query

After adding the parameter, click on the ‘validate’ button to validate the query, and then click on the ‘Run‘ button to execute it.

Path : Path >> setup >> Usage >> Reports >> SQL query tool >> Run button

Criteria button
Criteria button

Click on the ‘Criteria‘ button.

Popup for Parameters

So, in conclusion, we have successfully added parameters to this query tool. Now, users can manually enter the required parameters, click on ‘Ok,’ and filter the query according to their specific needs, thereby enhancing the flexibility and usability of the report.

Feature: How to create product with specific naming format using Product configurator in Sage X3

$
0
0

Introduction: As we know, Product configurator is the Sage x3 functionality which allows to create product along with BOMs, routing etc. There are some basic parameters that need to be set first. The first one is Configurator symbol where we can define the questions which can be used while using the configurator. The navigation for the same is Setup > Configurator > Configurator symbols. Each configurator symbol has multiple answers/responses that are stored in response table. The response can have several possible values which can be entered in the grid given on the screen. These questions or variable can be of type numeric/alphanumeric etc. You can refer below example of configurator symbol HGT i.e Height having multiple responses to be selected. The navigation path for this is Setup > Configurator > Response table

Fig 1. response table

Once the symbols and responses are defined, we need to create Configurator scenario. It contains below parameters to be setup.

  1. BOM setup: You can define the required BOM details like reference, type etc. as below along with the costing method.

Fig 2. BOM details

  • Parameters: You can setup/select questions or symbols that we have already defined with the desired sequence. Refer below screenshot for the same.

Fig 3. questions

  • Kit creation: You can define Reference product with the Equivalent search value as per the requirement. This field has below values for selection.
  • No equivalence research: The product number must have been created by the configurator (except in the case of automatic numbering). The product can be an existing product or a new product.
  • Equivalence search: A search for an equivalent product will be carried out according to the setups of the product line of the product and if no equivalence is found the product will be created.
  • Always create: The product number must have been created by the configurator (except in the case of automatic numbering). It is mandatory that the product is new.
  • Search+automatic selection: an equivalent product is searched and if only one line is found, the automatic selection of the equivalent found is carried out.

Once this is defined, you can assign your specific naming format for the product to be generated. You can also have the product description in the desired format. Refer the below screenshot for the same.

Fig 4. kit_creation

In order to run the configurator, navigate to Setup > Configurator > Configurator.

  1. You can select site, configurator scenario, customer and click on OK.

Fig 5. configurator

  • You will get below questions respect to the selected scenario. Here, it is ‘TEST’.

Fig 6. scenario_questions

  • Based on selected answers, the product will get generated with the given naming format as TEST3337 (TEST + Depth + Height(exact) + Widths(nominal)) and description as Prod 3X8X7 (Prod + Depth + Heights(nominal) + Widths(nominal))

Fig 7. line_details

Thus, using product configurator we can create products with the specific naming format as per the requirement along with its description.

About Us

Greytrix – a globally recognized Premier Sage Gold Development Partner is a one-stop solution provider for Sage ERP and Sage CRM needs. Being recognized and rewarded for multi-man years of experience, we bring complete end-to-end assistance for your technical consultations, product customizations, data migration, system integrations, third-party add-on development and implementation expertise.

Greytrix caters to a wide range of Sage X3 (Sage Enterprise Management) offerings – a Sage Business Cloud Solution. Our unique GUMU™ integrations include Sage X3 for Sage CRMSalesforce.com and Magento eCommerce along with Implementation and Technical Support worldwide for Sage X3 (Sage Enterprise Management). Currently we are Sage X3 Implementation Partner in East Africa, Middles East, Australia, Asia. We also offer best-in-class Sage X3 customization and development services, integrated applications such as POS | WMS | Payment Gateway | Shipping System | Business Intelligence | eCommerce and have developed add-ons such as Catch – Weight  and Letter of Credit for Sage X3 to Sage business partners, end users and Sage PSG worldwide.

Greytrix is a recognized Sage Rockstar ISV Partner for GUMU™ Sage X3 – Sage CRM integration also listed on Sage Marketplace; GUMU™ integration for Sage X3 – Salesforce is a 5-star app listed on Salesforce AppExchange.

For more information on Sage X3 Integration and Services, please contact us at x3@greytrix.com. We will be glad to assist you.

How to create pie chart in Sage Enterprise Intelligence (SEI) report.

$
0
0

Sage Enterprise Intelligence is an intuitive business intelligence solution integrated with your Sage business management system to help business users reduce time spent on analysis and reporting and make faster, better-informed decisions. It empowers all users with a simple solution to access and analyse data in a self-sufficient manner, which eliminates the need for disparate tools and specialized skills and can reduce time to decision.

Sage Enterprise Intelligence gives business users, managers, and executives the power to analyse and create business reports, dashboards, and views. In this blog, we will take a look at how we can create pie chart in Sage Enterprise Intelligence.

Follow these steps for insight into how to create pie chart in (SEI).

STEP1:- Right click on data models and click on new view among the different categories we can select different type of view type. The number of view types are present . As shown in figure .1 and   figure .2

New view
Fig02: New view

STEP2:-

Enter a pie view name.

Choose the Columns, Groups and Pivots by clicking Add.

Type the name to filter the list (or select from the drop-down menu). Choose one or more fields.

Click OK to confirm the chosen fields. As shown in figure 3.

File setting
Fig03: File setting

STEP3:- To change the view from a table with tabs to a graphical illustration, click on View Type in the vertical right-hand panel to expand Settings. The columns we choose in figure.3 are represented in pie chart format . As shown in figure 4.

Pie chart
Fig04: Pie chart

STEP 4: This will expand the menu, showing the options for different View types you can select from. You can scroll vertically through the View categories in the Left side of the pop up, and then chose specific Views within each category. The images below show the “Bar” category and “Pie” category options to give context to the wide variety of built in options available. For our example, we’ll click on the “Pie” chart in the “Pie” category (it may be on our mind with fruit pie season in full swing).

STEP 5: Once we’ve update our View Type, it will automatically close the expanded menus and update the Sales Report. Next, in the same vertical right-hand panel, click on Chart Properties (the wrench icon immediately above View Type) to specify the details for your graph.

STEP 6: In Chart Properties, you can modify the report title, labels, series, etc. The specific changes made will depend on how you want the information displayed in your dashboard. For reference, pay attention to the chart properties specified in the following screenshot. By enabling Animation (the very top toggle option), we’ve set up this graph so when you hover over a pie slice it will provide further details, which in this case is order quantity.

View properties
Fig08: View properties

STEP 7: Once  the done layout of the graph, click the floppy disc save icon on the right of the screen and click save as.

Save option
Fig09: Save option

This blog help us to know about the use of create and design pie chart in SEI report.

About Us

Greytrix – a globally recognized Premier Sage Gold Development Partner is a one-stop solution provider for Sage ERP and Sage CRM needs. Being recognized and rewarded for multi-man years of experience, we bring complete end-to-end assistance for your technical consultations, product customizations, data migration, system integrations, third-party add-on development and implementation expertise.

Greytrix caters to a wide range of Sage X3 (Sage Enterprise Management) offerings – a Sage Business Cloud Solution. Our unique GUMU™ integrations include Sage X3 for Sage CRMSalesforce.com and Magento eCommerce along with Implementation and Technical Support worldwide for Sage X3 (Sage Enterprise Management). Currently we are Sage X3 Implementation Partner in East Africa, Middles East, Australia, Asia. We also offer best-in-class Sage X3 customization and development services, integrated applications such as POS | WMS | Payment Gateway | Shipping System | Business Intelligence | eCommerce and have developed add-ons such as Catch – Weight  and Letter of Credit for Sage X3 to Sage business partners, end users and Sage PSG worldwide.

Greytrix is a recognized Sage Rockstar ISV Partner for GUMU™ Sage X3 – Sage CRM integration also listed on Sage Marketplace; GUMU™ integration for Sage X3 – Salesforce is a 5-star app listed on Salesforce AppExchange.

For more information on Sage X3 Integration and Services, please contact us at x3@greytrix.com. We will be glad to assist you.

How to perform automatic and multiple assignments using the assignments function

$
0
0

In Sage X3, assignment rules are used to define how transactions, such as sales orders or purchase orders, are automatically assigned to specific resources or entities. These rules are part of the Resource Planning module, which helps in optimizing resource utilization and improving efficiency in managing various business processes.Assigning orders (needs and resources) among one another are done via this function. One way to do this would be to link a work order to a sales order and a purchase order to a material need.

This function is customized to the needs of your organization and your processes. The transaction you select determines the way in which you enter information, and information is displayed and printed.The type of viewed orders depends on the product workbench transaction that is being used.
The assignments performed in this function correspond to orders in progress. The requirement calculation is based on the quantity not assigned at the resource or requirement level. When header criteria have been entered, the displayed orders can be assigned or not by double-clicking or right-clicking on the cells in the grids. Icons symbolize the various actions that are carried out or are available. The orders, whether assigned or not, are distributed among the two grids based on their status.

Key Features:

Create the following new assignment rule that allows for the assignment of multiple assignments:

Navigate to: Setup > Stock > Assignment rule

Fig. 1 – Setup new assignment rule

After creating the new Assignment rule do blank setup for the STD assignment rule.

Fig. 2 – Blank setup for STD assignment rule

Check the General parameter: DEFPTO (Assignment rule MTO) after setting up the new assignment rule; it should be the default STD.

Fig. 3 – Check General parameter(DEFPTO:MTO)

It is now necessary to set up the products for automatic assignment after creating the new assignment rule.

Go to: Products > Common data > Products

Next, navigate to the product site, select the Planning tab, update the assignment rule to the newly created ZTEST assignment rule in the assignment rule field, and complete the validation process.

Fig. 4 – Change the Assignment rule to the updated rule

To check the multiple assignments :

Navigate to : Stock > Assignments > Assignment Workbench

Fig. 5 – Multiple assignments

Now we are able to link the multiple assignments to the relevant sales order or work order.

About Us:

Greytrix – a globally recognized Premier Sage Gold Development Partner is a one-stop solution provider for Sage ERP and Sage CRM needs. Being recognized and rewarded for multi-man years of experience, we bring complete end-to-end assistance for your technical consultations, product customizations, data migration, system integrations, third-party add-on development and implementation expertise.

Greytrix caters to a wide range of Sage X3 (Sage Enterprise Management) offerings – a Sage Business Cloud Solution. Our unique GUMU™ integrations include Sage X3 for Sage CRMSalesforce.com and Magento eCommerce along with Implementation and Technical Support worldwide for Sage X3 (Sage Enterprise Management). Currently we are Sage X3 Implementation Partner in East Africa, Middles East, Australia, Asia. We also offer best-in-class Sage X3 customization and development services, integrated applications such as POS | WMS | Payment Gateway | Shipping System | Business Intelligence | eCommerce and have developed add-ons such as Catch – Weight  and Letter of Credit for Sage X3 to Sage business partners, end users and Sage PSG worldwide.

Greytrix is a recognized Sage Rockstar ISV Partner for GUMU™ Sage X3 – Sage CRM integration also listed on Sage Marketplace; GUMU™ integration for Sage X3 – Salesforce is a 5-star app listed on Salesforce AppExchange.

For more information on Sage X3 Integration and Services, please contact us at x3@greytrix.com. We will be glad to assist you.

How to export flat files in Sage X3

$
0
0

Introduction: Sage X3 provides the functionality of creating\updating the transactions using an Import/Export template. We can use import/export templates quite often for importing huge data with ease. We need to setup some parameters in order to export data in a particular format. We came across a scenario where users need to export data in a flat file format having tab separated records.

To achieve this follow below steps:

  1. Navigate to: All > Setup > Usage > Imports/Exports > Import/Export template
  2. Enter all the necessary details regarding objects, function. Select the Import, Export checkboxes as per requirement.
  3. Select File type as “Flat” and set Field separator as “\009”. Refer below screenshot.

Fig 1. template setup

  • Enter table details and fields to be exported. You need to make sure that there should not be “/” separator in Fields section as highlighted below. Otherwise you will get below error.

Fig 2. separator setup

Fig 3. separator error

  • Click on Create to create template

Now, you need to export the sales order using the template ZSOH as created above.

  1. Navigate to Usage > Usage > Import/Exports > Export.
  2. Select template “ZSOH”.
  3. Enter sales order number to be exported and click on OK.

Fig 4. export data

  • You will get the data exported in a desired manner. Refer below screenshot.

Fig 5. flat file export

Similarly, you can export the data with fields’ headers. For that, you need to select file type as “With headers” as follows.

Fig 6. fields with headers

Now, when you will export the sales order, you will get file with the fields having headers as field descriptions from respective tables in below format.

Fig 7. File with field headers

Thus, we can export data in a flat file format with fields having headers and tab separated manner too.

About Us

Greytrix – a globally recognized Premier Sage Gold Development Partner is a one-stop solution provider for Sage ERP and Sage CRM needs. Being recognized and rewarded for multi-man years of experience, we bring complete end-to-end assistance for your technical consultations, product customizations, data migration, system integrations, third-party add-on development and implementation expertise.

Greytrix caters to a wide range of Sage X3 (Sage Enterprise Management) offerings – a Sage Business Cloud Solution. Our unique GUMU™ integrations include Sage X3 for Sage CRMSalesforce.com and Magento eCommerce along with Implementation and Technical Support worldwide for Sage X3 (Sage Enterprise Management). Currently we are Sage X3 Implementation Partner in East Africa, Middles East, Australia, Asia. We also offer best-in-class Sage X3 customization and development services, integrated applications such as POS | WMS | Payment Gateway | Shipping System | Business Intelligence | eCommerce and have developed add-ons such as Catch – Weight  and Letter of Credit for Sage X3 to Sage business partners, end users and Sage PSG worldwide.

Greytrix is a recognized Sage Rockstar ISV Partner for GUMU™ Sage X3 – Sage CRM integration also listed on Sage Marketplace; GUMU™ integration for Sage X3 – Salesforce is a 5-star app listed on Salesforce AppExchange.

For more information on Sage X3 Integration and Services, please contact us at x3@greytrix.com. We will be glad to assist you.

Gross Price logic in Sales and Purchase Order Transactions

$
0
0

In Sage X3, we have the option to manually enter price in the detail line as required while creating any transaction. However, one of our clients wanted to add a validation on “Gross Price” field in Sales and Purchase Order Transactions based on Price Lists.
Here, user will enter supplier and product combination with price in Purchase Price list. Then approval of price list is required. If it is approved then, signed status will be displayed as “In Full” otherwise status will remain blank.

New Stuff: Trial Kitting in Sage X3

[Fig 1. Purchase - Not Approved Price List]
[Fig 1. Purchase – Not Approved Price List]

As you can see, signed status is blank for purchase price list. That means this price list is not approved. Now we are trying to enter price list value in Gross price field of Purchase Order screen

[Fig 2. Gross Price - Not Approved error]
[Fig 2. Gross Price – Not Approved error]

But the system is generating a pop-up message “Gross Price not defined or not yet approved.” Because the price list is not approved. It will not allow the user to proceed further till the price list gets approved.
After approval, signed status is “In Full” as shown in Fig3. Now, system will check the 2nd condition that gross price should be less than or equal to price list value.

[Fig 3. Purchase - Approved Price List]
[Fig 3. Purchase – Approved Price List]

To check for the 2nd condition, we are trying to create a Purchase Order Transaction by entering gross price greater than price list value. So, as per Fig 1, for supplier – SD0173 and product – PMTW068BLK_00003, price list value is ‘30’.

[Fig 4. Gross price - Greater than Error on Purchase Order]
[Fig 4. Gross price – Greater than Error on Purchase Order]

And we have entered gross price ‘31’ in Purchase Order as shown in Fig 4. Because of which system has generated pop-up message “Gross Price value is greater than the price list value: 30”.

But in sales, they required opposite condition – gross price should be greater than or equal to price list value.

[Fig 5. Sales - Approved Price List]
[Fig 5. Sales – Approved Price List]

So as shown in the above Fig 5, Sales Price list is approved as signed status is “In Full”. And price for customer -CP0001 and product – FGTW089BLK is ‘30’.
Now, we will try to enter gross price ‘20’ in Sales Order for same customer and product.

[Fig 6. Gross Price - Less than error on Sales Order]
[Fig 6. Gross Price – Less than error on Sales Order]

But system has generated error – “Gross Price value is less than the price list value: 30” as shown in Fig 6.
In this way, validation will be applied on Gross Price field in Sales and Purchase Invoice transactions based on price list values. But in Purchase, gross price >= price list value is allowed and in Sales, gross price <= price list value is allowed.

About Us

Greytrix – a globally recognized Premier Sage Gold Development Partner is a one-stop solution provider for Sage ERP and Sage CRM needs. Being recognized and rewarded for multi-man years of experience, we bring complete end-to-end assistance for your technical consultations, product customizations, data migration, system integrations, third-party add-on development and implementation expertise.

Greytrix caters to a wide range of Sage X3 (Sage Enterprise Management) offerings – a Sage Business Cloud Solution. Our unique GUMU™ integrations include Sage X3 for Sage CRM, Salesforce.com and Magento eCommerce along with Implementation and Technical Support worldwide for Sage X3 (Sage Enterprise Management). Currently we are Sage X3 Implementation Partner in East Africa, Middles East, Australia, Asia. We also offer best-in-class Sage X3 customization and development services, integrated applications such as POS | WMS | Payment Gateway | Shipping System | Business Intelligence | eCommerce and have developed add-ons such as Catch – Weight and Letter of Credit for Sage X3 to Sage business partners, end users and Sage PSG worldwide.

Greytrix is a recognized Sage Rockstar ISV Partner for GUMU™ Sage X3 – Sage CRM integration also listed on Sage Marketplace; GUMU™ integration for Sage X3 – Salesforce is a 5-star app listed on Salesforce AppExchange.

For more information on Sage X3 Integration and Services, please contact us at x3@greytrix.com. We will be glad to assist you.


Disabling buttons for Miscellaneous windows in Sage X3

$
0
0

In Sage X3, there are several types of windows design to choose from such as Object, Miscellaneous, Inquiry and Inquiry criteria. Out of which main transaction windows are object types, however miscellaneous types windows offer freedom to customize the windows however the developer wants.

Below we’ll show how to disable a custom window button for miscellaneous windows during runtime.

For this we’re referencing following paths and screenshots below:

Development: All > Development > Script dictionary > Windows (GESAWI)
Script editor: All > Development > Script dictionary > Scripts > Script editor (ADOTRT)

New Stuff: Gross Price logic in Sales and Purchase Order Transactions

Fig. 1 - Move Stock button visible
Fig. 1 – Move Stock button visible

-As shown in Fig. 1 we have our miscellaneous window with several custom buttons and all are enabled to use. But if we wanna disable any button based on any condition we can do so based on a Subprogram call.

Fig. 2 - Buttons codes in the miscellaneous window
Fig. 2 – Buttons codes in the miscellaneous window

-First we’ll navigate over to the development window to check the respective button code for the button we need to disable as shown in Fig. 2. Now to disable it we can make use of below code as shown in Fig. 3.

Fig. 3 - Code to remove button X (Move stock)
Fig. 3 – Code to remove button X (Move stock)

Fig. 4 - Move Stock button disabled
Fig. 4 – Move Stock button disabled

-After the code is scripted and compiled, during runtime we can see the button is disabled as shown in Fig. 4. In the code the button codes are added within the string format.

This way we can disable buttons within the Miscellaneous windows in Sage x3 for various purposes.

About Us

Greytrix – a globally recognized Premier Sage Gold Development Partner is a one-stop solution provider for Sage ERP and Sage CRM needs. Being recognized and rewarded for multi-man years of experience, we bring complete end-to-end assistance for your technical consultations, product customizations, data migration, system integrations, third-party add-on development and implementation expertise.

Greytrix caters to a wide range of Sage X3 (Sage Enterprise Management) offerings – a Sage Business Cloud Solution. Our unique GUMU™ integrations include Sage X3 for Sage CRM, Salesforce.com and Magento eCommerce along with Implementation and Technical Support worldwide for Sage X3 (Sage Enterprise Management). Currently we are Sage X3 Implementation Partner in East Africa, Middles East, Australia, Asia. We also offer best-in-class Sage X3 customization and development services, integrated applications such as POS | WMS | Payment Gateway | Shipping System | Business Intelligence | eCommerce and have developed add-ons such as Catch – Weight and Letter of Credit for Sage X3 to Sage business partners, end users and Sage PSG worldwide.

Greytrix is a recognized Sage Rockstar ISV Partner for GUMU™ Sage X3 – Sage CRM integration also listed on Sage Marketplace; GUMU™ integration for Sage X3 – Salesforce is a 5-star app listed on Salesforce AppExchange.

For more information on Sage X3 Integration and Services, please contact us at x3@greytrix.com. We will be glad to assist you.

Visibility of field on the basis of Transaction Type

$
0
0

In the realm of modern business operations, efficiency, accuracy, and transparency are priority In this pursuit, enterprise resource planning (ERP) systems play a pivotal role, and among them, Sage X3 stands out as a comprehensive solution catering to various aspects of business management.

In Sage X3, there is a requirement from one of our client to hide the Proforma Invoice Validity field for the specific transaction type (PRF transaction type in our case).
So as per the requirement, the Proforma Invoice Validity field will only be visible to the user when the user has selected the PRF transaction type and for the types other than PRF transaction, the user will not be able to see the Proforma Invoice Validity field on the sales invoice screen.

Let’s examine the functionality in more detail:

Navigate to: Sales -> Invoice -> Invoices -> Management tab

New Stuff: Disabling buttons for Miscellaneous windows in Sage X3

Fig -01 Sales Invoice Type

When the user is creating the sales invoice with the transaction type for “PRF” which is used for proforma invoice then, the field ”Proforma Invoice validity” date field will be visible in the management tab of the sales invoice screen.

Fig -02 Proforma Invoice Validity

As shown in the above screenshot, when a user selects the Proforma transaction type for sales invoice the Proforma Invoice Validity date field is visible to enter the data.

Fig - 03 Export Report Output
Fig – 03 Export Report Output

Also, the data which is entered in the Proforma Invoice Validity date field of sales invoice screen will fetched in the export report as shown in the report output in Fig 03.

But if the user is selecting any other transaction type, then this field will not be available to enter data in the invoice screen because this field will remain hidden.

In this way, we can hide any field on the basis of transaction type.

About Us

Greytrix – a globally recognized Premier Sage Gold Development Partner is a one-stop solution provider for Sage ERP and Sage CRM needs. Being recognized and rewarded for multi-man years of experience, we bring complete end-to-end assistance for your technical consultations, product customizations, data migration, system integrations, third-party add-on development and implementation expertise.

Greytrix caters to a wide range of Sage X3 (Sage Enterprise Management) offerings – a Sage Business Cloud Solution. Our unique GUMU™ integrations include Sage X3 for Sage CRM, Salesforce.com and Magento eCommerce along with Implementation and Technical Support worldwide for Sage X3 (Sage Enterprise Management). Currently we are Sage X3 Implementation Partner in East Africa, Middles East, Australia, Asia. We also offer best-in-class Sage X3 customization and development services, integrated applications such as POS | WMS | Payment Gateway | Shipping System | Business Intelligence | eCommerce and have developed add-ons such as Catch – Weight and Letter of Credit for Sage X3 to Sage business partners, end users and Sage PSG worldwide.

Greytrix is a recognized Sage Rockstar ISV Partner for GUMU™ Sage X3 – Sage CRM integration also listed on Sage Marketplace; GUMU™ integration for Sage X3 – Salesforce is a 5-star app listed on Salesforce AppExchange.

For more information on Sage X3 Integration and Services, please contact us at x3@greytrix.com. We will be glad to assist you.

How to solve Error @X3.TRT/ANUCOD$adx.

$
0
0

Recently, when attempting to delete masters such as Payment Terms, Technical sheet, etc., we encountered the error @X3.TRT/ANUCOD$adx. This issue occurs when the Script ANUCOD attempts to erase the link of the custom field, which is linked to the standard data types using a linked table and link expression.

New Stuff: Visibility of field on the basis of Transaction Type

Fig 1: PQUOTAT table with PTE linked
Fig 2: Linked Table and Link expression

You can see that the table and its index are linked in the linked table and link expression. The script looks for the PTE field in the PQUOTAT, but since the field is missing, it displays the error message below when attempting to delete the Payment term.

Fig 3: Error
Fig 3: Error

To delete the Payment term, simply navigate to the relevant table, remove the links in the Linked table and Link expression column, and Force Validate the table if you see the error message in Fig 3, it indicates the table code PQUOTAT where the issue exists.

So, by following this simple solution, we can solve an error – “@X3.TRT/ANUCOD$adx”.

About Us

Greytrix – a globally recognized Premier Sage Gold Development Partner is a one-stop solution provider for Sage ERP and Sage CRM needs. Being recognized and rewarded for multi-man years of experience, we bring complete end-to-end assistance for your technical consultations, product customizations, data migration, system integrations, third-party add-on development and implementation expertise.

Greytrix caters to a wide range of Sage X3 (Sage Enterprise Management) offerings – a Sage Business Cloud Solution. Our unique GUMU™ integrations include Sage X3 for Sage CRM, Salesforce.com and Magento eCommerce along with Implementation and Technical Support worldwide for Sage X3 (Sage Enterprise Management). Currently we are Sage X3 Implementation Partner in East Africa, Middles East, Australia, Asia. We also offer best-in-class Sage X3 customization and development services, integrated applications such as POS | WMS | Payment Gateway | Shipping System | Business Intelligence | eCommerce and have developed add-ons such as Catch – Weight and Letter of Credit for Sage X3 to Sage business partners, end users and Sage PSG worldwide.

Greytrix is a recognized Sage Rockstar ISV Partner for GUMU™ Sage X3 – Sage CRM integration also listed on Sage Marketplace; GUMU™ integration for Sage X3 – Salesforce is a 5-star app listed on Salesforce AppExchange.

For more information on Sage X3 Integration and Services, please contact us at x3@greytrix.com. We will be glad to assist you.

Account Pyramids in Sage X3

$
0
0

Account pyramids are the manner in which accounts are associated with one another in account groups as user-defined in sage x3. The account pyramids could also be known as account rollups in the way that account groups ‘roll up’ to greater account categorizations in summary form for reporting purposes. In Sage X3, Account pyramids can be created using the auto generate function or the duplicate function. To begin, navigate to the account pyramids screen on the following path:

All > common data > G/L accounting tables > General > account pyramids

As shown in figure 1.

 Figure 1.

Click new on the right-hand side of the screen as seen below to use the auto generate function in pyramid creation. As shown in figure 2.

Figure 2.

Fields denoted with the red asterisk (*) must have values to satisfy the creation of account groups. A code must be assigned under the pyramid input area. The description and short description input areas are not mandatory, but can be used to provide useful common language and identifiers. The pyramid must be associated with a chart of accounts as seen in the image below.

Figure 3.

The roles able to access the pyramid can be defined (below) for control purposes of editing and reconfiguration.

As Shown in Figure 4.

Figure 4.

Access code and stat group will be generated once the pyramid is created with the check (√). The autog enerate pyramid or duplicate pyramid functions are found in the top right-hand corner of the active window as denoted by the three vertical dots. As shown in Figure 5.

Figure 5.

A message box may appear that states that account groups already exist. Click ok and continue to the generate pyramid screen as shown below. This screen shows the number of levels in the pyramid with 50 being the lowest vertical display and 10 being the highest in this example.

As shown in figure 6.

Figure 6.

The pyramid will then be available for visual display. As shown in Figure 7.

Figure 7.

The pyramid may be modified by hovering the mouse indicator over the area of the pyramid the user wishes to modify and selecting the action from the drop-down listing noted below. As shown in Figure 8.

Figure 8.

Conclusion: Use account pyramids in dimension balance inquiry or for financial data extraction. The duplicate pyramid function, found in the top right-hand corner of the active window on the pyramid screen, can be used to quickly adopt a duplicate of a previously created pyramid. The duplicated pyramid can then be modified, added to, or simplified through similar steps as noted above.

About Us:

Greytrix – a globally recognized Premier Sage Gold Development Partner is a one-stop solution provider for Sage ERP and Sage CRM needs. Being recognized and rewarded for multi-man years of experience, we bring complete end-to-end assistance for your technical consultations, product customizations, data migration, system integrations, third-party add-on development and implementation expertise.

Greytrix caters to a wide range of Sage X3 (Sage Enterprise Management) offerings – a Sage Business Cloud Solution. Our unique GUMU™ integrations include Sage X3 for Sage CRMSalesforce.com and Magento eCommerce along with Implementation and Technical Support worldwide for Sage X3 (Sage Enterprise Management). Currently we are Sage X3 Implementation Partner in East Africa, Middles East, Australia, Asia. We also offer best-in-class Sage X3 customization and development services, integrated applications such as POS | WMS | Payment Gateway | Shipping System | Business Intelligence | eCommerce and have developed add-ons such as Catch – Weight  and Letter of Credit for Sage X3 to Sage business partners, end users and Sage PSG worldwide.

Greytrix is a recognized Sage Rockstar ISV Partner for GUMU™ Sage X3 – Sage CRM integration also listed on Sage Marketplace; GUMU™ integration for Sage X3 – Salesforce is a 5-star app listed on Salesforce AppExchange.

For more information on Sage X3 Integration and Services, please contact us at x3@greytrix.com. We will be glad to assist you.

Creation of Shipping Calendar to display on dashboard

$
0
0

To create a Shipping calendar we will use X3 calendar functionality.
The shipping calendar will help us with delivery tracking. Specially it will be helpful for sales and warehouse teams.

For creation of “Shipping calendar” we are going to use SORDER and BPCARRIER table’s.

Step 1: Go to Setup>Usage>Reports>Graphical query tool. Create new query

  • We require following fields: DEMDLVDAT, SOHNUM, BPDCRYNAM, ORDSTA, ALLSTA, MDL from SORDER and BPTBPTNAM from BPCARRIER.

Fig: Graphical query screen 1

Add below lines in selection filed:

Fig: Graphical query screen 2

Activate the check box and validate the screen. Click on RUN button to verify the record.

Fig: Graphical query screen 3

Step 2: Go to Setup>Interactive dashboard>Dashboard view. create new dashboard

Fig: Dashboard screen 4

Fig: Dashboard screen 5

Step 3: Create new menu items. Link type – Query.

Fig: Menu-Item 6

Create new menu item. Link type – Calendar.

Fig: Menu-Item 7

Step 4: Create new Home Page.

Fig: Home Page-8

Select calendar:

Fig: Add gadgets 9

Fig: Add gadgets 10

Fig: Dashboard 11

About Us:

Greytrix – a globally recognized Premier Sage Gold Development Partner is a one-stop solution provider for Sage ERP and Sage CRM needs. Being recognized and rewarded for multi-man years of experience, we bring complete end-to-end assistance for your technical consultations, product customizations, data migration, system integrations, third-party add-on development and implementation expertise.

Greytrix caters to a wide range of Sage X3 (Sage Enterprise Management) offerings – a Sage Business Cloud Solution. Our unique GUMU™ integrations include Sage X3 for Sage CRMSalesforce.com and Magento eCommerce along with Implementation and Technical Support worldwide for Sage X3 (Sage Enterprise Management). Currently we are Sage X3 Implementation Partner in East Africa, Middles East, Australia, Asia. We also offer best-in-class Sage X3 customization and development services, integrated applications such as POS | WMS | Payment Gateway | Shipping System | Business Intelligence | eCommerce and have developed add-ons such as Catch – Weight  and Letter of Credit for Sage X3 to Sage business partners, end users and Sage PSG worldwide.

Greytrix is a recognized Sage Rockstar ISV Partner for GUMU™ Sage X3 – Sage CRM integration also listed on Sage Marketplace; GUMU™ integration for Sage X3 – Salesforce is a 5-star app listed on Salesforce AppExchange.

For more information on Sage X3 Integration and Services, please contact us at x3@greytrix.com. We will be glad to assist you.

Importance of X3 Installation and how to solve error if encountered on Folder Validation 

$
0
0

The Installation of Sage x3 ERP system involves several steps to ensure a smooth and successful implementation.  

Which has multiple important steps that are,

  • JDK /APACHE Installation
  • Power user creation 
  • Component installation
  • X3 solution / Console configuration
  • Importing Seed folder
  • Folder validation
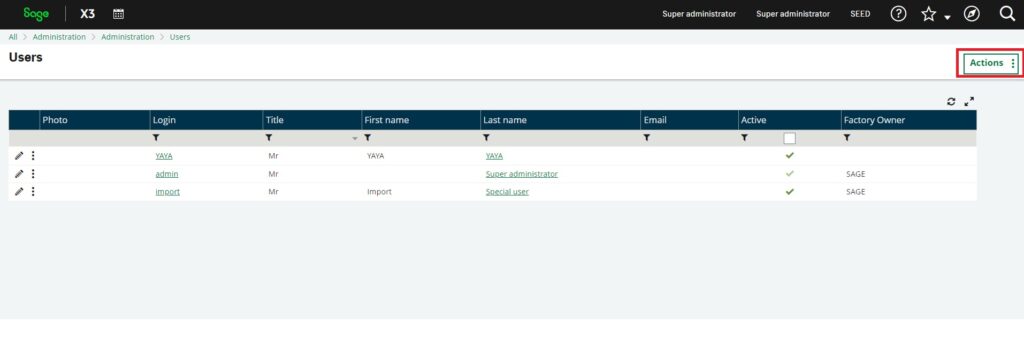
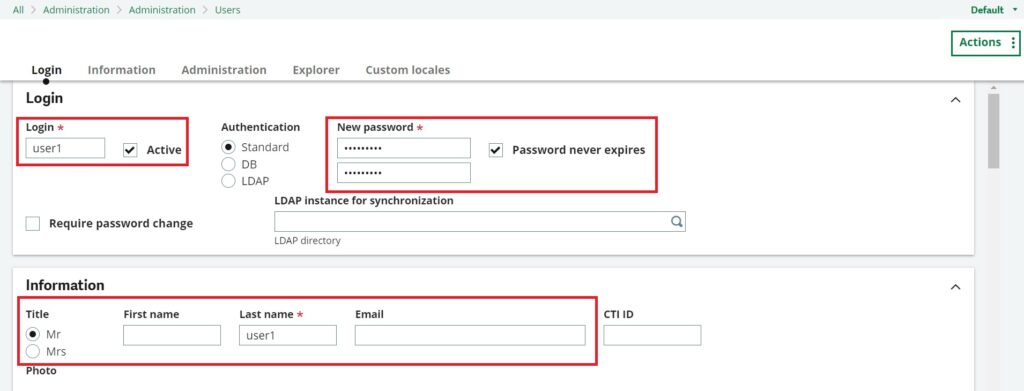
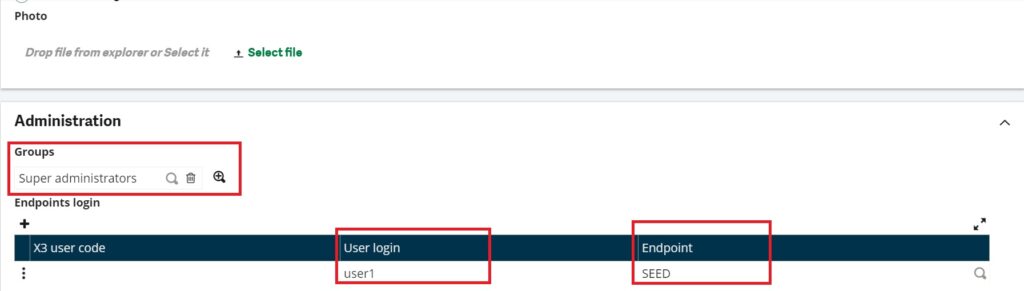
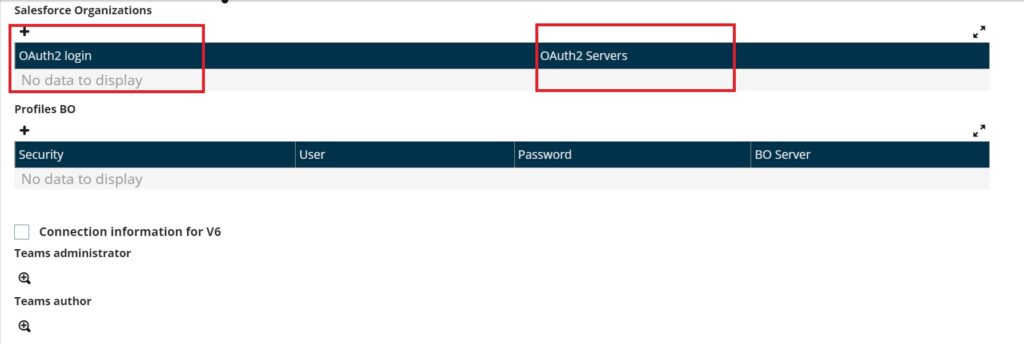
  • X3 Endpoint Creation

Implement a regular maintenance schedule to ensure the Sage X3 system remains up-to-date and secure.

Stay informed about software updates and implement them as necessary.

Remember that Sage X3 Installations can be complex, and it’s crucial to involve key stakeholders, communicate effectively, and adapt the implementation plan as needed throughout the process.

Data Migration:

Plan and execute data migration from existing systems to the new ERP system.

Cleanse and validate data to ensure accuracy and integrity.

Customization and Configuration:

Customize the ERP system to match your business processes.

Configure modules, workflows, and user roles based on organizational requirements.

Testing:

Conduct thorough testing of the ERP system to identify and resolve any issues.

Perform unit testing, integration testing, and user acceptance testing.

Go-Live:

Plan the system go-live carefully, considering the least disruptive time for your business.

Monitor the system closely during the initial period and address any issues promptly.

Post-Implementation Review:

Conduct a post-implementation review to evaluate the success of the ERP installation.

Get the feedback from users and address any remaining issues or optimization opportunities.

So, there are few chances to get the error, one of the below errors we might face on folder validation process.

Fig1. Error on folder Validation

If we face Fatal error (6) which shows the message like the webserver has experienced the following error when processing the last query sent. The session is going to be cancelled: classic session not found on this server. this can be due to the unscheduled server restart.

As mention in the error message itself this error has been encountered due to the unscheduled restart of server which cause the incompletion of Folder validation.

So, whenever we have faced this kind of error first we need to check firewall connection, schedule for windows update, schedule for Server Restart because this sometime putting the restriction in smooth installation

Where in you will go further and check the x3 solution and endpoint will get the below issue

Fig 2. Error on x3 endpoint

Whenever we can get this kind of error, open the console and try to configure the solution onto the console again if the runtime shows the error that means due to the error “ECONNABORTED” has crashed the runtime, so in this case the runtime services also get removed from the services.

The solution we can apply on it to Reinstall or modify the Runtime component again and if needed run the adxadmin component too after that check the services if the services gets starts properly and open the Sage X3 and then check the server setting from x3 solution if it looks that issue has not occurred again keep the unscheduled activity like a server restart, antivirus /window/firewall disable till the completion of installation for the clear results .

Fig 3. Error on Main Runtime

After that we can start the folder validation process, after the successful completion we can get the log below .

Fig 4. Log file

In this way we can solve the error faced folder validation and complete the Installation of Sage x3.

About Us

Greytrix – a globally recognized Premier Sage Gold Development Partner is a one-stop solution provider for Sage ERP and Sage CRM needs. Being recognized and rewarded for multi-man years of experience, we bring complete end-to-end assistance for your technical consultations, product customizations, data migration, system integrations, third-party add-on development and implementation expertise.

Greytrix caters to a wide range of Sage X3 (Sage Enterprise Management) offerings – a Sage Business Cloud Solution. Our unique GUMU™ integrations include Sage X3 for Sage CRMSalesforce.com and Magento eCommerce along with Implementation and Technical Support worldwide for Sage X3 (Sage Enterprise Management). Currently we are Sage X3 Implementation Partner in East Africa, Middles East, Australia, Asia. We also offer best-in-class Sage X3 customization and development services, integrated applications such as POS | WMS | Payment Gateway | Shipping System | Business Intelligence | eCommerce and have developed add-ons such as Catch – Weight  and Letter of Credit for Sage X3 to Sage business partners, end users and Sage PSG worldwide.

Greytrix is a recognized Sage Rockstar ISV Partner for GUMU™ Sage X3 – Sage CRM integration also listed on Sage Marketplace; GUMU™ integration for Sage X3 – Salesforce is a 5-star app listed on Salesforce AppExchange.

For more information on Sage X3 Integration and Services, please contact us at x3@greytrix.com. We will be glad to assist you.

How to flow dimension in Work Order’s GL/journal entry in Sage X3

$
0
0

In Sage X3,dimension types are analysis codes that can be used to track costs, revenue, and quantities.

In various case, user wants to flow the dimension data to the SI/PI/WO transactions and its GL entries. So, to achieve this setup and functionality. Kindly follow below steps.

Below is the setup and working of the GL flow through Work order/ production tracking’s GL entry.

Steps:

  1. Check the dimension defined for Machine Work Center and Labor Work Center.

Navigate to: Work Centers -> Costing Dimension field

For Machine work Center:

Machine work center
Fig01: Machine work center

-> Now jump to costing dimension screen and define the dimension there.

Machine Costing Dimension
Fig02: Machine Costing Dimension

-> For labor Work Center: Follow the same step to define dimension:

Labor Work Center
Fig03: Labor Work Center
Labor Costing Dimension
Fig04: Labor Costing Dimension

2. Now Define the dimension in below screen and validate it .

Navigate to : Setup -> Manufacturing -> Entry transaction -> Production tracking

Production Tracking
Fig05: Production Tracking setup

    3. Now define the dimensions in default dimension screen

    Navigate to: Setup -> Financial -> Accounting Interface -> Default Dimension

      For below codes define default dimension in below highlighted field.

      1. MFO
      2. MFOAUT
      3. MKOLAB
      Default dimensions
      Fig06: Default dimensions

      4. After setting above setup, the dimension field will display in production tracking screen.

      5. Now to check the dimension flow to GL. Create below transactions.

      6. Create Work Order: ‘WO240006’.

      7. Create Production Tracking: ‘PIIC2401MTK006’.

      Production Tracking screen
      Fig07: Production Tracking screen

      8. Close the Work Order ‘WO240006’.

      9. Post the Work Order from WIP Posting.

      10. Journal will get create ‘WIP240000003’.

      11. Now check the Journal and you will see dimensions flow.

      Journal Entry
      Fig08: Journal Entry

      As, we can see with all the above setup and flow , dimension got reflected in GL entries through their respective transactions(Work Order/Production Tracking).

      In this way, we can setup the parameters for flowing dimensions to GL entries.

      About Us

      Greytrix – a globally recognized Premier Sage Gold Development Partner is a one-stop solution provider for Sage ERP and Sage CRM needs. Being recognized and rewarded for multi-man years of experience, we bring complete end-to-end assistance for your technical consultations, product customizations, data migration, system integrations, third-party add-on development and implementation expertise.

      Greytrix caters to a wide range of Sage X3 (Sage Enterprise Management) offerings – a Sage Business Cloud Solution. Our unique GUMU™ integrations include Sage X3 for Sage CRMSalesforce.com and Magento eCommerce along with Implementation and Technical Support worldwide for Sage X3 (Sage Enterprise Management). Currently we are Sage X3 Implementation Partner in East Africa, Middles East, Australia, Asia. We also offer best-in-class Sage X3 customization and development services, integrated applications such as POS | WMS | Payment Gateway | Shipping System | Business Intelligence | eCommerce and have developed add-ons such as Catch – Weight  and Letter of Credit for Sage X3 to Sage business partners, end users and Sage PSG worldwide.

      Greytrix is a recognized Sage Rockstar ISV Partner for GUMU™ Sage X3 – Sage CRM integration also listed on Sage Marketplace; GUMU™ integration for Sage X3 – Salesforce is a 5-star app listed on Salesforce AppExchange.

      For more information on Sage X3 Integration and Services, please contact us at x3@greytrix.com. We will be glad to assist you.


      How to update the fields in the signature history table for a custom workflow.

      $
      0
      0

      In Sage X3, workflows are used to automate and streamline business processes by defining a sequence of tasks that need to be performed in a specific order. These tasks can involve approvals, reviews, or other actions necessary for the completion of a business process. Workflows in Sage X3 help organizations enforce consistency, reduce manual intervention, and improve efficiency.

      In Sage X3, you can assign multiple signatures in a workflow on different objects to implement a multi-level approval process. This allows for more complex and controlled workflows, where different users or groups need to review and approve various stages of a business process. But when we create the custome workflow the signature history is not getting the proper flow the flags are not updated.

      Here’s a step-by-step description of how to update the fields in the signature history table for a custom workflow in Sage X3:

      STEP 1:-

      Workflow Setup:  First, you need to define the workflow itself. Go to the –>>”Workflow Setup” screen in Sage X3,  where you can create and configure the workflow according to your business requirements.

      Specify the objects for which you want to implement the workflow, such as purchase orders, sales orders, or expense reports.

      STEP2:

      After clicking on workflow rules,

      Jump to: Assignment Rule: Create a New Assignment Rule

      Signature Assignment: Once you have defined the signature levels, you can assign the relevant users or user groups to each level. This is done based on the roles and responsibilities of the users in your organization. Sage X3 allows you to easily select the appropriate users or groups from your system’s user database

      STEP 3:-

      -After clicking on the Assignment Rule display below the

      -Enter the name of the assignment rule, the data model, and Number of ignatures.

      -The “number of signatures” field specifies how many signatures will be used throughout the approval process.

      Fig 1. Assignment Rules

      STEP 4:-

      After all the creation processes Save and validate the assignment rule and workflow rule.

                                                      Fig 2. Signature History

      STEP 5:-

      After completing all the creation processes and successfully triggering the workflow to the next user, such as ‘TEST2,’ we observed in the signature history, as shown in Figure 4, that the signed flag was updated to ‘To sign.’ However, when the user modified the order and saved it, the workflow was triggered again with the updated order, and the signed flag was updated to ‘Cancelled,’ and the reason flag was updated to ‘Document modified.’ However, for the custom workflow, the signatures history table is not updated automatically, as is the case with the standard workflow. Therefore, we need to manually update the flag in the table.

         Fig 3. Store requisition

                                                      Fig 4. Signature History

      STEP 6:-

      The signatures history data is stored in the ‘AWRKPARF’ workflow rules (signature) table. Therefore, we need to write code to update the flag during the modification process. After writing the code, the ‘Signed’ and ‘Reason’ flags are updated successfully. Refer to the below Figure 6.

           Fig 5. Table dictionary

         Fig 6. Signature History

      This blog help us to know about the use By implementing multiple signatures in workflows on different objects, Sage X3 enables you to create sophisticated approval processes that align with your organization’s specific requirements. This promotes better control, compliance, and efficiency in handling critical business operations an how to update the signature history table flags for the custom workflow .

      About Us

      Greytrix – a globally recognized Premier Sage Gold Development Partner is a one-stop solution provider for Sage ERP and Sage CRM needs. Being recognized and rewarded for multi-man years of experience, we bring complete end-to-end assistance for your technical consultations, product customizations, data migration, system integrations, third-party add-on development and implementation expertise.

      Greytrix caters to a wide range of Sage X3 (Sage Enterprise Management) offerings – a Sage Business Cloud Solution. Our unique GUMU™ integrations include Sage X3 for Sage CRMSalesforce.com and Magento eCommerce along with Implementation and Technical Support worldwide for Sage X3 (Sage Enterprise Management). Currently we are Sage X3 Implementation Partner in East Africa, Middles East, Australia, Asia. We also offer best-in-class Sage X3 customization and development services, integrated applications such as POS | WMS | Payment Gateway | Shipping System | Business Intelligence | eCommerce and have developed add-ons such as Catch – Weight  and Letter of Credit for Sage X3 to Sage business partners, end users and Sage PSG worldwide.

      Greytrix is a recognized Sage Rockstar ISV Partner for GUMU™ Sage X3 – Sage CRM integration also listed on Sage Marketplace; GUMU™ integration for Sage X3 – Salesforce is a 5-star app listed on Salesforce AppExchange.

      For more information on Sage X3 Integration and Services, please contact us at x3@greytrix.com. We will be glad to assist you.

      Pegging history in Sage X3

      $
      0
      0

      The “Pegging History” tool allows the history elements to be shown both upstream (what does the order cover?) and downstream (what covers the order?) from a “pivotal” order. In the second grid, under the multi-level option, the list of coverages is suggested if the selected “pivot” is of the required type.

      The “Pegging History” functionality tries to meet the following requirements:

      Memorization of the connections between resources and requirements, the effects of resource changes on the requirements they cover, and the renewal of the planned quantities.

      The following functions are concerned for the moment:

      Workbench, groupings, automatic release, direct order, automatic deletion and WO management.

      Navigate to: Manufacturing –> Utilities –> Pegging history. (Refer to the below fig)

      Figure 1: Navigation Menu

      Pegging in an ERP context typically refers to the ability to trace the relationship between supply and demand. It helps in understanding how the demand for a particular product is met by the supply of raw materials or components. However, the specific features and capabilities of ERP systems can evolve with updates and new releases.

      Following fields are present on the screen. (Refer to the below fig.)

      Figure 2: Pegging history

      Storage site (field STOFCY)
      Enter or select the storage site where the selected product is active.
      The Selection icon (magnifying glass) only suggests products that are referenced in the products-sites table.

      Product (field ITMREF)
      This field specifies the reference of the product to process.

      Stock unit (field STU)
      This field typically refers to the unit of measure in which the quantity of an item is managed or recorded in the system for stock or inventory purposes.

      Type (field VCRTYP)
      Enter the document type to select.

      Entry (field VCRNUM)
      The document type, the document number and the document line number are used to identify the origin of the stock movement:

      1. Supplier receipt
      2. Customer delivery
      3. Work order
      4. Receipt movement

      Line (field VCRLIN)
      The number of journal lines to process.

      Sequence (field VCRSEQ)
      The sequence number of the document to process.

      After entering all the required details click on the Search button and we will get the data which we are looking for.(Refer to the below fig.)

      Figure 3: Result

      The “Pegging History” screen in Sage X3 allows users to view the historical and current pegging relationships associated with a specific item.

      In conclusion, the Pegging History screen in Sage X3 plays a crucial role in providing transparency and insights into the relationships between different transactions, helping users manage and optimize their supply chain and order fulfillment processes.

      About Us

      Greytrix – a globally recognized Premier Sage Gold Development Partner is a one-stop solution provider for Sage ERP and Sage CRM needs. Being recognized and rewarded for multi-man years of experience, we bring complete end-to-end assistance for your technical consultations, product customizations, data migration, system integrations, third-party add-on development and implementation expertise.

      Greytrix caters to a wide range of Sage X3 (Sage Enterprise Management) offerings – a Sage Business Cloud Solution. Our unique GUMU™ integrations include Sage X3 for Sage CRMSalesforce.com and Magento eCommerce along with Implementation and Technical Support worldwide for Sage X3 (Sage Enterprise Management). Currently we are Sage X3 Implementation Partner in East Africa, Middles East, Australia, Asia. We also offer best-in-class Sage X3 customization and development services, integrated applications such as POS | WMS | Payment Gateway | Shipping System | Business Intelligence | eCommerce and have developed add-ons such as Catch – Weight  and Letter of Credit for Sage X3 to Sage business partners, end users and Sage PSG worldwide.

      Greytrix is a recognized Sage Rockstar ISV Partner for GUMU™ Sage X3 – Sage CRM integration also listed on Sage Marketplace; GUMU™ integration for Sage X3 – Salesforce is a 5-star app listed on Salesforce AppExchange.

      For more information on Sage X3 Integration and Services, please contact us at x3@greytrix.com. We will be glad to assist you.

      Time management and Inquiry Screen (Load and Capacity)

      $
      0
      0

      To equip its end user Sage X3 now has a Load and capacity screen to judge the work put in by a particular user on ERP.

      The view offers a graphical representation of time spent by a user with respect to different  time periods that can be years , hours , minutes and months.

      • To navigate to the screen follow the following steps

      Projects > Time Management > Inquiries > Load and Capacity

      Fig 1.  Navigation Page Load and Capacity

      This enables its end  to have a multi-project view related to the user  and additional selection criteria upto a selection period for viewing the detailed graph.

      The required access control values in the Functional authorization function for the function code have been applied to the Project billing overview function.

      The screen consist of a view that enables the viewer  him to choose the company which the employee is working with.This is to be chosen through the company’s unique code by selection.

      Fig 2. Load and capacity Screen

      Furthermore the user has to choose a site that must be an employee’s working site; however it is not mandatory to fill all the fields next to it( Role) .

      Employee  code in the next field has to be entered that will fetch the hourly/monthly/yearly workload and time spent  data according to that employee.

      Start and end date filtered data as stated between these dates.

      Group by field classifies data segregation unit .

      Fig 3.  Filtering data for Employee PJIMR

      As per the above screen shot the data to be brought to screen should only have an employee as filter and represent the graphical overview of workload on that employee between the dates above in days.

      We can include the site and company where that employee is to be or is listed.

      Fig 4. Graphical Representation

      The graph has capacity on Y axis and dates on X axis respectively in dictating the workload and attended dates of following workload.

      About Us

      Greytrix – a globally recognized Premier Sage Gold Development Partner is a one-stop solution provider for Sage ERP and Sage CRM needs. Being recognized and rewarded for multi-man years of experience, we bring complete end-to-end assistance for your technical consultations, product customizations, data migration, system integrations, third-party add-on development and implementation expertise.

      Greytrix caters to a wide range of Sage X3 (Sage Enterprise Management) offerings – a Sage Business Cloud Solution. Our unique GUMU™ integrations include Sage X3 for Sage CRMSalesforce.com and Magento eCommerce along with Implementation and Technical Support worldwide for Sage X3 (Sage Enterprise Management). Currently we are Sage X3 Implementation Partner in East Africa, Middles East, Australia, Asia. We also offer best-in-class Sage X3 customization and development services, integrated applications such as POS | WMS | Payment Gateway | Shipping System | Business Intelligence | eCommerce and have developed add-ons such as Catch – Weight  and Letter of Credit for Sage X3 to Sage business partners, end users and Sage PSG worldwide.

      Greytrix is a recognized Sage Rockstar ISV Partner for GUMU™ Sage X3 – Sage CRM integration also listed on Sage Marketplace; GUMU™ integration for Sage X3 – Salesforce is a 5-star app listed on Salesforce AppExchange.

      For more information on Sage X3 Integration and Services, please contact us at x3@greytrix.com. We will be glad to assist you.

      How to create a new User Login in Sage X3

      $
      0
      0

      Creating a new user login in Sage X3 is a simple process. Begin by accessing the Users section within the Administration module via All -> Administration -> Administration -> Users. Click on “Actions” and select “New User.” When you choose “New User” in Sage X3, a new screen appears. In the “Login” section, fill in all the mandatory details like the login name, activate the user by ticking “Active,” and set a new password with options like “Password never expires” or “Required password change.” Move to the “Information” section to pick a title, and enter the user’s name, last name, and email. For a personal touch, you can add a photo by selecting a file. In the “Administration” section, choose groups like “Super Administration” for user customization. Specify login endpoints like “SEED” and optionally add Oauth2 login and Oauth2 servers. Check user roles and permissions in the “Explorer” tab. In the “Custom Locales” tab, add the language code (e.g., “en-GB”) for preferences; the system fills in date and time formats automatically. Save the setup, log out, and test the new user login by entering the username and password, gaining access to Sage X3.

      Here are the step-by-step instructions for creating a new user login in Sage X3:

      Step 1: Navigate to User Creation

      • Go to All -> Administration -> Administration -> Users.
      • Click on the “Actions” button and then select “New User.”

      Fig1: Users–Action

      Step 2: Access New User Interface

      • After selecting “New User,” a new interface will appear, as displayed in the provided image.

      Fig 2: Users—New User

      Step 3: Login Tab Details

      • In the “Login” tab, enter mandatory information.
      • Specify the login name and activate the user by checking the “Active” checkbox.
      • Set a new password and configure options like “Password never expires” or “Required password change.”
      • In the “Information” tab, select the desired title (e.g., “Mr/Mrs”), and enter the user’s name, last name, and email.

      Fig 3: Administrator–login

      Fig 4.1: Administrator

      Step 4: Additional Settings

      • Optionally, add a photo by selecting a file.
      • In the “Administration” tab, choose groups like “Super Administration” for user customization.
      • Add endpoints for login, specifying the desired login (e.g., “user1”) and endpoints (e.g., “SEED”).
      • Optionally, include Oauth2 login and Oauth2 servers.

      Fig 4.2: Administrator

      Step 5: Explorer Tab and Custom Locales

      • In the “Explorer” tab, review assigned user roles and permissions.
      • In the “Custom Locales” tab, add the defined locale code (e.g., “en-GB”) for language preferences.
      • The system will automatically populate details like date format and time format.
      • Save the configuration, log out, and test the new user login by entering the specified username and password, granting access to Sage X3.Refer below image ”fig.5 and fig.6”.

      Fig 5: Explorer

      Fig 6: Custom locales

      Sage X3 makes it easy for administrators to add new users to the system. It’s simple yet powerful, allowing customization for roles and permissions. This helps users navigate and use Sage X3 efficiently. The step-by-step instructions ensure a smooth setup, making it secure and giving users confidence when logging in to Sage.

      Sage X3 Workflow Auditing Streamlining Transparency Across Operations

      $
      0
      0

      In Sage X3, workflow auditing involves tracking and recording the changes made to any documents as they progress through the workflow. This is useful for maintaining transparency, ensuring compliance, and identifying any discrepancies or issues in the process. Below are general steps to set up and perform workflow auditing on sales orders in Sage X3

      *Note: We will be using the “Sales Orders” table (SORDER) in this example, but you can apply these methods to any table/fields you choose.

      Access Rights: Ensure that users involved in the sales order workflow have appropriate access rights to view and edit sales orders. This includes access to the workflow and relevant screens.

      Define Workflow: Define the sales order workflow in Sage X3. This involves specifying the different stages through which a sales order passes.

      Set up workflow rules and conditions to determine how the sales order should progress through each stage.

      Audit Configuration: In Sage X3, configure audit settings to capture changes made to sales orders. This may include changes to order status, quantities, prices, customer details, and other relevant information.

      Audit tab
      Fig01: Audit tab

      Audit configuration settings can usually be found in the Administration module.

      Enable Audit Trails: Activate audit trails for sales orders. This is typically done in the parameters or settings related to auditing within Sage X3.

      Define which specific fields or actions you want to track in the sales order audit trail.

      Audit Reports: Utilize Sage X3’s reporting capabilities to generate audit reports for sales orders. These reports should provide a comprehensive view of all changes made to sales orders within the specified timeframe.

      Common audit reports may include details such as user activity, date and time of changes, and the nature of the modifications.

      Monitoring and Alerts: Set up monitoring and alert systems to notify relevant users or administrators of significant changes or actions within the sales order workflow.

      Alerts can be configured based on specific criteria, such as the approval of high-value orders or changes to critical order information.

      About Us

      Greytrix – a globally recognized Premier Sage Gold Development Partner is a one-stop solution provider for Sage ERP and Sage CRM needs. Being recognized and rewarded for multi-man years of experience, we bring complete end-to-end assistance for your technical consultations, product customizations, data migration, system integrations, third-party add-on development and implementation expertise.

      Greytrix caters to a wide range of Sage X3 (Sage Enterprise Management) offerings – a Sage Business Cloud Solution. Our unique GUMU™ integrations include Sage X3 for Sage CRMSalesforce.com and Magento eCommerce along with Implementation and Technical Support worldwide for Sage X3 (Sage Enterprise Management). Currently we are Sage X3 Implementation Partner in East Africa, Middles East, Australia, Asia. We also offer best-in-class Sage X3 customization and development services, integrated applications such as POS | WMS | Payment Gateway | Shipping System | Business Intelligence | eCommerce and have developed add-ons such as Catch – Weight  and Letter of Credit for Sage X3 to Sage business partners, end users and Sage PSG worldwide.

      Greytrix is a recognized Sage Rockstar ISV Partner for GUMU™ Sage X3 – Sage CRM integration also listed on Sage Marketplace; GUMU™ integration for Sage X3 – Salesforce is a 5-star app listed on Salesforce AppExchange.

      For more information on Sage X3 Integration and Services, please contact us at x3@greytrix.com. We will be glad to assist you.

      Viewing all 1515 articles
      Browse latest View live


      <script src="https://jsc.adskeeper.com/r/s/rssing.com.1596347.js" async> </script>