Quantcast
Channel: Sage X3 – Tips, Tricks and Components
Viewing all 1522 articles
Browse latest View live

Error “A: Unauthorized stock status” while creating purchase receipt in Sage X3

$
0
0

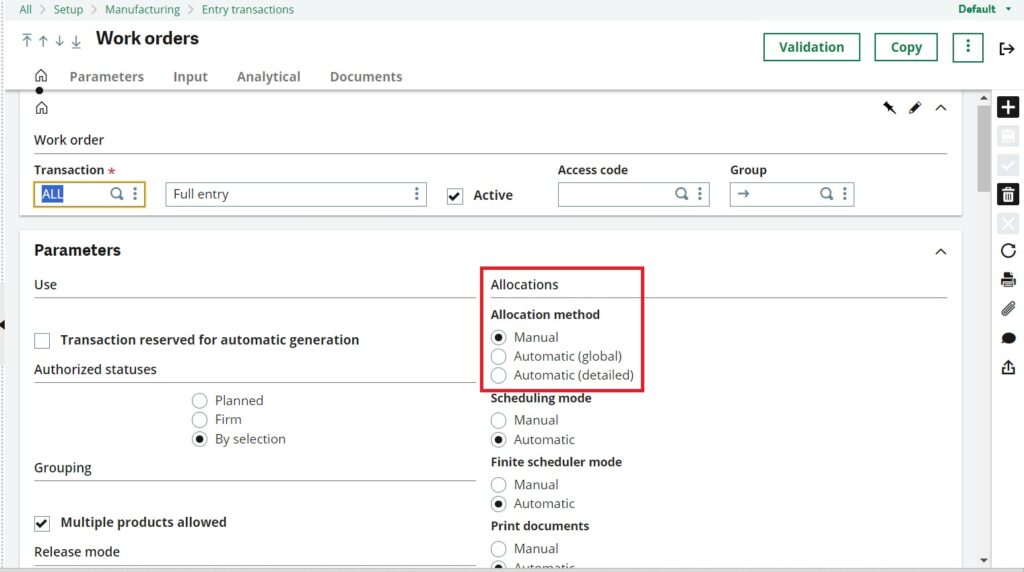
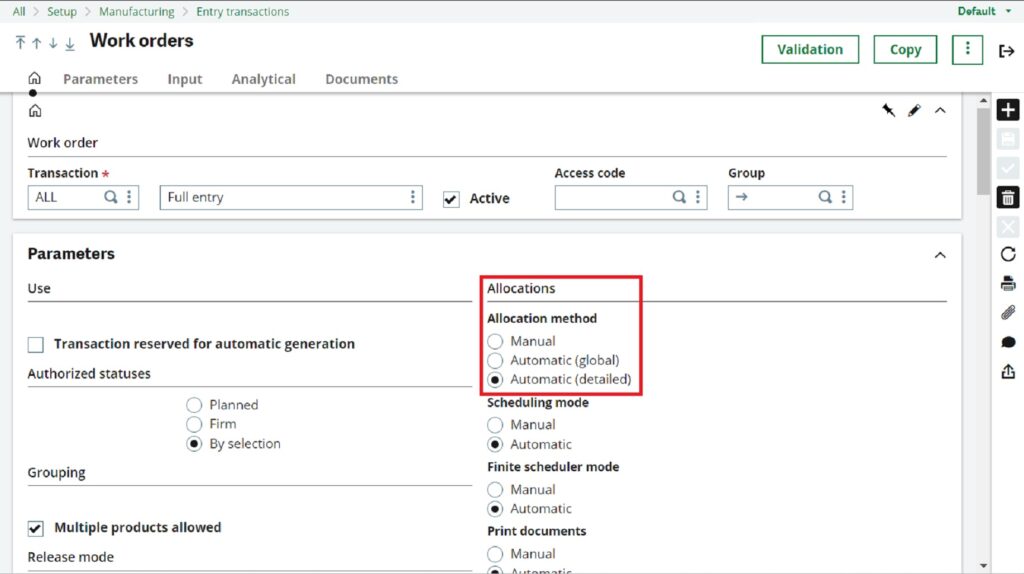
Sage X3 prevents customers from obtaining a “A: Unauthorized stock status” warning by providing three quality control settings, the degree of which varies based on the setup.

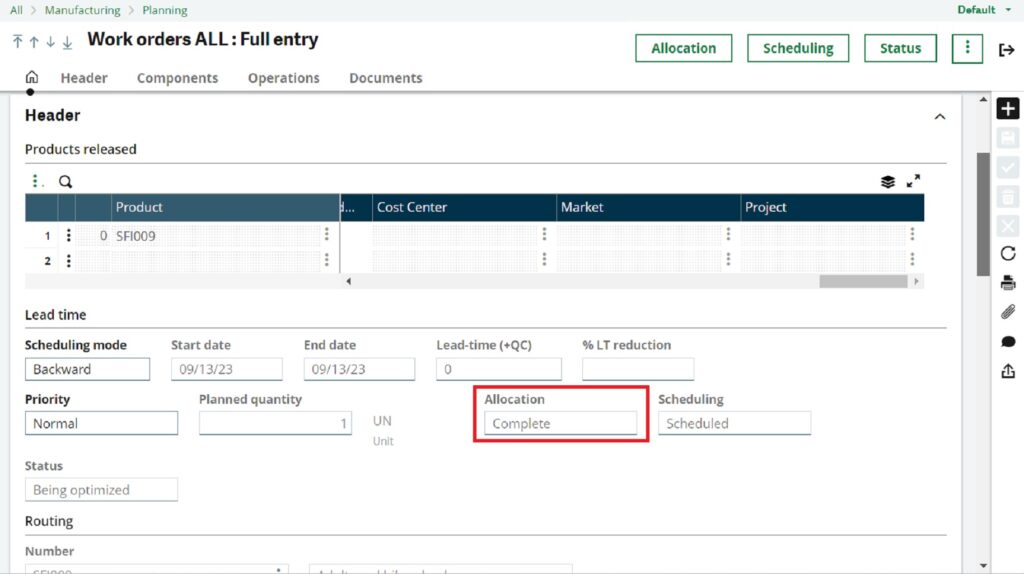
Suppliers tab in the product function is where you find the most restrictive setting. As soon as a PO receipt is processed for a supplier that has their QC management set to Non-changeable control, the product will automatically default to a Q status and needs to be received in that state. You will see the notice “A: Unauthorized stock status” if you attempt to alter the Q status to an A.

Fig02: QC Management field

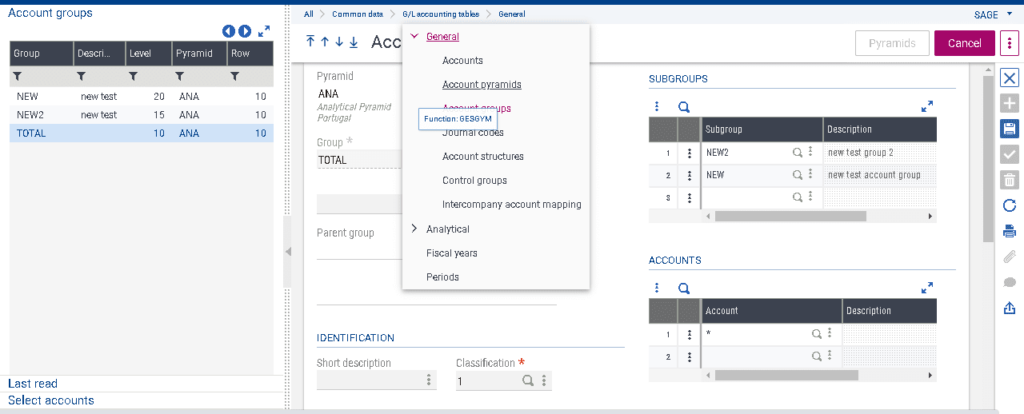
The product site is the next step of the quality control limitation. Any product for this site will default to a Q status according to the setup on the product site if the QC management is set to Non-changeable control. This means that it doesn’t matter which supplier is entered on the receipt.

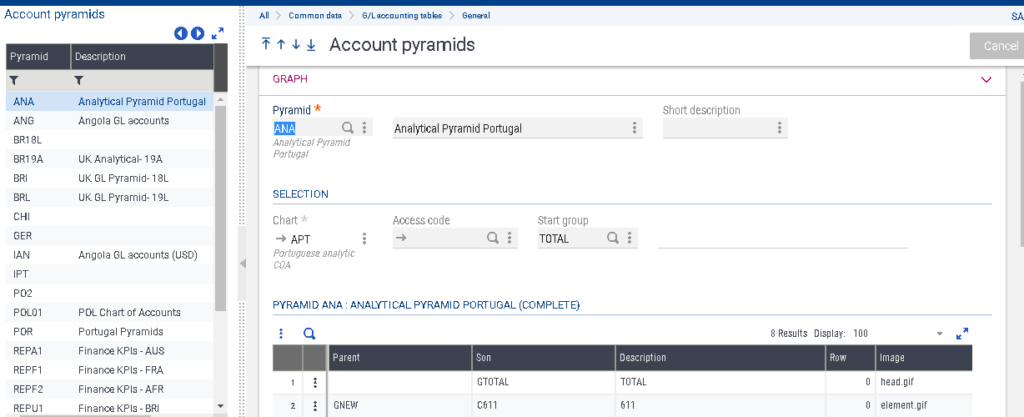
The least restrictive level is the Product category level. In the Quality section for the product category, the QC management can be set to Non-changeable control; however, when receiving a product, the status will default to A but it can be changed to Q.

By following the above-mentioned scenarios, the problem is readily handled.

About Us

Greytrix – a globally recognized Premier Sage Gold Development Partner is a one-stop solution provider for Sage ERP and Sage CRM needs. Being recognized and rewarded for multi-man years of experience, we bring complete end-to-end assistance for your technical consultations, product customizations, data migration, system integrations, third-party add-on development and implementation expertise.

Greytrix caters to a wide range of Sage X3 (Sage Enterprise Management) offerings – a Sage Business Cloud Solution. Our unique GUMU™ integrations include Sage X3 for Sage CRMSalesforce.com and Magento eCommerce along with Implementation and Technical Support worldwide for Sage X3 (Sage Enterprise Management). Currently we are Sage X3 Implementation Partner in East Africa, Middles East, Australia, Asia. We also offer best-in-class Sage X3 customization and development services, integrated applications such as POS | WMS | Payment Gateway | Shipping System | Business Intelligence | eCommerce and have developed add-ons such as Catch – Weight  and Letter of Credit for Sage X3 to Sage business partners, end users and Sage PSG worldwide.

Greytrix is a recognized Sage Rockstar ISV Partner for GUMU™ Sage X3 – Sage CRM integration also listed on Sage Marketplace; GUMU™ integration for Sage X3 – Salesforce is a 5-star app listed on Salesforce AppExchange.

For more information on Sage X3 Integration and Services, please contact us at x3@greytrix.com. We will be glad to assist you.


Adding Additional Invoices to Closed POs in Sage X3

$
0
0

When your PO is accidentally closed and your invoice status shows as fully invoiced and need to do changes or add products in line level you will get an error if the PO is closed and fully invoiced as shown in fig 1.1.

Fig1.1: Error on closed order

We can achieved this by re-opening the close orders.

  • To Re-open a closed Purchase order use below path as :
  1. Navigate to Purchasing > Orders > Close and re-open orders.
  • Enter the Purchase order you wished to re-open orders.
  • As the order is Closed, select “Closed” under the “Orders to process” field.
  • After you fill the data on close and re-open order function & Click OK.
Fig1.2: Close and Re-open orders

It will open a screen where you need to do below steps as :

  1. Select Cancel for the relevant lines that must be re-opened. This means you are cancelling the closure of these lines.
  2. Click OK.
  3. Refer fig 1.3 : Close and re-open orders.

Now when you go back to the order, you will notice the lines are now open for receipting.

  1. You are now able to see on PO screen the PO is Open now, You are able to add products on line level but even if you use the Close and re-open orders functionto re-open the PO, you still can’t post additional invoices because the invoiced status remains locked as Fully invoiced
  2. If you want to change the status as Fully invoiced to partially invoiced need to revise the invoiced status to allow additional invoices to be applied against your PO.

To change the Invoiced status from fully to partially invoiced to create additional invoices to post.

  1. Navigate to Purchasing > Orders > Orders
  2. Go back into the PO and notice that under the Management tab, invoiced now shows as Partially received.
  3. You are now able to see on line level the grid is greyed out and you can’t change anything.
  4. Go to the Lines tab, double click on the line you wish to revise. You should see the following pop-up:
  5. Select Yes to change the status from fully invoiced to partially invoiced.
  6. Save again the Purchase order. Refer below image as fig 1.4

To create an additional invoices for the respective PO, now you can create it by using the below path as

All -> Purchasing -> Invoice -> Invoice.

  1. Enter your details as same as purchase order, by selecting Order selections.
  2. On selection, you are able to create invoice which is Additional invoices for the respective purchase orders

To achieve the additional invoices for Closed and fully invoiced purchase order.

You need to re-open the purchase order and select the yes on click of the popup comes when you double click on line, It will allow, to create additional invoices for the specific purchase orders.

About Us

Greytrix – a globally recognized Premier Sage Gold Development Partner is a one-stop solution provider for Sage ERP and Sage CRM needs. Being recognized and rewarded for multi-man years of experience, we bring complete end-to-end assistance for your technical consultations, product customizations, data migration, system integrations, third-party add-on development and implementation expertise.

Greytrix caters to a wide range of Sage X3 (Sage Enterprise Management) offerings – a Sage Business Cloud Solution. Our unique GUMU™ integrations include Sage X3 for Sage CRMSalesforce.com and Magento eCommerce along with Implementation and Technical Support worldwide for Sage X3 (Sage Enterprise Management). Currently we are Sage X3 Implementation Partner in East Africa, Middles East, Australia, Asia. We also offer best-in-class Sage X3 customization and development services, integrated applications such as POS | WMS | Payment Gateway | Shipping System | Business Intelligence | eCommerce and have developed add-ons such as Catch – Weight  and Letter of Credit for Sage X3 to Sage business partners, end users and Sage PSG worldwide.

Greytrix is a recognized Sage Rockstar ISV Partner for GUMU™ Sage X3 – Sage CRM integration also listed on Sage Marketplace; GUMU™ integration for Sage X3 – Salesforce is a 5-star app listed on Salesforce AppExchange.

For more information on Sage X3 Integration and Services, please contact us at x3@greytrix.com. We will be glad to assist you.

Identifying local menu data from message in Sage X3

$
0
0

In Sage X3, we often come across some standard messages for which we want to track back its local menu chapter for either reusing purposes or data fetching. In Sage X3 this can be done very efficiently using the Message search utility.

To know more about this, we’ll show a small example of how we are identifying the pop-up message within the purchase request module and its local menu chapter.

For this we’re referencing following paths and screenshots below:

Message Search: All > Development > Searches > Message (RECHMESS)
Local Menu: All > Development > Data and parameters > Tables > Local menus – messages (TXT)
Purchase Request: All > Purchasing > Purchase requests > Purchase requests (GESPSH)

New Stuff: Adding Additional Invoices to Closed POs in Sage X3

Fig. 1 - Text message on Order button
Fig. 1 – Text message on Order button

-As shown in Fig. 1 we have our Purchase request entry transaction and we’ve clicked the Order button upon which the system throws a warning box. Now we’ll identify whether the message is fetched through a local menu.

Fig. 2 - Message search utility
Fig. 2 – Message search utility
Fig. 3 - Put in the messagep
Fig. 3 – Put in the message

-First we’ll navigate over to the Message search utility from the above path as shown in Fig. 2 and then enter the popped message in the text field as shown in Fig. 3 and hit OK.

Fig. 4 - The local menu chapter and number
Fig. 4 – The local menu chapter and number
Fig. 5 - Checking the local menu data
Fig. 5 – Checking the local menu data

-After the search is complete a log displays all the traced local menus data formatted in the below format:
mess(message line, chapter no, message translation no. in integer)

For our example, we received mess(0086, 00194, 1) which means our local menu chapter is 194 and message line is 86 with ENG translation as shown in Fig. 5.

This way we can identify whether a message has a linked local menu chapter in Sage X3 which makes helpful to track and reuse the message.

How to execute Global Scripts with parameters in SEI

$
0
0

In the last blog, we learned how to make global scripts. This blog will teach us how to make and use parameters.

Parameters:

The “Parameters” option shows all the parameters that are set up and can be used from the global scripts.

Fig.1 Parameters

Steps To create a new script parameter:

  • In the upper left hand corner, click  Create New Parameter.
  • Enter a unique Parameter Name and Description.
  • Click  Create to finish. The new script parameter will appear in the first line of the list.
Fig. 2 New Script Parameter

Steps To execute a script:

  • Go to  Env. & Data Sources.
  • Follow the instructions to add a new environment to match the global script you just created.
  • Click  Execute Scripts.
  • Click Run to execute the script.

In conclusion, executing Global Scripts with parameters in SEI is a powerful and flexible way to enhance the functionality of the Data Model Designer. It allows for more precise control and manipulation of data models, enabling users to tailor their operations to specific needs. The ability to define and apply parameters from global scripts further extends this flexibility, making SEI a robust tool for data management. As we continue to explore and understand its capabilities, we can leverage this feature to optimize our data handling tasks and improve efficiency.

About Us
Greytrix – a globally recognized Premier Sage Gold Development Partner is a one-stop solution provider for Sage ERP and Sage CRM needs. Being recognized and rewarded for multi-man years of experience, we bring complete end-to-end assistance for your technical consultations, product customizations, data migration, system integrations, third-party add-on development and implementation expertise.

Greytrix caters to a wide range of Sage Enterprise Management (Sage X3) offerings – a Sage Business Cloud Solution. Our unique GUMU™ integrations include Sage Enterprise Management (Sage X3) for Sage CRMSalesforce.com and Magento eCommerce along with Implementation and Technical Support worldwide for Sage Enterprise Management (Sage X3). Currently we are Sage Enterprise Management Implementation Partner in East Africa, Middles East, Australia, Asia. We also offer best-in-class Sage X3 customization and development services, integrated applications such as POS | WMS | Payment Gateway | Shipping System | Business Intelligence | eCommerce and have developed add-ons such as Catch – Weight  and Letter of Credit for Sage Enterprise Management to Sage business partners, end users and Sage PSG worldwide.

Greytrix is a recognized Sage Rockstar ISV Partner for GUMU™ Sage Enterprise Management – Sage CRM integration also listed on Sage Marketplace; GUMU™ integration for Sage Enterprise Management – Salesforce is a 5-star app listed on Salesforce AppExchange.

For more information on Sage X3 Integration and Services, please contact us at x3@greytrix.com. We will be glad to assist you.

Identifying local menu data from message in Sage X3

$
0
0

In Sage X3, we often come across some standard messages for which we want to track back its local menu chapter for either reusing purposes or data fetching. In Sage X3 this can be done very efficiently using the Message search utility.

To know more about this, we’ll show a small example of how we are identifying the pop-up message within the purchase request module and its local menu chapter.

For this we’re referencing following paths and screenshots below:

Message Search: All > Development > Searches > Message (RECHMESS)
Local Menu: All > Development > Data and parameters > Tables > Local menus – messages (TXT)
Purchase Request: All > Purchasing > Purchase requests > Purchase requests (GESPSH)

New Stuff: Adding Additional Invoices to Closed POs in Sage X3

Fig. 1 - Text message on Order button
Fig. 1 – Text message on Order button

-As shown in Fig. 1 we have our Purchase request entry transaction and we’ve clicked the Order button upon which the system throws a warning box. Now we’ll identify whether the message is fetched through a local menu.

Fig. 2 - Message search utility
Fig. 2 – Message search utility
Fig. 3 - Put in the messagep
Fig. 3 – Put in the message

-First we’ll navigate over to the Message search utility from the above path as shown in Fig. 2 and then enter the popped message in the text field as shown in Fig. 3 and hit OK.

Fig. 4 - The local menu chapter and number
Fig. 4 – The local menu chapter and number
Fig. 5 - Checking the local menu data
Fig. 5 – Checking the local menu data

-After the search is complete a log displays all the traced local menus data formatted in the below format:
mess(message line, chapter no, message translation no. in integer)

For our example, we received mess(0086, 00194, 1) which means our local menu chapter is 194 and message line is 86 with ENG translation as shown in Fig. 5.

This way we can identify whether a message has a linked local menu chapter in Sage X3 which makes helpful to track and reuse the message.

Restrictions on Selection Exceeding the requested SO quantity from pick ticket.

$
0
0

A recent demand from one of our clients said that Sage X3’s pick ticket shouldn’t allow picking more than the order quantity based on the quantity of sales orders. The system can only allow the user to produce a pick ticket if the pick ticket quantity is equal to or less than the sales order quantity.

Let’s examine the functionality in more detail:

The user will draft a sales order first. The screenshot below indicates that 10 is the ordered Quantity.
Navigate to : Sales -> Order -> Order

New Stuff: Identifying local menu data from message in Sage X3

Fig 1 : Sales Order.

Also, the preparation button is located on the sales order screen. Users must press that button to create a pick ticket against that sales order.

The user is redirected to the Pick ticket STD: Full entry screen after pressing the Preparation Button. The sales order quantity will be flown automatically on this Pick ticket screen in the Quantity field of detail line. Refer below screenshot.

Fig2: Pic Ticket STD with by default order Quantity.

The user can modify this quantity to suit their needs. However, the user must only enter the same quantity or less than the sales order quantity to produce the Pick Ticket entry, as per our client’s request. The system displays an error message such as “Picking quantity is greater than Order quantity” if the user attempts to enter a quantity that is greater than what was ordered as shown in the screenshot below.

Fig3: Pic Ticket STD screen Error message

So, as per our customization, picking more than the sales quantity should not be allowed while creating Pick ticket transaction against Sales Order.

Price List Import template does not update products

$
0
0

Have you ever encountered a problem with Sage X3 where a certain field that needs to be changed adds a new line to the pricing list template instead of updating for a product? The identical problem occurred to us in both the sales and purchase pricing lists; however, we were able to resolve it by updating the line that required updating rather than creating a new one.

To showcase the solution, we will be taking the Purchase Price list.

Step 1: Go to All->Set Up->Import export template

New Stuff: Restrictions on Selection Exceeding the requested SO quantity from pick ticket

Import export templates screen path

Step 2: In the left list look for template code PPL.

Step 3: Scroll to the Fields tab and add PLILIN Field of table PPRICLIST which is the line field.

Fields tab
Fields tab

You will now see the line number (1000, 2000) in the PLILIN field location when you export a price list. You may now import the data by modifying the field value you wish to update for the line number. You’ll see that the changes you made to the relevant field are displayed on the screen rather than a new line appearing on the screen.

How to show comma-separated value for single or multiple fields in Sage X3 reports using crystal report

$
0
0

Crystal report is a business intelligence application used to design and generate reports from a wide range of data source. It supports connectivity to various data sources such as Microsoft excel, SQL server, Oracle and more. It includes major features such as formulas, cross-tab reports, sub-reports, and conditional formatting etc. In crystal report sub-reports are used to embed one report within another. Sub-reports can be helpful when you need to display related or supplementary information alongside the main report.

In Sage X3, we recently received a requirement from one of our client. They requested that the sales order numbers be displayed in comma-separated format within the sales invoice report. Sage X3 allows user to create single invoice against one or multiple sales order or deliveries. The client desires same to have the same sales order numbers included in the report.

To achieve the above requirement follow the below steps:

Step 1: Open your main report (Sales invoice report) in crystal report and insert one new sub-report where you want to display the comma-separated value. Refer the below screenshot for your reference.

New Stuff : Price List Import template does not update products

Fig 1 SORDER Sub-report

Step 2: Open the sub-report and create the three new formulas.

Step 3: Create formula No.01 as shown in below figure, and place it in the report header section of the sub-report. It initialize a shared string variable named “t1” with an empty string. This variable will be used to accumulate or store the values that you want to display comma separated.

Fig 2 Formula No 01
Fig 2 Formula No 01

Step 4: Create formula No.02 as shown in below figure, and place it in the report footer section of the sub-report. It checks if shared string variable “t1” is empty, if empty it returns an empty string. If not empty, it trims extra spaces, calculate the length, and removes the trailing comma from the accumulated string.

Fig 3 Formula No 02
Fig 3 Formula No 02

Step 5: Create formula No.03 as shown in below figure, and place it in the detail section of the sub-report. Replace the fields name as per your requirement.

Fig 4 Formula No 03
Fig 4 Formula No 03

Step 6: Place all these formulas in sub-report as shown in below figure.

Fig 5 Formulas
Fig 5 Formulas

Step 7: Save both the sub-report and main report then deploy them to the desired folder.

Step 8: In the below screenshot you will get desired output.

Fig 6 Sales invoice report

Additionally, if you wants to display two or multiple fields comma separated value, create 3 new formulas in same sub-report and follow the above mentioned steps.

In this way, we can include comma separated value for single or multiple fields using crystal report by following simple steps in crystal report as mentioned in this blog.


Feature: How to create product with specific naming format using Product configurator in Sage X3

$
0
0

Introduction: As we know, Product configurator is the Sage x3 functionality which allows to create product along with BOMs, routing etc. There are some basic parameters that need to be set first. The first one is Configurator symbol where we can define the questions which can be used while using the configurator. The navigation for the same is Setup > Configurator > Configurator symbols. Each configurator symbol has multiple answers/responses that are stored in response table. The response can have several possible values which can be entered in the grid given on the screen. These questions or variable can be of type numeric/alphanumeric etc. You can refer below example of configurator symbol HGT i.e Height having multiple responses to be selected. The navigation path for this is Setup > Configurator > Response table

Fig 1. response table

Once the symbols and responses are defined, we need to create Configurator scenario. It contains below parameters to be setup.

  1. BOM setup: You can define the required BOM details like reference, type etc. as below along with the costing method.

Fig 2. BOM details

  • Parameters: You can setup/select questions or symbols that we have already defined with the desired sequence. Refer below screenshot for the same.

Fig 3. questions

  • Kit creation: You can define Reference product with the Equivalent search value as per the requirement. This field has below values for selection.
  • No equivalence research: The product number must have been created by the configurator (except in the case of automatic numbering). The product can be an existing product or a new product.
  • Equivalence search: A search for an equivalent product will be carried out according to the setups of the product line of the product and if no equivalence is found the product will be created.
  • Always create: The product number must have been created by the configurator (except in the case of automatic numbering). It is mandatory that the product is new.
  • Search+automatic selection: an equivalent product is searched and if only one line is found, the automatic selection of the equivalent found is carried out.

Once this is defined, you can assign your specific naming format for the product to be generated. You can also have the product description in the desired format. Refer the below screenshot for the same.

Fig 4. kit_creation

In order to run the configurator, navigate to Setup > Configurator > Configurator.

  1. You can select site, configurator scenario, customer and click on OK.

Fig 5. configurator

  • You will get below questions respect to the selected scenario. Here, it is ‘TEST’.

Fig 6. scenario_questions

  • Based on selected answers, the product will get generated with the given naming format as TEST3337 (TEST + Depth + Height(exact) + Widths(nominal)) and description as Prod 3X8X7 (Prod + Depth + Heights(nominal) + Widths(nominal))

Fig 7. line_details

Thus, using product configurator we can create products with the specific naming format as per the requirement along with its description.

About Us

Greytrix – a globally recognized Premier Sage Gold Development Partner is a one-stop solution provider for Sage ERP and Sage CRM needs. Being recognized and rewarded for multi-man years of experience, we bring complete end-to-end assistance for your technical consultations, product customizations, data migration, system integrations, third-party add-on development and implementation expertise.

Greytrix caters to a wide range of Sage X3 (Sage Enterprise Management) offerings – a Sage Business Cloud Solution. Our unique GUMU™ integrations include Sage X3 for Sage CRMSalesforce.com and Magento eCommerce along with Implementation and Technical Support worldwide for Sage X3 (Sage Enterprise Management). Currently we are Sage X3 Implementation Partner in East Africa, Middles East, Australia, Asia. We also offer best-in-class Sage X3 customization and development services, integrated applications such as POS | WMS | Payment Gateway | Shipping System | Business Intelligence | eCommerce and have developed add-ons such as Catch – Weight  and Letter of Credit for Sage X3 to Sage business partners, end users and Sage PSG worldwide.

Greytrix is a recognized Sage Rockstar ISV Partner for GUMU™ Sage X3 – Sage CRM integration also listed on Sage Marketplace; GUMU™ integration for Sage X3 – Salesforce is a 5-star app listed on Salesforce AppExchange.

For more information on Sage X3 Integration and Services, please contact us at x3@greytrix.com. We will be glad to assist you.

How to create pie chart in Sage Enterprise Intelligence (SEI) report.

$
0
0

Sage Enterprise Intelligence is an intuitive business intelligence solution integrated with your Sage business management system to help business users reduce time spent on analysis and reporting and make faster, better-informed decisions. It empowers all users with a simple solution to access and analyse data in a self-sufficient manner, which eliminates the need for disparate tools and specialized skills and can reduce time to decision.

Sage Enterprise Intelligence gives business users, managers, and executives the power to analyse and create business reports, dashboards, and views. In this blog, we will take a look at how we can create pie chart in Sage Enterprise Intelligence.

Follow these steps for insight into how to create pie chart in (SEI).

STEP1:- Right click on data models and click on new view among the different categories we can select different type of view type. The number of view types are present . As shown in figure .1 and   figure .2

New view
Fig02: New view

STEP2:-

Enter a pie view name.

Choose the Columns, Groups and Pivots by clicking Add.

Type the name to filter the list (or select from the drop-down menu). Choose one or more fields.

Click OK to confirm the chosen fields. As shown in figure 3.

File setting
Fig03: File setting

STEP3:- To change the view from a table with tabs to a graphical illustration, click on View Type in the vertical right-hand panel to expand Settings. The columns we choose in figure.3 are represented in pie chart format . As shown in figure 4.

Pie chart
Fig04: Pie chart

STEP 4: This will expand the menu, showing the options for different View types you can select from. You can scroll vertically through the View categories in the Left side of the pop up, and then chose specific Views within each category. The images below show the “Bar” category and “Pie” category options to give context to the wide variety of built in options available. For our example, we’ll click on the “Pie” chart in the “Pie” category (it may be on our mind with fruit pie season in full swing).

STEP 5: Once we’ve update our View Type, it will automatically close the expanded menus and update the Sales Report. Next, in the same vertical right-hand panel, click on Chart Properties (the wrench icon immediately above View Type) to specify the details for your graph.

STEP 6: In Chart Properties, you can modify the report title, labels, series, etc. The specific changes made will depend on how you want the information displayed in your dashboard. For reference, pay attention to the chart properties specified in the following screenshot. By enabling Animation (the very top toggle option), we’ve set up this graph so when you hover over a pie slice it will provide further details, which in this case is order quantity.

View properties
Fig08: View properties

STEP 7: Once  the done layout of the graph, click the floppy disc save icon on the right of the screen and click save as.

Save option
Fig09: Save option

This blog help us to know about the use of create and design pie chart in SEI report.

About Us

Greytrix – a globally recognized Premier Sage Gold Development Partner is a one-stop solution provider for Sage ERP and Sage CRM needs. Being recognized and rewarded for multi-man years of experience, we bring complete end-to-end assistance for your technical consultations, product customizations, data migration, system integrations, third-party add-on development and implementation expertise.

Greytrix caters to a wide range of Sage X3 (Sage Enterprise Management) offerings – a Sage Business Cloud Solution. Our unique GUMU™ integrations include Sage X3 for Sage CRMSalesforce.com and Magento eCommerce along with Implementation and Technical Support worldwide for Sage X3 (Sage Enterprise Management). Currently we are Sage X3 Implementation Partner in East Africa, Middles East, Australia, Asia. We also offer best-in-class Sage X3 customization and development services, integrated applications such as POS | WMS | Payment Gateway | Shipping System | Business Intelligence | eCommerce and have developed add-ons such as Catch – Weight  and Letter of Credit for Sage X3 to Sage business partners, end users and Sage PSG worldwide.

Greytrix is a recognized Sage Rockstar ISV Partner for GUMU™ Sage X3 – Sage CRM integration also listed on Sage Marketplace; GUMU™ integration for Sage X3 – Salesforce is a 5-star app listed on Salesforce AppExchange.

For more information on Sage X3 Integration and Services, please contact us at x3@greytrix.com. We will be glad to assist you.

HOW TO ADD A SINGLE REPORT TO SAGE X3 MODULES

$
0
0

As a user in Sage X3, you may have to run specific reports as part of your daily routine. Setting up a report as a single item for a particular module can help improve work flow and minimize any confusion you may have on which report to run.

In the example below, we will be adding the Trial Balance Report as a menu item and  later we can add to Financial sub-module.

Creating a new Menu Item

  1.  Go to Administration > Authoring > Menu Items
  •  Click on the new Menu item from the list on the right side.
  •  Enter a Code, Item and Description.
  • Select Function (classic) as link type.
  • In the ‘ Function ‘ field, enter AIMP ~ <Report Code>

  for example AIMP ~ <BALGRP>

Click on Save Button. Test the setting by clicking on the title of your report in the list

on the right side. As shown in below figure 2.

Options
Fig02: Options

Adding Menu Items to our desired Modules 

  1. Go to Administration > Authoring > Pages  > Menu Submodules
Menu Submodule
Fig03: Menu Submodule
  • Click on the ‘Pencil’ to Edit the Modules.
  • Click on the ‘Add Button ‘ to display report.
  • Select the menu item created in the previous step.                                  
Menu Items
Fig04: Menu Items

Save the changes once finished . Also, logout the Sage X3 and login to see the changes.

Trial Balance Report Screen
Fig05: Trial Balance Report Screen

And click on the menu in the above figure we can see the Trial Balance Report Menu is been added in Financial Module, we can click and the report will open now and we need to pass the parameter. As shown in figure  6 below.

Report Parameters
Fig06: Report Parameters

Our report is now added to the module and now we can print the report.

About Us

Greytrix – a globally recognized Premier Sage Gold Development Partner is a one-stop solution provider for Sage ERP and Sage CRM needs. Being recognized and rewarded for multi-man years of experience, we bring complete end-to-end assistance for your technical consultations, product customizations, data migration, system integrations, third-party add-on development and implementation expertise.

Greytrix caters to a wide range of Sage X3 (Sage Enterprise Management) offerings – a Sage Business Cloud Solution. Our unique GUMU™ integrations include Sage X3 for Sage CRMSalesforce.com and Magento eCommerce along with Implementation and Technical Support worldwide for Sage X3 (Sage Enterprise Management). Currently we are Sage X3 Implementation Partner in East Africa, Middles East, Australia, Asia. We also offer best-in-class Sage X3 customization and development services, integrated applications such as POS | WMS | Payment Gateway | Shipping System | Business Intelligence | eCommerce and have developed add-ons such as Catch – Weight  and Letter of Credit for Sage X3 to Sage business partners, end users and Sage PSG worldwide.

Greytrix is a recognized Sage Rockstar ISV Partner for GUMU™ Sage X3 – Sage CRM integration also listed on Sage Marketplace; GUMU™ integration for Sage X3 – Salesforce is a 5-star app listed on Salesforce AppExchange.

For more information on Sage X3 Integration and Services, please contact us at x3@greytrix.com. We will be glad to assist you.

Sales Order creation in Sage X3 using EDI 850 documents

$
0
0

The EDI 850 is a Sales Order transaction set used to place an order for goods or services. Also known as an electronic purchase order, an EDI 850 is usually sent to a vendor as the first step in the ordering process.

The EDI 850 generally provides the same information you would find in a paper SO document, including:

  1. Items, prices, and quantities ordered
  2. Shipping details
  3. Payment terms
  4. Discounts

It can be used for single or recurring purchases. Using the EDI 850 provides several benefits. It streamlines the purchasing process, enabling sellers to optimize their operations and buyers to receive their goods more quickly. In addition, because EDI transactions are encrypted en route, trading partners can securely share sensitive data like pricing.

Key Features:

Key features for the process of programmatically picking the EDI file from a defined location and creating a Sales Order transaction in Sage X3 are as follows:

  1. File Copy: The EDI file will be programmatically copied from the defined location, such as FTP, SFTP, or a network path, and saved in the Sage X3 local file format. This ensures that the file is accessible within the system for further processing.
  2. File Copy:  The EDI file will be programmatically copied from the defined location, such as FTP, SFTP, or a network path, and saved in the Sage X3 local file format. This ensures that the file is accessible within the system for further processing.
  3. File Conversion: Based on the defined mapping, the EDI file will be programmatically read and converted into a Sage X3-compatible template. This conversion ensures that the file can be processed and understood by the system.
  4. Sales Order Creation: Once the Sage X3 template is ready, a Sales Order will be created using the details from the file, such as item, price,quantities ordered, shipping details, payment terms, discounts,and any other relevant information. The system will display a log to provide visibility into the process and any potential errors or notifications.
Import Process
Fig01: Import Process
Creation of Sales Order
Fig02: Creation of Sales Order

5. File Deletion: After the successful processing of the EDI file, it will be deleted from the source location. This helps maintain a clean and organized file management system.

These key features enable the seamless integration of EDI files into Sage X3, facilitating the creation of sales orders. The process can be customized to fit specific business requirements and can be executed either manually or automatically for enhanced efficiency.

    The 850In (Sales Order in Sage X3) process automates the sales order creation from an EDI file. It involves file pickup from a defined location, conversion to Sage X3 format, and creating an archive for backup. The system then maps and converts the data, generates a sales order, and displays a log. The original file is deleted. This automated process enhances supply chain management in Sage X3.

    About Us

    Greytrix – a globally recognized Premier Sage Gold Development Partner is a one-stop solution provider for Sage ERP and Sage CRM needs. Being recognized and rewarded for multi-man years of experience, we bring complete end-to-end assistance for your technical consultations, product customizations, data migration, system integrations, third-party add-on development and implementation expertise.

    Greytrix caters to a wide range of Sage X3 (Sage Enterprise Management) offerings – a Sage Business Cloud Solution. Our unique GUMU™ integrations include Sage X3 for Sage CRMSalesforce.com and Magento eCommerce along with Implementation and Technical Support worldwide for Sage X3 (Sage Enterprise Management). Currently we are Sage X3 Implementation Partner in East Africa, Middles East, Australia, Asia. We also offer best-in-class Sage X3 customization and development services, integrated applications such as POS | WMS | Payment Gateway | Shipping System | Business Intelligence | eCommerce and have developed add-ons such as Catch – Weight  and Letter of Credit for Sage X3 to Sage business partners, end users and Sage PSG worldwide.

    Greytrix is a recognized Sage Rockstar ISV Partner for GUMU™ Sage X3 – Sage CRM integration also listed on Sage Marketplace; GUMU™ integration for Sage X3 – Salesforce is a 5-star app listed on Salesforce AppExchange.

    For more information on Sage X3 Integration and Services, please contact us at x3@greytrix.com. We will be glad to assist you.

    How to automatically open Printing parameter screen for particular report on delivery creation in Sage X3

    $
    0
    0

    As we know sage x3 provides numerous features along with reporting functionality. Accurate and timely reporting is the need of every business. Likewise, we can have reports on each and every process performed in sage x3. We can have reports for different modules including different functions like in Sales module we can print reports for sales order, delivery, invoice, pick ticket etc. We can get detailed information of respective process through report.

    In sage x3, we can manually print the reports using Reports function. But, we can make reports printed through code, too. Also, we can make a setup such as report parameters screen will be automatically populated after particular functionality performed. For example, let us do this setup for Delivery transaction.

    You need to perform following steps to make report printing parameter screen open automatically on delivery creation either from Sales order (Delivery button) or Preparation plan screen or from Picking ticket screen.

    1. Navigate to: Common data > BPs > Customers
    2. Select the customer and go to Ship-to customer tab and select the ship-to address. Check any of the checkbox from below. Here, we have done the below setup for customer “AO001” and address “001”.
    Customer level setup
    Fig01: Customer level setup

    For example, let us select Pckg. slip checkbox and save the changes.

    3. Navigate to: Setup > Sales > Entry transactions > Deliveries

    4. Select the required entry transaction. Select the document type i.e. the desired packing slip report to be printed after delivery creation and check the “Auto print” checkbox. Here, we have setup report BONLIV2. Refer below screenshot for the setup.

    entry transaction level setup
    Fig02: Entry transaction level setup

    5. Save and validate the entry transaction.

    6. Create a sales order for the same customer having delivery address as “001”. Refer below screenshot.

    Sales Order
    Fig03: Sales Order

    7. Click on Delivery button. Delivery will be created and you can see the report parameter screen will get open for the report BONLIV2 with all the parameter values.

    BONLIV2 report parameters
    Fig04: BONLIV2 report parameters

    You can print the report for the delivery transaction instead of printing it from Report function explicitly.

    We can do the same setup for “Pick ticket” checkbox on Ship-to customer tab (ref figure a) and on entry transaction, we can select Document type for Picking ticket section (refer figure b) and check “Auto print” checkbox.

    With the similar setup on “Pick ticket”, we can achieve the automatic opening of report parameter screen for the defined pick ticket report.

    Thus, we can make the picking ticket or packaging slip reports to be printed automatically on delivery creation either from Sales order-Delivery button, Shipment preparation screen or Pick ticket screen.

    About Us

    Greytrix – a globally recognized Premier Sage Gold Development Partner is a one-stop solution provider for Sage ERP and Sage CRM needs. Being recognized and rewarded for multi-man years of experience, we bring complete end-to-end assistance for your technical consultations, product customizations, data migration, system integrations, third-party add-on development and implementation expertise.

    Greytrix caters to a wide range of Sage X3 (Sage Enterprise Management) offerings – a Sage Business Cloud Solution. Our unique GUMU™ integrations include Sage X3 for Sage CRMSalesforce.com and Magento eCommerce along with Implementation and Technical Support worldwide for Sage X3 (Sage Enterprise Management). Currently we are Sage X3 Implementation Partner in East Africa, Middles East, Australia, Asia. We also offer best-in-class Sage X3 customization and development services, integrated applications such as POS | WMS | Payment Gateway | Shipping System | Business Intelligence | eCommerce and have developed add-ons such as Catch – Weight  and Letter of Credit for Sage X3 to Sage business partners, end users and Sage PSG worldwide.

    Greytrix is a recognized Sage Rockstar ISV Partner for GUMU™ Sage X3 – Sage CRM integration also listed on Sage Marketplace; GUMU™ integration for Sage X3 – Salesforce is a 5-star app listed on Salesforce AppExchange.

    For more information on Sage X3 Integration and Services, please contact us at x3@greytrix.com. We will be glad to assist you.

    Allocation Methods for Efficient Work Order Management

    $
    0
    0

    In Sage X3, a work order is a document that is used to plan and track the production of items in a manufacturing or production environment. Work orders are an essential part of the manufacturing process that can be the “Manual,” “Global,” and “Detailed” allocation methods are options you can choose when allocating materials to a work order. These methods determine how materials are assigned to the work order, and they differ in terms of flexibility and automation.

    To find allocation methods use path as :

    Manual_allocation_methods
    Fig01: Manual_allocation_methods

    1. Manual Allocation:

              After creating a work order with the Manual allocation method, the Allocation field will initially display “Not allocated.” To complete it, you need to manually select either the Global or Detailed method by clicking the Allocation button in the top right corner, as display in fig 1.1

    To find the work order screen use path as :

    All -> Manufacturing -> Planning -> Work order

    After creating work order
    Fig1.1: After creating work order

    To complete the allocation, click the Allocation button in the top right corner, choose either the Global or Detailed allocation system, then click Allocate. This action will mark the allocation as complete, as shown in fig 1.2

    Allocation screen after click on allocate.
    Fig1.2: Allocation screen after click on allocate.

    After the above process it will make allocation type from “Not allocated” to “Complete”, as shown in fig 1.3

    After manually allocating method to work order
    Fig1.3: After manually allocating method to work order

    2. Automatic (Global)

              In the global allocation method, materials are assigned to the work order automatically using pre-established rules and criteria. These allocation rules are configured ahead of time, and when you create the work order, the system automatically applies these rules.

              To implement this, simply switch the allocation method to “Automatic (Global)” during the work order entry transaction, as shown in Figure 2.1

    Allocation methods_automatic
    Fig2.1: Allocation methods_automatic

    Once a work order is created with the allocation method set to “Automatic (Global),” the system will automatically generate the work order and mark the allocation as complete, as shown in Figures 2.2 and 2.3

    After creating work order.
    Fig2.2: After creating work order.
    After creating work order.
    Fig2.3: After creating work order.

    NOTE :

              With the “Automatic (Global)” allocation method, you have the flexibility to switch to “Automatic (Detailed)” if needed. However, it’s important to note that once a work order is created with the “Automatic (Detailed)” allocation method, you cannot make any changes in the allocation method.

              To make changes when the allocation method is set as “Automatic (Global),” you can simply click on the Allocation button, select the desired allocation method if necessary, and then click on the “Allocate” button. This action will apply the selected allocation method to the work order, as shown in fig 2.4

    The allocation screen appears after clicking the Allocate button.
    Fig2.4: The allocation screen appears after clicking the Allocate button.

    Once you’ve made changes to the allocation type, such as switching it to “Detailed,” the allocation method will reflect this adjustment as “Detailed,” as illustrated in Figure 2.5.

    After modifying the allocation type.
    Fig2.5: After modifying the allocation type.

    3. Automatic (Detailed) :

             In the Detailed allocation method, materials are assigned to the work order automatically and it will display allocation as completed after creating work order

              To implement this, simply switch the allocation method to “Automatic (Detailed)” during the work order entry transaction, as shown in Figure 3.1

    Allocation method
    Fig3.1: Allocation method

    Once a work order is created with the allocation method set to “Automatic (Detailed),” the system will automatically generate the work order and mark the allocation as complete, as shown in Figures 3.2 and 3.3

    After creating the work order.
    Fig3.2: After creating the work order.
    After creating the work order.
    Fig3.3: After creating the work order.

    1.    Manual Allocation is the most manual and flexible method, where you manually select and assign materials.

     2.   Global Allocation provides some automation by applying predefined rules but still allows for customization through rule configuration.

     3.   Detailed Allocation offers granular control at the component level, allowing you to specify exact quantities of materials for each component in the work order.

    About Us

    Greytrix – a globally recognized Premier Sage Gold Development Partner is a one-stop solution provider for Sage ERP and Sage CRM needs. Being recognized and rewarded for multi-man years of experience, we bring complete end-to-end assistance for your technical consultations, product customizations, data migration, system integrations, third-party add-on development and implementation expertise.

    Greytrix caters to a wide range of Sage X3 (Sage Enterprise Management) offerings – a Sage Business Cloud Solution. Our unique GUMU™ integrations include Sage X3 for Sage CRMSalesforce.com and Magento eCommerce along with Implementation and Technical Support worldwide for Sage X3 (Sage Enterprise Management). Currently we are Sage X3 Implementation Partner in East Africa, Middles East, Australia, Asia. We also offer best-in-class Sage X3 customization and development services, integrated applications such as POS | WMS | Payment Gateway | Shipping System | Business Intelligence | eCommerce and have developed add-ons such as Catch – Weight  and Letter of Credit for Sage X3 to Sage business partners, end users and Sage PSG worldwide.

    Greytrix is a recognized Sage Rockstar ISV Partner for GUMU™ Sage X3 – Sage CRM integration also listed on Sage Marketplace; GUMU™ integration for Sage X3 – Salesforce is a 5-star app listed on Salesforce AppExchange.

    For more information on Sage X3 Integration and Services, please contact us at x3@greytrix.com. We will be glad to assist you.

    How to restrict the data for specific user or group in SEI

    $
    0
    0

    This is a process that involves setting up permissions and access controls within the Sage Enterprise Intelligence software. This process ensures that each user or group of users can only access the data that is relevant to their roles or tasks. It involves various steps such as granting or restricting access to reports, limiting access to master data, assigning specific sites or products to users, and more. This is a crucial aspect of data management and security in any organization.

    • In the Administration section.
    • Click on the  Security drop-down menu in the left pane.
    • Select Restrictions.

    Any Views/Graphs/Dashboards, or Excel Add-in Reports that are executed will automatically have the restrictions applied. The management of these restrictions can be done by Groups, Users or Data Models. Choose the option that is most suitable for your needs.

    Restrictions can be established either at the global level or at the level of a specific Data Model. The global level restrictions utilize Global Parameters and will influence any Data Models that incorporate these Global Parameters. On the other hand, restrictions at the Data Model level will only impact a single Data Model and will be based on a specific field within that Data Model.

    To add a restriction globally:

    In the Global Restrictions section, enter ABC for the Value and leave the Operator to =.

    Fig.1. Restriction globally
    Fig.1. Restriction globally

    To add a restriction to a specific Data Model:

    In the Data Model Restrictions section, click on Restriction Builder to build your restriction.

    Fig.2. Restriction on Data Model
    Fig.2. Restriction on Data Model

    Sage Enterprise Intelligence provides a robust and flexible framework for data access control. By leveraging its features, administrators can effectively restrict data access for specific users or groups. This ensures that sensitive information is only accessible to authorized personnel, thereby enhancing data security within the organization. Whether it’s granting or restricting access to reports, limiting access to master data, or assigning specific sites or products to users, Sage Enterprise Intelligence offers a comprehensive solution for data access management. As a result, organizations can maintain control over their data while still promoting a collaborative and efficient work environment.

    About Us

    Greytrix – a globally recognized Premier Sage Gold Development Partner is a one-stop solution provider for Sage ERP and Sage CRM needs. Being recognized and rewarded for multi-man years of experience, we bring complete end-to-end assistance for your technical consultations, product customizations, data migration, system integrations, third-party add-on development and implementation expertise.

    Greytrix caters to a wide range of Sage X3 (Sage Enterprise Management) offerings – a Sage Business Cloud Solution. Our unique GUMU™ integrations include Sage X3 for Sage CRMSalesforce.com and Magento eCommerce along with Implementation and Technical Support worldwide for Sage X3 (Sage Enterprise Management). Currently we are Sage X3 Implementation Partner in East Africa, Middles East, Australia, Asia. We also offer best-in-class Sage X3 customization and development services, integrated applications such as POS | WMS | Payment Gateway | Shipping System | Business Intelligence | eCommerce and have developed add-ons such as Catch – Weight  and Letter of Credit for Sage X3 to Sage business partners, end users and Sage PSG worldwide.

    Greytrix is a recognized Sage Rockstar ISV Partner for GUMU™ Sage X3 – Sage CRM integration also listed on Sage Marketplace; GUMU™ integration for Sage X3 – Salesforce is a 5-star app listed on Salesforce AppExchange.

    For more information on Sage X3 Integration and Services, please contact us at x3@greytrix.com. We will be glad to assist you.


    Account Pyramids in Sage X3

    $
    0
    0

    Account pyramids are the manner in which accounts are associated with one another in account groups as user-defined in sage x3. The account pyramids could also be known as account rollups in the way that account groups ‘roll up’ to greater account categorizations in summary form for reporting purposes. In Sage X3, Account pyramids can be created using the auto generate function or the duplicate function. To begin, navigate to the account pyramids screen on the following path:

    All > common data > G/L accounting tables > General > account pyramids

    As shown in figure 1.

                                                                 Fig 1. Account Group

    Click new on the right-hand side of the screen as seen below to use the auto generate function in pyramid creation. As shown in figure 2.

                                                                Fig 2. Account Pyramids

    Fields with denoted with the red asterisk (*) must have values to satisfy the creation of account groups. A code must be assigned under the pyramid input area. The description and short description input areas are not mandatory but can be used to provide useful common language and identifiers. The pyramid must be associated with a chart of accounts as seen in the image below.

                                                               Fig 3. Charts of accounts

    The roles able to access the pyramid can be defined (below) for control purposes on editing and reconfiguration.

    As Shown in Figure 4.

                                                          Fig 4. Access codes

    Access code and stat group will be generated once the pyramid is created with the check (√). The autog enerate pyramid or duplicate pyramid functions are found in the top right-hand corner of the active window as denoted by the three vertical dots. As shown in Figure 5.

                                                                  Fig 5. Action Menu

    A message box may appear that states that account groups already exist. Click ok and continue to the generate pyramid screen as shown below. This screen shows the number of levels in the pyramid with 50 being the lowest vertical display and 10 being the highest in this example.

    As shown in figure 6.

                                                                           Fig 6. Pyramid

    The pyramid will then be available for visual display. As shown in Figure 7.

                                                                      Fig 7. Account Pyramids

    The pyramid may be modified by hovering the mouse indicator over the area of the pyramid the user wishes to modify and selecting the action from the drop-down listing noted below. As shown in Figure 8.

                                                   Fig 8. drop down listing

    Hope this blog is helpful, use account pyramids in dimension balance inquiry or for financial data extraction. The duplicate pyramid function, found in the top right-hand corner of the active window on the pyramid screen, can be used to quickly adopt a duplicate of a previously created pyramid. The duplicated pyramid can then be modified, added to, or simplified through similar steps as noted above.

    How to flow dimension in Work Order’s GL/journal entry in Sage X3

    $
    0
    0

    In Sage X3,dimension types are analysis codes that can be used to track costs, revenue, and quantities.

    In various case, user wants to flow the dimension data to the SI/PI/WO transactions and its GL entries. So, to achieve this setup and functionality. Kindly follow below steps.

    Below is the setup and working of the GL flow through Work order/ production tracking’s GL entry.

    Steps:

    1. Check the dimension defined for Machine Work Center and Labor Work Center.

    Navigate to: Work Centers -> Costing Dimension field

    For Machine work Center:

    Machine work center1
    Fig01: Machine work center

    -> Now jump to costing dimension screen and define the dimension there.

    Machine Costing Dimension
    Fig02: Machine Costing Dimension

    For labor Work Center: Follow the same step to define dimension:

    Labor Work Center
    Fig03: Labor Work Center
    Labor Costing Dimension
    Fig04: Labor Costing Dimension

    2. Now Define the dimension in below screen and validate it .

    Navigate to : Setup -> Manufacturing -> Entry transaction -> Production tracking

    Production Tracking
    Fig05: Production Tracking Setup

    3. Now define the dimensions in default dimension screen

    Navigate to: Setup -> Financial -> Accounting Interface -> Default Dimension

    For below codes define default dimension in below highlighted field.

    1. MFO
    2. MFOAUT
    3. MKOLAB
    Default dimensions
    Fig06: Default dimensions

    4. After setting above setup, the dimension field will display in production tracking screen.

    5. Now to check the dimension flow to GL. Create below transactions.

    6. Create Work Order: ‘WO240006’

    7. Create Production Tracking: ‘PIIC2401MTK006’

    Production Tracking screen
    Fig07: Production Tracking screen

    8. Close the Work Order ‘WO240006’

    9. Post the Work Order from WIP Posting.

    10. Journal will get create ‘WIP240000003’

    11. Now check the Journal and you will see dimensions flow.

    Journal Entry
    Fig08: Journal Entry

    As, we can see with all the above setup and flow , dimension got reflected in GL entries through their respective transactions(Work Order/Production Tracking).

    In this way, we can setup the parameters for flowing dimensions to GL entries.

    About Us

    Greytrix – a globally recognized Premier Sage Gold Development Partner is a one-stop solution provider for Sage ERP and Sage CRM needs. Being recognized and rewarded for multi-man years of experience, we bring complete end-to-end assistance for your technical consultations, product customizations, data migration, system integrations, third-party add-on development and implementation expertise.

    Greytrix caters to a wide range of Sage X3 (Sage Enterprise Management) offerings – a Sage Business Cloud Solution. Our unique GUMU™ integrations include Sage X3 for Sage CRMSalesforce.com and Magento eCommerce along with Implementation and Technical Support worldwide for Sage X3 (Sage Enterprise Management). Currently we are Sage X3 Implementation Partner in East Africa, Middles East, Australia, Asia. We also offer best-in-class Sage X3 customization and development services, integrated applications such as POS | WMS | Payment Gateway | Shipping System | Business Intelligence | eCommerce and have developed add-ons such as Catch – Weight  and Letter of Credit for Sage X3 to Sage business partners, end users and Sage PSG worldwide.

    Greytrix is a recognized Sage Rockstar ISV Partner for GUMU™ Sage X3 – Sage CRM integration also listed on Sage Marketplace; GUMU™ integration for Sage X3 – Salesforce is a 5-star app listed on Salesforce AppExchange.

    For more information on Sage X3 Integration and Services, please contact us at x3@greytrix.com. We will be glad to assist you.

    Workflow Auditing Streamlining Transparency Across Operations in Sage X3

    $
    0
    0

    In Sage X3, workflow auditing involves tracking and recording the changes made to any documents as they progress through the workflow. This is useful for maintaining transparency, ensuring compliance, and identifying any discrepancies or issues in the process. Below are general steps to set up and perform workflow auditing on sales orders in Sage X3

    *Note: We will be using the “Sales Orders” table (SORDER) in this example, but you can apply these methods to any table/fields you choose.

    Access Rights: Ensure that users involved in the sales order workflow have appropriate access rights to view and edit sales orders. This includes access to the workflow and relevant screens.

    Define Workflow: Define the sales order workflow in Sage X3. This involves specifying the different stages through which a sales order passes.

    Set up workflow rules and conditions to determine how the sales order should progress through each stage.

    Audit Configuration: In Sage X3, configure audit settings to capture changes made to sales orders. This may include changes to order status, quantities, prices, customer details, and other relevant information.

    Audit
    Fig01: Audit

    Audit configuration settings can usually be found in the Administration module.

    Enable Audit Trails: Activate audit trails for sales orders. This is typically done in the parameters or settings related to auditing within Sage X3.

    Define which specific fields or actions you want to track in the sales order audit trail.

    Audit Reports: Utilize Sage X3’s reporting capabilities to generate audit reports for sales orders. These reports should provide a comprehensive view of all changes made to sales orders within the specified timeframe.

    Common audit reports may include details such as user activity, date and time of changes, and the nature of the modifications.

    Monitoring and Alerts: Set up monitoring and alert systems to notify relevant users or administrators of significant changes or actions within the sales order workflow.

    Alerts can be configured based on specific criteria, such as the approval of high-value orders or changes to critical order information.

    About Us

    Greytrix – a globally recognized Premier Sage Gold Development Partner is a one-stop solution provider for Sage ERP and Sage CRM needs. Being recognized and rewarded for multi-man years of experience, we bring complete end-to-end assistance for your technical consultations, product customizations, data migration, system integrations, third-party add-on development and implementation expertise.

    Greytrix caters to a wide range of Sage X3 (Sage Enterprise Management) offerings – a Sage Business Cloud Solution. Our unique GUMU™ integrations include Sage X3 for Sage CRMSalesforce.com and Magento eCommerce along with Implementation and Technical Support worldwide for Sage X3 (Sage Enterprise Management). Currently we are Sage X3 Implementation Partner in East Africa, Middles East, Australia, Asia. We also offer best-in-class Sage X3 customization and development services, integrated applications such as POS | WMS | Payment Gateway | Shipping System | Business Intelligence | eCommerce and have developed add-ons such as Catch – Weight  and Letter of Credit for Sage X3 to Sage business partners, end users and Sage PSG worldwide.

    Greytrix is a recognized Sage Rockstar ISV Partner for GUMU™ Sage X3 – Sage CRM integration also listed on Sage Marketplace; GUMU™ integration for Sage X3 – Salesforce is a 5-star app listed on Salesforce AppExchange.

    For more information on Sage X3 Integration and Services, please contact us at x3@greytrix.com. We will be glad to assist you.

    Understanding Class Management in Sage X3

    $
    0
    0

    Have you ever wondered how software systems like Sage X3 efficiently manage data entities, such as customers, products, and sales orders? The answer lies in the concept of classes, a crucial component of the Sage X3 ecosystem. In this blog, we will explore the intricacies of class management within Sage X3 and how it plays a pivotal role in structuring and handling data entities.

    Introduction:

    At the heart of Sage X3’s data management lies the concept of classes. A class serves as a blueprint for managing various entities, ranging from customers to general ledger entries, products, sales orders, and more. In this blog, we will delve into the details of class management, its components, and its significance within Sage X3.

    Class Essentials:

    In Sage X3, classes are essential for structuring and managing data entities. The information within a class is organized into distinct sections, each serving a specific purpose. These sections include:

    1. Header Information:

       – Contains details for identifying the class, including header code, description, and type.

    2. General Section:

       – Describes the primary information related to the class, including management mode, type, and more.

    3. Main Table:

       – Defines the primary database table used when the class is persistent and details about the main index.

    4. Additional Information:

       – Includes activity codes, technical module associations, cache settings, search-ability, and more.

    5. Collection:

       – Describes class collections, their attributes, and settings.

    6. Scripts:

       – Adding custom code related to supervisor events, especially for CRUD (Create, Read, Update, Delete) management.

    7. Methods Section:

       – Defines additional methods and operations available for the class, distinguishing between operations and methods.

    8. Standard Methods Section:

       – Describes the availability of standard CRUD methods and other methods supported by the supervisor layer on the class.

    9. Properties Section:

       – Lists and defines the properties associated with the class, including data types, menus, control tables, and more.

    10. Mapping Section:

        – Specifies how CRUD operations are linked to the database tables, including the main table and child classes.

    11. Miscellaneous Section:

        – Contains additional information for access rights, filters, history, and linked objects.

    Class Management:

    Class management in Sage X3 involves configuring the class to ensure data integrity, optimize performance, and enable seamless data interactions. This section covers settings like reading, creation, modification, deletion, filters, and more.

    Validation:

    One of the critical aspects of class management is validation, where the class description is checked for global consistency. During validation, code generation occurs, creating scripts and business logic associated with CRUD operations. It’s important to note that any generated program should not be modified, as it will be automatically recreated during validation.

    Hierarchy:

    The hierarchy feature offers a visual representation of class relationships. This is particularly useful for understanding how classes are connected and how data flows within Sage X3.

    In the world of Sage X3, class management is the backbone of data entity handling. Understanding the intricacies of classes and their various components is essential for optimizing data management, maintaining data integrity, and ensuring efficient data interactions within your Sage X3 system.

    As you venture further into the world of Sage X3, a strong grasp of class management will empower you to harness the full potential of this powerful enterprise resource planning (ERP) solution. Whether you’re configuring classes for customers, products, or other data entities, the knowledge shared in this blog will serve as your guiding light.

    About Us

    Greytrix – a globally recognized Premier Sage Gold Development Partner is a one-stop solution provider for Sage ERP and Sage CRM needs. Being recognized and rewarded for multi-man years of experience, we bring complete end-to-end assistance for your technical consultations, product customizations, data migration, system integrations, third-party add-on development and implementation expertise.

    Greytrix caters to a wide range of Sage X3 (Sage Enterprise Management) offerings – a Sage Business Cloud Solution. Our unique GUMU™ integrations include Sage X3 for Sage CRMSalesforce.com and Magento eCommerce along with Implementation and Technical Support worldwide for Sage X3 (Sage Enterprise Management). Currently we are Sage X3 Implementation Partner in East Africa, Middles East, Australia, Asia. We also offer best-in-class Sage X3 customization and development services, integrated applications such as POS | WMS | Payment Gateway | Shipping System | Business Intelligence | eCommerce and have developed add-ons such as Catch – Weight  and Letter of Credit for Sage X3 to Sage business partners, end users and Sage PSG worldwide.

    Greytrix is a recognized Sage Rockstar ISV Partner for GUMU™ Sage X3 – Sage CRM integration also listed on Sage Marketplace; GUMU™ integration for Sage X3 – Salesforce is a 5-star app listed on Salesforce AppExchange.

    For more information on Sage X3 Integration and Services, please contact us at x3@greytrix.com. We will be glad to assist you.

    Exporting Navigation page in Sage X3

    $
    0
    0

    In the previous blog, we learned how to export menu items using customization management. In this blog, we will learn how to export a navigation page using customization management. Which we can import into the desired environment.

    Follow the below steps to achieve this functionality:

    1. Create Customization management:

    Follow the below patch to access ‘Customization Management’:

    Navigation page > Administration > Utilities > Exports > Customizations management.

    Create new code, description and select the navigation page checkbox options export as shown in the below screenshot.

    Fig 1. Creating Customization management
    Fig 1. Creating Customization management
    Fig 2. Select Navigation pages
    Fig 2. Select Navigation pages

    Fill in the filters as desired.

    1. Export the customization

    After creation of the Customization, Click the below shown button and Select ‘Export Customization’.

    Fig 3. Export Customizations
    Fig 3. Export Customizations

    Choose the format of export and click ‘OK’

    After successfully creating the customization, proceed to click the designated button and select ‘Export Customization.’

    Choose the desired export format and confirm your selection by clicking ‘OK.’ Once the export process is complete, download the generated file by clicking on the download icon, as illustrated in the accompanying screenshot.

    Fig 4. Download the file
    Fig 4. Download the file

    This file encapsulates the navigation page ready for seamless transfer.

    In conclusion, the two blogs provide a comprehensive guide on how to use customization management in exporting, Menu items and navigation pages. This process is crucial as it allows these elements to be seamlessly imported into the desired environment, Ensuring consistency and efficiency.

    About Us

    Greytrix – a globally recognized Premier Sage Gold Development Partner is a one-stop solution provider for Sage ERP and Sage CRM needs. Being recognized and rewarded for multi-man years of experience, we bring complete end-to-end assistance for your technical consultations, product customizations, data migration, system integrations, third-party add-on development and implementation expertise.

    Greytrix caters to a wide range of Sage X3 (Sage Enterprise Management) offerings – a Sage Business Cloud Solution. Our unique GUMU™ integrations include Sage X3 for Sage CRMSalesforce.com and Magento eCommerce along with Implementation and Technical Support worldwide for Sage X3 (Sage Enterprise Management). Currently we are Sage X3 Implementation Partner in East Africa, Middles East, Australia, Asia. We also offer best-in-class Sage X3 customization and development services, integrated applications such as POS | WMS | Payment Gateway | Shipping System | Business Intelligence | eCommerce and have developed add-ons such as Catch – Weight  and Letter of Credit for Sage X3 to Sage business partners, end users and Sage PSG worldwide.

    Greytrix is a recognized Sage Rockstar ISV Partner for GUMU™ Sage X3 – Sage CRM integration also listed on Sage Marketplace; GUMU™ integration for Sage X3 – Salesforce is a 5-star app listed on Salesforce AppExchange.

    For more information on Sage X3 Integration and Services, please contact us at x3@greytrix.com. We will be glad to assist you.

    Viewing all 1522 articles
    Browse latest View live


    <script src="https://jsc.adskeeper.com/r/s/rssing.com.1596347.js" async> </script>