In Sage X3, a sales order is a document that is used to record and manage the sale of products or services to customers.
When we tried to create a sales order, we faced one scenario: While filling out the grid line details, one field called ‘Product Source’ was missing. Refer below screenshot Fig 1.
Fig1: Missing Field
So, we used the SOH4 screen dictionary to confirm, but the field was already formed and in enterable mode. Refer below screenshot Fig 2.
Fig2: Screen dictionary
To solve this, we go to Entry transactions. Refer below screenshot Fig 3.
Navigation : Setup–> Sales –> Orders
Fig3: Sales Order Setup
After that, when we checked the entry transaction (ALL), we saw that the field was in hidden mode. Refer below screenshot Fig 4.
Fig4: Hidden Field
Thus, we set it to enterable mode, and save the changes and validate it. Refer below screenshot Fig 5.
Fig5: Enable Field
After validating the entry trasanction, we are able to see the field in the sales order screen. Refer below screenshot Fig 6.
Fig6: Sales Order Product Source field
The “Product Source” field in a sales order is a critical component of inventory and supply chain management in Sage X3. It enables businesses to make informed decisions regarding product procurement, costs, and customer service, ultimately contributing to more efficient and effective operations.
About Us
Greytrix – a globally recognized Premier Sage Gold Development Partner is a one-stop solution provider for Sage ERP and Sage CRM needs. Being recognized and rewarded for multi-man years of experience, we bring complete end-to-end assistance for your technical consultations, product customizations, data migration, system integrations, third-party add-on development and implementation expertise.
Ever wished you could monitor the locations in Sage X3 where a specific data type is being utilized without having to create a large SQL query to discover their linking in tables, screens, and other areas? We have some good news. We discovered a feature in Sage X3 that accomplishes this.
You will find this feature in the Development-> Utilities -> Searches.
Path of the Utility
On clicking the “Data type” screen as shown in the above screenshot, you will see the below screen:
Searches-Data Type
This feature allows you to search through every dictionary entry. All the elements of the dictionary marked by the particular data type are tested:
-tables -screens -classes -representation
Now select the data type you would like to check and click on “OK” button. On clicking “OK” you will find a log that gets generated which shows based on the dictionary types.
Log
By using this feature, user can determine where the particular data type is used in Sage X3.
In Sage X3, we make sure of import/export templates quite often for importing huge data with ease. However sometimes the importing data templates are acquired through any external client application which might have different external data parameters which in Sage X3 are stored in different internal codes. Sage X3 provides us a Setup module that helps setting these in an efficient way.
For example: MATERIALS are external codes for category while in Sage X3 product category is RM.
To know more about this, we’ll show a small example of how we are transcoding the Internal code with an external code that works both for Importing & exporting cases.
For this we’re referencing following paths and screenshots below:
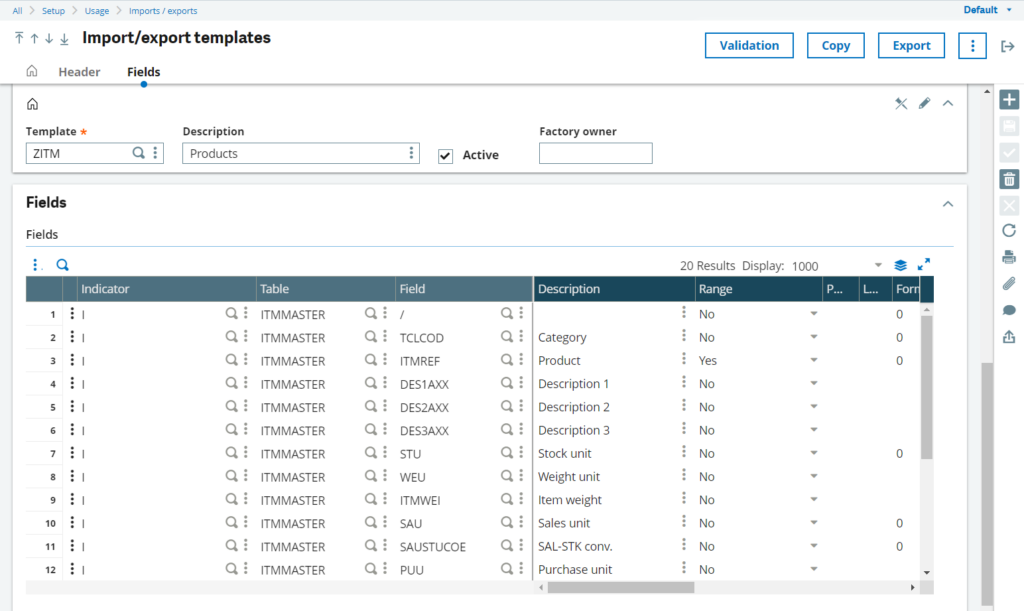
Imports/Exports template: All > Setup > Usage > Imports/Exports > Import/Export template (GESAOE) Transcribe Import/Export: All > Setup > Usage > Imports/Exports > Transcribe import/export (GESAOR) Exports: All > Usage > Imports/Exports > Exports (GEXPOBJ) Imports: All > Usage > Imports/Exports > Imports (GIMPOBJ) Products: All > Common Data > Products > Product (GESITM)
-As shown in Fig. 1 we have our custom product template on which we’ll showcase the part for Category field.
Fig. 2 – Normal exported data
-When we try to export the data from the above template we get the data as shown in Fig. 2 where we can see the Category as BRR.
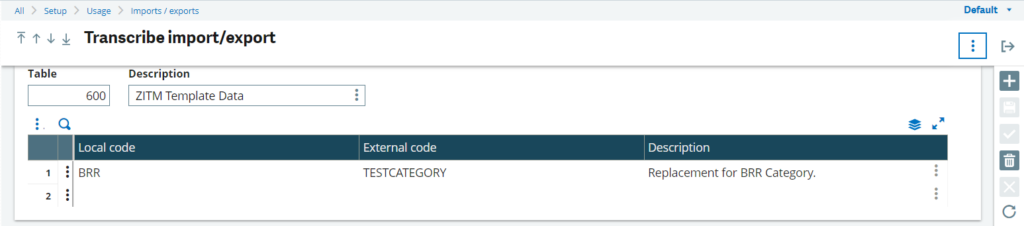
Fig. 3 – Setting up custom Transcribe table
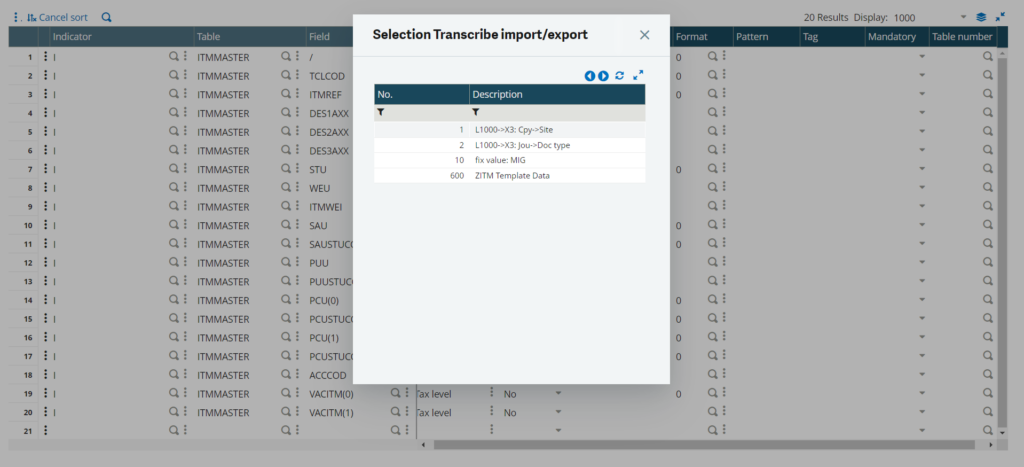
Fig. 4 – Linking the transcribe table no. in Category field of template setup
-Now to transform the category data we’ll set up a new Transcribe import/export table as shown in Fig. 3. In that we’re adding the local code as BRR & external code as TESTCATEGORY. Once the table is created we’re linking the table number to the Category field’s Table number column as shown in Fig. 4.
Note:- By sage standards it is recommended to use table numbers within the range 600-999 as below can be overwritten by application updates. -For the transcription process the following principles apply:
Exports: A search for the field’s original value is performed on the values in Local code and then transcribed to the value in External code. Imports: The External code column is searched, and the value is transcribed to the Local code value.
-Other important parts involve while setting up the table data: – Spaces are not allowed in the Local code and External code values. – To provide a default in the column being searched, use an “ * ” as the value. – If the column being searched includes the same value more than once, the first transcription will be used. – To prevent a specific value from being transcribed, set the transcribed value to “ * ”.
Fig. 5 – Export data having External code
-Now once we export the same product data we can see the category BRR is transformed with TESTCATEGORY as shown in Fig. 5.
-We can test the same scenario by Importing a template with an external code and in sage x3 the creation is handled with the internal code as shown in Fig. 6 & Fig. 7 below.
Fig. 6 – Import data with external code
Fig. 7 – Successful creation of custom product
-As we can see in Fig. 8. Below The product masters of the created product have BRR as the category.
Fig. 8 – Internal code referenced during creation by Sage X3
This way we can implement advanced restrictions on transactions using 4GL in Sage X3.
During the Production tracking process in Sage X3, it has been identified that there is a need for validation to ensure that the minimum corresponding amount of raw material has been tracked or consumed prior to initiating Production tracking for a specific work order.
To tackle this issue effectively, we plan to customize the Production tracking interface. Specifically, we will implement a validation mechanism that checks whether the minimum required proportion of raw material has been tracked or not before allowing a Production entry to be saved against a work order. This validation will be applicable exclusively during data entry on the Production entry screen.
For Example – Refer below screenshot of Work Order Entry, where requirement quantity of FG is 1000.
Now, for that 1 FG, 2 components are required which are getting flown from the Production BOM screen.
But here, we have added 1 unexpected raw material – “RM-0001” which is highlighted in the below screenshot.
[Fig 2. Work Order components]
Now, we will calculate the ratio required for each component in Work Order.
For component “SF-00000020”, 1000 qty. is required and FG qty. is 1000 which means to produce 1000 FGs we require 1000 qty. of raw material “SF-00000020”. To calculate ratio we have to divide component qty. by FG Qty. So here, 1000/1000 = 1. Then ratio is 1:1.
For Component ”RM-12-00000001”, ”, 1000 qty. is required again and FG qty. is 1000 which means to produce 1000 FGs we require 1000 qty. of raw material “RM-12-00000001”. To calculate ratio we have to divide component qty. by FG Qty. So here, 1000/1000 = 1. Then ratio is 1:1.
For unexpected raw material “RM-0001”, 200 qty. is required and FG qty. is 1000 which means to produce 1000 FGs we require 200 qty. of raw material “RM-0001”. To calculate ratio we have to divide component qty. by FG Qty. So here, 200/1000 = 0.2. Then ratio is 1: 0.2.
After calculating ratios of all the components with FG Product, we have to add a validation on Production Tracking screen.
Suppose while creating partial Production Tracking, we are selecting only 100 FGs to produce against that Work Order. Refer below screenshot Fig 3.
[Fig 3. Partial Production Tracking]
Then as per the ratios component’s qty. should be:
For component “SF-00000020”, the ratio is 1:1. So Requirement qty. of “SF-00000020” is 100 for 100 FGs. Because 1*100 = 100.
For component “RM-12-00000001”, again the ratio is 1:1. So Requirement qty. of “RM-12-00000001” is 100 for 100 FGs. Because 1*100 = 100.
For unexpected material “RM-0001”, the ratio is 1:0.2. So Requirement qty. of “RM-0001” is 20 for 100 FGs. Because 0.2*100 = 20. Refer Fig 4.
[Fig 4. Changed quantity tracked]
If it is in the same ratio as Work Order then only it will allow user to create Production Tracking against that Work Order. Also if the Component quantity is greater than the Work Order component required quantity then it will allow to create Tracking.
For Example, if component’s required quantity in Work Order is 100 but in tracking, user is entering 103, 104 or greater than 100 then it will allow user to create the tracking.
Which means Production Tracking Ratio >= Work Order Ratio is allowed. But Production Tracking Ratio < Work Order Ratio is not allowed.
Also there are some points which need to be considered in this customization:
It is important to highlight that this validation will be operational only under the condition where a single Finished Good (FG) is associated with one work order.
The validation process will utilize raw material requirements specified in the Work Order, and it will not rely on the Bill of Materials (BOM) Master for this purpose.
There is one more scenario. Suppose FG qty. is 10 and Component’s requirement qty. is 100 in Work Order. Now we have created 2 Trackings against that work Order with below quantities:
[Fig 5. Work Order Tracking Example – 1]
After these 2 trackings, user wants to create 1 more tracking with 1 FG Qty. And 8 component Qty.
[Fig 6. Work Order Tracking Example – 2]
At this time, system will check sum of previous trackings and current tracking for FG as well as component.
For FG, sum is 3. (Tracking 1 + Tracking 2 + Tracking 3 i.e. 1+1+1=3)
For Component, sum is 30. (Tracking 1 + Tracking 2 + Tracking 3 i.e. 10+12+8=30)
So the ratio is again 3:30 = 1:10 which is satisfying our ratio condition. So system will allow user to create Tracking.
But if the ratio does not match with Work Order ratio then system will restrict user to create tracking entry by giving below error:
[Fig 7. Error on Tracking]
So, it is mandatory that the ratio of work Order FG and Components should match with the ratio of Trackings’ FG and Component.
In Sage X3, you can set up business rules and validations to achieve the desired behavior of displaying a pop-up message when a payment receipt is being created for a sales order with a 100% advance payment term and no proforma invoice.
There was one requirement from one of our client if the proforma invoice is not generated for a sales order with a 100% advance payment, then while creating the Bank receipt from customer payment transaction against that sales order the pop up message should get displayed on the screen like “Please Generate the Proforma Invoice”.
If the payment term is different except the 100% then the system should allow the user to create the payment receipt entry against that sales order.
We will see this functionality in detail in this blog
Initially the user will create a sales order with the proper data as shown in the above screen shot.
Path: Sales -> Order -> Invoicing Tab
Fig2 – Mandatory Payment Term 100AD
As per the requirement from the client, if the sales order created by the user is having 100% Advance selected in the payment term field of the sales order, then it should not allow the user to create payment against that sales order until proforma is created against that Sales Order.
We have not created Proforma against that sales and payment term is selected as 100%AD in Sales Order. So the system would not allow user to create the payment receipt for one particular transaction type i.e. “Bank receipt from customer” and also system will generate a Pop-up message “Proforma invoice is not Generated for “SALES ORDER NO”, Please generated the Proforma invoice” as shown in the above screenshot.
As a result this customization is done for restriction on the advance payment if proforma invoice is not created.
All users play a very critical role in Sage X3, also it has a feature where we can set a permissions and access to a particular user.
The need to restrict users to access ERP Modules can be based on the employees’ role and their department. User security and access should be the top most priority as there is a lot of data involved in it. By providing limited rights, access and Security controls, we can control data corruption and data leakage, which is very much necessary for x3 system.
Thera are few important points which are main by doing the restriction process.
Menu Profile.
Function Profile
Menu Profile: Sage x3 provides a very useful feature called menu profile which can be defined in users screen to restrict the users to access all modules, screen, and reports in Sage X3. We can create a menu profile for example: ”Administration”, “Setup”, wherein we will only add Administration and Setup Module related screen and report and that profile can be assigned to a particular set of users.
Function Profile: Sage X3 provides another feature called function profile, which can be defined in the users screen to restrict users based on their function. In this case we can create an access code let’s say “TEST” and add this access code in function profile to give access function type for the users.
Now we will see how we can give admin access rights to change the profiles to non admin users . Follow below steps
Steps:
Create new user who don’t have access rights to all modules.
Assign the new menu profile and function profile to the new user which have only specific modules access.
Navigate to: Setup -> users -> users
Fig01: Users Screen
3. Now login with TEST user and try to modify/change user’s function profile through user screen, you will get below error.
Fig02: Access Error
To resolve this, follow below points:
Login with Admin user or that user who have full admin rights.
Now go to Setup -> Users -> users.
Search TEST user from left list and select it.
Now go to its parameter tab.
Test User -> Parameter tab-> AUZ -> parameter search -> AUZFCT -> AUZFCT -> enter *
Fig03: User Parameters
5. Now save the screen.
6. Now logout from the admin user .
7. Login with Test user.
8. Now go to users and change its function profile in Setup -> Users screen.
After doing all the above steps, non admin user can modify/ change the profiles without any error.
About Us
Greytrix – a globally recognized Premier Sage Gold Development Partner is a one-stop solution provider for Sage ERP and Sage CRM needs. Being recognized and rewarded for multi-man years of experience, we bring complete end-to-end assistance for your technical consultations, product customizations, data migration, system integrations, third-party add-on development and implementation expertise.
A security profile in Sage X3 is an essential component of the system’s security framework, allowing you to control and manage access to various resources, data, and functionality within the Sage X3 ERP (Enterprise Resource Planning) system. Security profiles are used to set and enforce user-specific rights and limits, ensuring that individuals or roles in your organisation can only access and perform tasks that are related to their responsibilities.
These profiles are highly customisable, allowing administrators to configure rights according to the module, data, and actions that users can access. By defining security profiles, organizations can maintain data integrity, protect sensitive information, and agree with regulatory requirements, which helps to enhance the overall security and transparency of their Sage X3 system.
The following information is entered while creating a security profile:
Code
It refers to a unique identifier used to uniquely identify a security profile. This code is required for the system to reference and manage certain security profiles. It enables administrators to distinguish and deal with various security profiles, making it easier to assign and restrict access permissions for users or roles based on these codes. The code is essentially a label or reference used to simplify security profile administration in the Sage X3 ERP system.
Description
It is a field or attribute that provides a quick yet informative explanation of a security profile. This description helps to provide extra context and details about the security profile’s purpose or role. It assists users and administrators in understanding the function of the profile, making it easier to find the proper profile for a given purpose or job inside the system. Individuals that need to work with security profiles in Sage X3 will find the description field useful.
Fig01: Security Profile
Customization level
Defines the level of Customization a user can perform on pages:
* None: no Customization is allowed.
* User: Customization is allowed, but only on a page that is dedicated to the user.
* Administrator: the user can modify authored page shared by several users.
Allow Office document upload
This setting determines whether a user has the capability to upload Office documents within a system. By default, this feature is deactivated as a security precaution to safeguard against potentially harmful Office documents. To enable the user to upload Office documents, this setting must be activated. This feature allows users to upload and work with Office files but should be managed carefully to maintain system security.
Security Level
“Security Level” represents a numerical rating assigned to each security profile, typically ranging from 0 to 99. This numeric level plays a critical role in determining a user’s authority to create or modify security profiles. The rule is that a user can only create or modify security profiles that have a security level higher than the user’s own security profile. Put simply, a user with a security level of 1 is restricted to viewing and managing security profiles with security levels of 2 and above. This hierarchy ensures that higher-level security profiles are controlled by users with the appropriate clearance, enhancing the security and access control within the system.
Fig02: Security Profile Customization level
Authorizations
This grid displays a list of predefined codes as well as their descriptions. Each code is an identifier for a certain controlled entity, and it is accompanied by filters that determine its behavior. These codes are used to categorise and manage controlled entities, making it easier to understand their function and the criteria that regulate them within the system.
For every code, you can select the check boxes to define the access rights granted by the security profile. When a check box is cleared, the access right is denied. A user cannot provide access to codes for which he doen’t have rights. If it is the case,the corresponding check boxes are disabled.
The access rights are the usual CRUD access (Creation, Read, Update, and Delete), plus an additional Execution right.
Fig03: Authorizations
Associated roles
This section defines the roles that the security profile applies to. In this area, you can assign roles to the security profile, or you can use the roles management interface. However, a single role cannot be linked to multiple security profiles. If a role does not have an associated security profile, it means that the system sets no specific restrictions on that role.
Security profiles in Sage X3 are essential for controlling access to resources and data within the ERP system. They use unique codes and descriptions for clarity, and users must confirm to numeric security levels when modifying profiles. Roles are linked to security profiles to manage access, with each role associated with a single profile. When no security profile is assigned to a role, it operates without specific restrictions. These profiles are a key component of Sage X3’s security framework, safeguarding data integrity and ensuring compliance while providing personalized control over user access.
About Us
Greytrix – a globally recognized Premier Sage Gold Development Partner is a one-stop solution provider for Sage ERP and Sage CRM needs. Being recognized and rewarded for multi-man years of experience, we bring complete end-to-end assistance for your technical consultations, product customizations, data migration, system integrations, third-party add-on development and implementation expertise.
In Sage X3, you can add a new report to a function on the different objects screen. When the standard reports are not sufficient, we use an existing report and customise it according to our requirements.
We can also add the validations on report printing. For example, On the screen, the user wants to print only those supplier BP invoice reports whose credit amount is greater than ‘$500 ‘ and whose supplier BP invoice date is after June month. Follow the below steps to add a new report to a function.
Once the report is ready, we need to make it available for the user to select it from the list. In that case, this blog is very helpful for you.
In this blog, we will use the standard report codes and have them available in the GESBIS (Supplier BP Invoices) function as a selection list.
Here’s a step-by-step description of how to add a new report to a function on the different objects screen in Sage X3:
STEP-1
As shown in the below screenshot, Select the navigation menu and go to A/P-A/R accounting –>> Invoicing–>> Supplier BP invoice, select the print icon on the right, and select “List”. Refer below screenshot as fig1.
Fig01: Supplier BP InvoiceFig02: Print Button
It will open a default report code FACTRSF (Supplier invoice list). his code is defined in the GESAFC (Functions) function against GESBIS code.
When you launch this report, it will print the supplier invoices list.
STEP-2
Report codes are located under Development–>>Script dictionary–>>Reports.
Now that we have identified the code next let’s add it to the GESARX (Print codes) function as internal code and then assign two reports codes, XFACTRSF and ZFACTRSF. Refer below screenshot as fig3.
Reason for listing two report codes is if I use only one, it will not show as a selection list.
Fig03: Report Dictionary
STEP-3
As shown in the below screenshot, Go to the print codes function in Setup–>> Destination–>> Print code and search if the FACTRSF internal code exist.
Then add the above codes as shown below.
Fig04: Print Code
STEP4:-
As shown in the below screenshot, Optionally we can use the GESARV (Default values) function to propose default values. This function is used to store values by default for the print setups.
Fig05: Default Values
As shown in the below screenshot Finally, in Supplier BP invoices we can select a list of print codes.
Fig06: Selection Print Code
This is a simple process to add a report code to a function.
This blog help us to know about the use By add a new report to a function on the different objects screen in Sage X3 .
About Us
Greytrix – a globally recognized Premier Sage Gold Development Partner is a one-stop solution provider for Sage ERP and Sage CRM needs. Being recognized and rewarded for multi-man years of experience, we bring complete end-to-end assistance for your technical consultations, product customizations, data migration, system integrations, third-party add-on development and implementation expertise.
Sage X3 uses an automatic matching process when posting open items which are applied to other open items. For example a payment made for some invoices is posted. During this posting process the details are loaded into a temporary table called MTCBATCH. Within this table the documents are matched together, open item entries are marked as closed, and the entries are then cleared from the MTCBATCH table.
Fig01: Accounting task
Clearing this field is a manual process. The steps below shows us how to create a query tool to view the suspended matching items and how to clear them from the MTCBATCH table in sage X3.
The first thing to check is to make sure the accounting tasks are running. After you have verified that everything is running proceed with the next steps.
Creating a Query tool to Identify the Incomplete Records.
Go to Setup > Usage > Reports > Query Tool
Create a new Query like below. Make sure to add the link expression formula: [F:DAE]DAE2 = [F:MTB]ACCNUM
Fig02: Query Tool
3. Validate and run the query.
Fig03: Suspended Matching
You can see two sets of matching that failed. We can go to manual matching to view the entries and complete the matching as needed.
Completing the matching using manual matching
Go to Financials > Matching > Manual matching
Complete the matching process if needed.
Fig04: Manual Matching
REMOVE THE ENTRIES FROM THE SUSPENDED MATCHING TABLE-
(A user with administrative permissions may be required for this process)
Go to Development > Utilities > Maintenances > In lines
Enter MTCBATCH in the ‘Table’ field
Click ‘OK’
Click on ‘Selection…’ from the list on the right
Enter the Match number (MTCNUM) from the query tool results
Click ‘OK’
Fig05: Selection Criteria
Click the delete icon from the list on the right
Fig06: Table maintenance
Click ‘Yes’
Fig07: Confirmation
Click the scroll arrow to move to the next record with the same MTCNUM
Delete any remaining records
Go to Accounting Tasks and review the Matching field. Confirm that it says ‘0’.
Fig08: Accounting Task Active
About Us
Greytrix – a globally recognized Premier Sage Gold Development Partner is a one-stop solution provider for Sage ERP and Sage CRM needs. Being recognized and rewarded for multi-man years of experience, we bring complete end-to-end assistance for your technical consultations, product customizations, data migration, system integrations, third-party add-on development and implementation expertise.
Global settings in Sage X3 are system-wide configuration options, applicable across the entire system, allowing administrators to establish default behaviors and parameters for various modules during initial implementation, ensuring consistent and standardized use throughout the organization’s use of Sage X3.
Access to global settings is limited to privileged users like system administrators. These settings encompass parameters for finance, inventory, manufacturing, sales, and other modules. Caution is necessary while modifying these settings, as they can significantly affect Sage X3’s functionality.
To access and configure global settings in Sage X3, Navigate to:
Administration -> Administration -> Settings -> Global settings
Here is a brief overview of global settings in Sage X3:
General settings:
Upper and lower bound: The upper and lower bounds are set using a specified pivot date for default century definition when two-digit years are input; only the upper bound is required, and the lower bound is calculated automatically.
For instance, if you set 2029 as the upper bound:
Any date with a two-digit year equal to or lower than 29 falls within the [2000-2029] range.
Any date with a two-digit year between 30 and 99 falls within the [1930-1999] range; this explains why 1930 is displayed as the lower bound.
Fig 1. Global Setting
Global default locale: The global default locale is initially English (United States) but can be altered; localized properties have default values, but specific translations or non-empty localized values can override them based on user preferences.
Display animation: Users can establish the default display animation setting (On/Off) and customize it individually in the Personal settings panel.
Authentication:
In the Authentication section, a default authentication method can be specified for users with standard authentication. The options include Basic, LDAP, OAuth2, or SAML2:
Basic and LDAP authentications involve sending passwords to the server, suitable for users with credentials stored in the database or LDAP server. Both login and password fields are case-sensitive.
OAuth2 requires an OAuth2 server for authorization handling.
SAML2 requires a SAML2 identity provider for authorization handling.
The selected authentication method functions as the default, yet personalized user-specific methods have priority; for LDAP, specify the Default LDAP server, for OAuth2, set the Default OAuth2 server, and for SAML2, enter the Default SAML2 identity provider.
Password Policy: You can define password policy which has defined in the Sage x3.
Proxy
Proxy Settings: Proxy Settings manage external URL access, with web browser proxy settings governing widget-based access. Direct external URL access, such as calling a Web service, requires a specific proxy server setup. The Syracuse server’s proxy settings can be configured here, including selecting the Proxy option and specifying the Default proxy configuration based on administrative reference proxy setup.
Fig 2. Global Setting
Mailer: This part sets the default mailer for notifications.
CTI Service: This section specifies the default computer telephony integration (CTI) service used.
License: Here, you can set a percentage value to limit the maximum size allowed by the license for web service transfers. Notifications are automatically sent when this limit is reached, with details available on the license_web_warn setup page.
Log: Starting from version 2018.R3, this feature enables users to generate technical trace files for Sage support, with customizable settings for file size, daily files, and retention period.
In the default setup:
A new log is made when a log reaches 10MB; the previous file is compressed.
There can’t be more than 5 log files for a single day; older logs are deleted.
After 5 days, logs from the oldest day are deleted for new logs.
You can set trace levels (Error, Warning, Info, Debug, Silly) for different codes. By default, traces are stored in Syracuse’s logs folder, but the folder location can be changed in the nodelocal.js configuration file.
Fig 3. Global Setting
Patch: The system’s Patch lock status, updated automatically by the platform, blocks patching during tasks like integrity checks. It’s stored temporarily in MongoDB due to node.js restarts, and users can manually unlock it once stability is confirmed. You can specify how long ZIP files are kept in the update entity by configuring the Update expiration period; setting it to 0 retains the file.
Synchronization: The Synchronization block contains data for future platform extensions and should not be altered presently.
History: This feature enables tracking user modifications in the MongoDB database. It creates logs for changes made to selected entities, displaying the modified attributes in the database
History Maximum Days: You can set the maximum number of days to retain history records. Once this period expires, the history records are automatically deleted from the database.
History logs: The configuration entities in the history log are consistently recorded, regardless of whether the technicalSetting group is active or not.
Fig 4. Global Setting
Global variables: Global variables are utilized in this section to set values automatically, particularly for substituting placeholders in URLs within the Syracuse client. Modifying these variables manually is strongly discouraged, and placeholders, automatically generated based on variable names, facilitate easy usage without manual input.
It’s important to document and maintain a clear record of global settings to ensure consistency and to facilitate system recovery or migration. Additionally, caution should be exercised when making changes to global settings, as they can impact the entire organization and its processes.
Global settings in Sage X3 provide essential configuration options, ensuring efficient control and management of various system parameters and functionalities for optimal performance.
About Us
Greytrix – a globally recognized Premier Sage Gold Development Partner is a one-stop solution provider for Sage ERP and Sage CRM needs. Being recognized and rewarded for multi-man years of experience, we bring complete end-to-end assistance for your technical consultations, product customizations, data migration, system integrations, third-party add-on development and implementation expertise.
In Sage X3, the creation of a miscellaneous receipt typically occurs for various reasons, and these receipts are used to record non-standard financial transactions or receipts that do not fit into the standard sales or purchase order processes.
When you encounter an issue with an “Already Occupied Single-Product Location” it means that the system is not allowing you from assigning a specific product to a location because that location is already occupied by the another product.
Fig 1. Error
At the line level, many goods are allocated to the same location type (CQU) and location (QUA03) in the above screenshot . Consequently, “Already-occupied single-product location” is the error message that the system displays.
Follow the below steps to encounter this error.
Navigate to : Common data > Product Tables > Location types.
Go to the location types as shown in below screenshot.
Fig2. Navigation
Into the location type select the location from the left list. As shown in the below screenshot.
Fig3. Location types
In the below screenshot, location type CQU is set for the single-product, that’s why miscellaneous receipts will not accept multiple products at the line level.
Fig4. Single-product
Uncheck the single-product box and save the changes. Please refer to screenshot 5 below for a better understanding.
Fig 5: Uncheck box
Now try to create the miscellaneous transaction with multiple products for the NA011 site to the location type CQU and location QUA03.
Please refer to screenshot 6 below for a better understanding.
Fig 6: Miscellaneous Receipts
Now it will allow you to create miscellaneous receipt with same location type and same location.
Thus, the process to achieve ‘Already Occupied Single-Product Location’ error for location.
About Us
Greytrix – a globally recognized Premier Sage Gold Development Partner is a one-stop solution provider for Sage ERP and Sage CRM needs. Being recognized and rewarded for multi-man years of experience, we bring complete end-to-end assistance for your technical consultations, product customizations, data migration, system integrations, third-party add-on development and implementation expertise.
Locales in Sage X3 are specific language or regional settings that are used to modify the software to fit various languages or geographical regions. Language preferences, date formats, currency symbols, and other regional requirements are examples of these settings. For multinational or multilingual organizations, setting up locales is essential because it guarantees that users from various regions can communicate with Sage X3 in the language and format of their choice.
Locale functionality in Sage X3 allows organizations to adapt the software to different regional and language preferences, ensuring a seamless user experience across diverse locations. Here’s a brief description of the key aspects of locale functionality in Sage X3:
1. Multilanguage Support: Sage X3 supports multiple languages, enabling users to interact with the system in their preferred language. Multilingual support is essential for multinational organizations with employees who speak different languages.
Fig 1. Multilanguage Support
2. Date and Time Formatting: Locales allow organizations to customize date and time formats according to regional conventions. This ensures consistency in date and time representations, accommodating various date formats used worldwide.
Fig 2. Date and Time formats
3. Currency Settings: Locales enable the selection of the preferred currency and its associated symbol. Different regions use different currencies, and Sage X3’s locale functionality ensures that financial transactions and reporting are accurate and aligned with the appropriate currency standards.
Number Formatting: Locales define how numbers are displayed, including decimal separators and thousand separators. Number formatting varies across regions, and Sage X3 adapts to these differences to maintain consistency in numerical data representation.
Fig 3. Number Formatting
5. Taxation and Compliance: Locales can influence tax codes, compliance requirements, and other regulatory settings specific to certain regions. By configuring locales, organizations can ensure that financial and regulatory reporting complies with local laws and standards.
6. Regional Preferences: Locale functionality extends to various regional preferences, such as measurement units (imperial or metric) and paper sizes, ensuring that documents and reports generated within Sage X3 align with regional norms.
Locale functionality in Sage X3 is essential for global organizations seeking to tailor their software to diverse regional and language preferences. It ensures a seamless user experience by offering multilingual support and allowing customization of date, time, currency, and number formats according to regional conventions. Additionally, locale settings influence taxation, compliance, and other regulatory requirements specific to certain regions. Configuring locales is crucial for promoting efficient communication, generating localized documents and reports, and ensuring accurate financial and regulatory compliance. This configuration is typically managed during the initial system setup or when expanding software usage to new regions, overseen by system administrators or privileged users
About Us
Greytrix – a globally recognized Premier Sage Gold Development Partner is a one-stop solution provider for Sage ERP and Sage CRM needs. Being recognized and rewarded for multi-man years of experience, we bring complete end-to-end assistance for your technical consultations, product customizations, data migration, system integrations, third-party add-on development and implementation expertise.
In the last blog, we learned how to make global scripts. This blog will teach us how to make and use parameters.
Parameters:
The “Parameters” option shows all the parameters that are set up and can be used from the global scripts.
Fig.1 Parameters
Steps To create a new script parameter:
In the upper left hand corner, click Create New Parameter.
Enter a unique Parameter Name and Description.
Click Create to finish. The new script parameter will appear in the first line of the list.
Fig. 2 New Script Parameter
Steps To execute a script:
Go to Env. & Data Sources.
Follow the instructions to add a new environment to match the global script you just created.
Click Execute Scripts.
Click Run to execute the script.
In conclusion, executing Global Scripts with parameters in SEI is a powerful and flexible way to enhance the functionality of the Data Model Designer. It allows for more precise control and manipulation of data models, enabling users to tailor their operations to specific needs. The ability to define and apply parameters from global scripts further extends this flexibility, making SEI a robust tool for data management. As we continue to explore and understand its capabilities, we can leverage this feature to optimize our data handling tasks and improve efficiency.
About Us Greytrix – a globally recognized Premier Sage Gold Development Partner is a one-stop solution provider for Sage ERP and Sage CRM needs. Being recognized and rewarded for multi-man years of experience, we bring complete end-to-end assistance for your technical consultations, product customizations, data migration, system integrations, third-party add-on development and implementation expertise.
Greytrix is a recognized Sage Rockstar ISV Partner for GUMU Sage Enterprise Management – Sage CRM integration also listed on Sage Marketplace; GUMU integration for Sage Enterprise Management – Salesforce is a 5-star app listed on Salesforce AppExchange.
For more information on Sage X3 Integration and Services, please contact us at x3@greytrix.com. We will be glad to assist you.
To manually select a sales order or delivery type every time you enter data into your system. It can be a tedious task, especially when you have a long list to choose from. However, there’s a solution that can save you time and improve your efficiency. By setting up a preferred default for your sales order and delivery types, you can eliminate the need to select them manually. This means that every time you enter data, your preferred default will automatically be selected, saving you time and effort. And the best part? You can easily set this up by following a few simple steps in your general parameter settings.
The following general parameter settings will allow you to setup a default value which will save time during data entry.
Sales Order
Setup > General Parameters > Parameter Values
Chapter: VEN / Group: ORD
Fig. 1 Parameter Values
Sales Delivery
Setup > General Parameters > Parameter Values
Chapter: VEN / Group: SSD
Fig. 2 General Parameters
In conclusion, the time-consuming task of manually selecting sales order and delivery types can be streamlined and made more efficient by establishing preferred defaults. By configuring these settings in your general parameters, you can enjoy the convenience of automatic selection, ultimately saving time and effort during data entry. This simple solution offers a significant improvement in workflow efficiency and is easily set up, providing a practical way to enhance your data entry process.
About Us Greytrix – a globally recognized Premier Sage Gold Development Partner is a one-stop solution provider for Sage ERP and Sage CRM needs. Being recognized and rewarded for multi-man years of experience, we bring complete end-to-end assistance for your technical consultations, product customizations, data migration, system integrations, third-party add-on development and implementation expertise.
Greytrix is a recognized Sage Rockstar ISV Partner for GUMU Sage Enterprise Management – Sage CRM integration also listed on Sage Marketplace; GUMU integration for Sage Enterprise Management – Salesforce is a 5-star app listed on Salesforce AppExchange.
For more information on Sage X3 Integration and Services, please contact us at x3@greytrix.com. We will be glad to assist you.
The ERP comprises multiple modules that link inventory accounts effects in a single process. In this blog, we will address the problem we are having with journal entry creation.
Initially, we create a sales order in X3 when we receive an order, then we move on to creating a sales invoice for the accounting effect. Once the invoice is posted, a journal entry is created that aids in maintaining credit debit account details for auditing purposes.
There are various methods to address the problem that occasionally x3 users encounter with the automated creation of journal entries following the posting of invoices. Please take a look at the solutions below to address the problem.
First step is to check the Batch server From Administration, if it is in stopped state please start the Batch server
Secondly check the Accounting task, if it’s in Inactive state, make it activate then click on update button and check the status display on the grid as shown in below image
If X3 user is not able to see any status on accounting task grid then open the respective Recurring task
Under the Recurring task check the time set to run the interval also check the days set to run the task , set it as per requirement , after that check the grid display under the accounting task
After making the changes to Recurring task, create and post the sales invoice and check whether it can be appeared on Journal on hold option under the accounting task before the next execution of the accounting task
If user still not able to see the Journal on hold after doing all the above step then we need to check accounting task screen under the X3 setup navigate as below
Check the Criteria set up onto the screen in front recurring task
Let us see why we need to set the criteria and what it the use if we set the criteria
Criteria is the field where we can specify the Company, site etc. based on the value passed with the field the transaction gets consider to create the automatic Journals
For Eg. In criteria if x3 user has set the company with value “LYN” it has to consider the transaction posted under the “LYN” company
if we do not want the filter criteria to get consider we can keep that field empty so all the posted invoices gets consider for automatic Journal creation.
So whenever user is facing the Issue on automatic creation of Journal entry, in this case would recommend you to check the criteria with its value setup on to the setup screen.
After that create and Post the New sales Invocie, activate the Accounting Task and check the count on Journal on hold Tab which will get execute on the set of interval in this way we can check the journal created on post action from Accounting Document option available on sales Invoice screen
About Us
Greytrix – a globally recognized Premier Sage Gold Development Partner is a one-stop solution provider for Sage ERP and Sage CRM needs. Being recognized and rewarded for multi-man years of experience, we bring complete end-to-end assistance for your technical consultations, product customizations, data migration, system integrations, third-party add-on development and implementation expertise.
Managing project billing is a critical aspect of project management and financial control within an organization. It involves the systematic and accurate invoicing of customers or clients for the work performed on projects, ensuring that revenue is appropriately recognized and financial goals are met. The process typically includes various stages, from tracking project activities and costs to generating invoices and monitoring payments.
In Sage X3, project billing functionality is designed to streamline the invoicing process for projects, ensuring accurate and timely billing based on project activities and costs. The functionality of the Project Billing Overview has been improved to update project billing statuses, validate the invoicing flow, and refresh project billing. This enhancement allows for a broader perspective by providing a multi-project view and introducing additional selection criteria. Access control values required in the Functional Authorization function for the specific function code have been implemented for the Project Billing Overview function.
To access the Project billing overview functionality, you need to navigate below path:
The project billing overview functionality allows users to view multiple project billings as per milestones, budgets, and all other aspects on one platform. This will be the easy way provided by Sage X3 to keep track of project billing as per status.
It allows you to view the project overview as per billing plan selection, like by sales order line, by sales order, or by project phases. This will also allow us to analyse the billing plan as per the forecast status.
Figure 2: Selection Criteria
We can keep a track on the project billing as per the periods. The system calculates the invoiced amounts based on the predefined billing plan.
Figure 3. Billing PlanFigure 4: Bills
The billing plan helps organizations manage complex billing scenarios, such as milestone-based invoicing or recurring billing. Identify and define specific milestones within the project. These milestones could represent key project phases, deliverables, or completion stages. Link each milestone to the associated budgetary and billing information.
Figure 5: Milestones
In Sage X3, the management of budget milestones and billing within the context of project billing involves tracking project progress, setting up budgetary goals, and invoicing customers based on predefined milestones. Establish a project budget within Sage X3, detailing the estimated costs and revenue associated with the project. The budget serves as a baseline for comparison with actual project performance.
Figure 6: Budget
Configure a billing plan within Sage X3 that corresponds to the project’s milestones. Specify the billing amounts or percentages associated with each milestone. This defines the invoicing schedule based on project progress.
In conclusion, the recent enhancements to the Project Billing Overview function in Sage X3 are designed to significantly improve the user experience and overall efficiency of project billing processes. The introduction of features such as refreshing project billing statuses, updating project billing, and validating the invoicing flow ensures that users can access real-time and accurate information. This not only facilitates a multi-project view but also provides additional selection criteria, allowing for a more comprehensive and flexible approach to project billing management. The integration of necessary access control values further enhances security and compliance, contributing to a robust and reliable project billing system. Ultimately, these advancements aim to streamline project billing operations, reduce manual efforts, and promote better decision-making for organizations leveraging Sage X3.
About Us
Greytrix – a globally recognized Premier Sage Gold Development Partner is a one-stop solution provider for Sage ERP and Sage CRM needs. Being recognized and rewarded for multi-man years of experience, we bring complete end-to-end assistance for your technical consultations, product customizations, data migration, system integrations, third-party add-on development and implementation expertise.
This blog explains what a Selection Page is and how it works with Global Parameters. This ensures that the selection page functions only within Dashboards, Workbooks, and Reports.
It is used to filter the data displayed in the current view. If a data type has been defined in the Global Parameters, user input will be validated.
Steps:
In the Administration section, click Global Selection Pages in the left pane.
Fig01: Global Selection
To create a new Global Selection Page:
In the upper left hand corner, click Add New Record.
Enter a name for the Global Selection Page into the text field. The name can be translated by clicking Search icon.
Drag and drop the Global Parameters from the list on the right to add them to the Selection Page.
Click Create to finish.
Fig02: Global Selection Page
To edit an existing Global Selection Page:
Click on pencil icon in upper right column.
Make the changes to the parameters as per your requirements.
Click Update to finish.
Fig03: Global selection edit mode
In this blog, we learn how we can use the global selection page in SEI and the workings of it.
About Us
Greytrix – a globally recognized Premier Sage Gold Development Partner is a one-stop solution provider for Sage ERP and Sage CRM needs. Being recognized and rewarded for multi-man years of experience, we bring complete end-to-end assistance for your technical consultations, product customizations, data migration, system integrations, third-party add-on development and implementation expertise.
A purchase request is a written request that lists the items that are required, how many are needed, and when they will be required. It becomes a purchase order after it is authorized. An unapproved purchase order is called a purchase request. The purchase request lists all necessary goods and services along with their respective quantities, suppliers, and associated expenses.
A purchase order is used by a buyer to place an order and is issued before delivery. An invoice is issued by a seller using invoicing software after an order is delivered. It defines the amount the buyer owes for the purchased goods and the date by which the buyer needs to pay.
In Sage X3, we can manage the purchase requirements of different departments or sites of a company in purchasing, purchase requests, and purchase requests. Here, you can create, modify, delete, copy, view, and print purchase requests.
Follow the below steps:
Navigate to : Development > Script dictionary > Objects
Fig01: Basic Object Screen
Navigate to the Environment tab in the Object, then add the table PRECEIPTD, its corresponding index, and link expression with [F:PTH]PTHNUM;1000 using the abbreviation ZPTD in the Tables to open column. Go to the Selection Tab after adding it to the Environment tab.
Fig02: Adding expression
Add the expression [F:ZPTD]POHNUM with the appropriate description and type POH to the Expression column of the Selection tab. Then, click Save to validate the corresponding object.
Fig03: Field added in Left list section
The purchase order number field is now visible in the left list of the Purchase receipts screen.
About Us
Greytrix – a globally recognized Premier Sage Gold Development Partner is a one-stop solution provider for Sage ERP and Sage CRM needs. Being recognized and rewarded for multi-man years of experience, we bring complete end-to-end assistance for your technical consultations, product customizations, data migration, system integrations, third-party add-on development and implementation expertise.
In Sage X3, reports play an important role for representing transactions and records for analysis and growth perspective. Reporting enables businesses to gain real-time visibility into their critical processes, such as sales, finance, inventory, and production. With accurate and up-to-date information at their fingertips, decision-makers can make informed choices, identify bottlenecks, and drive operational efficiency.
Likewise, Sage X3 provides various reports for each stage of business. This reports can be printed explicitly using Reports function. And, we can print them automatically on creation of certain transactions.
For example, there can be a requirement where user may need to print the order acknowledgment automatically after creation of a sales order for particular customers only rather than printing them explicitly. In Sage X3, we can achieve this easily using “Print ack.” Flag field present on Customers master screen.
To achieve this follow below steps:
Navigate to: Common data > BPs > Customers
Navigate to “Classifications” tab. Check the flag “Print ack.” And save the changes.
4. Select entry transaction. Set Document as “ARCCLIENT” and check “Auto Print” flag.
Fig02: Entry transaction setup
5. Perform entry transaction validation.
Now, when you create a sales order for that particular customer you will get popup of “Enter report parameters” screen for the report “ARCCLIENT” after order creation. If you print this report then the “Acknowledgment Printed” flag on sales order will be automatically set to Yes, otherwise it will be No by default.
Fig03: Ack. flag on Sales Order
Thus, we can automatically print the order acknowledgment using “Print ack.” Flag on Customers master. If it is set to No, the acknowledgment will not be printed.
About Us
Greytrix – a globally recognized Premier Sage Gold Development Partner is a one-stop solution provider for Sage ERP and Sage CRM needs. Being recognized and rewarded for multi-man years of experience, we bring complete end-to-end assistance for your technical consultations, product customizations, data migration, system integrations, third-party add-on development and implementation expertise.
In order to help the ERP user with the relevant information regarding the multiple project at the location that might be running , hold or may be finished but still has to be recorded or to be used to gather necessary information on future involvement with similar client or material/required/cost involved/person responsible/useful insights etc Sage X3 has a new Inquiry screen called Project Overview for each project at their site’s.
This can be traced as.. Projects > Overview > Project Overview as shown below
The screen is primarily designed to trace back the changes and resources that were used during a project’s timeline including any filter the user wants to have in order to have more control on information like expected payment for similar material and involving similar resources with duration spent by that resource etc.
The screen has a project’s field where we provide projects unique code ,time and currency units along with check boxes for Task that enables us to view detailed view of project information regarding its subtasks that were involved for successful completion , operations check box to view assignments that were made and products that were involved from site. Below is detailed view.
The check boxes as explained do the necessary filters to show products and assignments that were recorded.
Fig03: Criteria and Apply button
This view shows the apply button and criteria , apply as name suggests show changes and details whereas criteria shows the more filter options for same projects involving start due dates end due dates , task progress ranges and , from task progress to to task progress , person responsible , from product and to product, operation resources etc.
Fig04: Criteria 1Fig05: Criteria 2
Applying respective filters will show the information’s
Now we will apply filter on real data for a project code by hitting on search menu , for this I choose entry NA0131701000026 project code that was ended on year 2022 which will be cleared and shown on respective fields at detailed level along with other necessary informations.
Fig06: Entry at screen
By hitting on Apply button we will see the following output as
This show multiple sub task that were attached to it since we also selected the Task check box , the sub tasks as
Project Launch
Research and Design
Manufacturing
Project Management
Release and Shipment
Onsite mounting and testing
As these were the tasks involved in this particular projects. The more details of the project involving payment and site are at the detail level as to show the estimation around start and end date with category and status which is END in our case that means the project has ended at respective dates.
Fig08: Quantities and units
This detailed view shows the quantities and units that were used to accomplish the task that it shows on the left side of the screen.
Further this screen also shares a glance at pricing involved on the projects at each task for that particular durations of time for a site that were used
As seen in below snip the pricing is distributed for each task on the left with sites involved on the right side.
NA013 is the site in this case and USD is currency for each planned amount , which clearly shown the planned amount on each sub task of that project that was distributed earlier on the same , this give an efficient distribution of capital resources that were spend on sub tasks such as production, manufacturing in this case.
Here we can assert the amount that were 1,729 USD for production and 917.54 USD for manufacturing.
About Us
Greytrix – a globally recognized Premier Sage Gold Development Partner is a one-stop solution provider for Sage ERP and Sage CRM needs. Being recognized and rewarded for multi-man years of experience, we bring complete end-to-end assistance for your technical consultations, product customizations, data migration, system integrations, third-party add-on development and implementation expertise.


 integrations include Sage X3 for Sage CRM, Salesforce.com and Magento eCommerce along with Implementation and Technical Support worldwide for Sage X3 (Sage Enterprise Management). Currently we are Sage X3 Implementation Partner in East Africa, Middles East, Australia, Asia. We also offer best-in-class Sage X3 customization and development services, integrated applications such as POS | WMS | Payment Gateway | Shipping System | Business Intelligence | eCommerce and have developed add-ons such as Catch – Weight and Letter of Credit for Sage X3 to Sage business partners, end users and Sage PSG worldwide.


![[Fig 1. Work Order]](http://www.greytrix.com/blogs/sagex3/wp-content/uploads/2023/12/Fig-1.-Work-Order.jpg)
![[Fig 2. Work Order components]](http://www.greytrix.com/blogs/sagex3/wp-content/uploads/2023/12/Fig-2.-Work-Order-components.jpg)
![[Fig 4. Changed quantity tracked]](http://www.greytrix.com/blogs/sagex3/wp-content/uploads/2023/12/Fig-4.-Changed-quantity-tracked-1024x534.jpg)


 integrations include


