In the Sage X3, we have various standard reports for almost every screen which are developed in Crystal Report. Also we can develop own custom reports as per client requirement. Crystal Reports is a popular Windows-based report writer solution that allows a developer to create reports and dashboards from a variety of data sources with a minimum of code to write.
There is a feature to limit the number of records to be printed in a page in Crystal Report.
Below is the Sales Order report where total 7 records are printing in a page and wanted to limit 5 records per page in detail section and print remaining records on next page.
In the above output the 5 records are printing in 1st page and remaining are printing on 2nd page. This is how we can limit the number of records to be printed per page.
One of your frequent chores may involve running specific reports as a Sage X3 user. By putting up a report as a single item for a particular module, you can simplify work processes and eliminate uncertainty about which report to execute.
The example that follows will show how I will add our Sales Invoice report as a menu item and then add it to my Sales Module.
Creating a New Menu Item
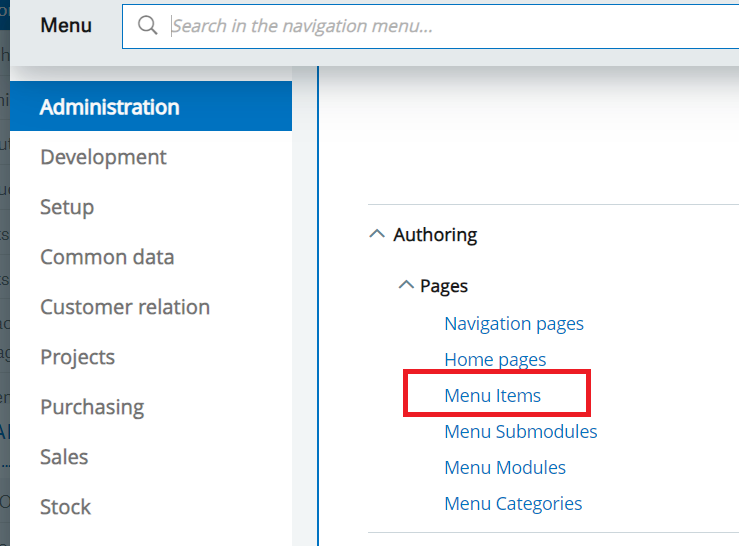
Go to Administration > Authoring > Menu Items
Click New Menu Item from the list on the right
Enter a Code, Title, and Description
Select Function (classic) for the Link Type
In the ‘Function’ field, enter AIMP~ (ex. AIMP~XX1P5_SINVE)
Harness the power of Sage X3 with our custom solution that effortlessly converts your sales invoice data into JSON format, ready for uploading to a government portal through a third-party API. In this blog post, we’ll guide you through this tailor-made process.
When it comes to E-invoice generation for government compliance, sometimes you need a unique approach. In this blog post, we’ll show you how we’ve customized Sage X3 to simplify the process and integrate seamlessly with a third-party API.
Custom Sage X3 Integration: Your E-Invoice Gateway
We’ve developed a specialized integration within Sage X3 to convert your sales invoice data into the required JSON format.
This integration ensures that your data is accurately prepared for E-invoice generation via a third-party API, which is linked to the government portal.
User-Friendly Interface
Despite its custom nature, we’ve prioritized user-friendliness:
We’ve integrated a straightforward “Convert to JSON” button directly within your Sage X3 interface, making it accessible for all users.
Effortless JSON Retrieval and Upload
Getting your JSON file ready for E-invoice generation is a breeze: Simply click the “Convert to JSON” button when you’re ready. Our custom code takes care of the technical aspects, smoothly retrieving the JSON file from Sage X3 and preparing it for upload to the government portal via the third-party API.
Adaptable for Your Unique Needs
What makes this solution stand out is its adaptability: You can customize this solution to meet various other requirements within your Sage X3 environment. It’s not just limited to E-invoicing; it’s a versatile tool for integration.
Our custom Sage X3 integration simplifies the process of converting sales invoice data into JSON format, ready for hassle-free uploading to the government portal through a third-party API. It’s a robust solution tailored to your specific needs. Give it a try and streamline your E-invoice compliance effortlessly!
We frequently work with multilingual Sage X3 clients that prefer to utilize the program in their native languages. As a result, the program may occasionally misinterpret the information or lose it.
To offer specialized translations Sage X3 gives us multiple techniques for handling various sections, such as screens, tables, descriptions, etc. individually. We’ll demonstrate one such approach for translating the title of a menu item.
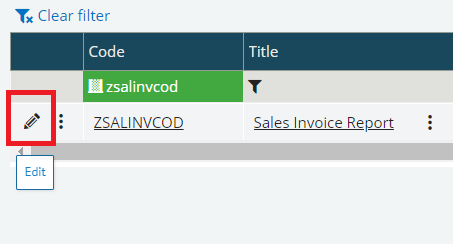
We already have a menu item with the title “Sales invoice report” which was created for ENG – US language. We’ll add our translation for ENG – BRI language as “Tax invoice report” for which we’ll go into edit mode by click the Pen icon as shown in Fig. 2.
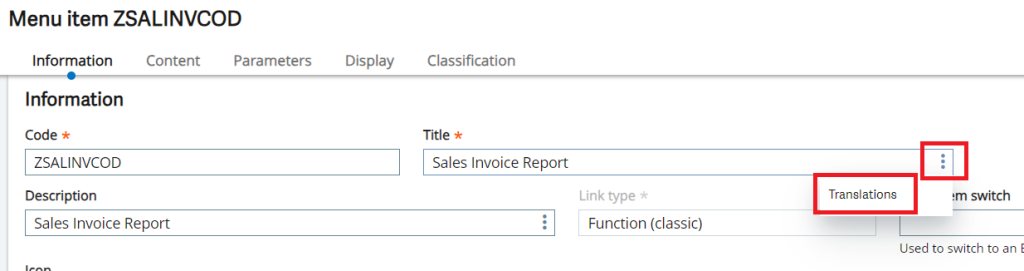
In the edit mode, click on the 3 dots next to the Title field to get the translation option as shown in Fig. 3, this is where Sage X3 gives us the option to handle translation for menu item titles.
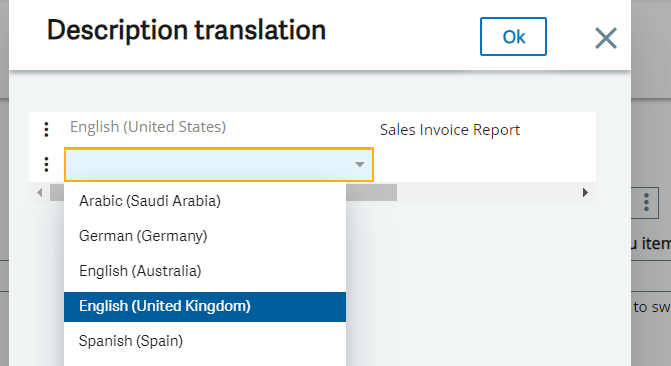
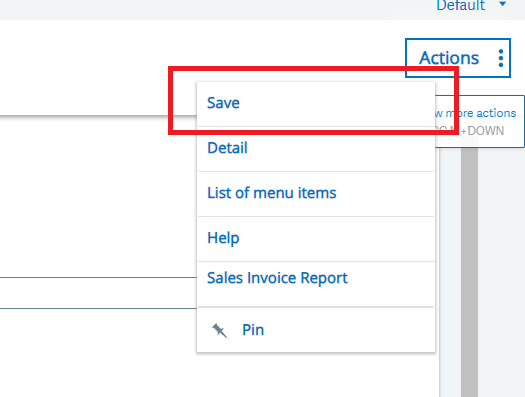
-In the pop-up window we can see that currently there is translation only for ENG – US language, so we’ll select our language in the next row and add in the desired description as shown in Fig. 4 and click OK. Finally to end our modification we’ll click on the Action button and hit the Save button as shown in Fig. 5.
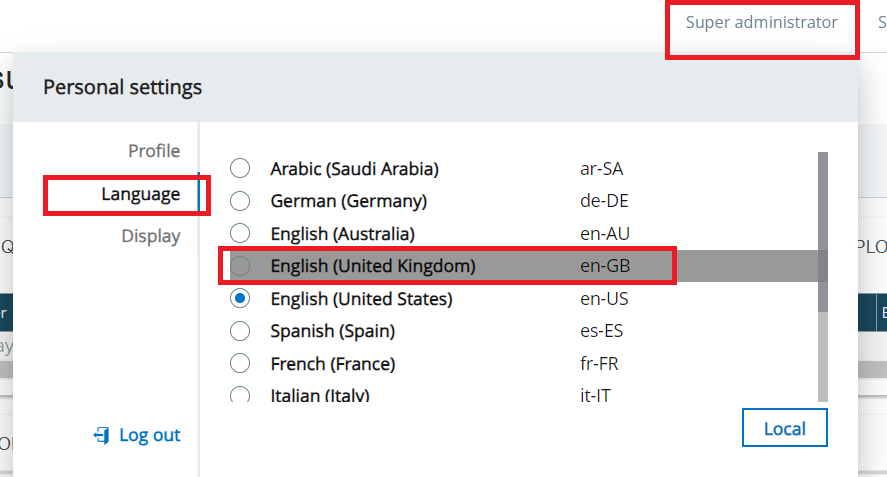
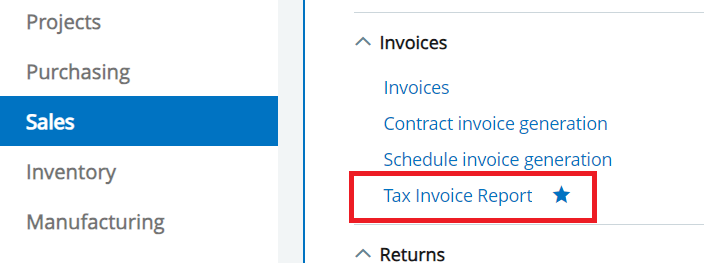
Now all we need to do is perform a quick relogin of the application and change the Application language to ENG – BRI as shown in Fig. 6 and then verify our menu item on the module/sub-module as shown in Fig. 7
Have you ever pondered whether you could make the report printable based on the Legislation in Payment Entry Transaction screen? In Sage X3, we have figured out how to make this achievable.
Before we proceed, kindly note this setup is only possible when you have multiple legislation in your Sage X3 application.
When you have multiple legislation set up in your Sage X3 you’ll have this option enabled.
Note: the legislation and Process ID should be the same.
Once the Report is set up, on the selection of the report you’ll find the below 2 options namely, NOTIF and ZIND. NOTIF is a default Report type that is Standard and is available for all legislation types and ZIND is the new report code that we set up. This ZIND report code will only be available when the Legislation type is IND.
Now that the report code is attached to the Payment entry type, Validate the entry type and let’s go to the final step, Print code.
Now in the print code, you’ll have to add the report code as follows. The first 3 characters, PAY, is the object code followed by the IND which is the Process name in the report code ZIND we created (refer Fig 3: Reports).
If suppose you need to further bifurcate your report with the currency as well then you can add it as PAYINDEUR where EUR is the currency code. Refer the below Fig for your reference.
Fig 6: Print code with further bifurcation of currency
Now that the Print code is setup, you can check your payment entry transaction type where the legislation is IND and with the report code as ZIND you’ll only find these 2 report codes available for print and for the rest of the transaction where legislation is not IND and Report code is not ZIND these reports will not be available for print.
In Sage X3, user can apply invoicing elements in Sales and Purchase Transactions. However, for a specific client, their approach differs from the standard procedure. According to their business process, the system should enforce a rule where users cannot create a transaction without including additional costs. Notably, these additional cost values are not intended for the same supplier; instead, they should be applied to a different supplier. But this contrasts with the standard process, where applying elements typically directs them to the same account, a behaviour that the client wishes to modify.
So that in order to match the required impact, we are customizing the invoicing elements for Purchase transactions in Sage X3 where we will handle this issue by applying reversing invoicing elements in Goods Receipts Note (GRN) Transaction.
We will see how this functionality will work in Sage X3 for Goods Receipts Note (GRN):
We have to add “Reverse Applicable” checkbox in setup screen of Invoicing Elements for Purchase.
If “Reverse Applicable” checkbox is checked then user will get option to select “Reversing Invoicing Element”. So we have to add one more field “Reversing Invoicing Element” in setup screen. And this field will get enabled only if “Reverse Applicable check box is checked.”
In “Reversing Invoicing Element” field, finder should be available to select Invoicing element. After clicking on finder, invoicing elements which are already created for Purchase will be displayed for selection.
Also, while modifying the invoicing elements, we have to add a validation for “Reversing Invoicing Element” field that user cannot select same invoicing element in “Reversing Invoicing Element” field which he/she is modifying.
Also if in any invoicing element, reverse applicable checkbox is checked then that element will not be displayed in the finder list of Reversing Invoicing element field for the other remaining elements.
After the setup, we have to add a validation on GRN Screen for invoicing elements.
If while creating GRN, we have selected an invoicing element for which Reverse Applicable checkbox is checked then 2 lines for invoicing element should be added. 1 for the selected element and 1 more line for the invoicing element which we have already added in the setup screen in “Reversing Invoicing Element” field.
There should be 2 conditions required to be added in GRN:
2 lines should be mandatory for reverse applicable invoicing elements in GRN otherwise it should not allow user to create the entry. It will generate below error for the 1st condition:
2. Also the Amount added for both the line’s invoicing elements should be equal to each other, else it should not allow user to create the entry. It will generate below error for the 2nd condition:
3. Suppose 1 invoicing element E1 is already linked with other invoicing element E4 in Reversing Invoicing Element field. Now 2nd invoicing element E2 can also link same E4 element with it. Many to 1 is valid in this case.
4. But if E2 element is already linked with any other element such as E1 or E3 in Reversing Invoicing Element field then that linked element E2 cannot have option of Reverse applicable checkbox. It will disable the reversal fields if E2 is already linked with other element. Refer below screenshot for the 4th condition:
5. Now if E1 and E2 elements are linked with the same element E4 and in GRN we have added both the elements E1 and E2 then 3rd line should be entered for E4 element and to match the amount of E4 with other 2 elements, sum of the amounts of E1 and E2 should be entered. It will generate below error for the 5th condition:
[Fig 7. Amount Mismatching error for multiple elements]
So user has to enter sum of E1 and E2 for E4 element to create the entry.
As shown in the above screenshot, Amount of E1 is ‘-20’ and E2 is ‘10’. So, [(-20) – (10)] = 10. We have entered 10 Amount for E4 element to satisfy the 5th condition applied.
In this way we can handle the invoicing elements scenario as per client’s process.
In Sage X3, validating the quantity field in a Purchase Invoice screen is important to ensure data accuracy and prevent errors in your accounting or inventory management system. Recently we had a requirement to add validation on the quantity field in the Purchase Invoice screen in such a way that, If the Purchase Order is created with some quantity, then the purchase invoice should not exceed the purchase order quantity it should be equal or less then the Purchase order qty. If the user tries to create more the Purchase Invoice with the quantity greater than the PO’s quantity, then the system should restrict the user to create the Purchase Invoice and Pop up message should be displayed on the Purchase Invoice screen.
So, to achieve this validation, Sage X3 has inbuild feature of 3 way PO matching by applying tolerance percentage to Supplier or products or Product-Supplier. Tolerance refers to the allowable variation or deviation between the quantities and prices on a purchase order, the actual goods received (receipts), and the corresponding supplier invoices. This feature is crucial for ensuring that your financial records accurately reflect your transactions, even when there are minor discrepancies or variations in the quantities or prices. But when users are trying to import bulk invoices using import template function this 3 way po matching tolerance feature seems to be not blocking the invoices which should block when quantities are more than purchase order quantities. So, to achieve this feature for import templates, we had to add additional validation to the invoice screen and customized the warning/blocking message as per user requirement.
As shown in the above screenshot, we have selected the purchase order from the left panel of the Purchase invoice screen and as per the standard process data is flowing. To check whether our validation is working fine or not we have modified the Quantity in the Invoice screen.
We have entered 7 quantity instead of 5 and as per our customization the, Pop is getting displayed by the system in the Purchase Invoice screen as we have exceeded the Purchase order quantity. So system will not allow the user to create Invoice.
In case of multiple lines the system will let us know in which line the quantity is exceeding the purchase order.
In this way we have added a validation on quantity field in the Purchase Invoice screen. And this validation will work only when the Purchase Invoice is getting created against the Purchase Order.
We frequently work with multilingual Sage X3 clients that prefer to utilize the program in their native languages. Many times during patching we often lose the translations for objects and to manually update them is a hassle.
To know all the untranslated texts Sage X3 has a Translation module in the Navigation page that offers several tools among which today we’ll show how to make use of the Texts to Translate function.
To do the translation process, follow the steps below:
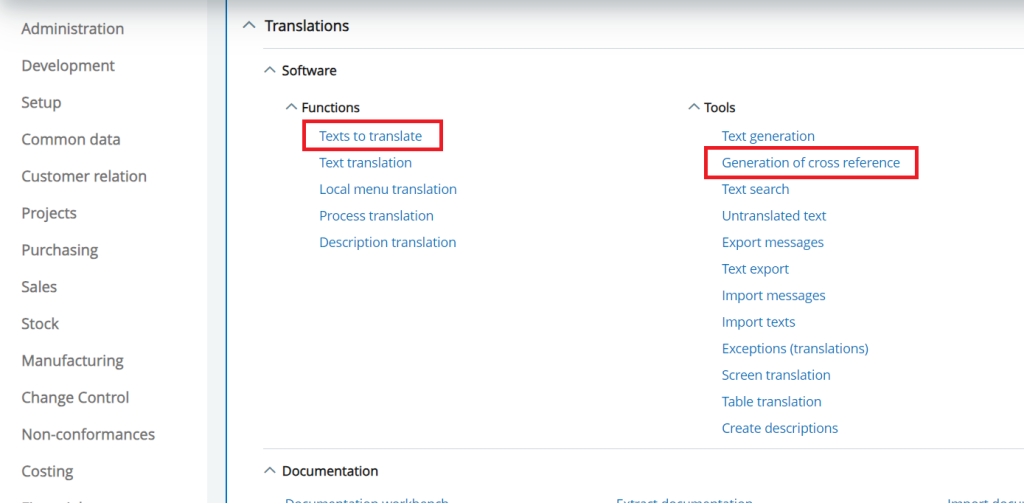
Generation of cross reference: All > Translations > Software > Tools > Generation of cross-reference (AGENREFTXT) Texts to Translate: All > Translations > Software > Functions > Texts to Translate (ATXTTRAD)
Fig. 1: Generation of cross ref. & Texts to translate
Refer the screenshots for reference:
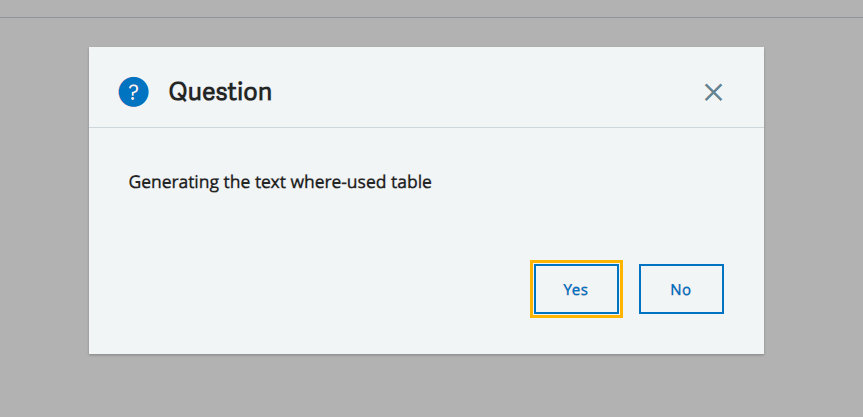
-First navigate to Generation of cross reference screen from the above path. This tool is used to generate a Temporary where-used table which has all the links of the text codes from ATEXTE table to the objects within Sage X3. Click on Yes button to begin the table generation as shown in Fig. 2.
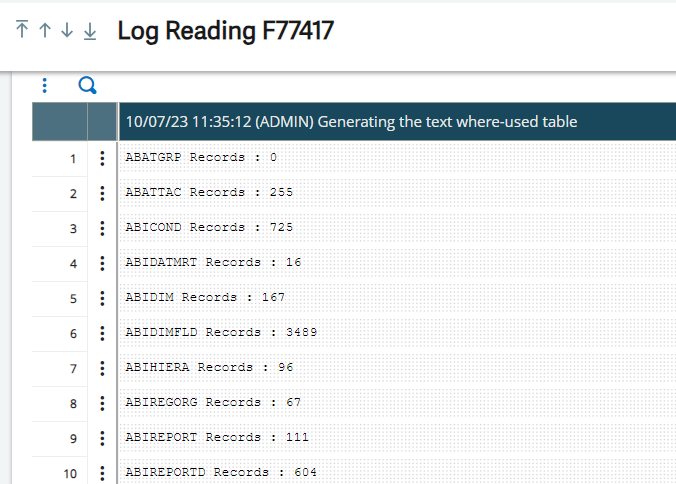
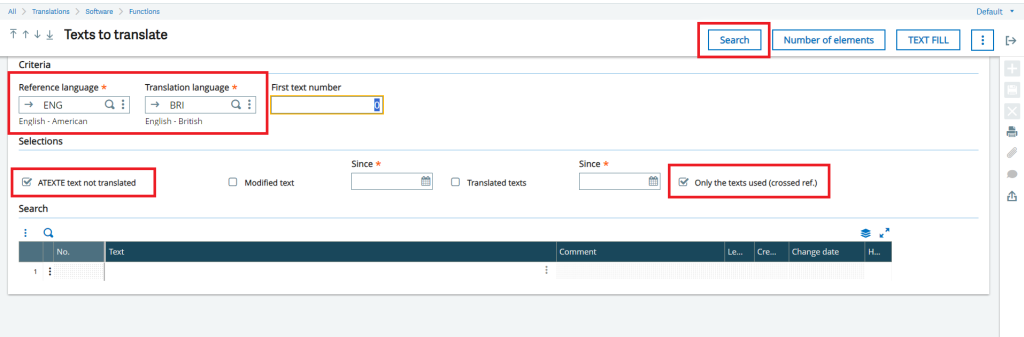
-Once the table is generated a log page shows how many objects are added as shown in Fig. 3. Then head to Texts to translate screen and fill in the data as per your translated language and click Search as shown in Fig. 4.
Fig. 4 – Texts to translate screen important components
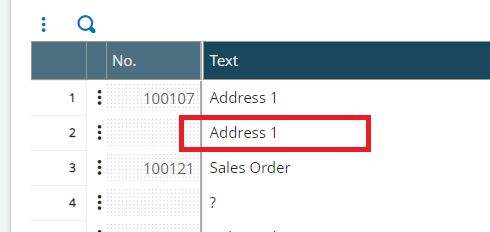
-Once the search is completed we’ll see all our untranslated texts below in the table and for each record 2 lines will be present. The 1st line is for Reference language and 2nd for Translation language, for untranslated data the line will show “?” and we can edit out and click on save as shown in Fig. 5.
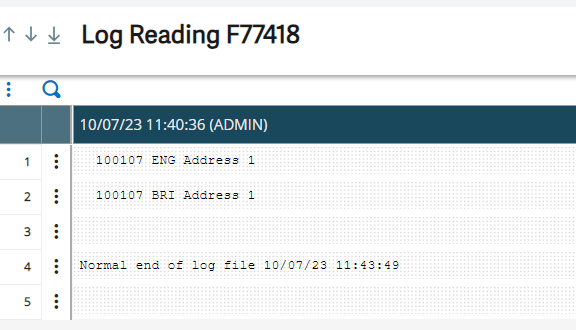
-When the changes are done on closing the screen a log will be generated showing all the changes made along with the validation as shown in Fig. 6. Log out the application and log in back with the translated language selected then we can see all our objects are updated with the texts.
This way we can make use of the Texts to translation function in Sage X3 to update all our untranslated data without having to worry about validations.
For any organisation, having a sales by customer dashboard in their ERP systems is a valuable tool for any businesses to track and analyse their sales performance with a focus on individual customers. This dashboard can provide insights into customer-specific sales data, helping you make informed decisions and improve customer relationships. Recently, one of our clients had a specific requirement for a dashboard. They needed a feature that would display the top 10 customers with the highest sales for a given month and year, sorted in descending order. Additionally, the dashboard would provide a summary of sales data for the remaining customers, collectively represented as “other customers” in the last row. This approach allows the management to obtain a comprehensive view of their organization’s total sales for a particular month and year, with a specific focus on their top customers, listed in descending order. To meet this requirement, we did develop a dashboard in Sage X3 which will allow their management to get the overview of their sales on fingertip as per their requirement. If you can refer the below screen shot, you can see the top customer who has highest sales for respective month and year.
You can see in the screenshot above, dashboard shows YTD Amount and YTD quantity for respective customer so these 2 columns give the information about Yearly sales for respective customers and MTD Amount and MTD quantity for respective customer give the information about monthly sales for respective customers.
Hence with Sales by customer dashboard for your ERP system can significantly enhance your ability to understand customer behaviour, identify opportunities, and make informed business decisions. Tailor it to your specific business requirements and objectives for the best results.
The 810 Electronic Data Interchange (EDI) transaction plays a major role in automating the invoicing process in Sage X3. The EDI 810 transaction, also known as the Invoice EDI, is a defined electronic document format used by businesses to exchange invoice information in a structured and machine-readable format with their trading partners, such as customers or suppliers.
Purpose of EDI 810 in Sage X3:
The primary purpose of Sage X3’s EDI 810 is to make it easier and speed up the invoicing process. Sage X3 allows businesses to generate electronic invoices in the standardised EDI 810 format instead of manually creating and sending paper invoices or email attachments. These invoices can be easily communicated to the systems of their trading partners, increasing accuracy, reducing manual data entry, and improving efficiency in the accounts receivable and accounts payable processes.
Key Features and Benefits of (EDI)810:
1. Export Button with Status Flag
Feature : With the addition of a custom “Export” button on the Sales Invoice screen, customers can now export EDI files directly from Sage X3. Each invoice has a status flag that indicates whether or not the EDI file has been exported.
Benefits :
User-Friendly : Simplifies the EDI export process for users by giving a single, simple-to-use button.
Real-time Status : The status flag displays which invoices have been exported in real-time, reducing the possibility of duplicate exports.
Error Prevention : Minimizes the chance of overlooking invoices by marking them as exported.
Image may be NSFW. Clik here to view.Image may be NSFW. Clik here to view.Fig01: 810 Button
2. Export to Local Drive and sending the file to the partner”
Feature : After clicking the “Export” button “810 OUT”, the EDI file is generated and saved to a local drive on the server or the user’s computer. It is then transmitted to a predefined location.
Benefits:
Data Control : Locally storing the EDI file ensures control and security before sending.
Acceptance : Allows for necessary file format adjustments before sending to meet trading partner requirements.
Efficiency : Simplifies the process of preparing and sending EDI files to trading partners.
3. Archive Creation for Backup
Feature : An archive is created to store copies of all generated EDI files, providing an older backup of all exported invoices.
Benefits:
Audit Trail : Maintaining a record of past EDI transactions makes accounting, security, and negotiations easier
Data Recovery : Allows data recovery in the case of a system failure or data loss.
Reference : Allows for easy access to previous invoices for reference or sending again.
Image may be NSFW. Clik here to view.Fig02: Move Files
4. Batch Export for Multiple Invoices
Feature : Users can export EDI files for many invoices at the same time, increasing efficiency when dealing with bulk transactions.
Benefits:
Time-Saving : Accelerates the export process for a large number of invoices.
Reduced Workload : Users can export EDI files for many invoices at the same time, increasing efficiency when dealing with bulk transactions.
Consistency : Ensures that multiple invoices are handled properly during the export process.
Image may be NSFW. Clik here to view.Fig03: Bulk Invoice Export
5. User and Customer-Specific Configuration
Feature : The functionality can be adjusted to individual users’ and specific customers’ preferences and needs.
Benefits :
Personalization : Users may adjust/modify their choices based on their process, which increases acceptance by customers.
Customer acceptance : Customizes EDI file formats to meet the specific standards of different trading partners.
Efficiency : Ensures that the EDI export process is customized to the specific needs of each user and customer, reducing mistakes.
The EDI 810 transaction in Sage X3 plays an important role in speeding up the invoicing process for organizations. Its main goal is to increase efficiency by replacing manual invoicing with structured electronic invoices, allowing for smooth contact with trading partners. A user-friendly export button with a real-time status flag to prevent errors, the ability to export to a local drive for data control and adjustments, archive creation for backup and reference, batch export for handling multiple invoices efficiently, as well as user and customer-specific configurations for customization and fulfillment of trading partner standards are among the key features and benefits of EDI 810 within Sage X3. These features are combined to improve accuracy, reduce manual workloads, and increase the efficiency of accounts receivable and payable processes, making Sage X3 a useful tool for organizations handling their invoicing needs.
About Us
Greytrix – a globally recognized Premier Sage Gold Development Partner is a one-stop solution provider for Sage ERP and Sage CRM needs. Being recognized and rewarded for multi-man years of experience, we bring complete end-to-end assistance for your technical consultations, product customizations, data migration, system integrations, third-party add-on development and implementation expertise.
Greytrix is a recognized Sage Rockstar ISV Partner for GUMUImage may be NSFW. Clik here to view. Sage X3 – Sage CRM integration also listed on Sage Marketplace; GUMUImage may be NSFW. Clik here to view. integration for Sage X3 – Salesforce is a 5-star app listed on Salesforce AppExchange.
For more information on Sage X3 Integration and Services, please contact us at x3@greytrix.com. We will be glad to assist you.
EDI 860, also known as a Sales Order Change Request, is sent from a buyer to a seller when the buyer needs to make changes to their EDI 850 Purchase Order. This electronic data interchange transaction helps streamline trading partner communications, so changes can be tracked and made easily.
EDI 860 documents need to match the information found on the EDI 850 Purchase Order, and indicate the changes needed, and reasons for the changes. Data found on the EDI 860 document include:
Purchase Order number
Buyer and seller information
Product quantities and descriptions
Quantity and product type changes
Price changes
Addition or deletion of products
Rescheduling of the order/desired delivery date
Indication of reasons for change
Using EDI 860 makes it easy to change orders without needing to cancel an order and create a new EDI 850 transaction. It also creates a virtual paper trail, so vendors and buyers can easily reconcile order changes and discrepancies. Automated EDI also helps by eliminating the need for time-consuming retyping and reducing the potential for errors.
Sending change requests with EDI 860 is also more secure than using an email or PDF document. EDI software providers often use technology like data encryption, HTTPs or FTPs protocols and portal user authentication to keep sensitive business details safe.
Key Features:
Key features for the process of programmatically picking the EDI file from a defined location and creating a Sales Order transaction in Sage X3 are as follows:
File Copy: The EDI file will be programmatically copied from the defined location, such as FTP, SFTP, or a network path, and saved in the Sage X3 local file format. This ensures that the file is accessible within the system for further processing.
File Conversion: Based on the defined mapping, the EDI file will be programmatically read and converted into a Sage X3-compatible template. This conversion ensures that the file can be processed and understood by the system.
Sales Order Creation: Once the Sage X3 template is ready, a Sales Order will be created using the details from the file, such as item, price, quantities ordered, shipping details, payment terms, discounts, and any other relevant information. The system will display a log to provide visibility into the process and any potential errors or notifications.
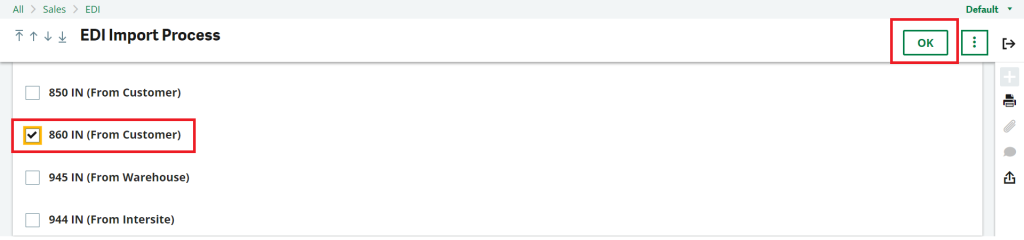
Image may be NSFW. Clik here to view.Image may be NSFW. Clik here to view.Fig01: EDI Import process screenImage may be NSFW. Clik here to view.Image may be NSFW. Clik here to view.Fig02:Updating of Sales Order
File Deletion: After the successful processing of the EDI file, it will be deleted from the source location. This helps maintain a clean and organized file management system.
These key features enable the seamless integration of EDI files into Sage X3, facilitating the updation of sales orders. The process can be customized to fit specific business requirements and can be executed either manually or automatically for enhanced efficiency.
The 860In (Sales Order Updating in Sage X3) process automates the sales order updating from an EDI file. It involves file pickup from a defined location, conversion to Sage X3 format, and creating an archive for backup. The system then maps and converts the data, generates a sales order, and displays a log. The original file is deleted. This automated process enhances supply chain management in Sage X3.
About Us
Greytrix – a globally recognized Premier Sage Gold Development Partner is a one-stop solution provider for Sage ERP and Sage CRM needs. Being recognized and rewarded for multi-man years of experience, we bring complete end-to-end assistance for your technical consultations, product customizations, data migration, system integrations, third-party add-on development and implementation expertise.
Greytrix is a recognized Sage Rockstar ISV Partner for GUMUImage may be NSFW. Clik here to view. Sage X3 – Sage CRM integration also listed on Sage Marketplace; GUMUImage may be NSFW. Clik here to view. integration for Sage X3 – Salesforce is a 5-star app listed on Salesforce AppExchange.
For more information on Sage X3 Integration and Services, please contact us at x3@greytrix.com. We will be glad to assist you.
Many times we need to restrict access for transactions based on some requirement and for doing that Sage X3 provides ways from application setup. However, we as developers also have control with the 4GL (Safe X3 console language) to add more in depth conditional requirements which sometimes with setup is not achieved.
To know more about this, we’ll show a small example of how we are restricting access for a specific user code on Sales Order transactions via 4GL.
For this we’re referencing following paths and screenshots below:
Sales Order: All > Sales > Orders > Orders (GESSOH)
Fig. 1 – Original transactional access to ADMIN on Orders
-As shown in Fig. 1 we can see the original access list for ADMIN user code on Sales orders. There are a total 6 transaction types available to open Sales Order Transaction.
-Now using the 4GL editor we’ve written the logic on Fig. 2 as shown. We wanted to give access to only ALL & SAL transactions within the selection to ADMIN user code. The above logic helps us achieves that and can be modified as per your own requirement.
Have you ever wondered whether you could use a tag to update the prices of all the products without having to go to the trouble of utilizing the usual template? We have developed a new functionality in SageX3 that allows our client to alter the price by using supplier codes and tags.
In the Price List we have added a new field Group 1, that acts as the Tag here the Group 1 is the Statistical group from the Product master that gets entered to all the products in the Price List.
There are two ways through which you can update the Price in the price list 1)When you have to update the price for a single Supplier and Tag. 2)Using the bulk method when you have to update the price for multiple Tag’s and Supplier.
Case 1: Now let’s look into the first case where you have to update the price for a single Supplier for a particular Group (tag).
Using the section in the Update Parameters you can select the Supplier and Group 1 for which you want to update the price and tag the new price in the Price field. After selecting you will see that the Update button gets enabled. On clicking the update button and on clicking Save button you will see the updated price in the price list.
Now there is a case when you are trying to update the Price for a Supplier or Tag that is not present in the price list then you will be given an error as given below.
Once the file has been selected you will find the file name in the File name field and on clicking the Import button, if the import is successful you will find a message box as below.
Crystal report is an application used to create custom reports from a various of data sources. It includes major features such as formulas, cross-tab reports, sub-reports , special fields and conditional formatting etc.
In Sage X3 recently we had an requirement that one of our client wants the hardcoded declaration based on supplier type and date conditions in sales invoice print report. We can achieve this requirement by using the cdate() function in crystal report formula fields.
cdate() Function – The cdate function converts a valid date and time expression to type date , and returns the result.
To achieve the above requirement follow the below steps:
Step 1: Open the sales invoice report in Crystal Reports and create a new formula named ‘Declaration’. This will make it easier to identify the formula when handling the declaration part. Please refer to the screenshot below for your reference.
Step 2: Create a formula in the Formula Wizard based on your date condition and other criteria. Then, add the text that you want to include in the report.
For example, in the screenshot below, we’ve created a formula by adding the hardcoded text ‘Sample Text Declaration for Sales Invoice Report.’ We’ve also included the date condition : this declaration will print after October1,2023.Additionally there’s another declaration, ‘Sample Declaration for Sales Invoice Report before October1,2023,’which will print before 01 oct 2023,as shown in below figure.
Additionally, you can supress the dummy date that may be generated in the report for any date field by using the cDate function.
To achieve this,right – click on the date field, select the ‘Format Field’ option in the ‘Commmon’ tab, and add the condition to supress the field. For reference, please check the below screenshot.
In this way, we can restrict the text based on date condition by using the cdate() function in Sales invoice report by following simple steps in crystal report as mentioned in this blog.
Customizing attachment validation to restrict delivery, shipment and Invoice on Sage X3 involves defining specific rules and configurations within the system. In Sage X3, you can create these customizations using the SDK (Software Development Kit) and scripting capabilities.
Customizing attachment validation on a sales order can be done in various ways, depending on the software or system you are using to manage your sales orders.
As per the requirement from one of our clients, before creating the sales order the pop up message should display on the screen like Attachment is mandatory. If the Sales order is created without the attachment document then the system should restrict the user to create further transactions. So let’s see this in detail.
As shown in the above screen shot, once the data is entered in the sales order screen, the system will allow the user to create a sales order and will show a pop up message displayed on the screen like “Attachment is mandatory! Please attach file” once the user click “OK” button in the pop up then a sales order will be created.
Once the order is created and if the user wants to create the Shipment, Delivery or invoice the system would not allow the user to create the further transactions and it will show a pop -up message “Kindly do the attachment against sales order (Sales Order No)” as shown in the above screen shot.
As a result once the user attached the file from the right panel of the sales order screen then as shown in the above screen shot the system would allow the user to create further transactions against that particular sales order.
Remember that Sage X3 is a complex system, and specific steps may vary depending on the version and customizations in your organization. Consulting with a Sage X3 expert or support team may be helpful in implementing these changes effectively.
The requirement was basically based on the attachment and for every transaction against the particular sales order as a result the attached file should be mandatory.
As we have saw in our pervious blog how to solve sales Jou not open issue during the fiscal year closing, in this blog we will see how to solve the error might face during the fiscal period closing
As we all know there are multiple entries, multiple accounts and multiple amount are validating together at single time when we run to close the period or so there is some possibility of getting error if the GL effect is not properly done
So to find out the route of cause we have to follow the standard process of period closure first which you can find on the multiple blogs written on Fiscal year /period closing
First check the Batch server status, should be in running state
Account task should be in Active state
For Manufacturing Entries, we need to run the WIP posting
For Other Modules we need to Run the Accounting Interface
If none of the issue occurs on WIP posting and Accounting. Interface, we need to run the Final Validation for that particular period
After that we have to proceed toward the closing of that Fiscal Period.
As shown in below image, if you might be get the error on WIP posting as shown in below image a based on Unbalance Journal with specific work order No.
Image may be NSFW. Clik here to view.Image may be NSFW. Clik here to view.Img 1. Issues from Accounting Interface
And on fiscal period closing we might get the error shown in below image
Image may be NSFW. Clik here to view.Image may be NSFW. Clik here to view.Img 2. Issue from fiscal Period Closing
To trace the problem, Sigma helps to find out the exact problem related to account amount and transaction number by displaying the related data on screen. we would recommend you to run the Sigma on WIP posting, follow the below steps to run the sigma,
Once the Sigma gets activated follow the below steps and then check the Account and Amount reflected on screen
Activate the sigma on WIP screen
Select the company site
Click on ok
Check the GL account if Displays on screen
Check the amount displays under the each of the account
Calculate the amount present in credit and debit
If any of the account is not present or missing on screen then it causing the error
If incase the amount under the Credit is not matching the amount comes under the debit account then also we can face the error
To resolve the above given error the alternate way to find the related post of the error.
For point no.7 if the account is not present on sigma then enter the account number which is not present and double click on enter button then exit the sigma and rerun the WIP posting
For Point No. 8 if the Debit amount and Credit amount is having Minor difference then we can add or minimize the amount if the Customer allow to make the changes to account amount.
For e.g.it the total of credit amount is Rs. 2587.01 and total of debit amount of Rs. 2587.00 then check the line no. specified on log and make the changes to amount on Sigma and double click on enter button then exit the sigma and rerun the WIP posting
Check if the error is solved
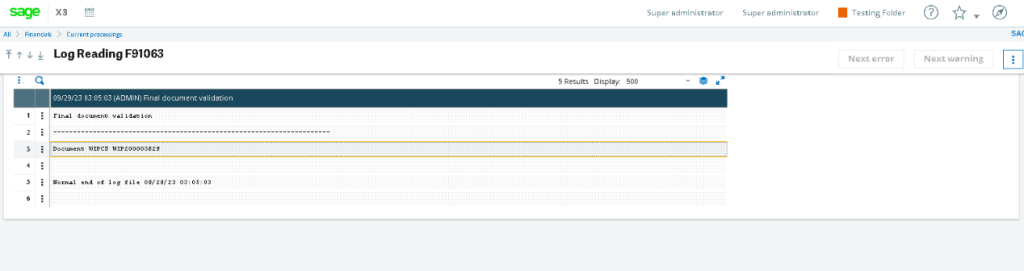
Image may be NSFW. Clik here to view.Image may be NSFW. Clik here to view.Img 3. log from final Validation
Then run the Accounting task by clicking on the active and update button
Run the final validation
Then close the fiscal period closing
Before applying the solution directly on production, please follow the steps in test server and analyzed the output.
In this way we will try to solve the error related to subcontract or work order entry.
Sage X3 offers the ability to send email notifications using the notification server as well as the ability to establish email in the pretty format. The Notification Server settings give Sage X3 users access to an email client that supports authentication, extra security measures like TLS, and may structure workflow message text using notification themes. Set up a notification server using this method to send emails to one or more recipients from the Sage X3 application or web server. The node mailer API is utilized.
For setup of notification servers, we need to navigate:
Administration->Administration->Servers->Notification server
In order configure the notification server (see figure 1 and 2), you need to provide information for following:
Information: Provide name and description for the server. the mode of transmission for messages. By default, the SMTP protocol will be used. If you want to send emails using the specific web API, choose one of the following: AWS Simple Email Service, SendGrid Service, or Mailgun Service if the customer has signed up for one of them. Alternatively, pick the SMTP protocol.
SMTP configuration: provide hostname or IP of or mail server and port and add proxy URL if you want to use it. Also provide authentication information if you want to configure with more security in SMTP authentication.
Message configuration: This is the important step to configure the messages using the notification sever to send the theme-based emails. We need to provide sender email and default theme.
Also, you can test your configuration by clicking on the “Test Configuration” to verify the setup has proper or not. You can create and configure multiple notification servers in the Sage X3.
Image may be NSFW. Clik here to view.Image may be NSFW. Clik here to view.Figure 1. Notification server configurationImage may be NSFW. Clik here to view.Image may be NSFW. Clik here to view.Figure 2. Theme creation and selection on notification server
For creation of themes, there is an option in the action buttons of the notification server screen. Refer figure 2. These themes can be configured as per our requirement by creating themes as shown in the figure 3,4. You can provide any name to your theme which you need to configure the notification server and write the HTML code for creation of your theme which you want to add in the email. You can attach the logo or image in themes like highlighted in the figure 4. This makes your email attractive and prettiest.
Image may be NSFW. Clik here to view.Image may be NSFW. Clik here to view.Image may be NSFW. Clik here to view.Figure 3.notification themes creation using HTMLImage may be NSFW. Clik here to view.Image may be NSFW. Clik here to view.Figure 4. Attaching images to the email
Now, for sending the theme-based emails, we need to create workflow as per requirement from the workflow rules in sage x3. You can refer the below link to create the workflow.
As per my setup of the theme-based notification email has sent on mail. See the figure 5.
Image may be NSFW. Clik here to view.Image may be NSFW. Clik here to view.Figure 5. Email sent via notification server
The layout of mail created using the HTML in the notification themes setup. Email looks prettiest using above steps. You can customise the template for email and use it by following above steps.
Hope this will help you to beautify your email via notification sever through Sage X3.
Sage X3 provides the best feature to send the theme-based emails using notification server.
In Sage X3, Batch server is a component of the software that is responsible for executing batch processes. Batch processes are typically large-scale, repetitive tasks that need to be performed in the background, such as data imports, report generation, data updates, and other automated operations.
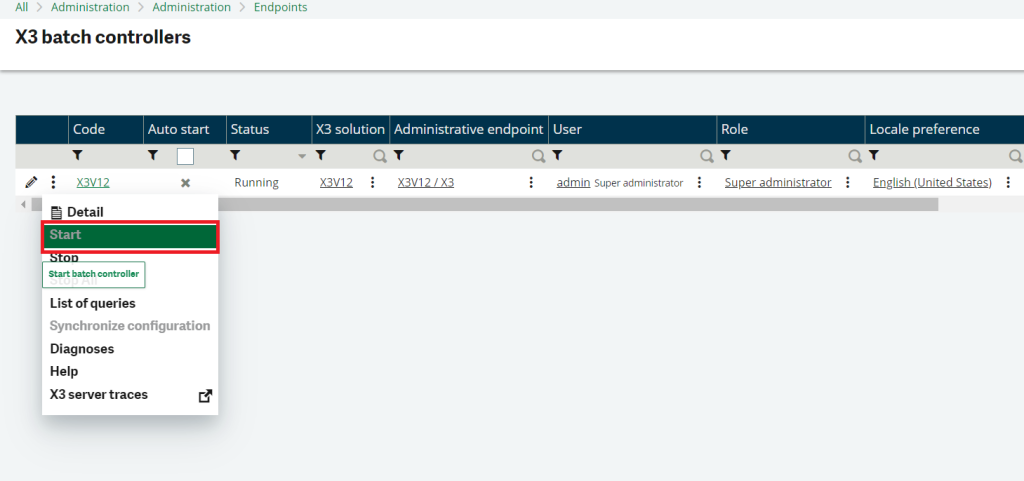
Path : All -> Administration -> Endpoints -> Batch server.
Image may be NSFW. Clik here to view.Image may be NSFW. Clik here to view.Fig 1 : Batch server
Click the “Start” option by clicking on the three-dot “Action” button.
Step 2 : Create a Task code in task management.
Path : All -> Usage -> Batch server -> Task management.
Task management within Sage X3 typically refers to the process of organizing, tracking, and managing various tasks.
NOTE : Choose “Task” for processing in functions or select “Script” as the task type for subprograms.
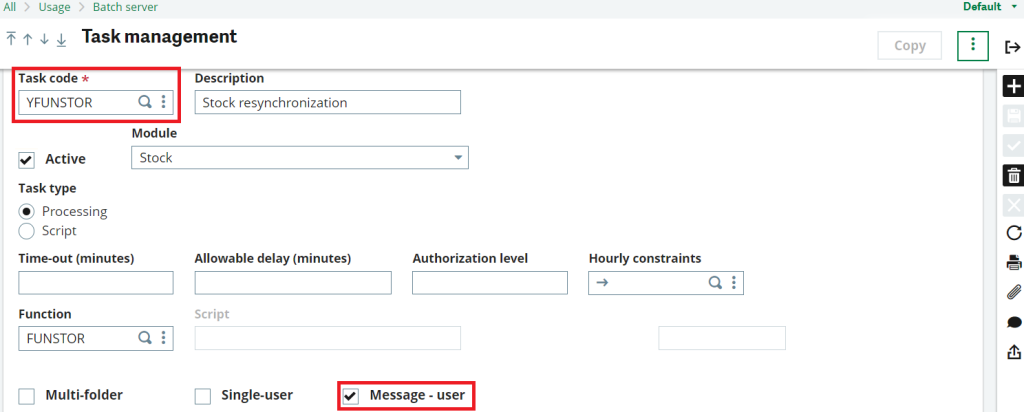
Image may be NSFW. Clik here to view.Image may be NSFW. Clik here to view.Fig 2 : Task management
Fig 2 : Task management
Make a new task code.
Choose “Processing” as the task type.
Specify the function you want to call in the ‘Function’ field for this task code.
Tick the ‘Message – User’ box.
Step 3 : Creating a workflow.
Path : All -> Setup -> Workflow -> Workflow rules.
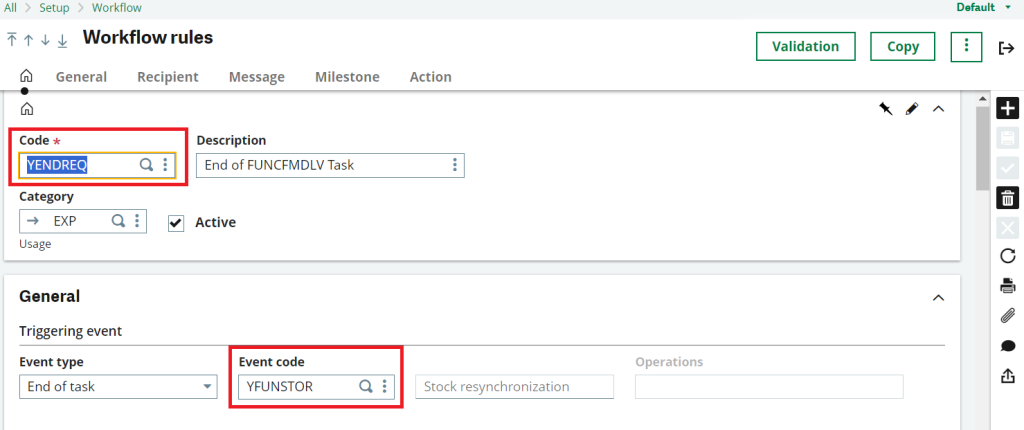
Image may be NSFW. Clik here to view.Image may be NSFW. Clik here to view.Fig 3.1 : Workflow rules
Duplicate the ‘ENDREQ’ Standard workflow.
Set the event type to ‘End of task.’
In the event code field, enter the task code you are using for log traces, like ‘YFUNSTOR’ for Stock resynchronization and control as an example.
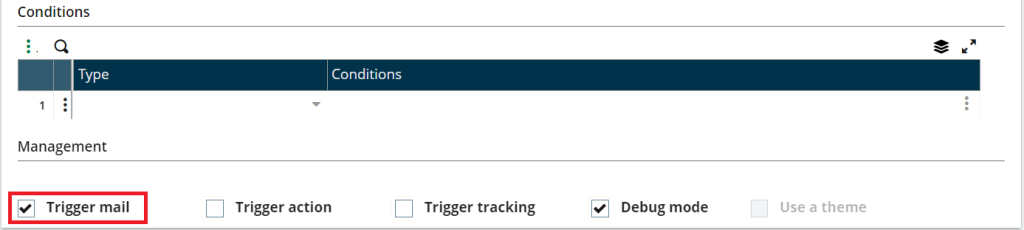
Image may be NSFW. Clik here to view.Image may be NSFW. Clik here to view.Fig 3.2 : Workflow_management_checkbox
On the General tab, mark the ‘Trigger Email’ box, which will send an email to the specified recipient ID.
If necessary, enable the ‘Debug mode’ checkbox for log traces/log files after processing.
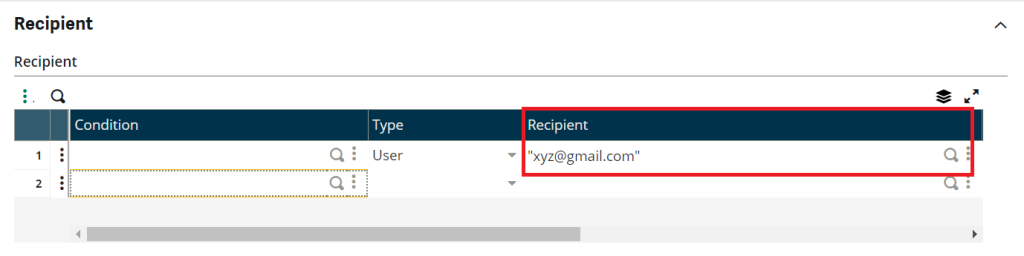
Image may be NSFW. Clik here to view.Image may be NSFW. Clik here to view.Fig 3.3 : Workflow Recipient
Enter the recipient’s ID in the Recipient field within the Recipient tab and proceed with the following steps.If required enter conditions or else put it blank.
Ensure that the “Send email” option is set to ‘YES.’
Set the milestone to ‘NO.’
Select the “Delegate option” as ‘NO.’
Image may be NSFW. Clik here to view.Image may be NSFW. Clik here to view.Fig 3.4 : Workflow Attachments
Tick the ‘Linked trace file’ checkbox in the Message tab.
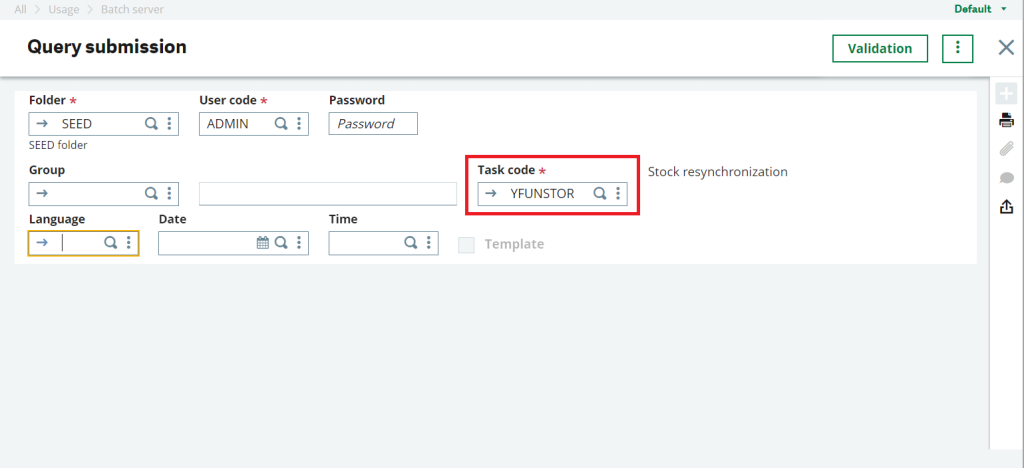
Step 4 : Query submission.
Path : All -> Usage -> Batch server -> Query submission.
Image may be NSFW. Clik here to view.Image may be NSFW. Clik here to view.Fig 4.1 : Query submission
In the Query submission section, provide the task code you wish to call.
Click the validation button located in the top-right corner.
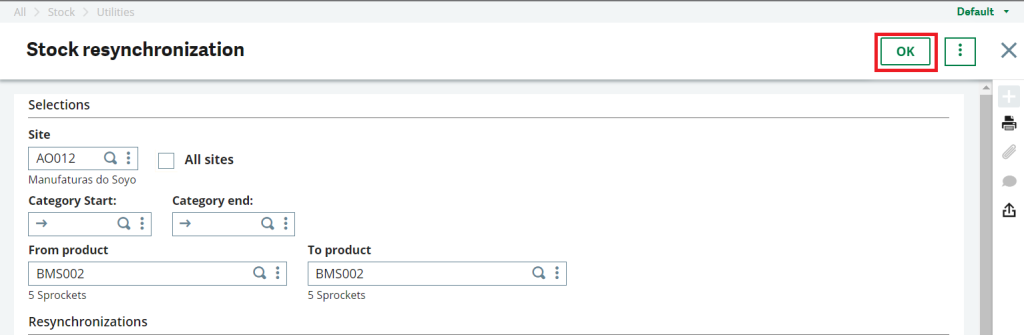
Upon clicking the Validation button, a screen will open, showing the linked function.
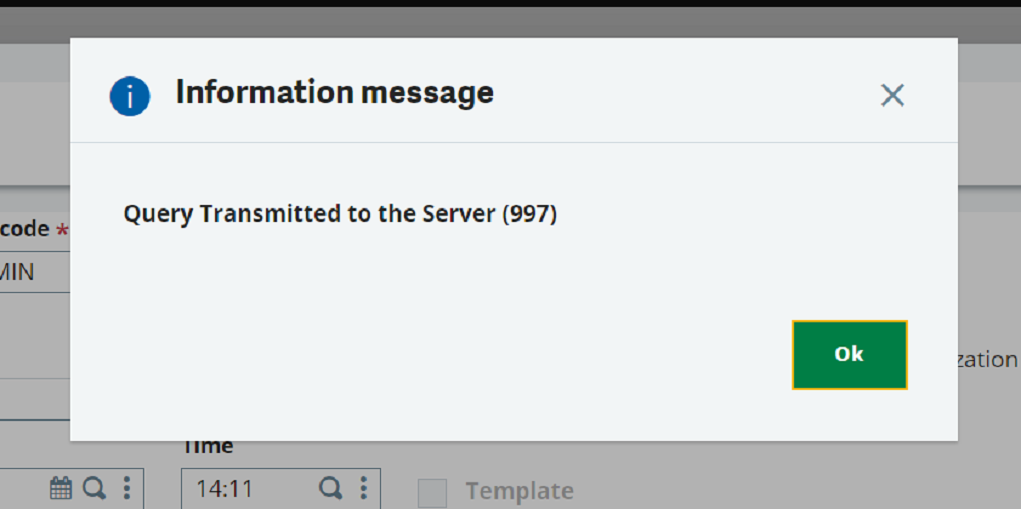
Input the necessary data, click the ‘OK’ button, and a query will be created and displayed in the message box.
Image may be NSFW. Clik here to view.Image may be NSFW. Clik here to view.Fig 4.2 : Stock resynchronization and control (FUNSTOR)
Note: You can verify the query in Query management.
Image may be NSFW. Clik here to view.Image may be NSFW. Clik here to view.Fig 4.3 : Query submission
Step 4 : Query management.
Path : All -> Usage -> Batch server -> Query management.
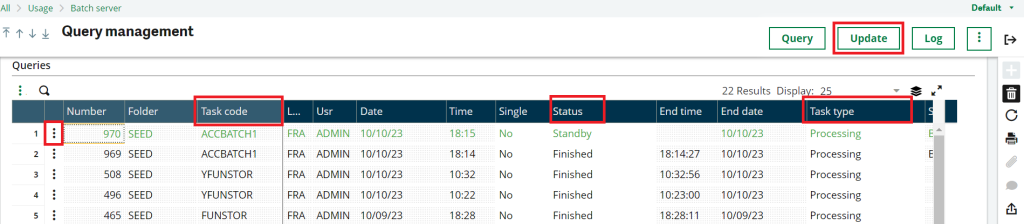
Image may be NSFW. Clik here to view.Image may be NSFW. Clik here to view.Fig 4.4 : Query management
You can observe that following the Query submission, there is a function listed in the Task code column. The status of the query can be found in the Status column, with ‘Standby’ indicating it’s processing and ‘Finished’ indicating that the query has been executed.
To view the most recent query, click the Update button located in the top-right corner.
In the Task code section, you’ll find the task code you created during the ‘query submission’ process.
Under the Status column, you can verify the status of the query.
The Task type column displays whether the query is function-based or script-based.
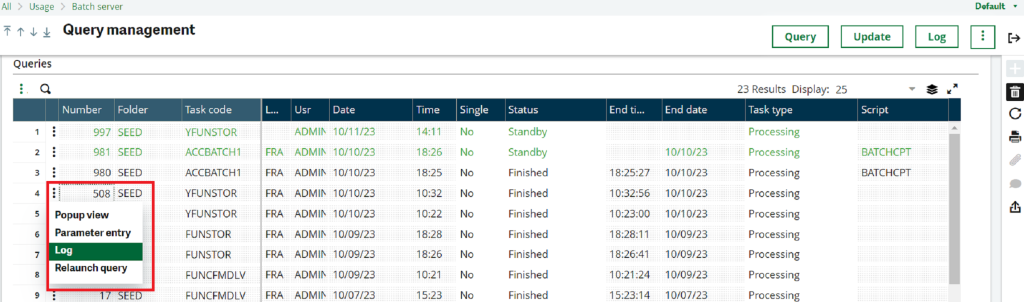
To access the log file, click the three-dot “Action” button and select “Log.” This will display the log file for the process.
Once the status changes to “Finished,” the recipient will receive an email containing the log trace file.
Image may be NSFW. Clik here to view.Image may be NSFW. Clik here to view.Fig 4.5 : Query management
In this way we can send a log trace file via email using the standard process.
Subcontracting process, raw materials are provided to subcontracting supplier/customer. It’s being processed by subcontracting supplier/customer, convert it to semi-finish material and deliver back.
To solve the error ‘supplement not assigned’, there are main point which are linked with it.
Work Order.
Purchase Order.
Sales Delivery.
PO’s Purchase Receipt.
Let’s describe each points shortly.
Work Order: A Work order is an order to make one or more products. Conventionally, the work order uses a bill of materials (BOM) to create a list of materials to be issued, and a routing to make a list of operations to be performed on work centres.
Delivery: In subcontract process, when the delivery is validated the stock is moved to the subcontract location assigned to the customer. This happens automatically when setup properly.
The ‘supplement not assigned’ errors sometimes comes in Sage X3 for subtracting Purchase orders when a subcontract Purchase Order gets created from Work Order and then we create this subcontract Purchase Order’s Purchase Receipt.
Check below process where usually this error we can face.
Through Work Order, purchase Order gets created with subcontracted service product.
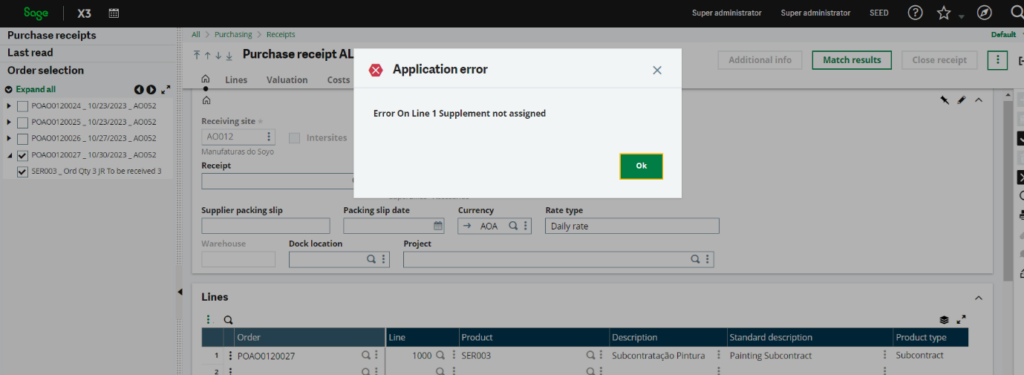
Then try to create this purchase order’s purchase receipt by selecting PO from left list PO selection .
Now click on create button. Once user hit create button below error ‘Supplement not assigned’ will come.
Image may be NSFW. Clik here to view.Image may be NSFW. Clik here to view.Fig01: Supplement not assigned
Now to solve this error, we just need to follow below steps:
Go to this Purchase Receipts line grid action button.
Then click on change receipt action.
One screen window will get open, then tab out from the lines fields until you reach transaction movement field. Just enter the data in this field and save this window.
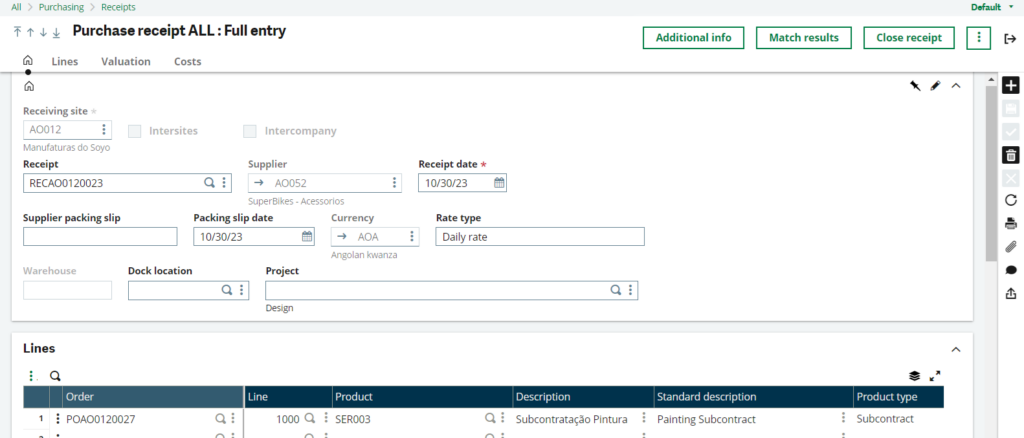
Then comes back to the purchase receipt screen and then hit on create button. You will see purchase receipt will get created without any error. Refer below screen shot.
Image may be NSFW. Clik here to view.Image may be NSFW. Clik here to view.Fig02: Purchase Receipt screen
By doing above all the steps, we can solve ‘supplement not assigned’ error in purchase receipt screen.
About Us
Greytrix – a globally recognized Premier Sage Gold Development Partner is a one-stop solution provider for Sage ERP and Sage CRM needs. Being recognized and rewarded for multi-man years of experience, we bring complete end-to-end assistance for your technical consultations, product customizations, data migration, system integrations, third-party add-on development and implementation expertise.
Greytrix is a recognized Sage Rockstar ISV Partner for GUMUImage may be NSFW. Clik here to view. Sage X3 – Sage CRM integration also listed on Sage Marketplace; GUMUImage may be NSFW. Clik here to view. integration for Sage X3 – Salesforce is a 5-star app listed on Salesforce AppExchange.
For more information on Sage X3 Integration and Services, please contact us at x3@greytrix.com. We will be glad to assist you.
Factoring consists in transferring all or part of the customer accounts receivable or debts to a third party financial body: the factoring company or factor. The factoring company collects the accounts receivable that have been transferred to it and the related non-payment risk. In exchange, the factoring company settles the amount of the invoices, minus commissions and late charges.
It is important to note that saving commissions and late charges is not automated. When entering the payment of the factoring company, you need to create at least two lines: one line for the payment of the receipt as a whole, and another line for commissions and late charges under an appropriate payment attribute.
The factoring function as it is managed in Sage X3 is sub-divided in several phases:
The identification of the factoring companies.
The assignment of the factoring companies to the customer invoices to be processed. It is used to assign or to modify the assignment of a factoring company to the various invoices requiring factoring. This phase is optional if:
At the level of the Customer record, “Financial” tab, a factoring company has been specified. This customer is thus supposed to be regularly managed by this factoring company.
At the level of the sales invoice, “Invoice” tab, a factoring company has already been entered.
At the level of the customer invoice header, a factoring company has already been entered.
The creation of the receipts to generate lists of transferred invoices accompanied with an account receivable transfer letter are proposed for printing.
Posting of these receipts. This posting generates the creation of a magnetic file that can be transmitted to the factoring company. This magnetic file can be regenerated via a dedicated function.
Payment notification. You need to save a payment receipt in the same amount as on the factoring company’s receipt. The phase follows the normal payment flow.
The factoring company is not considered a BP. The payment must be entered on the account of the factoring company, without mentioning the BP.
Assigning a factoring company to invoices is carried out in a single screen where you enter the search criteria and a grid that displays the invoices that match your criteria. The invoices that have already been received or for which the amount is null are not displayed.
For better understanding, please find out below steps:
Navigate to custom import function.
You must enter the BP code of the Customer for which one or more invoices need to be processed.
You can narrow your search results with the following options:
Company issuing the invoice
Site issuing the invoice
Invoice number ranges
Image may be NSFW. Clik here to view.Image may be NSFW. Clik here to view.Fig01: Factor assignment
This grid displays all the invoices matching the selection criteria detailed in the header.
For each invoice listed, you can only edit the Factor column to assign the Factoring company to which the accounts receivable will be transferred. The Company/Site for the Factoring company must be compatible with the Company/Site for the invoice.
Image may be NSFW. Clik here to view.Image may be NSFW. Clik here to view.Fig02: Customer transaction
4. There can be list of factors for selection as shown below. You can choose the required one and save the details.
Image may be NSFW. Clik here to view.Fig03: Factor Selection
Click Save to apply any Factor assignments and then you can add them to a receipt.
Thus, we can assign all receivables/debts to third party using factor assignment functionality.
About Us
Greytrix – a globally recognized Premier Sage Gold Development Partner is a one-stop solution provider for Sage ERP and Sage CRM needs. Being recognized and rewarded for multi-man years of experience, we bring complete end-to-end assistance for your technical consultations, product customizations, data migration, system integrations, third-party add-on development and implementation expertise.
Greytrix is a recognized Sage Rockstar ISV Partner for GUMUImage may be NSFW. Clik here to view. Sage X3 – Sage CRM integration also listed on Sage Marketplace; GUMUImage may be NSFW. Clik here to view. integration for Sage X3 – Salesforce is a 5-star app listed on Salesforce AppExchange.
For more information on Sage X3 Integration and Services, please contact us at x3@greytrix.com. We will be glad to assist you.


![[Fig 1. Invoicing elements setup for Purchase]](http://www.greytrix.com/blogs/sagex3/wp-content/uploads/2023/10/Fig-1.-Invoicing-elements-setup-for-Purchase-1024x425.jpg)
![[Fig 2. Invoicing elements in GRN]](http://www.greytrix.com/blogs/sagex3/wp-content/uploads/2023/10/Fig-2.-Invoicing-elements-in-GRN-1024x527.jpg)
![[Fig 3. Reversal element error]](http://www.greytrix.com/blogs/sagex3/wp-content/uploads/2023/10/Fig-3.-Reversal-element-error.jpg)
![[Fig 4. Amount mismatching error]](http://www.greytrix.com/blogs/sagex3/wp-content/uploads/2023/10/Fig-4.-Amount-mismatching-error.jpg)
![[Fig 5. Many To One]](http://www.greytrix.com/blogs/sagex3/wp-content/uploads/2023/10/Fig-5.-Many-To-One-1024x263.jpg)
![[Fig 6. Disabled reversal fields]](http://www.greytrix.com/blogs/sagex3/wp-content/uploads/2023/10/Fig-6.-Disabled-reversal-fields-1024x422.jpg)
![[Fig 7. Amount Mismatching error for multiple elements]](http://www.greytrix.com/blogs/sagex3/wp-content/uploads/2023/10/Fig-7.-Amount-Mismatching-error-for-multiple-elements.jpg)