Quantcast
Channel: Sage X3 – Tips, Tricks and Components
Viewing all 1521 articles
Browse latest View live

Dare to Disrupt – Greytrix at South Africa Sage Insights 2014 Conference

$
0
0

The ones who are crazy enough to think they can change the world are the ones that do.
                                                                                                                                 - Steve Jobs

A busy and fruitful year has gone by and already year 2014 is shaping up to be another exciting year for Sage, starting today with Sage South Africa Conference from 6th February to the 9th February.

We are quite excited to be exhibiting at the Sage Insights this year with our Sage ERP X3, Sage 300 ERP and Sage CRM solutions.  At the Greytrix camp, there is not only excitement about meeting our Sage Partner Friends and Sage team at the conference but also acquainting them with two interesting sessions one is about the new vertical developments for Sage CRM which on integrating with Sage CRM will boost the Service experience of a company the other one is a not to miss session for any Sage ERP X3 Partner where our Sage ERP X3 head would be discussing about the Best Practices, points to consider before you plan to integrate your Third Party solution followed by some real life examples and a Q & A session. Mark your calendar 8th February 16h10 hrs at Ondini.

Following are the details of the sessions which will be conducted by Greytrix Team at Sage Insights, South Africa:

Session 1 : End to end customer management with Greytrix Service CRM verticals Management, Survey Management and Customer Portals for Sage CRM
Date & Time: 07th Feb 2014. (10h45 – 11h25 – Ithaba)

With strong capabilities of Sage CRM and Greytrix verticals, offer your customers an end to end solution. We will present Service Management, Survey management and Extended Self Service Portal and how they are suited for your business and can help you generate more rewards. We will be walking you through the live demo too.

Session 2 : Best Practices for Integrating Third Party apps with Sage ERP X3
Date & Time: 08th Feb 2014. (16h10 – 17h15 – Ondini)

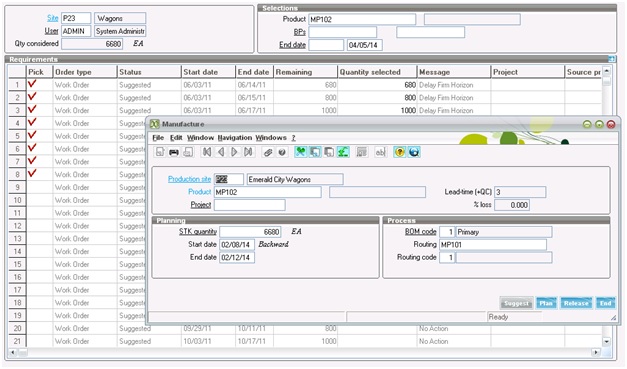
Join this session to walk through some Best Practices for integrating Third Party or your custom apps with Sage ERP X3 and how each of them is best suited for your app. Some technical points and tips and tricks to definitely consider before you start planning your integration.

With these sessions, there will also be other sessions which we are keen to participate in. Greytrix has been committed to providing services to businesses with keeping their needs in mind. We are looking forward for this conference which is already looking promising for opening new horizon for everyone.


Work order Grouping-For Different Products

$
0
0

  The X3 system can create work order suggestions for any anticipated inventory shortages for your finished products.   X3 will even allow you to group two work order suggestions if they are for the same product number.    However, we have customized the Enterprise Planning to group two work orders suggestions even when the product numbers are different.

New Stuff: 

We can take a scenario when the product number is package specific.   For example, the client may run a job which produces a liquid.   This liquid may then be stored in 10 different types of packages.  Each of these packages would be a different product number, but all of these products share the same formula.  Here we would like to group together and create a single WorkOrder.

The screen is customized such that Enterprise planning screen filters out the work orders and we can select the product for which we want to create a work order. We can select the work orders and clicking generates will pop-up a screen through which we can generate a work order.

WorkOrderGrp

Hope this Helps.

Also Read:

1) WO reactivation and Product tracking deletion in sage X3
2) Automatic Deletion of Work Order in X3
3) Including ‘Non Managed’ Products in Work Orders
4) Maximum size for a Pool in X3
5) Setup Price Code Priority

How to change the currency of all the BPs?

$
0
0

There are scenarios when we face the problem to change the currency of the Business partner once we have already created transactions against them.

New Stuff: Work order Grouping-For Different Products

But Sage ERP X3 offers a feature to change the currency of multiple BPs or all the BPs along with the all the places where it is needed. There is a standard function CNVBPR available in sage X3 by which we can easily change the currency of multiple BPs at a time.

Function: CNVBPR

Path: Development > Utilities > Euro > BPs

Below is the screen shot of Business Partner Currency Conversion screen.

UOMConv-1


Source currency: Mention the source currency name to be converted. After entering the source currency, all the BPs with entered currency will be listed in the grid.

Destination Currency: Mention the destination to which currency needs to be converted.

Conversion date: Mention the conversion date.

All flag: Tick the flag if all the BP’s needs to get converted to the other currency.

Once we click on OK, BPs currency that matches the original currency will be replaced by the destination currency. The amounts of the tables that correspond to the BPs will be converted to the destination currency upon the conversion date.

The ‘Log file’ if selected will display all the records which are processed while the conversion process. Refer to the below screen shot.

UOMConv-2Hope this helps.

Also Read:

1) Check the Price in different Currency Rates.
2) Control Max Decimals of Currency in Sage X3
3) How to Override Forex Rates while Importing Transactions
4) Use of Multiple Ledger Currency in Transactions in Sage ERP X3
5) Supplier pre-payment settlement in Sage X3

How to Find a Sub String in a String

$
0
0

There Is a common scenario in development where we need to find a sub string from a string value.

Just to help with the syntax we will be providing the help on the syntax, this is to find a particular value from a series of numerical, alphanumerical or date expressions or variables.

New Stuff: How to change the currency of all the BPs?

Below is the syntax to “Find a Sub String in a String”

find ( value_to_seek, list_exprg )

Here,

  • “value_to_seek” gives Expression to be searched for from the following list of arguments.
  • “list_exprg” gives List of expressions_ generalized separated by a ‘,’ symbol.

“find” returns the position of the value found in the list given, if the value is found (from 1 to the number of values in the list) or 0 if the value was not found.

If one of the arguments in the functions is a dimensioned variable and the range of indices is given, such that there is no element in the list of variables to be searched for (find (RECHERCHE, VALEURS(1..0)) for example) the result returned is 0.

Hope this helps to ‘find’ a solution for your answer too.

Also Read:

1) Modify Data of Tables in X3
2) How to Filter Left List in X3
3) Screen Translations in Sage X3
4) Passing Parameters to your Pop Up Window in Sage X3
5) Set column titles dynamically in Sage X3

Enabling-disabling Grid’s-right click option

$
0
0

We come across many scenarios when we need to customize Sage X3 and need to hide the gird right click selection option depending on various line conditions (status).

The right click buttons are represented by the GBOUT variable, and this button is identified based on the button number.

Our Other Blogs : Sage CRM | Sage 300 ERP | Salesforce.com

e.g. Button1 = GBOUT1, Button2 = GBOUT2 etc.

There is simple logic of hiding the gird right click option. We just need to RAZ the button which needs to be disabled.

Refer to the below example.

1) I have added the Stock issue button to the screen on Button17.

Rightclick-1

2. The hiding of the right click button should be written under the ‘Init button’ action of the Grid NBLIG. Refer to the below screen shot.

Rightclick-2

Also Read:
1) Service Contract Creation In X3
2) Adding new option/Button in Menus in Sage X3
3) Modify Data of Tables in X3
4) How to perform an Inter-Site Transfers
5) How to Unlock your Process in Sage X3

Checking the Existence of variable

$
0
0

You may come across the situation where you need to find the syntax which checks the scope of the variable and helps you to find out the existence of the variable. This syntax will help you avoiding a basic crashing issue “variable non-existence.” This will be handled just by checking variable with the help of “dim” keyword.

New Stuff: Enabling-disabling Grid’s-right click option

Dim : Dim is used to find the dimensions of variable. It can also be used to test the existence of variable

Syntax:

dim(Variable)

Parameter details:

Variable : name of the variable whose existence is to be tested.

If the value is less than 0 then the variable doesn’t exists else variable exists.

Kindly refer to the below snippet of code for better understanding

varEx-1Hope this Helps!

Also Read:

1) How to Find a Sub String in a String
2) How to change dimension of Statistical Group on screen level…?
3) Filtering the Selection List in Sage X3
4) Dimensions check for the Ledgers in Sage X3
5) How to Allow vertical Processing without Folder Validation

Changing Labels of standard miscellaneous tables

$
0
0

In the Sage X3 implementation there may be a need of changing the label (title) of standard miscellaneous table like product-customer statistical group. We cannot change the label of this standard miscellaneous table through miscellaneous table screen as the description field always is in display mode. However Sage X3 has provided an additional function (screen) through which we can easily change the labels of standard miscellaneous tables.

New Stuff: Checking the Existence of variable

The labels of the standard miscellaneous tables are stored in Local menu, and if we wish to change the label then we have to make the changes in those local menus where the labels are stored.

Below is the standard function which can be used to change the labels of standard miscellaneous tables.

Function: COMBOS [Local Menus]

Path: Setup > General Parameters > Local Menus

Screen:

local-1


Fields:

Module: Module belonging to the parameterization.

Local menu:  It corresponds to the number of the concerned local menu. Choose the appropriate local menu which is linked to the miscellaneous whose label you want to change.

Message: The text associated with the local menu choice is entered here in the current language.

Once the details has been entered & the changes has been made, click on Save.     

For better clarification refer to the above screen shot wherein we have changed the label of customer statistical group 4 to ‘Shelf Life’.

Hope this helps!

Also Read:

1) Using the Dependent Miscellaneous Tables in Sage X3
2) Using Miscellaneous Tables in Sage ERP X3
3) Adding Styles to Screen Fields in X3
4) Restricting a user to a specific site
5) X3 Commands for Dynamic Changes

How to add a Product to multiple sites simultaneously

$
0
0

Ever felt the need to add a product to several sites all together? If the function about to be explained is unknown then more time will be required to do the task.

New Stuff: 

In the Item Master Screen there is an option for Product-Site Creation.

multiple-1

 This function will open the Product-Site Creation screen as below:

multiple-2

Hope this helps.

Also Read:

1) Add Multiple Web service for same X3 folder
2) How to solve the ‘Stock Value Adjustment’ Error during Periodic Processing
3) Check the Price in different Currency Rates.
4) How to change the currency of all the BPs?
5) How to suppress Log File display?


Deleting a file from a directory

$
0
0

Sage X3 has a special feature to delete a file from a directory. The Sage X3 has a simple function through which we can easily delete the file present in the specified directory.

New Stuff: 

SYSTEME: This function can be used to delete the file present in the directory. This function is present in the ORDSYS standard processing file. We can access it using a function.

Syntax:

Call SYSTEME (adxmac(1), ‘ae_rm’+PATH,” ”, STAT) From ORDSYS

            Parameter Details:

  • PATH: The path where file is located
  • STAT: The status of the file.

Points to be noted;

  • File path should not contain any blank spaces.

Kindly refer to the below snippet of code for better understanding the COPSRV

Function :

del-1

Hope this Helps!

Also Read:

1) Creating a directory Programmatically in X3
2) Moving a file from a directory
3) List the files from the directory
4) Reading and Writing into sequential file
5) Data Integration In X3

Modifying the standard log file

$
0
0

While working for one of client’s customization I was looking to import the sequential file in order to create a Sales Order in X3. I created a new import template in X3 and assigned an object of Sales order i.e. SOH to my import template. Using my template though I was successfully imported the data from the file and created the new Sales Order in X3. But I got a weird error when I checked the log file. Please check below screen shot.

New Stuff: 

Impor-1

The Log file generated after the creation of Sales order was showing the wrong SO number. In fact the log file was displaying some scrap number by concatenating of site and product. To get the Sales Order number on the log file, I added a specific code in the Import template. Please refer below screen shot.

Impor-2

Also Read:

1) How to suppress Log File display?
2) Deleting a file from a directory
3) How to add a Product to multiple sites simultaneously
4) Work order Grouping-For Different Products
5) Creating a directory Programmatically in X3

WO reactivation and Product tracking deletion in sage X3

$
0
0

If we close the firm work orders in process which have been tracked before hand.The Complete function specifies the status “completed” of each operation, material and product line released.
The WO status changes automatically from “in process” to “completed”.
It is possible to continue to perform production tracking on a completed work order that is not yet closed.

New Stuff: 

The closure function sets the WO status from “firm” to “closed”. It also authorizes the launching of the cost price.
It is normally impossible to save consumption or work movements when the status is “closed”.
However, the WO reactivation utility can be used exceptionally to continue tracking a WO provided that no price cost has been calculated for this work order.

Select the production site and work order click on close button

WO-11

After that we have created a production tracking

Manfacturing >> production tracking >> production tracking

Production tracking

The purpose of this function is the production tracking of work orders released to the workshop: collection of the production times devoted to the operations, material consumption, production reporting.

This function was designed to optimize the automation of WO tracking. the setup of the production tracking transactions is used to pre-load all the necessary information so that in the best case scenarios, the mere creation of a tracking record carries out in a single action the tracking of the operations, materials and production reporting. However a more detailed manual tracking entry remains available to the operator at all times.

In production tracking screen, select the production site and order no which recently we have created and click on create button to create a production tracking

WO-12

Suppose in production tracking we have entered any wrong entry it cannot be deleted or modified unless and until we reactivate the work order

If we click on delete button it gives following validation that work order balanced, deletion of tracking is not possible.

WO-13

So after that it need to reactivate the work order, then go to Work order Reactivation screen

Manfacturing >> Utilities >> WO reactivation

Work order Reactivation

This function is used to reactivate a closed work order.

The reactivation of the work order consists in changing the status of this WO (the WO switches from the Closed status to the Firm status) in order to authorize additional tracking.

This reactivation can only take place on those WOs whose cost price has not been calculated yet.

WO-14

If status is Completed + Costed then it will not allow to reactivate the work order.

After reactivation the work order the production tracking will allow to delete.

Hope this helps to delete the wrong entered production tracking after reactivation of work order.

Also Read:

1) Work order Grouping-For Different Products
2) How to Track Revision in Sales Order
3) Auditing Tables in Sage ERP X3
4) Automatic Deletion of Work Order in X3
5) Including ‘Non Managed’ Products in Work Orders

Multi-Tier Installation of Sage ERP X3

$
0
0

What is the need for a client-server application? Well, the answer is quite simple as this provides Centralization, improves scalability and enhances flexibility. This is the same for an ERP application as well. An ERP application working on a Multi-tier model is a fundamental requirement for a growing business. Sage X3 allows distribution of its components across different servers thus enabling the use of multi-server architecture. Enlisted below are some tips to install the ERP application across two different servers (Application Server and Database Server).

GreytriX3 :  Best Practices for Integrating Third Party Apps with Sage ERP X3

Note: This process is only valid for the first installation of a SAFE X3 product on new servers 

A) Installation of the ADXADMIN administration engine: Install an administration engine on each server. It is mandatory on all process, application, database, print, web, documentation, Java and Business Objects servers. It is not necessary to install the administration engine on the client workstations or on the workstation that will run the configuration console.

B) Installation of the Database Server Component: It is mandatory to install to install the Database Server on the Server where the Database has been installed.

C) On the Application Server install the components to configure the SAFE X3 application solution

D) Install the SAFE X3 configuration console on the application server

E) Create a SAFE X3 solution using the SAFE X3 console.

F) Install the SAFE X3 client on the application server

G) Complete the installation.

H) Afterwards, it is possible to add the documentation servers, the print servers, the additional processing servers (remote engines), the Business Objects servers, the Web servers and the Java servers

Note: There is a need to install the SQL Server Client Tool on the application server (the version should be same as the one installed on the database machine) as during the Installation/Configuration process we need to mention the path for the SQL tools in the Console.

It is possible to install all these components on a single and same machine except for an additional processing server if a primary processing server is already installed on the machine.

Connect to the product root folder to finalise the supervisor installation: The folder predefined user is “admin”, no password is assigned to it but it is advisable to assign one after installation.

Also Read:
1) Why my customizations are not getting installed in Sage X3?
2) How to reconfigure Sage X3 solution after changing the computer name/domain
3) Tips for Installing Sage ERP X3
4) How to Check for Patch conflicts
5) Data Backup and Restore in Sage ERP X3

Populating the description of the field using X3 methodology

$
0
0

In X3 whenever we customize a screen or create a new screen, it’s obvious that the screen has a unique field. This unique field should also have a description attached to it. For e.g. Product category is the unique field and it has its own description.

New Stuff: Multi-Tier Installation of Sage X3

Now first thought which comes to a developer is to create a description field, but what if I say In sage X3 we do not have to create any new field but the system will automatically attach the description to the unique field.

To achieve this we just need to define long description and short description for that field, these 2 will be 2 different fields.

We can display the short/long description without physically adding the field from screen editor instead we have to just add these three fields in table and one parent field in screen. This can be achieved using below steps:

1) Navigate to Development->Data and parameters->Tables->Tables.

2) Add the three fields viz. parent field, short description, and long description in the table.

3) Now add the long description field and short description field as shown below:

Desc-1Navigate to Development->Processing dictionary->screens->screens.

Add the parent field and select Long/Short in link as shown below:

Desc-2

Selecting this will automatically display the long\short description of the parent field without adding any code.

Also Read:
1) Enabling-disabling Grid’s-right click option
2) Protecting Customized Mod through Code
3) Customer Balances resynchronization in X3
4) How to open a Closed Purchase Receipts in X3
5) Work order Grouping-For Different Products

Checking the Type of variable

$
0
0

Sometimes when you do coding, you may come across a situation where you don’t  know  what is the data type of the variable and you may be initializing the variable which may give you “Type compatibility error”. This issue can be handled in the code. If you have a check on this variable with the help of “Type” keyword which will return you the value depending on the type of variable. TYPE can also be used to check the existence of variable.

New Stuff: Populating the description of the field using X3 methodology

Type : type  is used to find the type of variable. It can also be used to test the existence of variable

Syntax:

type(Varaible)

Parameter details:

Variable : name of the variable whose type is to be tested.

type returns a code for the type of variable given in the parameters. This code has the following values

Code returned Data type
-1 Non- Existence of Variable
1 Text
2 Short Integer
3 Date
4 Long Integer
5 Float
6 Double
7 Decimal
>10 Char

Kindly refer to the below snippet of code for better understanding

Var-1

Also Read:
1) Checking the Existence of variable
2) How to check “Active” Activity Code
3) Global Variables in X3
4) Login Warning on Logical Date in Sage X3
5) Determine Calling Screen in Sage X3

Copying processing files from one folder to another

$
0
0

Sage X3 has a simple function of copying the processing file from one folder to another. However we developer can move the files manually but what if I get an another option to automate this copying.

New Stuff: 

The function COPTRT can be used to copy the processing file one folder to another.

Function: COPTRT

Path: Development > Utilities > Dictionary > Copies > Processings

Fields:

  1.     From folder: Enter the source folder name from which you want to copy the processing file
  2.     To folder: Enter the destination folder name to which file needs to copy.
  3.     Processing: Enter the processing file name which you want to copy to destination folder.

After entering the necessary field click on “OK” the processing file will get copied to destination folder.

Also Read:
1) How to access screen using Code
2) Copying Folder through Sage X3 Management Console Application
3) Data Backup and Restore in Sage ERP X3
4) How to Allow vertical Processing without Folder Validation
5) Steps to Automate Sage X3 Backups


Using Calculator in Sage ERP X3

$
0
0

While working on one of my customization, I need to populate one customized field with a calculated value. I completed my code and found that the value was not getting displayed in the respective field. I was not sure whether my field was containing the calculated value or not.

New Stuff: Copying processing files from one folder to another

At this moment I used the Calculator functionality provided in X3. Please see below steps:

1. Open Calculator: Press “Alt+Ctrl+k” or Navigate to ‘?’ on menu bar. Refer below screen shot

Calc-1

2.  Write the name of mask followed by field name (“[M:YIS]COUNT” in my case) which I was supposed to display on screen. It showed me that there was the value coming in my field but was not being displayed in the mask. At this point I was sure that my field was containing the calculated value.

Calc-2

This helps me to find the values in the field. We can find the values of the hidden fields too.

Also Read:
1) Configure Interface User in Sage ERP X3
2) Protecting Customized Mod through Code
3) Populating the description of the field using X3 methodology
4) Enabling-disabling Grid’s-right click option
5) Calling of Report through code

How to add Sales Invoice elements in X3?

$
0
0

You may have come across a situation where you would like to add invoicing elements. Sage X3 has a feature to add different invoicing elements like Discount %, Discount $, Freight etc. The maximum number of invoicing elements that can be created is defined in the Folder setup.

The following example will provide you a walkthrough for adding Invoice element for discount on the Sales order:
First go to Setup->Sales->invoicing elements

  1. Add invoice element

inv-1

2. Give element position a number. The entry of the position number is important as it will determine the position of the element in the respective screens. Click on “Element Position” button to open the screen (Refer below screen shot)

inv-2

inv-3

Thus you will be able to use the “Discount %” invoice element on the Customer,Order, Delivery and Invoice Screens.

Bulk source verification in Sage X3

$
0
0

Sage X3 has an interesting feature of verifying the multiple processing files at a time. The function AVERIFSRC is used for verifying the source files.

Function: AVERIFSRC

Path: Development>Utility>Verification>Source Verification

Below is the screen shot of Source Verification screen:

SRCVerif-1

Fields:

  • Folder: Select the folder name of the processing files you want to verify.
  • Control types: Tick the control type as per the requirement.
  • Criteria:

    There are 3 filter criteria:

  1. Source: If you want to verify a particular single code file then you can mention that source file name here. It is default to * and will consider all the files present in the folder to verify.
  2. Module: You can select the particular Module of all the source files you want to verify.
  3. Error: You can also search for a particular error in processing file. There are various error message listed on this button, you can select any one of them as per the requirement.

On clicking OK, the system will verify all the processing files which match the entered criteria and it will show a log file detailing the errors with processing files.

SRCVerif-2


Getting number of fields in table

$
0
0

You may come across a situation where you would like to know the number of fields in a table. Sage X3 has a special feature of getting number of fields in a table with the help of “nbzon” keyword which will return you the value in integer

nbzon: nbzon determines the number of fields of an open table. [G:abv]nbzon is a variable in class [G] associated with a table declared by File order

Syntax:

[G:abv]nbzon

Parameter details:

abv: Abbreviation of the table.

 Kindly refer to the below snippet of code for better understanding

Num-1

How to remove spaces from a string

$
0
0

Sometimes text values contain leading, trailing, or multiple embedded space characters. These characters can sometimes cause unexpected results when you sort, filter, or search. As these characters are not easily noticed, the unexpected results may be difficult to understand. To remove these unwanted characters, you can use “vireblc” in X3.

 Syntax

    vireblc( string, option )

 Where “string” is an Alphanumeric expression for the string to be modified and “option” is an Integer numerical expression for the option to use to delete spaces from the string.

“vireblc” is used to delete spaces from a string using the following options.

Option Removal of spaces
0 At the start of the string.
1 At the end of the string.
2 At the start and end of the string.
3 At the start, truncating to the first following space.
4 Throughout the string.
5 Consecutive spaces throughout the
Viewing all 1521 articles
Browse latest View live


<script src="https://jsc.adskeeper.com/r/s/rssing.com.1596347.js" async> </script>