Quantcast
Channel: Sage X3 – Tips, Tricks and Components
Viewing all 1520 articles
Browse latest View live

Using Sigma function in X3

$
0
0

In one of our last blogs we had seen saw the use of Calculator in X3. Going further, we will now throw more light on the use and functionality of Calculator.

Firstly, we can open the calculator by pressing “Alt+Ctrl+k”.

 Calculator can be used to find the order of execution of the Actions on any event like a particular button click. At the Calculator prompt, type a formula sigma(GTEST=0,1,0) and press enter. It will activate the GTEST variable which will then display all the action to be executed in order on any event and will continue to do so unless you turn off GTEST parameter.

sigma-1

To turn off GTEST, type sigma(GTEST=0,-1,-1). You can also exit X3 to turn off the parameter. Setting this parameter is specific to the user logged in and will not affect other users.

sigma-2

There are certain number of functions accessible via right click in a Calculator, like:

  • History: This function is used to display the recent formulas entered by the user.
  • Decimal: This function is used to define the number of decimals to be used when displaying the result (0 to 24).
  • Formula editor: This function is used to call the formula editor, to aid the user in the construction of the calculation formula.
  • Variable classes: This function is used to give access to certain debug functions (display of a class, the table list and open masks).

Also Read:

Activate Debugger in Crystal Report
Diagonistic/Debugging Tool in Sage ERP X3


Sage Introduces New Enhancements for Sage ERP X3 v6.5 (Patch 27)

$
0
0

In the latest news from Sage, new enhancements have been introduced for Sage ERP X3 v6.5 (Patch 27)

Highlighted below are the new enhancements, improvements and corrections included in Patch 27 for v6.5 of Sage ERP X3:

  • The SAFE Client v112, which is compatible      with Microsoft Internet Explorer 10 and 11.
  • Certification to run Sage ERP X3 on      Microsoft Windows Server 2012. See the updated hardware requirements for      specific details.

Sage ERP X3 is the most flexible and powerful solution for midsized companies. These new updates will be beneficial to the companies by improving accuracy, control and the overall operational performance.

This latest update is available for download by logging onto the Sage Partner Portal and using your credentials.

SageERP-

Also Read:

How to upgrade Runtime Server for Sage X3
Multi-Tier Installation of Sage X3

Pattern Matching in Sage X3

$
0
0

You may often need to write code that performs inexact pattern matching. The use of “PAT” allows you to find data that fits a certain pattern, rather than specifying the code exactly.

Syntax

pat( expr_c, pattern )

Where “expr_c” is an alphanumeric expression defining the string whose compliance is to be tested with the pattern given. And “pattern” is an alphanumeric expression defining the compliance pattern.

PAT is used to check compliance of a character string with a given pattern. This compliance uses the following conventions for the patterns:

  •  The character ‘*’ represents any number of characters, even null,
  •  The character ‘?’ represents precisely one character,
  •  The character ‘#’ represents a digit,

For example,

You may also combine these characters in complex patterns to perform more advanced queries. For example, supposedly you needed to write code for checking whether user is entering proper Email address or not. You could use the following Code:

If not(pat([M:ABC]EMAILID,”*#@*.*”))

Infbox(“Wrong Email address”)

Endif

All the other characters in a pattern must exist in the character string to be checked so that compliance may be recognised.

PAT returns an Integer type result: when the string is compliant, PAT returns 1, otherwise a 0.

Also Read:

How to Remove spaces from a string
  How to Find a Sub String in a string
Checking the Existence of Variable

Dictionary Copy in X3

$
0
0

There may be a scenario where you want to migrate your development from a folder to another. Since it is a time consuming process, and not a feasible one also, it is not recommended to migrate all X3 objects created during the development process.

But X3 has a very special feature to carry out the above requirement, “Dictionary Copy”. The basic functionality of this function is to copy the X3 objects from one folder to another. We can copy the tables, screens, data types, reports, etc.

New Stuff: Pattern Matching in Sage X3

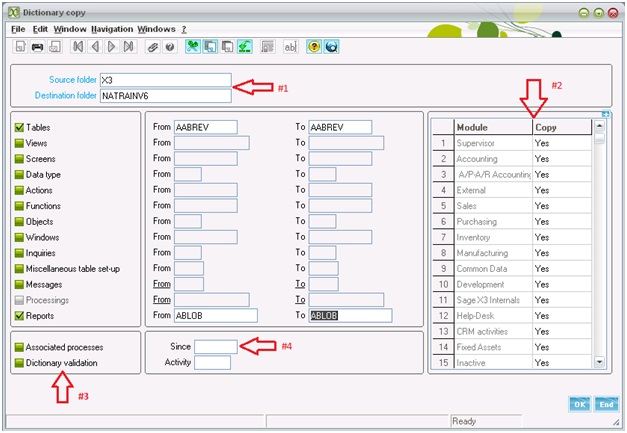
The navigation for this function is: Development > Utilities > Dictionary > Copies > Dictionary

copy-2

Let’s take a look on the certain useful and dynamic features available on the screen:

#1. We can enter the Source and Destination folder name.

#2. If Module fields are equal to Yes, the elements for the selected modules are also copied.

#3. Associated processes: Used to specify that the processes associated with the copied elements (screens, actions, objects, inquiries) are also copied. This flag also helps with the copy of the Crystal Reports reports associated with the dictionary elements for the reports.

Dictionary validation: Used to trigger the validation of the elements (tables, views, screens, windows, objects, inquiries, functions) in the destination folder after the copy. This validation is only possible if the current server associated with the folder is same as the server for the destination folder. If this is not the case, an error message will indicate this fact in the log file for the copy.

#4. One can view the data for the date entered in the field. All files created or modified later or equal to the date specified is viewable.

#5. If an activity code is entered here, only the elements marked with the activity code in question are copied.

In the end a log file is generated showing the operations carried while migration. Please refer below snapshot.


copy-1

Also Read:

Copying Processing files from one Folder to Another
How to Copy Detail lines in Sage X3
Purging and Archiving data in Sage X3

Determine Record Size of Tables in X3

$
0
0

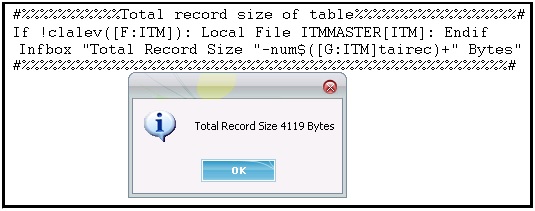
You may have come across a situation where you would like to know the record size of the table which will help you know the total space taken by the table. Sage X3 has a special feature of getting size of the table with the help of “tairec” keyword which will return you the value in bytes. This can also be used in order to know whether the table is empty or not.

tairec: Tairec contains the size in number of bytes of each record in an open table. [G:abv]tairec is a variable in class [G] associated with a table declared by File order

Syntax:

[G:abv]tairec

Parameter details:

abv: Abbreviation of the table.

Kindly refer to the below snippet of code for better understanding

RecordSize-1

Also Read:
How to intercept Standard Sage X3 functions
Setting Parameters in Actions function in Sage X3
Copying Processing file from one folder to another folder

How to know Alternate Currencies in Sage ERP X3

$
0
0

As we all know that Sage ERP X3 has a multicurrency feature. Along with this feature an interesting feature of displaying the alternate currency using keyboard shortcuts has also been provided.

To view the alternate currency, follow the below steps:

  1. Select the currency box of any screen.
  2. Press Ctrl+F9.
  3. A small pop-up window will display on the screen, prompting to enter your desired currency
  4. Press “OK”.
  5. The amounts displayed on the screen will reflect the new currency.

AltCur-1

Note: The alternate currency get displayed by pressing CTRL+F9 button is temporary one, as soon as you navigate through field it will again revert the currency to default currency.

Also Read:

How to change the currency of all BP’s?
Check the Price in different currency rates
Control Max Decimals of Currency in Sage X3


How to Restrict data input in Sage X3

$
0
0

By just using different Options (Numeric or Alphanumeric) in X3, one can validate data as it is fed in the system to reduce mistakes and improve accuracy and consistency.

All data types can be assigned a list of options for validating data when it is entered later on. Let’s take an example. If we assign and option “A” to Alphanumeric data, then while entering data later on, the system will always accept the characters in uppercase.

On the same lines we have others options explained in the tables below:

Greytrix Sage CRM Blog -  Get rid of demo data on Sage CRM install 

One or more entry characteristics are assigned to a given field. This notion can be in:

A) the data type

B)  the dictionary of tables (for the initialization of the screens created from this table)

C) the screen dictionary

There are many Options are available for different data types. Some are maintained below:

For alphanumeric:

img1

 For Numeric:

img2

For all field types:

img3

Also Read:
1) Checking the type of variable
2) Modify data of tables in X3
3) How to check Activity codes
4) Study Global Variables of X3
5) Handling GPE Variable in Sage X3

How to Deactivate Selections values in Dropdown List

$
0
0

Many a times we come across a scenario where we need to hide some of the values from the Dropdown list to make it easier to read or reduce any chances of confusions if any. This blog will prove a great help if you looking for the same.

Related Post: Integrate a specific local menu  while patching

For performing the said activity, the function ‘Discombo’ will come in handy. To know more about the same, read ahead for the description and its use:

Function: Discombo

Description: Deactivates the selections in a combo box.

Syntax: Discombo Selection list From Field id

Parameters:

1) Selection list: List of the selections to be deactivated, separated by comma(,)

2) Field id: Field name

Follow the below steps to deactivate the selection in Local Menu:

A) Add the function before the entry field action of that particular field.
B) Based on the condition, incorporate your logic before the entry action to deactivate the selection. Refer to the below snippet of code

decat-1

Also Read:
1) Setting up Procurement system using Tolerance in Sage X3
2) How to add sales Invoice elements in Sage X3?
3) How to filter Local Menu?
4) Filtering Object Based Selection List
5) Filtering the Selection List in Sage X3


Safe X3 JAVA Server installation and Configuration – II

$
0
0

In our last blog we went through the installation of JAVA server component, and checked if java component is already installed. Now we are going to see the configuration of JAVA bridge server with X3. To begin with the configuration open the safe X3 Console and follow the below steps:

New Stuff: Safe X3 JAVA Server installation and Configuration -I

1. Click on Add button to add our installed Java component. Then click on Next.

Java2-1

2. Here we can see the JAVA component which we had installed earlier. Choose the component to configure and click OK.

3. Before we configure, it will be a good practice to set a default server language. Please see the below snapshot and follow the steps according to the numbering.

A. Click on #1 button.

B. Select “all.host” from menu list. #2

C. Double click on “all.host.language”. #3

D. Give ENG for English or FRA for French. #4

4. Click on OK.

Java2-3

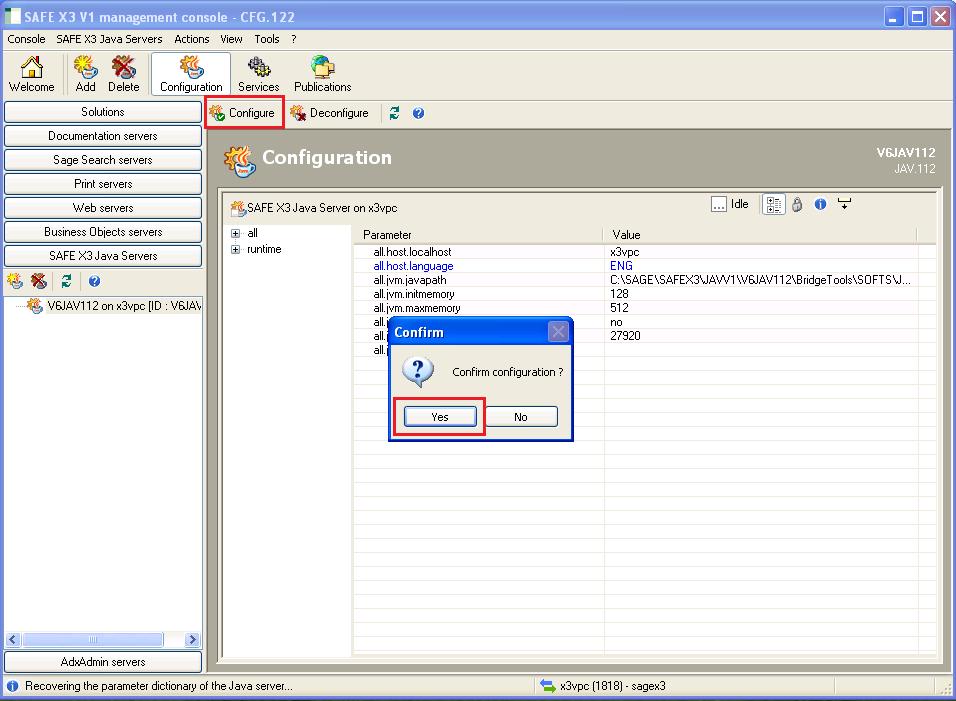
5. Now click on Configure button as shown in screenshot followed by YES.

Java2-4

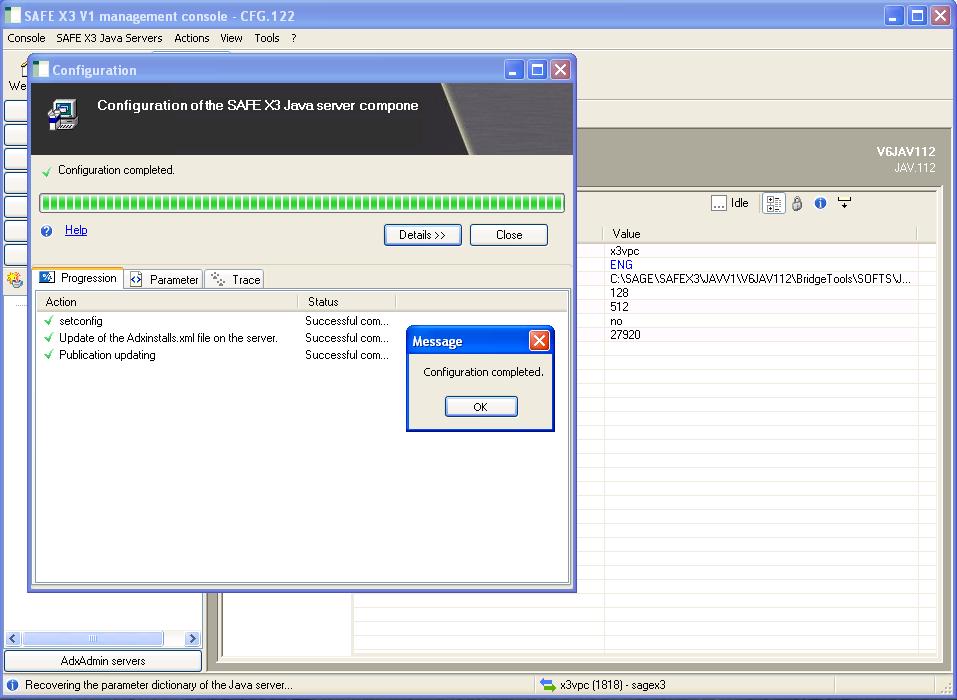
6. Once the configuration completes, the below message pops-up.

Java2-5

7. Click on OK and close the configuration window.

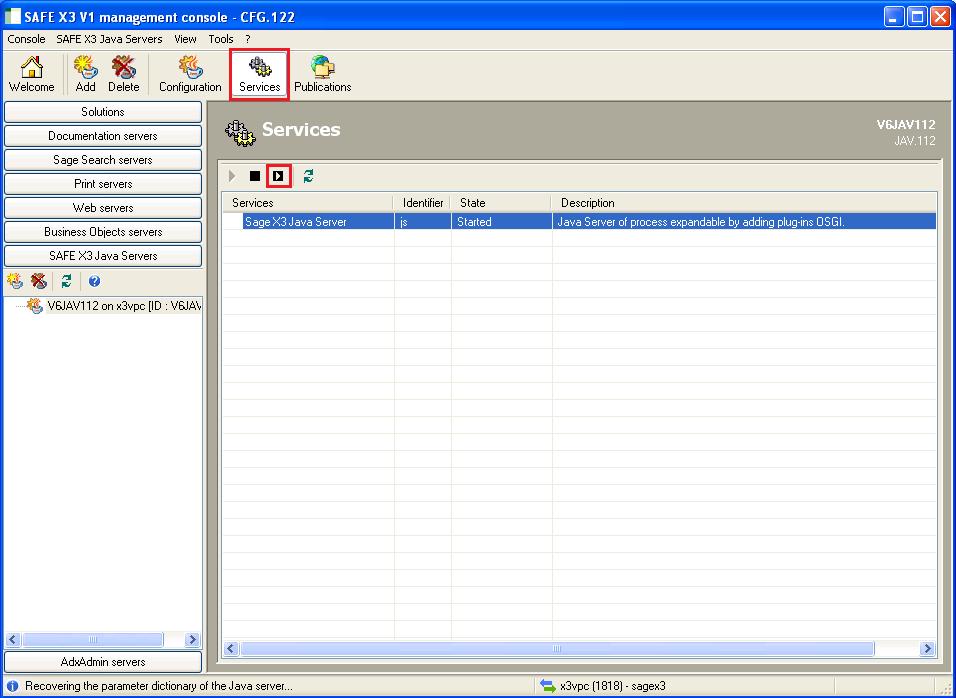
8. Since we have configured the JAVA bridge server with X3, the only thing we need to do now is to start the JAVA bridge services. To do that click on Services button as shown in below figure.

Java2-6

9. Select the X3 java server and click on restart button as shown in above figure.

10. Close the safe X3 Console.

11. We have successfully configured the Java Bridge component.To check if the JAVA bridge server is successfully set up or not. Login to your application server and open the following URL in Internet Explorer or any other http browser http://localhost:27880/infos/index.jspThis is the default path for JAVA bridge server, but this might be different in your system if the default path was changed during installation. If the JAVA bridge is installed, you should be able to see the following screen.

Java2-7

We are done now.

Also Read:
1) How to Upgrade Runtime Server for Sage X3
2) Create Notifications using Notification Server in Sage X3
3) Opening Java Bridge Connection through code
4) How to Get the Safe X3 Java Bridge Host and Port values
5) Multi-Tier Installation of Sage ERP X3

Filtering the Selection List in Sage X3 without object

$
0
0

Sometimes you may come across a situation where you want to give selection on any field using tables which are not the linked tables of the object.

New StuffGuide to setup Recurring Journals

In Sage X3 we can add selection (F12 functionality) and filter the selection records as per the requirement.

Kindly follow the below steps to add F12 selection functionality:

Create one “action” with template as “Selection from list” and also standard processing file. Kindly refer to the below screen shot.

Sel-1

2. Add the Selection field action on field and mention the action name as “XSELLINA”.

Sel-

3. XSELLINA action has a SET_LISTS action which gets called when user presses the F12 key.

4. Here in this action we can write our logic to filter out the records.

5. NBTEX: Integer

6. This is the number of lines (therefore the number of possible values for the field that is entered) to be     displayed in the window.

TEXTE (NBTEX): Char, length 50, sized at 100

7. This text is associated with each value. In fact, only these texts will be displayed in this selection list.

TIT: Char, length 50, sized at 5: It is the title of the window for the index 0, and the column titles for the indexes 1 to 5.

Sel-3

Also Read:
1) Filtering Object Based Selection List
2) Creating Left Selection List in Sage X3
3) Filtering the Selection List in Sage X3
4) Manipulation Of Selection List/Window – Part I
5) Manipulation Of Selection List/Window – Part II

Hiding fields in Screen Dynamically

$
0
0

You may come across the situation where you would like to hide fields in screen on a particular condition. Sage X3 has a special feature in which you can hide or display fields in with the help of “Chgfmt” keyword.
Chgfmt: It is used to change the format of the mask field. It is also used to display or hide any fields.

New Stuff: 

Syntax:

Chgfmt [class] field with expr_c

Parameter details:

class    :  name of the mask
field     :  name of the field
expr_c : expression to hide a field.

Kindly refer to the below snippet of code for better understanding

Hiding-1

Also Read:
1) Adding Styles to Screen Fields in X3
2) Getting number of fields in table
3) Auditing Fields in Sage ERP X3
4) How to access screen using Code
5) Closing of Screen via Code

Set user defined Shipment date on Delivery from Sales Order

$
0
0

Have you ever come across a situation in Sage X3 ERP where you set a future Shipment date on the Sales Order but when clicking/creating Delivery from the Sales Order, the Shipment date is automatically set to the current date irrespective of Shipment date set on the Sales Order?

New Stuff: Hiding fields in Screen dynamically

You can overcome this scenario with Parameter INISHIDAT under VEN Sales of the General parameters in Sage X3.

Setup > General parameters > Parameter values

ShiDat-1

Based on value set on the parameter ‘INISHIDAT’ the Shipment date is set accordingly on the Delivery made from the Sales Order.

By default the parameter value is set to “Current date” that means whenever a Delivery is made from a Sales Order the Shipment date will be always set to Current date irrespective of what is set in the ‘Shipment date’ field of the Sales Order.

When the parameter value is set to “Original document shipment date” then the Delivery made from the Sales Order has the user defined Shipment date.

Also Read:
1) Setting up procurement system using Tolerance in Sage X3
2) Entry transaction Validation via Patch
3) Determine Position of Invoicing Element
4) How to track revision in sales order
5) Creating parameter values in sage x3

All about X3 Recurring Journals

$
0
0

In our previous blog we had described the setup of recurring journal codes. Here we will discuss about the use of the recurring journal code and creating journal entries in X3.

New Stuff: Set User defined Shipment date on Delivery from Sales Order

How to generate recurring journal in X3?

The recurring journals can be generated using the recurring journal generation (VALABT) function (refer the below screenshot).

All you need to do is enter the recurring journal code and enter in the mandatory “until date” and click on OK. The accounting document type used on actual generation of the recurring entry is defined at recurring task setup level.

It is possible at processing level to choose the document generation type.

1)      Actual: The actual accounting document is a document that can always be viewed and printed (GL, Balance, etc.).
2)      ‘Active simulation’ or ‘Inactive simulation’

If the “Log file” is checked then a log is generated which displays the Journals created (refer below screenshot.

Rec2-2

This brings us to the end of the second and last part of ‘All about X3 recurring journals’.

Also Read:
1) Guide to Setup X3 Recurring Journals
2) Periodic Processing of Inventory Valuation
3) How to check for Accounting Codes in X3
4) Accounting Task in X3
5) Filtering the Selection List in Sage X3 without object

How to use assembly function in X3?

$
0
0

Have you ever felt the need for increasing the inventory of finished goods without having to undergo the hassles of creating work orders and its associated processes?  The assembly functionality of Sage X3 provides you with an answer to this.

New Stuff: All about X3 Recurring Journals

The assembly creates an inventory receipt of the assembled parent product and inventory issue of the various components described in the BOM from stock. The assembly function is used to carry out; based on bill of material (BOM). Here is the way to use assembly function.

Navigate to: Inventory> Internal transaction>Assembly

1. Select parent Product (Product or BOM)

Assembly-1

2. After the parent product in the grid1 is selected, a pop up window will open .When you click on OK button; the quantities to be issued for each component are calculated from the assembly quantity and the BOM line quantity for each component will be displayed in grid2. This quantity is modifiable. In the process of creating the assembly note, it is possible to delete a component planned on the BOM, or to add non-planned components by direct entry in the component grid.

Assembly-2

Assembly-3

Here you have created the assembled parent product.

Also Read:
1) Inventory Counts through ADC
2) Managing Inventory at Sub Lot Level in X3
3) Including Non-Managed Product in Work Orders
4) Using Sigma function in X3
5) Setting Parameters in Actions function in Sage X3

How to Disassemble the Assembly?

$
0
0

In our previous blog we saw how to create parent product by using assembly function. Here we will give the information on how to disassemble the parent product in X3.

New StuffHow to use the Assembly function in Sage X3?

The disassembly function disassembles the BOM products into its subsequent components. To disassemble the parent product you can select available assembly note in the left list or you can also select the BOM product. The disassembly function only allows entering a single parent product.

Navigate to: Inventory> Internal transaction>Disassembly

1. Select Assembly record or BOM (In this example we are selecting assembly record from the left list).

DisA-1
After picking the assembly, the system automatically loads the parent product and component grids based on the assembly selected. It is not impossible to modify the information coming from the original assembly.

DisA-2

Here you have disassembled the parent product and as a result the BOM quantity gets reduced and the component quantities increases. It is possible to view the stock details of the parent and its components in the inquiry screens.

Also Read:
1) Product creation using Configurator in Sage X3
2) Work order Grouping-For Different Products
3) WO reactivation and Product tracking deletion in sage X3
4) Automatic Deletion of Work Order in X3
5) Modifying the standard log file


Fetching the parameter values

$
0
0

In custom sage X3 development, we frequently use parameters for the use of constant values.

New Stuff: Filtering the Selection List in Sage X3 without Object

There are two ways to fetch the parameters values:

     1.  Creating global variable: Creating global variable and assigning the parameter values to it.But   whenever the parameter values change, we need to validate the global variable in order to initialize the global variable with latest parameter value.

     2.  Using standard function: We can directly fetch the parameter values by using the standard function.

Function Name: AFNC.PARAM

Syntax: AFNC.PARAM (PARAM, SITE)

Parameters:
PARAM: Parameter code (alpha)
SITE: Site code (alpha)

E.g. I have created a custom parameter XCMLOCCAP to store the default location capacity as shown in below screen shot.

Param-1

Now we can fetch the value for this parameter by using the above standard function. Kindly refer the below snippet of code.
Param-2

Also Read:
1) Creating Parameter Values in Sage X3
2) Setting Parameters in Actions function in Sage X3
3) Setting Parameters in Recurring Task
4) Assigning Workflow Parameters in Sage X3
5) Passing Parameters to your Pop Up Window in Sage X3

How to set up visible list in the menu bar?

$
0
0

While working on one of my customization, I needed to add a menu on the X3 menu bar. Though I added a new menu item on menu bar but when I tried to open the newly added screen, I found that the new menu was disabled. I tried to enable the menu from many different ways but didn’t get any solution from the windows screen.

New Stuff: Fetching the Parameter values

Menu01
Then after some research, I got to know that by writing one line of code in “SETBOUT” action, we can enable our list. Please see the below screen shot.

Visible List

Also Read:
1) Adding new Option/Button in Menus in Sage X3
2) How to Filter Local Menu
3) How to Deactivate selection values in Dropdown List
4) Create Sales Orders using Web services in Sage X3
5) Integrate a specific local menu while Patching

How to use local menus in a miscellaneous table

$
0
0

This blog will provide detailed information on how to use one or more local menu values in the miscellaneous table.

New Stuff: How to setup visible list in menu bar?

In this example we have two local menus: one for the Product statistical group and other which stores different product category type.

LocalMenu-1


LocalMenu-2

Now we shall create a miscellaneous table which will incorporate the use of both these local menus.
LocalMenu-3
The “Numeric1” and “Numeric2” fields are used to enter the text for the additional columns. Select the data type as M (for local menus) and enter the relevant local menu number in the adjacent text field. Save and complete the validation. The new columns will then be incorporated in the miscellaneous table Data function (Refer below screenshot)

LocalMenu-4
Also Read:
Using Miscellaneous Tables in Sage ERP X3
Using the Dependent Miscellaneous Tables in Sage X3
Integrate a specific local menu while Patching
How to filter Local Menu

How to add an additional invoicing element on the line items

$
0
0

Have you come across any requirement where in you need to add an additional invoicing element on the Line items. This blog will give you accurate steps on how to do so for Purchase Orders and Invoices.

New Stuff: Posting Additional Journal Entries !!!

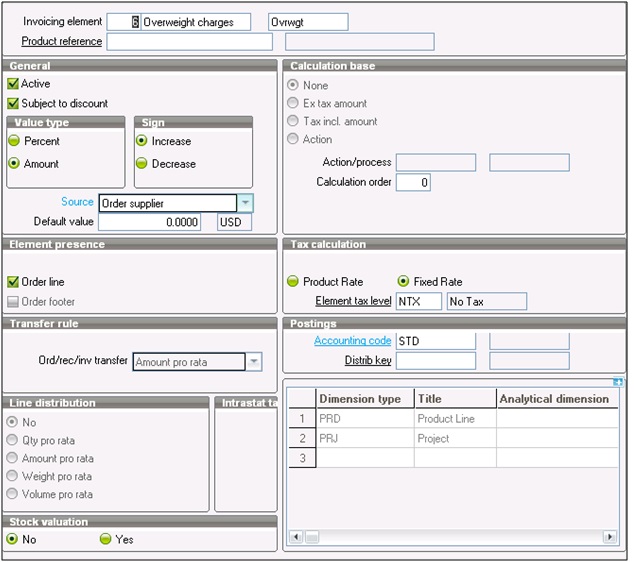
1) Create Invoicing Element – : While creating the Invoicing element keep value type as ‘Amount’ and Element presence as ‘Order Line’.

Inv-1

2) Navigate to Price list Structure screen of the Purchasing module. (Setup-> Purchase-> Price List-> Structure)

3) Create a new Structure as above and enter the relevant Invoicing Element number in the Invoicing Element field. The parameter in the “Value” field defines whether the value entered in the price list screen should be considered as an amount or as percentage.
Inv-2

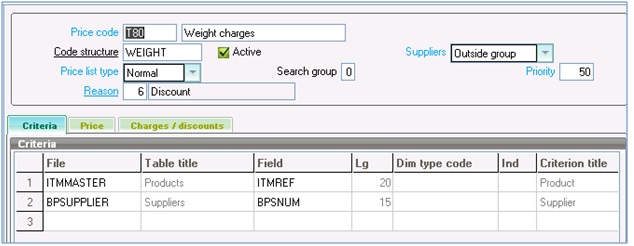
4) In the Price List setup screen create a new price code and assign the appropriate Code Structure.
Inv-33

5) In the Charges/Discount Change the Processing to ‘Yes’. As a result the field “Wgt Chrg” will be displayed in the price list entry screen.
Inv-4

6) Create a price list as needed using the appropriate price list code and enter the Charges accordingly.
Inv-5

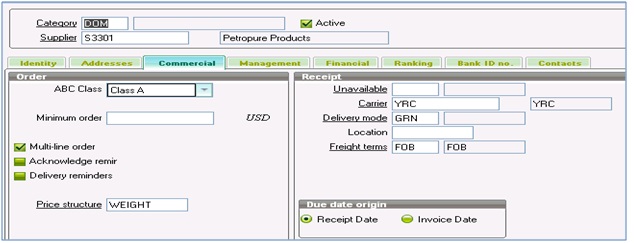
7) Assign the price structure to the applicable suppliers by entering the Structure code in the Price Structure field.

Inv-6

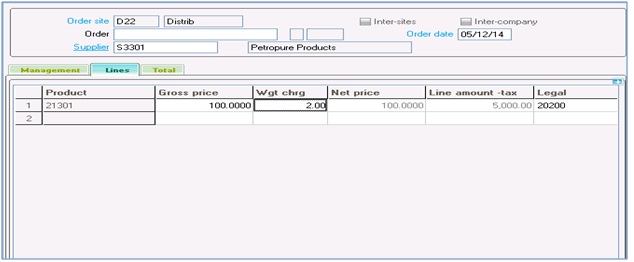
8)Now let us create a Purchase Order and check the calculations.

Inv-7

The purchase order created for 50 quantities of the product amounts to net price of 5000 USD. The weight charge entered was 2% which is exactly 100 USD. So the final total is calculated as 5100 USD.

Also Read:
1. Determine position of Invoicing Element
2. Set Default Dimensions for Invoicing Element in Sage X3
3. How to add Sales Invoice element in Sage X3
4. Check client type of the X3 session
5. Set user defined Shipment date on Delivery from Sales Order

Check client type of the X3 session

$
0
0

X3 has a feature of opening up multiple sessions but its often needed to know the current session running , but do you know how will we find the session. Then let me help you on this, there exists one inbuilt variable ‘ADXTYP’ which is used to know the session type.

New Stuff: How to add an additional invoicing element on line items

Syntax

ADXTYP

Examples

# Test is used to load a variable if web services client”

If ADXTYP = 12

TOTO = “Web Services”

Endif

Description and comments

ADXTYP returns the client type of the X3 session in integer and the values for those integers are

1.    Client / server

2.   Client/server for a secondary session

3.   Batch

9. Client/server

10. Web client for a secondary session

12. Web services client (communication synchronous with third-party applications; for eg. e-commerce site)

Also Read:
1. Setup Disconnection time of secondary session in X3
2. Manage user Connection time in Sage X3
3. How to check users connected in Sage X3
4. Unable to Access Help File in Sage X3
5. Work order Grouping-For Different Products

Viewing all 1520 articles
Browse latest View live


<script src="https://jsc.adskeeper.com/r/s/rssing.com.1596347.js" async> </script>