Quantcast
Channel: Sage X3 – Tips, Tricks and Components
Viewing all 1519 articles
Browse latest View live

How to do Routings version validation and revision of routing version in Sage X3

$
0
0

Basically this routing function use to define the sequence of shop floor processes required to produce, or process, a particular product.Every routing is a sequence of operations and tools that are involved in producing (manufacturing) or processing a particular product or assembly (bill of materials). Each routing is associated with the stock item that is being made or processed. Routings enable you to define and reference information for many of the shop floor processes in your business, providing shop floor control when used with Work orders.

Multiple routings can be defined for a single product.

Each routing code can be assigned specific management features. These include restriction of the routing to a specific site and to specific areas of functionality (for use in a manufacturing environment, for costing or for capacity planning).

In Sage X3, there is a standard functionality , with the help of this we can do the Version validation of Routings. Also after the Version validation process the BOM product will be Available to use.

Follow the below steps for the setup:

Steps:

First make sure that in Product category the Version management should be allow to use, as shown in below figure.

 Navigate To : Common Data > Products > Product Categories

Fig: Product Category

Also same setup should be done on Product screen also.

Navigate To : Common Data > Products > Products

In Management Tab, Version management Checkbox as well as Routing version checkbox should be checked, as shown in below figure.

Fig: Product

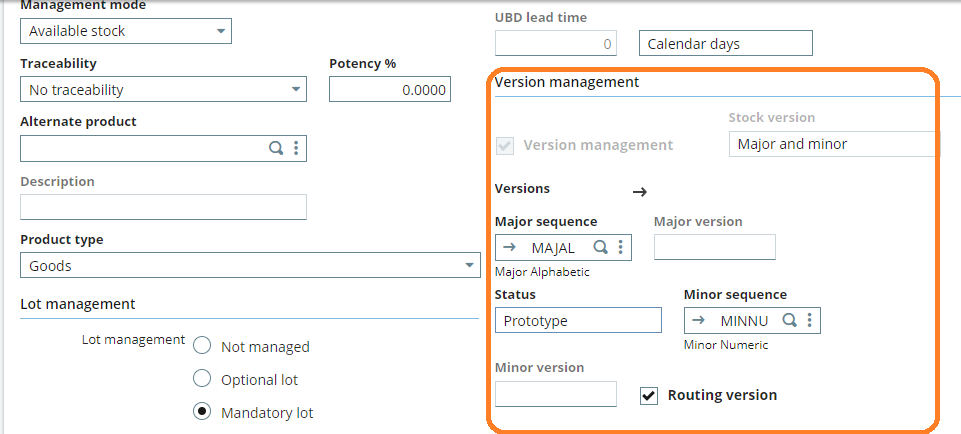
User will not be able to enter any values in version fields on routing management screen until they will not Checked Routing version checkbox as shown in above figure.

In short product and that respective product category set up should be set as defined above.

Now, we have to create routing transaction of the same product.

Navigate To : Manufacturing > Routings > Routings Management

  • Enter all-mandatory fields value
  • Also enter Minor and Major version values in respective field
  • Create the routing transaction

Refer the below figure for the same.

Fig: Routing Management

  You can see in above figure routing code is ’40’ and Use Status is set as an ‘In Development’.

Now we will change the routing code with the help of routing code screen, as shown in below figure.

Fig: Routing Codes

User will enter the new routing code i.e.,42 or any (it will be different) in ‘Available to use’ field and it should be different from ‘In Development routing ‘ code i.e., 40.

Fig: Routing codes

Now we will do the routing version validation with help of validation button.

Fig: Validation

After clicking on Validation button it will display one pop up window just click on ‘Yes’ button to proceed for validation process ,as shown in below figure.

Fig: Validation process

Now we have done the routing version validation. Now you can see in below figure after validation Use Status has changed from ‘In Development’ to ‘Available to Use’.

Fig: Routing

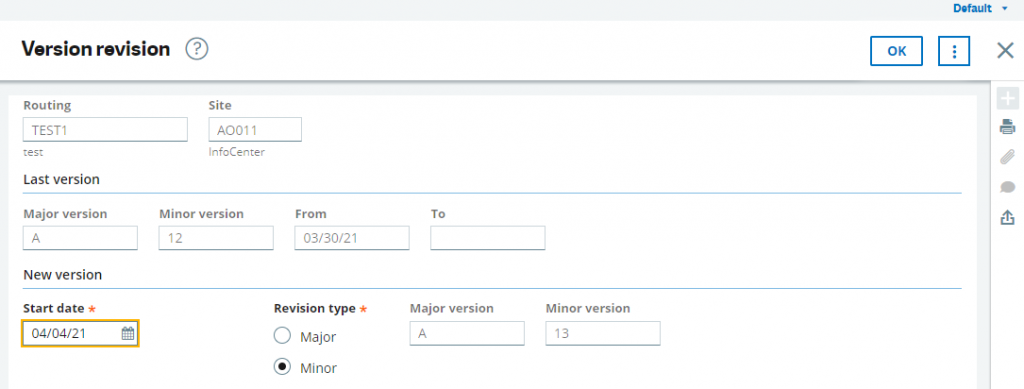
Revision of routing version code:

With the help of revision button user can revert back the version validation.

Fig: Revision

After clicking on Revision button, it will display below Version revision screen just click on OK button.

Fig: Version Revision

After doing this you can see in below figure Use Status has changed from ‘Available to Use’ to ‘In Development’ and user again will be able to do the routing version validation.

With the help of this user can does the Routings and BOM version validation and then BOM product will be Available to use.

About Us

Greytrix – a globally recognized and one of the oldest Sage Development Partner is a one-stop solution provider for Sage ERP and Sage CRM organizational needs. Being acknowledged and rewarded for multi-man years of experience, we bring complete end-to-end assistance for your technical consultations, product customizations, data migration, system integrations, third-party add-on development and implementation competence.

Greytrix caters to a wide range of Sage X3, a Sage Business Cloud Solution, offerings. Our unique GUMU™ integrations include Sage X3 for Sage CRMSalesforce.com, Dynamics 365 CRM and Magento eCommerce along with Implementation and Technical Support worldwide for Sage X3. Currently we are Sage X3 Implementation Partner in East Africa, Middle East, Australia, Asia, US, UK. We also offer best-in-class Sage X3 customization and development services, integrated applications such as POS | WMS | Payment Gateway | Shipping System | Business Intelligence | eCommerce and have developed add-ons such as Catch – Weight  and Letter of Credit and India Legislation for Sage X3 to Sage business partners, end users and Sage PSG worldwide.

Greytrix is a recognized Sage champion ISV Partner for GUMU™ Sage X3 – Sage CRM integration also listed on Sage Marketplace; GUMU™ integration for Sage X3 – Salesforce is a 5-star rated app listed on Salesforce AppExchange and GUMU™ integration for Dynamics 365 CRM – Sage ERP listed on Microsoft AppSource.

For more information on Sage X3 Integration and Services, please contact us at x3@greytrix.com, We will like to hear from you.


Sequence number setup for Projects in X3 V12

$
0
0

As we know, sage X3 v12 provides number of new features. One of them is the Project module which is completely new in v12.

This Projects function is used to manage the elements often denominated under different terms : Business, Projects, Opportunities. These translate to the same basic concept. Their objective is to manage the characteristics and stages in a sales cycle.

We can say this is the extension to “Projects” from Customer relation module in older versions of X3. This new module involves new elements along with older ones in “Project Management” such as financial status, revenues, assigned employees details etc.

        However, the sequence number parameter for Projects is different in older versions and v12. In older versions it is “OPP” but for v12 you need to setup sequence number for project in parameter “PJM”.

Seq.no.assignment for OPP
Fig: Seq.no.assignment for OPP

In older versions, the sequence number gets generated based on the OPP parameter defined under module CRM activities > Projects as shown above. However, in v12, though there is an existing setup similar to older versions for Projects. There is a new setup for module Common data > Projects > PJM. This is the working parameter for project sequence number generation.

Fig: Seq.no.assignment for PJM

So, you can setup PJM parameter as per your desired criteria to set sequence number for Projects both in Customer relation module and Project module. Navigate to: Setup > Parameters > Structures > Select parameter PJM. You can change the format of sequence number, here.

Fig: Setup for PJM

If you need to change format of sequence number for Projects in v12, you need to change setup of parameter PJM and not OPP. 

About Us

Greytrix – a globally recognized and one of the oldest Sage Development Partner is a one-stop solution provider for Sage ERP and Sage CRM organizational needs. Being acknowledged and rewarded for multi-man years of experience, we bring complete end-to-end assistance for your technical consultations, product customizations, data migration, system integrations, third-party add-on development and implementation competence.

Greytrix caters to a wide range of Sage X3, a Sage Business Cloud Solution, offerings. Our unique GUMU™ integrations include Sage X3 for Sage CRMSalesforce.com, Dynamics 365 CRM and Magento eCommerce along with Implementation and Technical Support worldwide for Sage X3. Currently we are Sage X3 Implementation Partner in East Africa, Middle East, Australia, Asia, US, UK. We also offer best-in-class Sage X3 customization and development services, integrated applications such as POS | WMS | Payment Gateway | Shipping System | Business Intelligence | eCommerce and have developed add-ons such as Catch – Weight  and Letter of Credit and India Legislation for Sage X3 to Sage business partners, end users and Sage PSG worldwide.

Greytrix is a recognized Sage champion ISV Partner for GUMU™ Sage X3 – Sage CRM integration also listed on Sage Marketplace; GUMU™ integration for Sage X3 – Salesforce is a 5-star rated app listed on Salesforce AppExchange and GUMU™ integration for Dynamics 365 CRM – Sage ERP listed on Microsoft AppSource.

For more information on Sage X3 Integration and Services, please contact us at x3@greytrix.com, We will like to hear from you.

How to refresh left list in Sage X3

$
0
0

In Sage X3, left-list plays an important role as most of the screens which are very important in X3 like sales delivery, sales invoice, purchase receipt, purchase invoice, etc. have left list selections where we can select from the left list and create a transaction in X3. For e.g. On the sales delivery screen we can select an order from the left list and create a delivery for that order. Here we have an option of selecting multiple orders and can create delivery of those multiple orders. Also, we can select particular lines from order and can create delivery of the same. The same way we can create invoices after selecting deliveries or orders from the left list. Purchase sides screens also contain the same left list where receipt can be created from a multiple purchase order of left list and invoices can be created after selecting multiple orders or multiple receipts from left list.

However, there are various master screens (i.e., customer, product, etc.) which don’t have left list selections as these screens contain master data. So in this type of screen, we can manually add a left list selection through some of the customization according to our use. However as said this screen doesn’t have a standard left list so refreshing of the left list becomes a headache as standard doesn’t refresh the left list after certain actions which standard normally does in sales delivery, invoice, etc. screens which have standard left list.

So in this blog we are going to see how we can refresh those left lists after certain actions like creation, deletion, cancellation or after hitting on some of the buttons.

Steps to follow :

                Suppose if you want to refresh the left list after hitting on some customized button then we just need to add a bit line code. Refer the below snippet of code.

Fig: Code

The above snippet of code can be put on any action like creation, modification, etc. which will refresh the left list as FILGAUCHE contains criteria of the left list record which needs to be modified according to our use and then the next line of code calls standard actions which automatically refresh the left list.

By the help of the above blog, we can refresh the left list in Sage X3.

About Us

Greytrix – a globally recognized and one of the oldest Sage Development Partner is a one-stop solution provider for Sage ERP and Sage CRM organizational needs. Being acknowledged and rewarded for multi-man years of experience, we bring complete end-to-end assistance for your technical consultations, product customizations, data migration, system integrations, third-party add-on development and implementation competence.

Greytrix caters to a wide range of Sage X3, a Sage Business Cloud Solution, offerings. Our unique GUMU™ integrations include Sage X3 for Sage CRMSalesforce.com, Dynamics 365 CRM and Magento eCommerce along with Implementation and Technical Support worldwide for Sage X3. Currently we are Sage X3 Implementation Partner in East Africa, Middle East, Australia, Asia, US, UK. We also offer best-in-class Sage X3 customization and development services, integrated applications such as POS | WMS | Payment Gateway | Shipping System | Business Intelligence | eCommerce and have developed add-ons such as Catch – Weight  and Letter of Credit and India Legislation for Sage X3 to Sage business partners, end users and Sage PSG worldwide.

Greytrix is a recognized Sage champion ISV Partner for GUMU™ Sage X3 – Sage CRM integration also listed on Sage Marketplace; GUMU™ integration for Sage X3 – Salesforce is a 5-star rated app listed on Salesforce AppExchange and GUMU™ integration for Dynamics 365 CRM – Sage ERP listed on Microsoft AppSource.

For more information on Sage X3 Integration and Services, please contact us at x3@greytrix.com, We will like to hear from you.

How to define multiple Taxes in line level of Customer BP invoice screen in Sage X3

$
0
0

The customer BP invoice entry function is used to manage the customer invoicing out of the “typical” sales cycle. In this context, the user does not manage the order, the delivery note with the stock issue etc. When issuing the invoice, the data necessary to the accounting are saved.

We may need a basic important points to make a sales invoice such as:

  1. Customer
  2. Account
  3. Site
  4. Tax

Customer: In sales, commerce and economics, a customer which sometimes are a clients, buyer or purchaser or is  the recipient of a good, service , product or an idea obtained from a seller, vendor or supplier via a financial transaction or exchange for money or some other valuable consideration.

Account: A general ledger, also known as a nominal ledger, is a bookkeeping ledger that serves as a central repository for accounting data transferred from all sub ledgers like accounts payable, accounts receivable, cash management, fixed assets, purchasing and projects. Each account maintained by an organization is known as a ledger account, and the collection of all these accounts is known as the general ledger. The general ledger is the backbone of any accounting system which holds financial and non-financial data for an organization.

Tax: A tax is a compulsory financial charge or some other type of levy imposed on a taxpayer (an individual or legel entity by a governmental organization in order to fund government spending and various public expenditures.

Now sometimes in Sage X3, we may find difficulties in entering multiple taxes on  line level of Customer BP invoice as X3 doesn’t allow user to enter multiple taxes on line level, so to overcome this, in X3 there is a setup for this. Kindly follow below steps for set up to define multiple taxes in the Customer BP invoice screen.

Navigate to: A/P-A/R accounting -> Invoicing -> Customer BP Invoices

Fig01: Customer BP Invoice screen

As we can see in the above screen shot only one Tax field is present on the screen. Now follow below steps for the multiple tax setup:

Step1:

Navigate to : Common Data ->  G/L Accounting Tables -> General.

Select that account which we used in the Customer BP Invoice

Fig02: Accounts screen

Then, navigate  to the General tab.
Set ‘Tax Management’ field as ‘Tax account’ and Tax as ‘ANSTD’ or any tax code we can set here. Refer below screenshot:

Fig03: Accounts Tax Management screen

Then save it.
Now, Navigate to:

AP / AR accounting code → Invoicing → Customer BP Invoice
Enter all the mandatory fields and then go to line level tax field select the action button of the tax field , click on tax entry button. Refer below screen shot:

Fig04: Tax Entry Field
Fig05: Tax Entry screen

Now as you can see in the above screen shot, user can define the multiple taxes in the Customer BP invoice screen.

In this way, we can define multiple taxes in the line level of customer BP invoice screen.

About Us

Greytrix – a globally recognized and one of the oldest Sage Development Partner is a one-stop solution provider for Sage ERP and Sage CRM organizational needs. Being acknowledged and rewarded for multi-man years of experience, we bring complete end-to-end assistance for your technical consultations, product customizations, data migration, system integrations, third-party add-on development and implementation competence.

Greytrix caters to a wide range of Sage X3, a Sage Business Cloud Solution, offerings. Our unique GUMU™ integrations include Sage X3 for Sage CRMSalesforce.com, Dynamics 365 CRM and Magento eCommerce along with Implementation and Technical Support worldwide for Sage X3. Currently we are Sage X3 Implementation Partner in East Africa, Middle East, Australia, Asia, US, UK. We also offer best-in-class Sage X3 customization and development services, integrated applications such as POS | WMS | Payment Gateway | Shipping System | Business Intelligence | eCommerce and have developed add-ons such as Catch – Weight  and Letter of Credit and India Legislation for Sage X3 to Sage business partners, end users and Sage PSG worldwide.

Greytrix is a recognized Sage champion ISV Partner for GUMU™ Sage X3 – Sage CRM integration also listed on Sage Marketplace; GUMU™ integration for Sage X3 – Salesforce is a 5-star rated app listed on Salesforce AppExchange and GUMU™ integration for Dynamics 365 CRM – Sage ERP listed on Microsoft AppSource.

For more information on Sage X3 Integration and Services, please contact us at x3@greytrix.com, We will like to hear from you.

How to Solve error ”Outside of validity date limit” in Journal Entries

$
0
0

In Sage X3, any transaction that impacts a company’s profit and loss needs to be recorded in their accounting system is called ‘Journal Entries’.

        A journal entry is used to record a business transaction in the accounting records of a business. A journal entry is usually recorded in the general ledger; alternatively, it may be recorded in a subsidiary ledger that is then summarized and rolled forward into the general ledger.

        In Sage X3, all documents such as Purchase Invoice, Sales Invoice, Shipment, etc. are coded to ‘automatic journals’, thus creating journal entries automatically when the documents are validated. Each document is coded to specific accounts in the ‘automatic journal’ setup, thereby posting the entries in the desired accounts during a transaction. However, these entries are posted in the ‘temporary’ mode which allows the user to modify the entry in terms of accounts, business partner, amount and description fields, before it is changed to ‘final’ during final validation.

        When the status is Temporary, journals can be deleted or modified, but journals generated in other modules are subject to consistency checks. Once the status is Final, some accounting elements included in a journal can no longer be modified.

        Depending on the setup of the transaction and journal type used, the following elements can be specified in journal entry:

  • Purely analytical journals
  • General and analytical journals
  • IAS documents, etc.

STEPS :-

Navigate to:  Financials -> Journals -> Journal Entry

  • Open the Journal Entry screen from Financials > Journals > Journal Entry
  • Click the New button to open a blank entry
  • Select a Site (defined as a financial site)
  • Select an Entry Type from the list according to the nature of the transaction. Each type is loaded with its required settings.
  • The Number field will be automatically generated by X3 when the document is created.
  • Select the accounting Date of posting this entry.

  Here, we can see that we are facing the below issue while creating journal entry. Refer the below figure:

Fig01: Journal Screen

Follow the steps given below to solve this error:-

 Navigate To: All -> Setup -> Financial  -> Journal Entry Transaction

As we are creating journal entry for STDCO transaction, Select the same transaction in entry transaction screen. 

Fig02: Journal Entry Transaction Screen

Here, we can see that the value in the field Validity End date is set to ’04/12/20′,  that means the validity of this transaction is valid only till 2020, but we are creating the transaction for 2021 so we are facing the error. Refer the below figure.        

We need to change the ‘Validity end date‘, till which date we want for the particular entry transaction of the Journal Entry.

So here we are changing the value to 12/31/21. Save and validate the same entry transaction.

Fig03: Validity end date

Hence, our journal entry has been created successfully. Refer the below screen shot

Fig04: Journal Entry Screen

This blog helps to solve the error “Outside of validity date limit ” while creating journal entry.

About Us

Greytrix – a globally recognized and one of the oldest Sage Development Partner is a one-stop solution provider for Sage ERP and Sage CRM organizational needs. Being acknowledged and rewarded for multi-man years of experience, we bring complete end-to-end assistance for your technical consultations, product customizations, data migration, system integrations, third-party add-on development and implementation competence.

Greytrix caters to a wide range of Sage X3, a Sage Business Cloud Solution, offerings. Our unique GUMU™ integrations include Sage X3 for Sage CRMSalesforce.com, Dynamics 365 CRM and Magento eCommerce along with Implementation and Technical Support worldwide for Sage X3. Currently we are Sage X3 Implementation Partner in East Africa, Middle East, Australia, Asia, US, UK. We also offer best-in-class Sage X3 customization and development services, integrated applications such as POS | WMS | Payment Gateway | Shipping System | Business Intelligence | eCommerce and have developed add-ons such as Catch – Weight  and Letter of Credit and India Legislation for Sage X3 to Sage business partners, end users and Sage PSG worldwide.

Greytrix is a recognized Sage champion ISV Partner for GUMU™ Sage X3 – Sage CRM integration also listed on Sage Marketplace; GUMU™ integration for Sage X3 – Salesforce is a 5-star rated app listed on Salesforce AppExchange and GUMU™ integration for Dynamics 365 CRM – Sage ERP listed on Microsoft AppSource.

For more information on Sage X3 Integration and Services, please contact us at x3@greytrix.com, We will like to hear from you.

How to resolve error: “In the current stage of CRM project ‘sending a quote’ purchase cannot be carried”

$
0
0

Many of the business process works on the basis of customer relationship projects which will then continue in sale cycle. As we all know the use of this function is to manage projects, which may also be referred to as “opportunities” or other various terms. Their objective is to manage the characteristics and stages in a sales cycle.

A project is also a special location for the creation of tracking and creates quote. We can create the quotes from the project and then can continue sales order cycle from the created quote.

We can also create the back to back order from the sales order which will created from quote and projects. But while creating the back to back order sometimes we face error as “Field PJTH(project code):In the current stage of CRM project ‘sending a quote’ purchase cannot be carried” if that sales order is created from quote and respective quote is created from the project. In this blog we will see how to resolve the below error which may occurs while creating the back-to-back order from the sales order. Check below screen shot for details.

Fig: Back-To-Back order issue

First will check how to create the projects > quotes > sales order. To create the project you need to navigate to Customer relation module >> Project screen. To create the project add all the mandatory details on the project screen and click on create button to create the project. Once the project is created you can use “Quote” button to create the sales quote from that project. Kindly check below screen shot for details.

Fig: Project

Once you create the quotation you can use the “Order” button to create the order from the quote screen.

You can follow below link to know how to setup the back-To-back order in sage x3:

Back-to-back-order or Drop Shipment Setup in Sage ERP X3

Now if you faced the above mentioned error i.e. (Field PJTH(project code):In the current stage of CRM project ‘sending a quote’ purchase cannot be carried”) while creating the back to back to order then just go back to the respective project code. Open tab “before sale stages” and checked the flag of “Phase end” is selected or not if that flag is not selected then select the flag on i.e. just tick the check box. Check below screen shot for details.

Fig: Project

Save that project and then try to create back to back order again from the respective sales order. This will now allow you to create the back-to-back order from the sales order successfully.

This how the simple setting of phase end in project will helps to resolve the error which restricted the back to back order creation.

About Us

Greytrix – a globally recognized and one of the oldest Sage Development Partner is a one-stop solution provider for Sage ERP and Sage CRM organizational needs. Being acknowledged and rewarded for multi-man years of experience, we bring complete end-to-end assistance for your technical consultations, product customizations, data migration, system integrations, third-party add-on development and implementation competence.

Greytrix caters to a wide range of Sage X3, a Sage Business Cloud Solution, offerings. Our unique GUMU™ integrations include Sage X3 for Sage CRMSalesforce.com, Dynamics 365 CRM and Magento eCommerce along with Implementation and Technical Support worldwide for Sage X3. Currently we are Sage X3 Implementation Partner in East Africa, Middle East, Australia, Asia, US, UK. We also offer best-in-class Sage X3 customization and development services, integrated applications such as POS | WMS | Payment Gateway | Shipping System | Business Intelligence | eCommerce and have developed add-ons such as Catch – Weight  and Letter of Credit and India Legislation for Sage X3 to Sage business partners, end users and Sage PSG worldwide.

Greytrix is a recognized Sage champion ISV Partner for GUMU™ Sage X3 – Sage CRM integration also listed on Sage Marketplace; GUMU™ integration for Sage X3 – Salesforce is a 5-star rated app listed on Salesforce AppExchange and GUMU™ integration for Dynamics 365 CRM – Sage ERP listed on Microsoft AppSource.

For more information on Sage X3 Integration and Services, please contact us at x3@greytrix.com, We will like to hear from you.

Bad debt management in Sage X3

$
0
0

Sage X3 provides a feature in which you can manage the entire bad debts process, which includes defining the types of bad debts managed like impairment, doubtful receivables, and write-offs and the automatic journals and analytical dimensions applied for journal entries.

There is a setup screen Bad debt term’s function (GESBDT) to create the terms to apply in calculating bad debt values.

Fig: Bad debt terms

Path: All > Setup > Financials

In Bad debts management (BADBTGEN), you can define which company and which bad debt management rule is used, select which open items are used to create new bad debts, and select the accounting date. The Generation type is always Debit/Credit.

Fig: Bad debt management

Path: All > Setup > Financial>Closing processes

This new functions is protected by the BADBT – Bad debt management activity code.

Use this function to create journal entries based on late charges calculated according to the terms defined in the Bad debt terms function (GESBDT).

Bad debt is an account receivable due to a business when the repayment of credit previously extended to a customer is estimated to be potentially uncollectible. Bad debt is a contingency that must be accounted for by all businesses that extend credit to customers because there is always a risk that payments will not be received.

To generate a list of open items to consider, select criteria such as company, bad debt rule, reference date, number of days, site, etc.

The Bad debt selection screen opens to display open items that are eligible for bad debts, grouped by company. If a bad debt has already been issued for an open item, the already processed column displays a value. On the click of OK button below selection screen is displayed in which you can select transaction.

Fig: Bad debt selection

Path: Financials > Utilities > Miscellaneous > Control account transfer

This screen displays open items eligible for bad debt management based on your search criteria. Open items are grouped by customer, site and currency and the data displayed in the grid cannot be modified except for the Percentage column, which is always a percentage of the Item balance.

From the Action icon on each line, you can view the original invoice, the original journal entry or the analytical dimensions. By default, the analytical dimensions for the company display. You can change these for the open item, but you must create the bad debt before closing the Analytical allocations screen to apply you changes.

Open items with a temporary balance are highlighted in pink.

You can select all open items or individual items by selecting Yes or No from the Select column.

When you click Create, a journal entry is created for each selected open item. A new screen opens where you can select the Accounting date. The Generation type is always Debit/Credit and cannot be modified

Using Bad debts management you can track and record your bad debts in X3 system. Hope this blog helps you in accounting your Bad debts more efficiently!

About Us

Greytrix – a globally recognized and one of the oldest Sage Development Partner is a one-stop solution provider for Sage ERP and Sage CRM organizational needs. Being acknowledged and rewarded for multi-man years of experience, we bring complete end-to-end assistance for your technical consultations, product customizations, data migration, system integrations, third-party add-on development and implementation competence.

Greytrix caters to a wide range of Sage X3, a Sage Business Cloud Solution, offerings. Our unique GUMU™ integrations include Sage X3 for Sage CRMSalesforce.com, Dynamics 365 CRM and Magento eCommerce along with Implementation and Technical Support worldwide for Sage X3. Currently we are Sage X3 Implementation Partner in East Africa, Middle East, Australia, Asia, US, UK. We also offer best-in-class Sage X3 customization and development services, integrated applications such as POS | WMS | Payment Gateway | Shipping System | Business Intelligence | eCommerce and have developed add-ons such as Catch – Weight  and Letter of Credit and India Legislation for Sage X3 to Sage business partners, end users and Sage PSG worldwide.

Greytrix is a recognized Sage champion ISV Partner for GUMU™ Sage X3 – Sage CRM integration also listed on Sage Marketplace; GUMU™ integration for Sage X3 – Salesforce is a 5-star rated app listed on Salesforce AppExchange and GUMU™ integration for Dynamics 365 CRM – Sage ERP listed on Microsoft AppSource.

For more information on Sage X3 Integration and Services, please contact us at x3@greytrix.com, We will like to hear from you.

How to display user signature pending for approval to the left list of any transaction

$
0
0

Signature workflow feature of Sage X3 helps in tracking of transactions. Sometimes there might be a requirement if the end user needs to add additional field in left list of any transaction which will display user’s name for whom the signature is pending for approval. We can achieve this by using the following steps.

Consider a purchase order transaction in which the signature workflow is active.

Navigate to All -> Development -> Data and parameters -> Tables

Fig: Workflow tracking archive table

Enter the table code “AWRKHISSUI” as shown in above figure.

This table holds the tracking data for signature workflows.

Fig: Adding new index

Go to “Index” section of the “AWRKHISSUI” table and add new index as shown above which consists of combination of “CLEDEC” and “FLGSIG” field. “CLEDEC” field represents the transaction number of any transaction and “FLGSIG” field represents the signature flag.

Navigate to All -> Development -> Script Dictionary -> Objects

Fig: Opening table in Object

As we are considering purchase order transaction, so enter its object code and go to its “Environment” section in which we need to add workflow tracking archive table and the index we created above with the expression as “[F:POH]POHNUM;3” as shown in above figure, where POHNUM represents transaction number field and “3” is signature field which will represent “To be signed” status for the user signature pending in the workflow.

Fig: Adding new field to selection

Go to “Selection” section in the object screen and add the table “AWRKHISSUI”, User signature pending field “DEST” which will display for whom the signature is pending for approval, as show in above figure.

Navigate to All -> Setup -> Workflow -> Workflow rules

Fig: Workflow rule

As shown above, select the purchase order workflow code which is “POHSIG” and jump to the assignment rules selected for the workflow. Here, it is “YPOHSIG”.

Fig: User assignment values

Add the desired users in the values of assignment rule as shown in above figure.

Now, if we navigate to Purchase order transaction, create one transaction and check its signature circuit, we will be able to see “YUSR1” which is first user yet to be signed as shown in below figure.

Fig: Signature circuit (a)

Since, “YUSR1” is yet to be signed. Hence, we are able to see “YUSR1” in “User Signature pending” field of left list.

Fig: User1 to be signed

After Signature of first user, that is “YUSR1”, if we open signature circuit, we will be able to see second user “YUSR2” is yet to be signed as shown in below figure.

Fig: Signature Circuit (b)

And also we can see “YUSR2” in left list of transaction as expected in the below figure for that transaction.

Fig: User2 to be signed

This blog helps us to add additional field to the left list of any transaction showing which user’s approval is pending for that transaction.

About Us

Greytrix – a globally recognized and one of the oldest Sage Development Partner is a one-stop solution provider for Sage ERP and Sage CRM organizational needs. Being acknowledged and rewarded for multi-man years of experience, we bring complete end-to-end assistance for your technical consultations, product customizations, data migration, system integrations, third-party add-on development and implementation competence.

Greytrix caters to a wide range of Sage X3, a Sage Business Cloud Solution, offerings. Our unique GUMU™ integrations include Sage X3 for Sage CRMSalesforce.com, Dynamics 365 CRM and Magento eCommerce along with Implementation and Technical Support worldwide for Sage X3. Currently we are Sage X3 Implementation Partner in East Africa, Middle East, Australia, Asia, US, UK. We also offer best-in-class Sage X3 customization and development services, integrated applications such as POS | WMS | Payment Gateway | Shipping System | Business Intelligence | eCommerce and have developed add-ons such as Catch – Weight  and Letter of Credit and India Legislation for Sage X3 to Sage business partners, end users and Sage PSG worldwide.

Greytrix is a recognized Sage champion ISV Partner for GUMU™ Sage X3 – Sage CRM integration also listed on Sage Marketplace; GUMU™ integration for Sage X3 – Salesforce is a 5-star rated app listed on Salesforce AppExchange and GUMU™ integration for Dynamics 365 CRM – Sage ERP listed on Microsoft AppSource.

For more information on Sage X3 Integration and Services, please contact us at x3@greytrix.com, We will like to hear from you.


How to solve blocking message ” The envelope must be approved before the fiscal year budget can be approved ” while submitting budget for approval

$
0
0

In sage x3, we have a budget envelopes which is used to plan operating or investment expenses that can extend to one or multiple fiscal years defined by the entry of the envelope’s start and end dates.

It also includes the concept of  budget type, budget code and project.

Budget type: The budget type determines whether the envelope we are using is annual or multi-annual.

Project: A project can be defined for a site, a company or be transverse, i.e. defined for a group of companies or sites.

Budget code: This budget code define if the tracking level is the site or the company. Depending on this rule, the envelope is attached either to a company or a site.

      In some envelope we can attach project. The parameter named as GDDPRJENV is used to determine  whether the attachment of an envelope to a project is mandatory or optional. In this case, some envelopes can be attached to a project while others are not.

Project and envelope definition levels:

The project, budget and budget line definition level follows the following management rules:

  1. If a project is attached to a site, the linked envelopes are attached to the same site.
  2. If a project is attached to a company, the linked envelopes are attached to the same company.
  3. If a project is attached to a group of companies, the linked envelopes are attached to one of the companies belonging to this group or to a site of one of the companies from this group, depending on the budget code characteristics.
  4. If a project is attached to a group of sites, the envelopes are necessarily attached to one of the sites from this group.  The budget code must be consistent.

Budgets by fiscal year are distributed throughout budget lines, by budget account and by recipient entity.

          Once the budget creation is complete, the approval process of envelopes, budgets and budget lines makes it possible to set the validated amount of determined forecasts. The commitment entry (Purchase requests, orders and invoices) can only be carried out after budget line approval.

Steps:

Navigate to: > Operating Budgets > Budget Management > Budget Envelopes

Create a new budget envelope. Select the budget type, budget code, project, company and also enter the envelope amount and budget amount. Refer the below screenshot.

Fig01: Budget Envelop
Fig02: Budget Envelop screen

Once the budget envelope is created , it is sent for approval, so click on submit for approval button. Refer below screenshot

Fig03: Submit for approval and message

On click of submit for approval button we will get the above message and it wont go for approval. We can see the status as Entered.

To Solve that:

Navigate to : Set up > Parameter values

 Go to chapter GDD( i.e Operating budget) and group GDD

 Set the value of parameter GDDAPPENV to No.

Fig04: Parameter values

Now click on submit for approval button.

Fig05: Budget envelopes status

Here, we can see the status has changed to “to be approved” which means the budget has been sent for approval.

After approval, any modification of budgeted amounts is submitted to budget reviews in order to track all the modifications applied after approval.

This blog helps to solve the blocking message The envelope must be approved before the fiscal year budget can be approved, while submitting the budget for approval.

About Us

Greytrix – a globally recognized and one of the oldest Sage Development Partner is a one-stop solution provider for Sage ERP and Sage CRM organizational needs. Being acknowledged and rewarded for multi-man years of experience, we bring complete end-to-end assistance for your technical consultations, product customizations, data migration, system integrations, third-party add-on development and implementation competence.

Greytrix caters to a wide range of Sage X3, a Sage Business Cloud Solution, offerings. Our unique GUMU™ integrations include Sage X3 for Sage CRMSalesforce.com, Dynamics 365 CRM and Magento eCommerce along with Implementation and Technical Support worldwide for Sage X3. Currently we are Sage X3 Implementation Partner in East Africa, Middle East, Australia, Asia, US, UK. We also offer best-in-class Sage X3 customization and development services, integrated applications such as POS | WMS | Payment Gateway | Shipping System | Business Intelligence | eCommerce and have developed add-ons such as Catch – Weight  and Letter of Credit and India Legislation for Sage X3 to Sage business partners, end users and Sage PSG worldwide.

Greytrix is a recognized Sage champion ISV Partner for GUMU™ Sage X3 – Sage CRM integration also listed on Sage Marketplace; GUMU™ integration for Sage X3 – Salesforce is a 5-star rated app listed on Salesforce AppExchange and GUMU™ integration for Dynamics 365 CRM – Sage ERP listed on Microsoft AppSource.

For more information on Sage X3 Integration and Services, please contact us at x3@greytrix.com, We will like to hear from you.

To Design the screen with the responsive screen

$
0
0

In latest version of the Sage X3 Patch 23, we have new feature of designing in the using the badge as shown below.

On every screen we have drop-down as shown below:

Fig : Screen with badge option

This will display the below page as below, this will hold the panel with the sections, block and the fields:

Fig: Badge screen

From this screen, we will be able to change the locations of the screens with the below steps:

On the left panel you will able to see each and every screen, blocks and the fields according to that we would be able to the change the dimensions.

Screens:

Initially we will start with the screen, where we have two different options to arrange the objects within the tabs and screen with the columns and stacked.

Column: In the column options, all the fields in that particular screen will be arranged in the column manner which are mentioned in the decimal as shown below.

Columns flag is “ON”, this would arrange the blocks in the below shown format.

Fig: Column format

If the column flag is “OFF”, the arrangement can be done in the below format. Where the Block in the screen will be displayed one after the other.

Fig: Column off

We have another option of the Stacked which have some different arrangement of the fields, in this option the field which are present in same line will align one below the other. On the one click all the fields which are having same line number will be brought one below the other.

As per below screenshot the arrangement of field is done on one below the other as shown below.

Fig: Stacked

In case of the stacked in turn off it would bring the field as per mention in the screen master.

Fig: Non stacked

The same set of the Stacked and Column can also be implemented in the block level as shown below.

Fig: Stacked

In this setup, we can implement column or Stacked entirely on the screen that is all the blocks mentioned in the screen will hold in the manner as mentioned in the screen. Hence there is no need to go on each block and apply this setup it would be implemented to all the blocks present in the screen.

In case if we need specific block to behave in different manner then the screen setup then we can make the flag change to arrange the objects in that manner.

Display mode:

There are two more option where we can hide the fields from screens using the badge as shown below.

We have option of hiding the field from the desktop mode and display in mobile mode. Or we have another option to hide from mobile mode and display in the Desktop mode.

Fig: Options

We can hide from the both mode, desktop and mobile.

We have one more option to declare any field as last line on the screen. Hence if we click on the below option then all the remaining field would be shifted to next line.

Fig: Options

The above process will help us to make the movement of field , hide and display of field as per the UI needed.

About Us

Greytrix – a globally recognized and one of the oldest Sage Development Partner is a one-stop solution provider for Sage ERP and Sage CRM organizational needs. Being acknowledged and rewarded for multi-man years of experience, we bring complete end-to-end assistance for your technical consultations, product customizations, data migration, system integrations, third-party add-on development and implementation competence.

Greytrix caters to a wide range of Sage X3, a Sage Business Cloud Solution, offerings. Our unique GUMU™ integrations include Sage X3 for Sage CRMSalesforce.com, Dynamics 365 CRM and Magento eCommerce along with Implementation and Technical Support worldwide for Sage X3. Currently we are Sage X3 Implementation Partner in East Africa, Middle East, Australia, Asia, US, UK. We also offer best-in-class Sage X3 customization and development services, integrated applications such as POS | WMS | Payment Gateway | Shipping System | Business Intelligence | eCommerce and have developed add-ons such as Catch – Weight  and Letter of Credit and India Legislation for Sage X3 to Sage business partners, end users and Sage PSG worldwide.

Greytrix is a recognized Sage champion ISV Partner for GUMU™ Sage X3 – Sage CRM integration also listed on Sage Marketplace; GUMU™ integration for Sage X3 – Salesforce is a 5-star rated app listed on Salesforce AppExchange and GUMU™ integration for Dynamics 365 CRM – Sage ERP listed on Microsoft AppSource.

For more information on Sage X3 Integration and Services, please contact us at x3@greytrix.com, We will like to hear from you.

Approved Label in Sage X3

$
0
0

Printing & applying labels on the products helps user to trace the inventory. This help overall business to track in an out of the stock. In our last blog we have shown you how we have developed rejection label. This blog will help you to understand another label which is Approved Label. Whenever a company manufactured or procured some inventory from suppliers, company has to do quality process for those inventory before selling it further. So using Quality control module in Sage X3, users actually does the quality check of the inventory and segregate the stock based on the parameters. So the stock which gets approved, user apply the label which is called as Approved label where data is getting displayed from the Quality Analysis request entry of the Quality Control and PO receipt screen.

Refer below identification code for product status)

  1. “A “indicates acceptance status for the product.
  2. “Q “indicates pending validation status for the product.
  3. “R “indicates the Rejection status for the product.

Approved Labels will be displayed based on the Qty present in the “Quantity Qualified PAC” field of Quality Control screen.

Now let’s see how the data will be displayed from Purchase Receipt and Quality Control screen.

According to setup, once the user creates a Receipt entry from the PO with the status “Q” then only the Analysis request gets created automatically. (Refer below screenshot for more Clarification)

New Stuff: To Design the screen with the responsive screen

Quality Control Screen

If you can see in the above screenshot, in the Quality control screen, the Analysis request has been created successfully based on the Purchase Receipt entry also we have highlighted the same Receipt number with the blue Border and the Analysis request with the Red Border for your reference.

Now as per the current client’s requirement, the “Approved label” should be printed based on the Qty Present in the “Quantity Qualified PAC” field from the detail line -> Enter Quality Control Detail -> Quantity Qualified PAC field , if 10 Qty is present in the “Quantity Qualified PAC” field then as per the qty 10 labels will be printed respectively for each Product.

And Approved Qty will be displayed based on the qty entered in the “Quantity Qualified STK” field in the Quality Control screen. Exact path for the Approved Quality is Control screen -> detail line -> Enter Quality Control Detail -> Quantity Qualified STK field.

Approved Label
Approved Label

Refer below details of some fields and mappings for each field of Approved label.

  1. APPROVED: Hardcoded Text.
  2. Product Name: – All –Stock—Quality Control –Product (need to display Product description field)
  3. A.R NO: – All –Stock—Quality Control –Analysis Request
  4. Container No: – This will be the “Quantity Qualified PAC” field value that needs to be considered here and based on the same, the number of Labels should be displayed.
  5. Assay: All –Stock—Quality Control –Quality control Detail-Action button—Quality control–Assay

By using the Approved label concept, the user can print labels product-wise based on the Qty present in the “Quantity Qualified PAC” field of Quality Control screen along with the exact Approved Qty for each label and above mentioned details.

Restriction on Purchase/Sales transactions on the basis of PAN No

$
0
0

In Sage X3, we have a standard “PAN No” field in the Customer and Supplier master. One of our client requested to add one field i.e. “(Total) Invoice Amount” in the header level of Sales Invoice, Sales Order, Purchase Order and Purchase Invoice transaction screens which will reflect the total amount booked for the respective customer/supplier under current fiscal year and this customization will work on the basis of PAN No saved in the Customer/Supplier master.

For amount calculation of particular customer/supplier, only posted Invoices will be considered. If the total amount exceeds 50 lakhs, then at the time of entry creation, it will generate a pop-up message “TCS is mandatory at tax level 3” for the current transaction.

Now, we will see how this customization will work on Purchase Transactions.

Refer the below screenshot of the Supplier master in which same PAN No “PAN0003” is saved for the suppliers V01994 (TEST 6) and V01995 (TEST 7) and these are the newly created suppliers which are not having any transaction history.

New Stuff: Approved Label in Sage X3

[Supplier Master]
[Supplier Master]

After that we have created and posted a new Purchase Invoice entry of ‘1 lakh’ amount for Supplier V01994.

[Purchase Invoice for Supplier - V01994(1lakh)]
[Purchase Invoice for Supplier – V01994(1lakh)]

If you have observed in the above screenshot, in the header of the invoice, total amount for fiscal year is ‘0’ for the supplier V01994 as it is the first transaction for this supplier. After successfully posting the invoice for V01994, we have created and posted a new Purchase Invoice entry of ’50 thousand’ for supplier V01995.

[Purchase Invoice for Supplier - V01995(50k)]
[Purchase Invoice for Supplier – V01995(50k)]

As you can see in the above screenshot, in the header of the invoice, total amount for fiscal year is ‘1 Lakh’ for the supplier V01995. Because PAN No for both the suppliers is same. So, it is considering 1 lakh of the posted invoice which was created earlier for the supplier V01994.

After this, we have created one more invoice entry for Supplier V01995 with the amount ’50 lakhs’ and posted the same invoice.

[Purchase Invoice for Supplier - V01995(50lakhs)]
[Purchase Invoice for Supplier – V01995(50lakhs)]

After posting the previous invoice, total amount for fiscal year is ‘1,50,000’ for both the suppliers V01995 and V01994.

Now, we will check the working of the condition entered if the total amount exceeds 50 lakhs, then at the time of entry creation, it will generate a pop-up message.

[TCS Mandatory Pop-up Message]
[TCS Mandatory Pop-up Message]

As shown in the above screenshot, we tried to create a new Purchase Order entry for supplier V01994 and total invoice amount for current fiscal year is 51,50,000 rupees as per our previous transactions done for both the suppliers. It has exceeded the 50 lakhs amount limit and due to which we are getting the “TCS is mandatory at Tax Level 3” pop-up message while creating the Purchase Order entry. It will not allow you to create Purchase Order or Invoice transactions for those suppliers until you enter TCS tax rate in the Tax 3 field. Similarly, we will use this customization in the Sales Order and Invoice Transactions on the basis of Customer’s PAN No.

Hence with the help of this customization, Purchase/Sales transactions will be restricted if the total invoice amount of the Supplier/Customer exceeds 50 lakhs on the basis of PAN No.

Error: “Function not defined for the value given..” in Sage X3

$
0
0

In Sage X3, developers can do customization within Sage X3 using development module. Sometimes user reports an error “Function not defined for the given value” whenever he/she tries to use the customization done in Sage X3.

As shown in below screenshot.

New stuff: Restriction on Purchase/Sales transactions on the basis of PAN No

Error
Error

In such case, the first step would be to check the Activity code which is linked to this customization, whether it is active or not at master and then at folder level. If you found it is inactive in either case, then user will get such error.

I will give you step by step how you can check:

  1. Go to Development -> Activity Codes -> Select the custom Activity code on the screen and check for the status. Refer below screen shot
Activity Code Master

2. Then Go to Setup->-General Parameter-> Folder-> Specific Tab as shown in below screenshot.

Folder Master
Folder Master

So here user has to make it as active at both path. So once we make it is active, you would require to do dictionary validation to impact changes across the folder. After executing dictionary validation the error will get resolved.

Copy Project functionality in Sage X3 V12

$
0
0

In Sage X3, version 12, we have so many new features as well as few modules. Project module is one of them. This Projects function is used to manage the elements used with different terms like Business, Projects, Opportunities The basic objective of these projects is to manage the characteristics and stages in a sales cycle.

We can say this is the extension to “Projects” from Customer relation module in older versions of X3. This new module involves new elements along with older ones in “Project Management”. There is a particular structure of each project which includes financial status, revenues, assigned employees details etc.

In V12, we have a separate functionality to copy the structure of one project to another one.

For this, Navigate to: Projects > Projects > Project copy

Below is the screenshot of Project copy screen.

Fig : Criteria
  • Criteria: The basic fields to work with this functionality are:
  • Source project: The project whose structure is to be copied for new project
  • Destination project: If you want to update existing project with the source project then check “Existing project” checkbox and it will allow you to select destination project with existing projects selection list.
  • New project: If you want to create new project with particular name then you can define it here. It will create new project with next sequence number by default.

Key elements of the source project are used as the basis for the destination project. These include the sales and operational sites, and the currency. You can change the sales and operating sites after you create the new project, however you cannot change the currency. You must ensure, that the default values are correct for the new project before you confirm the project copy.

After selection of source and destination projects, you have a choice to modify the structure of source project in order to create new project. Below are the elements, you can edit while creating new project. Here, you can carry the data of source project if required like storage site, dimensions etc.

  • Tasks and Budgets: These sections allow to select (or deselect) individual task and budget lines to copy to the destination project code. The tables in these sections are populated from the structure of the source project.
Fig : Tasks and budgets

After defining all elements, when you click on ‘OK’, new project gets created with the name defined in “New project” field. Refer below screenshot of the log.

  • Additional criteria: This section displays specific options that you can use to control data and can be copied to the destination project code.
Fig : New project

If you check in Project management function, both the projects are similar and newly created project has source project name in screen.

Fig : Source project

Thus, by exactly copying or modifying the existing project structure, you can create replica of that project with your desired naming convention.

About Us

Greytrix – a globally recognized and one of the oldest Sage Development Partner is a one-stop solution provider for Sage ERP and Sage CRM organizational needs. Being acknowledged and rewarded for multi-man years of experience, we bring complete end-to-end assistance for your technical consultations, product customizations, data migration, system integrations, third-party add-on development and implementation competence.

Greytrix caters to a wide range of Sage X3, a Sage Business Cloud Solution, offerings. Our unique GUMU™ integrations include Sage X3 for Sage CRMSalesforce.com, Dynamics 365 CRM and Magento eCommerce along with Implementation and Technical Support worldwide for Sage X3. Currently we are Sage X3 Implementation Partner in East Africa, Middle East, Australia, Asia, US, UK. We also offer best-in-class Sage X3 customization and development services, integrated applications such as POS | WMS | Payment Gateway | Shipping System | Business Intelligence | eCommerce and have developed add-ons such as Catch – Weight  and Letter of Credit and India Legislation for Sage X3 to Sage business partners, end users and Sage PSG worldwide.

Greytrix is a recognized Sage champion ISV Partner for GUMU™ Sage X3 – Sage CRM integration also listed on Sage Marketplace; GUMU™ integration for Sage X3 – Salesforce is a 5-star rated app listed on Salesforce AppExchange and GUMU™ integration for Dynamics 365 CRM – Sage ERP listed on Microsoft AppSource.

For more information on Sage X3 Integration and Services, please contact us at x3@greytrix.com, We will like to hear from you.

How to use packaging for product on Sales order

$
0
0

As we all know the importance of packaging. Packaging refers to the process of designing, evaluating, and producing packages. Packaging is the technology of enclosing or protecting products for distribution, storage, sale, and use. Packaging keeps the product safe during shipment between the manufacturing facility and the retailer and must prevent damage while the product sits on the shelf.

Sage x3 also has in build setting of packaging. In this blog we will see how to setup and how to use the packaging in sales order.

Before we use the packaging function on sales order, we need to first set the setup of packaging and to do the same you can refer our below blog link. Basically, in below blog link we have shown the setup in sage x3 V8 but the same way you can setup in the V12

How to Setup packaging in Version 8 of Sage X3

In above blog you can see the setup of packaging in product category screen but apart from that we need to set the setting in product site as well. At the Product-site level, more specifications can be defined for each product; for example, the Stock detail box can be checked to indicate whether the stock must be displayed in the parcels. Each product for each site can have its own packaging identification code and packaging capacity. To make the setting in product site you may need to navigate.

All >> Common data >> Products >> Product Site.

Fig : Product Site

Now to check its working we need to create the sales order. To do the same navigate to All >> Sales module >> Order.

Fig : Sales order

In the above screen shot you can see sales order created with the order quantity 50. Now to create a packaging first you need to create the delivery from the respective sales order. And before validating the delivery need to create the packaging. See below screen shot for more details.

Fig : Delivery

Packing option will be present in Action button, just click on packing option to open the packaging screen. Once you click on packing button you will get below screen of packaging.

Fig : Packaging

In the above screen shot you can see 5 lines were generated with 10 in the QTY. to pack field (based on the product-site setup). You can also change or modify the QTY and the number of packages as needed.

Once you save this record the number of packages will update in the field “Number Of packages”.

Fig : Packaging no

Once you validate the delivery after creation of package that number of packages will get display in the generated delivery as well.

Fig : Package no on delivery

So that while delivering the product user can manage number of packages for the delivery product. Which will be very helpful to trace the number of product and number of packaging for the respective product.

This how we can use the packaging in sale module.

About Us

Greytrix – a globally recognized and one of the oldest Sage Development Partner is a one-stop solution provider for Sage ERP and Sage CRM organizational needs. Being acknowledged and rewarded for multi-man years of experience, we bring complete end-to-end assistance for your technical consultations, product customizations, data migration, system integrations, third-party add-on development and implementation competence.

Greytrix caters to a wide range of Sage X3, a Sage Business Cloud Solution, offerings. Our unique GUMU™ integrations include Sage X3 for Sage CRMSalesforce.com, Dynamics 365 CRM and Magento eCommerce along with Implementation and Technical Support worldwide for Sage X3. Currently we are Sage X3 Implementation Partner in East Africa, Middle East, Australia, Asia, US, UK. We also offer best-in-class Sage X3 customization and development services, integrated applications such as POS | WMS | Payment Gateway | Shipping System | Business Intelligence | eCommerce and have developed add-ons such as Catch – Weight  and Letter of Credit and India Legislation for Sage X3 to Sage business partners, end users and Sage PSG worldwide.

Greytrix is a recognized Sage champion ISV Partner for GUMU™ Sage X3 – Sage CRM integration also listed on Sage Marketplace; GUMU™ integration for Sage X3 – Salesforce is a 5-star rated app listed on Salesforce AppExchange and GUMU™ integration for Dynamics 365 CRM – Sage ERP listed on Microsoft AppSource.

For more information on Sage X3 Integration and Services, please contact us at x3@greytrix.com, We will like to hear from you.


How to create a Reversing GL journal Entry in X3

$
0
0

Journal entries are records of financial transactions flowing in and out of the business. Journal entries are used to make transfers between nominal accounts. These transactions all get recorded in the book, called the general journal.

Transactions are listed in an accounting journal that shows a company’s debit and credit balances.

Journal entries includes the following main elements like a reference number, a date of journal entry, account name, two separate amount for debit and credit.

Reversing Journals are special journals that are automatically reversed after a specified date. They exist only till that date specified

The purpose of reversing entries is to cancel out certain adjusting entries that were recorded in the previous accounting period.

Create the GL Journal Entry that will be reversed.

Fig 1.1 Creation of Journal Entry With Reversal Details
  • Go to Financials > Journals > Journal entry
  • Create a new GL Journal entry that will be reversed after some days.
  • Select “Yes” in the Reversal drop down and enter the ‘Reversal date’.
  • Click the Create button when finished. Refer Fig 1.1.

Create the reversing entry:

STEP I: 1. Within the GL Journal entry task, select the ‘Reversing’ option from the   Zooms menu in the right list.

Fig 2.1 Click Reversal Option from Zooms Menu

2.Select the Debit / Credit option to post the reversing entry as reversed debits and credits or select Amount / Negative Amount to post the reversing entry as a negative debit and credit.

  • Enter the ‘Reversal Date’
  • Click ‘OK’. Refer Fig 2.2
Fig 2.2 Reversal Parameters

3.Once you click OK the newly created reversal entry will appear on the screen and the ‘Default description’ field will show the original GL Journal number as shown in Fig 2.3

Fig 2.3 After Reversal Journal Entry

4. And original Journal entry changed its status as ‘Reversed’ as in Fig 2.4

Fig 2.4 Status changed to Reversed

STEP II:Users can also reverse a single or multiple entries by using the Reversals function

Navigational Path: Financials > Current Processing’s > Reversals.

This blog helps us to understand how to perform reversing journal entries and  two benefits of using reversing entries are:

  • It greatly reduces the chance of double counting revenues and/or expenses
  • It allows for more efficient processing of the actual invoices that will be processed in the new accounting period.

About Us

Greytrix – a globally recognized and one of the oldest Sage Development Partner is a one-stop solution provider for Sage ERP and Sage CRM organizational needs. Being acknowledged and rewarded for multi-man years of experience, we bring complete end-to-end assistance for your technical consultations, product customizations, data migration, system integrations, third-party add-on development and implementation competence.

Greytrix caters to a wide range of Sage X3, a Sage Business Cloud Solution, offerings. Our unique GUMU™ integrations include Sage X3 for Sage CRMSalesforce.com, Dynamics 365 CRM and Magento eCommerce along with Implementation and Technical Support worldwide for Sage X3. Currently we are Sage X3 Implementation Partner in East Africa, Middle East, Australia, Asia, US, UK. We also offer best-in-class Sage X3 customization and development services, integrated applications such as POS | WMS | Payment Gateway | Shipping System | Business Intelligence | eCommerce and have developed add-ons such as Catch – Weight  and Letter of Credit and India Legislation for Sage X3 to Sage business partners, end users and Sage PSG worldwide.

Greytrix is a recognized Sage champion ISV Partner for GUMU™ Sage X3 – Sage CRM integration also listed on Sage Marketplace; GUMU™ integration for Sage X3 – Salesforce is a 5-star rated app listed on Salesforce AppExchange and GUMU™ integration for Dynamics 365 CRM – Sage ERP listed on Microsoft AppSource.

For more information on Sage X3 Integration and Services, please contact us at x3@greytrix.com, We will like to hear from you.

Advanced bank statement import in Sage X3

$
0
0

Sage X3 provides function to import statements from a file saved on your server or computer. The setup involves technical settings that should be done very carefully.

The import settings are defined in the Bank import settings function (BSIIMPPAR). You cannot change them here. After you enter the code for the Bank import settings, the remaining fields populate based on these settings. These settings are also used for the matching process and for paying invoices.

Navigate to A/P-A/R accounting > Bank transactions > Advanced bank statement import > Bank transactions import 

Click OK to start the import and upload a file from your computer or a server location. A log file displays when the import is complete. For each statement contained in the file, there is a dedicated statement entry. A warning message displays if a file with the same name is imported again.

After importing the statement, use the Bank transaction management function (BSIIMP) to process the statements.

Below are the five functions involved in Bank transactions import.

1. Import transactions

This function imports bank transactions in various electronic formats from one or several bank statement files. These files have been obtained directly from your bank or exported from an online banking tool and saved to your workstation or server. The bank transaction import function (BSIIMPORT) imports these files from their saved location for matching and processing

2. Managing imports and matching

Next, you need to manage how you import and match transactions.

An imported statement can have one of the following statuses:

Not matched: Initial status after import, no matching has been performed.

Matched: Matching or partial matching has been performed for the statement.

Validated: Payments have been generated and the statement is read-only.

Reconcile: The bank statement was imported with Reconciliation only as the flow type. The transaction data has been copied to the Bank statement reconciliation function (RAPBAN). The statement here is read-only.

3. Matching transactions to open items or accounts

This step only applies to the Standard flow type. The imported transactions need to be reviewed and matched to open items or other accounts such as a G/L account, BP account, or a suspense account. Transactions can also be matched to existing payments.

Matching is done in the Process bank transactions screen. You can match items automatically or manually.

Automatic matching: From the Bank transaction management screen, click Start matching to run the process on all unmatched statements in the grid.

Manual matching: From the Action icon menu at the beginning of a line, select Process bank transactions. This opens a new screen where you can review and edit results from automatic matching, perform manual matching and selection, and manual entry.

4. Validating a statement

This step only applies to the Standard flow type. Validating is the final step in the bank import process and generates a payment for transactions matched to open items or BP/GL accounts. After you have validated the statement, you can no longer modify the transactions. The validation is always performed for the entire current statement and depends on the matching status:

5. Manually completing a transaction

This step only applies to the Standard flow type. In certain cases, open items associated with a bank statement transaction might have been settled outside the bank statement import process. In other words, a payment transaction included in the bank statement already exists as a payment.

Hope this blog helps you in understanding Advance bank statement import in detail.

About Us

Greytrix – a globally recognized and one of the oldest Sage Development Partner is a one-stop solution provider for Sage ERP and Sage CRM organizational needs. Being acknowledged and rewarded for multi-man years of experience, we bring complete end-to-end assistance for your technical consultations, product customizations, data migration, system integrations, third-party add-on development and implementation competence.

Greytrix caters to a wide range of Sage X3, a Sage Business Cloud Solution, offerings. Our unique GUMU™ integrations include Sage X3 for Sage CRMSalesforce.com, Dynamics 365 CRM and Magento eCommerce along with Implementation and Technical Support worldwide for Sage X3. Currently we are Sage X3 Implementation Partner in East Africa, Middle East, Australia, Asia, US, UK. We also offer best-in-class Sage X3 customization and development services, integrated applications such as POS | WMS | Payment Gateway | Shipping System | Business Intelligence | eCommerce and have developed add-ons such as Catch – Weight  and Letter of Credit and India Legislation for Sage X3 to Sage business partners, end users and Sage PSG worldwide.

Greytrix is a recognized Sage champion ISV Partner for GUMU™ Sage X3 – Sage CRM integration also listed on Sage Marketplace; GUMU™ integration for Sage X3 – Salesforce is a 5-star rated app listed on Salesforce AppExchange and GUMU™ integration for Dynamics 365 CRM – Sage ERP listed on Microsoft AppSource.

For more information on Sage X3 Integration and Services, please contact us at x3@greytrix.com, We will like to hear from you.

Error: “Too Many Tables open” in Sage X3

$
0
0

Sometimes In sage X3, Developers can do customization within sage x3 using development module and in that they need to open some tables to do some customization in sales quote or sales order or delivery as well as in sales invoice or any sage x3 module.

Sometimes we need to follow sequential operation means first we create sales quote then we create sales order from that sales quote then we need to create transaction from delivery screen then we create invoice for that delivery. In this case, At a time three to four screens like sales order, sales quote, sales delivery and sales invoice. When we open the screen, Standard opens their standard tables for sales quote, sales order, delivery and sales invoice so standard automatically creates invoice using that open tables. These tables will close only when we close those screens.

 So, in this situation sometimes we face an error like “Too many tables open” as shown in figure 1 and stopped the working of standard and crashes the screen. This error arises when a number of tables are opened at a time and not closed ahead. This is a standard error that which occurred when standard finds that many tables are opened.

Fig 1: Error message

To solve this error, we need to follow following steps:

  1. Follow the below path to open the Folders screen to solve this error.
           
    Setup > General parameters > Folders

        In the setup module, In general parameters open the folder generation screen.

  • Go to the Miscellaneous tab and change the value of open tables.

In Folder generation go to the Miscellaneous tab. In the miscellaneous tab there is a field named as ‘Open tables’ as shown in figure 2.

Fig 2 : Open tables field in folder generation screen

We have to increase the value of open tables to solve this error. Just we need to increase the value of open tables and save it. We do not need to do the folder validation. Only you need to save it. When you save it populates one message that is File APL.ini modified as shown in figure 3. It means changes are reflected and saved properly.

Fig 3: Changes in open table field and saved

Now If we follow same procedure to create sales invoice through sales quotes, sales order and delivery sequentially then it does not show any error because now we have increased the value of open tables so at a time that number of tables which is shown in open table field that number of tables can be open at a time. In figure 2 . Value of open tables are 300 so standard can allow 300 tables to be opened at a time.

In this way, by doing above steps we can solve this error.

About Us

Greytrix – a globally recognized and one of the oldest Sage Development Partner is a one-stop solution provider for Sage ERP and Sage CRM organizational needs. Being acknowledged and rewarded for multi-man years of experience, we bring complete end-to-end assistance for your technical consultations, product customizations, data migration, system integrations, third-party add-on development and implementation competence.

Greytrix caters to a wide range of Sage X3, a Sage Business Cloud Solution, offerings. Our unique GUMU™ integrations include Sage X3 for Sage CRMSalesforce.com, Dynamics 365 CRM and Magento eCommerce along with Implementation and Technical Support worldwide for Sage X3. Currently we are Sage X3 Implementation Partner in East Africa, Middle East, Australia, Asia, US, UK. We also offer best-in-class Sage X3 customization and development services, integrated applications such as POS | WMS | Payment Gateway | Shipping System | Business Intelligence | eCommerce and have developed add-ons such as Catch – Weight  and Letter of Credit and India Legislation for Sage X3 to Sage business partners, end users and Sage PSG worldwide.

Greytrix is a recognized Sage champion ISV Partner for GUMU™ Sage X3 – Sage CRM integration also listed on Sage Marketplace; GUMU™ integration for Sage X3 – Salesforce is a 5-star rated app listed on Salesforce AppExchange and GUMU™ integration for Dynamics 365 CRM – Sage ERP listed on Microsoft AppSource.

For more information on Sage X3 Integration and Services, please contact us at x3@greytrix.com, We will like to hear from you.

How to disable the Tax3 field of Sales Order screen if the customer is not TCS Applicable

$
0
0

There was a requirement from the user to add a check box on Customer master as “TCS Applicable” and “Tax Level 3” field of detail line on the Sales Order screen should be activated only when the “TCS Applicable” check box for any customer is ticked, otherwise it should be disabled.

To achieve the above requirement follow the below steps:
Step 1:
Go to OBPC(Customer) window and add a checkbox on header screen and name it as “TCS Applicable” as per below screenshot:

New Stuff: Error: “Too Many Tables open” in Sage X3

Customer Master
Customer Master

Step 2:
Add below code to “SPESOH” script in $APRES_MODIF event:

#####################################################################################

IF !Clalev([F:ZBPC]) : Local File BPCUSTOMER[ZBPC] Endif
FOR [F:ZBPC] WHERE [F:ZBPC]BPCNUM=[M:SOH0]BPCORD

IF[M:SOH0]BPCORD=[F:ZBPC]BPCNUM AND [F:ZBPC]ZTCS <> 2
Diszo [M:SOH4] VACITM3
Endif

NEXT

######################################################################

Step 3:
Compile the “SPESOH” script.

Output:

Output
Output

In the above screenshot the “Tax level 3” field is disabled because the customer is not “TCS Applicable” (TCS Applicable check box is not checked for this customer in cusstomer master).

In this way we can activate a tax field only when the selected Customer is TCS Applicable.

About Us

Greytrix – a globally recognized and one of the oldest Sage Development Partner is a one-stop solution provider for Sage ERP and Sage CRM organizational needs. Being acknowledged and rewarded for multi-man years of experience, we bring complete end-to-end assistance for your technical consultations, product customizations, data migration, system integrations, third-party add-on development and implementation competence.

Greytrix caters to a wide range of Sage X3, a Sage Business Cloud Solution, offerings. Our unique GUMU™ integrations include Sage X3 for Sage CRMSalesforce.com, Dynamics 365 CRM and Magento eCommerce along with Implementation and Technical Support worldwide for Sage X3. Currently we are Sage X3 Implementation Partner in East Africa, Middle East, Australia, Asia, US, UK. We also offer best-in-class Sage X3 customization and development services, integrated applications such as POS | WMS | Payment Gateway | Shipping System | Business Intelligence | eCommerce and have developed add-ons such as Catch – Weight  and Letter of Credit and India Legislation for Sage X3 to Sage business partners, end users and Sage PSG worldwide.

Greytrix is a recognized Sage champion ISV Partner for GUMU™ Sage X3 – Sage CRM integration also listed on Sage Marketplace; GUMU™ integration for Sage X3 – Salesforce is a 5-star rated app listed on Salesforce AppExchange and GUMU™ integration for Dynamics 365 CRM – Sage ERP listed on Microsoft AppSource.

For more information on Sage X3 Integration and Services, please contact us at x3@greytrix.com, We will like to hear from you.

How to set a sign(+,-) for an account used in a budget in Sage X3

$
0
0

budget is an estimation of revenue and expenses over a specified future period of time. Budgeting is an important aspect to any company, no matter how big or small, in order to see where the company has been and to plan accordingly for the future

Analytical budgets provide the basis for managing and controlling a group of transactions for a specific chart of accounts and dimension types within the parameters of defined controls. Also analytical budget must be associated with a chart of accounts.

In Sage X3, the budget set up provides this basis of managing and controlling a group of transactions based on the criteria of the managers of the chart of accounts. Budgets are likely approved by the management of the company and reflect expectations for a period of time within a specific region or product line.

The analytical budget in Sage X3 will need to be set for a site or company.

In the case of a retail company budgeted revenue and expense expectations can be laid out by store or region. The budget for an entire company to become profitable or achieve a certain objective set by management (i.e. product development).

Now follow the below steps to assign the particular sign for a budget account :

Step1: Create the budget setup. For this navigate to : Financial -> Budgets  -> Budgets misc. operations screen.

Create new budget setup. Refer below screen:

Fig01: Budget misc. operations screen

As you can see in the above screen shot the account which is used in the budget setup ‘17000’. Now navigate to that account and assign the sign to it.

Navigate to: Common data -> G/L accounting table -> General -> Accounts

Now go to that account which is used in the budget setup screen i.e ‘17000’. In the account screen

  1. Go to the general tab.
  2. Click on the Classification field.
  3. Click on the classification field’s action button. Under that click on the classification button. Refer below screen shot.
Fig02: Accounts screen

4. As you can see in the above screen shot, we have taken classification as ‘1’. Now check under this classification (1) what default sign is set there. If it’s Default sign is Credit and Analytical sign is expense . Refer below screen shot.

Fig03: Account Classes screen

Now to see the effect of above setup. Create new Customer BP Invoice transaction with same account and dimension  which is setup in the budget setup screen (Refer fig01) and check in the budget entry screen there you will get the total amount in the negative sign(-).

Same thing if you set default sign as ‘Debit’ and Analytical sign as ‘revenue’ in the account classification set . Then in the Budget entry you will get the amount in positive sign (+).

Note: If Account classification’s  default sign is ‘Credit’ and Analytical sign is ‘Expense’ this means credit value decreases and debit value increases.

Same thing if default sign is Debit and analytical sign is ‘revenue’ then it means credit values increase and debit value decreases.

In this way , we can assign a particular sign to an account which is used in a budget entry.

About Us

Greytrix – a globally recognized and one of the oldest Sage Development Partner is a one-stop solution provider for Sage ERP and Sage CRM organizational needs. Being acknowledged and rewarded for multi-man years of experience, we bring complete end-to-end assistance for your technical consultations, product customizations, data migration, system integrations, third-party add-on development and implementation competence.

Greytrix caters to a wide range of Sage X3, a Sage Business Cloud Solution, offerings. Our unique GUMU™ integrations include Sage X3 for Sage CRMSalesforce.com, Dynamics 365 CRM and Magento eCommerce along with Implementation and Technical Support worldwide for Sage X3. Currently we are Sage X3 Implementation Partner in East Africa, Middle East, Australia, Asia, US, UK. We also offer best-in-class Sage X3 customization and development services, integrated applications such as POS | WMS | Payment Gateway | Shipping System | Business Intelligence | eCommerce and have developed add-ons such as Catch – Weight  and Letter of Credit and India Legislation for Sage X3 to Sage business partners, end users and Sage PSG worldwide.

Greytrix is a recognized Sage champion ISV Partner for GUMU™ Sage X3 – Sage CRM integration also listed on Sage Marketplace; GUMU™ integration for Sage X3 – Salesforce is a 5-star rated app listed on Salesforce AppExchange and GUMU™ integration for Dynamics 365 CRM – Sage ERP listed on Microsoft AppSource.

For more information on Sage X3 Integration and Services, please contact us at x3@greytrix.com, We will like to hear from you.

Viewing all 1519 articles
Browse latest View live


<script src="https://jsc.adskeeper.com/r/s/rssing.com.1596347.js" async> </script>