Quantcast
Channel: Sage X3 – Tips, Tricks and Components
Viewing all 1519 articles
Browse latest View live

How to make multiple selection of transaction in single field

$
0
0

In Sage X3, there are various types of transactions for different modules such as sales order, purchase order, sales invoice, purchase invoice, customer BP invoice, etc. Sage X3 have feature of selection that is a “lookup” button on fields which helps the user to choice a particular selection. Sometimes there may be requirement for particular customized screen where it is required to have multiple selection of various transactions on single field.

This can be achieved by adding few fields and manipulation of data into those fields. First of all, the datatype of the selection field should be “VCR” and the parameters should be blank.Sage X3 allows to have two types of selections, that is object based selection and non-object based selection. Non-object based selections can be achieved by using SELLINA which requires one action and specific script which possess the code to fetch data from existing tables and display them. It elongates the process and time consumption for filtering the data from tables, hence we will use object based selection. Object based selections basically work on objects of that transaction and field which stores entry transaction number of that transaction. For obtaining multiple selection in single field using object based selection, follow below steps. Consider a test screen which contains fields for selecting different types of transactions such as sales invoice, customer BP invoice, sales order, purchase order, etc.

Fig 01: Script Dictionary

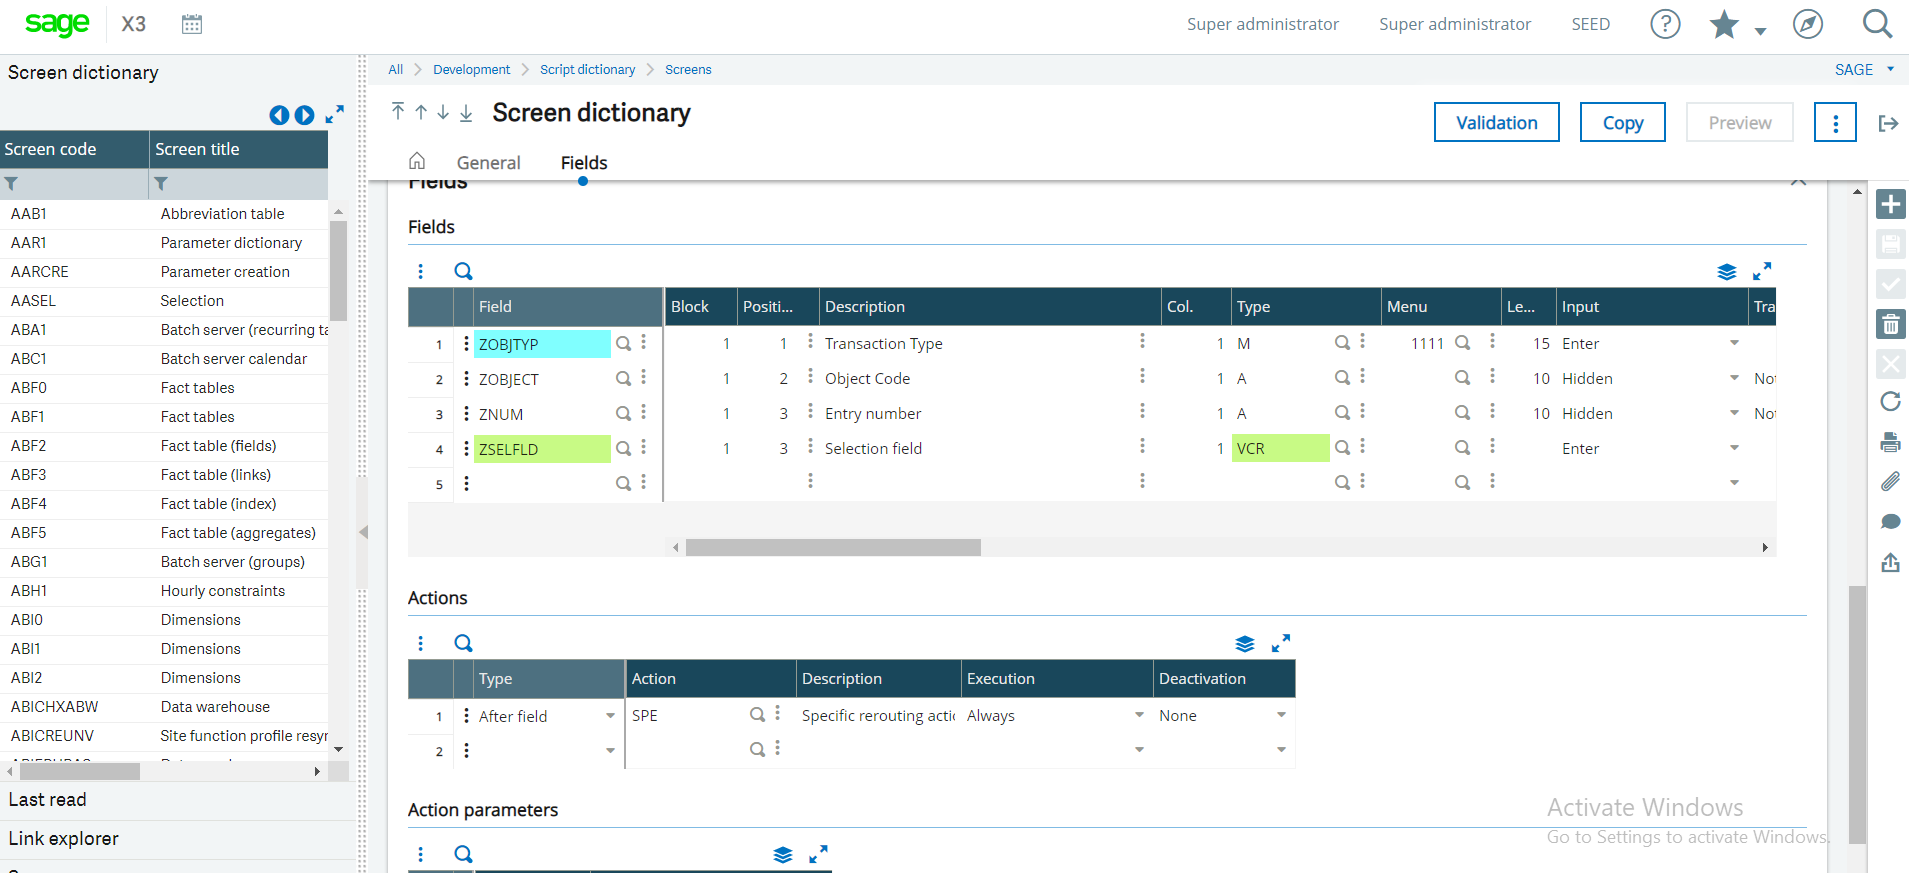
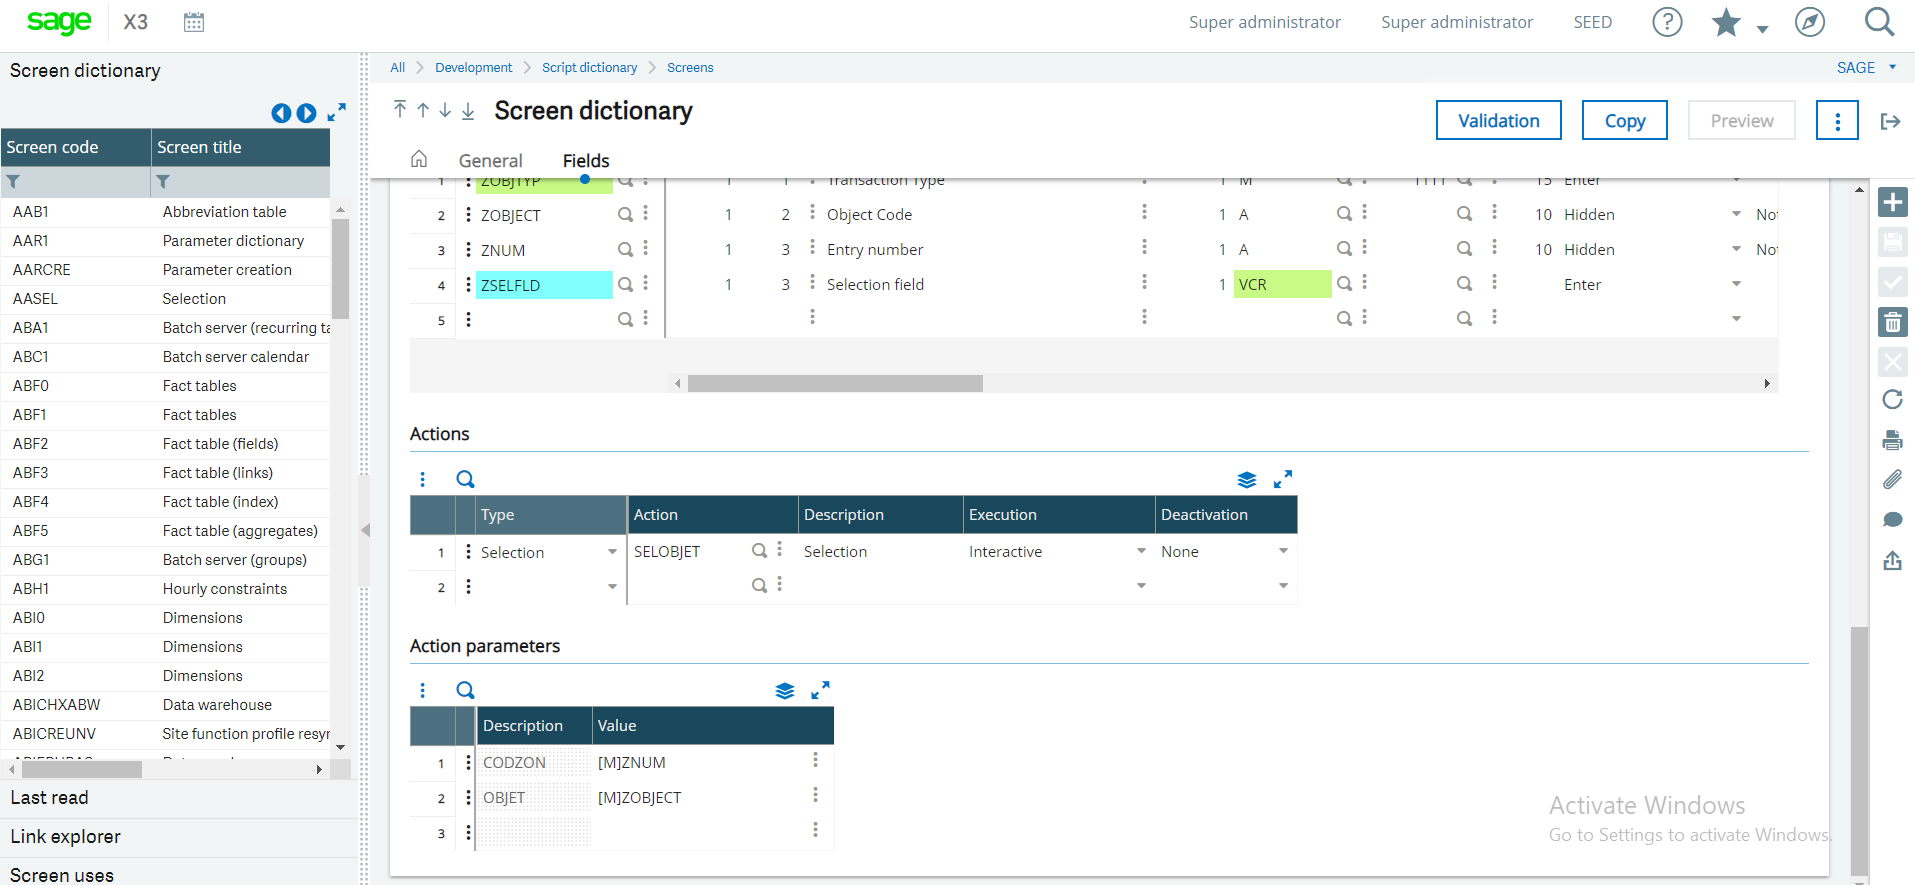
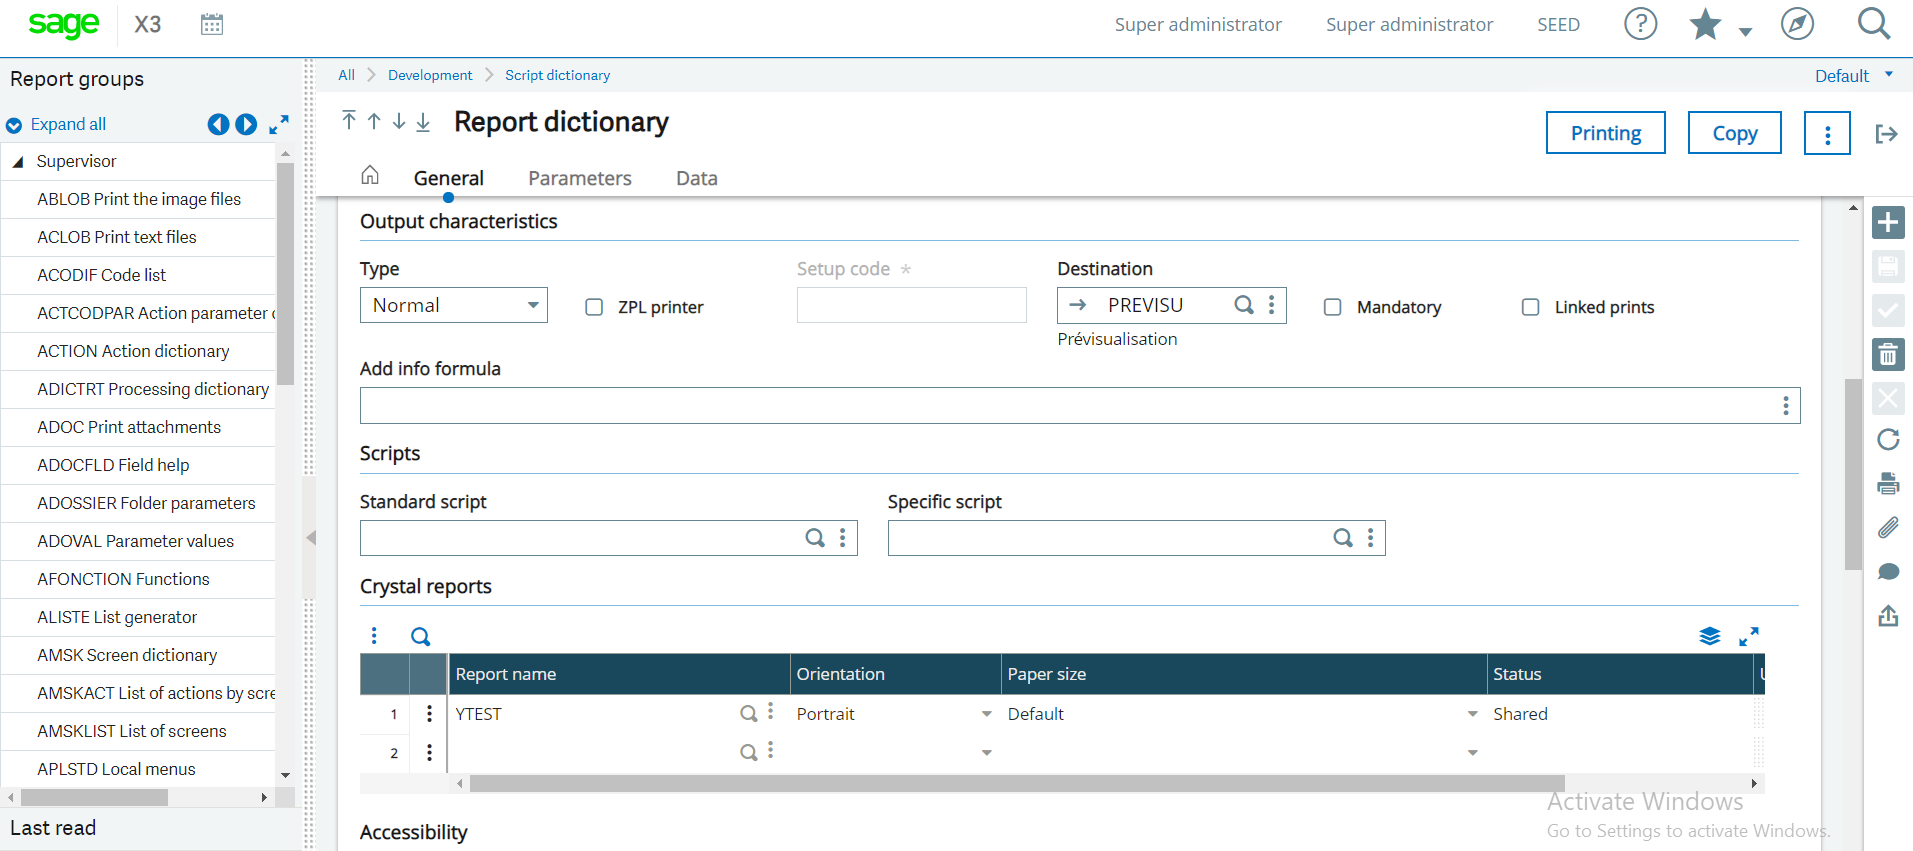
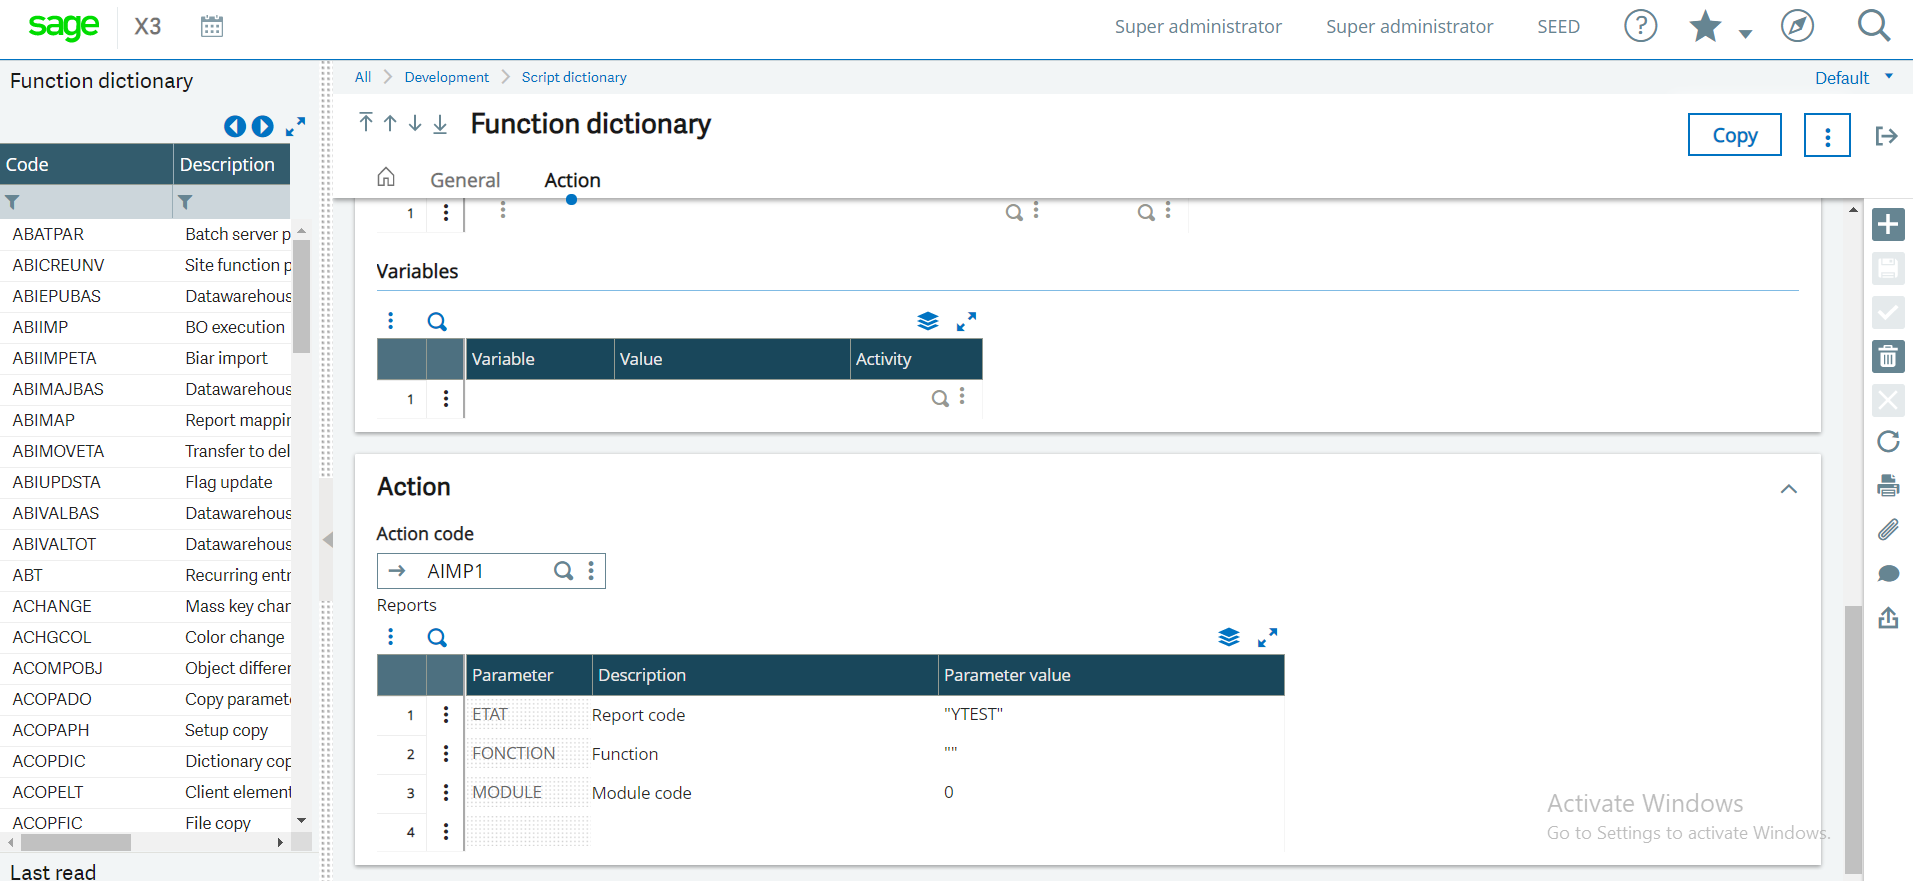
Add action type as “Selection” and action as “SELOBJET” as shown in below figure. SELOBJET is predefined action for selection which requires object code and field which stores entry transaction number. Since object code and field storing transaction number for each transaction is different so will store it in another field, here as “Entry number” field. For example, if its Sales order, then it would be storing “SOHNUM”, if purchase order then “POHNUM” which will be passed in action parameters of selection field in mask of added field, here “ZNUM”. Similarly, for different transactions object code and transaction number fields will be different. As can be seen in below figure in “CODZON” action parameter ZNUM is passed and in OBJET parameter ZOBJECT is passed.

Fig 02: Screen Dictionary

Once done with the above changes validate the screen and the globally validate the window associated with that screen. Navigate to the test screen, you will be able to see the below figure.

Fig 03: Test screen

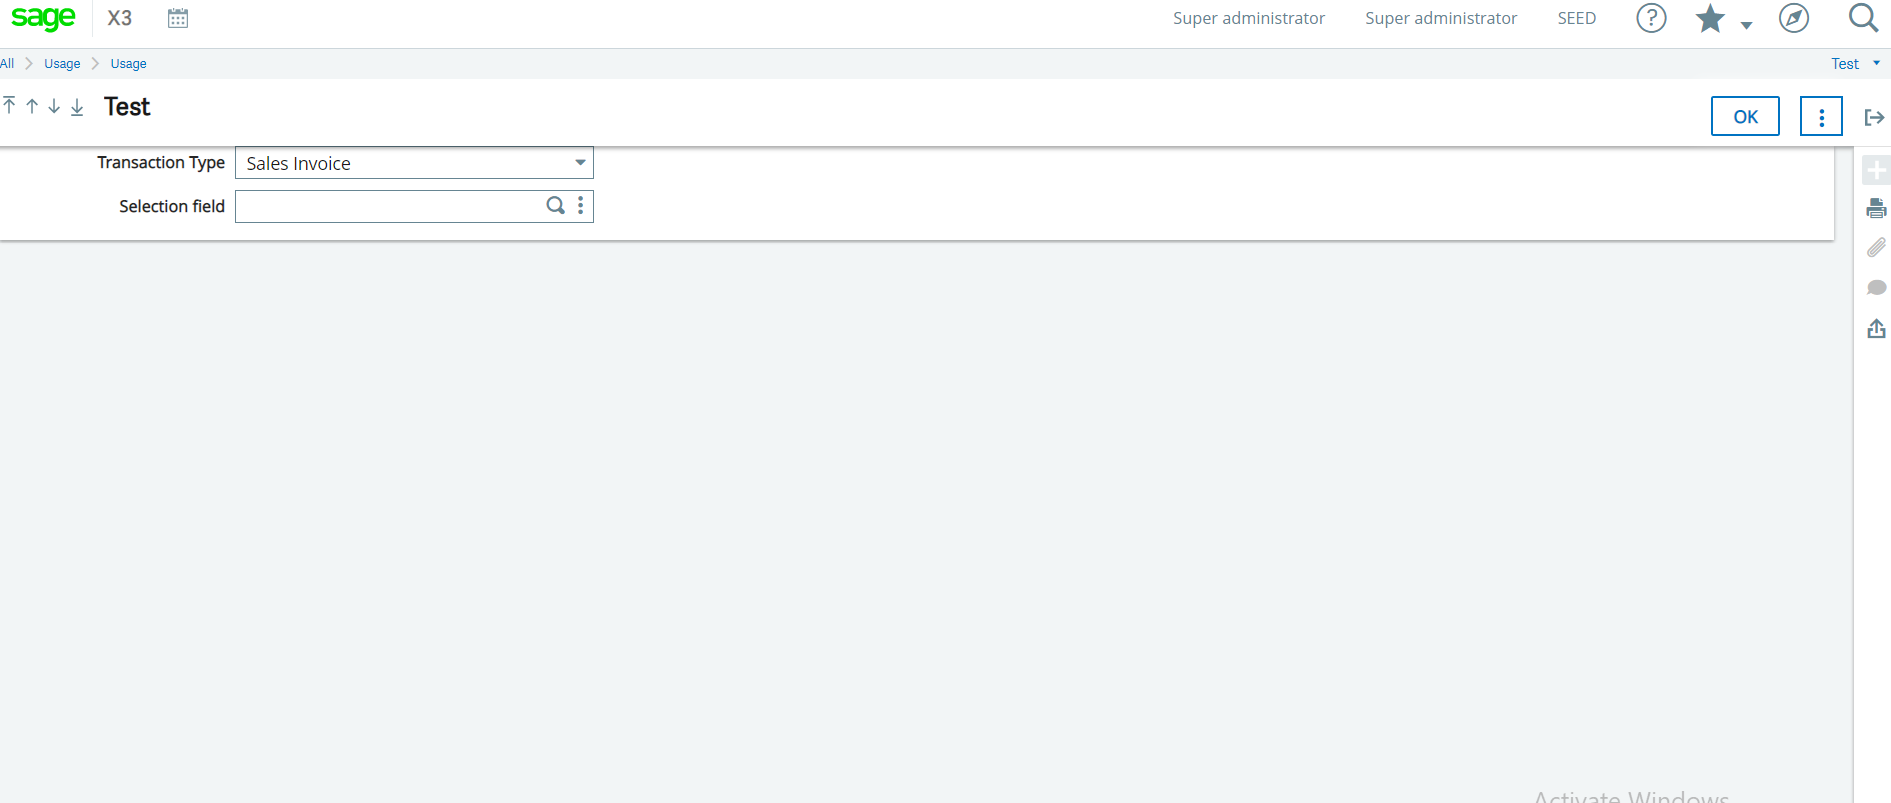
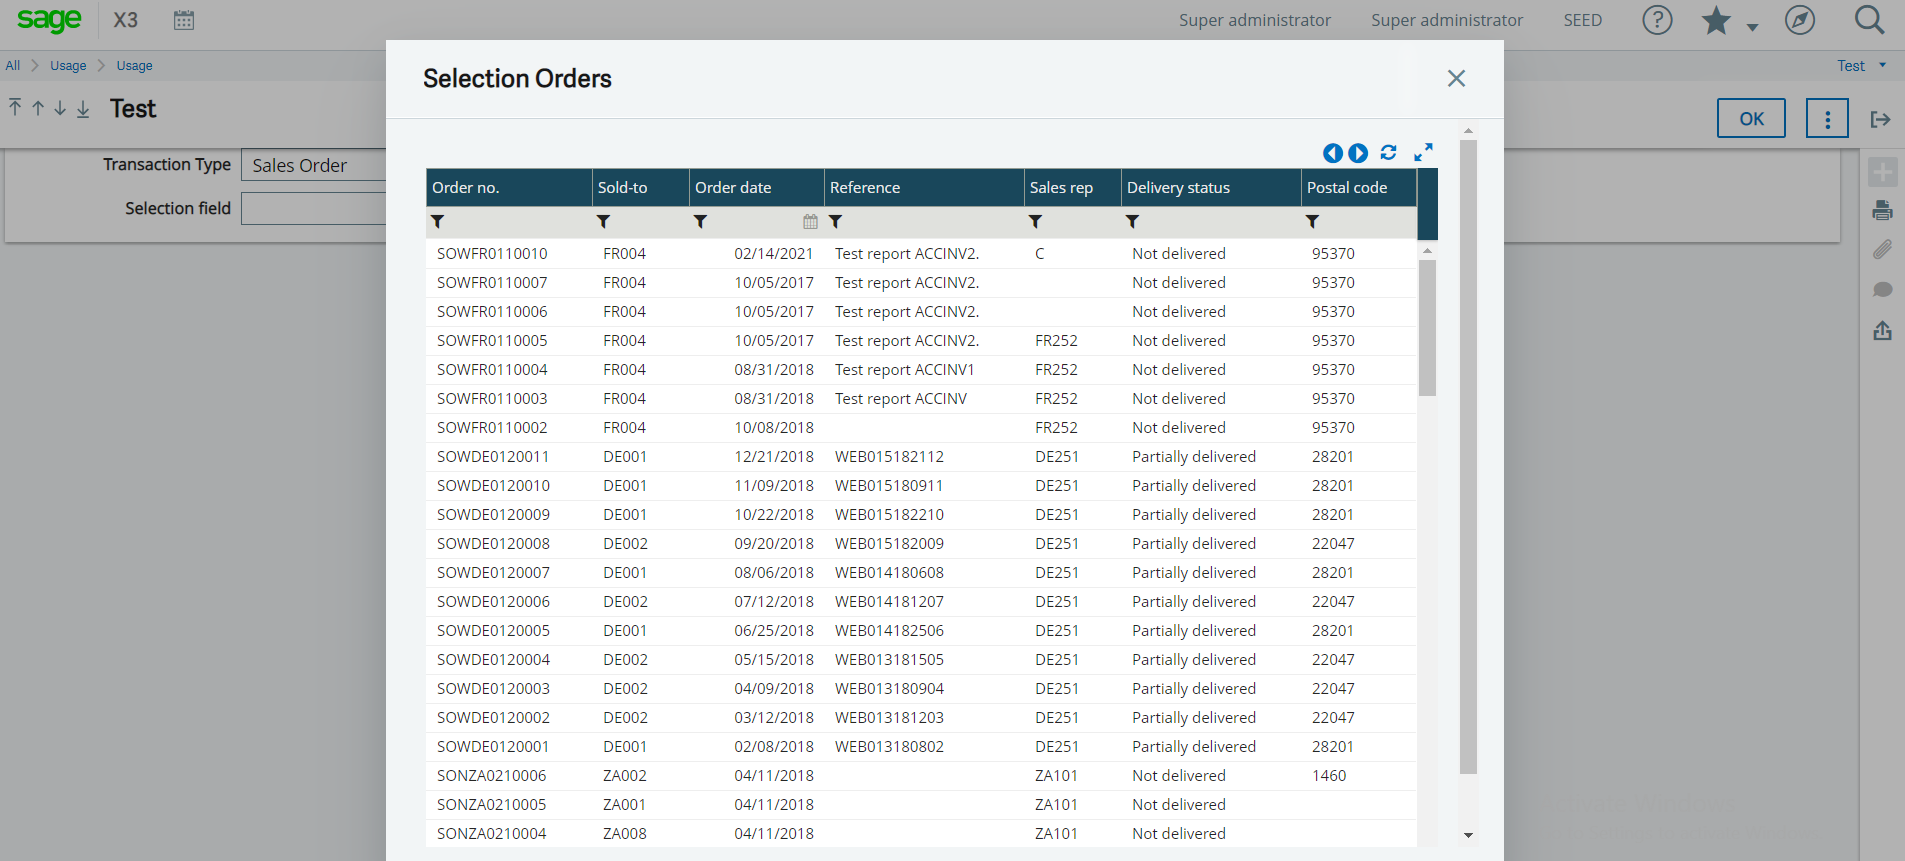
Select any transaction type from the option and hit on the look up button of the selection field. You will be able to see the selection of invoice as shown in in below figure.

Fig 04: Sales Invoice Selection

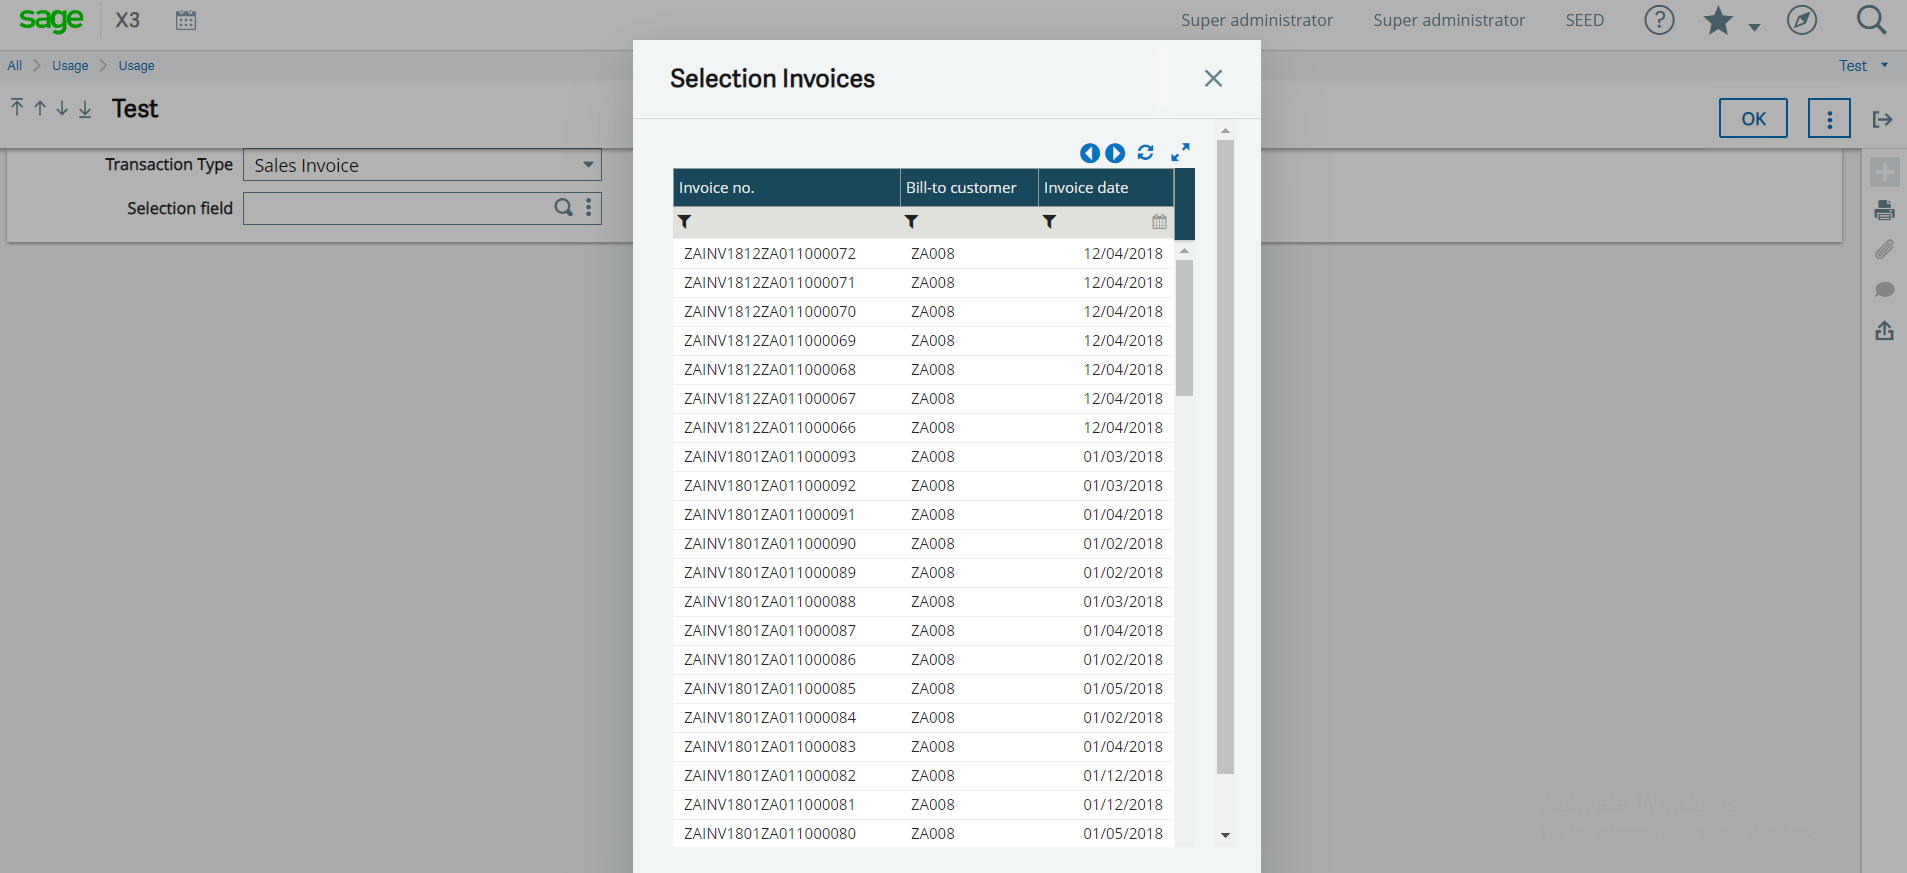
Similarly, if selected any other transaction type for example “Sales Order”, then selection of sales order will appear in selection.

Fig 05: Sales Order selection

Thus, we can have multiple selection of multiple transactions in single field.

This blog helps us to make multiple selection of any transaction in single field.

About Us

Greytrix – a globally recognized and one of the oldest Sage Development Partner is a one-stop solution provider for Sage ERP and Sage CRM organizational needs. Being acknowledged and rewarded for multi-man years of experience, we bring complete end-to-end assistance for your technical consultations, product customizations, data migration, system integrations, third-party add-on development and implementation competence.

Greytrix caters to a wide range of Sage X3, a Sage Business Cloud Solution, offerings. Our unique GUMU™ integrations include Sage X3 for Sage CRMSalesforce.com, Dynamics 365 CRM and Magento eCommerce along with Implementation and Technical Support worldwide for Sage X3. Currently we are Sage X3 Implementation Partner in East Africa, Middle East, Australia, Asia, US, UK. We also offer best-in-class Sage X3 customization and development services, integrated applications such as POS | WMS | Payment Gateway | Shipping System | Business Intelligence | eCommerce and have developed add-ons such as Catch – Weight  and Letter of Credit and India Legislation for Sage X3 to Sage business partners, end users and Sage PSG worldwide.

Greytrix is a recognized Sage champion ISV Partner for GUMU™ Sage X3 – Sage CRM integration also listed on Sage Marketplace; GUMU™ integration for Sage X3 – Salesforce is a 5-star rated app listed on Salesforce AppExchange and GUMU™ integration for Dynamics 365 CRM – Sage ERP listed on Microsoft AppSource.

For more information on Sage X3 Integration and Services, please contact us at x3@greytrix.com, We will like to hear from you.


How to solve ‘User does not have any Badge for product’ error while running the batch server during Migration process in Sage X3

$
0
0

In some industries the company wants to migrate the data from lower version to higher version in Sage X3. Every company wants to upgrade the system functionally or data on the higher version. 

During migration process various things should be in well processed some of them are:

  1. Components installation process.
  2. Console configuration process.
  3. Batch server activation process.
  4. License File.
  5. Accounting task process.

License File: Sage X3 is available in several suites: finance; distribution; manufacturing; projects and jobs; and construction. It contains advanced functionality to manage even the most demanding mid-market business needs. The concurrent licensing consists of full, operational and transactional user licenses that enable enterprises to cost effectively include more people and processes in their business system eco-system for better results. The system can be deployed under a public or private cloud arrangement or as an on-premise deployment. The licensing is available as a subscription or a perpetual license.

Batch Server: The capacity of a batch server is determined based on the maximum number of threads that can run on the server concurrently. Each thread executes one batch task. You can run these tasks in a serial steps or parallel steps, depending on the business logic and requirements. All tasks that do not have any dependencies are considered parallel tasks. All servers that are configured as batch servers periodically check for tasks that are waiting for processing. The batch server assigns each parallel task to a thread and starts to process the thread.

In Sage X3, while doing migration process sometimes we may face the difficulties while running the batch server. For solving such errors, kindly follow below steps:

Navigate to : Administrator  -> Endpoint -> batch server

  1. Enter all the parameters in the batch server such as:
  2. Administration Endpoints.
  3. Maximum delay to launch a query
  4. Maximum no. active queries.

Refer below screen shot:

Fig 01: Batch Server Screen
  1. Now click on the Start button.
  2. After clicking on the start button, then you will get the below error.

Refer below screen shot.

Fig 02: Badge error

Now follow below steps for solving above error.

Check License file which we have uploaded in sage X3. Check the ‘ERPDEV’ code under Badges is 1 or 2. If it is 1 then the above error will come. So to solve this , you need to apply another license file in sage x3 which has ‘ERPDEV’ as 2.

Fig 03: License file with ERPDEV 1
Fig 04: License File with ERPDEV 2

As we know that,badges are associated with users and they also dictate the type of access the user has. For example, the ERPDEV badge has access to everything in Sage X3, but the ERPFULL badge has access to everything except development functions.

Now upload the new license file which has ERPDEV ‘2’ in the sage x3. Then go to the batch server screen and start the batch server. You will see batch server will get started.

Hence by following above steps, we can solve the error and start the batch server.

About Us

Greytrix – a globally recognized and one of the oldest Sage Development Partner is a one-stop solution provider for Sage ERP and Sage CRM organizational needs. Being acknowledged and rewarded for multi-man years of experience, we bring complete end-to-end assistance for your technical consultations, product customizations, data migration, system integrations, third-party add-on development and implementation competence.

Greytrix caters to a wide range of Sage X3, a Sage Business Cloud Solution, offerings. Our unique GUMU™ integrations include Sage X3 for Sage CRMSalesforce.com, Dynamics 365 CRM and Magento eCommerce along with Implementation and Technical Support worldwide for Sage X3. Currently we are Sage X3 Implementation Partner in East Africa, Middle East, Australia, Asia, US, UK. We also offer best-in-class Sage X3 customization and development services, integrated applications such as POS | WMS | Payment Gateway | Shipping System | Business Intelligence | eCommerce and have developed add-ons such as Catch – Weight  and Letter of Credit and India Legislation for Sage X3 to Sage business partners, end users and Sage PSG worldwide.

Greytrix is a recognized Sage champion ISV Partner for GUMU™ Sage X3 – Sage CRM integration also listed on Sage Marketplace; GUMU™ integration for Sage X3 – Salesforce is a 5-star rated app listed on Salesforce AppExchange and GUMU™ integration for Dynamics 365 CRM – Sage ERP listed on Microsoft AppSource.

For more information on Sage X3 Integration and Services, please contact us at x3@greytrix.com, We will like to hear from you.

Formula based Material Issue

$
0
0

This “Formula based material issue” concept will be mostly useful in Pharmaceutical Industries, as these type of industries produce medicines. In manufacturing process, drugs will be considered as Raw Material to produce one particular tablet/ medicine. For this, quantity of required drugs should be correctly calculated. By using this formula based concept we will be making tablets/medicines using the appropriate quantities of the drugs required.

In Sage X3, while creating a work order when user selects a FG/SFG product, its respective component will get automatically populated on work order screen in component tab as per the defined BOM and BOM code. And as per the BOM quantity allocation is done.
But one of our client wanted to have a control on the issuance of the raw material to production on the basis of formula they have already defined. When GRN is received QC is done, on the basis of results QC department note down the Assays and Moisture contain in raw material.

In order to compensate this loss additional quantities of that particular material should be issued to production when that particular LOT is used in production on the basis of the formula defined.

Let’s understand this concept with an example:

When GRN is done QC entry is created automatically in Sage X3. When QC user does the quality testing we will create the technical sheet at QC entry where he/she will enter Assays and Moisture attribute as shown in the below screenshot.

New Stuff: How to solve ‘User does not have any Badge for product’ error while running the batch server during Migration process in Sage X3

Technical Sheet
[Technical Sheet]

We have entered values in Technical Sheet for raw material “RA010” i.e. Assay: 98 and Moisture: 2.
These attributes will be linked to that particular LOT.

At Work Order, the allocation of the LOT will be as per FEFO basis but even if user wishes to change the allocation he/she can alter it. Now we will see the requirement quantity of “RA010” before allocation in the work order as mentioned in the BOM.

Requirement Qty before Allocation
[Requirement Qty before Allocation]

Formula which we are using is:

Formula

We will use this formula in our example for better understanding:

We have a work order which determines that 80000 quantity of FG1 (TEST Product) needs to be produce. RA010 = 24 KG is required to produce 1 Batch (80000) of FG1 which is already mentioned in BOM as shown earlier.

ASSAY: 98 %, MOISTURE: 2 %
BATCH SIZE: 8000, KG per Batch: 24

Formula used in example

= 24.989 Kg per Batch

Now, we have customized the screen in such a way that when user clicks on the ‘SAVE’ button of Work Order after creation and lot allocation, components quantity gets updated as per the quantity derived after formulation:

Requirement Qty after Allocation
[Requirement Qty after Allocation]

NOTE: To enable the save button, you need to select the “Allocation” checkbox in the header after lot allocation.

Quantity for “RA010” is updated as expected but for “RA051” component we have not entered values in the technical sheet. Due to which quantity remains same for that component.

In this way on the basis of formula, allocation will be done. By doing this, correct calculated quantity of required materials will be issued on every work order in the manufacturing of the FG Product.

About Us

Greytrix – a globally recognized and one of the oldest Sage Development Partner is a one-stop solution provider for Sage ERP and Sage CRM organizational needs. Being acknowledged and rewarded for multi-man years of experience, we bring complete end-to-end assistance for your technical consultations, product customizations, data migration, system integrations, third-party add-on development and implementation competence.

Greytrix caters to a wide range of Sage X3, a Sage Business Cloud Solution, offerings. Our unique GUMU™ integrations include Sage X3 for Sage CRMSalesforce.com, Dynamics 365 CRM and Magento eCommerce along with Implementation and Technical Support worldwide for Sage X3. Currently we are Sage X3 Implementation Partner in East Africa, Middle East, Australia, Asia, US, UK. We also offer best-in-class Sage X3 customization and development services, integrated applications such as POS | WMS | Payment Gateway | Shipping System | Business Intelligence | eCommerce and have developed add-ons such as Catch – Weight  and Letter of Credit and India Legislation for Sage X3 to Sage business partners, end users and Sage PSG worldwide.

Greytrix is a recognized Sage champion ISV Partner for GUMU™ Sage X3 – Sage CRM integration also listed on Sage Marketplace; GUMU™ integration for Sage X3 – Salesforce is a 5-star rated app listed on Salesforce AppExchange and GUMU™ integration for Dynamics 365 CRM – Sage ERP listed on Microsoft AppSource.

For more information on Sage X3 Integration and Services, please contact us at x3@greytrix.com, We will like to hear from you.

Invoice Sequence issue on Finder for Custom screen

$
0
0

In Sage X3, we have created a screen where in Tax Invoice report is getting printed from the Tax invoice custom screen. In this screen we have added a filter “From Invoice” and “To Invoice” number which filters the list of invoices which are posted in a selected range.

New Stuff: Formula based Material Issue

GUMU Integration App
[Tax Invoice Screen]

In the above screenshot, we have added the data type for Sales invoice as “SIH” for getting the list of Invoices which are posted.

GUMU Integration App
[Tax Invoice Screen – Invoice selection]

As you can see in the above screenshot, the invoices are getting displayed in the descending order with respect to invoice number and invoice date. Now we will select the invoice range to print the report i.e. from “10121IVR0021” to “10121IVR0019”. So while printing the report it was printing blank as the sequence is in the descending order.

To handle this case, we need to manage the sequence issue so that report will be printing properly. Let’s check the steps to handle invoice number filter in the ascending order. To do so, we will first navigate into Development -> Windows -> Screen (Tax invoice).

GUMU Integration App
[Tax Invoice screen dictionary]

Here we will jump into “SIH” data type and then further navigate into “SIH” linked object.

GUMU Integration App
[SIH – Object screen]

In the above screenshot, in the Selection tab you can see there is a radio button named “Sign” as Ascending and Descending. Now we will change the sequence for the same into ascending order and save the changes and validate the object, data type, screen and also global validate the window.

After validation we will now open the Tax invoice screen to check if the changes done are reflected or not.

GUMU Integration App
[Tax Invoice Screen]

As you can see in the above screenshot the invoices are getting displayed in ascending order as desired which eventually will print the Tax invoice report properly.

About Us

Greytrix – a globally recognized and one of the oldest Sage Development Partner is a one-stop solution provider for Sage ERP and Sage CRM organizational needs. Being acknowledged and rewarded for multi-man years of experience, we bring complete end-to-end assistance for your technical consultations, product customizations, data migration, system integrations, third-party add-on development and implementation competence.

Greytrix caters to a wide range of Sage X3, a Sage Business Cloud Solution, offerings. Our unique GUMU™ integrations include Sage X3 for Sage CRMSalesforce.com, Dynamics 365 CRM and Magento eCommerce along with Implementation and Technical Support worldwide for Sage X3. Currently we are Sage X3 Implementation Partner in East Africa, Middle East, Australia, Asia, US, UK. We also offer best-in-class Sage X3 customization and development services, integrated applications such as POS | WMS | Payment Gateway | Shipping System | Business Intelligence | eCommerce and have developed add-ons such as Catch – Weight  and Letter of Credit and India Legislation for Sage X3 to Sage business partners, end users and Sage PSG worldwide.

Greytrix is a recognized Sage champion ISV Partner for GUMU™ Sage X3 – Sage CRM integration also listed on Sage Marketplace; GUMU™ integration for Sage X3 – Salesforce is a 5-star rated app listed on Salesforce AppExchange and GUMU™ integration for Dynamics 365 CRM – Sage ERP listed on Microsoft AppSource.

For more information on Sage X3 Integration and Services, please contact us at x3@greytrix.com, We will like to hear from you.

Formatting of text using HTML tags for Sage X3 Reports

$
0
0

In Sage X3, every company/site/supplier/customer have their addresses that we fetch from the respective screens to Standard or Custom reports. Normally we create a formula in Crystal Report for address with the required fields and place that formula wherever required. This can be also achieved by using HTML tags in formula. Using this method can be more beneficial because previously we used method in which we used to apply same formatting to all the fields and if you wanted to add different formatting style to each field then that was not possible in a formula but with the help of HTML tags this can be possible, here you can apply different formatting style to any line as per your need.

For Example: We have to print a supplier’s address in Purchase Order report where header section that contains name, address lines, city, country, GST No, contact no, etc. Where Supplier’s name and the headings of other details should be bold.

To achieve this, follow the below steps:
Step 1:

Create a formula in Crystal report, name it as “Supplier Address” and add code in formula wizard as per below screenshot:

New Stuff: Invoice Sequence issue on Finder for Custom screen

GUMU Integration App
Formula Wizard

Step 2:

Place that formula in your report wherever you want to add.

Step 3:

Right click on that formula and click on format field.

Step 4:

Go to Paragraph tab and select HTML Text from Text Interpretation list as per below screenshot:

GUMU Integration App
Format Field

Output:

GUMU Integration App
Output

In this way using HTML tags we can do formatting of text in crystal report.

About Us

Greytrix – a globally recognized and one of the oldest Sage Development Partner is a one-stop solution provider for Sage ERP and Sage CRM organizational needs. Being acknowledged and rewarded for multi-man years of experience, we bring complete end-to-end assistance for your technical consultations, product customizations, data migration, system integrations, third-party add-on development and implementation competence.

Greytrix caters to a wide range of Sage X3, a Sage Business Cloud Solution, offerings. Our unique GUMU™ integrations include Sage X3 for Sage CRMSalesforce.com, Dynamics 365 CRM and Magento eCommerce along with Implementation and Technical Support worldwide for Sage X3. Currently we are Sage X3 Implementation Partner in East Africa, Middle East, Australia, Asia, US, UK. We also offer best-in-class Sage X3 customization and development services, integrated applications such as POS | WMS | Payment Gateway | Shipping System | Business Intelligence | eCommerce and have developed add-ons such as Catch – Weight  and Letter of Credit and India Legislation for Sage X3 to Sage business partners, end users and Sage PSG worldwide.

Greytrix is a recognized Sage champion ISV Partner for GUMU™ Sage X3 – Sage CRM integration also listed on Sage Marketplace; GUMU™ integration for Sage X3 – Salesforce is a 5-star rated app listed on Salesforce AppExchange and GUMU™ integration for Dynamics 365 CRM – Sage ERP listed on Microsoft AppSource.

For more information on Sage X3 Integration and Services, please contact us at x3@greytrix.com, We will like to hear from you.

How to solve “No Current record” error while posting the Purchase Invoice

$
0
0

Recently there was an issue while posting the purchase invoice in Sage X3, where system was giving a pop up message “No current record found“. All the taxes and other configuration were right still while positing any purchase invoice, it was giving an error as shown in the below screenshot.

New Stuff: Formatting of text using HTML tags for Sage X3 Reports

GUMU Integration App
Error Message

As per the above screenshot, we have created invoice “INVP2021188888” and it was throwing errors after clicking on post button as shown in the below window.

GUMU Integration App
Error Log

Solution:

Please follow the below Steps:

1) Go to setup -General parameter – Sequencing- Assignment
2) Check under Finance module “ Final number sequence has been define or not.
3) If yes then check it’s type and it should be “FNL” only.
4) If not define then please define final number under finance module.
5) Above error will get resolved.

GUMU Integration App
Sequencing Assignment

In this way, we can solve the “No Current record” error which occurs while posting the Purchase Invoice.

About Us

Greytrix – a globally recognized and one of the oldest Sage Development Partner is a one-stop solution provider for Sage ERP and Sage CRM organizational needs. Being acknowledged and rewarded for multi-man years of experience, we bring complete end-to-end assistance for your technical consultations, product customizations, data migration, system integrations, third-party add-on development and implementation competence.

Greytrix caters to a wide range of Sage X3, a Sage Business Cloud Solution, offerings. Our unique GUMU™ integrations include Sage X3 for Sage CRMSalesforce.com, Dynamics 365 CRM and Magento eCommerce along with Implementation and Technical Support worldwide for Sage X3. Currently we are Sage X3 Implementation Partner in East Africa, Middle East, Australia, Asia, US, UK. We also offer best-in-class Sage X3 customization and development services, integrated applications such as POS | WMS | Payment Gateway | Shipping System | Business Intelligence | eCommerce and have developed add-ons such as Catch – Weight  and Letter of Credit and India Legislation for Sage X3 to Sage business partners, end users and Sage PSG worldwide.

Greytrix is a recognized Sage champion ISV Partner for GUMU™ Sage X3 – Sage CRM integration also listed on Sage Marketplace; GUMU™ integration for Sage X3 – Salesforce is a 5-star rated app listed on Salesforce AppExchange and GUMU™ integration for Dynamics 365 CRM – Sage ERP listed on Microsoft AppSource.

For more information on Sage X3 Integration and Services, please contact us at x3@greytrix.com, We will like to hear from you.

How to configure additional process server and its benefit

$
0
0

Basically the additional process servers are installed to balance the load of CPU and memory usage. In this blog we will see the necessary steps to configure the additional process server.

To begin the installation process of additional servers, we need to satisfy pre-requisite.

  1. Install the SQL Client Connectivity tools and Management Tools
  2. Install the ADXADMIN runtime
  3. Install the Java Runtime Environment (also known as JDK).

Now to install the process server, you need to follow below:

  1. Install the runtime Component on the different server i.e. Execute the safex3-runtime-installer.jar file.
  2. Follow proper instructions present on installation wizard and provide a Component Name and select the runtime type Process server.
  3. Complete the installation through Wizard.
  4. Locate the certificate .pem file on the Syracuse server and copy it to the new server
  5. Location will be similar to <Drive>:\Sage\Syracuse\syracuse\certs_tools\output\<servername>.pem
  6. Paste the files into the Process server’s directory: <Drive>:\Sage\SAGEX3V7\X3V7\runtime\key\

Once the installation of process server is completed, the next step is to configure the additional server into existing X3 solution. To configure this you can follow below steps:

  • Move to the server where sage X3 application and console is installed.
  • Open sage X3 management console.
  • Click on solutions, created x3 solution will be display on console.
  • Click on Process server button.
  • Then click on “New” button.
  • In the Search SAFE X3 components window, click the “New” button to add the new server to the server name list.
  • Select the new Process server from the component selection window
  • Click on OK
  • In the bottom grid, provide the SAFE X3 service port number, User login, and password for the service.
  • Click Configuration to configure the new process server adding it to the solution.

You can see additional process server in below screen shot.

X3 Solution with additional process server

Once you’ve done those above steps, you’ll be ready to set up additional server on the X3 side. For that you need to create the X3 solution with the additional server name.

Note: – After completion of this setting you need to first verify the settings by clicking on “Check Server Setting” option.

Then you need to add the new endpoint for this new process server and also need to give user access to the newly created endpoint.

Basically, these additional process servers manage processes when scalability is required. They can run processes linked to interactive sessions as well as web services sessions and batch processes.

There are difference between the main process server and additional process server as:

  • At least one Main Process server is mandatory and runs on the same machine as the Application server.
  • Additional Process servers are optional and are used to load-balance among multiple resource processes related to X3 users sessions.
  • Additional Process servers load balancing is automatically managed by the front-end Syracuse Web Presentation server(s).

This is how you can setup the extra process server in to sage x3 which will help load balancing if large number of users are present in sage x3.

About Us

Greytrix – a globally recognized and one of the oldest Sage Development Partner is a one-stop solution provider for Sage ERP and Sage CRM organizational needs. Being acknowledged and rewarded for multi-man years of experience, we bring complete end-to-end assistance for your technical consultations, product customizations, data migration, system integrations, third-party add-on development and implementation competence.

Greytrix caters to a wide range of Sage X3, a Sage Business Cloud Solution, offerings. Our unique GUMU™ integrations include Sage X3 for Sage CRMSalesforce.com, Dynamics 365 CRM and Magento eCommerce along with Implementation and Technical Support worldwide for Sage X3. Currently we are Sage X3 Implementation Partner in East Africa, Middle East, Australia, Asia, US, UK. We also offer best-in-class Sage X3 customization and development services, integrated applications such as POS | WMS | Payment Gateway | Shipping System | Business Intelligence | eCommerce and have developed add-ons such as Catch – Weight  and Letter of Credit and India Legislation for Sage X3 to Sage business partners, end users and Sage PSG worldwide.

Greytrix is a recognized Sage champion ISV Partner for GUMU™ Sage X3 – Sage CRM integration also listed on Sage Marketplace; GUMU™ integration for Sage X3 – Salesforce is a 5-star rated app listed on Salesforce AppExchange and GUMU™ integration for Dynamics 365 CRM – Sage ERP listed on Microsoft AppSource.

For more information on Sage X3 Integration and Services, please contact us at x3@greytrix.com, We will like to hear from you.

How to do Control Account transfer in Sage X3

$
0
0

Managing the Accounts in Sage X3 is the simple yet challenging task since X3 has provided most dynamic Account handling mechanism which includes customizable Automatic journal and Line level condition and formula. There may be a case in which a wrong account got picked due to the configuration error or a suspend account gets picked if the account is not defined in that setup screen to which Automatic journal is pointed.

Sage X3 provides a feature of Control account transfer which is used to replace the incorrect account with the correct control account. We can use this function to modify a source control account code with a destination control account code in the Journal accounting lines.

Below are the most important points to be considered before using this functionality:

  • This control is in effect only if the Chart of Accounts is associated with at least one consolidated ledger for the company.
  • This function is only launched for open financial years and involves all the postings with the exception of the RAN.
  • The control account transfer is made for a specific business partner. The process cannot be run for all the business partners in the source control account.

A selection screen is used to define the business partner (BP) line characteristics that the process must modify. Below are the criteria fields which are provided

Company, Site, Matched entries, the journal type, The journal, The user, Date range

Matched entries: The entries that are already matched can be included (by specifying the matching type: partial, full or both). In this case, the matching codes are also fused with the exception of the matching groups that mount two financial years that remain in the source control account (forward postings included).

Flow code coming from the account if the flow code management has been chosen for the account.

Flow initialization: The initialization rule only applies to accounts with Optional or Mandatory flow management selected and only for the first ledger defined in the journal entry transaction whose consolidation management is selected.

Source control account: User must enter the account code which is a incorrect or a suspended account.

Target control account: User must enter the account code which is a correct account which has to be applied in journal.

BP: User can only enter a Business partner with one of the following characteristics: Customer, Supplier, or Miscellaneous BP.

The Partner is the partner of original record if an account class is set to Yes, and it is empty if the account class is set to No.

Control Account transfer

Path: Financials > Utilities > Miscellaneous > Control account transfer

Control Account transfer enables you to correct your journal lines with the correct account if a wrong account got picked due to the configuration error or a suspend account gets picked if the account is not defined in that setup screen to which Automatic journal is pointed.

Hope this blog helps you correcting your journal lines with correct account and manages your accounts more efficiently!

About Us

Greytrix – a globally recognized and one of the oldest Sage Development Partner is a one-stop solution provider for Sage ERP and Sage CRM organizational needs. Being acknowledged and rewarded for multi-man years of experience, we bring complete end-to-end assistance for your technical consultations, product customizations, data migration, system integrations, third-party add-on development and implementation competence.

Greytrix caters to a wide range of Sage X3, a Sage Business Cloud Solution, offerings. Our unique GUMU™ integrations include Sage X3 for Sage CRMSalesforce.com, Dynamics 365 CRM and Magento eCommerce along with Implementation and Technical Support worldwide for Sage X3. Currently we are Sage X3 Implementation Partner in East Africa, Middle East, Australia, Asia, US, UK. We also offer best-in-class Sage X3 customization and development services, integrated applications such as POS | WMS | Payment Gateway | Shipping System | Business Intelligence | eCommerce and have developed add-ons such as Catch – Weight  and Letter of Credit and India Legislation for Sage X3 to Sage business partners, end users and Sage PSG worldwide.

Greytrix is a recognized Sage champion ISV Partner for GUMU™ Sage X3 – Sage CRM integration also listed on Sage Marketplace; GUMU™ integration for Sage X3 – Salesforce is a 5-star rated app listed on Salesforce AppExchange and GUMU™ integration for Dynamics 365 CRM – Sage ERP listed on Microsoft AppSource.

For more information on Sage X3 Integration and Services, please contact us at x3@greytrix.com, We will like to hear from you.


How to create schedule invoices in X3

$
0
0

In a normal business scenario, invoices play an important role as it is a key part of any business process. An invoice is a document that maintains a record of a transaction between a buyer and seller, such as a paper receipt from a store or online record from an e-trailer.

New Stuff:- How to do Control Account transfer in Sage X3

Invoices are a critical element of accounting internal controls and audits.

Charges found on an invoice must be approved by the responsible management personnel.

Invoices generally outline payment terms, unit costs, shipping, handling, and any other terms outlined during the transaction.

 Schedule invoices are also very useful where by defining them the invoiced amount can be periodically charged to the customer and the same invoice can be set to them.                               

Invoice Scheduling enables you to plan when and on what basis to bill clients. Sending your invoices out on time and the ability to forecast revenues is vital for the smooth running of your business. 

Since the advent of the computer era, people and businesses have found it easier to rely on electronic invoicing as an alternative to paper documents. Electronic invoicing, or e-invoicing, is a form of electronic billing to generate, store and monitor transaction-related documents between parties and ensure the terms of their agreements are fulfilled.

These e-documents may include invoices and receipts, purchase orders, debit and credit notes, payment terms and instructions, and remittance slips. Digital invoices are normally sent via email, web page or app.

Some invoices are no longer paper-based, but rather transmitted electronically over the Internet. It is still common for electronic remittance or invoicing to be printed in order to maintain paper records. Standards for electronic invoicing vary widely from country to country.

Order screen
Order screen

Now after creation of the sales order we need to create schedule invoices. So we  need to navigate to All -> Sales -> Invoices -> Schedule invoice generation

Schedule invoice
Schedule invoice

On the Schedule invoice generation screen, we need to select a few mandatory fields like company, site, invoice date, invoice type, etc. Then we have other optional fields like sales order range, customer range, project range, etc. where we can pass order range or customer range or project range based on our requirements or data. So after filling those mandatory fields and optional fields based on our data, we can create invoices after hitting on the “OK” button and if all the information is valid then we can see the created invoices in the generated log file.

So after the invoices are created, we can just verify all the invoices with the ‘Schedule invoice’ visible in the ‘source’ field of ‘Management’ tab of the sales invoice screen. Also, we can see the last generated invoice in the ‘invoicing’ tab of the sales order screen.

With the help of the above blog, we can create schedule invoices in X3.

About Us

Greytrix – a globally recognized and one of the oldest Sage Development Partner is a one-stop solution provider for Sage ERP and Sage CRM organizational needs. Being acknowledged and rewarded for multi-man years of experience, we bring complete end-to-end assistance for your technical consultations, product customizations, data migration, system integrations, third-party add-on development and implementation competence.

Greytrix caters to a wide range of Sage X3, a Sage Business Cloud Solution, offerings. Our unique GUMU™ integrations include Sage X3 for Sage CRMSalesforce.com, Dynamics 365 CRM and Magento eCommerce along with Implementation and Technical Support worldwide for Sage X3. Currently we are Sage X3 Implementation Partner in East Africa, Middle East, Australia, Asia, US, UK. We also offer best-in-class Sage X3 customization and development services, integrated applications such as POS | WMS | Payment Gateway | Shipping System | Business Intelligence | eCommerce and have developed add-ons such as Catch – Weight  and Letter of Credit and India Legislation for Sage X3 to Sage business partners, end users and Sage PSG worldwide.

Greytrix is a recognized Sage champion ISV Partner for GUMU™ Sage X3 – Sage CRM integration also listed on Sage Marketplace; GUMU™ integration for Sage X3 – Salesforce is a 5-star rated app listed on Salesforce AppExchange and GUMU™ integration for Dynamics 365 CRM – Sage ERP listed on Microsoft AppSource.

For more information on Sage X3 Integration and Services, please contact us at x3@greytrix.com, We will like to hear from you.

How to use service products in Purchasing

$
0
0

In sage x3 v11, if we need to generate a purchase order for services, it won’t allow us to create it by giving us an error as no “requirement to consider for the subcontract product”.

 In sagex3 v12 there is a new enhancement that will allow us to generate Purchase orders for services without subcontracting. Here we have a new field named as “Product Type” present on the Purchase order entry transactions as well as on PO line level. Also, we have a new parameter named as DEFITMKND that allows us to define the default service type. Follow the below steps to create purchase order for services.

New Stuff:- How to configure additional process server and its benefit

Steps:

Navigate to: > Common data > Products > Product Category

We have to use the products that have a product category as ‘SERVI’( i.e. Service) . A Service category is used for Subcontracting or Bought services. The category type should be selected as Services. Kindly refer the below screenshot.

Product Category Screen

Navigate to: > Set up > Parameter values

 Here go to chapter ACH, in group ORD, we have a parameter DEFITMKND. This parameter is used to define the default service type that we want to use. Here the value used is Subcontract. Refer the below screenshot.

Parameter Value Screen

Service Products on Purchase Orders must be defined with a Service category type and bought category flow. The product type on the Purchase order line determines whether the service is linked to a subcontract order.

Navigate to: > Purchase > Order

Create a purchase order. Select the product having a category as SERVI. Here we are using a product SER001.

 In x3v11, we face the below error while creating PO using product SER001 and also we dont have a field named as Product type

Purchase Order Screen V11

In v12, we can see the product type field which is not present in v11. As the value in the default parameter is Subcontract and we have used the product having SERVI category, by default the product type is selected as Subcontract. Refer the below screenshot.

Purchase Order Screen v12

If the product selected is not in a Service type Category then the product type would be Standard.

There are 3 values that can be in field Product Type:

Standard – It is used for the product whose category is not service.

Subcontracting – It is used for a product that is a service and also used in case of subcontracting. It can be a service in a subcontracting Bill of Material, in case of subcontract without work order, or it can be a single service in case of subcontracting with work order. In this situation, a selection list appears to select subcontract orders. It’s mandatory to select at least one subcontract order to continue the entry in the “Requirements to consider” screen.

Service – It is used for product that is just a simple service.

This blog helps to use service products in Purchasing

About Us

Greytrix – a globally recognized and one of the oldest Sage Development Partner is a one-stop solution provider for Sage ERP and Sage CRM organizational needs. Being acknowledged and rewarded for multi-man years of experience, we bring complete end-to-end assistance for your technical consultations, product customizations, data migration, system integrations, third-party add-on development and implementation competence.

Greytrix caters to a wide range of Sage X3, a Sage Business Cloud Solution, offerings. Our unique GUMU™ integrations include Sage X3 for Sage CRMSalesforce.com, Dynamics 365 CRM and Magento eCommerce along with Implementation and Technical Support worldwide for Sage X3. Currently we are Sage X3 Implementation Partner in East Africa, Middle East, Australia, Asia, US, UK. We also offer best-in-class Sage X3 customization and development services, integrated applications such as POS | WMS | Payment Gateway | Shipping System | Business Intelligence | eCommerce and have developed add-ons such as Catch – Weight  and Letter of Credit and India Legislation for Sage X3 to Sage business partners, end users and Sage PSG worldwide.

Greytrix is a recognized Sage champion ISV Partner for GUMU™ Sage X3 – Sage CRM integration also listed on Sage Marketplace; GUMU™ integration for Sage X3 – Salesforce is a 5-star rated app listed on Salesforce AppExchange and GUMU™ integration for Dynamics 365 CRM – Sage ERP listed on Microsoft AppSource.

For more information on Sage X3 Integration and Services, please contact us at x3@greytrix.com, We will like to hear from you.

How to solve Error: “Kit not generated for the product” on sales order

$
0
0

A BOM is an assembly, a finished product, made up of assemblies and components. If an assembly is used as a component of a final product it is referred to as a sub-assembly or semi-finished product. Each sub-assembly will itself have a list of components and this list can also contain sub-assemblies. Up to 999 levels of assembly can create below the final assembly.

New Stuff:- How to use service products in Purchasing

Sales (kit) BOMs are the commercial BOMs used on Sales Order.

Why to create BOM Code:

 BOM Types are

*Sales(KIT)

*Manufacturing

*Subcontracting

Create BOM Code and assign BOM code to one of BOM Type above and BOM code is used for all context as BOM Type.

For commercial BOMs select Sales (kit) as the BOM type

Navigational Path: Common Data>BOMs>BOM Code.

BOM Code
BOM Code

Create Commercial BOM

Navigational Path: Common Data>BOMs>Commercial BOM.

Commercial BOM
Commercial BOM

Site: If the site is blank, it can be used at all sites

Code: Enter the BOM code created.  Multiple BOMs can be defined for a single product.

Reference date: It is assigned when we create the record and it can be modified. It cannot be blank.

Management unit: Use this field to define how the quantities of the components needed to make this parent product. Percentage is not available for commercial BOM.

Use status: ‘In development’ meaning the components that make up the product are being defined. ‘Available to use’ the structure of the BOM is complete and has been validated.

Select the components:

Components:

Sequence number: A single component can exist multiple times in a BOM by assigning a different sequence number for each instance of the component.

Link quantity: Use this field to define the quantity of this component in the displayed unit that is needed to make the parent product.

Component type: There are several component types that we can use on a sales/ commercial BOM.

*Normal – standard component and always added to a sales transaction.

*Option – an optional component and it is not mandatory to add it to a sales transaction.

*Variant – a variant or alternative of a standard component. It is mandatory to add the standard/ variant component to a sales transaction.

*Multiple option – When a value must be calculated for the provisional cost and the production cost price of the parent product.

*Normal (with formula) – This is the default value if we are using a selection formula. Components selected by the formula are standard components of this BOM and added to a sales transaction.

Note: All components with the same sequence number must have the same component type.

Error: “No Records Selected :Kit not generated for the product” on sales order

Error on creation of sale order

Solution for solving “No Records Selected : Kit not generated for the product” on sales order.

Check Product Master Sales Data Type

Navigational Path: Common Data > Products > Products

Sales tab –check the box ‘Fixed Kit’ or ‘Flexible Kit’

The main difference between the fixed kit and the flexible kit is that in a flexible kit, we can delete products from the BOM as required but in a fixed kit, we cannot delete products from the BOM.

Product Master sales data type

When a product is defined as a KIT then it must have Commercial BOM set up for the product.

Change the Product Record by un-checking ‘Fixed Kit’ or ‘Flexible Kit’, check ‘Normal’  and save

Or by creating Commercial BOM for the Product on sales order

This blog helps us to understand what is commercial BOM and how to create BOM code for BOM type and how BOM code is replicating BOM type for commercial BOM and difference between flexible kit and fixed kit of sales data type on product master. Solution for the error “No Record Selected -Kit not generated for the product”

About Us

Greytrix – a globally recognized and one of the oldest Sage Development Partner is a one-stop solution provider for Sage ERP and Sage CRM organizational needs. Being acknowledged and rewarded for multi-man years of experience, we bring complete end-to-end assistance for your technical consultations, product customizations, data migration, system integrations, third-party add-on development and implementation competence.

Greytrix caters to a wide range of Sage X3, a Sage Business Cloud Solution, offerings. Our unique GUMU™ integrations include Sage X3 for Sage CRMSalesforce.com, Dynamics 365 CRM and Magento eCommerce along with Implementation and Technical Support worldwide for Sage X3. Currently we are Sage X3 Implementation Partner in East Africa, Middle East, Australia, Asia, US, UK. We also offer best-in-class Sage X3 customization and development services, integrated applications such as POS | WMS | Payment Gateway | Shipping System | Business Intelligence | eCommerce and have developed add-ons such as Catch – Weight  and Letter of Credit and India Legislation for Sage X3 to Sage business partners, end users and Sage PSG worldwide.

Greytrix is a recognized Sage champion ISV Partner for GUMU™ Sage X3 – Sage CRM integration also listed on Sage Marketplace; GUMU™ integration for Sage X3 – Salesforce is a 5-star rated app listed on Salesforce AppExchange and GUMU™ integration for Dynamics 365 CRM – Sage ERP listed on Microsoft AppSource.

For more information on Sage X3 Integration and Services, please contact us at x3@greytrix.com, We will like to hear from you.

Error ‘Not Converted No Pricing’ in Back to back order in Sage X3

$
0
0

In Sage X3, we know that back to back orders are nothing but purchase orders created from associated sale orders. It means we can create as many purchase orders as there are sales orders. These type of orders are generally used for products which are ordered or manufactured on demand.

There are certain industries who work with back to back order mechanism with selective products. In such scenarios, the products are not managed in stock but purchased on demand and sold simultaneously. As soon as the product is received, it is sold to the customers.

Back to back orders are of two types:

  1. Direct back to back order: In this there is no need of stock management. The ordered products directly delivered to the customers from suppliers.
  2. Back to back delivery order: In this, once purchase order is generated against sales order, direct allocation of received stock take place.

While creating back to back order, there are certain setups you need to follow. You can refer blog for the same on:

Back-to-back-order or Drop Shipment Setup in Sage ERP X3

Sometimes, you may face some errors in spite of setting all the required things. One of the error you might have faced is ‘Order No. XXX Not converted No pricing’. Refer below screen shot.

Error
Error

From the error description, we can identify that this is related to pricing setup.

There can be below reasons for this error.

  1. No price list: The system has not found a purchase price list for the back-to-back order supplier.
  2. No base price: No purchase base price is entered on the product record.
  3. PURCTLPRI0 Parameter set to ‘No’: The product has no standard cost, or the PURPRICE – Price by default standard cost parameter (chapter ACH, group PRI) is set to ‘No’.

In order to solve the error follow below steps.

  1. No price list:    You can define purchase price for the ordered product in price list setup.

Navigate to: Purchasing -> Price list -> Price list entry

Price list
Price list

2. No base price:    If product has no base price, then you can setup the same in ‘Base price’ field on Product master screen.

Navigate to: Common data -> Products – > Sales (tab)

Base Price
Base Price

3. PURCTLPRI0 Parameter set to ‘No’:

You can verify if the purchase price control parameter is set to NO. In order to check it, navigate to: Setup – > Parameters – > ACH -> PRI (group)

Parameter
Parameter

You can set parameter to ‘Control’ if it is set to ‘No Control’.

Setup
Setup

4. No standard cost:

You can set up standard cost of the product from below screen.

Navigate to: Common data -> Products -> Standard Cost

Cost
Cost

Thus, by identifying exact cause of the pricing error you can resolve it while back to back order generation with above mentioned steps. 

Hope this blog helps in raising your quality standards!

About Us

Greytrix – a globally recognized and one of the oldest Sage Development Partner is a one-stop solution provider for Sage ERP and Sage CRM organizational needs. Being acknowledged and rewarded for multi-man years of experience, we bring complete end-to-end assistance for your technical consultations, product customizations, data migration, system integrations, third-party add-on development and implementation competence.

Greytrix caters to a wide range of Sage X3, a Sage Business Cloud Solution, offerings. Our unique GUMU™ integrations include Sage X3 for Sage CRMSalesforce.com, Dynamics 365 CRM and Magento eCommerce along with Implementation and Technical Support worldwide for Sage X3. Currently we are Sage X3 Implementation Partner in East Africa, Middle East, Australia, Asia, US, UK. We also offer best-in-class Sage X3 customization and development services, integrated applications such as POS | WMS | Payment Gateway | Shipping System | Business Intelligence | eCommerce and have developed add-ons such as Catch – Weight  and Letter of Credit and India Legislation for Sage X3 to Sage business partners, end users and Sage PSG worldwide.

Greytrix is a recognized Sage champion ISV Partner for GUMU™ Sage X3 – Sage CRM integration also listed on Sage Marketplace; GUMU™ integration for Sage X3 – Salesforce is a 5-star rated app listed on Salesforce AppExchange and GUMU™ integration for Dynamics 365 CRM – Sage ERP listed on Microsoft AppSource.

For more information on Sage X3 Integration and Services, please contact us at x3@greytrix.com, We will like to hear from you.

How to de-activate the Runtime server status on Console

$
0
0

The application server and Runtime server or main process server provides access to all the elements that make up Sage X3 including processes, screens, reports, etc. These elements are organized in directories by folder and are not repeated from parent folder to child folder except when they truly belong to the child folder. Otherwise, it is the element from the parent folder that is used. The application is organized as a hierarchy of folders where the root folder is the image of the standard delivery and the other folders are the customer folders, generated from the root folder and each representing an application. From Version 11, it is possible to have several application servers (but only through a manual set-up at current time). In this type of implementation, multiple application servers will use common files in a single location, typically on a shared file system provided by redundant servers or NAS. Setting up multiple application servers eliminates a single point of failure.

In some cases user wants to update the Main process server and after updating he\she faced the issue while login into the Sage X3. In that case user needs to uninstall the current Main process server and install a new one. But before this user needs to change the Runtime server status from Sage x3 console management and then user will be able to uninstall the process server and install a new main process server.

Follow the below steps for the same :

 Step 1: Open the Sage X3 management console, as you can see in below figure Main process server(Runtime server) status is ‘Active’.

Fig : Sage X3 management Console

Step 2: Change the status of Main process server from the below solution files.

 Navigate to below path and open the Solution file as shown in below figure.

Fig : Solution file

 Change the Status From ‘Active‘ to ‘Idle‘ as shown in below figure.

Fig : Status

  After changing the status save the file.

 Now, navigate to below path and open the  adxinstalls file as shown in below figure.

Fig : ADX file

 Change the Status From ‘Active‘ to ‘Idle‘ as shown in below figure.

Fig : ADX file

   After changing the status save the file.

  Now we have changed the status of Main process server. Now open the Sage X3 management console and you can see the status of Main process server has changed as a ‘Idle’,as you can see in below figure.

Fig : Sage X3 management Console

After changing the Main process server status user will be able to uninstall the current Main process server from control pannel and also will be able to install new one.

 With the above steps you can change the Main process server status.

About Us

Greytrix – a globally recognized and one of the oldest Sage Development Partner is a one-stop solution provider for Sage ERP and Sage CRM organizational needs. Being acknowledged and rewarded for multi-man years of experience, we bring complete end-to-end assistance for your technical consultations, product customizations, data migration, system integrations, third-party add-on development and implementation competence.

Greytrix caters to a wide range of Sage X3, a Sage Business Cloud Solution, offerings. Our unique GUMU™ integrations include Sage X3 for Sage CRMSalesforce.com, Dynamics 365 CRM and Magento eCommerce along with Implementation and Technical Support worldwide for Sage X3. Currently we are Sage X3 Implementation Partner in East Africa, Middle East, Australia, Asia, US, UK. We also offer best-in-class Sage X3 customization and development services, integrated applications such as POS | WMS | Payment Gateway | Shipping System | Business Intelligence | eCommerce and have developed add-ons such as Catch – Weight  and Letter of Credit and India Legislation for Sage X3 to Sage business partners, end users and Sage PSG worldwide.

Greytrix is a recognized Sage champion ISV Partner for GUMU™ Sage X3 – Sage CRM integration also listed on Sage Marketplace; GUMU™ integration for Sage X3 – Salesforce is a 5-star rated app listed on Salesforce AppExchange and GUMU™ integration for Dynamics 365 CRM – Sage ERP listed on Microsoft AppSource.

For more information on Sage X3 Integration and Services, please contact us at x3@greytrix.com, We will like to hear from you.

How to Setup Credit Hold Authorization Levels for Users in Sage X3

$
0
0

A critical part of managing risk within an organization is managing the credit available to customers. If you give a customer who may not be in the best financial position credit terms, or too much credit, you may have a hard time collecting what they owe. In addition, you do not want to provide a customer with more or less credit than they have been approved for, as this could trigger similar problems. You can monitor this process and prevent these situations with sage X3 credit limit and credit review capabilities.

To ensure that Customer Credit Control Management is configured correctly and that the authorized limits do yield the correct results, the following setups are important to understand how Sage X3 checks the specified authorized credit limits and prevents possible anomalies or negative balances showing up in Customer Situation inquiries, etc.

In Sage X3 the credit limit is applied at two levels- folder level and company level.

This two-credit limit level works in the following way:

  1. Folder Level: If the credit limit is on folder level then the credit authorized to a customer will belong to all the companies present in the folder.
  2. Company Level: If the credit limit is on company level then the credit authorized to the customer will be separate for all the companies present in that particular folder.

Example: Suppose authorized credit of customer is 1000USD then

  1. If credit limit is on folder level then authorized credit 1000USD will belongs to all the companies present in folder.
  2. If credit limit is on company level then authorized credit 1000USD will be allocated to each company separately.

Sage X3 can designate whether users are able to allocate or process a delivery for an order if the credit limit has been exceeded.

  1. This can be set by navigating to Setup, Users, Users.
Fig 1 : Users

2. Click the user in question.

3. Click on the Parameter definition tab.

Fig 2 : Parameter definition

4. Identify the Chapter = VEN (Sales), Group = AUZ (Authorizations), Parameter = SCDTUNL

Fig 3 : VEN sales Parameter

5. Click the Action box and select Detail.

6. Find the SCDTUNL parameter and change the setting as needed.

Fig 4 : SCDTUNL parameter
  • The SCDTUNL parameter is used to set the authorization level for users. It determines if a credit hold can be unlocked on an order and authorizes the allocation, delivery, and the invoicing of an order.
    • The options for setting up this parameter are as follows:
  1. No – The user cannot unlock the credit hold and cannot allocate, delivery, or invoice the order when the bill-to customer has exceeded their authorized credit level
  2. Yes – The user can unlock the credit hold and can allocate, deliver, or invoice the order when the bill-to customer has exceeded their authorized credit level.

About Us

Greytrix – a globally recognized and one of the oldest Sage Development Partner is a one-stop solution provider for Sage ERP and Sage CRM organizational needs. Being acknowledged and rewarded for multi-man years of experience, we bring complete end-to-end assistance for your technical consultations, product customizations, data migration, system integrations, third-party add-on development and implementation competence.

Greytrix caters to a wide range of Sage X3, a Sage Business Cloud Solution, offerings. Our unique GUMU™ integrations include Sage X3 for Sage CRMSalesforce.com, Dynamics 365 CRM and Magento eCommerce along with Implementation and Technical Support worldwide for Sage X3. Currently we are Sage X3 Implementation Partner in East Africa, Middle East, Australia, Asia, US, UK. We also offer best-in-class Sage X3 customization and development services, integrated applications such as POS | WMS | Payment Gateway | Shipping System | Business Intelligence | eCommerce and have developed add-ons such as Catch – Weight  and Letter of Credit and India Legislation for Sage X3 to Sage business partners, end users and Sage PSG worldwide.

Greytrix is a recognized Sage champion ISV Partner for GUMU™ Sage X3 – Sage CRM integration also listed on Sage Marketplace; GUMU™ integration for Sage X3 – Salesforce is a 5-star rated app listed on Salesforce AppExchange and GUMU™ integration for Dynamics 365 CRM – Sage ERP listed on Microsoft AppSource.

For more information on Sage X3 Integration and Services, please contact us at x3@greytrix.com, We will like to hear from you.

Revision management in purchase order

$
0
0

Sage X3 provide us a function where we can keep the tracking of the changes done in header and detail level of the purchase order. This function is known as revision management in sage X3. If a user does any kind of modification in header level or line level of purchase order we will be able to see what field is been modified and how many times the purchase order is been modified. Once the revision management is on we are able to see the revision field at the header level which holds the count of modification done to that particular purchase order. Thus the revision management helps users to save their time in finding what modification is done to the purchase order. The modified field appears in red color normally and it is also possible to print a report for the change records.

To use revision management in purchase order we will have to turn it on by changing a parameter value named ‘PURREV’.

Navigate: SETUP -> GENERAL PARAMETER -> PARAMETER -> ACH -> ORD

Set the PURREV parameter to ‘Managed on demand’ or ‘Managed automatically.

Fig : Revision management parameter

When the PURREV parameter is set to “Managed on demand”, the user will receive a message asking to confirm the changes. As shown in below figure.

Fig: if managed on demand

When the PURREV parameter is set to “Managed automatically”, the revision will generate automatically when the order is modified.

As discussed before once we turn on the parameter for revision management we get a field in header level of purchase order which holds the count of modification done for that order, which keep increasing by 1 each time the order is modified. Refer the below figure.

Fig : Revision no.

If the purchase order has signature workflow on, the revision management turns on only if the order is completely signed and if the order is not managed for signature workflow then the order must be printed before revision.

In the below example we have kept the PURREV parameter to “Managed automatically” and we have a signature workflow on for purchase order.

We have created an order and then signed the order completely. As the signature is completely signed and order is modified, the revision management button gets enabled. After this if we try to modify the header level the ‘revision no.’ field will get increased by 1 and we can check the modified order by clicking on ‘revision management’ button. If we would keep the parameter on “Managed on demand” then we would face the pop-up to confirm and if we hit on yes then only we can check the revision.

Fig : Revision management

And as discussed above, the field which is modified in an order appears in red color in revision management. This indicates users that the field is modified in the particular revision number.

Fig: Modified field in red

Hence, if we need to keep a track on changes done by users in purchase order we can enable the revision management parameter and follow the above steps.

About Us

Greytrix – a globally recognized and one of the oldest Sage Development Partner is a one-stop solution provider for Sage ERP and Sage CRM organizational needs. Being acknowledged and rewarded for multi-man years of experience, we bring complete end-to-end assistance for your technical consultations, product customizations, data migration, system integrations, third-party add-on development and implementation competence.

Greytrix caters to a wide range of Sage X3, a Sage Business Cloud Solution, offerings. Our unique GUMU™ integrations include Sage X3 for Sage CRMSalesforce.com, Dynamics 365 CRM and Magento eCommerce along with Implementation and Technical Support worldwide for Sage X3. Currently we are Sage X3 Implementation Partner in East Africa, Middle East, Australia, Asia, US, UK. We also offer best-in-class Sage X3 customization and development services, integrated applications such as POS | WMS | Payment Gateway | Shipping System | Business Intelligence | eCommerce and have developed add-ons such as Catch – Weight  and Letter of Credit and India Legislation for Sage X3 to Sage business partners, end users and Sage PSG worldwide.

Greytrix is a recognized Sage champion ISV Partner for GUMU™ Sage X3 – Sage CRM integration also listed on Sage Marketplace; GUMU™ integration for Sage X3 – Salesforce is a 5-star rated app listed on Salesforce AppExchange and GUMU™ integration for Dynamics 365 CRM – Sage ERP listed on Microsoft AppSource.

For more information on Sage X3 Integration and Services, please contact us at x3@greytrix.com, We will like to hear from you.


To Export all the Email address, Phone number and Personal Details

$
0
0

We would come across that we would need all the email address, Phone number, Personal details associated with the respective personal details in the system.

Sage X3 has provided the below functionality were we can export all the email address with its names.
We would receive this details in the csv file format, which then we can use it for the latter used in the excel file format.

We can then find the email address of the of the any concern person on the contact which are linked to the respective contact.

We need to navigate the below menu: All > Usage > GDPR > List of the Email

Fig : List of email data

Initially we will need to press on the Generation that would create the data in the temporary table.

In the next step we need to hit on the Export button that will generate the export file as shown below:

Fig : Notepad

In this template we have email address, table in which email is present, key table, field present in the table.

Phone number:

Sage X3 has provided the below functionality were we can export all the phone number with its names.
We would receive this details in the csv file format, which then we can use it for the latter used in the excel file format.

We can then find the phone number of the of the any concern person on the contact which are linked to the respective contact.

We need to navigate the below menu:

All >Usage > GDPR > List of Phone  number

Fig : List of phone data

Initially we will need to press on the Generation that would create the data in the temporary table.

In the next step we need to hit on the Export button that will generate the export file as shown below:

Fig : Notepad

In this template we have phone numbers, table in which Phone number is present, key table, field present in the table.

Personal Details:

Sage X3 has provided the below functionality were we can export all the phone number with its names.
We would receive this details in the csv file format, which then we can use it for the latter used in the excel file format.

We can then find the phone number of the of the any concern person on the contact which are linked to the respective contact.

We need to navigate the below menu:

All> Usage > GDPR > List of Personal Details

Fig : List of personal details

In the next step we need to hit on the Export button that will generate the export file as shown below:

Fig : Notepad

In this template we have Personal details, table in which Personal Details is present, key table, field present in the table.

About Us

Greytrix – a globally recognized and one of the oldest Sage Development Partner is a one-stop solution provider for Sage ERP and Sage CRM organizational needs. Being acknowledged and rewarded for multi-man years of experience, we bring complete end-to-end assistance for your technical consultations, product customizations, data migration, system integrations, third-party add-on development and implementation competence.

Greytrix caters to a wide range of Sage X3, a Sage Business Cloud Solution, offerings. Our unique GUMU™ integrations include Sage X3 for Sage CRMSalesforce.com, Dynamics 365 CRM and Magento eCommerce along with Implementation and Technical Support worldwide for Sage X3. Currently we are Sage X3 Implementation Partner in East Africa, Middle East, Australia, Asia, US, UK. We also offer best-in-class Sage X3 customization and development services, integrated applications such as POS | WMS | Payment Gateway | Shipping System | Business Intelligence | eCommerce and have developed add-ons such as Catch – Weight  and Letter of Credit and India Legislation for Sage X3 to Sage business partners, end users and Sage PSG worldwide.

Greytrix is a recognized Sage champion ISV Partner for GUMU™ Sage X3 – Sage CRM integration also listed on Sage Marketplace; GUMU™ integration for Sage X3 – Salesforce is a 5-star rated app listed on Salesforce AppExchange and GUMU™ integration for Dynamics 365 CRM – Sage ERP listed on Microsoft AppSource.

For more information on Sage X3 Integration and Services, please contact us at x3@greytrix.com, We will like to hear from you.

How to open printing screen & print a desired report on click of customized menu item

$
0
0

In Sage X3, reports play an important role for representing transactions and records for analysis and growth perspective. Reports can be printed by navigating to the reports module as well as it can be printed via writing script file using 4GL code in sage X3.

Sometimes there might be a requirement if the end user wants to print a report directly clicking on the customized menu item and not by going to the reports module and searching for the report code which needs to be printed.

If we try to open the window of the standard printing screen of reports using 4GL script file, the screen will get opened but still it will not allow the end user to pass the parameters nor print the report. So to solve this, what can we do is create a function which will be called after clicking on the menu item and directly open the printing screen with the desired report code and will also allow to pass the parameters and print the report like the standard report printing works.

Consider a test report named as “YTEST” be the desired report which end user wants to open the printing screen on clicking of menu item. Navigate to All -> Development -> Script dictionary -> Reports and can create a report as shown in below figures.

Fig1.1: a) Report Dictionary
Fig 1.2: b) Report Dictionary

Now, let’s create the function for the menu item.

Navigate to: All -> Development -> Script dictionary -> Functions

and click on Functions.

Create a function with function code “YTEST” and select parent menu as “MMIP” and select function type as “Process” as shown in below figure.

Fig2.1: a) Function dictionary

In the Action block of function screen select action code as “AIMP1”. After entering the action code, parameters grid will get enabled and in first line “ETAT” parameter is used for report code in which we will enter desired report code in double quotes the end user wants to be printed. Here, it is “YTEST”. No need to add function code and pass empty double quotes in second line of parameter grid named as “FONCTION” and set module code as 0 as shown in below figure.

Fig 2.2: b) Function dictionary

Navigate to All -> Administration -> Authoring -> Pages and create a menu item as shown in below figure. Here, menu item code is “YTEST”, endpoint selected is “SEED” and function already created, that is “YTEST”.

Fig 3: Menu Item

After creating menu item, navigate to All ->Administration -> Navigation Pages and add it to the desired module and once clicked on menu item, the printing screen for report code passed in parameter of function will get displayed as shown in below figure.

Fig 4: Report Printing

After clicking on the print button, the report will get printed as we print by the standard process of reports module.

Fig 5: Printed Report

Thus, any desired report can be printed on click of menu item by following the above steps.

This blog helps us to print any report of desired report code on click of a customized menu item.

About Us

Greytrix – a globally recognized and one of the oldest Sage Development Partner is a one-stop solution provider for Sage ERP and Sage CRM organizational needs. Being acknowledged and rewarded for multi-man years of experience, we bring complete end-to-end assistance for your technical consultations, product customizations, data migration, system integrations, third-party add-on development and implementation competence.

Greytrix caters to a wide range of Sage X3, a Sage Business Cloud Solution, offerings. Our unique GUMU™ integrations include Sage X3 for Sage CRMSalesforce.com, Dynamics 365 CRM and Magento eCommerce along with Implementation and Technical Support worldwide for Sage X3. Currently we are Sage X3 Implementation Partner in East Africa, Middle East, Australia, Asia, US, UK. We also offer best-in-class Sage X3 customization and development services, integrated applications such as POS | WMS | Payment Gateway | Shipping System | Business Intelligence | eCommerce and have developed add-ons such as Catch – Weight  and Letter of Credit and India Legislation for Sage X3 to Sage business partners, end users and Sage PSG worldwide.

Greytrix is a recognized Sage champion ISV Partner for GUMU™ Sage X3 – Sage CRM integration also listed on Sage Marketplace; GUMU™ integration for Sage X3 – Salesforce is a 5-star rated app listed on Salesforce AppExchange and GUMU™ integration for Dynamics 365 CRM – Sage ERP listed on Microsoft AppSource.

For more information on Sage X3 Integration and Services, please contact us at x3@greytrix.com, We will like to hear from you.

How to link additional Print Server with the Main Application server in Sage X3

$
0
0

Print server is hosted on a machine running a Windows Server operating system. There can be multiple print servers per solution depending on volume requirements for printing.

The Print server supports all print requests from interactive sessions as well as batch submissions and sends the files to the appropriate print destination (printer, file, PDF etc.).A windows service is started on the computer that hosts the Print server. This service is on port number 1890 by default, but it can be customized during installation. The print service manages an output queue of the requests submitted, and the execution of these reports can be dispatched on several editing processes or threads. The number of editing processes can be customized in the Configuration Console and must be adapted to the size of the server. The Print server communicates with two other servers in your environment: the Application server that hosts the printing model and the Database server that hosts the tables via an ODBC connection. The report files are transferred using the SADFSQ internal communication protocol. The print server embeds a SADFSQ client able to address and communicate with a SADFSQ server running on the Application and Main Process server.

Reports are designed using Crystal Reports 2008, (version 12.x) or Crystal Reports.

Configuring secondary print servers and locally attached printers

This section covers the setup of a secondary print server in “Quick Start” format. For a detailed explanation of the underlying technology and what’s happening behind the scenes see the subsequent sections.

A secondary print server is a system that directly hosts a printer. In many situations it can be a dedicated server, however, a secondary server can also be a desktop system hosting a directly attached USB printer. If this printer is to be controlled and tracked by PaperCut NG/MF, a small monitoring component needs to be installed. The monitoring component intercepts the local printing and reports this use back to the primary Application Server. A secondary server can be either :

A server style system hosting many printers.

A desktop style system hosting printer(s) also shared to other network users.

A desktop style system with the printer used only for local users (not shared).

The monitoring service is also referred to as a Print Provider as its task is to provide information back to the main Application Server.

The process of setting up a secondary print server, depends on the operating system.

Steps to install print server on different server other than Application Server:

  1. Create Power users with same credentials as per the application server.
  2. Install JDK .
  3. Install AdxAdmin.
  4. Install Print Server Component.

Now, follow below steps on how to link print server which is installed on different server with application server.

  1. Open the Console.
  2. Click on the Print Server component.
  3. Click on Add new print server option.
  4. login window will get displayed on the screen.
  5. In that , enter the IP of the second printer which is installed on different server. and then enter power user name and password in the username and password field.
  6. Enter all the parameters.
  7. Click on configuration button.
  8. After configuration , click on print server publication.
  9. Click on Add button.
  10. Now select the folder on which you want to add new print server.
  11. Click on Publication button.
Fig1.1: Print Server Configuration in Console

By doing above steps, we can install the new print server on different server and linked with the main application server.

About Us

Greytrix – a globally recognized and one of the oldest Sage Development Partner is a one-stop solution provider for Sage ERP and Sage CRM organizational needs. Being acknowledged and rewarded for multi-man years of experience, we bring complete end-to-end assistance for your technical consultations, product customizations, data migration, system integrations, third-party add-on development and implementation competence.

Greytrix caters to a wide range of Sage X3, a Sage Business Cloud Solution, offerings. Our unique GUMU™ integrations include Sage X3 for Sage CRMSalesforce.com, Dynamics 365 CRM and Magento eCommerce along with Implementation and Technical Support worldwide for Sage X3. Currently we are Sage X3 Implementation Partner in East Africa, Middle East, Australia, Asia, US, UK. We also offer best-in-class Sage X3 customization and development services, integrated applications such as POS | WMS | Payment Gateway | Shipping System | Business Intelligence | eCommerce and have developed add-ons such as Catch – Weight  and Letter of Credit and India Legislation for Sage X3 to Sage business partners, end users and Sage PSG worldwide.

Greytrix is a recognized Sage champion ISV Partner for GUMU™ Sage X3 – Sage CRM integration also listed on Sage Marketplace; GUMU™ integration for Sage X3 – Salesforce is a 5-star rated app listed on Salesforce AppExchange and GUMU™ integration for Dynamics 365 CRM – Sage ERP listed on Microsoft AppSource.

For more information on Sage X3 Integration and Services, please contact us at x3@greytrix.com, We will like to hear from you.

Supplier Invoice Date validation on Purchase Invoice screen

$
0
0

As we all know in Purchase Invoice screen, Supplier Invoice Date field is mandatory. In Sage X3, while creating Purchase Invoice transaction, it displays current date by default in the Supplier Invoice Date as well as in the Accounting date fields. But one of our client requested to add a validation for the dates where, for the Purchase Invoice, Supplier Invoice Date should not be greater than the current date (Purchase invoice booking date). But if the selected Supplier Invoice Date falls 2 months (60 days) before the current date, then an alert notification should be displayed on the screen.

For this purpose, we did a customization on Purchase Invoice screen. Refer below screenshot in which Accounting Date i.e. Invoice Booking Date is ‘03/09/21’ i.e. 9th March. And same date is getting displayed in the Supplier invoice date field by default.

New Stuff: How to link additional Print Server with the Main Application server in Sage X3

[Accounting Date]

There are two cases. In the first case, we will check what happens when we try to enter the date greater than the current date in the Supplier Invoice Date field.

[Supplier Invoice Date - Example 1]
[Supplier Invoice Date – Example 1]

As you can see in the above screenshot, we have entered ‘03/10/21’ i.e. 10th March in Supplier Invoice Date and 10th March is greater than 9th March. Therefore, the pop-up message is getting displayed that “Supplier Invoice date is greater than Purchase Invoice date”. After giving this pop-up, it will not allow you to create invoice. So as per our first condition, we are restricting purchase invoice creation.

Now in the second case, we will check the working of this customization. Now we have entered ‘01/07/21’ i.e. 7th January in Supplier Invoice Date. 7th January is the date which falls 60 days before ‘03/09/21’ i.e. 9th March. Therefore, the pop-up message is getting displayed that “Supplier Invoice date has exceeded more than 60 days” as shown in the below screenshot.

[Supplier Invoice Date - Example 2]
[Supplier Invoice Date – Example 2]

In this condition, only alert message will be generated. It will not restrict user to create purchase invoice. And if user is entering current date in Supplier Invoice Date or any date between current date and 60 days before current date then it will not generate any alert message and will allow you to create Invoice.

Hence with the help of this customization, we can restrict a Purchase Invoice creation on the basis of Supplier Invoice Date. Invoice creation is restricted only if Supplier Invoice date is greater than Invoice booking date but if the date falls within 2 months (60 days) of the current date, only alert box will be generated.

How to solve error “Non – blocking difference Incorrect date ACCDAT 20210210” while importing data through template

$
0
0

In Sage X3, We can import data to the table through an Import/Export template feature. Here we can create Import/Export template with table fields which we have to update or enter in the table and import the text file which contain data and after successfully import of text file, table get affected. Through Import/Export template feature we can import or export data for single transaction or bulk of transaction.

While importing, we may get an error “Non – blocking difference Incorrect date ACCDAT 20210210”. as shown in the below screenshot.

New stuff: Supplier Invoice Date validation on Purchase Invoice screen

Error – “Non-blocking difference Incorrect date ACCDAT 20210210”

Above error appears due to different date format of date field in a text file (which we were importing) and template date format.

Date Format selected in Template

Earlier we had selected the date format as (DDMMYYYY) in template as shown in above screenshot and date format of text file field was (YYYYMMDD), because of this, we were facing an error “Non – blocking difference Incorrect date ACCDAT 20210210” while importing text file.

Date Format selected in Template to solve error

Then we changed date format to 4th value (YYYYMMDD), same as the date format of field in a text file which we were importing earlier as shown in above screenshot. After this we fixed

Viewing all 1519 articles
Browse latest View live