Quantcast
Channel: Sage X3 – Tips, Tricks and Components
Viewing all 1528 articles
Browse latest View live

How to restrict automatic signature in workflow

$
0
0

Sage X3 provide us a feature of processing automatic signature for a record if the record is created or modified by the first level of user present in assignment rule. This means if we have ADMIN as first user to sign a record and if ADMIN himself creates or modifies the record, that particular record will get signed automatically. The user will not have to manually go and perform the signature. You will able to see the record signed and processed to second level user for signature in workflow history. But is some cases user may need to restrict this automatic signature. For example if a user creates a record and need to do some modifications before singing that particular record, in this case user will have to restrict the standard’s automatic signature. Below we will see how we can restrict standard to perform the automatic signature in workflow.

In the below screenshot we can see the first level of user in assignment rule is ADMIN.

Fig01: Assignment Rule

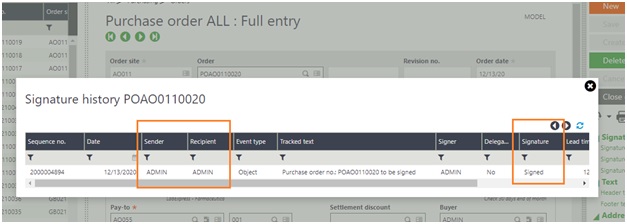
Now when we create the purchase order with user ADMIN the standard will not ask user for signature, it will perform the automatic signature as shown in below screenshot.

Fig02: PO signature history

To restrict the automatic signature we will have to change the setup in workflow rule. Kindly refer the below steps.

Navigate to workflow rules and select the workflow of the object for which we want to restrict the automatic signature.

Navigate: SETUP -> WORKFLOW -> WORKFLOW RULE

Select the ACTION tab from the workflow window. Here we will be able to see what actions are triggered when the workflow is executed. Also we can see the which action is triggered at what phase of workflow and the action’s execution condition, which means at what condition the action will get triggered.

You will be able to see an action named SIGWRK in three different lines of the grid as shown in the below screenshot.

Fig03: Action tab in workflow

From these three lines you will have to delete the action which has “VAL” in it parameter value as shown below. To check the parameter values just click on the line for which you need to check the parameter and you will be see its value in the parameter tab which is located just below the action grid.

Fig04: General Parameter Values

The reason behind deleting this action is the action is used to sign the record which is the created by first level of user.

Another change we have to do is with DIVPOHAPP1 action. We just have to change the execution condition for this action from “[L]USER<>GUSER & [L]USER<>[F:PSH]REQUSR & S_NBRUSR>0″ into “S_NBRUSR>0”.

The reason behind changing the execution condition for this action is this action updates the purchase order signature status. Hence we will be able to restrict the automatic signature.

Hence, when we make above two changes in workflow rules the automatic signature which get restricted and when the first level user creates or modifies the record he will be able to perform the signature for that particular record.

About Us

Greytrix – a globally recognized and one of the oldest Sage Development Partner is a one-stop solution provider for Sage ERP and Sage CRM organizational needs. Being acknowledged and rewarded for multi-man years of experience, we bring complete end-to-end assistance for your technical consultations, product customizations, data migration, system integrations, third-party add-on development and implementation competence.

Greytrix caters to a wide range of Sage X3, a Sage Business Cloud Solution, offerings. Our unique GUMU™ integrations include Sage X3 for Sage CRMSalesforce.com, Dynamics 365 CRM and Magento eCommerce along with Implementation and Technical Support worldwide for Sage X3. Currently we are Sage X3 Implementation Partner in East Africa, Middle East, Australia, Asia, US, UK. We also offer best-in-class Sage X3 customization and development services, integrated applications such as POS | WMS | Payment Gateway | Shipping System | Business Intelligence | eCommerce and have developed add-ons such as Catch – Weight  and Letter of Credit and India Legislation for Sage X3 to Sage business partners, end users and Sage PSG worldwide.

Greytrix is a recognized Sage champion ISV Partner for GUMU™ Sage X3 – Sage CRM integration also listed on Sage Marketplace; GUMU™ integration for Sage X3 – Salesforce is a 5-star rated app listed on Salesforce AppExchange and GUMU™ integration for Dynamics 365 CRM – Sage ERP listed on Microsoft AppSource.

For more information on Sage X3 Integration and Services, please contact us at x3@greytrix.com, We will like to hear from you.


How to flow custom fields from Customer master to Sales order screen

$
0
0

In Sage X3, in customer master user have provision to define multiple addresses with different address codes. So one of our client has requested to add some custom fields on address tab of customer master. And flow it to the Sales order depending on the address code selection on Sales order screen

Suppose user wants to create custom fields say GST Reg. No and PAN No fields and flow it from customer master to sales order screen. To achieve this, we need to follow the below steps:

Step 1:

Create custom fields in SORDER(Sales order) table as well as in Sales order screen and add After Change and After Field events in Delivery Address field as per the below screenshot:

New Stuff: How to restrict automatic signature in workflow

Events
Events

Step 2:

After adding fields in screen validate the Sales Order screen, global validate window and also validate all the transaction types from Setup.

Setup -> Sales -> Orders

Below screenshot is the output of Sales Order screen after field addition:

Sales Order Screen
Sales Order Screen

Step 3:

To flow GST No and PAN No from Customer master to Sales order screen on the basis of Delivery address code we have to add below code in SPESOH script under APRES_MODIF & AVANT_MOD Action:

#################################################################################

If !clalev([F:ZBPC]) Local File BPCUSTOMER[F:ZBPC] : Endif
For[F:ZBPC] where [F:ZBPC]BPCNUM=[M:SOH0]BPCORD
[M:SOH1]ZPANNO=[F:ZBPC]XX1P4PANNO
AFFZO[M:SOH1]ZPANNO
Next

If !clalev([F:ZBPD]) Local File BPDLVCUST[F:ZBPD] : Endif
For[F:ZBPD] where [F:ZBPD]BPCNUM=[M:SOH0]BPCORD AND [F:ZBPD]BPAADD=[M:SOH1]BPAADD
[M:SOH1]ZGSTNO=[F:ZBPD]XX1P4GSTNO
AFFZO[M:SOH1]ZGSTNO
Next

#################################################################################

Similaraly, also assign the values of custom fields in AM_BPAADD & AP_BPAADD actions

In this way developer can add the “GST No” and “PAN No” fields in Sales Order screen and flow data from Customer master on the basis of Customer code and their Delivery address code.

About Us

Greytrix – a globally recognized and one of the oldest Sage Development Partner is a one-stop solution provider for Sage ERP and Sage CRM organizational needs. Being acknowledged and rewarded for multi-man years of experience, we bring complete end-to-end assistance for your technical consultations, product customizations, data migration, system integrations, third-party add-on development and implementation competence.

Greytrix caters to a wide range of Sage X3, a Sage Business Cloud Solution, offerings. Our unique GUMU™ integrations include Sage X3 for Sage CRMSalesforce.com, Dynamics 365 CRM and Magento eCommerce along with Implementation and Technical Support worldwide for Sage X3. Currently we are Sage X3 Implementation Partner in East Africa, Middle East, Australia, Asia, US, UK. We also offer best-in-class Sage X3 customization and development services, integrated applications such as POS | WMS | Payment Gateway | Shipping System | Business Intelligence | eCommerce and have developed add-ons such as Catch – Weight  and Letter of Credit and India Legislation for Sage X3 to Sage business partners, end users and Sage PSG worldwide.

Greytrix is a recognized Sage champion ISV Partner for GUMU™ Sage X3 – Sage CRM integration also listed on Sage Marketplace; GUMU™ integration for Sage X3 – Salesforce is a 5-star rated app listed on Salesforce AppExchange and GUMU™ integration for Dynamics 365 CRM – Sage ERP listed on Microsoft AppSource.

For more information on Sage X3 Integration and Services, please contact us at x3@greytrix.com, We will like to hear from you.

How to Align Lot numbers with Miscellaneous receipts numbers

$
0
0

“Miscellaneous Receipts” is the business process that is used to carry out the receipt of products into the warehouse without a corresponding transaction such as a purchase order or works order to receive the product against. Datalinx Warehouse Manager for Sage X3 allows the receipt of product to be recorded.

Whilst completing the receipt, the application checks and validates to ensure that the product code exists and if relevant, captures additional information such as serial and batch numbers together with date related details such as best before or use by dates. The resulting transaction is used to update Sage X3 with the receipt as if the transaction had been completed within Sage X3. The history record will also attribute the transaction details complete with date and time to the individual logged on at the hand held terminal.

Some companies would like to create their Miscellaneous receipts with a Lot Number that is the same as the Miscellaneous receipts transaction Number that created the product. This is useful for general quality assurance and for product recalls. Some lot numbers are generated with the use of date and time stamps to help identify a specific lot.

Why we make the Lot number same as Miscellaneous receipts number because this can make the tracing of the Lot easier. In Sage X3, there is a standard functionality of doing this.

Follow the below steps for the setup:

Steps:

First make sure that Lot Management setting of product is checked as a ‘Mandatory lot’ and under the Lot Sequence field this MUST be blank as shown in below figure.

Fig: Product

Also, product category set up should be same as product setup, as shown in below figure.

Fig: Product category

In short product and that respective product category set up should be set as defined above.

Navigate To: Common Data> Product category > Receipts Tab > Management Rules Grid

1. Select Movement type as Miscellaneous Receipt’

2. Change the value of Lot entry as a ‘Free’

3. Change the value of Lot by default as a ‘Document number’.

4. Click on Save or OK button.

Please refer the below figure for the same.

Fig: Product category

We have completed the setup for product master and product category.

Now follow the below path for Miscellaneous Receipts creation,

Navigate To > Stock > Receipt/issue transaction > Miscellaneous Receipts

While creating the Miscellaneous receipts transaction, keep LOT no. as blank on line level and after creation you can see LOT no. is coming same as a Miscellaneous receipts transaction number. Refer below figure for the same.

Fig: Miscellaneous Receipts

With the help of this setup you can align the Lot numbers with the Miscellaneous receipts transaction number and it will also help to make the tracing of the Lot easier.

Hence after doing all the above steps we can able to align the same lot number with Miscellaneous receipts transaction number.

About Us

Greytrix – a globally recognized and one of the oldest Sage Development Partner is a one-stop solution provider for Sage ERP and Sage CRM organizational needs. Being acknowledged and rewarded for multi-man years of experience, we bring complete end-to-end assistance for your technical consultations, product customizations, data migration, system integrations, third-party add-on development and implementation competence.

Greytrix caters to a wide range of Sage X3, a Sage Business Cloud Solution, offerings. Our unique GUMU™ integrations include Sage X3 for Sage CRMSalesforce.com, Dynamics 365 CRM and Magento eCommerce along with Implementation and Technical Support worldwide for Sage X3. Currently we are Sage X3 Implementation Partner in East Africa, Middle East, Australia, Asia, US, UK. We also offer best-in-class Sage X3 customization and development services, integrated applications such as POS | WMS | Payment Gateway | Shipping System | Business Intelligence | eCommerce and have developed add-ons such as Catch – Weight  and Letter of Credit and India Legislation for Sage X3 to Sage business partners, end users and Sage PSG worldwide.

Greytrix is a recognized Sage champion ISV Partner for GUMU™ Sage X3 – Sage CRM integration also listed on Sage Marketplace; GUMU™ integration for Sage X3 – Salesforce is a 5-star rated app listed on Salesforce AppExchange and GUMU™ integration for Dynamics 365 CRM – Sage ERP listed on Microsoft AppSource.

For more information on Sage X3 Integration and Services, please contact us at x3@greytrix.com, We will like to hear from you.

How to jump to specific record on click of button

$
0
0

In Sage X3, buttons play an important role as those are the passage through which the screen opens up, records can be created, modified and deleted. In short, buttons are the catalyst as the entire functionality of X3 works on the click of various buttons.

So, X3 has various types of inbuilt buttons already provided by standard like Create, Save, Delete and many more like each screen has various range of buttons depending on it’s functionality. For e.g. Sales Invoice has a ‘Post’ button so that after posting the invoice it’s journal can be created. Along with that it has many other buttons like ‘Journal traceability’ which shows us the cycle of invoice like from order no to delivery no to invoice no to journal no and so on. So, those buttons allow us to keep a track of the complete process of any function and it also allows us to navigate to any other screen or window through the shortcut buttons provided on the same. Sage X3 also has many buttons on header level fields or line level fields which we can use to jump specific records of the other function. For e.g. description field of product of line level of sales order screen we have a button upon clicking of which we can be able to jump to the specific product record which is currently visible in line level of that particular order. So that is one of the functionality that X3 offers.

Along with above functionality X3 allows us to add any other customized button to the window of the same which can be attached to a customized screen and by using the same we can navigate to the screen and can perform the activities on the same. Also by adding the same buttons to the field or some grid level field we can be able to jump any customized function or even standard functions like sales order, delivery etc. depending on the usage.

In this blog we are going to see how we can add a button to any field either on header level or grid level and then by using the same button click we will jump to a specific function like order or delivery. As said user can jump to any specific screen depending on the object which he wants to jump.

Steps to be followed :

First we need to navigate to Development -> Screen (GESAMK) function and then

  • We need to add buttons through action on screen.
  • Below is the screenshot of the same.
Fig : Screen
Fig: Action
  • We need to write code for jumping to the specific screen where we need to pass the object of the function on which we need to jump.
  • Below is the snippet of the code for the same.
Fig : Code

“POD” is the object where we are supposed to jump. It can be changed depending on your needs.

“GBIDC1” is the record of that same object.

  • By using the above code we can jump to the screen of the required object.
  • But in order to jump to the specific record we just need to filter out the record in “FILTRE” action of the object in code.

By using the above code we can jump to the screen of the required object.

About Us

Greytrix – a globally recognized and one of the oldest Sage Development Partner is a one-stop solution provider for Sage ERP and Sage CRM organizational needs. Being acknowledged and rewarded for multi-man years of experience, we bring complete end-to-end assistance for your technical consultations, product customizations, data migration, system integrations, third-party add-on development and implementation competence.

Greytrix caters to a wide range of Sage X3, a Sage Business Cloud Solution, offerings. Our unique GUMU™ integrations include Sage X3 for Sage CRMSalesforce.com, Dynamics 365 CRM and Magento eCommerce along with Implementation and Technical Support worldwide for Sage X3. Currently we are Sage X3 Implementation Partner in East Africa, Middle East, Australia, Asia, US, UK. We also offer best-in-class Sage X3 customization and development services, integrated applications such as POS | WMS | Payment Gateway | Shipping System | Business Intelligence | eCommerce and have developed add-ons such as Catch – Weight  and Letter of Credit and India Legislation for Sage X3 to Sage business partners, end users and Sage PSG worldwide.

Greytrix is a recognized Sage champion ISV Partner for GUMU™ Sage X3 – Sage CRM integration also listed on Sage Marketplace; GUMU™ integration for Sage X3 – Salesforce is a 5-star rated app listed on Salesforce AppExchange and GUMU™ integration for Dynamics 365 CRM – Sage ERP listed on Microsoft AppSource.

For more information on Sage X3 Integration and Services, please contact us at x3@greytrix.com, We will like to hear from you.

Printing labels with barcode for work-order in sage X3 manufacturing process

$
0
0

Applying labels to your manufactured inventory is the first step in automating your warehouse and improving the overall traceability of your stock. Sage X3 provides the features of printing label for work order for production tracking etc. which will help manufacturing business to improve their stock traceability. In this blog we will see how to print the label for created work order.

New Stuff: – How to flow custom fields from Customer master to Sales order screen

As we all know that Work order is an order to make one or more products. Conventionally, the work order uses a bill of materials (BOM) to create a list of materials to be issued, and a routing to make a list of operations to be performed on work centers. Sometimes as per the business requirement there is necessary to trace the labeling of the product before production tracking so, let see how to print the label for work order.

There are two types of report are present in report dictionary to print the label i.e. one is ETIQPROD which is called as Manufacturing label and another is ETIQ01 which is called as Demonstration Label.

To check the report you can navigate to Development >> Script Dictionary >> Report.

Report Dictionary
Report Dictionary

Now to print the label for the created work order, we need to set the stock label format in to the respective product. You can see in below screenshot. Here we have selected product “SFI009” which we will use further in to work order. To set the STK Label format follow below navigation.

Go Product screen >> Open any product >> go to the Unit Of Measure Tab>> check the field “STK Label Format.

Here you can select the format as “ETIQ01” which is demonstration label. Save the product with changes.

Product Screen
Product Screen

Now we will create the work order using the same product. To create the work order navigate to below path.

Manufacturing >> Planning >> Work order screen. Select the Planning site, Production site and other mandatory details >> Then select the same product for which you have set the Stock label format and click on create to create the Work order. Once you have created the work order just click on action button at the right top. Go to Report section and click on labels.

Work Order
Work Order

System will open the Print label screen once you click on label option. The screen will be populated with auto loaded values from the work order. To print the label for the product follow below steps:

  • Go to line level>> select label format as “ETIQPROD”
  • Select the Destination
  • Also check the server is properly populated in the field. If not then set default destination from the destination screen so while printing the label system will take the default print server which is set for the folder.
  • Click on Print button to generate the label.
Print label Screen
Print label Screen

Label will be generate with the barcode and other product information such as Product code, Product description, Stock Unit, work order number and quantity.

Label printed with barcode

This is how you can generate or print the label for work order and before production traction in manufacturing module of sage X3.

About Us

Greytrix – a globally recognized and one of the oldest Sage Development Partner is a one-stop solution provider for Sage ERP and Sage CRM organizational needs. Being acknowledged and rewarded for multi-man years of experience, we bring complete end-to-end assistance for your technical consultations, product customizations, data migration, system integrations, third-party add-on development and implementation competence.

Greytrix caters to a wide range of Sage X3, a Sage Business Cloud Solution, offerings. Our unique GUMU™ integrations include Sage X3 for Sage CRMSalesforce.com, Dynamics 365 CRM and Magento eCommerce along with Implementation and Technical Support worldwide for Sage X3. Currently we are Sage X3 Implementation Partner in East Africa, Middle East, Australia, Asia, US, UK. We also offer best-in-class Sage X3 customization and development services, integrated applications such as POS | WMS | Payment Gateway | Shipping System | Business Intelligence | eCommerce and have developed add-ons such as Catch – Weight  and Letter of Credit and India Legislation for Sage X3 to Sage business partners, end users and Sage PSG worldwide.

Greytrix is a recognized Sage champion ISV Partner for GUMU™ Sage X3 – Sage CRM integration also listed on Sage Marketplace; GUMU™ integration for Sage X3 – Salesforce is a 5-star rated app listed on Salesforce AppExchange and GUMU™ integration for Dynamics 365 CRM – Sage ERP listed on Microsoft AppSource.

For more information on Sage X3 Integration and Services, please contact us at x3@greytrix.com, We will like to hear from you.

This is how you can generate or print the label for work order and before production traction in manufacturing module of sage X3.

Routing functionality in Sage X3

$
0
0

There are business process in which component are not be readily available at the start of the production process, routing code is used to define the specific operation or stage in the manufacturing process at which this component must be available to it. Holding back availability of this component until it is needed can be particularly beneficial in some circumstances.

New Stuff:- Printing labels with barcode for work-order in sage X3 manufacturing process

Sage X3 provides a feature of Routing which is used to define the sequence processes required to produce, or process, a particular product. This helps in manufacturing process by managing availability of components product.

Every routing is a sequence of operations and tools that are involved in producing (manufacturing) or processing a particular product or assembly (bill of materials). Each routing is associated with the stock item that is being made or processed. Routings enable you to define and reference information for many of the shop floor processes in your business, providing shop floor control when used with Work orders.

Multiple routings can be defined for a single product. Each routing code can be assigned specific management features. These include restriction of the routing to a specific site and to specific areas of functionality (for use in a manufacturing environment, for costing or for capacity planning).

Routing-Screen
Routing-Screen

Path: All>Manufacturing>Technical data>Routings

The Routings function contains one section per feature of the requirement let’s see in detail below:

Home section. The Home section provides key tracking information. It contains the key field – Use status – which indicates the current status on the shop floor of the preparation of the operations and tools.

Header. This is the main section for this function. You use it to define management controls.

The Home section provides key tracking information. The critical field in the Home section is the Use status field. This field indicates the current status on the shop floor of the preparation of the operations and tools in the routing. You can pin the Home section to stop it scrolling off the screen.

Routings. Use this section to define the operations that are used in the routing.

Every routing is a sequence of operations and tools that are involved in producing (manufacturing) or processing a particular product or assembly (bill of materials). You define the details of the resources and operations to be assembled into each stage of your routing.

Scheduling. Use this section to provide the scheduling details for each operation.

Scheduling details include the sequence in which the operations are performed. Validation of the scheduling grid checks the coherence of the routing operations. For example, it checks the last operation does not have a next operation, the schedule does not loop and at least one production operation has been declared.

This routing code is defines against the BOM components product and this routing code helps to calculate and schedule the availability date of the components which in later stage user in the work order. In work order user can easily view the start date and end date and plan in advance

Routing helps us to largely manage and plan the manufacturing process in which multi-level production of a product is involved by providing function to user to easily manage availability of the component for production.

Hope this blog helps you in using routing functionality and ease your shop floor production process!

About Us

Greytrix – a globally recognized and one of the oldest Sage Development Partner is a one-stop solution provider for Sage ERP and Sage CRM organizational needs. Being acknowledged and rewarded for multi-man years of experience, we bring complete end-to-end assistance for your technical consultations, product customizations, data migration, system integrations, third-party add-on development and implementation competence.

Greytrix caters to a wide range of Sage X3, a Sage Business Cloud Solution, offerings. Our unique GUMU™ integrations include Sage X3 for Sage CRMSalesforce.com, Dynamics 365 CRM and Magento eCommerce along with Implementation and Technical Support worldwide for Sage X3. Currently we are Sage X3 Implementation Partner in East Africa, Middle East, Australia, Asia, US, UK. We also offer best-in-class Sage X3 customization and development services, integrated applications such as POS | WMS | Payment Gateway | Shipping System | Business Intelligence | eCommerce and have developed add-ons such as Catch – Weight  and Letter of Credit and India Legislation for Sage X3 to Sage business partners, end users and Sage PSG worldwide.

Greytrix is a recognized Sage champion ISV Partner for GUMU™ Sage X3 – Sage CRM integration also listed on Sage Marketplace; GUMU™ integration for Sage X3 – Salesforce is a 5-star rated app listed on Salesforce AppExchange and GUMU™ integration for Dynamics 365 CRM – Sage ERP listed on Microsoft AppSource.

For more information on Sage X3 Integration and Services, please contact us at x3@greytrix.com, We will like to hear from you.

How to solve Error: FILE Reading Error STOPAR ‘site’ while validating a Stock Count

$
0
0

Stock Count is the process of tracking the actual physical stock available in the warehouse. Stock count is to provide an audit of existing stock. It is the process of physically counting is to check the actual stock on different sites. sites can also include any storage or warehouse facility. A stock count will identify any issues that arise in a loss of stock as well as offer data to conduct regular product performance analysis so as to maximize gross profit margins.

Why Stock Count is  important

Stock count is important because it allow to know how much inventory is available at that moment.

  • Preventing stock outs or overstocking: Keeping regular count of inventory gives more information for demand forecasting. Better planning leads to optimized stock levels, meaning less revenue lost.
  • Identifying and preventing loss: Understanding stock on warehouse helps to prevent the inventory loss
  • Better accuracy: stock levels provides more clarity for entire supply chain.

Error: ‘FILE Reading Error STOPAR’:

Create a stock count session:

Navigational path: Stock>counts>stock count sessions     

A stock count session is generated to select the products and /or locations to be counted along with other parameters and selection criteria.

  • Enter the site, selection criteria to select the products based on Product range, lot range, product category range, buyer range, location types, location, Business partner etc.
  • Click on create button and Simulation of the session can be created by clicking on Simulation button.
  • The Generation button is used to generate the stock count list(s) which are then displayed in the tab Lists.

On click of action button of count worksheet, Refer Fig1.1.count lists available which directed to stock count document.

Fig-1.1-Navigating to count list from stock count session
  • Enter the counted quantity for a line either in packing units or in stock units i.e. the stock on ‘Stock STK’ field and the stock count on ‘Counted stock PAC’ fields
  • After checking the quantity click on ‘Save’
Fig-1.2 validating stock count

Click on the ‘Validation’ button to validate the stock count. Error occurred during  validation

Fig-1.3-Error while validating sock count

Solution for solving ‘FILE Reading Error STOPAR’ error:

Creating a stock parameter for that particular site:

Navigational path: Setup>Stock>Stock Parameters

Stock parameter is used to establish the stock-site parameters that will then be used in the replenishment calculation, class A, B, C physical stock counts processes and the adjustment of the stock shortages.

It is possible to create a default setup linked to the site for all the product categories or to establish a specific setup for a site and a given product category. Table used for stock parameter:STOPAR

Fig-2.1-Stock parameters

Refer Blog – steps for creating stock parameters:

How to solve “Stocks-Site parameters are not defined” error while importing file using ‘INV’ Template.

This blog helps us to understand why stock count is performing at regular intervals, pre-determined inventory counts is helpful in revenue growth and how to resolve the error during validation of stock count list.

About Us

Greytrix – a globally recognized and one of the oldest Sage Development Partner is a one-stop solution provider for Sage ERP and Sage CRM organizational needs. Being acknowledged and rewarded for multi-man years of experience, we bring complete end-to-end assistance for your technical consultations, product customizations, data migration, system integrations, third-party add-on development and implementation competence.

Greytrix caters to a wide range of Sage X3, a Sage Business Cloud Solution, offerings. Our unique GUMU™ integrations include Sage X3 for Sage CRMSalesforce.com, Dynamics 365 CRM and Magento eCommerce along with Implementation and Technical Support worldwide for Sage X3. Currently we are Sage X3 Implementation Partner in East Africa, Middle East, Australia, Asia, US, UK. We also offer best-in-class Sage X3 customization and development services, integrated applications such as POS | WMS | Payment Gateway | Shipping System | Business Intelligence | eCommerce and have developed add-ons such as Catch – Weight  and Letter of Credit and India Legislation for Sage X3 to Sage business partners, end users and Sage PSG worldwide.

Greytrix is a recognized Sage champion ISV Partner for GUMU™ Sage X3 – Sage CRM integration also listed on Sage Marketplace; GUMU™ integration for Sage X3 – Salesforce is a 5-star rated app listed on Salesforce AppExchange and GUMU™ integration for Dynamics 365 CRM – Sage ERP listed on Microsoft AppSource.

For more information on Sage X3 Integration and Services, please contact us at x3@greytrix.com, We will like to hear from you.

Variable Class Function inside Calculator

$
0
0

There is a tool in X3 hidden inside the calculator that will tell you everything about the function that you are currently using. Note that this only works with Classic (AKA convergent) functions that are data entry type functions. So, functions under the administration module (for example) will not have this ability as they are not classic functions (i.e. Entry type functions). For example, if you are using Sales order i.e. Function “GESSOH”

it will show are the statistics related to the function “GESSOH”.

  • Go to Right list click on Help >> Diagnosis >> Calculator
Fig : Calculator

Click on the right side of the calculator(refer the below screenshot).

Fig : Calculator

You will see a list with four options. Click on “Variable class”.

 Calculator options
Fig : Calculator options
  • The following screens should load. So, what this tool does is it tells you statistics on the current function you are in. So since I started with Sales Order (GESSOH) it is going to show me the stats for GESSOH.

The first section is the Class Selection. It allows you to view the values and type of classes specific to the function loaded (GESSOH).

  1. The first screen shows the all the classes related top that perticular function and the different variables and fields used in the function and also their respective values.
Fig : Class selection screen

2. This is followed by the Memory Section. Memory allows you to see current memory used as it pertains to the MAXMEM field. It also shows you defaulted classes so you can look them up independently.

Fig : Memory screen

3. Next after that is the Screens Section. The Screens allow you to view what screen codes are accessed by the function.

Fig. Screen used in current function

4. Followed by that is the Tables Section. The Tables show you what Tables are accessed by the function.   Note that there is a max number of tables that a function can open.. The point is there is a max. If you look closely at the table list, you can see some other tables that are not initially part of Sales Order (GESSOH) like BPCUSTOMER table which goes to the Customer function (GESBPC) or ITMMASTER which goes to the Products function (GESITM). So, you can see how each function is tied to each-other.

Fig: Tables used in current function

5. After that is the Variable Class section. This section allows you to see what classes are actually in use currently as opposed to the Class Section where you can lookup all the Classes used for the function.

Fig : Variables used in current function.

6. The next screen “Processing” displays the script files that are being currently used by the function. Processing Section shows what processes are currently being accessed like MENU.adx for getting menus and stuff like that. It can be handy if your looking to see if any custom adx processes are currently running.

Fig.: Script files used in current function

7. And lastly, the Sequential Files section. This section shows what specific files are opened when using the function like mappings and print directories.

Fig : Sequential files used in current function

About Us

Greytrix – a globally recognized and one of the oldest Sage Development Partner is a one-stop solution provider for Sage ERP and Sage CRM organizational needs. Being acknowledged and rewarded for multi-man years of experience, we bring complete end-to-end assistance for your technical consultations, product customizations, data migration, system integrations, third-party add-on development and implementation competence.

Greytrix caters to a wide range of Sage X3, a Sage Business Cloud Solution, offerings. Our unique GUMU™ integrations include Sage X3 for Sage CRMSalesforce.com, Dynamics 365 CRM and Magento eCommerce along with Implementation and Technical Support worldwide for Sage X3. Currently we are Sage X3 Implementation Partner in East Africa, Middle East, Australia, Asia, US, UK. We also offer best-in-class Sage X3 customization and development services, integrated applications such as POS | WMS | Payment Gateway | Shipping System | Business Intelligence | eCommerce and have developed add-ons such as Catch – Weight  and Letter of Credit and India Legislation for Sage X3 to Sage business partners, end users and Sage PSG worldwide.

Greytrix is a recognized Sage champion ISV Partner for GUMU™ Sage X3 – Sage CRM integration also listed on Sage Marketplace; GUMU™ integration for Sage X3 – Salesforce is a 5-star rated app listed on Salesforce AppExchange and GUMU™ integration for Dynamics 365 CRM – Sage ERP listed on Microsoft AppSource.

For more information on Sage X3 Integration and Services, please contact us at x3@greytrix.com, We will like to hear from you.


Rejection Label in Sage X3

$
0
0

Sage X3 provides us a Quality Control module that is used to carry out the quality control and confirm the Product availability to place inventory into the stock.

Once the product received in the receipt from the Supplier then the creation of Receipt entry and according to configuration process product must pass through quality control for quality verification purpose and accordingly stock identified by status. (Refer below identification code for product status)

“A“ that indicates acceptance status for the product
“Q“ indicates pending validation status for the product
“R“ indicates the Rejection status for the product

In this blog, we will discuss about Rejection label generation process for those products which got rejected from the Quality control module.

Let’s understand the process with a single example.

According to setup once the user creates a Receipt entry from the PO then the Analysis request gets created automatically. (Refer below screenshot for more Clarification)

Quality Control Entry

If you can see above the Quality control screen, the Analysis request was successfully created based on the Purchase Receipt entry also we have highlighted the same Receipt number with blue Border and the Analysis request with Red Border.

Now as per the current client current requirement the Rejection label will be print-based on the Qty present from Detail level, in case there will be 10 Qty present then 10 label will be print respectively for each Product.

Below is the Rejection Label format as per requirement:

Rejection Label - Output
Rejection Label – Output

Here is some Fields mapping that we have used in the Rejection label.

1. REJECTED: Hardcoded Text.

2. QC Ref No: – Analysis Request No. from Quality Control screen.

3. Dt: Control end date from Quality Control

4. Material Name: All –Stock—Quality Control –Product Disc

5. Batch No. : All –Stock—Quality Control –Quality control Detail-Lot

The purpose of this blog that users can print label-wise Products along with required details and easily keep tracking of rejected Inventories.

About Us

Greytrix – a globally recognized and one of the oldest Sage Development Partner is a one-stop solution provider for Sage ERP and Sage CRM organizational needs. Being acknowledged and rewarded for multi-man years of experience, we bring complete end-to-end assistance for your technical consultations, product customizations, data migration, system integrations, third-party add-on development and implementation competence.

Greytrix caters to a wide range of Sage X3, a Sage Business Cloud Solution, offerings. Our unique GUMU™ integrations include Sage X3 for Sage CRMSalesforce.com, Dynamics 365 CRM and Magento eCommerce along with Implementation and Technical Support worldwide for Sage X3. Currently we are Sage X3 Implementation Partner in East Africa, Middle East, Australia, Asia, US, UK. We also offer best-in-class Sage X3 customization and development services, integrated applications such as POS | WMS | Payment Gateway | Shipping System | Business Intelligence | eCommerce and have developed add-ons such as Catch – Weight  and Letter of Credit and India Legislation for Sage X3 to Sage business partners, end users and Sage PSG worldwide.

Greytrix is a recognized Sage champion ISV Partner for GUMU™ Sage X3 – Sage CRM integration also listed on Sage Marketplace; GUMU™ integration for Sage X3 – Salesforce is a 5-star rated app listed on Salesforce AppExchange and GUMU™ integration for Dynamics 365 CRM – Sage ERP listed on Microsoft AppSource.

For more information on Sage X3 Integration and Services, please contact us at x3@greytrix.com, We will like to hear from you.

How to personalize the layout of screen in Sage X3 V12

$
0
0

In Sage X3, screens play a very important role and their layouts too. Sometimes, customer wants little more different layout than the standard screens of Sage X3.

One exciting feature in Sage X3 is that it allows the user to change or modify with few possible options for customized screen layout for better user experience. In this blog, we will show you how we can change screen layouts in sage X3 V12.

Consider a test screen consisting of few fields as shown in below figure.

Fig01: Test Screen

As we can see in the above figure, the fields are not aligned properly. For moving field to the next line there is option of “break after” in screen where by selecting yes, the field can be moved to the next line. 

Navigate to All – > Development -> Script Dictionary -> Screens 

Go to fields and select yes after which field you want the other fields should come in next line as shown in the below figure.

Fig02: Break after

Save the changes and validate the screen and after that global validating the respective window. You will be able to see the fields in the next line wherever select yes in break after option as shown in below figure.

Fig 03: Text screen

For personalizing the screen layout, navigate to the screen and click on the text “Default” at the top right corner of the screen and then click on “Customize page” option as shown in below figure.

Fig 04: Customize field

After clicking on the “Customize page” option below screen appears where you will be able to see the sections and blocks in the screen in the left list of the screen.

Fig 05: Customize layout page

We can use break after option directly here while customizing layout. Just click on the “Enter key symbol”  for applying break after a particular field as shown in below figure.

Fig 06: Break after option

In the left list of screen, on clicking three dots in the block you will be able to see two options “Columns” and “Stacked” as shown in below figure.

Fig 07: Column and stacked option

After selecting “ON” in columns, the fields will get aligned in columns format as shown in below figure.

Fig 08: Column selection

After selecting “ON” in stacked, the fields will get aligned in stacked format as shown in below figure.

Fig 09: Stack selection

Click on Save button and then click on “Save as” button.

After that the below screen will pop up and enter the fields such as code, title, description and select global in save as option in layout configuration.

Fig 10: Saving Layout

After clicking on OK button, you will be able to see your personalize layout for a particular screen

This blog helps us to personalize the layout of a particular screen in sage X3 V12.

About Us

Greytrix – a globally recognized and one of the oldest Sage Development Partner is a one-stop solution provider for Sage ERP and Sage CRM organizational needs. Being acknowledged and rewarded for multi-man years of experience, we bring complete end-to-end assistance for your technical consultations, product customizations, data migration, system integrations, third-party add-on development and implementation competence.

Greytrix caters to a wide range of Sage X3, a Sage Business Cloud Solution, offerings. Our unique GUMU™ integrations include Sage X3 for Sage CRMSalesforce.com, Dynamics 365 CRM and Magento eCommerce along with Implementation and Technical Support worldwide for Sage X3. Currently we are Sage X3 Implementation Partner in East Africa, Middle East, Australia, Asia, US, UK. We also offer best-in-class Sage X3 customization and development services, integrated applications such as POS | WMS | Payment Gateway | Shipping System | Business Intelligence | eCommerce and have developed add-ons such as Catch – Weight  and Letter of Credit and India Legislation for Sage X3 to Sage business partners, end users and Sage PSG worldwide.

Greytrix is a recognized Sage champion ISV Partner for GUMU™ Sage X3 – Sage CRM integration also listed on Sage Marketplace; GUMU™ integration for Sage X3 – Salesforce is a 5-star rated app listed on Salesforce AppExchange and GUMU™ integration for Dynamics 365 CRM – Sage ERP listed on Microsoft AppSource.

For more information on Sage X3 Integration and Services, please contact us at x3@greytrix.com, We will like to hear from you.

How to display reserved quantity message in Sales Order screen in Sage X3

$
0
0

The Sales Order, sometimes abbreviated as SO, is an order issued by a business to a customer. A sales order is a document generated by the seller specifying the details about the product or services ordered by the customer. Along with the product and service details, sales order consists of price, quantity etc.

Order entry allows you to record information about your customers and the items they have ordered. When you enter a sales order, the system automatically enters pertinent information that currently exists in the customer, item, preference, and pricing records. Sales order processing begins as soon as you complete order entry.

A sale order usually carries information such as customer’s name, shipping address, transaction date, products ordered, descriptions, units of measure, quantities, prices, taxes, etc. The key details of the sales order are listed below:

  • Bill to Customer information.
  • Ship–to Customer information
  • Information about product or service
  • Price before taxes
  • Tax, delivery, and shipping charges
  • Total price after taxes

Bill-to Customer information: The bill-to address is where you send customer invoices and other billing-related information.

Ship-to Customer information: the ship-to customer information covers all of the documentation that relates to shipping orders to customers

Reserved Quantity: Entering in a reserved quantity will remove that quantity from the product’s available quantities. The On Hand quantity will still reflect the true on hand number. An example of how the reserved quantity would be use is for items you sell, but you also use internally. For example, let’s say you have 100 quantities on hand. Typically you sell this to your customers as a repair part, but occasionally your own machines require this part as well. You can set your warehouse to have a reserved quantity of 20 for this item. The items availability will decrease to 80, however your On Hand will still reflect 100. This will allow you to record the proper value and quantity of your inventory, but it will also keep you from selling all of your widget, thus allowing you to use a small reserved quantity internally.

Now, in Sage X3, there is a setup where we can display the reserved quantity for the customer of particular product in Sales Order screen. For displaying that, follow below steps.

Step1:

  1. Navigate to: Setup -> General Parameters -> Parameter Values
  2. Select VEN Sales ->  Folder (SEED)
  3. Select  SAL (Order allocation rules)
  4. Change the values of below highlighted  parameter to ‘On request’ .
    1. USERERBPC (consumption of customer reservation).
Fig 01: Parameter Values

Step2:

Navigate to: Sales -> Order -> order

  1. Create new Sales Order transaction.
  2. Enter all the mandatory data.
  3. Enter product on line level.
  4. Enter quantity and then tab out.
  5. Check now reserved quantity for that customer is getting displayed on screen.

Refer below screen shot:

Fig 02: Sales Order

Note: Mainly reserve the product’s quantity for particular customer in the customer allocation screen.

By doing all the above steps we can display the reserved quantity message for particular customer in Sales Order Screen.

About Us

Greytrix – a globally recognized and one of the oldest Sage Development Partner is a one-stop solution provider for Sage ERP and Sage CRM organizational needs. Being acknowledged and rewarded for multi-man years of experience, we bring complete end-to-end assistance for your technical consultations, product customizations, data migration, system integrations, third-party add-on development and implementation competence.

Greytrix caters to a wide range of Sage X3, a Sage Business Cloud Solution, offerings. Our unique GUMU™ integrations include Sage X3 for Sage CRMSalesforce.com, Dynamics 365 CRM and Magento eCommerce along with Implementation and Technical Support worldwide for Sage X3. Currently we are Sage X3 Implementation Partner in East Africa, Middle East, Australia, Asia, US, UK. We also offer best-in-class Sage X3 customization and development services, integrated applications such as POS | WMS | Payment Gateway | Shipping System | Business Intelligence | eCommerce and have developed add-ons such as Catch – Weight  and Letter of Credit and India Legislation for Sage X3 to Sage business partners, end users and Sage PSG worldwide.

Greytrix is a recognized Sage champion ISV Partner for GUMU™ Sage X3 – Sage CRM integration also listed on Sage Marketplace; GUMU™ integration for Sage X3 – Salesforce is a 5-star rated app listed on Salesforce AppExchange and GUMU™ integration for Dynamics 365 CRM – Sage ERP listed on Microsoft AppSource.

For more information on Sage X3 Integration and Services, please contact us at x3@greytrix.com, We will like to hear from you.

PAN No Field Validation in Sage X3

$
0
0

Sage X3 has Supplier master where we can define information about supplier, where we have added PAN number field which will store PAN number of supplier. So for that field one of our client requested us to add validation for PAN number which can accept only string in PAN format i.e. length of the string should be 10 digit only first 5 characters should be alphabets, next 4 should be numbers and last one should be alphabet.

So to achieve this requirement programmatically we have added some code on “After Change(AM_XXX)” action on PAN number field:

New Stuff: How to display reserved quantity message in Sales Order screen in Sage X3

#################################################################################

SUBPROG PANValidation(PANNO)
VALUE CHAR PANNO

Local integer I : I = 0

Local integer k : k = 0

LOCAL CHAR TEMP(10) : TEMP = PANNO

Local CHAR CH1(5)

Local CHAR CH2(4)

Local CHAR CH3(1)

IF LEN(TEMP) = 10

CH1 = NUM$(LEFT$(TEMP,5))

CH2 = NUM$(SEG$(TEMP,6,9))

CH3 = NUM$(SEG$(TEMP,10,10))

I = 0

k = 0
for I = 1 to len(CH1)
k = find (seg$(CH1,I,I), “A”,”B”,”C”,”D”,”E”,”F”,”G”,”H”,”I”,”J”,”K”,”L”,”M”,”N”,”O”,”P”,”Q”,”R”,”S”,”T”,”U”,”V”,”W”,”X”,”Y”,”Z”)
IF k = 0

INFBOX “INVALID PAN NUMBER”

mkstat=2

end

ENDIF

NEXT

I = 0

k = 0
for I = 1 to len(CH2)
k = find (seg$(CH2,I,I), “0”,”1″,”2″,”3″,”4″,”5″,”6″,”7″,”8″,”9″)
IF k = 0
INFBOX “INVALID PAN NUMBER”

mkstat=2
end
ENDIF

NEXT

I = 0

k = 0
for I = 1 to len(CH3)

k = find (seg$(CH3,I,I), “A”,”B”,”C”,”D”,”E”,”F”,”G”,”H”,”I”,”J”,”K”,”L”,”M”,”N”,”O”,”P”,”Q”,”R”,”S”,”T”,”U”,”V”,”W”,”X”,”Y”,”Z”)
IF k = 0
INFBOX “INVALID PAN NUMBER”
mkstat=2
end
ENDIF

NEXT

ELSE
IF LEN(TEMP) <> 0
INFBOX “INVALID PAN NUMBER”
mkstat=2
ENDIF
ENDIF
END

#################################################################################

In above script we have created one subprogram named as “PANValidation” which is called in ‘after change’ action of PAN number field and has parameter as PAN number. In subprogram firstly we have stored PAN number in TEMP variable and then segregated TEMP to 3 different variables. After this we have validated every character of every variable with alphabet & number as shown in above script.

According to above script if any character of string is not following the condition mentioned in script then it will popup message of “INVALID PAN NUMBER” and not allow to proceed further up to user is not entering valid format.

In this way, we can do PAN number validation on particular field for a specific format of a string in Sage X3.

About Us

Greytrix – a globally recognized and one of the oldest Sage Development Partner is a one-stop solution provider for Sage ERP and Sage CRM organizational needs. Being acknowledged and rewarded for multi-man years of experience, we bring complete end-to-end assistance for your technical consultations, product customizations, data migration, system integrations, third-party add-on development and implementation competence.

Greytrix caters to a wide range of Sage X3, a Sage Business Cloud Solution, offerings. Our unique GUMU™ integrations include Sage X3 for Sage CRMSalesforce.com, Dynamics 365 CRM and Magento eCommerce along with Implementation and Technical Support worldwide for Sage X3. Currently we are Sage X3 Implementation Partner in East Africa, Middle East, Australia, Asia, US, UK. We also offer best-in-class Sage X3 customization and development services, integrated applications such as POS | WMS | Payment Gateway | Shipping System | Business Intelligence | eCommerce and have developed add-ons such as Catch – Weight  and Letter of Credit and India Legislation for Sage X3 to Sage business partners, end users and Sage PSG worldwide.

Greytrix is a recognized Sage champion ISV Partner for GUMU™ Sage X3 – Sage CRM integration also listed on Sage Marketplace; GUMU™ integration for Sage X3 – Salesforce is a 5-star rated app listed on Salesforce AppExchange and GUMU™ integration for Dynamics 365 CRM – Sage ERP listed on Microsoft AppSource.

For more information on Sage X3 Integration and Services, please contact us at x3@greytrix.com, We will like to hear from you.

Validation on Miscellaneous receipt based on Tolerance value

$
0
0

For any transaction in Sage X3, user can enter price manually as per his/her requirement. But one of our client requested to add validation on the price field in Miscellaneous Receipt Transaction.

To achieve this requirement, we have added “Tolerance Percentage” field in the Product master as shown in the below screenshot. In which user can define tolerance percentage for calculation of the Price range of that particular product at the time of creating Miscellaneous Receipt Transaction using the same product.

New Stuff: PAN No Field Validation in Sage X3

[Product Master]
[Product Master]

We have defined ‘10’ tolerance percentage for Product “030011” in the Product Master.

Now, we will check the costing method and Cost of the Product “030011” in the Product Site.

[Product Site - Costing Method]
[Product Site – Costing Method]

As you can see, costing method for Product “030011” is STD i.e. Standard. So we will take Standard cost value in the calculation. If costing method is AVC i.e. Average cost then we have to consider Average cost value in calculation.

[Product Site - Standard Cost]
[Product Site – Standard Cost]

As shown in the above screenshot, standard cost for product “030011” is 98.3509. Now, we will calculate 10%(tolerance percentage already defined in product master) on this standard cost value and 10% of 98.3509 is 9.83509.

Now, we will add 10 % value in the standard cost and subtract 10% value from the standard cost for calculating the price range for that product “030011”.

By adding 10% in the standard cost we will get: 98.3509 + 9.83509 = 108.1859

By subtracting 10% from the standard cost we will get: 98.3509 – 9.83509 = 88.5159

So the price range which will be considered for Product “030011” is from 108.1859 to 88.5159. User can enter any value from this particular range while creating Miscellaneous Receipt Transaction for that particular product.

[Miscellaneous Receipt Example - 1]
[Miscellaneous Receipt Example – 1]

We have entered 98.3509 in the price field for product “030011” which is between the calculated range. Therefore it has accepted the price and entry will be created successfully. But if user tries to enter any other value which is not from the given range then it will not allow to create Miscellaneous Receipt Transaction and will give you an error “Price is not as per tolerance percentage” as shown in the below screenshot.

[Miscellaneous Receipt Example - 2]
[Miscellaneous Receipt Example – 2]

Hence by defining tolerance percentage in the Product master, user can restrict miscellaneous receipt creation for any product if price entered is not between the calculated range as per the tolerance percentage.

About Us

Greytrix – a globally recognized and one of the oldest Sage Development Partner is a one-stop solution provider for Sage ERP and Sage CRM organizational needs. Being acknowledged and rewarded for multi-man years of experience, we bring complete end-to-end assistance for your technical consultations, product customizations, data migration, system integrations, third-party add-on development and implementation competence.

Greytrix caters to a wide range of Sage X3, a Sage Business Cloud Solution, offerings. Our unique GUMU™ integrations include Sage X3 for Sage CRMSalesforce.com, Dynamics 365 CRM and Magento eCommerce along with Implementation and Technical Support worldwide for Sage X3. Currently we are Sage X3 Implementation Partner in East Africa, Middle East, Australia, Asia, US, UK. We also offer best-in-class Sage X3 customization and development services, integrated applications such as POS | WMS | Payment Gateway | Shipping System | Business Intelligence | eCommerce and have developed add-ons such as Catch – Weight  and Letter of Credit and India Legislation for Sage X3 to Sage business partners, end users and Sage PSG worldwide.

Greytrix is a recognized Sage champion ISV Partner for GUMU™ Sage X3 – Sage CRM integration also listed on Sage Marketplace; GUMU™ integration for Sage X3 – Salesforce is a 5-star rated app listed on Salesforce AppExchange and GUMU™ integration for Dynamics 365 CRM – Sage ERP listed on Microsoft AppSource.

For more information on Sage X3 Integration and Services, please contact us at x3@greytrix.com, We will like to hear from you.

How to fetch the Work center while printing the report in Sage X3

$
0
0

Recently there was a requirement in Sage X3 to create a report which will fetch the data on the basis of Work center. In this report we have fetched the Work center wise data and grouped the product with respect to quantity. So we have created the report for Work center which has the filter criteria for work center, site, product and date range.

New Stuff: Validation on Miscellaneous receipt based on Tolerance value

[Report Dictionary-1]
[Report Dictionary-1]

As shown in above screenshot, we have created the new report code in which we have added the filter criteria of date range, product code range, site range and work center range and saved it. When we click on Print button, and then click on finder we will be able to select the product which we wish to print and also select the respective site for the same. But when we click on work center finder, it does not fetch the work centers which are present in the master.

[Report Dictionary-2]
[Report Dictionary-2]

As you can see in the above screenshot, we are unable to fetch the work center when we click on finder. To solve this concern we will be creating a custom data type named “ZWST”.

[Custom Data type - ZWST]
[Custom Data type – ZWST]

In the above screenshot, we have created the custom data type “ZWST” with reference to the standard data type. In Convergence tab, in the Action table, we have added the selection type “SWSTB” which is the standard action code used for work center selection.

[Report Dictionary - 3]
[Report Dictionary – 3]

Further we have saved the changes and validated the data type created and also saved the report code as shown in the above screenshot.

[Work center finder]
[Work center finder]

Thus, once we click on Print button for printing the report we will now be able to select the work centers which are present in the master. As shown in above screenshot, now we are able to fetch work center while printing the report.

About Us

Greytrix – a globally recognized and one of the oldest Sage Development Partner is a one-stop solution provider for Sage ERP and Sage CRM organizational needs. Being acknowledged and rewarded for multi-man years of experience, we bring complete end-to-end assistance for your technical consultations, product customizations, data migration, system integrations, third-party add-on development and implementation competence.

Greytrix caters to a wide range of Sage X3, a Sage Business Cloud Solution, offerings. Our unique GUMU™ integrations include Sage X3 for Sage CRMSalesforce.com, Dynamics 365 CRM and Magento eCommerce along with Implementation and Technical Support worldwide for Sage X3. Currently we are Sage X3 Implementation Partner in East Africa, Middle East, Australia, Asia, US, UK. We also offer best-in-class Sage X3 customization and development services, integrated applications such as POS | WMS | Payment Gateway | Shipping System | Business Intelligence | eCommerce and have developed add-ons such as Catch – Weight  and Letter of Credit and India Legislation for Sage X3 to Sage business partners, end users and Sage PSG worldwide.

Greytrix is a recognized Sage champion ISV Partner for GUMU™ Sage X3 – Sage CRM integration also listed on Sage Marketplace; GUMU™ integration for Sage X3 – Salesforce is a 5-star rated app listed on Salesforce AppExchange and GUMU™ integration for Dynamics 365 CRM – Sage ERP listed on Microsoft AppSource.

For more information on Sage X3 Integration and Services, please contact us at x3@greytrix.com, We will like to hear from you.

How to check the version and patch used for Sage X3

$
0
0

Process to check in Version 12

  • Go to Administration > Utilities > Update > About
  • Click on the Folder name to view the Version
Version 12
Version 12 2
Version 12 3

Process to check in Version 11

  • Go to Administration > Utilities > Update > About
  • Click on the Folder name to view the Version
Version 11

Process to check in Version 9

  • Go to Administration > Utilities > Update> About
  • Click on the Folder name to view the Version
  • In the example below the Product update 9.0.8 refers to Product Update 9 with Patch Level 8
Version 9

Process to check in Version 8

  • Go to Administration > Licenses > About
  • Click on the folder
  • In the example below the Product update 9.0.8 refers to Product Update 8 and Patch Level 8
Version 8
Version 8/1

Process to check in Version 7

  • Go to Administration > Version information
  • Then Click on the folder
Version 7
Version 7/1

Conclusion

Hence by following the above steps user can check for the applicable versions running in Sage X3

About Us

Greytrix Africa is a leading Implementation, Reselling and Consulting partner for Sage X3, Sage 300, Enterprise Management HR (formerly Sage X3 People) & Sage CRM based out of Nairobi, Kenya in Africa region catering to Tanzania, Ethiopia, Middle East, Australia and Asia business sectors.

Greytrix Africa offers professional services such as Implementation & configurationBusiness Process AnalysisProject Management, Customization, Integrations & Migrations, Technical support and Onsite resource augmentation along with enhancements within Sage X3,Enterprise Management HR (Sage X3 People)Sage CRM and Sage 300 (Accpac) across various industry verticals like Process Manufacturing (Food & BeveragesChemical), Discrete manufacturing (AutomotiveTextile & Apparel), Non ProfitHealth-care Industry and Service Industry (Financial , Software & Engineering).

For more information on Sage X3 Consulting Services, please contact us at sales@greytrix.com. We will like to hear from you.


How to do BOM version and Routings version validation in Sage X3

$
0
0

Basically work order uses a bill of materials (BOM) to create a list of materials to be issued, and a Routings to make a list of operations to be performed on work centers. Also provides a description of the various operations and activities involved in the Work orders dictate what product need to be manufactured, what raw materials are going to be required to manufacture the product, and which work center that the product needs to pass through in the manufacturing process. An operational routing defines the formalization of the steps required for a manufactured product (finished or semi-finished). It  production process, as well as the sequencing of the operations to be completed. In Sage X3, there is a standard functionality , with the help of this we can do the Version validation of BOM and Routings. Also after the Version validation process the BOM product will be Available to use.

Follow the below steps for the setup:

Steps:

First make sure that in Product category the Version management should be allow to use, as shown in below figure.

 Navigate To : Common Data > Products > Product Categories

Fig: Product Category

Also same setup should be done on Product screen also.

Navigate To : Common Data > Products > Products

In Management Tab, Version management Checkbox as well as Routing version checkbox should be checked, as shown in below figure.

Fig: Product

In short product and that respective product category set up should be set as defined above.

Now, we have to create Production BOM of the same product.

Navigate To : Common Data > BOM’s > Production BOM’s

  • Enter a  all mandatory fields value
  • Also enter Minor and Major version values in respective field
  • Enter components on line level
  • Create the transaction

Refer the below figure for the same.

Fig :Manufacturing BOM

You can see in above figure BOM code is ’40’ and Use Status is set as a ‘In Developement’.

Now we will change the BOM code with the help of BOM code screen, as shown in below figure.

Fig: BOM codes

User will enter the new BOM code i.e.41 or any(it will different) in ‘Available to use’ field and it should be different from ‘In Development BOM ‘ code i.e.40.

Fig : BOM Codes

Now we will do the BOM version validation with help of validation button.

Fig : Validation

After clicking on Validation button it will display one pop up window just click on ‘Yes’ button to proceed for validation process ,as shown in below figure.

Fig : Validation Process

Now we have done the BOM version validation. Now you can see in below figure after validation Use Status has changed from ‘In Development’ to ‘Available to Use’.

Fig : BOM

Also we can do the version validation of Routings with the same way.

 Just click on the ‘Routings’ button as shown in below figure and do the same procedure.

Fig : Routings

With the help of this user can does the BOM and Routings version validation and BOM product will be Available to use.

About Us

Greytrix – a globally recognized and one of the oldest Sage Development Partner is a one-stop solution provider for Sage ERP and Sage CRM organizational needs. Being acknowledged and rewarded for multi-man years of experience, we bring complete end-to-end assistance for your technical consultations, product customizations, data migration, system integrations, third-party add-on development and implementation competence.

Greytrix caters to a wide range of Sage X3, a Sage Business Cloud Solution, offerings. Our unique GUMU™ integrations include Sage X3 for Sage CRMSalesforce.com, Dynamics 365 CRM and Magento eCommerce along with Implementation and Technical Support worldwide for Sage X3. Currently we are Sage X3 Implementation Partner in East Africa, Middle East, Australia, Asia, US, UK. We also offer best-in-class Sage X3 customization and development services, integrated applications such as POS | WMS | Payment Gateway | Shipping System | Business Intelligence | eCommerce and have developed add-ons such as Catch – Weight  and Letter of Credit and India Legislation for Sage X3 to Sage business partners, end users and Sage PSG worldwide.

Greytrix is a recognized Sage champion ISV Partner for GUMU™ Sage X3 – Sage CRM integration also listed on Sage Marketplace; GUMU™ integration for Sage X3 – Salesforce is a 5-star rated app listed on Salesforce AppExchange and GUMU™ integration for Dynamics 365 CRM – Sage ERP listed on Microsoft AppSource.

For more information on Sage X3 Integration and Services, please contact us at x3@greytrix.com, We will like to hear from you.

Hourly Constraint in Batch Task

$
0
0

We may come across where we need to execute the batch task for only particular time for the rest of the batch server should not be in active state so that the other process can utilize the working space. In Sage X3 we can setup this making the setup in such a way so that only for that particular time the batch server will work, in the rest of time it will in inactive state.

To execute the batch server for particular time frame we need to execute perform the below setup:

Batch Calendar:

We need to setup the batch calendar: This include the start and end Date on which the batch server will be active and will be executing the task. For the rest of the period the batch task will not be in active state.

In this screen we would be able to mention multiple range of the date on which the batch server needs to be active. If the current date fall in the below given multiple range then it will go-ahead to check the other condition. This is the first date check is utilized.

Fig: Batch calendar

In the next step we need to navigate: —

All > Setup > Usage >Batch Server

Fig: Hourly constraint

In the above screen, we need to mention the constraint name and description.

Workday: This will help us to decide the working weekday for batch task to be active. We can mark the day as if we need to consider as working weekday. We will be not marking the checkbox if this is not the working weekday. This bifurcation will help us to not execute the batch task in the working time of the user while entering the transaction so that server will be utilized in the user and not batch task.

Calendar: The batch server calendar which executed in the earlier step will be utilized to fetch the date of the execution.

Hours /Day worked: In this we would be able to mention the start and end time of the batch server to be active and executing the task. If the current weekday falls in the calendar date and does satisfies the working day, it will follow this time zone.

Hours(worked ) other days: In this we would be able to set the time of the for the non-working days which we have unmarked in workdays. If the current weekday falls in the calendar date and doesn’t satisfies the working day, it will follow this time zone.

According to this setup we will be executing the batch server for only particular time constraint and would release the server for the other process.

Execution:

It will check the date from the calendar attached, then it would check the weekday of the execution. If the weekday is satisfied then it will check the hours of the execution. Incase if the weekdays is not satisfied it will follow the time of the range from the second the grid to check the time of active batch task.

About Us

Greytrix – a globally recognized and one of the oldest Sage Development Partner is a one-stop solution provider for Sage ERP and Sage CRM organizational needs. Being acknowledged and rewarded for multi-man years of experience, we bring complete end-to-end assistance for your technical consultations, product customizations, data migration, system integrations, third-party add-on development and implementation competence.

Greytrix caters to a wide range of Sage X3, a Sage Business Cloud Solution, offerings. Our unique GUMU™ integrations include Sage X3 for Sage CRMSalesforce.com, Dynamics 365 CRM and Magento eCommerce along with Implementation and Technical Support worldwide for Sage X3. Currently we are Sage X3 Implementation Partner in East Africa, Middle East, Australia, Asia, US, UK. We also offer best-in-class Sage X3 customization and development services, integrated applications such as POS | WMS | Payment Gateway | Shipping System | Business Intelligence | eCommerce and have developed add-ons such as Catch – Weight  and Letter of Credit and India Legislation for Sage X3 to Sage business partners, end users and Sage PSG worldwide.

Greytrix is a recognized Sage champion ISV Partner for GUMU™ Sage X3 – Sage CRM integration also listed on Sage Marketplace; GUMU™ integration for Sage X3 – Salesforce is a 5-star rated app listed on Salesforce AppExchange and GUMU™ integration for Dynamics 365 CRM – Sage ERP listed on Microsoft AppSource.

For more information on Sage X3 Integration and Services, please contact us at x3@greytrix.com, We will like to hear from you.

How to calculate freight charges automatically

$
0
0

Freight charge, also known as freight rate is the amount paid to a carrier company for the transportation of goods from the point of origin to an agreed location. The freight charge is calculated based on the type of mode of transportation and the distance between the pickup place and the place of destination.

The shipment of goods may be transported using freight prepaid or freight collect on the basis of the incoterm rules.

How Freight Rate is determined :

The cost which a shipper (the consumer or business providing goods for shipment) or consignee (the person or company to whom commodities are shipped) is charged for the transportation of goods is determined by a number of factors. The main factors in determining the freight rate are: mode of transportation, weight, size, distance, points of pickup and delivery, and the actual goods being shipped. All of these factors play their own independent role in determining the price or rate at which the freight will be transported but they are also all interconnected. When determining which mode of transportation will be used to deliver the freight to its destination there are many things which need to be taken into consideration which will all have an effect on the freight rate. Federal, State, and Local authorities all have their own laws and regulations with regards to the size, weight, and type of freight which can be transported on their roads. Transportation of freight by Rail, Water, or air craft all have their own regulations which take into account Federal, State, and Local regulations as well as safety concerns which contribute to the rate at which freight is transported.

Automatic Freight charges calculation in X3:

In Sage X3 we can have the freight charges calculated automatically by using the parameter FRENUM. With parameter FRENUM, it is possible to have the system calculates freight charges based on the invoicing element number entered in the FRENUM parameter and the weight and amounts that are defined in the carrier record.

To set this up, in Common data, Products, the product must have a Weight unit and a STK weight entered under the Unites of measure tab.

Fig: Units of measure

Once the weight is entered for the product, the next thing is to create or select the invoicing element (Setup, Sales, Invoicing elements) that is going to be entered in the FRENUM parameter.

Fig: Invoicing elements

The next thing to do is to enter the invoicing element into parameter FRENUM found in VEN Sales chapter for INV Invoicing rules group.

Fig: FRENUM Parameter setup

The next step is to enter the weight and charges for the Carrier (Common data, BPs, Carriers, Management tab). In this example, the freight charge is set to be a fixed amount of $10 plus there is an additional charge of $2 for each kilogram.

Fig : Carrier Management

When entering the Sales delivery, the carrier can be entered on the Delivery screen or it can roll automatically to the delivery if the carrier is assigned to the customer record in the Ship-to customer section. Once the delivery is created, the freight charge cost will populate in the Invoicing element section.

Fig(a): Freight calculation on delivery
Fig(b): Freight calculation on delivery

About Us

Greytrix – a globally recognized and one of the oldest Sage Development Partner is a one-stop solution provider for Sage ERP and Sage CRM organizational needs. Being acknowledged and rewarded for multi-man years of experience, we bring complete end-to-end assistance for your technical consultations, product customizations, data migration, system integrations, third-party add-on development and implementation competence.

Greytrix caters to a wide range of Sage X3, a Sage Business Cloud Solution, offerings. Our unique GUMU™ integrations include Sage X3 for Sage CRMSalesforce.com, Dynamics 365 CRM and Magento eCommerce along with Implementation and Technical Support worldwide for Sage X3. Currently we are Sage X3 Implementation Partner in East Africa, Middle East, Australia, Asia, US, UK. We also offer best-in-class Sage X3 customization and development services, integrated applications such as POS | WMS | Payment Gateway | Shipping System | Business Intelligence | eCommerce and have developed add-ons such as Catch – Weight  and Letter of Credit and India Legislation for Sage X3 to Sage business partners, end users and Sage PSG worldwide.

Greytrix is a recognized Sage champion ISV Partner for GUMU™ Sage X3 – Sage CRM integration also listed on Sage Marketplace; GUMU™ integration for Sage X3 – Salesforce is a 5-star rated app listed on Salesforce AppExchange and GUMU™ integration for Dynamics 365 CRM – Sage ERP listed on Microsoft AppSource.

For more information on Sage X3 Integration and Services, please contact us at x3@greytrix.com, We will like to hear from you.

Notifications in Sage X3

$
0
0

Notifications in Sage X3 are used to send alerts to users. If users don’t want signature workflow and only wants to get alerts via email, creating notifications becomes a better option because notification does not include approval process. User can get alerts if any of the record is creation, modified or deleted. We can create notifications for any objects-based transactions. Notifications in sage X3 has limit of two users which can receive the alerts and also, we can add execution condition to trigger the notification.

Below are the steps to create a notification in Sage X3.

Navigate: SETUP -> WORKFLOW -> NOTIFICATIONS

Once we open the notification screen, we will be able to see it as shown in the below figure.

If we create a notification for an object, a workflow gets created in background with the same details we put in notification screen. The workflow which gets created in background is with the same name we put in notifications workflow code.

Fig: Notification Window

Notifications have the below four event type which we can change as required.

  • Object
  • Function entry
  • Report
  • Task end

Event type defines when the notification is to be triggered. It can be set to ‘object’ if we want alerts for object-based transactions. It can be set to ‘function entry’ if we want to trigger notification when a function is executed. It can be triggered if a report’ is printed and also when a task is ended. For example, we can get alerts when a batch task is completely executed.

In the above example we have created a notification which will run on ‘object’ event type for purchase order. Therefore, we have added the object code of purchase order in code field.

Fig: Execution condition

As shown in the above figure we can see that we have options to trigger workflow on events i.e., creation, modification, deletion and return.

We can also set the triggering of notification on the basis of execution condition. That means if the execution conditions added are satisfied then only the notifications will get triggered.

Fig: Users and Message Body

As discussed above, we can set only two users to get the alerts in notifications server.

Just below the users field we have a message section which includes the subject of the email and the message body.

Click on create once all the fields are filled as needed and validate the notification. Once the notification is created, we will be able to see a workflow gets automatically created in workflow rules with the same workflow code.

To check the workflow, navigate: SETUP -> WORKFLOW -> WORKFLOW RULES.

Fig : Workflow Rules

As we can see in the above figure that workflow rule is created with the workflow code of notification. Event type is set to object and event code of purchase order is set with operation of creation and modification.

The execution condition added in notification are carried here in header condition of workflow rules and the message body is also been carried from notification to workflow rule message section. The two users added in notification are carried here in recipients tab in workflow rule.

Kindly note that we are able to make the changes in the workflow rule which is created from notification but once we do the changes the original notification will get deleted from notification window.

Hence, when the purchase order is created or modified the users will get the alerts through the notification server.

About Us

Greytrix – a globally recognized and one of the oldest Sage Development Partner is a one-stop solution provider for Sage ERP and Sage CRM organizational needs. Being acknowledged and rewarded for multi-man years of experience, we bring complete end-to-end assistance for your technical consultations, product customizations, data migration, system integrations, third-party add-on development and implementation competence.

Greytrix caters to a wide range of Sage X3, a Sage Business Cloud Solution, offerings. Our unique GUMU™ integrations include Sage X3 for Sage CRMSalesforce.com, Dynamics 365 CRM and Magento eCommerce along with Implementation and Technical Support worldwide for Sage X3. Currently we are Sage X3 Implementation Partner in East Africa, Middle East, Australia, Asia, US, UK. We also offer best-in-class Sage X3 customization and development services, integrated applications such as POS | WMS | Payment Gateway | Shipping System | Business Intelligence | eCommerce and have developed add-ons such as Catch – Weight  and Letter of Credit and India Legislation for Sage X3 to Sage business partners, end users and Sage PSG worldwide.

Greytrix is a recognized Sage champion ISV Partner for GUMU™ Sage X3 – Sage CRM integration also listed on Sage Marketplace; GUMU™ integration for Sage X3 – Salesforce is a 5-star rated app listed on Salesforce AppExchange and GUMU™ integration for Dynamics 365 CRM – Sage ERP listed on Microsoft AppSource.

For more information on Sage X3 Integration and Services, please contact us at x3@greytrix.com, We will like to hear from you.

How to manage Transportation details and shipment pre-receipt in purchase shipment

$
0
0

As we all know that transportation services can be quite important for a country’s economy. With increasing levels of commercialization, the demand for goods and services has witnessed a steady increase. Transportation is an essential activity in the logistics function which provides the essential service of linking a company to its suppliers and customers.

Sage X3 has introduces the Freight container, Transport and Shipment pre-receipt function in Purchasing. In this blog we will see how to add purchase order in freight container and create a shipment with transport details.

New Stuff: – How to check the version and patch used for Sage X3

To add an order in the freight container kindly follow below steps:

Go to the Purchasing>> Shipments >> Open Freight Container screen.

Enter the site and suppliers and select the order from left list for which you want to create the freight details.

Fig : Freight Container

You can see in above screen that you can add details of container, Seal number, container ID weight etc. in the freight container screen.

Basically the management of freight containers is included in the logistics chain. Freight containers are used in the Shipments management in order to manage the Transportation of purchase orders to their delivery point.

In this function, select the lines of the orders to ship. It can be full orders for which you can decide to keep or discard the initially planned quantities. You can also pick a selection of lines and modify their initial quantity.
These lines can come from several orders, sites and suppliers, provided that they belong to the same legal company.

Note: – You cannot select order lines already associated directly with a shipment.

Now after creation of freight container for order, you can create the shipment for the freight container. For that you can select the Site and supplier and can select the respective freight container from the left list under the option “Container Selection”

Check below screen shot here you can see in the left list, the container which created using the order is listed in the list. Select that container to create the shipment.

Fig : Container selection in shipment

You can also select the Transport details in to the shipment >> Management tab

Fig : Transport select in shipment

This Transport detail you can add in to Transport scree and can select the generated transport no in to shipment. All the transport details added will be automatically fetched in to shipment screen once Transport no. will be selected.

To add the transport detail you can navigate to the Purchasing>> Shipments >> Transport

Fig : Transport screen

You can see in below transport screen that shipment details get fetched in to shipment tab as this transport no. is selected in to shipment.

Fig : Transport-Shipment detail

Sometimes as per the business requirement it is require to generate the pre-receipt on the basis of information provided by the suppliers. So sage X3 v12 introduced also the Shipment pre-receipt function using which you can update the planned receipt date and enter the quantities that will effectively be received. Pre-entering this information will contribute to the optimization of the supply process, help avoid stock shortages and notify customers of late or incomplete deliveries.

This function is only used to manage shipment pre-receipts concerning orders or containers.

To check the shipment pre-receipt navigate to Purchasing >> Shipments >> Shipment Pre-receipt screen.

Pre-receipt always apply to a shipment, therefore, you must pick the one you wish to pre-receive in the shipments selection list. All the information concerning this shipment is displayed on the screen. You then need to enter the information on the pre-receipt: pre-receipt date and pre-receipt quantity.

After all this process then you can create the final purchase receipt. The GL effects will be affected only after the final receipt and not pre-receipt.

This is how you can manage the transportation purchasing shipments using the information provided by suppliers.

About Us

Greytrix – a globally recognized and one of the oldest Sage Development Partner is a one-stop solution provider for Sage ERP and Sage CRM organizational needs. Being acknowledged and rewarded for multi-man years of experience, we bring complete end-to-end assistance for your technical consultations, product customizations, data migration, system integrations, third-party add-on development and implementation competence.

Greytrix caters to a wide range of Sage X3, a Sage Business Cloud Solution, offerings. Our unique GUMU™ integrations include Sage X3 for Sage CRMSalesforce.com, Dynamics 365 CRM and Magento eCommerce along with Implementation and Technical Support worldwide for Sage X3. Currently we are Sage X3 Implementation Partner in East Africa, Middle East, Australia, Asia, US, UK. We also offer best-in-class Sage X3 customization and development services, integrated applications such as POS | WMS | Payment Gateway | Shipping System | Business Intelligence | eCommerce and have developed add-ons such as Catch – Weight  and Letter of Credit and India Legislation for Sage X3 to Sage business partners, end users and Sage PSG worldwide.

Greytrix is a recognized Sage champion ISV Partner for GUMU™ Sage X3 – Sage CRM integration also listed on Sage Marketplace; GUMU™ integration for Sage X3 – Salesforce is a 5-star rated app listed on Salesforce AppExchange and GUMU™ integration for Dynamics 365 CRM – Sage ERP listed on Microsoft AppSource.

For more information on Sage X3 Integration and Services, please contact us at x3@greytrix.com, We will like to hear from you.

Viewing all 1528 articles
Browse latest View live