Quantcast
Channel: Sage X3 – Tips, Tricks and Components
Viewing all 1524 articles
Browse latest View live

How to Setup a Default Bank Account in Sage X3

$
0
0

Sometimes users may want to have a default bank account populate during Payment or Receipt entry. This allows for faster data entry processing and less chance of errors. Below are the steps that can be made to setup the payment entry so the bank account defaults from the supplier or customer.

New Stuff:- How To Set Notes For products in Sage X3 V12

The setup function of the bank accounts is used to characterize those bank accounts with which payment operations must be recorded.

The setup of payment transactions is used to define the characteristics and the operation methods of the different payment transactions used by the company:

  • general characteristics: sense (receipt or expense), payment method (transfer, cheque…)
  • entry screen: displayed fields, fields with mandatory entry,
  • accounting stages and grouping methods: bank posting, cash posting.

STEP 1: Select the payment entry screen (RECCH).

Navigation :-  All > Setup > A/P-A/R Accounting > Payment entry type

Payment/Receipt Entry function is used to:

  • Enter a payment and associate it with an invoice/order,
  • View all the entered payments, by payment transaction,
  • Generate a journal by payment entered, or to know the grouping/posting stages that remain to be carried out,
  • View all the payment journals already generated with respect to this payment.

Select the payment entry screen which you want to use for the transaction.

Then click on the Entry tab and select the Bank ‘Mandatory’ checkbox. And then Save and Validate it.

Payment-entry-type

STEP 2: Select the customer or supplier for whom you want to set the default bank account.

Navigation :-  All > Common Data > BPs > Customers (or Suppliers)

Select NA009 and click on the Financial Tab and then assign NA1US to the ‘Payment Bank’ field and Save it.

Here, we have taken Customer ‘NA009’ to setup the default bank account.

Then click on the Financial and then assign ‘NA1US’ to the ‘Payment Bank’ field and Save.

Payment-Bank-Field

STEP 3: Create a Payment/Receipt.

Navigation :-  All > A/P-A/R Accounting > Payments > Payment/Receipts

Create a new Cash Receipt using the RECCH payment entry screen.

Enter the ‘Site’ and ‘Customer’ for which you have setup the default bank account.

Then tab to the ‘Bank’ Field. Note the Bank Setup for the Customer will default in the field.

Here, we have entered Site ‘NA011’ and Customer ‘NA009’ and we get the bank ‘NA1US’ which we have set of that customer.

Check-Receipts

This blog helps to understand how to Setup a Default Bank Account in Sage X3.

About Us

Greytrix – a globally recognized and one of the oldest Sage Development Partner is a one-stop solution provider for Sage ERP and Sage CRM organizational needs. Being acknowledged and rewarded for multi-man years of experience, we bring complete end-to-end assistance for your technical consultations, product customizations, data migration, system integrations, third-party add-on development and implementation competence.

Greytrix caters to a wide range of Sage X3, a Sage Business Cloud Solution, offerings. Our unique GUMU™ integrations include Sage X3 for Sage CRMSalesforce.com, Dynamics 365 CRM and Magento eCommerce along with Implementation and Technical Support worldwide for Sage X3. Currently we are Sage X3 Implementation Partner in East Africa, Middle East, Australia, Asia, US, UK. We also offer best-in-class Sage X3 customization and development services, integrated applications such as POS | WMS | Payment Gateway | Shipping System | Business Intelligence | eCommerce and have developed add-ons such as Catch – Weight  and Letter of Credit and India Legislation for Sage X3 to Sage business partners, end users and Sage PSG worldwide.

Greytrix is a recognized Sage champion ISV Partner for GUMU™ Sage X3 – Sage CRM integration also listed on Sage Marketplace; GUMU™ integration for Sage X3 – Salesforce is a 5-star rated app listed on Salesforce AppExchange and GUMU™ integration for Dynamics 365 CRM – Sage ERP listed on Microsoft AppSource.

For more information on Sage X3 Integration and Services, please contact us at x3@greytrix.com, We will like to hear from you.


Setting up the Purchase Order Suggestion in X3

$
0
0

Purchase Order suggestion process is most widely useful in manufacturing activity. Sage x3 provides a flexible, user-friendly, and relatively easy process to perform this activity.

In the PO Suggestion screen, the safety stock material appears in the suggestion list.

PO suggestion is the integration between the modules means core modules functions are interconnected, all the information will flow across the organization structure so that the user can release/create the Purchase Requisition/Purchase Order for approval. The PO suggestion streamlines the procurement of required raw materials from the Production/Work order/Safety stock.

Steps to perform PO Suggestion process:

STEP 1:Create Enterprise Planning transaction

Navigational Path: – Setup/Parameters > Purchasing>Entry Transactions>Enterprise Planning

Click on the ‘Enterprise planning’ on left side we can see the standard entry transaction for PO suggestion (POS).Refer Fig.1.1

Fig 1.1 Enterprise Planning Transaction

Note: If any modifications are required in the entry transaction level. It is recommended that instead of modifying the standard Transaction. Create a new ‘Entry Transaction’ as not to affect the standard-setting.

For Example: Name the transaction code as a ‘YPOS’ and click on selections tab ,check the options (Suggested,Planned,Firm,Firm Critical) for Type Supplier Order. Refer Fig.1.2:

Fig 1.2 Selection tab on Enterprise Planning Transaction

Click on Create ,It will question for “Continue and Confirm the Duplication?” click on YES, once it is created then validate the entry.

STEP 2:Select New Enterprise Planning transaction

Navigational Path: Purchasing> Supply > Enterprise Planning

Select the New Transaction(YPOS) just created. As shown in Fig.2.1:

Fig 2.1 Transaction Selection

STEP 3:Enter the site and click on search

Click on the ‘POS Purchase suggestion’. Later the POs screen will appear in that filter by the site as per required and the start – end range. After providing the filter criteria click the ‘Search’ option displays as per shown in Fig.3.1:

You will see that the Firm PO’s now appear on the grid.

The Remaining Qty displays which is outstanding quantity from the PO that needs to be received.

Fig 3.1. Firm PO – remaining qty on grid

STEP 4:How to find outstanding from the PO

If you click on the action button at the beginning of the grid ,you will be able to Jump to the Purchase Order. As shown in Fig.,4.1:

Fig 4.1 Jump to PO from action button

On the Purchase Order, click the line tab to see that this Purchase Order for the product BMS001.

If you click on the Management Tab, at the bottom you will see that this order was Partly received. as shown in Fig.4.2:

Fig 4.2 Purchase Order Screen

STEP 5:Tracking to confirm the results.

On Purchase Order, Right Side actions click on Journal traceability. As shown in the Fig 5.1:

Fig 5.1. Journal traceability screen from PO

From Journal traceability screen, jump to purchase receipt where product BMS001 received 3 quantity refer Fig 5.2, so remaining 11-3=8 quantity display in enterprise planning.

Fig 5.2 Purchase Receipt Screen

This blog helps us to understand what is PO suggestion and how to setup the purchase order suggestion by creating new enterprise planning transaction and how to track and confirm the results from purchase receipt screen.

About Us

Greytrix – a globally recognized and one of the oldest Sage Development Partner is a one-stop solution provider for Sage ERP and Sage CRM organizational needs. Being acknowledged and rewarded for multi-man years of experience, we bring complete end-to-end assistance for your technical consultations, product customizations, data migration, system integrations, third-party add-on development and implementation competence.

Greytrix caters to a wide range of Sage X3, a Sage Business Cloud Solution, offerings. Our unique GUMU™ integrations include Sage X3 for Sage CRMSalesforce.com, Dynamics 365 CRM and Magento eCommerce along with Implementation and Technical Support worldwide for Sage X3. Currently we are Sage X3 Implementation Partner in East Africa, Middle East, Australia, Asia, US, UK. We also offer best-in-class Sage X3 customization and development services, integrated applications such as POS | WMS | Payment Gateway | Shipping System | Business Intelligence | eCommerce and have developed add-ons such as Catch – Weight  and Letter of Credit and India Legislation for Sage X3 to Sage business partners, end users and Sage PSG worldwide.

Greytrix is a recognized Sage champion ISV Partner for GUMU™ Sage X3 – Sage CRM integration also listed on Sage Marketplace; GUMU™ integration for Sage X3 – Salesforce is a 5-star rated app listed on Salesforce AppExchange and GUMU™ integration for Dynamics 365 CRM – Sage ERP listed on Microsoft AppSource.

For more information on Sage X3 Integration and Services, please contact us at x3@greytrix.com, We will like to hear from you.

Change Request in Sage X3 V12

$
0
0

In Sage X3 V12, the Change request function is the central function for managing the delivery of ‘change’ for issues or enhancements that will benefit your organization or your customers. It controls every stage of the ‘change management’ process from the initial raising of a ‘request for change’ through to delivery of that change. Changes are important in the development of a product and for the ongoing maintenance of a product.

        The initial stage in Change Control process is “Change Request”. This change request can be to meet marketplace changes, solve issues related to a product or add values to a product. In Sage X3, change request function is basically to collect detailed information of a change into single repository.

        Change request function then uses standardized procedures to enable efficient handling of all subsequent stages in the change cycle:

  • To each change request key personnel can be assigned  who can identify and understand the requirements and will also be able to control the consequence of any changes.
  • It provides visibility of all proposed changes and the impact of those changes on commitments.
  • The key personnel can make a plan to deliver the requirements and  to meet the objectives for the request can be outlined.

For a change request that will be processed through to completion the standard cycle is: New > In review > Plan > Implement > Completed > Closed

For example, if user creates change request to modify product A, then the changes reuest is first reviewed by the change manager or approver. Once it gets approved, Project manager will make a plan to implement this change. After delivering the scope of the requirements, change request gets completed.


For a change request that will be rejected the standard cycle is: New > In review > Rejected > Closed or New > Rejected > Closed

  • You must be logged in as the current Change manager for this change request to change its status.
  • A change request cannot be reset to status ‘New’ once the change cycle has started.
  • You cannot change any key elements of this change request once the change cycle has started. If the product code is incorrect, for example, reject then close this change request, then raise a new change request with the element corrected.
  • No changes are permitted at all once this change request is closed.

Path: All> Change Control > Change Control > Change Request

The Change request function contains a header information section and one tab per feature of the requirement:

  • Header information: The header information provides key tracking information. It contains the key field – Status – which indicates the current stage of this requirement in the change cycle.
  • Request details: This is the main tab for this function. It contains all information related to the changes.
Fig1: Change Request Header

Originators: This tab is used to provide requester contact information.

Fig2: Originator Screen
  • Approvers: This is an optional tab which is used by the change manager for this change request and subject matter experts within your organization. Access to the fields is controlled by the Status field in the header information.
  • Rejection: This tab is used by the change manager for this change request when this requirement is formally rejected. Access to the fields is controlled by the Status field in the header information.

Attachments: This optional tab can be used to attach documentation that supports the business case for this requirement in its entirety, that is, from creation through to closure.

Fig3: Approvers Screen

The Change Request function controls every stage of the ‘change management’ process within the context of a maintenance cycle or a ‘change’ to a design or production model. From the initial raising of a ‘request for change’ through to the conclusion or delivery of that change, it manages business risk at every stage.

About Us

Greytrix – a globally recognized and one of the oldest Sage Development Partner is a one-stop solution provider for Sage ERP and Sage CRM organizational needs. Being acknowledged and rewarded for multi-man years of experience, we bring complete end-to-end assistance for your technical consultations, product customizations, data migration, system integrations, third-party add-on development and implementation competence.

Greytrix caters to a wide range of Sage X3, a Sage Business Cloud Solution, offerings. Our unique GUMU™ integrations include Sage X3 for Sage CRMSalesforce.com, Dynamics 365 CRM and Magento eCommerce along with Implementation and Technical Support worldwide for Sage X3. Currently we are Sage X3 Implementation Partner in East Africa, Middle East, Australia, Asia, US, UK. We also offer best-in-class Sage X3 customization and development services, integrated applications such as POS | WMS | Payment Gateway | Shipping System | Business Intelligence | eCommerce and have developed add-ons such as Catch – Weight  and Letter of Credit and India Legislation for Sage X3 to Sage business partners, end users and Sage PSG worldwide.

Greytrix is a recognized Sage champion ISV Partner for GUMU™ Sage X3 – Sage CRM integration also listed on Sage Marketplace; GUMU™ integration for Sage X3 – Salesforce is a 5-star rated app listed on Salesforce AppExchange and GUMU™ integration for Dynamics 365 CRM – Sage ERP listed on Microsoft AppSource.

For more information on Sage X3 Integration and Services, please contact us at x3@greytrix.com, We will like to hear from you.

Action: Non Conformance in Sage X3 V12

$
0
0

In Sage X3 V12, Action function in Non-conformance provides more enhancements to handle non-conformity cases. ‘Action’ is used to link process with business transaction in X3.A unique action code will link business process (action) plus transaction type this unique action code is used in Non-conformance Action plans as global action.

There are many business scenarios in which an Action plan will help in handling non-conformity, let’s take example of garment industry for some reason a particular type of clothes has been returned by customer frequently. In this example Customer care support will examine the returned goods and according to their finding they would raise a non-conformity and raise the issue to Quality checker and then QA will follow an action plan by checking the Quality of packing, Supplier details, Delivery method and if they find that goods purchased from a particular supplier is not up to the quality promised then a action plan to returns faulty components to the supplier by creating  an ‘action’ that links the Transaction type ‘Purchase orders’ with the Action ‘Return to supplier’ is created by and attached to the global action in Non-conformance plan.

Depending on your business scenario you can create an ‘Action’ that links a task or process to transaction type.

Some common examples are as follows

  • Transaction type ‘Purchase orders’ with the action ‘Cancel’.
  • Transaction type ‘BOMs’ with the action ‘Change’;
  • Transaction type ‘Demand forecasts’ with the action ‘Delete lines’.

This would enable the planner (project manager) to include an action in the plan and speed up the Non Conformance plan.

Every ‘action’ should reflect a ‘process’ commonly carried out within your organization. The Non-conformance functionality uses ‘Actions’ in the audited corrective or preventive actions against non-conformity.

Fig: Non Conformance Action

Path: All>Non-conformance’s>Action

Field details:

Action code: This is a unique action code to link Action with the transaction type. This action code will get appended on Non conformance plan.

Action: To identify a standard business process which is commonly carried out in your organization for a specific type of transaction.

The list of actions (business processes) is defined in Miscellaneous table 806 – Actions.

Transaction type: To identify a type of business transaction which is commonly carried out in your organization. For example, if your company returns faulty purchased goods to the supplier select the value ‘Purchase orders’.

 The list of transaction types is defined in Miscellaneous table 807 – Transaction type.

Configuration details are as follows:

In X3, a predefined list of actions (business processes) relevant to non-conformance in Miscellaneous table 806 – Actions commonly used by businesses in the distribution and manufacturing sectors. A predefined list of relevant transaction types is provided in miscellaneous table 807 – Transaction type. User can add business specific transaction and user specific screen and map with appropriate action.

It’s the responsibility of the Planners (project managers) to append individual Action codes to their planning schedules (Action plans) to deliver a requested ‘change’.

The Non-conformance ‘Action’ adds an additional enhancement in handling non-conformity by allowing Planner to guide and implement a corrective or preventive action. Using this function we can effectively improve or correct non-conformance’s in your particular business.

About Us

Greytrix – a globally recognized and one of the oldest Sage Development Partner is a one-stop solution provider for Sage ERP and Sage CRM organizational needs. Being acknowledged and rewarded for multi-man years of experience, we bring complete end-to-end assistance for your technical consultations, product customizations, data migration, system integrations, third-party add-on development and implementation competence.

Greytrix caters to a wide range of Sage X3, a Sage Business Cloud Solution, offerings. Our unique GUMU™ integrations include Sage X3 for Sage CRMSalesforce.com, Dynamics 365 CRM and Magento eCommerce along with Implementation and Technical Support worldwide for Sage X3. Currently we are Sage X3 Implementation Partner in East Africa, Middle East, Australia, Asia, US, UK. We also offer best-in-class Sage X3 customization and development services, integrated applications such as POS | WMS | Payment Gateway | Shipping System | Business Intelligence | eCommerce and have developed add-ons such as Catch – Weight  and Letter of Credit and India Legislation for Sage X3 to Sage business partners, end users and Sage PSG worldwide.

Greytrix is a recognized Sage champion ISV Partner for GUMU™ Sage X3 – Sage CRM integration also listed on Sage Marketplace; GUMU™ integration for Sage X3 – Salesforce is a 5-star rated app listed on Salesforce AppExchange and GUMU™ integration for Dynamics 365 CRM – Sage ERP listed on Microsoft AppSource.

For more information on Sage X3 Integration and Services, please contact us at x3@greytrix.com, We will like to hear from you.

Automatic Price calculation in Sales Transactions

$
0
0

In Sage X3, user can enter a Gross Price manually for any product in any Sales – Purchase transactions. But one of our client wanted to calculate gross price automatically while creating Sales transactions on the basis of LOT Numbers. To achieve this requirement, we did a customization on Product master, Work Order and Sales transaction screens. Refer the below example for better understanding:

At the product master, there is a checkbox named as “Schedule”. If it is checked then that particular product will be considered as Scheduled Product and if it is not checked then that particular product will be considered as Non-Scheduled Product. As you can see in the below screenshot for Product-014583R1, schedule checkbox is checked and tax rate is 12% which will be required further for price calculation.

New Stuff: How to delete Customer BP Invoice in Sage X3

[Product Master Screen]
[Product Master Screen]

At the Work order screen, there is one custom field “Price” at detail line level, where user will enter price manually along with the LOT number. There are three more custom fields –“MRP Price, Trade Price and Stockiest Price”.Calculation will be done based on the entered Price and then these prices will get associated with the entered LOT and will get saved in some custom table.

[Work Order]
[Work Order]

Formula for price calculation will be different for schedule and Non-schedule products as per the GST rate saved for each product in product master screen. Refer WO No – APCF2011MFG00000001 as shown in the above screenshot to check the price calculation.

For Scheduled Formulations the Price Formula:

Price = Rs. 100/- and GST applicable is 12% (which is saved in Product master for Product 014583R1)

Formula will be: GST: (12% on Rs.100 i.e. 100*12/112) = 10.71
MRP after GST: Rs.100-10.71= 89.285
Trade Price:(16% margin on MRP after GST i.e. 89.29) = 75.000
Stockiest Price: (8% margin on PTR i.e.75.00) = 69.000
Billing Rate for Scheduled Formulation is Rs.69.000

For Non-Scheduled Formulations the Price Formula:

Price = Rs. 100/- and GST applicable is 12% (which is saved in Product master)

Formula will be: GST: (12% on Rs.100 i.e. 100*12/112) = 10.71
MRP after GST: Rs.100-10.71= 89.285
PTR: (20% margin on MRP after GST i.e. 89.29) = 71.428
PTS: (10% margin on PTR i.e.71.43) = 64.286
Billing Rate for Non-Scheduled Formulation is Rs.64.286

These prices will be flown to Sales delivery screen, the moment LOT is allocated to delivery. System will allocate the LOT on the basis of FIFO method which is the standard Sage X3 feature. Once LOT is allocated by the system then user can manually de-allocate the LOT and may select any other LOT if required.

In Sales delivery, gross price will get auto populated by Stockiest price after computing above formulation and gross price will remain non-editable.

[Sales Delivery]
[Sales Delivery]

Refer above screenshot in which Sales Delivery No is APCF2011SDH00000032 and its Prices which are calculated in WO for Product-014583R1 and LOT No-LOT014 are flown automatically for same product and same LOT and calculated Gross price is 69.000 which is the stockiest price.

Hence with the help of this customization, Gross Price will be calculated automatically in the sales transactions on the basis of GST rate which is already saved in the product master.

About Us

Greytrix – a globally recognized and one of the oldest Sage Development Partner is a one-stop solution provider for Sage ERP and Sage CRM organizational needs. Being acknowledged and rewarded for multi-man years of experience, we bring complete end-to-end assistance for your technical consultations, product customizations, data migration, system integrations, third-party add-on development and implementation competence.

Greytrix caters to a wide range of Sage X3, a Sage Business Cloud Solution, offerings. Our unique GUMU™ integrations include Sage X3 for Sage CRMSalesforce.com, Dynamics 365 CRM and Magento eCommerce along with Implementation and Technical Support worldwide for Sage X3. Currently we are Sage X3 Implementation Partner in East Africa, Middle East, Australia, Asia, US, UK. We also offer best-in-class Sage X3 customization and development services, integrated applications such as POS | WMS | Payment Gateway | Shipping System | Business Intelligence | eCommerce and have developed add-ons such as Catch – Weight  and Letter of Credit and India Legislation for Sage X3 to Sage business partners, end users and Sage PSG worldwide.

Greytrix is a recognized Sage champion ISV Partner for GUMU™ Sage X3 – Sage CRM integration also listed on Sage Marketplace; GUMU™ integration for Sage X3 – Salesforce is a 5-star rated app listed on Salesforce AppExchange and GUMU™ integration for Dynamics 365 CRM – Sage ERP listed on Microsoft AppSource.

For more information on Sage X3 Integration and Services, please contact us at x3@greytrix.com, We will like to hear from you.

Division Wise Product Restriction on Sales Order

$
0
0

In Sage X3, we got a requirement from the client on restricting the Product based on dimension type (Division) on the Sales Order screen. This customization only works on specific transactions i.e. on DMD (Domestic Marketing Division) transaction type on the Sales order screen. The client wishes to have such control over the Sales order that the system should restrict the user from selecting the products associated with different divisions in a single Sales order. To achieve the same, they follow division wise billing to the customer to control the tracking of Sales, Returns, Receipts, etc.

All the products are mapped with dimension type (Division) at the Product master screen with division dimension value mapped in it. As shown in the below screenshot, Product code “10011” has division code as “GS” dimension mapped against it.

New Stuff: Automatic Price calculation in Sales Transactions

[Product Master]
[Product Master]

Now, on the Sales order screen user will select Site code, Customer code, Order date, etc along with division dimension value present at header level manually as shown in the below screenshot. Herein, we have selected the same dimension “GS” at the header level on the Sales order screen.

[Sales Oder]
[Sales Oder]

Gradually once the user moves to the Lines grid tab to select the product from the selection finder, the system will display the list of only those products which have the Sale orders header tab’s dimension value mapped in it at the Product masters screen. As shown in the below screenshot, the Product code “10011” has dimension type “GS” in it, and while selecting the product using the finder only that product is getting displayed in the selection list.

[Product Selection]
[Product Selection]

In simple words, the system will compare the Sales orders header tab dimension value with the dimension value mapped in the Product master screen. So we have restricted the product based on division dimension type in the Sales Order screen for the specific transaction type.

About Us

Greytrix – a globally recognized and one of the oldest Sage Development Partner is a one-stop solution provider for Sage ERP and Sage CRM organizational needs. Being acknowledged and rewarded for multi-man years of experience, we bring complete end-to-end assistance for your technical consultations, product customizations, data migration, system integrations, third-party add-on development and implementation competence.

Greytrix caters to a wide range of Sage X3, a Sage Business Cloud Solution, offerings. Our unique GUMU™ integrations include Sage X3 for Sage CRMSalesforce.com, Dynamics 365 CRM and Magento eCommerce along with Implementation and Technical Support worldwide for Sage X3. Currently we are Sage X3 Implementation Partner in East Africa, Middle East, Australia, Asia, US, UK. We also offer best-in-class Sage X3 customization and development services, integrated applications such as POS | WMS | Payment Gateway | Shipping System | Business Intelligence | eCommerce and have developed add-ons such as Catch – Weight  and Letter of Credit and India Legislation for Sage X3 to Sage business partners, end users and Sage PSG worldwide.

Greytrix is a recognized Sage champion ISV Partner for GUMU™ Sage X3 – Sage CRM integration also listed on Sage Marketplace; GUMU™ integration for Sage X3 – Salesforce is a 5-star rated app listed on Salesforce AppExchange and GUMU™ integration for Dynamics 365 CRM – Sage ERP listed on Microsoft AppSource.

For more information on Sage X3 Integration and Services, please contact us at x3@greytrix.com, We will like to hear from you.

How to add selection screen on field action

$
0
0

In Sage X3 , selection screen on a particular field helps users to search easily and select as per the requirement.

In Sage x3, If user want search selection should be there on any field, then it is easy if we are directly using custom data type for the same, but if we have used data type as “A(alphanumeric)”, and we are expecting that selection search screen should be there so that we can easily select the data for the field as per our need. In that case this blog is very helpful for you.

For example, On the screen , user wants search selection screen on “From Journal Number” field, and user is expecting journal no and description should be displayed on that screen to fulfil the requirement follow below steps to add selection search screen on field action:

Step 1:
Go to India pack module -> GL Voucher
As shown in the below screenshot, field “From Journal Number” is already added on screen and we need to add selection search screen on tab of “From Journal Number” field.

New Stuff: Define Daily and Monthly rate type in Sage X3

Print Screen
Print Screen

Step 2:
Go to Development -> Script Dictionary -> Action
create action “ZGL”.

Action Dictionary
GUMU Integration App

Add this action on field action as “ZGL”.

Screen Dictionary
Screen Dictionary

Step 3:
Go to Development -> Script
add code into the “SPEZGL” script.

TIT(1) = ‘Journal Entry No.’ : #N
TIT(2) = ‘Description’ : #N

REQUEST(0) =”Select DISTINCT NUM_0,DESVCR_0 from “+nomap+”.GACCENTRY “
FOR (CHAR NUM_0 (250), CHAR DESVCR_0 (250)) FROM “5” Sql REQUEST As [YCHD]

I += 1
TEX(I) = num$([YCHD]NUM_0 )
TEXTE(I,1) = num$([YCHD]NUM_0 )
TEXTE(I,2) = num$([YCHD]DESVCR_0 )
If I = 10000
Break
Endif
Next

Step 4:
Go to India pack Module -> GL Voucher
Now we can see on the tab of field, one selection screen displays.

Output
Output

In this way , we can add selection search screen on any custom field, when user tabs on “From Journal no” field the above selection screen gets open for searching as shown in the screenshot.

About Us

Greytrix – a globally recognized and one of the oldest Sage Development Partner is a one-stop solution provider for Sage ERP and Sage CRM organizational needs. Being acknowledged and rewarded for multi-man years of experience, we bring complete end-to-end assistance for your technical consultations, product customizations, data migration, system integrations, third-party add-on development and implementation competence.

Greytrix caters to a wide range of Sage X3, a Sage Business Cloud Solution, offerings. Our unique GUMU™ integrations include Sage X3 for Sage CRMSalesforce.com, Dynamics 365 CRM and Magento eCommerce along with Implementation and Technical Support worldwide for Sage X3. Currently we are Sage X3 Implementation Partner in East Africa, Middle East, Australia, Asia, US, UK. We also offer best-in-class Sage X3 customization and development services, integrated applications such as POS | WMS | Payment Gateway | Shipping System | Business Intelligence | eCommerce and have developed add-ons such as Catch – Weight  and Letter of Credit and India Legislation for Sage X3 to Sage business partners, end users and Sage PSG worldwide.

Greytrix is a recognized Sage champion ISV Partner for GUMU™ Sage X3 – Sage CRM integration also listed on Sage Marketplace; GUMU™ integration for Sage X3 – Salesforce is a 5-star rated app listed on Salesforce AppExchange and GUMU™ integration for Dynamics 365 CRM – Sage ERP listed on Microsoft AppSource.

For more information on Sage X3 Integration and Services, please contact us at x3@greytrix.com, We will like to hear from you.

How to solve if added tab in window is not visible after global validation of window

$
0
0

Sometimes, it happens when we add any customized screen or tab in window, we are not able see the customized screen added in the window. Also, it might happen you may see the fields of the added tab in the window but not added tab. We mostly solve this issue by global validation of window or by validating the entry transactions. But sometimes after doing these validations also the added customized tab is not visible in the window. We can solve this using customizing page layout option present in the top right corner of window.

Consider an example such that we need to add a customized screen or tab in sales order transaction window.

Navigate to All -> Development -> Script dictionary -> Screens

Create new test screen to be added in sales order window as shown below.

Fig1: Test Screen

Consider it as an example, we have added five fields in test screen.

Add this test screen to the window, here consider it as Sales Order transaction.

Navigate to All -> Development -> Script dictionary -> Windows

Fig2: Window Management

After selecting sales order window, add new created test screen in it as shown below.

Fig3: Test Screen added in SO window management

After adding new customized tab in window, click on save and then Globally validate the window.

Next,

Navigate to All -> Setup -> Sales -> Entry transactions -> Orders

Select your transaction and click on validation.

After Global validation and entry transaction, still added customized tab is not visible in the sales order window as we can see below.

Fig4: Added tab not visible

But the fields of the added customized tab are visible.

Sometimes it may happen the fields are also not visible in some cases.

To solve this problem, Go to layout option at the top right corner of your sales order transaction screen. Click on “MODEL” (In non-entry transactions, it can be referred as “SAGE”).

Fig5: Page Layout

Select the Customize page option as shown below.

Fig6: Customize page

Click on Refresh button

After clicking on refresh button, you will be able to see added customized tab in window as well as in left panel of page layout as shown below.

Fig7: Test Screen Visible

Click on Save button and then click on “Save as” button option as shown below.

Fig8: Save As Button

After that the below screen will pop up and enter the fields such as code, title, description and select global in save as option in layout configuration.

Fig9: Layout configuration screen

After clicking on OK button, you will be able to see your added customized tab in sales order transaction screen.

Fig10: SO screen

This blog helps us to solve problem when added customized screens or tabs are not visible or missing after global validation of window (or validation of entry transactions).

About Us

Greytrix – a globally recognized and one of the oldest Sage Development Partner is a one-stop solution provider for Sage ERP and Sage CRM organizational needs. Being acknowledged and rewarded for multi-man years of experience, we bring complete end-to-end assistance for your technical consultations, product customizations, data migration, system integrations, third-party add-on development and implementation competence.

Greytrix caters to a wide range of Sage X3, a Sage Business Cloud Solution, offerings. Our unique GUMU™ integrations include Sage X3 for Sage CRMSalesforce.com, Dynamics 365 CRM and Magento eCommerce along with Implementation and Technical Support worldwide for Sage X3. Currently we are Sage X3 Implementation Partner in East Africa, Middle East, Australia, Asia, US, UK. We also offer best-in-class Sage X3 customization and development services, integrated applications such as POS | WMS | Payment Gateway | Shipping System | Business Intelligence | eCommerce and have developed add-ons such as Catch – Weight  and Letter of Credit and India Legislation for Sage X3 to Sage business partners, end users and Sage PSG worldwide.

Greytrix is a recognized Sage champion ISV Partner for GUMU™ Sage X3 – Sage CRM integration also listed on Sage Marketplace; GUMU™ integration for Sage X3 – Salesforce is a 5-star rated app listed on Salesforce AppExchange and GUMU™ integration for Dynamics 365 CRM – Sage ERP listed on Microsoft AppSource.

For more information on Sage X3 Integration and Services, please contact us at x3@greytrix.com, We will like to hear from you.


How to add Comment Text from transaction screen to the Crystal Report

$
0
0

In Sage X3, user have an option to add comment against every transaction screen on right panel after attachment symbol. In this comment field user can enter an additional information as per the requirements for e.g. description, terms & conditions, declaration, note etc. This comment field is considered as a header comment field which is applicable for that particular transaction. Some of our clients has a requirement to print this comment field on the standard or custom report.

Refer the below screenshot for Comment field.

New Stuff: How to solve if added tab in window is not visible after global validation of window

Comment Option
Comment Option

By clicking on highlighted symbol you will get a window where user enters text, as shown in the below screenshot:

Comment Window
Comment Window

For example, If user have one report name as “Purchase Order Report” and he wanted to print this comment field into this report then we have to follow the steps mentioned below:

Step 1: Refer below screenshot for SQL Query snippet:

SQL Query
SQL Query

Step 2: After adding query for ‘ACLOB’ table in the report we need to add that ‘CLOB’ field (the CLOB field holds the actual comment) into this report wherever we want to add, as shown in the below screenshot.

Crystal Report
Crystal Report

Step 3: if the CLOB type is RTF (Rich Text), right click the field added to the report (CLOB_0), select “Format Field”, then select the Paragraph tab, and select the “Text Interpretation” as “RTF Text” and click on “OK” button. Refer below screenshot.

Format Field
Format Field

After following above steps, user will able to see those comments in the report whatever user has added into the comment section on transaction level.

Refer below screenshot of the sample output.

Output
Output

By following above steps in the crystal report, we will be able to print the comment field from any screen on the particular report.

About Us

Greytrix – a globally recognized and one of the oldest Sage Development Partner is a one-stop solution provider for Sage ERP and Sage CRM organizational needs. Being acknowledged and rewarded for multi-man years of experience, we bring complete end-to-end assistance for your technical consultations, product customizations, data migration, system integrations, third-party add-on development and implementation competence.

Greytrix caters to a wide range of Sage X3, a Sage Business Cloud Solution, offerings. Our unique GUMU™ integrations include Sage X3 for Sage CRMSalesforce.com, Dynamics 365 CRM and Magento eCommerce along with Implementation and Technical Support worldwide for Sage X3. Currently we are Sage X3 Implementation Partner in East Africa, Middle East, Australia, Asia, US, UK. We also offer best-in-class Sage X3 customization and development services, integrated applications such as POS | WMS | Payment Gateway | Shipping System | Business Intelligence | eCommerce and have developed add-ons such as Catch – Weight  and Letter of Credit and India Legislation for Sage X3 to Sage business partners, end users and Sage PSG worldwide.

Greytrix is a recognized Sage champion ISV Partner for GUMU™ Sage X3 – Sage CRM integration also listed on Sage Marketplace; GUMU™ integration for Sage X3 – Salesforce is a 5-star rated app listed on Salesforce AppExchange and GUMU™ integration for Dynamics 365 CRM – Sage ERP listed on Microsoft AppSource.

For more information on Sage X3 Integration and Services, please contact us at x3@greytrix.com, We will like to hear from you.

Sage X3 – How to setup Legal and Analytical Chart of Accounts for Multiple Companies Reporting.

$
0
0

Title – How to Configure Legal and Analytical Reporting Account Setup for multiple companies in Sage X3

Summary -This functionality in Sage X3 will enable the users to view the Account balances at reporting level in either Company’s Local currency (Legal) and in other currencies (Analytical) if there are multiple Companies in same or other countries.

Below is the scenario described along with the setup which will elaborate the different functions setup which are supposed to be configured when the Company setup is done in Sage X3.

Scenario– A Company XYZ Pvt. Ltd.as Group Company is located in Country 1 (Kenya) and in Country 2 (Rwanda) having their own respective local currency. When the reports are viewed in a Company which is in Country 1 (Kenya) it will be either in Local currency or in some other foreign currency.

Similarly when reports will be viewed in Country 2 (Rwanda) it will be either in Local currency or in the currency applicable in Country 2 (Rwanda). This is where the Legal and Analytical setup is required to be configured. The defined 2 Companies in 2 different countries will be treated as 2 separate Legal entities.

Step 1: Chart of Accounts

There will be three different Chart of Accounts will be created for a Company-

  • Country 1 Analytical CoA (Kenya)
  • Country 1 Legal CoA (Kenya)
  • Country 2 Legal CoA (Rwanda)

Based on the system process and available provision CoA we will be defined. In CoA “General Tracking” and “Analytical Tracking” check box should be ticked in all the CoA defined.

Step 2: Ledgers

A ledger is associated with the setup data of the Chart of Accounts. Ledgers also contain the management rules connected to the matching and year-end rules.

There will be three different Ledgers will be created for a Company which will be applicable to the respective legal entities, one individually for Legal and another for Analytical-

  • Country 1 Analytical Ledger
  • Country 1 Legal Ledger
  • Country 2 Legal Ledger

Every individual Ledgers created will have its Unique Code along with the other details of Dimensions and Budgets if applicable.

Step 3: Account Core Models

This function is a structure containing the Chart of Accounts, which is to be applied to both the legal companies. One model can be linked to a single or several legal companies within the same country or legislation. Every individual Account Core Model created will have its unique code.

The following Account Core Model will be created for both the Legal Entities-

  • Country 1 Standard Model
  • Country 2 Standard Model

For every Standard Model select the Proper “Principal General ref” as “Legal” and “Principal Analytical ref” as “Analytical”.

Based on that in the table for Legal and Analytical reference types map the correct Ledger code created earlier along with the desired currency for Legal and Analytical reporting. Refer Screenshot for reference for Country 1 & 2 Standard Model.

Step 4: Accounts

Different Accounts will be created in individual Chart of Accounts with their own respective Account codes.

In each and every Account of Country 1 Legal CoA, the relevant Analytical Account Code will be tagged which is created in the Country 1 Analytical CoA. Similarly for the Account in Country 2 Legal CoA, its relevant Analytical Account Code will be tagged.

Refer Screenshot for reference of a particular Account in Legal and Analytical tagged to it.

Fig– Country 1 Analytical CoA account showing the Account code tagged to them from both Country 1 legal CoA and Country 2 Legal CoA.

Transaction

When any transaction is created is Country 1 and when it’s relevant Journal Entry gets created in the system, automatically the system shows the Country 1 Legal Account code along with the mapped Country 1 Analytical Account code. Refer screenshot for reference.

Conclusions

Thus by following the above stated steps, legal and analytical setup required for multiple companies reporting shall be configured in Sage X3.

About Us

Greytrix Africa is a leading Implementation, Reselling and Consulting partner for Sage X3, Sage 300, Enterprise Management HR (formerly Sage X3 People) & Sage CRM based out of Nairobi, Kenya in Africa region catering to Tanzania, Ethiopia, Middle East, Australia and Asia business sectors.

Greytrix Africa offers professional services such as Implementation & configurationBusiness Process AnalysisProject Management, Customization, Integrations & Migrations, Technical support and Onsite resource augmentation along with enhancements within Sage X3,Enterprise Management HR (Sage X3 People)Sage CRM and Sage 300 (Accpac) across various industry verticals like Process Manufacturing (Food & BeveragesChemical), Discrete manufacturing (AutomotiveTextile & Apparel), Non ProfitHealth-care Industry and Service Industry (Financial , Software & Engineering).

For more information on Sage X3 Consulting Services, please contact us at sales@greytrix.com. We will like to hear from you.

How to Setup a Default Date Range for multiple reports and inquiries in Sage X3

$
0
0

Summary

While generating multiple reports in order to compile data across various departments in the organization every time the end user has to enter the date range in the report parameters every time they generate the report which becomes a quiet task and can be error prone too.

The below mention process will eradicate such difficulties and shall enable the end user to generate multiple reports with same date range or same period.

Parameter Setup

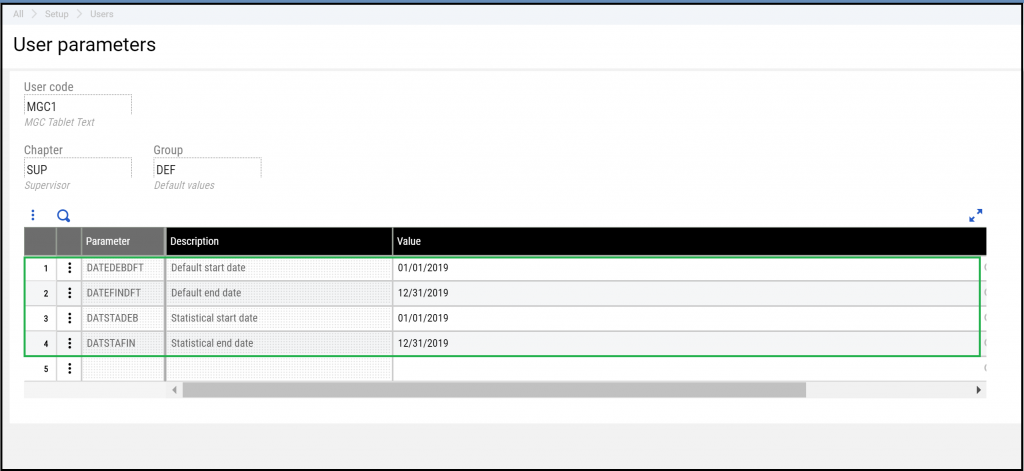
1. Go to Setup > Users > Users

2. Select the User Code

3. Click on the ‘Parameters’ anchor or tab

4. From the ‘Parameters’ section locate the Chapter = Supervisor and Group = DEF (Default Values)

5. Click the dots or action box and select ‘Detail’

User-Level-Setup

Update the following parameters to the desired start and end dates:

DATEDEBDFT (Default Start Date)

DATEFINDFT (Default End Date)

DATSTADEB (Statistical start date)

DATSTAFIN (Statistical end date)

Click ‘Ok’ when finished and save.

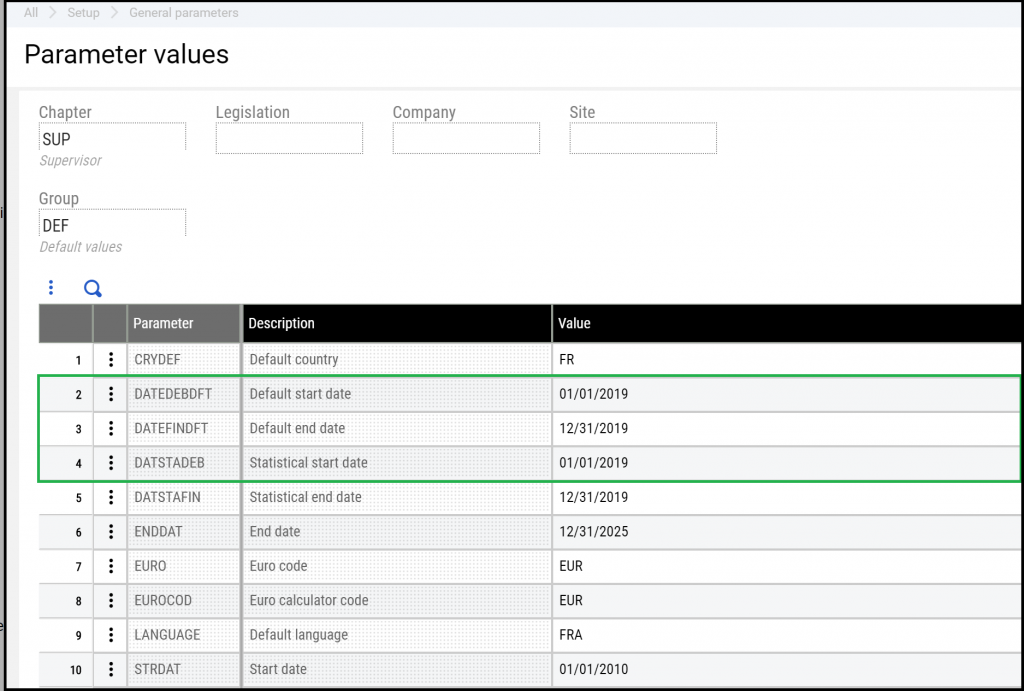
Folder Setup

Go to Setup > General Parameters > Parameter Values

Expand the SUP Chapter and select the appropriate folder

Click on the dots or action box for the DEF Group and select ‘Detail’

Enter the default start and end dates

Click ‘OK’ and save

Parameter-values-Image-2

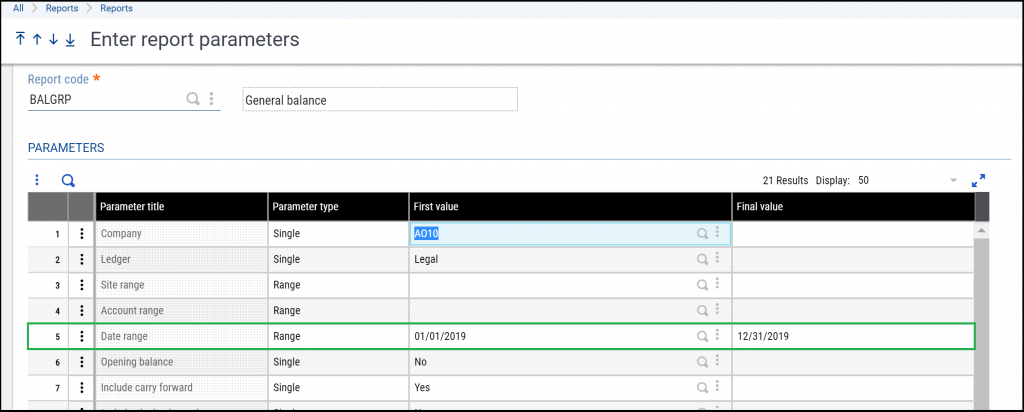
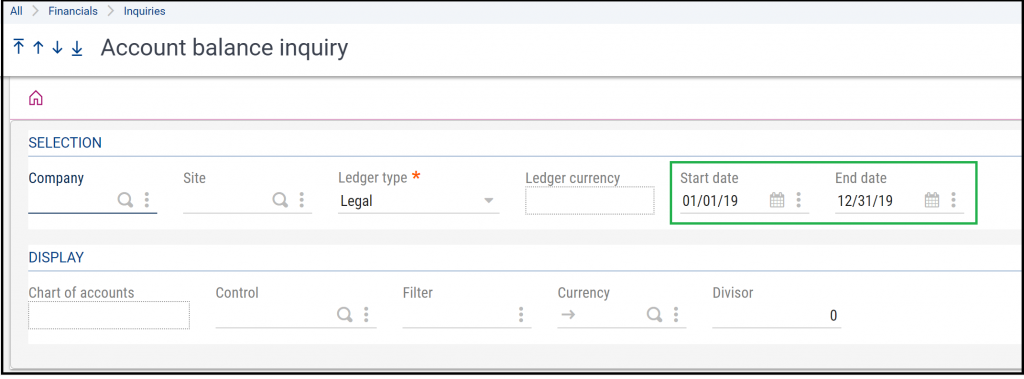
When running a report the default date range will now automatically populate

Report-parameters Image-3
Acct-balance-inquiry-Image-4

Conclusion

Thus by following and applying the above stated steps and process the end user shall be able to generate multiple reports I inquiries with the same date range in Sage X3.

About Us

Greytrix Africa is a leading Implementation, Reselling and Consulting partner for Sage X3, Sage 300, Enterprise Management HR (formerly Sage X3 People) & Sage CRM based out of Nairobi, Kenya in Africa region catering to Tanzania, Ethiopia, Middle East, Australia and Asia business sectors.

Greytrix Africa offers professional services such as Implementation & configurationBusiness Process AnalysisProject Management, Customization, Integrations & Migrations, Technical support and Onsite resource augmentation along with enhancements within Sage X3,Enterprise Management HR (Sage X3 People)Sage CRM and Sage 300 (Accpac) across various industry verticals like Process Manufacturing (Food & BeveragesChemical), Discrete manufacturing (AutomotiveTextile & Apparel), Non ProfitHealth-care Industry and Service Industry (Financial , Software & Engineering).

For more information on Sage X3 Consulting Services, please contact us at sales@greytrix.com. We will like to hear from you.

How to resolve error “Application server not yet started” in X3 version 7 and above

$
0
0

Many times it happens as user face sage x3 connection error after applying a new patch on the existing system. Today in this blog we are going to see the cause and resolution of most common error which gets arise after patch upgradation i.e. “Application servers not yet started. Try again later”.

New Stuff:-How to add Comment Text from transaction screen to the Crystal Report

Basically this error may occurs because an exclusive lock could not be obtained to MongoDb either due to improper shutdown of the MongoDb database or for some other reason.

This message is mostly accompanied by the below message in a log file located in the Syracuse logs directory.

  1. “Error: Timeout attempting to acquire database exclusive control. If this is abnormal behavior please run node with –dbUnlock option”
  2. Error during scheduling license termination notifications Error: The instance (eventTime) is already locked by ‘anonymous’.
  3. Also sometimes user may face below error screen level.

Fatal Error

If you want to check the syracus log file for the error then default log file location would look like.

<Drive letter>:\Sage\syracuse\logs\YYYY-MM-DD_PRODUCTION-N0.log

In most of the cases this error occurs due to the mongoDB get locked or improper shutdown of mongoDB.

 To resolve this error or to unlock the mongoDB you can follow below steps.

  • Very firstly check for any Node.exe processes within task manager and if it is in process then end task on them.
  • Whenever we follow this process user needs to make sure that no one should be within Sage ERP X3 at this point given the nature of the error.
  • Launch a command prompt (cmd.exe) from windows
  • Within the command prompt traverse to the Syracuse folder where servicestop.cmd exists. You can follow below command to get in to syracus folder.

(<drive letter>:\Sage\Syracuse\syracuse by default)

Once you get in to the syracus/bin folder from within the command prompt then type in the following command:

  1. Win32_x64\node.exe<sp>.<sp>–dbUnlock (there is 1 period between the spaces <sp> and 2 dashes)
  2. This will run node with the option to force the database to be unlocked so that the database get unlock and the data import into MongoDB can begin.
  3. In the console you will see the progress of the import and a message saying the update is completed will display when it is done.
  4. This process may takes up to 5-10 minutes to perform according to the system performance.
  5. Once the import is done control will still reside in the node.exe process as it is now waiting for request to the Syracuse server.
  6. We have 4 node processes running as well as other handling by the Syracuse agent so we need to stop this process. This can be done by pressing Ctrl-C or closing the window.
  7. You need to restart the syracus services from the command prompt or you can start this services from the “services.msc”.

This is how we can easily unlock the mongodb using command prompt and can resolve the application start error.

About Us

Greytrix – a globally recognized and one of the oldest Sage Development Partner is a one-stop solution provider for Sage ERP and Sage CRM organizational needs. Being acknowledged and rewarded for multi-man years of experience, we bring complete end-to-end assistance for your technical consultations, product customizations, data migration, system integrations, third-party add-on development and implementation competence.

Greytrix caters to a wide range of Sage X3, a Sage Business Cloud Solution, offerings. Our unique GUMU™ integrations include Sage X3 for Sage CRMSalesforce.com, Dynamics 365 CRM and Magento eCommerce along with Implementation and Technical Support worldwide for Sage X3. Currently we are Sage X3 Implementation Partner in East Africa, Middle East, Australia, Asia, US, UK. We also offer best-in-class Sage X3 customization and development services, integrated applications such as POS | WMS | Payment Gateway | Shipping System | Business Intelligence | eCommerce and have developed add-ons such as Catch – Weight  and Letter of Credit and India Legislation for Sage X3 to Sage business partners, end users and Sage PSG worldwide.

Greytrix is a recognized Sage champion ISV Partner for GUMU™ Sage X3 – Sage CRM integration also listed on Sage Marketplace; GUMU™ integration for Sage X3 – Salesforce is a 5-star rated app listed on Salesforce AppExchange and GUMU™ integration for Dynamics 365 CRM – Sage ERP listed on Microsoft AppSource.

For more information on Sage X3 Integration and Services, please contact us at x3@greytrix.com, We will like to hear from you.

How to Align Lot numbers with Purchase receipts numbers

$
0
0

Purchase Receipts are made when you accept Items from your Supplier usually against a Purchase Order. A purchase receipts is created when you accept materials from a certain supplier. This is usually against a purchase order. It also serves as a proof and a document given to consumers as a record of their sample purchase of goods and services. Purchase receipts can either be a printed cash register or written by hand.

Some companies would like to create their Purchase receipts with a Lot Number that is the same as the Purchase receipts transaction Number that created the product. Purchase Items with serial or lot numbers can be traced both backwards and forward in the supply chain. This is useful for general quality assurance and for product recalls. Some lot numbers are generated with the use of date and time stamps to help identify a specific lot.

Why we make the Lot number same as Purchase receipts number because this can make the tracing of the Lot easier. In Sage X3, there is a standard functionality of doing this.

Follow the below steps for the setup:

Steps:

First make sure that Lot Management setting of product is checked as a ‘Mandatory lot’ and under the Lot Sequence field this MUST be blank as shown in below figure.

Fig; Product

Also, product category set up should be same as product setup, as shown in below figure.

Fig: Product Category

In short product and that respective product category set up should be set as defined above.

Navigate To: Common Data> Product category > Receipts Tab > Management Rules Grid

1. Select Movement type as ‘Supplier Receipt’.

2. Change the value of Lot entry as a ‘Free’

3. Change the value of Lot by default as a ‘Document number’.

4. Click on Save or OK button.

Please refer the below figure for the same.

Fig : Product category

If the user is not able to change the above modifications then first user can change the same modifications from Stock management rules screen and then can do the above setup on same screen. Refer the below screenshot for the same.

Fig : Stock Management Rules

We have completed the setup for product master and product category.

Now follow the below path for Purchase Receipts creation,

Navigate To > Purchasing > Receipts > Receipts

While creating the Purchase receipts transaction, keep LOT no. as blank on line level and after creation you can see LOT no. is coming same as a Purchase receipts transaction number. Refer below figure for the same.

Fig: Purchase Receipt

With the help of this setup you can align the Lot numbers with the Purchase receipts transaction number and it will also help to make the tracing of the Lot easier.

Hence after doing all the above steps we can able to align the same lot number with Purchase receipts transaction number.

About Us

Greytrix – a globally recognized and one of the oldest Sage Development Partner is a one-stop solution provider for Sage ERP and Sage CRM organizational needs. Being acknowledged and rewarded for multi-man years of experience, we bring complete end-to-end assistance for your technical consultations, product customizations, data migration, system integrations, third-party add-on development and implementation competence.

Greytrix caters to a wide range of Sage X3, a Sage Business Cloud Solution, offerings. Our unique GUMU™ integrations include Sage X3 for Sage CRMSalesforce.com, Dynamics 365 CRM and Magento eCommerce along with Implementation and Technical Support worldwide for Sage X3. Currently we are Sage X3 Implementation Partner in East Africa, Middle East, Australia, Asia, US, UK. We also offer best-in-class Sage X3 customization and development services, integrated applications such as POS | WMS | Payment Gateway | Shipping System | Business Intelligence | eCommerce and have developed add-ons such as Catch – Weight  and Letter of Credit and India Legislation for Sage X3 to Sage business partners, end users and Sage PSG worldwide.

Greytrix is a recognized Sage champion ISV Partner for GUMU™ Sage X3 – Sage CRM integration also listed on Sage Marketplace; GUMU™ integration for Sage X3 – Salesforce is a 5-star rated app listed on Salesforce AppExchange and GUMU™ integration for Dynamics 365 CRM – Sage ERP listed on Microsoft AppSource.

For more information on Sage X3 Integration and Services, please contact us at x3@greytrix.com, We will like to hear from you.

Restriction on Purchase Invoice creation

$
0
0

As per the standard functionality of Sage X3, if the user is entering same Supplier Document No in new Purchase Invoice entry which is already entered or used in the existing invoice entry then user gets a warning message popup that “Reference entered on Invoice(Invoice No)” as shown in the below screenshot. But after clicking on “Ok or Cancel” it allows user to create Invoice with the same document number. That means it is just a warning message and it depends on the user if he wants to continue with the same document no or different document no.

New Stuff: How to Align Lot numbers with Purchase receipts numbers

[Warning Message]
[Warning Message]

Recently one of our client came up with the requirement in which he wanted to restrict purchase invoice creation if the combination of Supplier Document No, Suppler Invoice Date and Amount i.e. (Invoice-tax) is repeated for the same Supplier. For this purpose, we did a customization in such a way that it will not allow you to create new Purchase Invoice entry if combination of the mentioned three fields is already used for some other invoice for the same supplier.


For Example – In the below screenshot you can see in Invoice No – 1012011INVBS0047, for Supplier – V00010, Supplier Document No is SD001, Date is 11/26/20 and Amount is 1100.

[Purchase Invoice Entry: 1012011INVBS0047]
[Purchase Invoice Entry: 1012011INVBS0047]

Now, when you try to create new invoice for the same supplier “V00010” with the same Supplier Document No – “SD001”, Date – “11/26/20” and Amount 1100 then it will give you an error that “Supplier Document Number, Supplier Inv Date and Amount already exist for Invoice No: 1012011INVBS0047” as shown in the below screenshot.

[Error on Purchase Invoice Screen]
[Error on Purchase Invoice Screen]

It will not allow you to create invoice with the same combination. At least one of those three fields should be different. This customization will work only for the same supplier. If supplier is different and this combination is repeated then Invoice will be created without any error.

Hence with the help of this customization, Purchase Invoice creation will be restricted if the combination of Supplier Document No, Supplier Invoice Date and Amount (Invoice-tax) is repeated for the same Supplier.

About Us

Greytrix – a globally recognized and one of the oldest Sage Development Partner is a one-stop solution provider for Sage ERP and Sage CRM organizational needs. Being acknowledged and rewarded for multi-man years of experience, we bring complete end-to-end assistance for your technical consultations, product customizations, data migration, system integrations, third-party add-on development and implementation competence.

Greytrix caters to a wide range of Sage X3, a Sage Business Cloud Solution, offerings. Our unique GUMU™ integrations include Sage X3 for Sage CRMSalesforce.com, Dynamics 365 CRM and Magento eCommerce along with Implementation and Technical Support worldwide for Sage X3. Currently we are Sage X3 Implementation Partner in East Africa, Middle East, Australia, Asia, US, UK. We also offer best-in-class Sage X3 customization and development services, integrated applications such as POS | WMS | Payment Gateway | Shipping System | Business Intelligence | eCommerce and have developed add-ons such as Catch – Weight  and Letter of Credit and India Legislation for Sage X3 to Sage business partners, end users and Sage PSG worldwide.

Greytrix is a recognized Sage champion ISV Partner for GUMU™ Sage X3 – Sage CRM integration also listed on Sage Marketplace; GUMU™ integration for Sage X3 – Salesforce is a 5-star rated app listed on Salesforce AppExchange and GUMU™ integration for Dynamics 365 CRM – Sage ERP listed on Microsoft AppSource.

For more information on Sage X3 Integration and Services, please contact us at x3@greytrix.com, We will like to hear from you.

How to setup commission factor for sales representative in X3

$
0
0

Commission also called a sales commission, is a payment given to salespeople for each individual sale. When planning a commission structure, sales leaders should consider factors like how much of their budget they can allocate for commission, how much they’ll pay for different levels of sales output, employee’s base salaries, and potential bonuses or incentives to include.

It’s the amount of money a salesperson earns based on the number of sales they have made. This is additional money that often complements a base salary.

A sales commission rate can reflect factors like the value of products or services sold, employee involvement in the sales process, or the size of an employee’s sales territory.

Commission in Sagex3:

Commissions in Sage X3 assign at the time of sales order creation/Sales Invoice creation based on sales rep.

Create Sales Rep with Commission Rate:

Navigate to: Common Data>Bps>Sales Rep

Fig1.1 : Creation of Sales Rep

On General Tab, Commission base section, from the list % on Net price,% on Margin,% on formula.

Select % on Net Price. if % on formula selected then commission formula 1 and 2 field get enabled.

Commission Rate section has Sales categories,commerical rate 1,commerical rate 2.

Sales categories-category 1 example may be Direct sale, Category 2 example may be whole sale.

Commercial rate 1 which is applicable for primary sales rep and commercial rate 2 which is applicable for secondary sale rep.

Financial section, selecting Accounting code where sales rep accounting setup can be defined.

Commission Setup on Customer Master:

Navigate to: Common Data>Bps>Customer

Fig 2.1: Sales Rep Setup on Customer screen

On Commercial tab ,under sales reps section, choose commission category and primary sales rep 1 and secondary sales rep 2.

Ship-to customer tab also has primary and secondary sales rep ,which override the commercial tab sales rep’s.

Fig 2.2 : Sales Rep Setup on Customer screen(ship-to customer Tab)

Sales Order- Automatic allocation of Sales Rep:

Navigate to: Sales >Orders>Orders

Fig 3.1: Sales Rep on Sales Order Screen

On Management tab, sales rep will automatically flow based on the customer chosen on header level.

On the Lines tab, Select the action button pop up view for the product and view corresponding sales rep1 and 2.

Sales Invoice-Automatic allocation of Sales Rep:

On Management tab, sales rep will automatically flow based on the customer chosen on header level.

On the Lines tab, Select the action button pop up view for the product and view corresponding sales rep1 and 2.

Sales Price List Setup For Sales Rep:

Navigate to: Setup>Sales>Price Lists >Setup

Fig 4.1 Setting Sales rep commission factor on Price List Screen

On T20 Price List, price/Free tab sale rep commission, commission factor set to yes and click on Yes for “This pricing contain lines ,Do you want to continue?”,finally click on save.

This factor will flow to sales invoice which is having corresponding sales rep.

Report Selection for Sales Rep. Bonus List :

Navigate to: More>Reports>Reports

Fig 5.1: Report Screen

This blog helps us to understand how commission is assigned to individual sales rep and setting up the price list for sales rep commission and report to view sales rep bonus.

About Us

Greytrix – a globally recognized and one of the oldest Sage Development Partner is a one-stop solution provider for Sage ERP and Sage CRM organizational needs. Being acknowledged and rewarded for multi-man years of experience, we bring complete end-to-end assistance for your technical consultations, product customizations, data migration, system integrations, third-party add-on development and implementation competence.

Greytrix caters to a wide range of Sage X3, a Sage Business Cloud Solution, offerings. Our unique GUMU™ integrations include Sage X3 for Sage CRMSalesforce.com, Dynamics 365 CRM and Magento eCommerce along with Implementation and Technical Support worldwide for Sage X3. Currently we are Sage X3 Implementation Partner in East Africa, Middle East, Australia, Asia, US, UK. We also offer best-in-class Sage X3 customization and development services, integrated applications such as POS | WMS | Payment Gateway | Shipping System | Business Intelligence | eCommerce and have developed add-ons such as Catch – Weight  and Letter of Credit and India Legislation for Sage X3 to Sage business partners, end users and Sage PSG worldwide.

Greytrix is a recognized Sage champion ISV Partner for GUMU™ Sage X3 – Sage CRM integration also listed on Sage Marketplace; GUMU™ integration for Sage X3 – Salesforce is a 5-star rated app listed on Salesforce AppExchange and GUMU™ integration for Dynamics 365 CRM – Sage ERP listed on Microsoft AppSource.

For more information on Sage X3 Integration and Services, please contact us at x3@greytrix.com, We will like to hear from you.


Impact Analysis of Change Request in Sage X3 V12

$
0
0

 In Sage X3 V12, as we know the Change request function is the central function for managing the delivery of ‘change’ for issues or enhancements that will benefit your organization or your customers. As changes are important in the development of a product and for ongoing maintenance of a product, we need to study the impact of these change requests on us along with our market place.

        Sage X3 provides function ‘Impact Anlysis’ to study significant impacts on current as well as future sales and profit/loss. This function supports the assessment process by providing easy access to data associated with a request for a design or a production ‘change’. With the associated data, this function can be used as:

  1. a risk analysis tool for business or technical justification foe modifications.
    1. a communications tool that supports members of a change control team identifying the potential consequences of that ‘change’.

        You can access key information from the summary and the detailed impact analysis using the standard Sage X3 functionality provided with selected fields. For example, you can jump to critical information associated with the change request and into the change request itself. From the displayed list of commitments you can jump to information such as the order details, partner or site from which the transaction was raised. Access to this level of detail supports the gathering of critical information in the assessment of the business case for a specific requirement.

To obtain or run impact analysis, a change request must be at status ‘In review’.

  • If you access this function from the change request itself (using the Impact analysis action) a high level assessment or summary impact analysis is displayed. You can obtain a detailed impact analysis for each commitment by simply clicking the appropriate action in the Action panel.
  • If you access this function directly from the menu all change requests at a minimum status ‘In review’ are displayed in a grid or table. The high level assessment or summery impact analysis will display for your selected change request. You can obtain a detailed impact analysis for each commitment by simply clicking the appropriate action in the Action panel.

Below tabs Sales and purchasing, Manufacturing and Stock are the commitment groups or key transactions of X3. The commitments and the quantities that could be impacted by a ‘change’ to the product are displayed in these tabs.

For example, if you have created a change request for a defective product “BMS007” and currently the request is at ‘In review’ status then how ordered quantities can be impacted are shown below.

fig1: Change Request
Fig2: Commitment Group

Action Panel:

There are various actions provided to directly jump from impact anlysis to respective functions.

  • Return to request : It displays the full details of a change request.
  • List of change requests : It displays the full list of change requests in the database.

The following actions display the list of commitments for the selected commitment type that have one or more open lines :

Sales orders, Sales quotes, Purchase orders, Purchase requests, Work orders, Sub contract orders.

  • Demand forecast : The forecast sales order quantities cover time horizons for each month. These are measured in weeks from the first of the month in which this impact analysis was created or updated.
  • Stock : Displays stock status available on a site.
  • BOMs : This action displays a list of assemblies and subassemblies that are associated with the product on this change request.
  • Routing : This action displays the list of routes i.e. the sequence of operations, materials and tools required to produce or process a product or an assembly associated with the product on the change request.
Fig3: Action Panels

A detailed impact analysis identifies the individual commitments that could be potentially impacted by a ‘change’ to the product defined on a change request.

About Us

Greytrix – a globally recognized and one of the oldest Sage Development Partner is a one-stop solution provider for Sage ERP and Sage CRM organizational needs. Being acknowledged and rewarded for multi-man years of experience, we bring complete end-to-end assistance for your technical consultations, product customizations, data migration, system integrations, third-party add-on development and implementation competence.

Greytrix caters to a wide range of Sage X3, a Sage Business Cloud Solution, offerings. Our unique GUMU™ integrations include Sage X3 for Sage CRMSalesforce.com, Dynamics 365 CRM and Magento eCommerce along with Implementation and Technical Support worldwide for Sage X3. Currently we are Sage X3 Implementation Partner in East Africa, Middle East, Australia, Asia, US, UK. We also offer best-in-class Sage X3 customization and development services, integrated applications such as POS | WMS | Payment Gateway | Shipping System | Business Intelligence | eCommerce and have developed add-ons such as Catch – Weight  and Letter of Credit and India Legislation for Sage X3 to Sage business partners, end users and Sage PSG worldwide.

Greytrix is a recognized Sage champion ISV Partner for GUMU™ Sage X3 – Sage CRM integration also listed on Sage Marketplace; GUMU™ integration for Sage X3 – Salesforce is a 5-star rated app listed on Salesforce AppExchange and GUMU™ integration for Dynamics 365 CRM – Sage ERP listed on Microsoft AppSource.

For more information on Sage X3 Integration and Services, please contact us at x3@greytrix.com, We will like to hear from you.

How to change a lot number in sage X3

$
0
0

A lot number is an identification number assigned to a particular quantity or lot of material from a single manufacturer. Lot numbers can be found on the outside of packaging.

New Stuff:- Impact Analysis of Change Request in Sage X3 V12

A lot number is a combination of numerical digits that are given to a group of products that have commonalities. Maybe they were manufactured in the same batch or contain a common material. Lot numbers are often assigned to groups of products from a manufacturer. Every company has a different way of assigning lot numbers to a product. It could be based on the manufacture date, location, expiration date or a combination of multiple numbers. 

Lot tracking is the process of recording how each product moves in and out of our inventory. We will apply the lot number to our reporting and be able to look at trends with specific lots, and understand how some may have moved faster or slower than others, or we can also check for which lot there is a larger or lesser profit. This is helpful if we notice that we have a lot of returns from the same lot — perhaps there’s a defect or similar issue to look into.

We can come across this mistake that when a lot-tracked product is received into stock but assigned an incorrect lot number. In this instance user will likely need to update the available stock in one lot with a new or another existing lot number. Fortunately Sage X3 makes it quick and simple to update your lot information.

These steps will assist the user with changing the lot number in this scenario.

Navigate to : Inventory > Inquiries >Stock by lots

Here we are searching for site  AO011 and product BMS001. We can see that there are four different lot assigned to product. We want to change the lot number which is highlighted (i.e. LO2008AO0110001). Refer the below screenshot.

Stock by lot screen before changing lot number

To changes that lot number:

Navigate to:  Inventory > Quality Control > Lot Modifications > Renum/split/mix

  • Create a new record.
  • Enter the ‘Stock site’ and select the ‘Product’ for which you want to change lot number. Here we will take site as ‘AO011’ and product as ‘BMS001’
  • In the Source section select the lot assignment which we to change for the product. Here we will select the lot ‘ LO2008AO0110001’
  • Click on the ‘Stock Selection’ from the left list.
  • In the Destination create a new lot id for the product. Here we are giving as LO2020AO0110001
  • Select the source lot from the left list.

Click on Create. Refer the below screen shot.

Renum split merge screen

To verify the same

Navigate to : Inventory > Inquiries > Stock by lots

Select the same site and product. Here we can see the existing lot number is replaced with a new lot number. Refer below figure

Stock by lot after changing lot number

About Us

Greytrix – a globally recognized and one of the oldest Sage Development Partner is a one-stop solution provider for Sage ERP and Sage CRM organizational needs. Being acknowledged and rewarded for multi-man years of experience, we bring complete end-to-end assistance for your technical consultations, product customizations, data migration, system integrations, third-party add-on development and implementation competence.

Greytrix caters to a wide range of Sage X3, a Sage Business Cloud Solution, offerings. Our unique GUMU™ integrations include Sage X3 for Sage CRMSalesforce.com, Dynamics 365 CRM and Magento eCommerce along with Implementation and Technical Support worldwide for Sage X3. Currently we are Sage X3 Implementation Partner in East Africa, Middle East, Australia, Asia, US, UK. We also offer best-in-class Sage X3 customization and development services, integrated applications such as POS | WMS | Payment Gateway | Shipping System | Business Intelligence | eCommerce and have developed add-ons such as Catch – Weight  and Letter of Credit and India Legislation for Sage X3 to Sage business partners, end users and Sage PSG worldwide.

Greytrix is a recognized Sage champion ISV Partner for GUMU™ Sage X3 – Sage CRM integration also listed on Sage Marketplace; GUMU™ integration for Sage X3 – Salesforce is a 5-star rated app listed on Salesforce AppExchange and GUMU™ integration for Dynamics 365 CRM – Sage ERP listed on Microsoft AppSource.

For more information on Sage X3 Integration and Services, please contact us at x3@greytrix.com, We will like to hear from you.

In this blog, we came to know how we can change the existing lot number of a product to a new lot number

Plan of Change Request in Sage X3 V12

$
0
0

In Sage X3 V12, as we know the Change request function is used for managing the delivery of ‘change’ for issues or enhancements that will benefit your organization or your customers. Sage X3 also provides ‘Impact Analysis’ function to study possible impacts on current as well as future sales and profits. To guide and schedule the implementation and execution of a design or a production ‘change’, Sage X3 provides special function called ‘Plan’. This function can be used as:

  1. a planning tool that facilitates in the consideration and identification of the components required to deliver a specific ‘change’.
    1. a communications tool to consider the components proposed by the project manager, and for confirming or developing the scope of the requirements.

        It categorizes the sequencing of activities, and simplifies time estimations to avoid delays and potential cost overruns.An action plan directly impacts the progress of a change request through the remaining stages of the processing cycle. A change request, therefore, can only progress to status ‘Completed’ once all individual tasks (actions) on the plans have been accomplished. This empowers the change manager to hold a change request at status ‘Implement’ until the requirements have been delivered in full and have been approved. Once the delivered requirements have been approved the change request can then be advanced to the final status of ‘Closed’.

  • It is not mandatory to define an Action plan.
  • All plans are automatically deleted if the status of a change request is reverted from status ‘Plan’ to status ‘In review’.
Fig1: Plan

The main persons involved in action plan are as follows:

  1. Project Manager(Planner): Creates or add tasks to a high level Work Breakdown Structure and sets your high level Work Breakdown Structure as ‘Planning complete’. This informs the ‘actioners’ and stakeholders that the plan is complete and ready to implement.
  2. Actioner: Updates the status of the tasks to which you have been assigned.
  3. Stake holder: As a stakeholder or member of your company’s ‘change board’, at any time, you access an action plan. An action plan shows you how the objectives for the design or production ‘change’ will be met. You can use it as a mechanism for referencing and managing business risk, and potentially costs.

High Level Block

This is the high level Work Breakdown Structure. This plan defines the approach to be taken to deliver the requirements for the change request.

The summary grid displays the current status of the individual Implementation plans. The entities listed are aligned with the associated Impact analysis.

A plan status can be one of the following: ‘Plan’, ‘Implement’ or ‘Complete’. ‘Not applicable’ is displayed if either of the following conditions apply:

  • The associated Impact analysis did not generate any transaction lines, or
  • The project manager has confirmed that the plan is not required.

As soon as an actioner sets the status of one of their actions to ‘In progress’ your high level Work Breakdown Structure will be fixed. You will not be able to append to or delete any of the lines on the plan.

Fig2: Plan details

Plan Status

This grid displays a summary of the status of the individual Implementation plans. Each plan provides a breakdown of all the work to be completed for the individual transaction types to deliver the approved requirements. Each plan can be accessed by simply clicking the appropriate action in the Action panel.Once you flag your implementation plan as ‘Planning complete’ your plan is validated. All transaction lines for which an action has been defined must have been assigned a completion date and an actioner responsible for delivering the task.

Fig3: Plan status

This function gives you total flexibility over which plans you need and which ones you decide are not required. The timeframes, milestones and dates you define will provide you with an effective control mechanism in the successful delivery of the ‘change’.

About Us

Greytrix – a globally recognized and one of the oldest Sage Development Partner is a one-stop solution provider for Sage ERP and Sage CRM organizational needs. Being acknowledged and rewarded for multi-man years of experience, we bring complete end-to-end assistance for your technical consultations, product customizations, data migration, system integrations, third-party add-on development and implementation competence.

Greytrix caters to a wide range of Sage X3, a Sage Business Cloud Solution, offerings. Our unique GUMU™ integrations include Sage X3 for Sage CRMSalesforce.com, Dynamics 365 CRM and Magento eCommerce along with Implementation and Technical Support worldwide for Sage X3. Currently we are Sage X3 Implementation Partner in East Africa, Middle East, Australia, Asia, US, UK. We also offer best-in-class Sage X3 customization and development services, integrated applications such as POS | WMS | Payment Gateway | Shipping System | Business Intelligence | eCommerce and have developed add-ons such as Catch – Weight  and Letter of Credit and India Legislation for Sage X3 to Sage business partners, end users and Sage PSG worldwide.

Greytrix is a recognized Sage champion ISV Partner for GUMU™ Sage X3 – Sage CRM integration also listed on Sage Marketplace; GUMU™ integration for Sage X3 – Salesforce is a 5-star rated app listed on Salesforce AppExchange and GUMU™ integration for Dynamics 365 CRM – Sage ERP listed on Microsoft AppSource.

For more information on Sage X3 Integration and Services, please contact us at x3@greytrix.com, We will like to hear from you.

How to ‘Close PO’ programmatically using 4GL Script

$
0
0

In Sage X3, User have option to close Purchase order manually by using “close order” button on Purchase order screen. But one of our client has requested to automate this process on certain event so that user doesn’t have to take of this manually. To achieve this we have come up with some customization on PO screen where we did the 4GL code. Using the standard subprogram from standard script, we able to do it successfully. Lets look at the subprogram code.

New stuff: Restriction on Purchase Invoice Creation

Syntax:

Call TRTPOHCLE (WPOHNUM, WMSGFLG, WRET) From TRTACHDIV1

Here is the meaning of each parameter value,

WPOHNUM: Purchase order number
WMSGFLG: It is Integer value which indicates error message
0: No error Message
1: error on screen (Call ERROR)
2: GMESSAGE+GERROR
3: Message in trace
WRET: (Return Code) It Contains an integer value.

By calling above subprogram we can close the Purchase order.

Through above syntax we can close the purchase order by calling TRTPOHCLE subprogram from standard script with proper parameters.

Example:

Here we have created one Purchase order as shown in below screenshot which is showing closed order status “No” means PO is not closed yet.

Purchase Order screen- Closed Status
Purchase Order screen- Closed Status “No”

Now, call the Subprogram with appropriate parameter as mentioned in below script screenshot to close PO.

Script
Script

After execution of script, Purchase order got closed as shown in below screenshot.

Purchase Order screen- Closed Status
Purchase Order screen- Closed Status “Yes”

In this way, any programmer who knows the 4GL scripting can do this customization easily.

About Us

Greytrix – a globally recognized and one of the oldest Sage Development Partner is a one-stop solution provider for Sage ERP and Sage CRM organizational needs. Being acknowledged and rewarded for multi-man years of experience, we bring complete end-to-end assistance for your technical consultations, product customizations, data migration, system integrations, third-party add-on development and implementation competence.

Greytrix caters to a wide range of Sage X3, a Sage Business Cloud Solution, offerings. Our unique GUMU™ integrations include Sage X3 for Sage CRMSalesforce.com, Dynamics 365 CRM and Magento eCommerce along with Implementation and Technical Support worldwide for Sage X3. Currently we are Sage X3 Implementation Partner in East Africa, Middle East, Australia, Asia, US, UK. We also offer best-in-class Sage X3 customization and development services, integrated applications such as POS | WMS | Payment Gateway | Shipping System | Business Intelligence | eCommerce and have developed add-ons such as Catch – Weight  and Letter of Credit and India Legislation for Sage X3 to Sage business partners, end users and Sage PSG worldwide.

Greytrix is a recognized Sage champion ISV Partner for GUMU™ Sage X3 – Sage CRM integration also listed on Sage Marketplace; GUMU™ integration for Sage X3 – Salesforce is a 5-star rated app listed on Salesforce AppExchange and GUMU™ integration for Dynamics 365 CRM – Sage ERP listed on Microsoft AppSource.

For more information on Sage X3 Integration and Services, please contact us at x3@greytrix.com, We will like to hear from you.

Purchase Receipt quantity not flowing to Purchase Invoice screen in Sage X3

$
0
0

In Sage X3, we faced an issue for the Quantity not getting flown from Purchase Receipt to Purchase Invoice screen on the selection from the left list. As per the standard process, we create a Purchase order, and further we create a Purchase receipt using the same Purchase Order. Further, while creating the Purchase Invoice we select the respective Receipt which eventually flow the detail line data of the Receipt to Invoice screen which includes Product Code, Product description, UOM, Quantity, Gross price, etc. But here the quantity is not getting flowed from Receipt to Invoice screen.

New Stuff: How to ‘Close PO’ programmatically using 4GL Script

[Purchase Receipt]
[Purchase Receipt]

As shown in above screenshot, we have created the Purchase receipt with quantity 10 for “SASA001 – Test Supplier”.

[Purchase Invoice – Quantity not flowing in Invoice screen]
[Purchase Invoice – Quantity not flowing in Invoice screen]

Now we will be creating a Purchase Invoice using the same supplier code and select the respective Receipt from the left list. As you can see in above screenshot, all the details are flowing properly in Purchase Invoice detail line except the quantity which did not flow on Invoice screen.

Let’s check the steps to solve above the issue.

Navigate to Setup -> General Parameters -> Parameter Values. In Parameter values, expand the ACH Purchase field from the left list and select the folder. Here in the grid there is an option of INV – Invoicing rules. Click on the action button and select Details which will open the pop-up box as shown in below screenshot.

[Parameter Values]
[Parameter Values]

As you can see, the value for billable quantity is “Qty A”. So this means only those Receipt quantities will be flowing in Invoice detail line whose Status is “A”. But as you can see in the first screenshot (Purchase Receipt), the status is “Q” in detail line so that is the reason the quantity did not flow in the Invoice screen. Here we will select from the finder which Invoice Quantity we need to select so that quantity will flow in the Invoice screen. Here there are three options, A (Allocate), Q (Quality) and R (Reject). As per the clients requirement we will select the Products whose status is either Allocated (A) or in Quality (Q) i.e. (Qty A+Q).

[Selection of Quantity Status – A, Q, R]
[Selection of Quantity Status – A, Q, R]

Now we will create the Purchase Invoice from the Receipt using same supplier code and now we will check the whether the quantity will flow in the Invoice or not.

[Purchase Invoice – Quantity flowing in Invoice screen]
[Purchase Invoice – Quantity flowing in Invoice screen]

As you can see in the above screenshot, here the quantity 10 is flowing properly now in the Purchase Invoice detail line as it we changed the setting as per the requirement. So now here the Quantity is flowing properly from the Purchase Receipt screen to Purchase Invoice.

About Us

Greytrix – a globally recognized and one of the oldest Sage Development Partner is a one-stop solution provider for Sage ERP and Sage CRM organizational needs. Being acknowledged and rewarded for multi-man years of experience, we bring complete end-to-end assistance for your technical consultations, product customizations, data migration, system integrations, third-party add-on development and implementation competence.

Greytrix caters to a wide range of Sage X3, a Sage Business Cloud Solution, offerings. Our unique GUMU™ integrations include Sage X3 for Sage CRMSalesforce.com, Dynamics 365 CRM and Magento eCommerce along with Implementation and Technical Support worldwide for Sage X3. Currently we are Sage X3 Implementation Partner in East Africa, Middle East, Australia, Asia, US, UK. We also offer best-in-class Sage X3 customization and development services, integrated applications such as POS | WMS | Payment Gateway | Shipping System | Business Intelligence | eCommerce and have developed add-ons such as Catch – Weight  and Letter of Credit and India Legislation for Sage X3 to Sage business partners, end users and Sage PSG worldwide.

Greytrix is a recognized Sage champion ISV Partner for GUMU™ Sage X3 – Sage CRM integration also listed on Sage Marketplace; GUMU™ integration for Sage X3 – Salesforce is a 5-star rated app listed on Salesforce AppExchange and GUMU™ integration for Dynamics 365 CRM – Sage ERP listed on Microsoft AppSource.

For more information on Sage X3 Integration and Services, please contact us at x3@greytrix.com, We will like to hear from you.

Viewing all 1524 articles
Browse latest View live