Quantcast
Channel: Sage X3 – Tips, Tricks and Components
Viewing all 1524 articles
Browse latest View live

How to increase no. of characters in Line text entry using import template

$
0
0

Sometimes, it happens we need to insert description for particular line in any transaction using import template and the standard just allows limited text in line text entry like for around 194 characters. We can increase this number of characters by doing few changes in import/export template of that particular transaction.

Consider example for a sales invoice transaction and template as shownbelow :

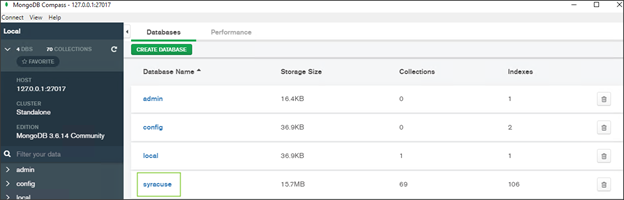
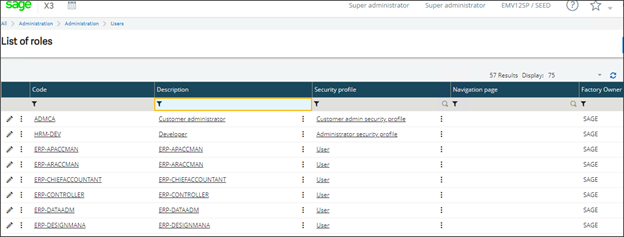
Navigation to All -> Setup -> Usage -> Import/Export templates

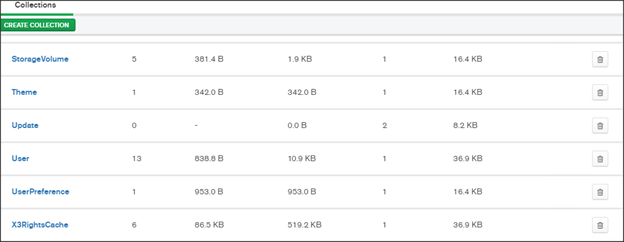
Select “SIH” as template code

Fig1: Import/Export Template

Consider the sample text for line text entry

Sample text :The youth who got that must have felt as if he were perusing a railroad time-table. Good mental exercise Never, never use that argument. To cause your reader or correspondent unnecessary mental labor is the greatest of all blunders in business English. The more patience he spends in getting at your thought, the less he will have for your proposition. Let us turn that alleged sentence into a paragraph. There are several versions that might be made. Here is one.I have your inquiry of June ninth. You ask first about the stenographer and type-writer examinations next spring. [Here let him answer that inquiry. You inquire also as to local appointments in connection with the conducting of Civil Service examinations. The route examinations are conducted by the various district secretaries. The others are held at the different places of examination by post-office employees

If we import from standard template we will be able to see below number of characters in Line text entry as shown in screenshot below

Fig2: Text entry screen

Out of 865 characters the file got imported with only 194 characters in length.

How to increase number of characters  :

Navigate to All -> Setup -> Usage -> import/export template

Select the template, here “SIH” is the template code as shown in below screenshots.

Fig3: Setup Imp/exp screen

Go to fields section, you will be able to see Line text fields as shown below

Fig4: Sales Invoice Field screen

Add new fields for Line text in template as shown below :

Fig5: Imp/Exp screen

Now consider the same sample text,

“The youth who got that must have felt as if he were perusing a railroad time-table. Good mental exercise Never, never use that argument. To cause your reader or correspondent unnecessary mental labor is the greatest of all blunders in business English. The more patience he spends in getting at your thought, the less he will have for your proposition. Let us turn that alleged sentence into a paragraph. There are several versions that might be made. Here is one.I have your inquiry of June ninth. You ask first about the stenographer and type-writer examinations next spring. [Here let him answer that inquiry. You inquire also as to local appointments in connection with the conducting of Civil Service examinations. The route examinations are conducted by the various district secretaries. The others are held at the different places of examination by post-office employees”

Add it in the import file you are using as shown below.

Fig6: Notepad file

Open Line text entry as shown below :

Fig7: Line Text button

Imported text in line text entry :

Fig8: Line Text screen

This blog helps us to increase number of characters in line text entry in any transaction. It will work for any transaction template which consists of Line text entry field. We can increase more number of characters by adding more fields as per requirement.

About Us

Greytrix – a globally recognized and one of the oldest Sage Development Partner is a one-stop solution provider for Sage ERP and Sage CRM organizational needs. Being acknowledged and rewarded for multi-man years of experience, we bring complete end-to-end assistance for your technical consultations, product customizations, data migration, system integrations, third-party add-on development and implementation competence.

Greytrix caters to a wide range of Sage X3, a Sage Business Cloud Solution, offerings. Our unique GUMU™ integrations include Sage X3 for Sage CRMSalesforce.com, Dynamics 365 CRM and Magento eCommerce along with Implementation and Technical Support worldwide for Sage X3. Currently we are Sage X3 Implementation Partner in East Africa, Middle East, Australia, Asia, US, UK. We also offer best-in-class Sage X3 customization and development services, integrated applications such as POS | WMS | Payment Gateway | Shipping System | Business Intelligence | eCommerce and have developed add-ons such as Catch – Weight  and Letter of Credit and India Legislation for Sage X3 to Sage business partners, end users and Sage PSG worldwide.

Greytrix is a recognized Sage champion ISV Partner for GUMU™ Sage X3 – Sage CRM integration also listed on Sage Marketplace; GUMU™ integration for Sage X3 – Salesforce is a 5-star rated app listed on Salesforce AppExchange and GUMU™ integration for Dynamics 365 CRM – Sage ERP listed on Microsoft AppSource.

For more information on Sage X3 Integration and Services, please contact us at x3@greytrix.com, We will like to hear from you.


How to store CLOB variable data to the table through webservice

$
0
0

CLOB stands for Character Large Object, CLOB stores large amounts of character data ,up to 4GB in size. CLOB data may be very large, some database management systems do not store the text directly in the table. Instead, the CLOB field serves as an address, which references the location of the data.

New Stuff:- How to increase no. of characters in Line text entry using import template

How to address CLOB in X3 Script file and Screen, tables and reports:

In X3,Clbfile is the keyword used to declare the variables of the type CLOB.

Syntax:

          Local Clbfile Name_of_the_Variable(Length)

          Local Clbfile Name_of_the_Variable(Length)(Dimensions)

Example:

          Local Clbfile YMYCLOB(200)

          Local Clbfile YMYCLOB(200)(1..10)

          Dimension: having index range 1 to 10

In X3 ,ACB is the data types that can be used in all the dictionaries where the CLOB data is defined  in screen fields, table fields, report setups, etc.

ACB data type stores the information more than 250 characters in the database.

When saving file date to the field of table if you find any “Text file length too long error”, then declare the field as ACB to rectify the error.

Create Subprogram based Web service:

STEP 1: Create a script with subprogram for storing input data to the table.

Create a table named YCLOBTAB with following fields

S.No

Name of the Field

Datatype

Length

1

YLEG

A

10

2

YFILENAM

A

50

3

YFILESTR

ACB


4

YSTA

A

50

Click on Create and Validate the table in X3.

Create the Script file name: YSAVEENCRYPT and write the subprogram below:

Subprog  YSAVECLOB(YLEG,YFILENAM,YFILESTR,YSTA) 

Value    Char     YLEG

Value    Char     YFILENAM

Value    Clbfile   YFILESTR

Variable Char     YSTA

##OPENING Table for storing CLOB data FILE

If !clalev([F:YCLB]) Local File YCLOBTAB[F: YCLB] :Endif

####ERROR HANDLING

ONERRGO YCATCH

         [F: YCLB]YLEG           = YLEG

          [F: YCLB]YFILENAM = YFILENAM

          [F: YCLB]YFILESTR  = YFILESTR

          WRITE[F: YCLB]

          YSTA = “SUCCESS”

ONERRGO

#####

Close File[F: YCLB]

End

## ERROR HANDLING CATCH METHOD

$YCATCH

   YSTA = “FAIL”

Resume

STEP 2: Create Subprograms by referring script file and subprogram created on step 1

Navigational Path: Development>Script dictionary>Subprograms.

Creating Subprograms

Enter the Script file name in File field “YSAVEENCRYPT”

Enter the subprogram name in Subprograms field “YSAVECLOB”

Enter the appropriate description in Description field “Save CLOB data”

Then click on Create button, then publication button gets enabled then click on publication button to create web service.

Creating Webservices

STEP 4:Invoking the Web service by XML input

For Invoking Webservices, Please refer the blog “How to invoke Import/Export Template through Webservices”

Place the below XML in  Input XML/JSON field

<PARAM>

<GRP ID=”GRP1″>

<FLD NAM=”YSLEG”  TYP=”Char”>AUS</FLD>

<FLD NAM=”YSFILENAM”  TYP=”Char”>FIL002</FLD>

<FLD NAM=”YSFILESTR”  TYP=”Clob”>

hQEMA/KwatWd7FffAQf/Zh/GVgozLWaVOVzVrJT9KZvjJ0QKs4p698zA2oCb9LhK

QRprExhgALKZp7qdtnK5LRC9P1VNt0lKduZ23BjxXWlaxY5V+TwxdAcVXEonWhB2

3SbK9wDjgB1w0zItOC+dz5TEYvzXJMlb9mGqVKwVWqRYYaKgjg3AHF4+iu4VSUns

sImvvOvnNDQ/3KPX3NE3F3RS9XeTajU4zozbYkry+mcxGbj9wAsNASMLWqBTb2sN

NGG5EAqkqTBxsIbHv+m5J8GZbpTrJgIkiek+shVrH0nNnIGyz6I7bedxIupFY5xQ

lYAuupvuIuSK4DcOuiXazUvKx81kSFGvKTnsadMCcsnBHaOE6dEW9crEd5itDsWE

yJflofoO2WR7B1vQ5O2Vd8pBLJ7xxtt3SVzQToO4921wRd99BROeMfUDVLXwqR5/

AGUbyw+Y383AFSfdjYvxK2XSW3Fit6JVNZ1SqXVVuMzpyA9+nchkffzL4WiI+p7m

I7VnuAjrltUqTcC+7cd1viTVcH6GD9liaElQnbwVJt12FYOe0JYio9FWOdFPBeIJ

Vhm0RjPm/fDffbGhPm/mzkbhJLskRFXek1e//wt9SEmSgJ6U/erYerfxwOYPDE2n

y3qrP7Kz5ROQn15cU8Fh8zoTBJT53pvAH6GFvpzoQoPyv35Oy1YWulHTRkWoCRoG

kJVbvL2pUftyxZBWc1tufQKZ9VO7s+WqiS1BJWvwj2U1JdbLgbt+1mQXU+T86KHg

xfKTjMBnjZFLKXJxvyn+efx6zfQ5EDiaw7SmsLoQe4stA9RHQcYRuN0UAGR4qxVS

Lm6QAPQImLnz+17Uqt449w5s9OEOlRAva+6aN9tJmp+roeQOT813Mn6BPz51KX65

/gbPUDRgPp30NQsEDbqusrqLVCCEikYGwLteNNShbz2+IR1mDtsEsDsRFJPNOaaL

t05eLvB4DPjCZWL27lKkOXMeXuj3kzYdXDVyl0YHyw===Z1hp

</FLD>

<FLD NAM=”YSTA”  TYP=”Char”></FLD>

</GRP>

</PARAM>

The field YSFILESTR contains more than 255 characters.

STEP 5: Response after invoking Web services

<RESULT>

<GRP ID=”GRP1″>

<FLD NAME=”YSLEG” TYPE=”Char”>AUS</FLD>

<FLD NAME=”YSFILENAM” TYPE=”Char”>FIL002</FLD>

<FLD NAME=”YSFILESTR” TYPE=”Clob”>hQEMA/KwatWd7FffAQf/Zh/GVgozLWaVOVzVrJT9KZvjJ0QKs4p698zA2oCb9LhK QRprExhgALKZp7qdtnK5LRC9P1VNt0lKduZ23BjxXWlaxY5V+TwxdAcVXEonWhB2 3SbK9wDjgB1w0zItOC+dz5TEYvzXJMlb9mGqVKwVWqRYYaKgjg3AHF4+iu4VSUns sImvvOvnNDQ/3KPX3NE3F3RS9XeTajU4zozbYkry+mcxGbj9wAsNASMLWqBTb2sN NGG5EAqkqTBxsIbHv+m5J8GZbpTrJgIkiek+shVrH0nNnIGyz6I7bedxIupFY5xQ lYAuupvuIuSK4DcOuiXazUvKx81kSFGvKTnsadMCcsnBHaOE6dEW9crEd5itDsWE yJflofoO2WR7B1vQ5O2Vd8pBLJ7xxtt3SVzQToO4921wRd99BROeMfUDVLXwqR5/ AGUbyw+Y383AFSfdjYvxK2XSW3Fit6JVNZ1SqXVVuMzpyA9+nchkffzL4WiI+p7m I7VnuAjrltUqTcC+7cd1viTVcH6GD9liaElQnbwVJt12FYOe0JYio9FWOdFPBeIJ Vhm0RjPm/fDffbGhPm/mzkbhJLskRFXek1e//wt9SEmSgJ6U/erYerfxwOYPDE2n y3qrP7Kz5ROQn15cU8Fh8zoTBJT53pvAH6GFvpzoQoPyv35Oy1YWulHTRkWoCRoG kJVbvL2pUftyxZBWc1tufQKZ9VO7s+WqiS1BJWvwj2U1JdbLgbt+1mQXU+T86KHg xfKTjMBnjZFLKXJxvyn+efx6zfQ5EDiaw7SmsLoQe4stA9RHQcYRuN0UAGR4qxVS Lm6QAPQImLnz+17Uqt449w5s9OEOlRAva+6aN9tJmp+roeQOT813Mn6BPz51KX65 /gbPUDRgPp30NQsEDbqusrqLVCCEikYGwLteNNShbz2+IR1mDtsEsDsRFJPNOaaL t05eLvB4DPjCZWL27lKkOXMeXuj3kzYdXDVyl0YHyw== =Z1hp</FLD>

<FLD NAME=”YSTA” TYPE=”Char”>SUCCESS</FLD>

</GRP>

</RESULT>

This blog helps us to understand what is CLOB, what is the keyword used in script and database in X3 and how to store the CLOB data to the table using subprogram based web service.

About Us

Greytrix – a globally recognized and one of the oldest Sage Development Partner is a one-stop solution provider for Sage ERP and Sage CRM organizational needs. Being acknowledged and rewarded for multi-man years of experience, we bring complete end-to-end assistance for your technical consultations, product customizations, data migration, system integrations, third-party add-on development and implementation competence.

Greytrix caters to a wide range of Sage X3, a Sage Business Cloud Solution, offerings. Our unique GUMU™ integrations include Sage X3 for Sage CRMSalesforce.com, Dynamics 365 CRM and Magento eCommerce along with Implementation and Technical Support worldwide for Sage X3. Currently we are Sage X3 Implementation Partner in East Africa, Middle East, Australia, Asia, US, UK. We also offer best-in-class Sage X3 customization and development services, integrated applications such as POS | WMS | Payment Gateway | Shipping System | Business Intelligence | eCommerce and have developed add-ons such as Catch – Weight  and Letter of Credit and India Legislation for Sage X3 to Sage business partners, end users and Sage PSG worldwide.

Greytrix is a recognized Sage champion ISV Partner for GUMU™ Sage X3 – Sage CRM integration also listed on Sage Marketplace; GUMU™ integration for Sage X3 – Salesforce is a 5-star rated app listed on Salesforce AppExchange and GUMU™ integration for Dynamics 365 CRM – Sage ERP listed on Microsoft AppSource.

For more information on Sage X3 Integration and Services, please contact us at x3@greytrix.com, We will like to hear from you.

Restriction on WO Close unless Quality Transaction is clear

$
0
0

As you all know in Sage X3, Users can close any Work Order after Production Tracking by using WO Close screen. But one of our client wanted to restrict that WO Close functionality until that particular Work Order is Completely Tracked and Quality Control Transaction is done. Now we will see both the conditions one by one:

1. WO should be Completely Tracked:

As you can see in the below screenshot, there are three checkboxes on Production Tracking Screen i.e. Operation Tracking, Production Reporting and Material Tracking. If all the three checkboxes are ticked after creation of Production Tracking entry for any particular Work Order then only that Work Order will be considered as “Completely Tracked WO”. And if in case one of them or two of them are not ticked then that work order is not completely tracked WO.

New Stuff: How to store CLOB variable data to the table through webservice

[Production Tracking Screen]
[Production Tracking Screen]

In Production Tracking Number – 101/MFG/19-20/0056, all the three checkboxes are ticked which means 101/PROD/19-20/0077 is the completely tracked Work Order.

2. Quality Transaction should be done:

In Quality Control screen of Stock module, if the transaction is done against the same Production Tracking Entry and Quality “A” or “R” is entered in quality control detail for total quantity of that WO then only that Transaction will be considered as complete. If the status of the work order products is in “Q” then it will consider that Quality Transaction is not clear. That means the work order Products status should be either Accepted (A) or Rejected (R) but it should not be in the Quality (Q).

As you can see in the below screenshot, Work Order – 101/PROD/19-20/0077 is in “Q” status and quality transaction is not done for this Work Order.

[Quality Control Screen – Q Status]
[Quality Control Screen – Q Status]

If both the conditions are satisfied then only Work Order should be allowed to close. But if one of those two conditions is not satisfied and you click on Close Button for that particular Work Order in WO Close screen, then it will give you an error that “WO cannot be closed unless it is completely tracked and quality has been done” and will not allow to close that Work Order as shown in the below screenshot.

[WO Close screen – Error Message]
[WO Close screen – Error Message]

As we already know, for Work Order – 101/PROD/19-20/0077, first condition is satisfied but second condition is not satisfied because of which it is giving an error when you try to close that order in WO Close screen.

After entering quality control detail in Quality Control screen, status has changed to “A” and both the conditions for Work Order -101/PROD/19-20/0077 are satisfied now. And user can close the Work Order easily. Refer below screenshot in which status is “A”.

[Quality Control Screen –  A Status]
[Quality Control Screen – A Status]

After clicking on close button, that work Order is closed easily without getting any error in WO Close screen and “Close” button is disabled automatically.

[WO Status - Closed]
[WO Status – Closed]

Hence with the help of this customization, WO Close functionality will get restricted unless it is completely tracked and quality transaction is done(A and R).

About Us

Greytrix – a globally recognized and one of the oldest Sage Development Partner is a one-stop solution provider for Sage ERP and Sage CRM organizational needs. Being acknowledged and rewarded for multi-man years of experience, we bring complete end-to-end assistance for your technical consultations, product customizations, data migration, system integrations, third-party add-on development and implementation competence.

Greytrix caters to a wide range of Sage X3, a Sage Business Cloud Solution, offerings. Our unique GUMU™ integrations include Sage X3 for Sage CRMSalesforce.com, Dynamics 365 CRM and Magento eCommerce along with Implementation and Technical Support worldwide for Sage X3. Currently we are Sage X3 Implementation Partner in East Africa, Middle East, Australia, Asia, US, UK. We also offer best-in-class Sage X3 customization and development services, integrated applications such as POS | WMS | Payment Gateway | Shipping System | Business Intelligence | eCommerce and have developed add-ons such as Catch – Weight  and Letter of Credit and India Legislation for Sage X3 to Sage business partners, end users and Sage PSG worldwide.

Greytrix is a recognized Sage champion ISV Partner for GUMU™ Sage X3 – Sage CRM integration also listed on Sage Marketplace; GUMU™ integration for Sage X3 – Salesforce is a 5-star rated app listed on Salesforce AppExchange and GUMU™ integration for Dynamics 365 CRM – Sage ERP listed on Microsoft AppSource.

For more information on Sage X3 Integration and Services, please contact us at x3@greytrix.com, We will like to hear from you.

How to solve formatting issue in v12 using “Break After”

$
0
0

In earlier version of Sage X3 (before v12), whenever there was any requirement from client to add custom fields on standard transaction/master screen, developer has to select the position and block in which it will be displayed and has to place those fields by giving specific numbering to it. But most of the time, developer faced issues while displaying the fields in blocks even after assigning the correct sequence to the fields. To overcome this issue, Sage X3 v12 has given the feature of breaking the line so that fields will get displayed properly and as expected. This feature has been added in V12 as it was not there in previous versions of Sage X3.

As the name implies, “Break After” is applied on the field so that next fields gets placed on the next line within the block or any tab on the screen.

New Stuff: Restriction on WO Close unless Quality Transaction is clear

[Sales Invoice screen]
[Sales Invoice screen]

In the above screenshot, we have added few custom fields in the Sales invoice screen under the Management tab of the Project block, as they are scattered and are not displaying in proper sequence. So we will be displaying the fields in proper format using the break feature given in Version 12 in Sage X3.

For this, we will navigate into Development -> Script Dictionary -> Windows (OSIH) -> Screen (SIH1).

[Screen dictionary for SIH1]
[Screen dictionary for SIH1]

As shown in the above screenshot, the “Break after” column is present on the screen with the drop-down option as “Yes” or “No” in it. So for the BOE number, we will be selecting “Yes” so that the GST number will be displaying on the next line. Also, we will select “Yes” for Port Number so that Original invoice no and Original invoice date will be displaying in the next line. Further, save the changes and do Global validation of the window and also validate it from the Setup so that changes will be reflected on the Sales invoice screen.

[Sales Invoice screen after modification]
[Sales Invoice screen after modification]

In the above screenshot, you can see the Sales invoice screen after the changes are done and the fields are now displaying properly on the screen. As you can see after applying the “Break after” feature, fields in Project block are properly formatted in that section and are placed rightly on the screen. So this new feature has solved most of our formatting issues in Sage X3.

About Us

Greytrix – a globally recognized and one of the oldest Sage Development Partner is a one-stop solution provider for Sage ERP and Sage CRM organizational needs. Being acknowledged and rewarded for multi-man years of experience, we bring complete end-to-end assistance for your technical consultations, product customizations, data migration, system integrations, third-party add-on development and implementation competence.

Greytrix caters to a wide range of Sage X3, a Sage Business Cloud Solution, offerings. Our unique GUMU™ integrations include Sage X3 for Sage CRMSalesforce.com, Dynamics 365 CRM and Magento eCommerce along with Implementation and Technical Support worldwide for Sage X3. Currently we are Sage X3 Implementation Partner in East Africa, Middle East, Australia, Asia, US, UK. We also offer best-in-class Sage X3 customization and development services, integrated applications such as POS | WMS | Payment Gateway | Shipping System | Business Intelligence | eCommerce and have developed add-ons such as Catch – Weight  and Letter of Credit and India Legislation for Sage X3 to Sage business partners, end users and Sage PSG worldwide.

Greytrix is a recognized Sage champion ISV Partner for GUMU™ Sage X3 – Sage CRM integration also listed on Sage Marketplace; GUMU™ integration for Sage X3 – Salesforce is a 5-star rated app listed on Salesforce AppExchange and GUMU™ integration for Dynamics 365 CRM – Sage ERP listed on Microsoft AppSource.

For more information on Sage X3 Integration and Services, please contact us at x3@greytrix.com, We will like to hear from you.

Define Daily and Monthly rate type in Sage X3

$
0
0

Sage X3 is most powerful business management process offered by Sage. Sage X3 manages all critical business functions in any business process. Sage X3 offers multi-currency functionality enabling businesses to handle different currencies within your accounting system. Also having multi-currency feature in Sage X3 ERP benefit your organization in many ways. With the Multi-Currency support,user can able to get multi-currency values on the transactions and reports. To get the multi-currency values in Sage X3, defining exchange/conversion rate under rate type is very important. To know about more on this, we will discuss how we can define Rate Type in Sage X3 by defining Currency Rate as Daily Rate or Monthly Rate in currency rate screen.

So if rate is is defined in sage X3, it is not required for the users to enter the exchange rate at the transaction level manually, system will automatically pick the exchange rate based on rate given in currency table as per the rate date.

To view this screen, navigate to: Common Data–>Common table–>Currency Rates

In Currency rate screen, there is a drop-down list where user can select the rate type as per the customer’s requirements to define the rate for multiple currencies with respect to the rate date. Refer below screenshot:-

New Stuff: How to solve formatting issue in V12 using “Break After”

Daily Rate
[Type: Daily Rate]

There are four options to select the rate type as Daily rate, Monthly rate, Average rate and customs doc file exchange. First User has to select the source currency for which they want to define the exchange/currency rate and then need to select currency rate type. If a user wants to configure it as Daily rate then user will select rate type as Daily and will add in rate date fields on each line per currency that can have a different rate than source currency. The lines relate to last known rate at the date provided in the header. User has to make sure that there should not be two different rates for the same date. This can be affect in sales, purchase and journal ledger transactions if transactions are in multi-currency.

The second option user can select is Monthly rate, from which user can add the monthly rate and rate date fields on detail line per currency which can have other than source currency. If user has requirement where customer wants to set the currency rate against source currency according to the month then user can select the rate type as monthly rate and define rate per month. Refer below screenshot:-

[Type: Monthly Rate]
[Type: Monthly Rate]

So based on rate type, user can set the daily as well as monthly currency rate for different currency as per the rate date and based on this auto calculation will happen at transaction level based on the currency and rate type.

This will make easy for user to automatically fetch the exchange rates at the transaction level for multiple currencies without intervention of currency exchange rate. This currency will affect in bank account in general ledger as well.

About Us

Greytrix – a globally recognized and one of the oldest Sage Development Partner is a one-stop solution provider for Sage ERP and Sage CRM organizational needs. Being acknowledged and rewarded for multi-man years of experience, we bring complete end-to-end assistance for your technical consultations, product customizations, data migration, system integrations, third-party add-on development and implementation competence.

Greytrix caters to a wide range of Sage X3, a Sage Business Cloud Solution, offerings. Our unique GUMU™ integrations include Sage X3 for Sage CRMSalesforce.com, Dynamics 365 CRM and Magento eCommerce along with Implementation and Technical Support worldwide for Sage X3. Currently we are Sage X3 Implementation Partner in East Africa, Middle East, Australia, Asia, US, UK. We also offer best-in-class Sage X3 customization and development services, integrated applications such as POS | WMS | Payment Gateway | Shipping System | Business Intelligence | eCommerce and have developed add-ons such as Catch – Weight  and Letter of Credit and India Legislation for Sage X3 to Sage business partners, end users and Sage PSG worldwide.

Greytrix is a recognized Sage champion ISV Partner for GUMU™ Sage X3 – Sage CRM integration also listed on Sage Marketplace; GUMU™ integration for Sage X3 – Salesforce is a 5-star rated app listed on Salesforce AppExchange and GUMU™ integration for Dynamics 365 CRM – Sage ERP listed on Microsoft AppSource.

For more information on Sage X3 Integration and Services, please contact us at x3@greytrix.com, We will like to hear from you.

Restrict Purchase Order based on Open SO amount

$
0
0

Recently one of our client wants customization in Sage X3 where they want to restrict creation of Purchase Order based on the Sales Order amount i.e. if Purchase order amount get exceeded than total Sales Order amount then user should not able to create Purchase Order.

To achieve this, we have added a custom field name as “Open SO” under the ‘Management tab’ where user can able to see all the open sales order using finder button and can select the appropriate sales order from the list. Please refer below screenshot:-

New Stuff: Define Daily and Monthly rate type in Sage X3

Purchase Order Sample 1

So with our customization, program checks the open sales Order amount for the respective sales order with Purchase order amount. If the Purchase Order amount is greater than the Sales order amount then it shows the message popup “Purchase order amount cannot be greater than Sales order amount” and restrict users from creating purchase order. Please refer below screenshot:-

GPurchase Order Sample 2
Purchase Order Sample 2

In case, if sales order already selected for any purchase order then it will sum both the purchase order amounts i.e. Current PO amount + Previous PO amount and this amount will be compared with the sales order amount and accordingly program check for the validation.

As explained above, by using this customization, user will restrict the Purchase order creation on the basis of Open Sales Order amount by comparing the respective PO amounts. So using this validation, user can restrict the Purchase order creation.

Top 3 Benefits of Greytrix Professional Services

$
0
0

Greytrix is one of the leading ERP vendors and CRM vendors globally, providing low cost, high quality Professional Services for ERP softwares like Sage X3, Sage 100, Sage 300, Sage 500, Sage Intacct and CRM softwares like Sage CRM, Microsoft Dynamics 365 CRM, Salesforce with over two decades of experience and 250+ developers & consultants. Our team of highly qualified and certified techno-functional experts provide complete assistance for your technical consultations, product customizations, system integrations, add-on development and implementation expertise. Having dealt in thousands of product customizations worldwide, we pride ourselves with the best of services and products with a focus on characteristics, dependability, customer service and uniqueness. Greytrix bridges the functionality gaps and helps you deliver projects on time every time for an always ON business.

Greytrix professional services

Greytrix Professional Services provides the following benefits:

  • Development Services

Our team of highly skilled and certified developers have the expertise, understanding and experience in handling ERP development and CRM development involving introduction of new objects, reports and application for enhancing and streamlining your business processes.

  • Industry Specific Customizations

Our best in class development capabilities for Sage ERP and Sage CRM delivers new modules, add- ons, and verticals for various industries. Greytrix – software vendors, with multi- man years of experience provides you customizations including software based product configurations which enable end users to add or change specific functions of the core product to suit your organizational needs.

  • Configuring Solutions

We provide configuration of ERP systems and CRM systems (cloud based and Windows system) and are experienced with 500+ Customers projects and services delivered across the globe. We understand the core requirements of businesses and chart out a strategic plan to best suit the needs of your organization. Greytrix offers consulting for flexible engagement models, fixed time/ fixed cost, as per your business processes including project planning, assessing business rules, configuring and optimizing the solutions. So, if you have an ERP or a CRM software and are interested in developing it from scratch then join hands with Greytrix. Our team of highly qualified and certified techno-functional consultants will define the roadmap of how to build your system and address the most frequent questions until you are familiarized with the new technology.

About Us

Greytrix – a globally recognized and one of the oldest Sage Development Partner is a one-stop solution provider for Sage ERP and Sage CRM organizational needs. Being acknowledged and rewarded for multi-man years of experience, we bring complete end-to-end assistance for your technical consultations, product customizations, data migration, system integrations, third-party add-on development and implementation competence.

Greytrix caters to a wide range of Sage X3, a Sage Business Cloud Solution, offerings. Our unique GUMU™ integrations include Sage X3 for Sage CRMSalesforce.com, Dynamics 365 CRM and Magento eCommerce along with Implementation and Technical Support worldwide for Sage X3. Currently we are Sage X3 Implementation Partner in East Africa, Middle East, Australia, Asia, US, UK. We also offer best-in-class Sage X3 customization and development services, integrated applications such as POS | WMS | Payment Gateway | Shipping System | Business Intelligence | eCommerce and have developed add-ons such as Catch – Weight  and Letter of Credit and India Legislation for Sage X3 to Sage business partners, end users and Sage PSG worldwide.

Greytrix is a recognized Sage champion ISV Partner for GUMU™ Sage X3 – Sage CRM integration also listed on Sage Marketplace; GUMU™ integration for Sage X3 – Salesforce is a 5-star rated app listed on Salesforce AppExchange and GUMU™ integration for Dynamics 365 CRM – Sage ERP listed on Microsoft AppSource.

For more information on Sage X3 Integration and Services, please contact us at x3@greytrix.com, We will like to hear from you.

MongoDB Backup and Restore Procedure

$
0
0

Sage X3 uses Mongo DB as a storage database for the Administration Module. It also acts as part of the first layer of security alongside the Syracuse Component. Just like Microsoft SQL and Oracle DB; Mongo DB also needs to be backed up. In this blog we will see how to take a backup of MongoDB and how to restore the procedure.

New Stuff:- Top 3 Benefits of Greytrix Professional Services

To take the backup first need to check below pre-requisite.

  • Sage X3 needs to be installed on the server with same version and patch level.
  • Both the server needs to have MongoDB Compass downloaded i.e. from where the data of MongoDB will be extracted and to where it will be restored.

Below are the steps needs to be followed to export and import data from MongoDB from one server to another:

  • Download the stable version MongoDb Compass as per the platforms you use.
  • Run the Application file with the name “”MongoDBCompass” from the downloaded folder.
MongoDB-Compass Setup
  • Enter the connection string as “ mongodb://127.0.0.1:27017 ” and click on CONNECT button to connect to the link.
Creation of New-Connection
  • After the successful connection application will take you to the home page which will show the database.
Database-List
Database-List

In the above screenshot you can see the “syracuse” is the one in which Sage X3 saves all the data of Administration module.

Click on Syracuse Option.

  • After clicking on the syracuse database it will take you to Administration
Syracus-database-list

Out of all the functions the one can decide which all functions data needs to be extracted from one server and restore it in another server.

  • Below we will see exporting the MongoDB data.

From the above list user can extract data of below mentioned function. (As per requirement this is just an example.)

  • Groups
  • Roles

Below are the steps to extract data from the function through MongoDB compass.

  1. Groups :

In Sage X3 currently we have 4 groups out of which 1 “Super Administrator” is the standard group which comes with the Sage X3 installation.

List-of-group
List-of-group

a. Click on Group on MongoDb compass.

Group-selection
Group-selection

b. Once clicked it will take you to the below screen. In which this symbol   is the export button through data gets extracted.

Syracus Group-Export

c. Click on the export button it will take to the following screen.

Export-group
Export-group
  • Click on Browse and select the path where you want to store the data and name the file with .json extension. In the above image we have named the file as Groups.json.
  • Once finished go back to the selected path you will see a .json file. This file has all the groups available in Sage X3.

2. Roles :

In Sage X3 currently we have 57 roles out of which 3 “Purchase, Sales, Finance” are the ones manually created rest all are the standard ones.

List-of-Roles
List-of-Roles

a. Click on Role

Roles-selection
Roles-selection

b. Once clicked it will take you to the below screen. In which this symbol   is the export button through data gets extracted.

Syracus.Role
Syracus.Role

c. Click on the export button it will take to the following screen

Export-Roles
Export-Roles
  • Click on Browse and select the path where you want to store the data and name the file with .json extension. In the above image we have named the file as Roles.json.
  • Once finished go back to the selected path you will see a .json file. This file has all the roles available in Sage X3.

In a same way you can export rest of the data.

Here we will see how to restore the exported .json files into another server.

Move all the exported .json files to the new server where there is already Sage X3 is installed with same version and patch level.

Note: As mentioned earlier the exported files contains all the data from their respective function even the standard data which comes automatically after the Sage X3 installation. We need to delete the standard data so that it doesn’t get duplicated after the import.

To delete the standard data open the .json file through Notepad ++, this make easier to identify and delete the data:

Once you delete the date, the .json file is ready to get imported. Below are the steps to import the extracted data:

a. Open the MongoDB Compass by following the steps mentioned in point  1 mentioned above at the start.

b. Click on Syracuse database and from the following window click on Group function.

c. Click on the Import Data as highlighted in the below image.

Import-group
Import-group

d. Click on Browse and select the json file and click on Import.

Group.Json-Import
Group.Json-Import

e. Now login Sage X3 and click on Groups from Administrator module there you will see new groups added.

f. Edit all the new groups added. In Endpoint section add all the folders and Save

Roles:


Even for roles we have to delete the Standard roles and import the manually created roles. Below are the steps:

a. Open the Roles.json file using Notepad ++. Identify the standard roles and delete them by selecting the lines and Save the file. All the new roles created in Sage X3 you will find it in the bottom of the json file above that line all are standard ones.

b. Now the .json file is ready to get imported next go to MongoDB compass click on Roles function going to Syracuse database and click on Import Data.

Role-Import
Role-Import

About Us

Greytrix – a globally recognized and one of the oldest Sage Development Partner is a one-stop solution provider for Sage ERP and Sage CRM organizational needs. Being acknowledged and rewarded for multi-man years of experience, we bring complete end-to-end assistance for your technical consultations, product customizations, data migration, system integrations, third-party add-on development and implementation competence.

Greytrix caters to a wide range of Sage X3, a Sage Business Cloud Solution, offerings. Our unique GUMU™ integrations include Sage X3 for Sage CRMSalesforce.com, Dynamics 365 CRM and Magento eCommerce along with Implementation and Technical Support worldwide for Sage X3. Currently we are Sage X3 Implementation Partner in East Africa, Middle East, Australia, Asia, US, UK. We also offer best-in-class Sage X3 customization and development services, integrated applications such as POS | WMS | Payment Gateway | Shipping System | Business Intelligence | eCommerce and have developed add-ons such as Catch – Weight  and Letter of Credit and India Legislation for Sage X3 to Sage business partners, end users and Sage PSG worldwide.

Greytrix is a recognized Sage champion ISV Partner for GUMU™ Sage X3 – Sage CRM integration also listed on Sage Marketplace; GUMU™ integration for Sage X3 – Salesforce is a 5-star rated app listed on Salesforce AppExchange and GUMU™ integration for Dynamics 365 CRM – Sage ERP listed on Microsoft AppSource.

For more information on Sage X3 Integration and Services, please contact us at x3@greytrix.com, We will like to hear from you.

c.. Click on Browse and select the json file and click on Import the same way we did for groups.

d. Now login Sage X3 and navigate to roles function you will notice 3 new roles added apart from 54 roles which are standard ones.

e. Edit all the 3 newly added roles. Select badges as ERPFULL and security profile as User and click on Save.

Similarly you can import data for users also.

This is how we can extract the data from the mongodb backup database using the MongoDB Compass from one system and Import the same in to another system. This MongoDb backup and restore process is mostly used to move groups, Roles, Users, LDAP from one x3 system to another.


How to create credit memo from customer return

$
0
0

In a normal business scenario credit memo and customer return plays an important part. It has its own importance in the sales process which is integral to business processes.

New Stuff:- MongoDB Backup and Restore Procedure

A credit note or credit memo is a commercial document issued by a seller to a buyer. Credit notes act as a source document for the sales return journal. In other words the credit note is evidence of the reduction in sales. A credit memo, a contraction of the term “credit memorandum”, is evidence of a reduction in the amount that a buyer owes a seller under the terms of an earlier invoice. It can also be a document from a bank to a depositor to indicate the depositor’s balance is being in event other than a deposit, such as the collection by the bank of the depositor’s note receivable.

A credit note lists the products, quantities and agreed prices for products or services the seller provided the buyer, but the buyer returned or did not receive. It may be issued in the case of damaged goods, errors or allowances. In respect of the previously issued invoice, a Credit Memo will reduce or eliminate the amount the buyer has to pay. Note: A Credit Memo is not to be substituted as a formal document. The Credit Memo rarely contains: PO #, Date, Billing Address, Shipping Address, Terms of Payment, List of products with quantities and prices. Usually it references the original Invoice and sometimes states the reason for the issue.

Customer Returns are basically items that have been purchased from a store or any online store but then returned by a customer. In retail, a product return (customer return) is the process of a customer taking previously purchased merchandise back to the retailer, and in turn receiving a refund in the original form of payment, exchange for another item (identical or different), or a store credit.

Many retailers will accept returns provided that the customer has a receipt as a proof of purchase, and that certain other conditions, which depend on the retailer’s policies, are met. These may include the merchandise being in a certain condition (usually resalable if not defective), no more than a certain amount of time having passed since the purchase, and sometimes that identification be provided (though usually only if a receipt is not provided). In some cases, only exchanges or store credit are offered, again usually only without a receipt, or after an initial refund period has passed. Some retailers charge a restocking fee for non-defective returned merchandise, but typically only if the packaging has been opened.

Steps to be followed:

In sage X3 when you want to create a credit note against customer return the first step is to create customer return against a particular delivery. In sage X3, after trying to create a new transaction and entering mandatory fields like site and customer you can select particular delivery by left-list selection. But for delivery to appear in left-list selection of customer return it needs to be validated first then and only then it will appear in left-list selection of customer return. Kindly refer below screenshot for the same.

Customer Return Entry

So, after creating a customer return against the delivery user needs to make a credit memo flag on lines of the customer return to “Yes”, then only the user can select those lines of returns for the credit note. But that flag can only be made to “Yes” when the field is active to select and that field is activated only if invoice is created against the particular delivery. If delivery is not invoiced then even after selecting that particular line on the customer return system doesn’t allow us to change the flag of the credit memo. Kindly refer below screenshot for the same.

Credit memo flag setting

So if a user wants to create a credit memo against that particular line of customer return then he/she can change the flag to “Yes” and then can create a transaction of the same.

Then the next step is to create a credit note against that customer return. So for that transaction we need to select a credit note transaction and while creating the same that particular line has to select from left-list selection of customer return. Here only those lines will appear for selection whose credit memo flag is “Yes” on customer return transaction.

With the help of the above blog we can create credit note against customer return in sage X3.

About Us

Greytrix – a globally recognized and one of the oldest Sage Development Partner is a one-stop solution provider for Sage ERP and Sage CRM organizational needs. Being acknowledged and rewarded for multi-man years of experience, we bring complete end-to-end assistance for your technical consultations, product customizations, data migration, system integrations, third-party add-on development and implementation competence.

Greytrix caters to a wide range of Sage X3, a Sage Business Cloud Solution, offerings. Our unique GUMU™ integrations include Sage X3 for Sage CRMSalesforce.com, Dynamics 365 CRM and Magento eCommerce along with Implementation and Technical Support worldwide for Sage X3. Currently we are Sage X3 Implementation Partner in East Africa, Middle East, Australia, Asia, US, UK. We also offer best-in-class Sage X3 customization and development services, integrated applications such as POS | WMS | Payment Gateway | Shipping System | Business Intelligence | eCommerce and have developed add-ons such as Catch – Weight  and Letter of Credit and India Legislation for Sage X3 to Sage business partners, end users and Sage PSG worldwide.

Greytrix is a recognized Sage champion ISV Partner for GUMU™ Sage X3 – Sage CRM integration also listed on Sage Marketplace; GUMU™ integration for Sage X3 – Salesforce is a 5-star rated app listed on Salesforce AppExchange and GUMU™ integration for Dynamics 365 CRM – Sage ERP listed on Microsoft AppSource.

For more information on Sage X3 Integration and Services, please contact us at x3@greytrix.com, We will like to hear from you.

Non Conformance Plan in Sage X3 V12

$
0
0

In Sage X3 V12 a new functionality is added which will help in enhancement in quality standard. In our previous blog we saw in detail on Non conformance management screen. In this blog we will see in details on how Use Non conformance plan function to guide and schedule corrective or preventive actions against a reported non-conformity.

New Stuff:- How to create credit memo from customer return

Once a report is logged in Non conformance it is important to address this issue methodologically and track the progress this is where Non conformance plan screen helps in planning further steps of non-conformity reported, using this function we can correct or prevent an incidence of non-conformance and this screen provides a framework for adjusting the current system or operations currently in use.

 This function supports the planning process. It becomes easier for user to track and plan since it brings together the components that must be met to successfully correct or prevent an incidence of non-conformance and provides a framework for adjusting the current system or operations currently in use.

Non Conformance Plan

Path: All>Non-conformances>Non-conformance plan

There are two action button available in this screen

  • Implement
  • Complete
  1. Implement: On click of this button, this will advance the status of this plan to status ‘Being implemented’. This indicates to the user that they can start processing the tasks on the plan to which they have been assigned and in turn provides visibility to stakeholders of the progress of the corrective and preventive Action plan.
  2. Complete: On click of this button, this will advance the status of this plan to status ‘Completed’. This in turn informs the stakeholders that the Action plan has been delivered and the product is approved.

This screens helps to maintain more details related to the plan, below are the list of fields which helps in maintaining more relatable data of tracking the plan

The header flag provides the current status of the Action plan and key information from the reported non-conformity.

A plan status can have following: ‘In planning’, ‘Being implemented’ or ‘completed’, depending on the role assigned to user handling of non-conformity is characterized. Following are the list of roles Planner (Project manager), Actioner and Stakeholder

  1. Planner: As the Planner (Project manager) assigned to that non-conformance the QA manager has effectively handed over control. Planner are now responsible for planning a successful delivery of those requirements and build a set of ‘global actions’ to eliminate the problem.
  2. Actioner: He is responsible for taking ownership of and delivering a line (a task or action) in the Action plan by the specified date. As soon as the Action plan is at status ‘Being implemented’ you can start processing the tasks (actions) to which he have been assigned.
  3. Stakeholder: As a stakeholder at any time can access an action plan. An action plan shows you how the objectives for the design or production ‘change’ will be met. You can use it as a mechanism for referencing and managing business risk, and potentially costs.

The Non-conformance plan adds an additional feature in handling non-conformity by allowing user to guide and schedule corrective or preventive actions. Using this function we can effectively improve our quality cycle by planning the non-conformity in an effective way.

Hope this blog helps in raising your quality standards!

About Us

Greytrix – a globally recognized and one of the oldest Sage Development Partner is a one-stop solution provider for Sage ERP and Sage CRM organizational needs. Being acknowledged and rewarded for multi-man years of experience, we bring complete end-to-end assistance for your technical consultations, product customizations, data migration, system integrations, third-party add-on development and implementation competence.

Greytrix caters to a wide range of Sage X3, a Sage Business Cloud Solution, offerings. Our unique GUMU™ integrations include Sage X3 for Sage CRMSalesforce.com, Dynamics 365 CRM and Magento eCommerce along with Implementation and Technical Support worldwide for Sage X3. Currently we are Sage X3 Implementation Partner in East Africa, Middle East, Australia, Asia, US, UK. We also offer best-in-class Sage X3 customization and development services, integrated applications such as POS | WMS | Payment Gateway | Shipping System | Business Intelligence | eCommerce and have developed add-ons such as Catch – Weight  and Letter of Credit and India Legislation for Sage X3 to Sage business partners, end users and Sage PSG worldwide.

Greytrix is a recognized Sage champion ISV Partner for GUMU™ Sage X3 – Sage CRM integration also listed on Sage Marketplace; GUMU™ integration for Sage X3 – Salesforce is a 5-star rated app listed on Salesforce AppExchange and GUMU™ integration for Dynamics 365 CRM – Sage ERP listed on Microsoft AppSource.

For more information on Sage X3 Integration and Services, please contact us at x3@greytrix.com, We will like to hear from you.

Quality control on Purchase receipts

$
0
0

There are various setups on the product, product-site, technical sheets and stock management rules that define exactly when and how the quality control process will function within Sage Enterprise.

Let’s take a look at an example of the Sage Enterprise Quality Control function integrated into the purchase order receipt process.  This would emulate the business process of incoming receipt inspection of supplier goods.

You can see the process starts at the purchase order line level based on the various settings and parameters, the QC flag being set to Yes.

Fig : Purchase Order

As the purchase order receipts are being processed, the product status code is being set to Q.  Again, based on the stock management rules certain transactions cannot be performed with Q status products.

Fig : Purchase Receipts

Once the purchase order receipt is finalized, a QC analysis requests is created in the Quality Control workbench.

The Quality Control Department can now complete the actual control steps defined in the technical sheet and post those results to the analysis request in the Quality Control workbench (Stock – Quality Control – Quality Control).

Fig: Quality Control

From the Quality Control workbench (pictured above) you can select the analysis request that was generated from the purchase order receipt from the left list.  You will see various details regarding this analysis request including the original document generating the request, product and quantity detail, as well as the quality control detail grid at the bottom of the screen.  Line items that have a technical sheet to be completed will be identified with an F in the * column of the detail grid.

Clicking the action button on the detail line of the quality control grid and then click the Quality record options will give you access to the technical sheet.

Fig : Quality Record

The enter quality record screen will appear.  The top section of the screen being the analysis request detail and the lower part of the screen being comprised of the questions and responses defined on the technical sheet.

Fig : Quality Record

Once the responses are entered for each of the questions and the record is saved, you will see the analysis request detail line has been updated with a + in the * column.

Fig : Quality Control

The Quality Control technician can now enter the respective quantities that have been accepted (A) or rejected (R) as part of the quality check by clicking the action button on the detail line of the quality control grid and then click the Enter quality control detail.

Fig : Quality control details

On the quantities grid of the enter quality control detail screen is where the accepted or rejected quantities are entered.

Fig : Quantities

As you can see from the above example, by implementing Sage Enterprise quality control processes directly into your ERP system, the test results and quality control data become part of an integrated system.  This allows those test results and corresponding quality control data to be readily available for any reporting requirements as well as historical archiving should there be a quality control issue in the future.

About Us

Greytrix – a globally recognized and one of the oldest Sage Development Partner is a one-stop solution provider for Sage ERP and Sage CRM organizational needs. Being acknowledged and rewarded for multi-man years of experience, we bring complete end-to-end assistance for your technical consultations, product customizations, data migration, system integrations, third-party add-on development and implementation competence.

Greytrix caters to a wide range of Sage X3, a Sage Business Cloud Solution, offerings. Our unique GUMU™ integrations include Sage X3 for Sage CRMSalesforce.com, Dynamics 365 CRM and Magento eCommerce along with Implementation and Technical Support worldwide for Sage X3. Currently we are Sage X3 Implementation Partner in East Africa, Middle East, Australia, Asia, US, UK. We also offer best-in-class Sage X3 customization and development services, integrated applications such as POS | WMS | Payment Gateway | Shipping System | Business Intelligence | eCommerce and have developed add-ons such as Catch – Weight  and Letter of Credit and India Legislation for Sage X3 to Sage business partners, end users and Sage PSG worldwide.

Greytrix is a recognized Sage champion ISV Partner for GUMU™ Sage X3 – Sage CRM integration also listed on Sage Marketplace; GUMU™ integration for Sage X3 – Salesforce is a 5-star rated app listed on Salesforce AppExchange and GUMU™ integration for Dynamics 365 CRM – Sage ERP listed on Microsoft AppSource.

For more information on Sage X3 Integration and Services, please contact us at x3@greytrix.com, We will like to hear from you.

How to solve “No currency exchange rate” error on payment screen

$
0
0

As you all know, multi-currency is the key feature for Sage X3 with the multi-currency support, you can define Suppliers/Customer in Sage X3 with different currencies such as INR, USD, AUD, EURO, etc. This helps users to do ERP transactions in various currencies depending on the Supplier/Customer currency. But sometimes you may face an error “No currency exchange rate” while creating payment entries.

Now we will see, why this error occurs and how to fix this?

Suppose, Purchase Invoice is created against supplier who is having currency other than INR and user is trying to create payment entry against the same invoice then it does not allow to create payment entry against that invoice because of the currency rate error. This error occurs because it does not get currency exchange rate to calculate the amount in INR.

For Example – We have created Purchase Invoice – 1012010PINV00004 for Supplier SD0012 whose currency is USD which is already defined in Supplier master. As you can see in the below screenshot, we have selected same invoice from open items for SD0012 supplier in Payment entry screen but it is not allowing to create entry and giving an error “No currency exchange rate USD -> INR”.

New Stuff: Restrict Purchase Order based on Open SO amount

[No currency exchange rate error on Payment screen]
[No currency exchange rate error on Payment screen]

To solve this error, only one simple solution is needed. You have to add currency rate for that particular currency in Currency Rate master.

Path: Common Data-> Common Tables -> Currency rates

[Currency Rate]
[Currency Rate]

As shown in the above screenshot, we have defined the currency rate for USD and saved the data in currency rate master.

After that, we tried to create payment entry again in which we have selected same invoice from open items for SD0012 supplier and entered all the required details in Payment entry screen. The Payment Number – SPIN2010101000001 is generated without any currency rate error and payment entry for that particular supplier is created successfully.

[Payment Number - SPIN2010101000001]
[Payment Number – SPIN2010101000001]

Sometimes same error occurs on Receipt screen while creating Receipt entry for customer. Customer who is having currency other than INR may get “No currency exchange rate” error on the receipt entry screen. You can solve this error too by following the same steps which we have mentioned above for payment screen.

Hence by defining currency rate in Currency Rate master, user can easily solve “No currency exchange rate” error on Payment as well as Receipt screens.

About Us

Greytrix – a globally recognized and one of the oldest Sage Development Partner is a one-stop solution provider for Sage ERP and Sage CRM organizational needs. Being acknowledged and rewarded for multi-man years of experience, we bring complete end-to-end assistance for your technical consultations, product customizations, data migration, system integrations, third-party add-on development and implementation competence.

Greytrix caters to a wide range of Sage X3, a Sage Business Cloud Solution, offerings. Our unique GUMU™ integrations include Sage X3 for Sage CRMSalesforce.com, Dynamics 365 CRM and Magento eCommerce along with Implementation and Technical Support worldwide for Sage X3. Currently we are Sage X3 Implementation Partner in East Africa, Middle East, Australia, Asia, US, UK. We also offer best-in-class Sage X3 customization and development services, integrated applications such as POS | WMS | Payment Gateway | Shipping System | Business Intelligence | eCommerce and have developed add-ons such as Catch – Weight  and Letter of Credit and India Legislation for Sage X3 to Sage business partners, end users and Sage PSG worldwide.

Greytrix is a recognized Sage champion ISV Partner for GUMU™ Sage X3 – Sage CRM integration also listed on Sage Marketplace; GUMU™ integration for Sage X3 – Salesforce is a 5-star rated app listed on Salesforce AppExchange and GUMU™ integration for Dynamics 365 CRM – Sage ERP listed on Microsoft AppSource.

For more information on Sage X3 Integration and Services, please contact us at x3@greytrix.com, We will like to hear from you.

Unable to add custom report in the RECORD option of any screen

$
0
0

In Sage X3 normally when we add any report in the Record option of the any of transaction screen, we as consultant just need to find out the Internal Code of that screen under Setup–>Destination–>Print codes and then needs to add the report using that Internal code in Print Code screen.

This blog can be helpful if Internal code is not present for that screen where we want to add that report.

To handle above, Scenario you have to declare an Internal code for that screen.

For Example:- To add a report i.e. ZPORDER in Record option of the Purchase Order screen and there is no Internal code for that screen then follow below steps to declare the Internal Code :-

Step 1:- Go to the Print Code screen i.e. Setup–>Destination–>Print Code

Step 2:- Add a new Internal code Ex: ZPORD and add your report code i.e. ZPORDER in the Print code field.

New Stuff: How to solve “No currency exchange rate” error on payment screen

Print Code
Print Code

Step 3:- Go to the Window and select purchase order i.e. Development–> Script dictionary–>Window–>Purchase Order window, refer below screenshot:-

PO window
PO window

Step 4:- Jump to ‘POH’ Object, refer below screenshot:-

POH object
POH object

Step 5:- Go to ‘Printing’ field in General tab and add the Internal code ‘ZPORD’ in it.

Step 6 :- Save and Validate the Object and do the global validation of the Window.

In this way we can resolve the issue of Internal code to add any report on ‘Record’ option of any screen by adding Printing code in Object of that screen

About Us

Greytrix – a globally recognized and one of the oldest Sage Development Partner is a one-stop solution provider for Sage ERP and Sage CRM organizational needs. Being acknowledged and rewarded for multi-man years of experience, we bring complete end-to-end assistance for your technical consultations, product customizations, data migration, system integrations, third-party add-on development and implementation competence.

Greytrix caters to a wide range of Sage X3, a Sage Business Cloud Solution, offerings. Our unique GUMU™ integrations include Sage X3 for Sage CRMSalesforce.com, Dynamics 365 CRM and Magento eCommerce along with Implementation and Technical Support worldwide for Sage X3. Currently we are Sage X3 Implementation Partner in East Africa, Middle East, Australia, Asia, US, UK. We also offer best-in-class Sage X3 customization and development services, integrated applications such as POS | WMS | Payment Gateway | Shipping System | Business Intelligence | eCommerce and have developed add-ons such as Catch – Weight  and Letter of Credit and India Legislation for Sage X3 to Sage business partners, end users and Sage PSG worldwide.

Greytrix is a recognized Sage champion ISV Partner for GUMU™ Sage X3 – Sage CRM integration also listed on Sage Marketplace; GUMU™ integration for Sage X3 – Salesforce is a 5-star rated app listed on Salesforce AppExchange and GUMU™ integration for Dynamics 365 CRM – Sage ERP listed on Microsoft AppSource.

For more information on Sage X3 Integration and Services, please contact us at x3@greytrix.com, We will like to hear from you.

How to perform file Import/Export function using Batch Processing

$
0
0

Batch processing is a method of queued up transaction executed without manual intervention on the regular interval.

The batch server is a background process that launches programs or system commands. A queue of tasks is processed by the server, executing and logging the results of each task.

we come across the scenario where file based import and export function to be performed for transferring data between x3, the process can be automated through user-defined time scheduling of batch jobs.

How to add export batch task to the batch server queue:

STEP 1: Navigate to Usage > Batch server > Query management.

STEP 2: Click on Query.

STEP 3: Task code, Enter Export.

STEP 4: Click on Validation.

Fig : Export Batch task-Query submission

STEP 5: Enter your template in the Template field

STEP 6: Select Server as the Location. Batch processes do not use client files.

STEP 7: Exports-Enter a Data file name or select one using the lookup button. The name needs to be a storage volume followed by a file name, e.g. [TMP]/SOHFILE.csv

STEP 8: Exports-Range and Criteria fields used to filter the data to be exported.

Fig : Export Template Selection

Once the status of the Export task is finished, you can select Log from the action button’s menu on the row of batch task.

Fig : Task status on Query Management
Fig : Export query Log

Create recurring batch task for export batch task

STEP 1: Navigate to Usage > Batch server > Recurring task management.

STEP 2: Click New.

STEP 3: Enter a Recurring task code and Description.

STEP 4: For the Task code EXPORT/IMPORT.

STEP 5: Select a Periodicity. Choose either Weekly or Monthly and select or enter the days the job should run.

STEP 6: Enter a Time Range or one to three Fixed times to run the job each scheduled day.

STEP 7: Click Create.

STEP 8: Click Parameters.

STEP 9: Enter your template in the Template field

STEP 10: Select Server as the Location. Batch processes do not use client files.

STEP 11: Enter a Data file name or select one using the lookup button. The name needs to be a storage volume followed by a file name, e.g. [TMP]/ SOHFILE.csv

STEP 12: Range and Criteria fields are available to filter the data to be exported.

STEP 13: Click OK.

STEP 14: Select ACTIVE button and click on save button.

Fig : Recurring Task for export batch task

Task code-EXPORT

        A standard task called ‘EXPORT’, which runs the batch export function BATCHEXP. A standard task called ‘IMPORT’, which runs the batch export function BATCHIMP.Set up a recurring task with EXPORT or IMPORT as the task code, X3 will ask you to enter parameters, which will include the template to use.

How to add Import batch task to the batch server queue:

STEP 1: Navigate to Usage > Batch server > Query management.

STEP 2: Click on Query.

STEP 3: Task code, Enter Import.

STEP 4: Click on Validation.

Fig : Import Batch task-Query submission

STEP 5: Enter your template in the Template field

STEP 6: Select Server as the Location. Batch processes do not use client files.

STEP 7: Select the Location of file to be imported.

STEP 8: Click OK.

Fig : Import Template Selection

Click on Log, if import task status completed successfully.

Fig : Task status on Query Management
Fig : Import query Log

This blog helps us to understand what is batch task and how to perform import/export using batch processing and create recurring task for import/export batch task.

About Us

Greytrix – a globally recognized and one of the oldest Sage Development Partner is a one-stop solution provider for Sage ERP and Sage CRM organizational needs. Being acknowledged and rewarded for multi-man years of experience, we bring complete end-to-end assistance for your technical consultations, product customizations, data migration, system integrations, third-party add-on development and implementation competence.

Greytrix caters to a wide range of Sage X3, a Sage Business Cloud Solution, offerings. Our unique GUMU™ integrations include Sage X3 for Sage CRMSalesforce.com, Dynamics 365 CRM and Magento eCommerce along with Implementation and Technical Support worldwide for Sage X3. Currently we are Sage X3 Implementation Partner in East Africa, Middle East, Australia, Asia, US, UK. We also offer best-in-class Sage X3 customization and development services, integrated applications such as POS | WMS | Payment Gateway | Shipping System | Business Intelligence | eCommerce and have developed add-ons such as Catch – Weight  and Letter of Credit and India Legislation for Sage X3 to Sage business partners, end users and Sage PSG worldwide.

Greytrix is a recognized Sage champion ISV Partner for GUMU™ Sage X3 – Sage CRM integration also listed on Sage Marketplace; GUMU™ integration for Sage X3 – Salesforce is a 5-star rated app listed on Salesforce AppExchange and GUMU™ integration for Dynamics 365 CRM – Sage ERP listed on Microsoft AppSource.

For more information on Sage X3 Integration and Services, please contact us at x3@greytrix.com, We will like to hear from you.

Multiple ways to sign a standard workflow

$
0
0

Sage X3 provide us multiple ways to sign a record in workflow process. There are various ways which helps user to save their time. Basically a user goes manually to a particular transaction and searches the record and then signs the record, this process is bit time consuming but we have few different methods to sign the workflow which are more easy and time saving.

Below are the ways to sign a workflow.

*Manual signature.

*Landing page signature.

*Workflow monitor.

*Signature from link.

MANUAL SIGNATURE:

This is the basic way to sign a particular record which we have already introduced. Here user manually goes to the particular transaction, searches the record, clicks on signature button and makes the signature.

Fig1: Manual signature

LANDING PAGE SIGNATURE:

We have a standard landing pages for some modules in X3 i.e. sales workflow and purchase workflow. In these landing pages we get all essential information of a particular record such as record number, business partner, amount, sender etc. It has an action button form where we are allowed to accept or reject the particular record.

Fig2: Landing Pages

WORKFLOW MONITOR:

We can also perform signature from workflow monitor.

Navigation: USAGE -> USAGE -> WORKFLOW MONITOR.

You can select the entry transaction according to your module.

Fig3: Signature from Workflow monitor

As in above figure we can see we also have the information of the record and we have action button where we can select the signature option and accept or reject a particular record.

SIGNATURE FROM LINK:

As we know when a workflow is triggered a notification is been sent to the recipient that notify them to sign a record. As we can see the kind of link recipient receives in the email.  

Fig4: Link we receive on email

But if user want to sign from the link, they’ll have to do the below steps once before the workflow is triggered. When we click on the link, it redirect to a webpage which shows a message as shown in the below screenshot.

Fig5: After clicking link
  1. Navigate SETUP -> GENERAL PARAMETER -> PARAMETER VALUE ->SUPERVISOR

Jump to the details for WRK group and set a directory (path) into the WRKRMTDIR parameter as shown in the below screenshot.

target=”_blank” rel=”noopener noreferrer”>
Fig6: Directory Path

2. Create a recurring task of the standard task ‘AWRKSIG’ and make sure this batch task is created and is running in background before we click on the link.

target=”_blank” rel=”noopener noreferrer”>
Fig7: Recurring Task screen

What happens is when we click on the link, a file with .lka extension get created in the directory which is set in the WRKRMTDIR parameter (refer the below figure) and the batch AWRKSIG picks these files and verifies the type of file (i.e. can be for VALIDATION or REJECTION) and processes the signature accordingly.

target=”_blank” rel=”noopener noreferrer”>
Fig8: .lka file example

Hence above are all the various ways to perform signature in workflow which helps user to do signature in more convenient way.

About Us

Greytrix – a globally recognized and one of the oldest Sage Development Partner is a one-stop solution provider for Sage ERP and Sage CRM organizational needs. Being acknowledged and rewarded for multi-man years of experience, we bring complete end-to-end assistance for your technical consultations, product customizations, data migration, system integrations, third-party add-on development and implementation competence.

Greytrix caters to a wide range of Sage X3, a Sage Business Cloud Solution, offerings. Our unique GUMU™ integrations include Sage X3 for Sage CRMSalesforce.com, Dynamics 365 CRM and Magento eCommerce along with Implementation and Technical Support worldwide for Sage X3. Currently we are Sage X3 Implementation Partner in East Africa, Middle East, Australia, Asia, US, UK. We also offer best-in-class Sage X3 customization and development services, integrated applications such as POS | WMS | Payment Gateway | Shipping System | Business Intelligence | eCommerce and have developed add-ons such as Catch – Weight  and Letter of Credit and India Legislation for Sage X3 to Sage business partners, end users and Sage PSG worldwide.

Greytrix is a recognized Sage champion ISV Partner for GUMU™ Sage X3 – Sage CRM integration also listed on Sage Marketplace; GUMU™ integration for Sage X3 – Salesforce is a 5-star rated app listed on Salesforce AppExchange and GUMU™ integration for Dynamics 365 CRM – Sage ERP listed on Microsoft AppSource.

For more information on Sage X3 Integration and Services, please contact us at x3@greytrix.com, We will like to hear from you.


How to exclude Components on a Work Order in Sage X3

$
0
0

In Sage X3, Work orders dictate what product need to be manufactured, what raw materials are going to be required to manufacture the product, and which work center that the product needs to pass through in the manufacturing process.

New Stuff:- Multiple ways to sign a standard workflow

We have a Work Order created in Sage X3 and we are ready to start tracking it. We realize that there are some components on the Work Order that we will not be using.  We decide to exclude those components, but for some reason the ‘Exclude Line’ option is not available.

Typically we would make sure that the Component we want to exclude is NOT allocated.

Work Order Entry

STEP 1: Check the Routing and Routing Code.

A routing is defined by a product code and a routing code.

The routings are used to describe the production processes of the finished products and sub-assemblies: they are made of a set of elementary operations that must be performed in an order set by scheduling. This function is used to create, view and update a routing information.

It is possible to have several routings for a single product reference, which are adapted to the use context: technical description of the R&D Department, cost calculation, macro-routings for the global costs calculation, etc.

It is possible to define routing codes: the routing code is a number associated with the product code, which identifies the routing code and authorizes the existence of several routings for a single product. The codes must be set up in the routing code table.

If you are sure that the component is not allocated, the reason that Exclude line is not showing is because of the set up on your Routing.

Highlighted below is the Routing and Routing Code used on this Work Order.

Here, Routing is ‘SFI001’ and Routing Code is ‘40’ and Site is ‘ZA012’.

Work order entry

STEP 2: Change the set up on your Routing.

Navigate to:  All -> Manufacturing -> Technical Data -> Routings -> Routing Management

Work order is used in the work order generation by using one or more BOMs and a single production routing.

Select our Routing with the correct Routing Code from the left list.

Routing

The WO management mode based on this routing and information concerning the last release.

We will notice that under the WO management mode either ‘No change’ or ‘Operation change’ is selected.

Routing

We need to change this to either ‘Materials Change’ or as in the example below ‘Change Materials and Operations’ and we need to save.

Routing-Change Material option

STEP 3: Check the Work Order:

Navigate to:  All -> Manufacturing -> Planning -> Work order

We need to go back and check our Work Order, under components tab click on the action button.  Now ‘Exclude line’ is available.

Work Order Entry

This blog helps to understand how to exclude components on a Work Order in Sage X3.

About Us

Greytrix – a globally recognized and one of the oldest Sage Development Partner is a one-stop solution provider for Sage ERP and Sage CRM organizational needs. Being acknowledged and rewarded for multi-man years of experience, we bring complete end-to-end assistance for your technical consultations, product customizations, data migration, system integrations, third-party add-on development and implementation competence.

Greytrix caters to a wide range of Sage X3, a Sage Business Cloud Solution, offerings. Our unique GUMU™ integrations include Sage X3 for Sage CRMSalesforce.com, Dynamics 365 CRM and Magento eCommerce along with Implementation and Technical Support worldwide for Sage X3. Currently we are Sage X3 Implementation Partner in East Africa, Middle East, Australia, Asia, US, UK. We also offer best-in-class Sage X3 customization and development services, integrated applications such as POS | WMS | Payment Gateway | Shipping System | Business Intelligence | eCommerce and have developed add-ons such as Catch – Weight  and Letter of Credit and India Legislation for Sage X3 to Sage business partners, end users and Sage PSG worldwide.

Greytrix is a recognized Sage champion ISV Partner for GUMU™ Sage X3 – Sage CRM integration also listed on Sage Marketplace; GUMU™ integration for Sage X3 – Salesforce is a 5-star rated app listed on Salesforce AppExchange and GUMU™ integration for Dynamics 365 CRM – Sage ERP listed on Microsoft AppSource.

For more information on Sage X3 Integration and Services, please contact us at x3@greytrix.com, We will like to hear from you.

Warning message on credit note creation as per the financial year

$
0
0

In Sage X3, user can create sales credit note against the Sales Invoice transaction. This can be done as per the selected date of invoice & credit note creation date. In this customization we are going to give the pop up message at the time of the credit note creation against particular Sales Invoice. As per the GST rules, whenever material is returned by the customer to supplier for any specific reason, all taxes are collected by the supplier can be reversed if return is done before 6th month of next fiscal year, if credit note i.e. return are done after 6th month of the next financial year then taxes cannot be reversed. So in this case we will provide the pop up message at the time of creation of credit note against invoice if credit note is done after 6th month of next financial year.

Let us take an example, if current fiscal year is 2017-18, user has created one sales invoice transaction on 30th June 2017, now if customer wants to return the material in next fiscal year i.e. 2018-19 in the month says August 2018 the system will allow to making a credit note entry against that particular Sales Invoice. But if Credit Note will be done after September 2018 then system will give a pop up message as “Since transaction older than 6 months of the next financial year tax credit should not be taken, kindly review the Tax applied on the document”. After displaying this message, user can click on “OK” button and can create the credit note transaction as this is just a warning message.

Create new Sales Invoice, select Sales site, bill to customer, add detail line products with taxes on 2nd July 2017 and post this particular entry, Go to Sales–>Invoices–>Select all full entry invoice, refer below screenshot:-

New Stuff: How to exclude Components on a Work Order in Sage X3

[Sample Sales Invoice]
[Sample Sales Invoice]

Now go to Sales–>Invoices–>select all full entry credit, select sales site, bill to customer, click on select invoice option from left side on screen, select above invoice no, change date as 17th November 2018, click on create button. Message box will get pop up i.e. “Since transaction older than 6 months of the next financial year tax credit should not be taken, kindly review the Tax applied on the document”. Refer below screenshot:-

[Warning message on credit note]
[Warning message on credit note]

Now user will click “OK” button on pop up message and then system will allow to create the above transaction.

With the help of above customization, user will know whether they have created the transactions as per the specific fiscal year or not. This customization can be done in other screens also as per the client’s specific requirements.

About Us

Greytrix – a globally recognized and one of the oldest Sage Development Partner is a one-stop solution provider for Sage ERP and Sage CRM organizational needs. Being acknowledged and rewarded for multi-man years of experience, we bring complete end-to-end assistance for your technical consultations, product customizations, data migration, system integrations, third-party add-on development and implementation competence.

Greytrix caters to a wide range of Sage X3, a Sage Business Cloud Solution, offerings. Our unique GUMU™ integrations include Sage X3 for Sage CRMSalesforce.com, Dynamics 365 CRM and Magento eCommerce along with Implementation and Technical Support worldwide for Sage X3. Currently we are Sage X3 Implementation Partner in East Africa, Middle East, Australia, Asia, US, UK. We also offer best-in-class Sage X3 customization and development services, integrated applications such as POS | WMS | Payment Gateway | Shipping System | Business Intelligence | eCommerce and have developed add-ons such as Catch – Weight  and Letter of Credit and India Legislation for Sage X3 to Sage business partners, end users and Sage PSG worldwide.

Greytrix is a recognized Sage champion ISV Partner for GUMU™ Sage X3 – Sage CRM integration also listed on Sage Marketplace; GUMU™ integration for Sage X3 – Salesforce is a 5-star rated app listed on Salesforce AppExchange and GUMU™ integration for Dynamics 365 CRM – Sage ERP listed on Microsoft AppSource.

For more information on Sage X3 Integration and Services, please contact us at x3@greytrix.com, We will like to hear from you.

How to add any description field in the left side panel

$
0
0

Recently we had a requirement in which client wants to add Routing description field on work order screen in left side panel and description field will be fetched from routing Master. This field addition will help user to find operation details on work order screen. Also, we can add this field on report level as well. In left side panel we can add header level fields easily but for this field addition, we have done some changes in object screen which we have explained in below step by step.

Step 1: First open work order window and go to the object.

New Stuff: Warning message on credit note creation as per the financial year

Work Order window
Work Order window

Step 2: In object go to environment tab and open a table from where you are going to take the field and also give abbreviation to table.

Step 3: In the expression field mention joining condition according to the table index.

Objects
Objects

Step 4: In object grid expression field write table abbreviation name with field and give them a column Title.

Object grid expression

Step 5: Save and Validate the object.

Step 6: Do global validation of window as well as from set up.

Because of this field addition user can check operation level detail in work order screen only . he can also show this in any work order report.

About Us

Greytrix – a globally recognized and one of the oldest Sage Development Partner is a one-stop solution provider for Sage ERP and Sage CRM organizational needs. Being acknowledged and rewarded for multi-man years of experience, we bring complete end-to-end assistance for your technical consultations, product customizations, data migration, system integrations, third-party add-on development and implementation competence.

Greytrix caters to a wide range of Sage X3, a Sage Business Cloud Solution, offerings. Our unique GUMU™ integrations include Sage X3 for Sage CRMSalesforce.com, Dynamics 365 CRM and Magento eCommerce along with Implementation and Technical Support worldwide for Sage X3. Currently we are Sage X3 Implementation Partner in East Africa, Middle East, Australia, Asia, US, UK. We also offer best-in-class Sage X3 customization and development services, integrated applications such as POS | WMS | Payment Gateway | Shipping System | Business Intelligence | eCommerce and have developed add-ons such as Catch – Weight  and Letter of Credit and India Legislation for Sage X3 to Sage business partners, end users and Sage PSG worldwide.

Greytrix is a recognized Sage champion ISV Partner for GUMU™ Sage X3 – Sage CRM integration also listed on Sage Marketplace; GUMU™ integration for Sage X3 – Salesforce is a 5-star rated app listed on Salesforce AppExchange and GUMU™ integration for Dynamics 365 CRM – Sage ERP listed on Microsoft AppSource.

For more information on Sage X3 Integration and Services, please contact us at x3@greytrix.com, We will like to hear from you.

How To Set Notes For products in Sage X3 V12

$
0
0

There are many situations where user need to set up the important information or notes for specific Products, product in ERP. Now Sage X3 is also provide the provision of setting up the messages or notes which will further reflect in to sales document.

In our last blog we have already seen how to set up notes for Customer. Today in this blog we will discuss how user can setup the messages/notes for specific Products.

You can follow below link to check Customer notes setup:

How to Set Notes for Customer in Sage X3

Navigate to below path to setup a notes in product screen:

Common Data >> Products >> Products >> Identification Tab. In the Identification tab you can see the notes section and Product notes icon

Product Screen

Once you click on Product notes icon the system will redirect you to the Notes screen where you can mentioned all the details such as Description, Short description and Comment under the section of Notes. You can also set the start and end date i.e. Validity period of the particular notes.

Kindly check below screenshot for detail view.

Notes Screen

You can use the notes function to enter information related to the product, prospect or product as a note. This information is displayed or inquired from the functions that have been selected at the Note category level.

User can create multiple notes for the same product.

Let us see the use / function of all the fields present:

  • Note: – This is basically use to enter mentioned the Note code which will further use to identify the notes.
  • Category: – Use this function to set up and maintain note categories for products (including product-sites), products, suppliers, prospects, or product relations. When creating a note, this note is assigned a category that determines in which functions this note will be available. These functions may belong to the Purchasing, Sales, Product relation and Production module
  • Description and Short description: – This is use to add the particular description. For both the field there is a Translation option is present form the Actions menu in order to open the Line Translation function.
  • Effective Date: – This field use to determine from which date the note can be access in the function selected in the category. By default it is the system date. If this field is blank, the note takes effect the same day it is created.
  • Expiration date: – This field use to determine till when this note will be available. By default, the expiry date corresponds to the default system date + 1 year. If this field is blank, the note does not expire.
  • Auto Display: – User can specify if the note must be displayed automatically by using the option Auto display. This option helps user to display the notes automatically during the data entry.
  • Priority: – This field is use to assign the note as a priority.

As per the mentioned above in the category section we have created this particular notes with category “ALLP” and we assigned all the modules for this category. So during further data entry if user wants to create the sales order then this created notes will be pop up once user enters the Product in the sales order detail line. You can see below screenshot for details.

SO Product Notes Pop Up

This is how user can setup the comments for specific product in Sage X3. This will helps user to easily maintain the important notes / Message for products. This feature is very user-friendly and it is introduced updated version of Sage X3 i.e.  in V12.

About Us

Greytrix – a globally recognized and one of the oldest Sage Development Partner is a one-stop solution provider for Sage ERP and Sage CRM organizational needs. Being acknowledged and rewarded for multi-man years of experience, we bring complete end-to-end assistance for your technical consultations, product customizations, data migration, system integrations, third-party add-on development and implementation competence.

Greytrix caters to a wide range of Sage X3, a Sage Business Cloud Solution, offerings. Our unique GUMU™ integrations include Sage X3 for Sage CRMSalesforce.com, Dynamics 365 CRM and Magento eCommerce along with Implementation and Technical Support worldwide for Sage X3. Currently we are Sage X3 Implementation Partner in East Africa, Middle East, Australia, Asia, US, UK. We also offer best-in-class Sage X3 customization and development services, integrated applications such as POS | WMS | Payment Gateway | Shipping System | Business Intelligence | eCommerce and have developed add-ons such as Catch – Weight  and Letter of Credit and India Legislation for Sage X3 to Sage business partners, end users and Sage PSG worldwide.

Greytrix is a recognized Sage champion ISV Partner for GUMU™ Sage X3 – Sage CRM integration also listed on Sage Marketplace; GUMU™ integration for Sage X3 – Salesforce is a 5-star rated app listed on Salesforce AppExchange and GUMU™ integration for Dynamics 365 CRM – Sage ERP listed on Microsoft AppSource.

For more information on Sage X3 Integration and Services, please contact us at x3@greytrix.com, We will like to hear from you.

This is how user can setup the comments for specific product in Sage X3. This will helps user to easily maintain the important notes / Message for products. This feature is very user-friendly and it is introduced updated version of Sage X3 i.e.  in V12.

How to delete Customer BP Invoice in Sage X3

$
0
0

The customer BP invoice entry function is used to manage the customer invoicing out of the “typical” sales cycle.
In this context, the user does not manage the order, the delivery note with the stock issue etc. When issuing the invoice, the data necessary to the accounting are saved.

We may need a basic important points to make a sales invoice such as:

  1. Customer
  2. Account
  3. Site

Customer: In sales, commerce and economics, a customer which sometimes are a clients, buyer or purchaser or is  the recipient of a good, service , product or an idea obtained from a seller, vendor or supplier via a financial transaction or exchange for money or some other valuable consideration.

Account: A generalledger, also known as a nominalledger, is a bookkeeping ledger that serves as a central repository for accounting data transferred from all subledgers like accounts payable, accounts receivable, cash management, fixed assets, purchasing and projects. Each account maintained by an organization is known as a ledger account, and the collection of all these accounts is known as the general ledger. The general ledger is the backbone of any accounting system which holds financial and non-financial data for an organization.

In Sage X3, we may find difficulty on deleting Customer BP Invoice which are already posted. There is a functionality in Sage X3 with which we can delete purchase invoice.

Navigate to: A/P- A/R accounting → Invoicing -> Customer BP Invoices

Fig1: Customer BP Invoice screen

As we can see in the above screen , here in Customer BP invoice  transaction is already posted and delete button is disable after creating new transaction. Now to enable this button, follow below steps to resolve this:

Steps:

  1. Navigate to: Setup -> General Parameters -> Parameter Values
  2. Select TC Common Data ->  select INV (invoicing rule)
  3. Change the values of below highlighted  parameters to ‘YES’ .
    1. GASSUP
    1. INVCAN
    1. SIVSUP
Fig2: General Parameter Screen

After doing all these steps, now navigate to Customer BP  Invoice screen and then click on the accounting cancellation button which is on the right panel of the screen, refer below screen shot:

Fig3: Accounting Cancellation

After clicking on the Accounting cancellation button, one window will get open which is for confirmation just click OK button. After doing all we can see in the below screen shot ‘Delete’ button is enabled now and we can delete the customer bp invoice without any issue.

Fig4: Customer BP Invoice Delete Button

Note: Also make sure that accounting task and batch server are in a running status.

In this way, we can delete posted Customer BP Invoice transaction in Sage X3.

About Us

Greytrix – a globally recognized and one of the oldest Sage Development Partner is a one-stop solution provider for Sage ERP and Sage CRM organizational needs. Being acknowledged and rewarded for multi-man years of experience, we bring complete end-to-end assistance for your technical consultations, product customizations, data migration, system integrations, third-party add-on development and implementation competence.

Greytrix caters to a wide range of Sage X3, a Sage Business Cloud Solution, offerings. Our unique GUMU™ integrations include Sage X3 for Sage CRMSalesforce.com, Dynamics 365 CRM and Magento eCommerce along with Implementation and Technical Support worldwide for Sage X3. Currently we are Sage X3 Implementation Partner in East Africa, Middle East, Australia, Asia, US, UK. We also offer best-in-class Sage X3 customization and development services, integrated applications such as POS | WMS | Payment Gateway | Shipping System | Business Intelligence | eCommerce and have developed add-ons such as Catch – Weight  and Letter of Credit and India Legislation for Sage X3 to Sage business partners, end users and Sage PSG worldwide.

Greytrix is a recognized Sage champion ISV Partner for GUMU™ Sage X3 – Sage CRM integration also listed on Sage Marketplace; GUMU™ integration for Sage X3 – Salesforce is a 5-star rated app listed on Salesforce AppExchange and GUMU™ integration for Dynamics 365 CRM – Sage ERP listed on Microsoft AppSource.

For more information on Sage X3 Integration and Services, please contact us at x3@greytrix.com, We will like to hear from you.

Viewing all 1524 articles
Browse latest View live


<script src="https://jsc.adskeeper.com/r/s/rssing.com.1596347.js" async> </script>