An inquiry screen is used to extract information from one or more table and present it in the from of a grid. It help us to display the records based on the filter criteria we entered.
In Sage X3, we have a multiple inquiry screens available such as Stock by product, stock by lot,stock by site etc where we can search a stock available by product wise, lot wise and site wise etc. Stock by product screen help us to check the stock of a product we want to search by specifying the name of the product in the field. But if want to search based on some condition we can search the same by creating a formula. Sage X3 provide us a functionality of creating a formula where we can create a formula based on any condition.
Sage X3 allows the user to add formula to inquiries criteria that can help to filter a specific record based on the condition specified in the formula. Here we want to search a stock of a product only whose product status is active.
To create a formula follow the below steps:
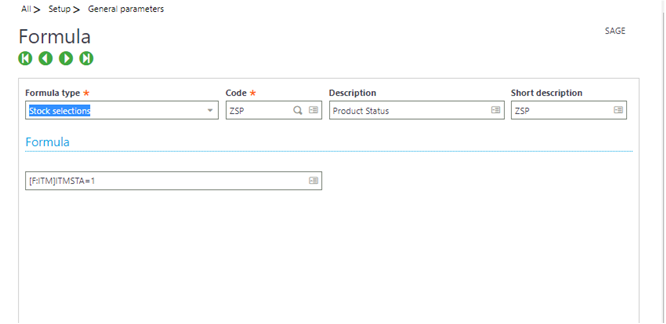
Navigate to : Set up > General Parameters > Formula
- Click new to create a formula.
- Select the formula type as “Stock selection”.
- Provide the code , description and short description.
- Enter the condition in the formula based on which you need to search a product.
We have specified [F:ITM]ITMSTA=1 as we want to search the product whose status is active.
- Click on the create button. Refer the below figure
In this way we have to created a formula named as ZSP and now we can use the same formula in inquiry screen.
Follow the below steps to add the formula in inquiry screen:
Navigate to : Stock > Inquiries > Stock by Product.
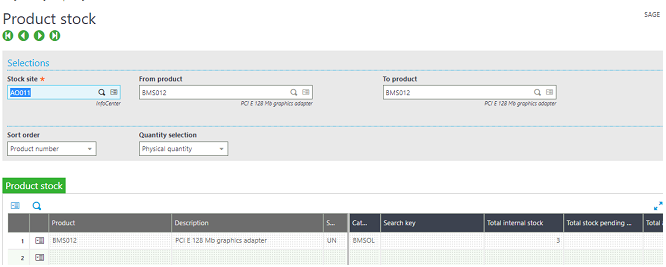
Here we have specified the product in the From product and To product field and clicked on search so we can see the stock available for those product. If we wont specify any product and click on search then all the products will get display whose status is active as well as in active.
Since we need to search for all those product whose status is active. Click on the criteria button on the right side. Refer the below figure.
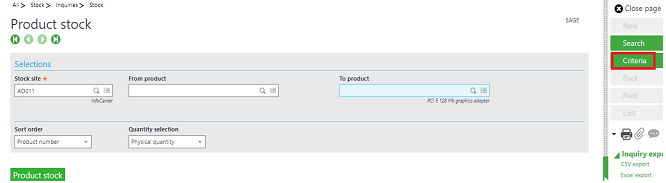
The below window will get pop up. Scroll down to enter the formula.
Select the formula you have created by clicking on the selection. Then click ok.
Once you click on OK, then all the product will get display whose status is active.
Refer the below figure.

In this way we can create a formula based on which we want to search a product and can be used in the inquiry screen.
In this blog, we came to know how we can create a formula and to use those formula in the inquiry screen.
About Us
Greytrix – a globally recognized and one of the oldest Sage Gold Development Partner is a one-stop solution provider for Sage ERP and Sage CRM organizational needs. Being acknowledged and rewarded for multi-man years of experience, we bring complete end-to-end assistance for your technical consultations, product customizations, data migration, system integrations, third-party add-on development and implementation competence.
Greytrix caters to a wide range of Sage X3, a Sage Business Cloud Solution, offerings. Our unique GUMU integrations include Sage X3 for Sage CRM, Salesforce.com, Dynamics 365 CRM and Magento eCommerce along with Implementation and Technical Support worldwide for Sage X3. Currently we are Sage X3 Implementation Partner in East Africa, Middle East, Australia, Asia, US, UK. We also offer best-in-class Sage X3 customization and development services, integrated applications such as POS | WMS | Payment Gateway | Shipping System | Business Intelligence | eCommerce and have developed add-ons such as Catch – Weight and Letter of Credit and India Legislation for Sage X3 to Sage business partners, end users and Sage PSG worldwide.
Greytrix is a recognized Sage champion ISV Partner for GUMU Sage X3 – Sage CRM integration also listed on Sage Marketplace; GUMU integration for Sage X3 – Salesforce is a 5-star rated app listed on Salesforce AppExchange and GUMU integration for Dynamics 365 CRM – Sage ERP listed on Microsoft AppSource.
For more information on Sage X3 Integration and Services, please contact us at x3@greytrix.com, We will like to hear from you.


 integrations include


![[User Master]](http://www.greytrix.com/blogs/sagex3/wp-content/uploads/2020/08/User-Master-adminabhi-1024x325.jpg)
![[Order Lines Inquiry screen – ADMIN User (My PO Option)]](http://www.greytrix.com/blogs/sagex3/wp-content/uploads/2020/08/My-PO-admin-1024x428.png)
![[Order Lines Inquiry screen – ADMIN User (None option)]](http://www.greytrix.com/blogs/sagex3/wp-content/uploads/2020/08/None-admin-1024x418.jpg)
![[Order Lines Inquiry screen – ABHI User (My PO option)]](http://www.greytrix.com/blogs/sagex3/wp-content/uploads/2020/08/MY-PO-abhi-1024x417.jpg)
![[Order Lines Inquiry screen – ABHI User (None option)]](http://www.greytrix.com/blogs/sagex3/wp-content/uploads/2020/08/None-abhi-1024x417.jpg)


