In X3 people, every employee has their payslip. X3 people have a functionality where we can automatically generate payslip for a particular employee for a particular period.
Registration start and end : Enter the Employee ID for which we have to generate the payslip.
Period : Select the appropriate year
After selecting the year, select the month and then click close.
Selection of month
For Example:
Here we are creating payslip for the year “2019” and month “July”.
Automatic generation screen
The selected period will get display on the above highlighted field.
Click on OK button to generate the payslip automatically for the selected period.
About Us
Greytrix – a
globally recognized Premier Sage Gold Development Partner is a one-stop
solution provider for Sage ERP and Sage CRM needs. Being recognized and
rewarded for multi-man years of experience, we bring complete end-to-end
assistance for your technical consultations, product customizations, data
migration, system integrations, third-party add-on development and
implementation expertise.
For every sales order transaction, we need a stock availability at sales site.In standard Sage X3 there is one stock inquiry screen for checking the stock availability on sales site.But instead of this,while during the sales order transaction if we want to see the available stock on the sales order screen,then Sage X3 provides standard functionality. This functionality is available only in Sage X3 version 12.
Benefits:
On
sales order screen you will get the information about the stock
availability and allocated quantity.
It’s
helpful for displaying the negative stock message during the
creation of sales order delivery, or
else you will get the
stock availability information during the creation of the
sales order
transaction.
Steps:
1.Navigate to setup-> General parameter-> Parameter values-> VEN(sales)-> MIS group.
2.Click on the action of MIS group ->Go to detail.
Fig: Parameter Values
3. Set SOHVALLIG parameter value to ‘Yes’ click on the Ok button.
Fig : MISC Group Parameter Values
Now we
need to set the Availability of product flag on Sales order entry
transaction screen.
Navigate To : Setup-> Sales-> Entry transaction-> Go to display tab-> Tick the “Availability of product” checkbox.
The ‘Availability of the product’ flag must be checked. As shown in the below Fig.
Fig : Entry Transactions Screen
Now, Let’s go on to the sales order screen.
When you create the sales order transaction and enter a sales order line where the product has all the stock available you get a message like the highlighted below, letting you will know that there is stock available for this sales order line as shown in the below Fig. If you will enter the other product in second sales order line and that product is not available in the stock then it will display the message ‘Not available in stock’ as shown in the below Fig.
Fig: Sales Order screenFig: Sales Order screen
If you will go to the “Qty To Allocate” field, then in the available stock line it will display the information about ‘Allocated Qty’ and also display the ‘Available Stock’ on sales site as shown in below Fig.
Fig: Sales Order screen
After generating a sales order the available stock line will be blank.On this way you can know the stock availability on the sales order screen instead of stock inquiry screen.
Hope this works.
About Us Greytrix – a globally recognized Premier Sage Gold Development Partner is a one-stop solution provider for Sage ERP and Sage CRM needs. Being recognized and rewarded for multi-man years of experience, we bring complete end-to-end assistance for your technical consultations, product customizations, data migration, system integrations, third-party add-on development and implementation expertise.
A serial number is a
series of characters that have been assigned to each product in the warehouse
so that it remains separate and are identified in the warehouse system. Using serial numbers, you can easily track the
location of goods in the warehouse.
While trying to import file for creating miscellaneous receipt for serial managed product with quantity of 1500 or more than that, you may get two different errors.
Error 1: Function not defined for the value given.
Error while importing file
Error 2: Line not processed
Second error while importing file
Solution:
STEP I: Increase the dimension of activity code.
Navigational Path:Development ->Data and Parameters->Development Setup->Activity code.
Increase the screen size to 3000 as shown in below fig.
Change the screen size of activity code
Follow the same process (Increasing dimension)
for activity code SLE and STW.
In Filters section, enter activity code ENW and
click on OK.
Follow the dictionary validation for activity
code SLE, STW.
STEP III: Import
file for creating Miscellaneous Receipt using SMR template.
E;19;;AO012;20190919;;;
L;1000;BMS001;3 Sprockets;UN;1500;UN;1500;0;0
S;UN;1;;;;Q0201;A;SERTESTTST0001
S;UN;1;;;;Q0201;A;SERTESTTST0002
Etc. with 1500 serial numbers.
Conclusion: Now we may know how to increase serial number more than 1000 for product while creating Miscellaneous Receipt. We may increase based on our requirement.
About Us
Greytrix – a
globally recognized Premier Sage Gold Development Partner is a one-stop
solution provider for Sage ERP and Sage CRM needs. Being recognized and
rewarded for multi-man years of experience, we bring complete end-to-end
assistance for your technical consultations, product customizations, data
migration, system integrations, third-party add-on development and
implementation expertise.
In Sage X3, we may
come across a scenario where we need to calculate machine and labor time for
the specific release quantity on basis of time, cost for machine and labor will
be calculated.
Navigate to -> Manufacturing -> Technical Data -> Standard Operation
Standard Operation
Here we have entered setup and run time for machine is
2 & 3 hours respectively.
And we have entered setup and operational time for
labor is 2 & 5 hours respectively.
There is no impact of preparation, wait time
and post operation time on cost calculation.
Routing Management
We need to map standard operation in routing
management so that it can invoke the details (Work centers, operational
timings, etc) in routing management.
Routing code is tagged with finished good
product so it will be directly inherited in work order and calculation will be
as per standard operation.
Machine calculation
Now for a completed work order for release
quantity 6, calculation will be as follows.
Machine:
Declaration in standard
operation
Setup Time: 2
Hours
Run Time: 3 hours
/ UN
Calculation for work
order
Setup Time: 2
hours
Run Time: 3 Hours / UN * 6(release Quantity) = 18 Hours
(Total for work Order)
3 Hours (Machine Run
Time) * 6 (release Quantity) * 5 Hours (Operational Time) = 90 Hours (Total for
work Order)
On basis of calculated time, final cost will be
calculated.
About Us
Greytrix Africa is a leading Implementation, Reselling and Consulting partner for Sage X3 (Sage Enterprise Management), Sage 300, Sage Enterprise Management HR (Sage X3 People) & Sage CRM based out of Nairobi, Kenya in East Africa region catering to Tanzania, Ethopia, Middle East, Australia and Asia businesses.
In Sage X3 People for uploading and updating records a user should use the Import functions to either add a new record or update an existing records. Below is the navigation for import functionality. Navigate: – Usage -> Imports/Exports -> Imports
Usage Screen
To upload employee data by using standard functionality below are the steps to be followed. As per the requirement the templates can be selected for instance.
Sr. No
Template
Description
1.
SAEMP1
This template is used to upload/ update employee records.
2.
SAEMPCTR
This template is used to upload/ update Employee contract.
3.
Saemp2
This template is used to upload/ update Employee telephone number, Email Id.
4.
VAREURSA
This template is used to upload/ update Variable Import.
Click on the “Fields” tab in Import/export templates page.
Import-export templates page Fields Tab
Step 2: Click on the action button and select “Excel export” as shown below.
Import-export templates page Excel Export option
Below file will get generated with all the fields available in the export template.
Excel format
Step 3: Use the excel transpose function (to change vertical data to horizontal format) for the above-shown columns.
Excel Paste Special options
Below is the output after using the transpose function.
Formatted Excel file
Step 4: Fill the data in the formatted columns, below image shows the excel with the employee data.
Formatted Excel file with employee records
Use the excel concatenate formula for the data in the fields and paste the concatenated data in a notepad file. While concatenating ensure that the separator (comma “,”) is used to separate the fields. The upload file should look similar to the below data file.
Txt File format
Step 5: For uploading the txt file, below are the steps to be followed:- Navigate to Setup-> Imports/export-> Import
Imports Page
Before uploading the records a user can also test the created txt file by using the “Test” functionality. It is recommended that if there are multiple records a user must enter one record and test the format and data. If the records are proper then system will show a message with suceesfull records or it will through a error message.
Imports Page Test functionality
Select the upload template name and click OK button, after clicking OK button the below screen gets appeared.
File Upload Page
Select the notepad file which is created and upload the same. Once txt file is uploaded you can verify the new employee records from personnel administration page.
About Us
Greytrix Africa is a leading Implementation, Reselling and Consulting partner for Sage X3 (Sage Enterprise Management), Sage 300, Sage Enterprise Management HR (Sage X3 People) & Sage CRM based out of Nairobi, Kenya in East Africa region catering to Tanzania, Ethopia, Middle East, Australia and Asia businesses.
Sage X3 ERP – is the choice of next-generation enterprises to stay ahead of the competition. It is a comprehensive suite that integrates and streamlines your business information and processes. Sage X3 offers flexible and adaptable solutions offering the safest development platform designed to take control of processes like finance, sales, CRM, purchasing, inventory, and manufacturing. However, going beyond the aspects of ERP and looking at the broader perspective of any business requirement, understanding the reason and objective of an ERP for unique requirements of your business and aligning the best infrastructure of ERP application is the need of the hour.
An expanding business may demand you to accommodate certain crucial processes that may not be covered in the initial standard ERP offerings. Greytrix has always been a step ahead in enhancing the functionalities of enterprise solutions to deliver simplified business workflow. Keeping in the loop, the growing requirements of enterprises with Sage X3 ERP, Greytrix – a global provider of integrated Sage ERP – CRM solutions brings the developed Sage X3 add-on Catch Weight. Explore Catch Weight for Sage X3 segment and get insights on the benefits of using this add-on to address specific business challenges with extended functionalities through our webinar on Catch Weight.
Catch Weight Add-on for Sage X3
Enhance the value chain of food and beverage processing industry with Catch Weight add-on for Sage X3. The add-on lets you bill the customer based on its Catch Weight unit, rather than the original estimate derived from the Sales unit.
Benefits of Catch Weight add-on for Sage X3
Support products that vary in weight from piece to piece. E.g. meat items, fish items, fruit items etc.
Accurate pricing of items by weight or by piece Accurate invoicing with Catch Weight and unit of measure details
Multiple packaging variations for each product
Flexible and scalable pricing by Catch Weight
Integrated quality control processes from receipt through production and shipping
Product lot tracking
For a live demo/trial or any queries/ feedback/suggestions please email x3@greytrix.com.
About Us
Greytrix – a globally recognized Premier Sage Gold Development Partner is a one-stop solution provider for Sage ERP and Sage CRM needs. Being recognized and rewarded for multi-man years of experience, we bring complete end-to-end assistance for your technical consultations, product customizations, data migration, system integrations, third-party add-on development and implementation expertise.
Africa has been
in the hub of growing economies in the world since quite some time now and has
emerged as one of the promising economies. Presently 6 of the world’s 10
fastest growing economies are in Africa, and the simplicity of doing business
is improving to the extent that a good number of countries like South Africa
and Ghana now outperform major giants in economy.
Though the numbers and charts are growing but still there are challenges that need to be addressed for doing business in Africa. The success of business opportunities in Africa are dependent on invested capital and the prevailing knowledge with expertise needed to drive an industry. More than 50% of Africa’s population is under 20 years old, making it the world’s youngest continent and hence revealing the huge workforce to deploy the expertise that investors bring.
Sage X3 in Africa
To achieve and
maintain these numbers the African industries should seriously start thinking
about Sage
X3, a cloud ERP aimed at providing integrated functionality for financial
management, sales, customer service, distribution, inventory, manufacturing,
and business intelligence. The module includes General Ledger, Accounts Payable,
Accounts Receivable and many diverse inbuilt operations to simplify operations
across the organization.
Top 5 reasons why you should use Sage X3 if you own an industry in Africa
Simplified Accounting
Sage X3 is a robust and reliable financial management tool. It uses
dimensional accounting that charts all the financial, personnel, budgeting and
accounting commitments effortlessly. It controls your bottom-line operations
with accuracy and provides real-time global visibility with key functionalities
like GL with multiple charts of accounts, cash flow management, bank
management, cost and analytical accounting and expenditures.
Vigorous Business Insights
You are on the right page if you can extract the maximum information
from your ERP. Sage X3 provides real-time dashboards, intelligent reporting
tools, business alerts and more through which enterprises can achieve
visibility across departments.
Enhanced Sales and Rich Customer Experience
Leverage the benefits of prioritizing strategic customers and
closely monitoring sales opportunities with an added advantage of data access
on-the-go for an always on business. Sage X3 manages contact information,
customer call centre support, better solution knowledge base and effective
marketing campaigns to soar your business to great heights of success.
Streamlined Manufacturing and Production
Sage X3 offers real-time updates of work order details, bill of
materials, traceability, WIP and routing, material requirements planning,
production scheduling and quality control. It reduces the inefficiencies by
optimizing order entry thereby standardizing processes.
Warehouse and Inventory Management
The built-in warehouse automation and fulfilment tools in Sage X3
provide multiple site inventory visibility, distribution module, barcode
recording, product lot tracking, shipping automation and stock level alerts.
Sage X3 ERP is a complete business management suite that adapts according to your needs. As stated earlier, choosing the right ERP is very essential for businesses in Africa as it directly impacts the consumer market. According to the recent statistics Sage X3 is widely used across 50+ countries due to its flexibility with multi-language and multi-currency support. So, what are you waiting for? Roll up your sleeves and liberate your worries as you will be headed in the right direction with Sage X3.
For product details and 1-1 interaction with our technical team, contact us at sales@greytrix.com
About Us
Greytrix Africa is a leading Implementation, Reselling and Consulting partner for Sage X3, Sage 300, Enterprise Management HR (Sage X3 People) & Sage CRM based out of Nairobi, Kenya in East Africa region catering to Tanzania, Ethopia, Middle East, Australia and Asia businesses.
In X3 People, each employee has their payslip generated for each month. In Employee Payslip master, we can see payslip generated for a particular month. We may come across the situation when we need to change the pay month in Employee Payslip Master. In order to change this, follow the below steps.
Navigate to : Payroll – Payslip -Payslip – Employee Payslip.
Employee Payslip
In the above Fig, We can see the records of the Employee payslip having pay date 31/01/19 i.e. Of January month. To change this.
In the above Fig, the pay month is ’01/2019′ i.e. of month January.
Now change this to ’02/2019′ i.e. February , Click OK. On clicking of OK button the below message pops up. Click on yes. Refer below Fig.
Balance by currency inquiry
We can see that pay date has been changed to ’31/02/19′ , Period From has changed to ’01/02/19′ and Period To has changed to ’28/02/19′. After that another message box gets pop up Click yes . Refer to fig (a) and fig(b).
Pay Month(a)Pay Month(b)
Now navigate back to Employee Payslip Master in order to see the changes.
Navigate to -> Payroll -> Payslip ->Payslip ->Employee Payslip.
Employee Payslip
We can see that records has been changed from the month of January to February.
Sometimes
we may come under a situation where we need to update a field in the
same time when the workflow gets triggered.
To update field on running workflow firstly we need to select a workflow rule. i.e at what action you need to update the field (For eg: on Validation, rejection, notification, cancellation etc).
The action we need to add for this is AWRKUPDOBJ. This action has parameters where you can define the name of the object and the field from its header table.(The table linked to object). We can also define when this action is need to be triggered in ‘triggering’ field and also set a condition for its execution in ‘execution condition’ field.
Fig: Workflow Rules screen-adding action
Kindly refer the below fig to know how the parameters should be added.
Fig: Workflow Rules Parameter grid
Hence, make sure the action checkbox is checked for this workflow rule. The field will get updated once this workflow get triggered.
Hope this blog works!
About Us Greytrix – a globally recognized Premier Sage Gold Development Partner is a one-stop solution provider for Sage ERP and Sage CRM needs. Being recognized and rewarded for multi-man years of experience, we bring complete end-to-end assistance for your technical consultations, product customizations, data migration, system integrations, third-party add-on development and implementation expertise.
We may come across a scenario where we want to delete the sales delivery after delivery has been validated
Now when we try to delete created shipment or delete lines in validated sales delivery, the delete button is disabled by default and also not allowed to delete lines in sales delivery. Refer the screen shot below which shows the error message while trying to delete lines in sales delivery after validated.
Fig1: Sales Delivery Screen
Sage
X3 have a special feature to achieve this functionality. Follow below
steps to achieve this feature:
Navigate
to
Sales -> Deliveries -> Deliveries
Create
a delivery and click on Validation. Availability of stock can be
visible by navigate to Stock->Inquiries->Stock by Site.
Click action button on line level of sales delivery and click on Modification of issue. Refer below screen shot.
Fig2: Click Modification of issues on Action button.
In Modification of issues screen, Change the “TO SHIP” field value to ZERO (0) as per shown in Fig 3 .we will get warning message shown as shown in Fig 4.
Fig3: Modification of Issues Screen Fig4: Warning message after modification of TOSHIP field to 0
Click on OK, Delivery has been deleted. Check the stock effects.
This blog helps to understand how to delete delivery which is validated and its stock quantity gets increased after delivery has been deleted.
About Us Greytrix – a globally recognized Premier Sage Gold Development Partner is a one-stop solution provider for Sage ERP and Sage CRM needs. Being recognized and rewarded for multi-man years of experience, we bring complete end-to-end assistance for your technical consultations, product customizations, data migration, system integrations, third-party add-on development and implementation expertise.
The “Credit level total” field under the management tab in the Customer screen displays the total of credit level of that particular customer based on the calculation involving a number field.
Customer credit level total
By clicking on Calculation details the field that are involved in the calculation, The field On order+ shows the amount for the sales orders that are created for this particular customer.
BP Calculation details
Sometimes it might happen that
this field shows the amount of a sales order only if the invoice is created and
posted for that order.
If we want that the orders created for this customer should be included in the calculation for Credit level total before they are invoiced. Then we can use the below steps.
STEPS:
Go toSetup > General parameters > Parameter values
1) In VEN sales, select the folder,Select the parameter OST and click on details.
2) The Parameter OSTORD is responsible for on sales values to be included in the credit level total. Set this parameter to “YES”.
Parameter values
Logout Sage X3 and login again. Now it will work as expected.
About Us
Greytrix – a globally recognized Premier Sage
Gold Development Partner is a one-stop solution provider for Sage ERP and Sage
CRM needs. Being recognized and rewarded for multi-man years of experience, we
bring complete end-to-end assistance for your technical consultations, product
customizations, data migration, system integrations, third-party add-on
development and implementation expertise.
In industries the company has different accounts and that accounts has different currencies. So one company account can be define in a different currencies.
In standard Sage X3 there is a screen “Account balances”, With the help of this, user can check the account balance for respective currency. Also Sage X3 have another screen “Balance by currency inquiry” where user can check the accounts balance with different currencies.
Benefits:
You can check the account balance with currency.
It’s helpful to check different accounts balance with different currencies.
From this screen you can jump to on Account Inquiry screen.
You have a bank account but in that have a different currencies, so you can check that also with the help of this “Balance by currency inquiry” screen.
You can check also the “Ledger Currency” on this screen.
Steps:
1.Navigate to -> Financials -> Inquiries ->Balance by currency inquiry ,as shown in below figure.
Balance by currency inquiry
2.Enter the data in company and company site field and click on the Search button, as shown in below figure.
Balance by currency inquiry
After clicking on the search button you will get the list of accounts with currency, as shown below figure.
Balance by currency inquiry
With the help of “Balance by currency Inquiry” screen user can check also the Debit and Credit amounts.
Also user can jump to the account inquiry screen by clicking on the Action button of Line level, as shown in below figures.
Balance by currency inquiry Account inquiry
This way user can use the inquiry screen to esquire a different things of the accounts in Sage X3.
About Us
Greytrix – a
globally recognized Premier Sage Gold Development Partner is a one-stop
solution provider for Sage ERP and Sage CRM needs. Being recognized and
rewarded for multi-man years of experience, we bring complete end-to-end
assistance for your technical consultations, product customizations, data
migration, system integrations, third-party add-on development and
implementation expertise.
In Sage X3 we can control transaction creation by specifying the duration for which creation should be allowed. In order to prohibit the entry of invoices/credit memos Sage X3 provide a parameter level control where we can specify the duration for which sales transaction should be active these parameter set up is available for Sales, Purchase and Accounting modules.
Date prohibited error for the sales module
Sales transaction:
VENSTRDAT – Sales start date: This folder parameter is used
in the invoice/credit memo management, in order to prohibit the entry of
invoices/credit memos having a date prior to the specified one.
When used together with the VENENDDAT – Sales end date parameter, it is used to limit the entry of invoices/credit memos to the date range defined by these two parameters.
Navigate To:
All>>Setup>>General parameters>>Parameter Values
Expand TC Common Data to get to the folder level.
Parameter setup
Right-click group CLO and select ‘Detail’
Change or Clear VENSTRDAT and VENENDDAT parameter field
values.
Now you will be able to create sales invoice.
Accounting transaction
These two parameters, start date and end date respectively,
define the duration for which accounting transaction should be active.
The parameters are as follows:
CPTENDDAT – Accounting end date
This folder parameter is used to restrict accounting transactions to date beyond the specified one. The transaction should be created before the specified end date.
2. CPTSTRDAT – Accounting start date
This folder parameter is used to limit the entry accounting transactions to the date prior to the defined start date. It means, transactions should be created with date after start date.
Parameters
Purchasing transaction:
ACHSTRDAT – Purchase start date: This folder parameter
is used in the purchase invoice management, in order to prohibit the entry of
invoices having a date prior to the specified one.
ACHENDDAT – Purchase end date parameter, it is used to limit the entry of invoices to the date range defined by these two parameters.
Purchase parameter setup
This above parameter set up works for Sage, Purchase and Accounting module.
About Us
Greytrix – a globally recognized Premier Sage
Gold Development Partner is a one-stop solution provider for Sage ERP and Sage
CRM needs. Being recognized and rewarded for multi-man years of experience, we
bring complete end-to-end assistance for your technical consultations, product
customizations, data migration, system integrations, third-party add-on
development and implementation expertise.
Greytrix is a recognized Sage Rockstar ISV Partner
for GUMU Sage X3 – Sage CRM integration also listed on Sage Marketplace; GUMU integration for Sage X3 – Salesforce is a 5-star app
listed on Salesforce AppExchange.
For more information on
Sage X3 Integration and Services, please contact us at x3@greytrix.com. We will be glad to assist
you.
There can be possible scenario in an industry where
the Products undergoes Quality Check once the Purchase Receipt is created.
There is a setup explained below which will decide
if Quality check is required or not.
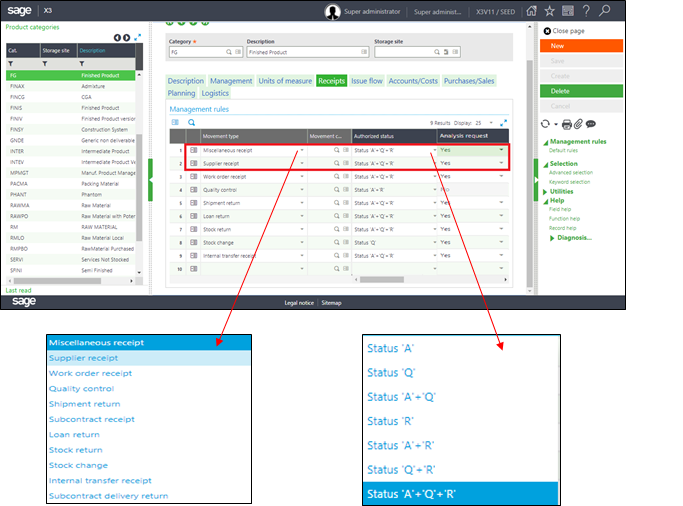
Steps Involved- Common data >Products > Product
Categories
Select the Product Category for which you would like to enable Quality check
Click
on the Receipts tab
Receipt tab in Product category selection
Movement Type, Authorized Status and Analysis Required columns
From the Movement Type column drop down select the transaction name as-
Miscellaneous Receipt
Supplier Receipt
From the Authorized Status column select the desired status from the
dropdown. Where ‘A’ stands for
Accepted, ‘Q’ for Quality Control
and ‘R’ for Rejected. Besides ‘A+R’, ‘A+Q+R’, etc. denotes the combination of different status.
The status selected in Default Status column will be auto-fetched in Purchase Receipts transaction respectively.
In the Analysis Request column select either of Yes/No, to enable
generation of Analysis request after any of the Receipt transaction.
With these above steps, Quality check will be
enabled once any Purchase Receipt or Miscellaneous Receipt transaction is
created for the desired Product category and Authorized Status set as “Q”.
About Us
Greytrix Africa is a leading Implementation, Reselling and Consulting partner for Sage X3, Sage 300, Enterprise Management HR (Sage X3 People) & Sage CRM based out of Nairobi, Kenya in East Africa region catering to Tanzania, Ethopia, Middle East, Australia and Asia businesses.
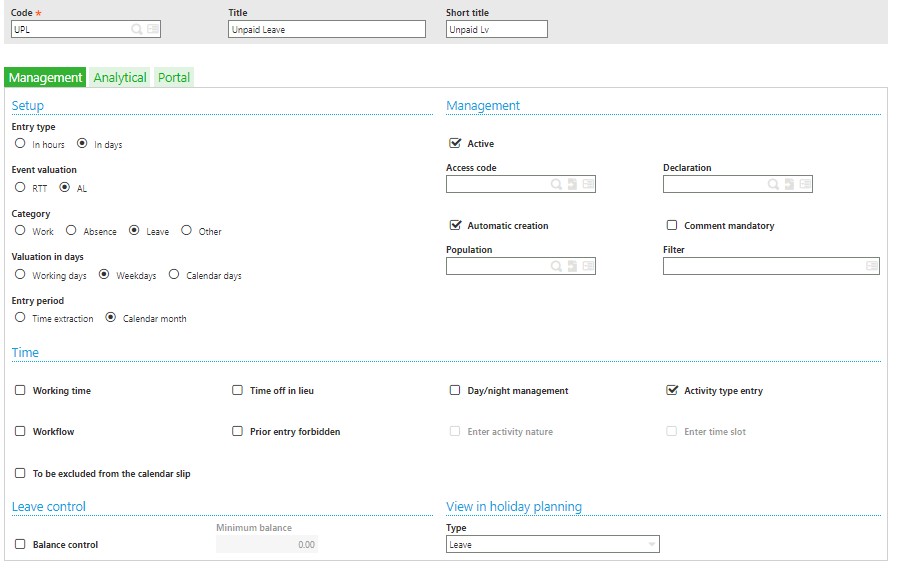
LOP stands for Loss of Pay. In some organizations, this is also called as LWP (Leave Without Pay) or UPL (Unpaid Leave). In order to calculate the LOP days and deduction automatically in Sage X3 people there are few steps needs to be followed, Below are the details.
LOP needs to be applied from the portal by employee or HR, The below are the configurations required to be setup LOP leave in Sage X3 people for automatic LOP configuration.
Step: 1
Navigation: – Time management -> Parameter Definition -> Nature of Event
Create Nature of Event for LOP.
Nature of Events Screen
Select the values as shown in the image as it will create
the LOP event which can be further use to configure the LOP leave type
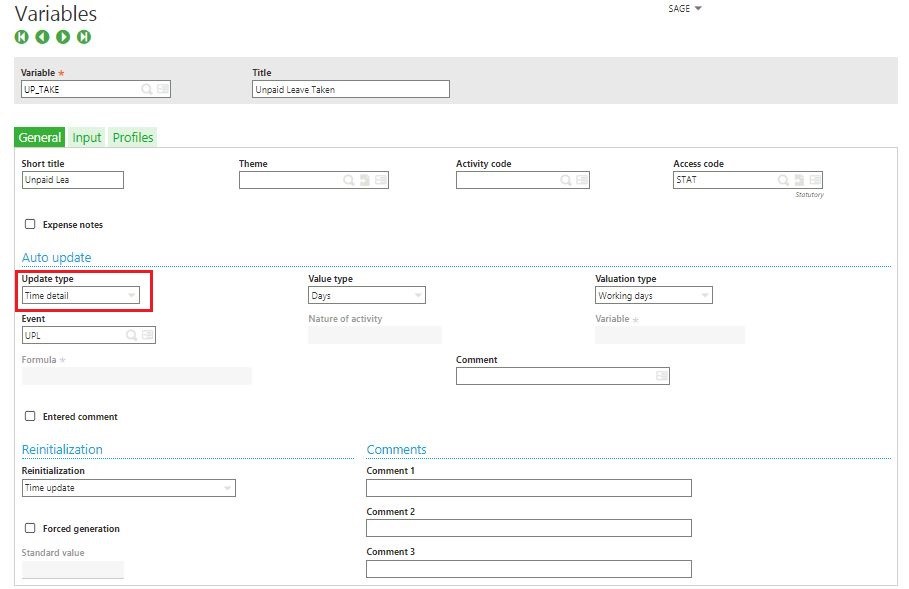
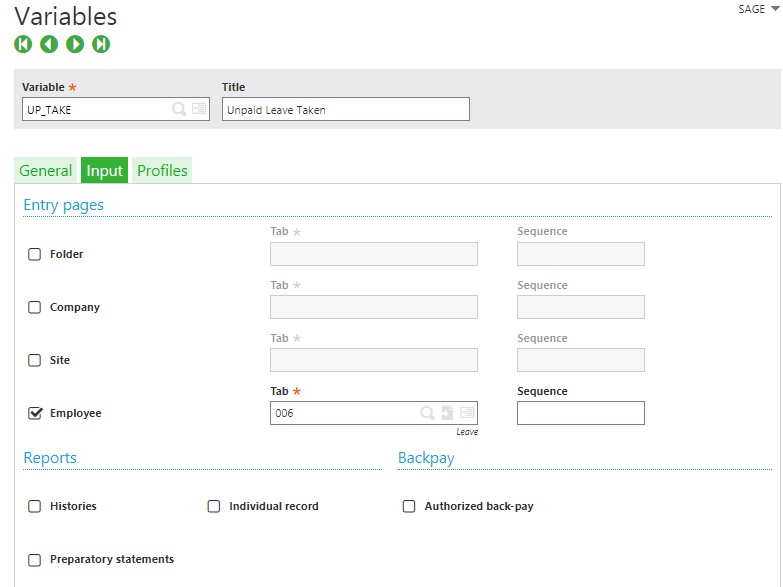
Step: 2
Create a variable to input the LOP days in payslip
Navigation: – Setup -> Payroll Plan -> Variables
Variables Screen
As shown in above screen, update type should be selected as
‘Time detail’ for automatic leave capture.
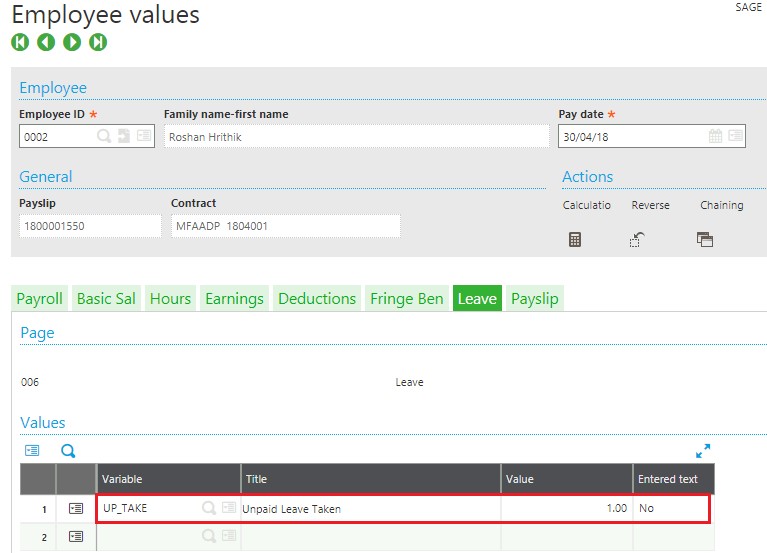
Set the input as employee so that the LOP days can be
entered (if need to do the manual transction) through Employee payslip under
the Leave tab screen as shown below.
Variables screen Input tab
Note – Make sure that to check the profiles wherever this
configuration applies.
Step: 3
In order to calculate the LOP deduction amount there is a need to create the salary component in the headings, below are the details for the same
Navigation: – Setup -> Payroll Plan -> Headings
Formula = Gross Salary
/ 30 (This heading will calculate the gross salary of employee for one day)
Headings screen tab GSP
Create Heading for LOP calculation and map the relevant total
Formula = Gross per
day* Number of LOP days (LOP variable created above) This heading will
calculate the Loss of Pay deduction amount based on the number of LOP days
entered in the portal
Headings screen LOPD page
The below mentioned totals are to be linked for the heading
LOPD;
Sr. No
Total
Description
1.
T_DEDMTD
This total is used for calculating monthly deduction
2.
T_DEDYTD
This total is used to store values for the yearly deduction report
3.
NETT_PAY
This total is used to calculate net pay
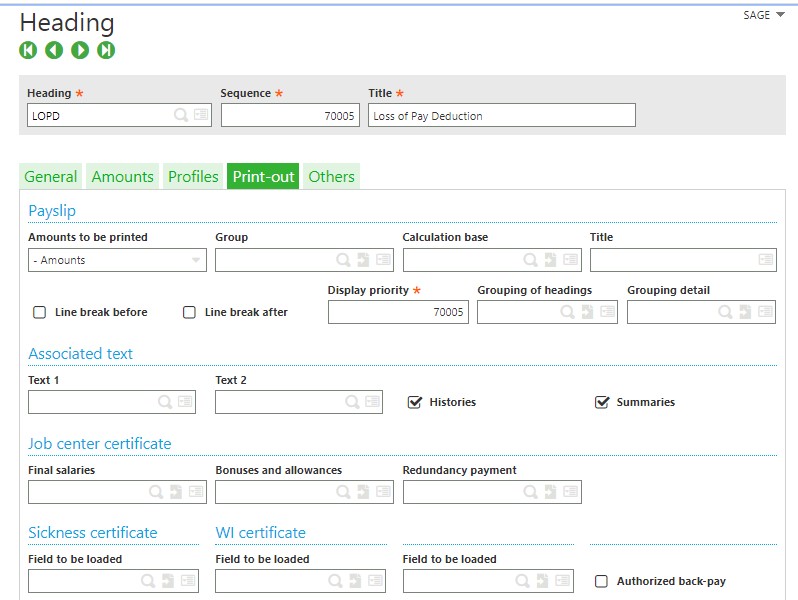
Headings screen Print-out tab
Select the appropriate values as shown in the above screen
Step: 4
After setting up the configuration for headings there is a
need to create the Totals for LOP days which will be used to fetch the values
in reports and leave related processes
Creation of totals as shown in below fig;
Navigation: – Setup -> Payroll Plan -> Totals
A) Unpaid MTD Accrual
Totals screen – Unpaid MTD Acc
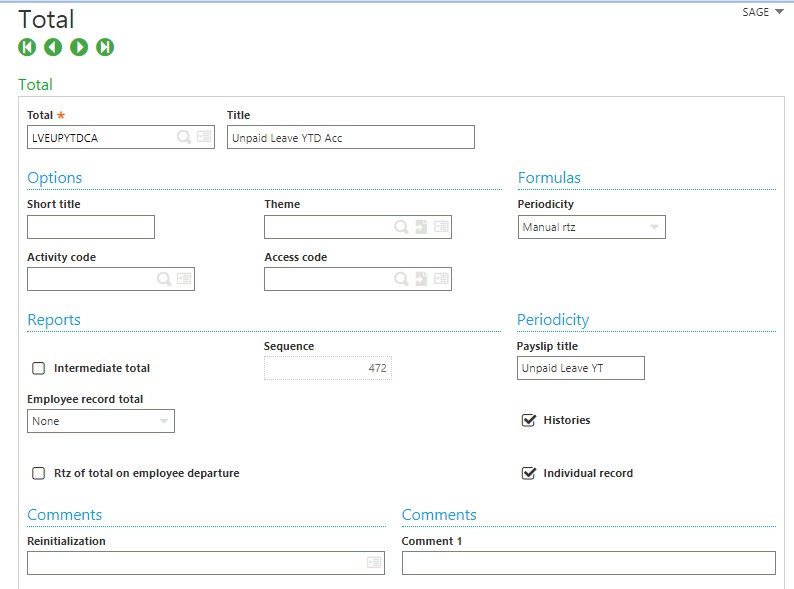
B) Unpaid YTD Accrual
Totals screen – Unpaid Leave YTD Acc
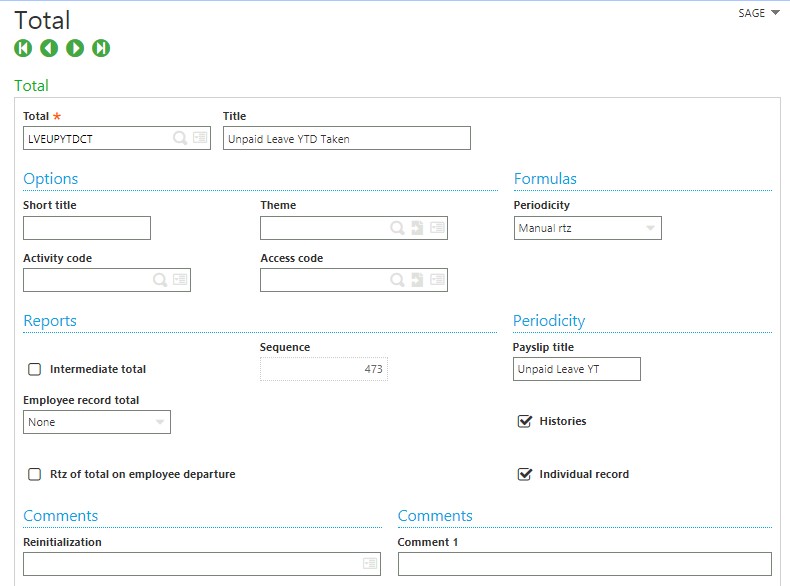
C) Unpaid Leave YTD Taken
Totals screen – Unpaid Leave YTD Taken
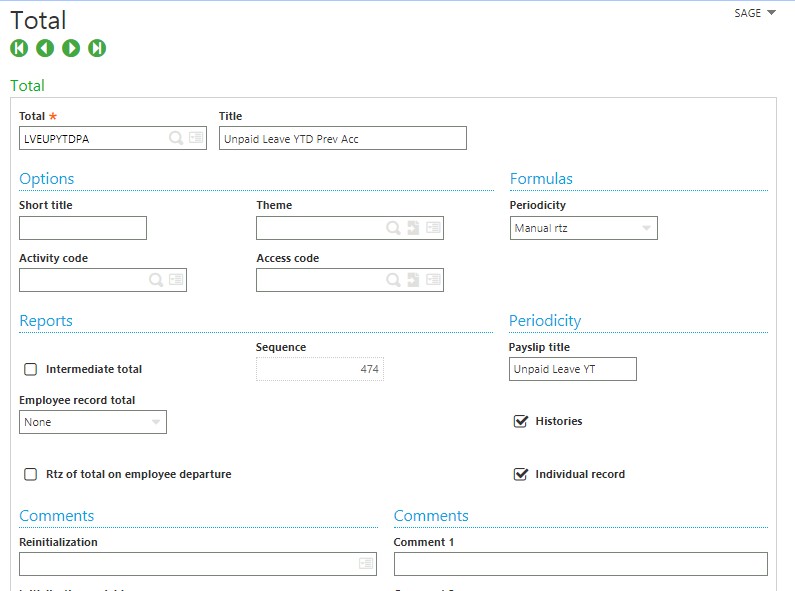
D) Unpaid leave YTD Prev Accumulated.
Totals screen – Unpaid Leave YTD Prev Acc
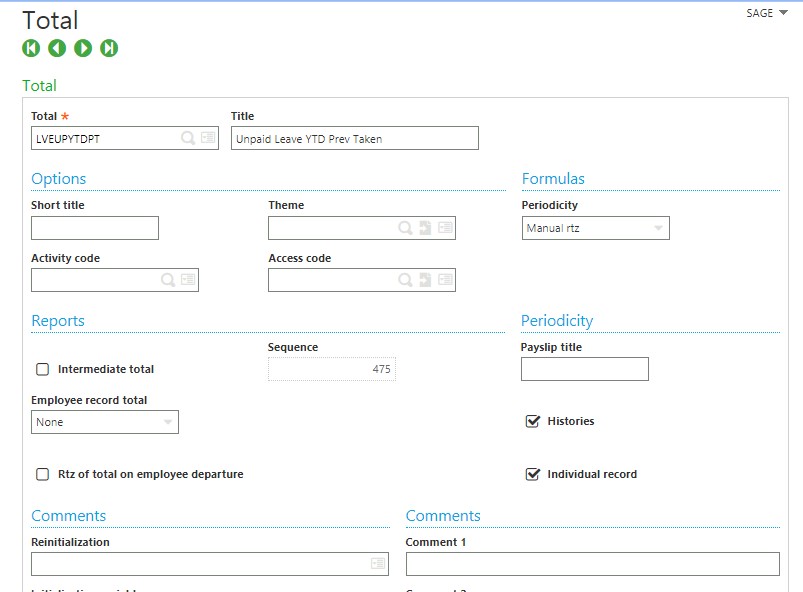
E) Unpaid leave YTD Prev Taken
Totals screen – Unpaid Leave YTD Prev Taken
Step: 5
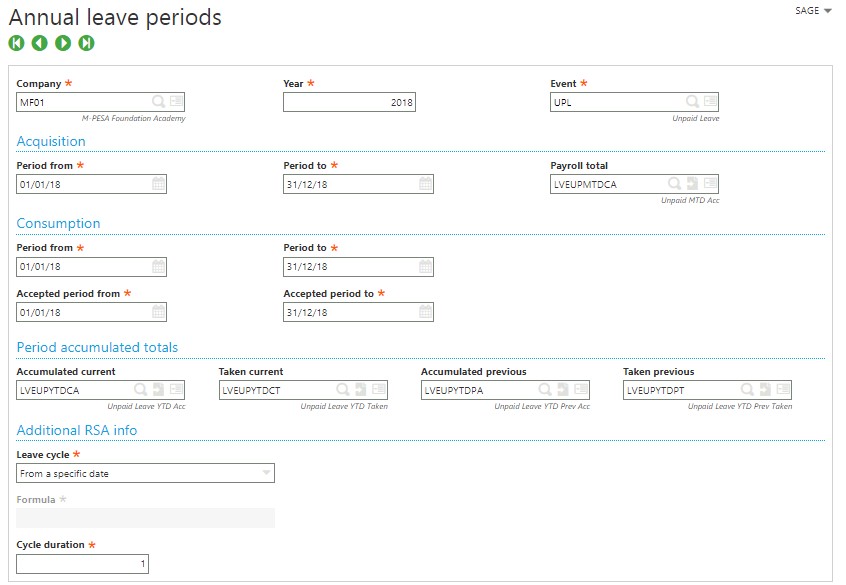
a) Create Annual Leave period for LOP and map all the totals as shown below.
Navigation: – Time management -> Leave – Absence -> Annual leave -> Annual Leave Periods
Annual leave periods screen
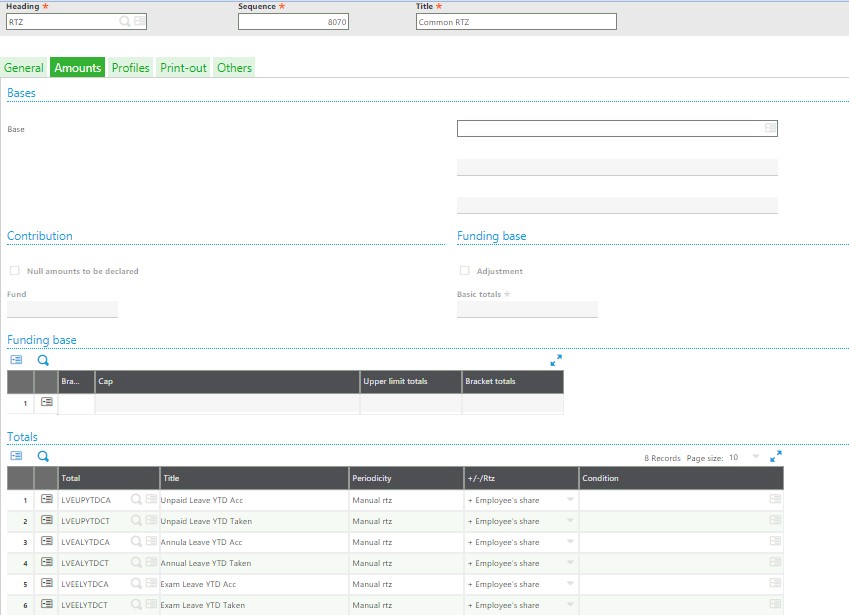
b) Create RTZ Heading and map all the totals as shown below;
Navigation: – Setup -> Payroll Plan -> Headings
Headings screen – RTZ
This is the common RTZ which will be used to lapse all types
of leaves during year-end process.
Step: 6
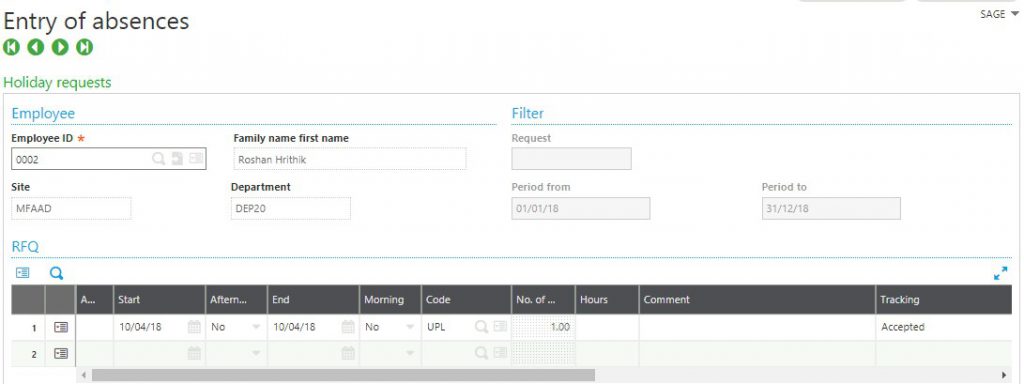
Entry of Absences from admin login
Navigation: – Time management -> Leave – Absence -> Absences -> Entry of absences
Entry of absences screen
Sr. No
Fields
Description
1.
Employee Id
A user can select Employee Id in this field for whom LOP leave has to be updated
2.
Start
Start date of the leave will be entered in this field
3.
End
End date of the leave will be entered in this field
4.
Code
Leave Code of the leave type will be selected in this field
Step: 7
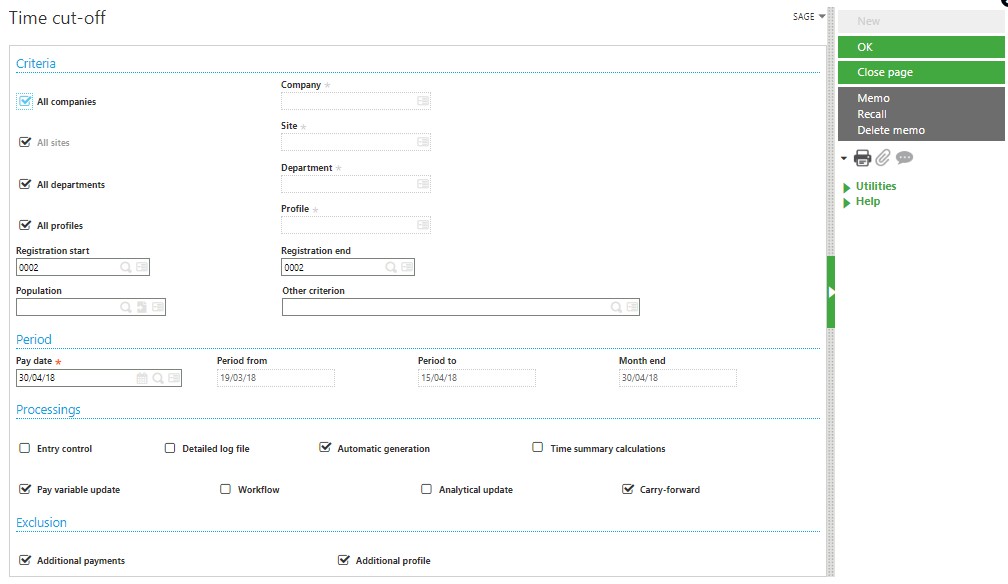
Time cut-off
This function enables a user to fetch all the leaves applied
from employee portal and admin login.
Navigation: – Time management -> TIME – LABOR -> Input -> Time data transfer
Time cut-off
Note :- Before doing time cut-off process make sure that
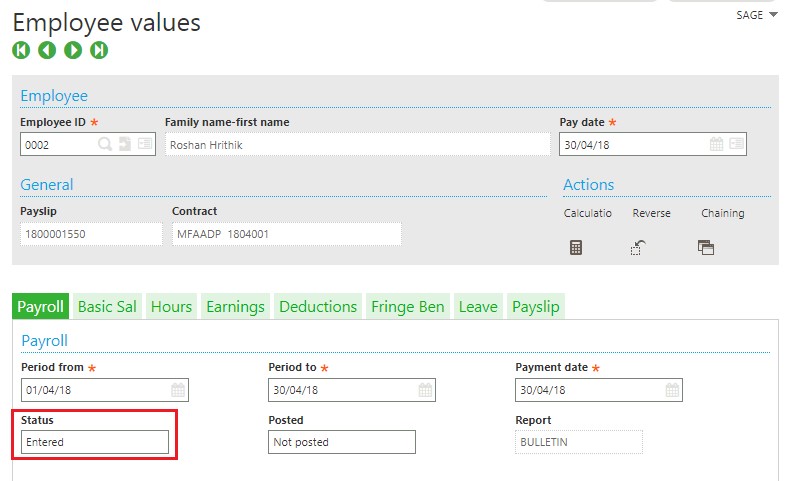
payslips of employees for whom LOP has been updated are in entered state as
shown below;
By following the above mentioned steps a user can very easily create LOP leave type.
About Us
Greytrix Africa is a leading Implementation, Reselling and Consulting partner for Sage X3, Sage 300, Enterprise Management HR (Sage X3 People) & Sage CRM based out of Nairobi, Kenya in East Africa region catering to Tanzania, Ethopia, Middle East, Australia and Asia businesses.
Greytrix Africa wins award in all the three categories at the annual Sage Partner Kick-off event FY-19 for excellence in driving revenue and being the Sage Top ISV Partner.
Greytrix Africa has proved yet again its excellence in providing out of the box quality work and services to its customers throughout Africa. The award ceremony held by Sage at its annual Partner Kick-off event for FY-19 witnessed Greytrix Africa sweeping in as winners in all the three categories namely Revenue Growth Enterprise Business, Generating Highest Revenue Enterprise Business and Sage Top ISV Partner. What turned out the most remarkable moment for Greytrix Africa was that this has been its consecutive third year of registering itself as a winner and this year in all the three categories, meant a double hat-trick.
The Partner Kick-off event is an annual event held by Sage in Africa for honouring partners who have excelled in implementing Sage software solutions to Sage’s customers. Apart from the plethora of knowledge flowing from all the Sage Sessions and keynotes by Sage speakers, it’s a collaborative effort to share, gain and grow together. Greytrix Africa has always addressed its customers as priority which has helped it in being on the top and unstoppable in all the achievements. Gold development partnership with Sage enables Greytrix to implement the business acumen and standards required to service the customers, every business need with complete automation and streamlined system.
For 21+ years Greytrix has implemented a system combining innovative approach, high-quality skills, quick turnaround time and cost-effective implementation & development for 500+ Sage ERP – CRM Partners and end-users worldwide.
About Us
Greytrix Africa is a leading Implementation, Reselling and Consulting partner for Sage X3, Sage 300, Enterprise Management HR (Sage X3 People) & Sage CRM based out of Nairobi, Kenya in East Africa region catering to Tanzania, Ethopia, Middle East, Australia and Asia businesses.
Freight charges refers to the Freight rate or the Price that is charged by a carrier for delivering goods from Source location to Destination location.
You may come across a situation where you would like to add elements like discounts, freight charges etc on the sales order . Sage X3 has a feature to add different invoicing elements like Discount%, Discount $, Freight etc in the sales invoicing element screen. Also the entry of the position number is important as it will determine the position of the elements in respective screens. Refer below screen shots:
Navigate to : Setup → Sales → Invoicing Elements → Freight Charges → Element position
Fig1: Sales invoicing element screenFig2: Freight Charges Element position on sales order
Now, check freight charge
is added on the invoicing tab → invoicing element grid.
Fig3: Invoicing Element (Freight Charge) on sales order screen
Refer above screen shot, as we have defined value for Freight = ‘4.05’ amount .
Now, check tax calculation on freight, how taxes are applied on Freight. Refer below screen shot:
Fig4: Taxes applied on sales order line level
As we can see that, in the
above screen shot the taxes which are applied on the sales order
lines are (GST,EXO).
Now, as we can see in the
above screen shot that what freight charge and discounts values are
applied on the lines. See the below calculation for Lines excluding
tax, Excluding tax, and including tax fields.
Lines excluding tax = 32 , because the total gross price which are applied on the line level is ’32’ and ‘0’
Fig5: Gross Price defined on line level in SO screen
Excluding tax= 36.05 (32+4.05)
where 32 are the lines
total price and 4.05 is freight charges which is defined in the
invoicing tab.
Including tax= 38.06 (33.60+4.46)
here, 33.06 is the total
tax amount which are applied on the line level I.e 5% discount is
applied on the line1 = 32+ (5%)= 32 + 1.6 = 33.60
4.46 is the tax applied on
the freight charge= 4.05 + (10%)= 4.05 + 0.405= (4.05+ 0.41) = 4.46.
Refer below screen shot for more clarity:
Fig6: Tax Valuation screen from Sales order
Now , check form where Tax
(T10) is applied on the freight Charges.
Follow below steps to
replicate it:
Check Tax which is applied on the Freight charges. (Navigate to: setup → sales → invoicing element, Freight charges → Taxes) which is (NOR)
Check BP tax rule in the ‘Management tab’ on sales order screen which is ‘SPIC’ .
Now check the tax rate which is applied on both the taxes in the tax determination screen. Refer below screen shot:
Fig7: Tax determination screen
The Tax rate which is
applied on the ‘SPIC’ and ‘NOR’ is T10 and on this 10% rate is
defined. So that is why 10% rate is applied on the freight charges.
This explains the calculation of tax which is applied on the freight charges.
About Us Greytrix – a globally recognized Premier Sage Gold Development Partner is a one-stop solution provider for Sage ERP and Sage CRM needs. Being recognized and rewarded for multi-man years of experience, we bring complete end-to-end assistance for your technical consultations, product customizations, data migration, system integrations, third-party add-on development and implementation expertise.
In Sage X3 two tier installation for a client, we came across an error of user creation in database. While configuring the application server in console, we got an ERROR – Error while creating
user. Please check file E:\Sage\X3V12\folders\X3\FILPLAT\x3v12_CrUsr.tra on server.(LibAdm.RunCreateUserSqlMainNT).
Also, Refer the below screen shot for the same error.
Console Error Trace
We investigated the error in back end files and got to know that this error occurs because of missing the Microsoft ODBC drivers. After installation of the same ODBC driver in a SQL and Application server, this error got resolved.
This feature
is used when the user wants to upload the company logo or need to update the
existing logo on the ESS portal.
For adding a new logo and to update the existing logo, a user
needs to access the same screen.
Only admin users can access this page.
The Prerequisites before uploading the Logo are as follows: –
Dimensions
required for uploading the logo are: 80*47
px
The logo name
must be: logo.gif
Steps for adding/ updating the company logo: –
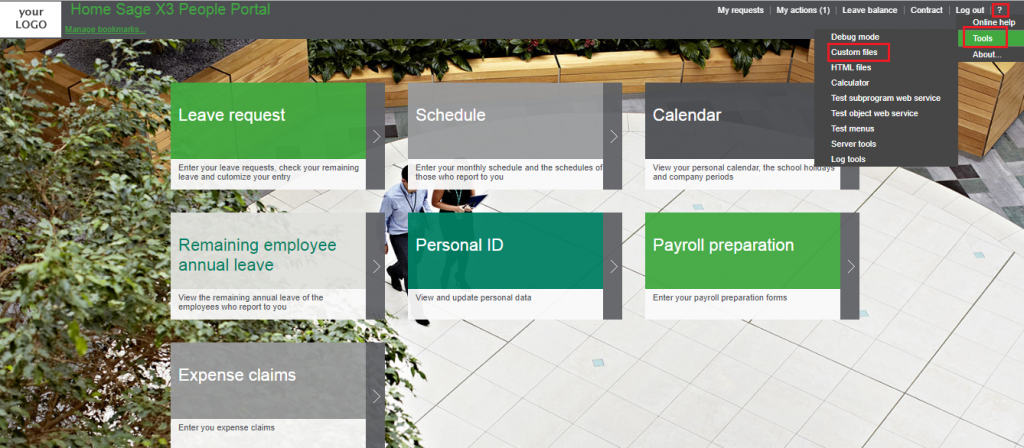
1. ESS Portal Homepage:
Navigation: – Access the portal à click on “?”option à click on Tools à Custom files.
ESS-portal-homepage
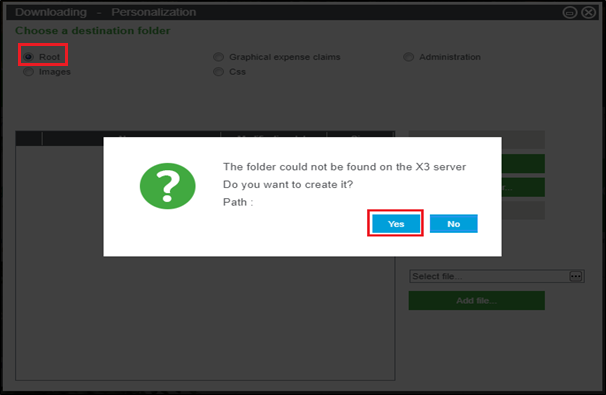
If there is no default folder available in Root folder, then system will ask you to create the folder, click on Yes to create the folder as shown below.
Destination Folder root option
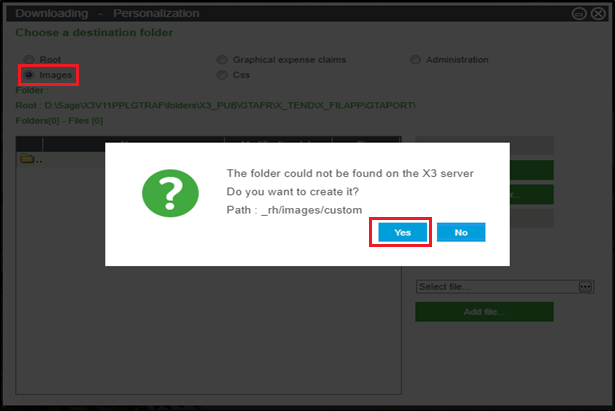
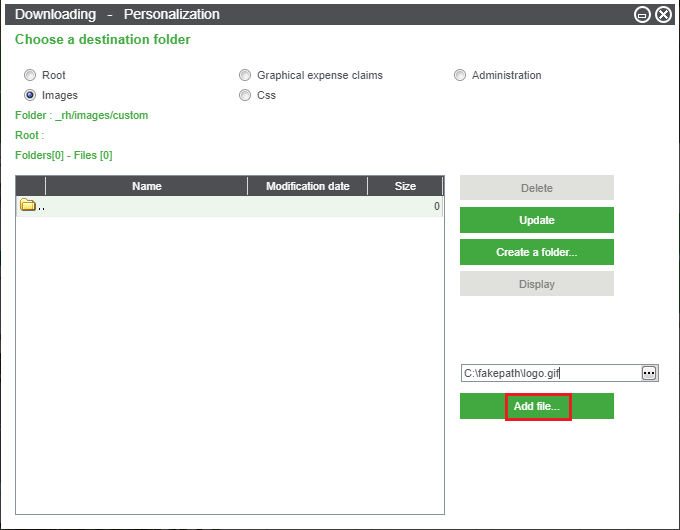
2. Select Images option from destination folder
Note: – If there is no default folder available in Images folder, then system will ask you to create the folder, click on Yes to create the folder as shown below
Destination folder images option
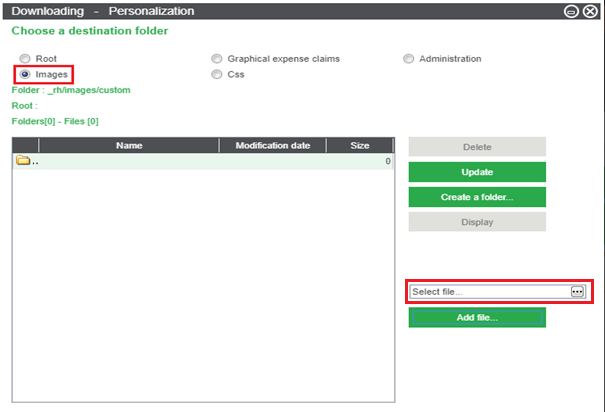
3. Click on select file option and then, select the image file from the drive as shown below
select file option
4. After selecting the image, then click on Open button.
logo selection page
5. Click on Add file button.
Add File option
6. Once you have added the file, system will give a pop-up click on Yes button
Logo Confirmation Option
7. Logo file will get added as shown below
Logo Updated
Log out from the ESS portal and log in again for changes to
get effective in the portal.
Company Logo will get displayed in the highlighted area as shown below.
Logo Upated on ESS Portal
So this is how the company logo can be added/updated by the admin users.
About Us
Greytrix Africa is a leading Implementation, Reselling and Consulting partner for Sage X3, Sage 300, Enterprise Management HR (Sage X3 People) & Sage CRM based out of Nairobi, Kenya in East Africa region catering to Tanzania, Ethopia, Middle East, Australia and Asia businesses.
Sometimes
we may come under a situation where we need to update a field in the
same time when the workflow gets triggered.
To update field on running workflow firstly we need to select a workflow rule. i.e at what action you need to update the field (For eg: on Validation, rejection, notification, cancellation etc).
The action we need to add for this is AWRKUPDOBJ. This action has parameters where you can define the name of the object and the field from its header table.(The table linked to object). We can also define when this action is need to be triggered in ‘triggering’ field and also set a condition for its execution in ‘execution condition’ field.
Fig: Workflow Rules screen-adding action
Kindly refer the below fig to know how the parameters should be added.
Fig: Workflow Rules Parameter grid
Hence, make sure the action checkbox is checked for this workflow rule. The field will get updated once this workflow get triggered.
About Us Greytrix – a globally recognized Premier Sage Gold Development Partner is a one-stop solution provider for Sage ERP and Sage CRM needs. Being recognized and rewarded for multi-man years of experience, we bring complete end-to-end assistance for your technical consultations, product customizations, data migration, system integrations, third-party add-on development and implementation expertise.


 integrations include Sage X3 for Sage CRM, Salesforce.com and Magento eCommerce along with Implementation and Technical
Support worldwide for Sage X3
(Sage Enterprise Management). Currently we are Sage
X3 Implementation Partner
in East Africa, Middles East, Australia, Asia. We also offer best-in-class Sage X3 customization and development services, integrated applications such as POS | WMS | Payment Gateway | Shipping System | Business Intelligence | eCommerce and have developed add-ons such as Catch – Weight and Letter of Credit for Sage X3 to Sage business partners, end users and Sage
PSG worldwide.
integrations include Sage X3 for Sage CRM, Salesforce.com and Magento eCommerce along with Implementation and Technical
Support worldwide for Sage X3
(Sage Enterprise Management). Currently we are Sage
X3 Implementation Partner
in East Africa, Middles East, Australia, Asia. We also offer best-in-class Sage X3 customization and development services, integrated applications such as POS | WMS | Payment Gateway | Shipping System | Business Intelligence | eCommerce and have developed add-ons such as Catch – Weight and Letter of Credit for Sage X3 to Sage business partners, end users and Sage
PSG worldwide.