Quantcast
Channel: Sage X3 – Tips, Tricks and Components
Viewing all 1528 articles
Browse latest View live

How to upgrade a patch level in Sage X3 Version 12

$
0
0

In this blog we will see an alternate method to upgrade a patch level in Sage X3 version 12.It provides an easy way of patch upgradation. In this case we are going to upgrade the patch from 14 to 15.

Login in Sage X3 with X3 folder and then

Navigate to: Administrator > Utilities > Update > Updates

Refer the below screenshot.

Path for update screen

After click on updates screen user will see the below screen. Select “Add an update” option from the action button.

List of updates

After click on “Add an update” button user will see the below screen. On this screen user need to do two things:

  1. Select a zip file which contains a patch(It contains below folders)
    1. DELIVERY
    1. DIVPATCH
    1. DIVVTB
    1. FILPATCHA
    1. FILPATCHB
    1. HOTFIX
  • Add an endpoints
    • X3
    • Endpoint which user want to upgrade (In this case we are upgrading the ‘SEED’)
Updates

After selection of zip file user can see the details of the selected files.

Updates

After selection of zip file and endpoints click on “Test update” button from action button. It will take few minutes to test the updates. After the test update click on “Apply update” button, then update process will start and it will take few hours to complete it.

This way we can upgrade the patch in Sage X3 version 12, though user can still use the old method to upgrade the patch.

Hope this helps.

About Us
Greytrix – a globally recognized Premier Sage Gold Development Partner is a one-stop solution provider for Sage ERP and Sage CRM needs. Being recognized and rewarded for multi-man years of experience, we bring complete end-to-end assistance for your technical consultations, product customizations, data migration, system integrations, third-party add-on development and implementation expertise.

Greytrix caters to a wide range of Sage Enterprise Management (Sage X3) offerings – a Sage Business Cloud Solution. Our unique GUMU™ integrations include Sage X3 for Sage CRMSalesforce.com and Magento eCommerce along with Implementation and Technical Support worldwide for Sage X3 (Sage Enterprise Management). Currently we are Sage X3 Implementation Partner in East Africa, Middles East, Australia, Asia. We also offer best-in-class Sage X3 customization and development services, integrated applications such as POS | WMS | Payment Gateway | Shipping System | Business Intelligence | eCommerce and have developed add-ons such as Catch – Weight  and Letter of Credit for Sage X3 to Sage business partners, end users and Sage PSG worldwide.

Greytrix is a recognized Sage Rockstar ISV Partner for GUMU™ Sage X3 – Sage CRM integration also listed on Sage Marketplace; GUMU™ integration for Sage X3 – Salesforce is a 5-star app listed on Salesforce AppExchange.

For more information on Sage X3 Integration and Services, please contact us at x3@greytrix.com. We will be glad to assist you.


Block Sales Order if gross price is equal to or less than cost price

$
0
0

In a live scenario there is always a possibility that the company would want to keep a control on the pricing that is defined during the sales. The scenario would be that the gross price should not exceed or matches with the cost price of the products entered in the sales process.

This will help the company to control the sales and keep a validation that the gross price should not be less than or equal to cost price which will lead to loss for the company.

Below is the setup that has to be followed in Sage X3.

1). Go to the products master and under the sales tab enter value “1” in the Minimum margin field.

Through this setup the user has to enter the gross price more than cost price at least by 1%.

Below is the creation of the sales order with the possible scenarios.

Here the gross price is 161.6000 and cost price is also 161.6000 so the system will give the below error and block the sales order as the margin has to be more than 1 %.

About Us

Greytrix Africa is a leading Implementation, Reselling and Consulting partner for Sage X3 (Sage Enterprise Management), Sage 300, Sage Enterprise Management HR (Sage X3 People) & Sage CRM based out of Nairobi, Kenya in East Africa region catering to Tanzania, Ethopia, Middle East, Australia and Asia businesses.

Greytrix Africa offers professional services such as Implementation & configuration, Business Process Analysis, Project Management, Customization, Integrations & Migrations, Technical support and Onsite resource augmentation along with enhancements within Sage X3 (Sage Enterprise Management), Sage Enterprise Management HR (Sage X3 People), Sage CRM and Sage 300 (Accpac) across various industry verticals like Process Manufacturing (Food & Beverages, Chemical), Discrete manufacturing (Automotive, Textile & Apparel), Non Profit, Health-care Industry and Services Industry (Financial , Software & Engineering).

For more information on Sage X3 Consulting Services, please contact us at sales@greytrix.com.We will be glad to assist you.

Define State field in BP Master

$
0
0

In this blog, we will see how to add State field in BP Master.This can be done by following below mentioned steps.

Step 1: As seen from below Screenshot no State field is there in BP Master Screen.

Customer Master
Fig.Customer Master

Follow the below steps

Navigate:Common Data->Common Tables->Countries->Details Tab

Do the following setting

1. Select Subdivision checkbox

2. Enter Description “State” 3. Check subdivision control check box

Fig.Countries screen

State field is added in BPs-Addresses Tab.

Fig.Customer Address Tab

Hope this helps !!

About Us
Greytrix – a globally recognized Premier Sage Gold Development Partner is a one-stop solution provider for Sage ERP and Sage CRM needs. Being recognized and rewarded for multi-man years of experience, we bring complete end-to-end assistance for your technical consultations, product customizations, data migration, system integrations, third-party add-on development and implementation expertise.

Greytrix caters to a wide range of Sage Enterprise Management (Sage X3) offerings – a Sage Business Cloud Solution. Our unique GUMU™ integrations include Sage Enterprise Management (Sage X3) for Sage CRMSalesforce.com and Magento eCommerce along with Implementation and Technical Support worldwide for Sage Enterprise Management (Sage X3). Currently we are Sage Enterprise Management Implementation Partner in East Africa, Middles East, Australia, Asia. We also offer best-in-class Sage X3 customization and development services, integrated applications such as POS | WMS | Payment Gateway | Shipping System | Business Intelligence | eCommerce and have developed add-ons such as Catch – Weight  and Letter of Credit for Sage Enterprise Management to Sage business partners, end users and Sage PSG worldwide.

Greytrix is a recognized Sage Rockstar ISV Partner for GUMU™ Sage Enterprise Management – Sage CRM integration also listed on Sage Marketplace; GUMU™ integration for Sage Enterprise Management – Salesforce is a 5-star app listed on Salesforce AppExchange.

For more information on Sage X3 Integration and Services, please contact us at x3@greytrix.com. We will be glad to assist you.

How to enable Accounts mapping section under Accounting Code in Sage X3

$
0
0

In Sage X3, when a new folder is created we may come across a scenario where we don’t see a column to map accounts in Accounting code lines.

Below screen capture depicts the navigation to enable the column:

Navigate to Setup–>Financial –>Accounting interface–>Accounting Code

Accounting Code

Step1: Navigate to Setup –>General Parameters–>Parameter Values.

Step2: From left pane drill down module TC Common Data.

Step3: Under TC module get into details of DEF group.

Parameter Values

Step4: Enter the Accounting entry transaction code which you have created under

Setup–> Financial –>Accounting interface –>Accounting code entry transaction.

TC Module – DEF Group

Step5: Now you will notice account mapping column enabled.

Account mapping column

Hope this blog helps!

How to modify Financial Assets details in Sage X3

$
0
0

Sage X3 Fixed Asset helps to manage different financial Assets created in it along with its modification functionality. The financial asset corresponds to Fixed Asset. While using Sage X3, user may come across such scenarios where asset related information requires some modification to be incorporated.

Once the asset creation is confirmed, the entered information can no longer be modified in this tab. The modification must be carried out using the following Action available- “Change Method”.

Steps Involved- Fixed Assets >Fixed Assets > Fixed Assets

  • Select the Particular Assets for which value of the asset to be changed
  • Select the respective tabs into which the data needs to be modified.
  • In Actions (Right panel)> Change Method
Finnacial Assests
Financial Asset>Change Method
  • If user wants to change the Deprecation method, select the relevant method.

Change Depreciation Method
  • If the user opts to update/modify other details, there is Column named as “Update->” with (Yes/No).
  • If set to Yes, system will allow the respective value in the next column to be modified.
  • If set to No, system will restrict the modification of the next column
Update (Yes/No)>rate
  • Click OK button and SAVE the record to enforce the changes.
Click Ok and Save
  • Accordingly Sage X3 application will automatically calculate the fixed asset valuation amount.

Note-

  • Once the Depreciation of the Asset is finalized for the particular accounting period, Sage X3 will not allow the modification of that particular asset.

About Us

Greytrix Africa is a leading Implementation, Reselling and Consulting partner for Sage X3 (Sage Enterprise Management), Sage 300, Sage Enterprise Management HR (Sage X3 People) & Sage CRM based out of Nairobi, Kenya in East Africa region catering to Tanzania, Ethopia, Middle East, Australia and Asia businesses.

Greytrix Africa offers professional services such as Implementation & configurationBusiness Process AnalysisProject Management, Customization, Integrations & Migrations, Technical support and Onsite resource augmentation along with enhancements within Sage X3 (Sage Enterprise Management)Sage Enterprise Management HR (Sage X3 People)Sage CRM and Sage 300 (Accpac) across various industry verticals like Process Manufacturing (Food & BeveragesChemical), Discrete manufacturing (AutomotiveTextile & Apparel), Non ProfitHealth-care Industry and Services Industry (Financial , Software & Engineering).

For more information on Sage X3 Consulting Services, please contact us at sales@greytrix.com.We will be glad to assist you.

Related Posts

Category: ConfigurationSage X3 ConsultingTips Tags: Accounting CodesAccounts mapping column missinggreytrix africaGreytrix Africa ConsultingSage X3Sage X3 Technical assistanceSage X3 technical 

How to enable the Source transaction in Journal entry.

$
0
0

In sage x3 version 12 release there is an amendment to the existing feature for journal entry transactions screen where we can now get the journal entry source transaction details which is mapped with the respective transactions.

This addition will ease the auditing of journal entry. To enable this amendment you need to follow the steps below, however being it’s an amendment the users who have already used this in lower version will be aware of the steps to follow.

Navigate To: Setup>Financial>Journal entry transaction.

Navigation screen

Navigate To: Setup>Financial>Journal entry transaction>Header tab

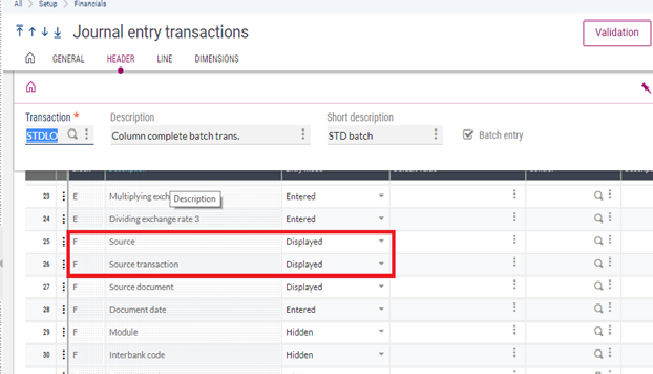
In journal entry transaction screen, select Entry mode of source, Displayed, being there are only 2 options Hidden/Displayed.

Journal Entry Setup screen

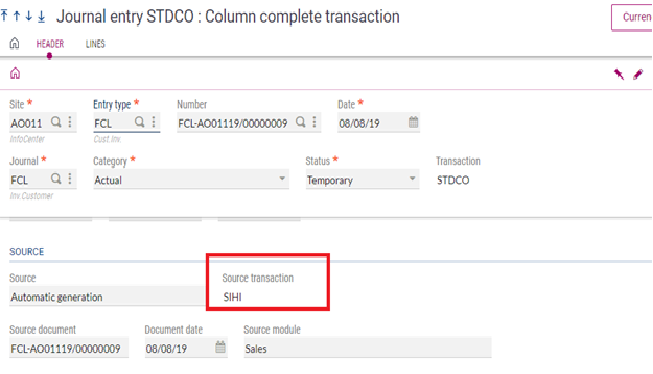
Once we select the “Displayed “entry mode you can see the source transaction in journal entry screen.

Journal entry

As you can see in above screen, source transaction display as “SIHI”,

Hope this Helps!

About Us
Greytrix – a globally recognized Premier Sage Gold Development Partner is a one-stop solution provider for Sage ERP and Sage CRM needs. Being recognized and rewarded for multi-man years of experience, we bring complete end-to-end assistance for your technical consultations, product customizations, data migration, system integrations, third-party add-on development and implementation expertise.

Greytrix caters to a wide range of Sage Enterprise Management (Sage X3) offerings – a Sage Business Cloud Solution. Our unique GUMU™ integrations include Sage X3 for Sage CRMSalesforce.com and Magento eCommerce along with Implementation and Technical Support worldwide for Sage X3 (Sage Enterprise Management). Currently we are Sage X3 Implementation Partner in East Africa, Middles East, Australia, Asia. We also offer best-in-class Sage X3 customization and development services, integrated applications such as POS | WMS | Payment Gateway | Shipping System | Business Intelligence | eCommerce and have developed add-ons such as Catch – Weight  and Letter of Credit for Sage X3 to Sage business partners, end users and Sage PSG worldwide.

Greytrix is a recognized Sage Rockstar ISV Partner for GUMU™ Sage X3 – Sage CRM integration also listed on Sage Marketplace; GUMU™ integration for Sage X3 – Salesforce is a 5-star app listed on Salesforce AppExchange.

For more information on Sage X3 Integration and Services, please contact us at x3@greytrix.com. We will be glad to assist you.

How to do the Acceptance Return in sage x3.

$
0
0

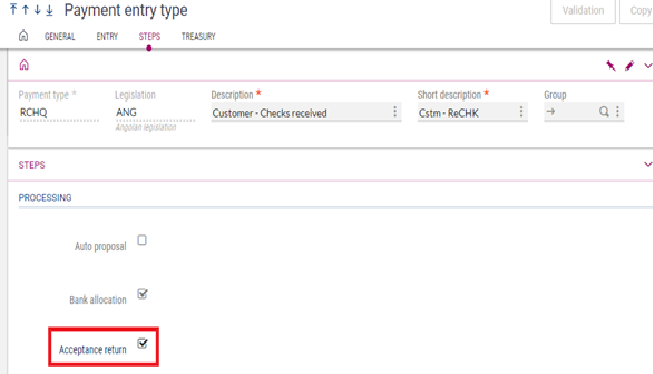
In acceptance draft there is an additional phase before they can be settled and i.e. Acceptance return. This phase is restricted during the characterization of the payment transaction. This blog will help you to create Acceptance return after the creation of Payment/receipt entry in Sage x3. If you pick out an Acceptance return check box from the payment entry transaction screen, then it won’t grant to establish the payment of invoice.

Payment entry setup

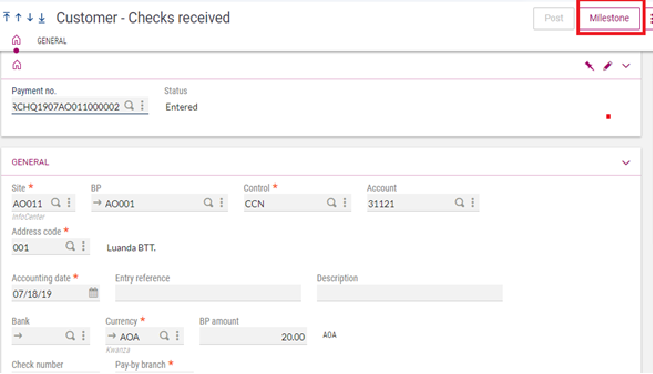
Make a payment receipt entry of invoice.

Navigate To: A/P-A/R Accounting Payments>Payment/Receipt entry

Payment Receipt entry

Click on the Milestone to view the next steps to perform (Refer the below screen shot for milestone log)

Log Screen

As you can see above, you need to perform the “Acceptance return “to complete the Check Receipt Process.

For acceptance return refer the below path

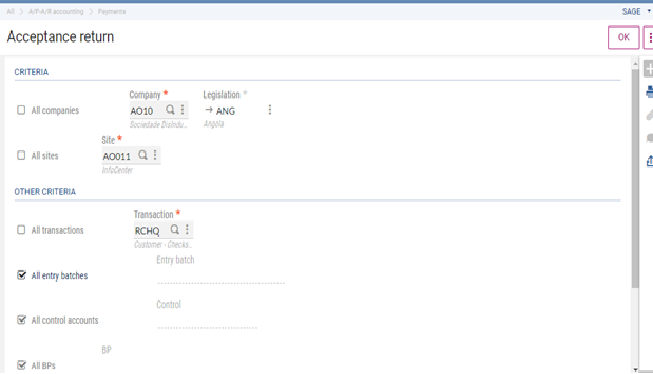
GO TO: A/P-A/R accounting>payments>Acceptance Returns

Acceptance Return

Enter the mandatory data and click on OK button, the next below screen will be open.

Acceptance Return milestone

Now, click on SAVE button it will complete the acceptance returns process. And it allows to payment posting process.

Hope this Help!

About Us
Greytrix – a globally recognized Premier Sage Gold Development Partner is a one-stop solution provider for Sage ERP and Sage CRM needs. Being recognized and rewarded for multi-man years of experience, we bring complete end-to-end assistance for your technical consultations, product customizations, data migration, system integrations, third-party add-on development and implementation expertise.

Greytrix caters to a wide range of Sage Enterprise Management (Sage X3) offerings – a Sage Business Cloud Solution. Our unique GUMU™ integrations include Sage X3 for Sage CRMSalesforce.com and Magento eCommerce along with Implementation and Technical Support worldwide for Sage X3 (Sage Enterprise Management). Currently we are Sage X3 Implementation Partner in East Africa, Middles East, Australia, Asia. We also offer best-in-class Sage X3 customization and development services, integrated applications such as POS | WMS | Payment Gateway | Shipping System | Business Intelligence | eCommerce and have developed add-ons such as Catch – Weight  and Letter of Credit for Sage X3 to Sage business partners, end users and Sage PSG worldwide.

Greytrix is a recognized Sage Rockstar ISV Partner for GUMU™ Sage X3 – Sage CRM integration also listed on Sage Marketplace; GUMU™ integration for Sage X3 – Salesforce is a 5-star app listed on Salesforce AppExchange.

For more information on Sage X3 Integration and Services, please contact us at x3@greytrix.com. We will be glad to assist you.

A different set of values for a discount in Sage X3

$
0
0

In this blog, we will see the different set of values for a discount in Sage X3.

Navigate to Setup > Sales > Price list > Structures User can see the different values for discount (Refer below screenshot).

Different values for discount

These values are used to define whether the value is an amount or percentage.
When it is an amount, the entered amount in the transaction is applied to the document.
When it is a percentage, it can be combined with percentages previously defined, or applied
in series to these elements.
There are thus two choices in this case: % combined, and % series.

Let’s see an example of the above values:

Amount: Let’s say the values are set as ‘Amount’ for Discount 1 and Discount 2. Now, I have created an invoice document with gross price 100 and discount 1 as 5 and discount 2 as also 5 (refer below screenshot).

Discount as a amount

As we can see in the above screenshot, amount $ 10 (5 from Discount 1 and 5 from Discount 2) is deducted from Gross price (100) and total amount after the discount is 90 $.

% combined: Now let’s say that the values are set as ‘%combined’ for Discount 1 and Discount 2. Now, I have created an invoice document with gross price 110 and discount 1 as 5% and discount 2 as also 5% (refer below screenshot).

Discount as %combined

As we can see in the above screenshot, amount 11$ (5% from Discount 1 and 5% from Discount 2) is deducted from Gross price (110) and total amount after the discount is 99 $.

In %combined both discounts are applied on gross price. See the below calculation:

  • Discount 1: 5 %            110*5%= 5.5 $
  • Discount 2: 5%             110*5%= 5.5 $
  • Total Amount = 110 – (5.5+5.5)= 99 $

% series: Now let’s say that the values are set as ‘%series’ for Discount 1 and Discount 2. Now, I have created an invoice document with gross price 110 and discount 1 as 5% and discount 2 as also 5% (refer below screenshot).

Discount as %series

As we can see in the above screenshot, amount 10.72 $ (5% from Discount 1 and 5% from Discount 2) is deducted from Gross price (110) and total amount after the discount is 99.28 $.

In %series Discount 1 is applied on gross price and Discount 2 is apply on Gross price – Discount 1 amount. See the below calculation:

  • Discount 1: 5 %  thus    110*5%= 5.5
  • Amount after Discount 1 calculation = 104.5
  • Discount 2: 5%   thus    104.5*5%= 5.225
  • Here Discount 2 is applied on the amount after Discount 1 calculation
  • Total Amount = 104.5-5.225 = 99.28 $

This explains the different set of values for discounts in Sage X3.

Hope this helps.

About Us
Greytrix – a globally recognized Premier Sage Gold Development Partner is a one-stop solution provider for Sage ERP and Sage CRM needs. Being recognized and rewarded for multi-man years of experience, we bring complete end-to-end assistance for your technical consultations, product customizations, data migration, system integrations, third-party add-on development, and implementation expertise.

Greytrix caters to a wide range of Sage Enterprise Management (Sage X3) offerings – a Sage Business Cloud Solution. Our unique GUMU™ integrations include Sage X3 for Sage CRMSalesforce.com and Magento eCommerce along with Implementation and Technical Support worldwide for Sage X3 (Sage Enterprise Management). Currently we are Sage X3 Implementation Partner in East Africa, Middles East, Australia, Asia. We also offer best-in-class Sage X3 customization and development services, integrated applications such as POS | WMS | Payment Gateway | Shipping System | Business Intelligence | eCommerce and have developed add-ons such as Catch – Weight  and Letter of Credit for Sage X3 to Sage business partners, end users and Sage PSG worldwide.

Greytrix is a recognized Sage Rockstar ISV Partner for GUMU™ Sage X3 – Sage CRM integration also listed on Sage Marketplace; GUMU™ integration for Sage X3 – Salesforce is a 5-star app listed on Salesforce AppExchange.

For more information on Sage X3 Integration and Services, please contact us at x3@greytrix.com. We will be glad to assist you.


How to solve webservice error: ”nextLong”

$
0
0

We may come across the “nextLong “error while invoking web service. One way to resolve the “nextLong” error is below.

In Version 11 and Version 12, created object based web service for saving the product .While trying to save new product we received nextLong error with Type 4. Refer. Fig., 1.1

Fig 1.1 nextLong error-while saving product through web service

Cause: If no field found or exceeds dimensional field:
If we try to send value for field, which is not available in screen causes nextLong Error. More precise if you try to pass values in dimensional field, in screen dimension specified as 5 and you try to pass 6 values to it then nextLong error will occur.

Example: Created Customized dimensional field XIVENCUST of 5, but trying to send 6 values to it. Refer Fig 1.2

Fig 1.2 Input XML for saving product through webservice.

Solution: Send values exact or less than dimension specified in the field.

Hope this works!!!!

About Us
Greytrix – a globally recognized Premier Sage Gold Development Partner is a one-stop solution provider for Sage ERP and Sage CRM needs. Being recognized and rewarded for multi-man years of experience, we bring complete end-to-end assistance for your technical consultations, product customizations, data migration, system integrations, third-party add-on development and implementation expertise.

Greytrix caters to a wide range of Sage Enterprise Management (Sage X3) offerings – a Sage Business Cloud Solution. Our unique GUMU™ integrations include Sage X3 for Sage CRMSalesforce.com and Magento eCommerce along with Implementation and Technical Support worldwide for Sage X3 (Sage Enterprise Management). Currently we are Sage X3 Implementation Partner in East Africa, Middles East, Australia, Asia. We also offer best-in-class Sage X3 customization and development services, integrated applications such as POS | WMS | Payment Gateway | Shipping System | Business Intelligence | eCommerce and have developed add-ons such as Catch – Weight  and Letter of Credit for Sage X3 to Sage business partners, end users and Sage PSG worldwide.

Greytrix is a recognized Sage Rockstar ISV Partner for GUMU™ Sage X3 – Sage CRM integration also listed on Sage Marketplace; GUMU™ integration for Sage X3 – Salesforce is a 5-star app listed on Salesforce AppExchange.

For more information on Sage X3 Integration and Services, please contact us at x3@greytrix.com. We will be glad to assist you.

How to add the Dashboard in Sage X3 Version 12

$
0
0

We need to make Query in Sage EM through SQL Query Tools with the below navigation as follow:

Setup > Usage > Report > Query Tool

SQL Query Tool

Once we are done with the Query tool we need to create the new menu item with the below navigation:

Administration > Authoring > Pages > Menu Items

Menu Item

Next step is to add the Landing page on the home screen as below:

Landing Page

We now need to add the created Menu item in the Landing page as below:

We will get the newly added menu item in the Queries as shown below:

Adding the query in landing page

Need to click on the menu and will need to follow the below navigation to get the gadget:

Gadget

After clicking on the OK you will see the dashboard as below:

Dashboard

In the above steps, you will see the dashboard on the landing page.

Hope this helps

About Us
Greytrix – a globally recognized Premier Sage Gold Development Partner is a one-stop solution provider for Sage ERP and Sage CRM needs. Being recognized and rewarded for multi-man years of experience, we bring complete end-to-end assistance for your technical consultations, product customizations, data migration, system integrations, third-party add-on development and implementation expertise.

Greytrix caters to a wide range of Sage Enterprise Management (Sage X3) offerings – a Sage Business Cloud Solution. Our unique GUMU™ integrations include Sage X3 for Sage CRMSalesforce.com and Magento eCommerce along with Implementation and Technical Support worldwide for Sage X3 (Sage Enterprise Management). Currently we are Sage X3 Implementation Partner in East Africa, Middles East, Australia, Asia. We also offer best-in-class Sage X3 customization and development services, integrated applications such as POS | WMS | Payment Gateway | Shipping System | Business Intelligence | eCommerce and have developed add-ons such as Catch – Weight  and Letter of Credit for Sage X3 to Sage business partners, end users and Sage PSG worldwide.

Greytrix is a recognized Sage Rockstar ISV Partner for GUMU™ Sage X3 – Sage CRM integration also listed on Sage Marketplace; GUMU™ integration for Sage X3 – Salesforce is a 5-star app listed on Salesforce AppExchange.

For more information on Sage X3 Integration and Services, please contact us at x3@greytrix.com. We will be glad to assist you.

Warehouse management in sage x3

$
0
0

We all know there is both location management and Warehouse management available in Sage. There has been question why do we need warehouse management enabled when we can manage inventory by location, we create different location type and location in it and inventory can be managed. Then what is the use of Warehouse management in Sage X3.

We may want to create the different location and use each location for specific purpose, for example we may want to create the location where we can only keep the issuing components for production so it not used in Sales Process. We may like to keep the different location for delivering to the customer so it not goofed up. Here we know we can create different location type and location so we can create on for production and one for shipping but does we actually have control on it.

Sage X3 may allow you to create different location, but you cannot control transaction activity on them, like even if I create the location for shipping, I would be able to ship the product from any other location. Here comes the use of Sage X3 warehouse management.

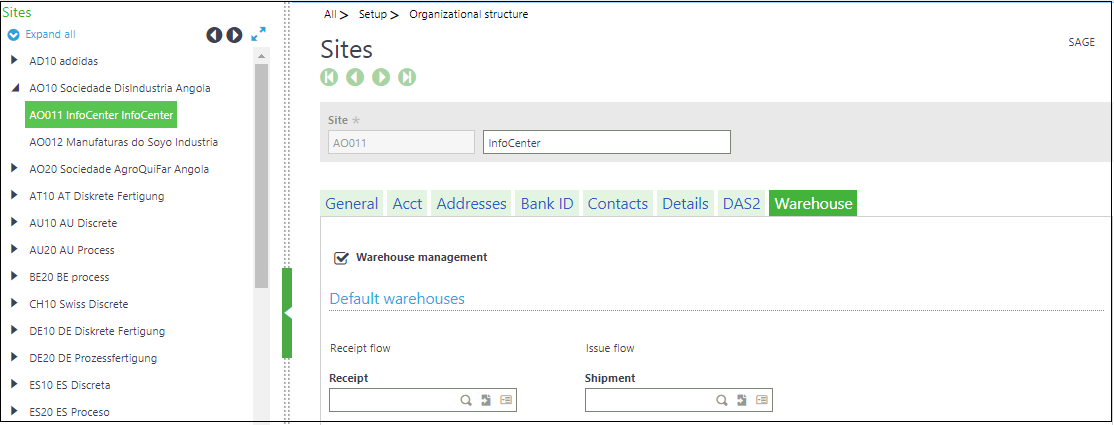
Navigate To: Setup>organizational structure >Sites.

Fig1.1: Sites -> Warehouse

By activating warehouse management, you can create one warehouse and link several locations or location types to that warehouse. On your stock site you can define warehouse for each transaction like which warehouse will be for receiving, picking etc… Also your new warehouse can contain a stock location, a receiving location and a picking location.

Navigate To: Common data>Product tables >Warehouses.

Fig1.2: Warehouse -> Stock Site

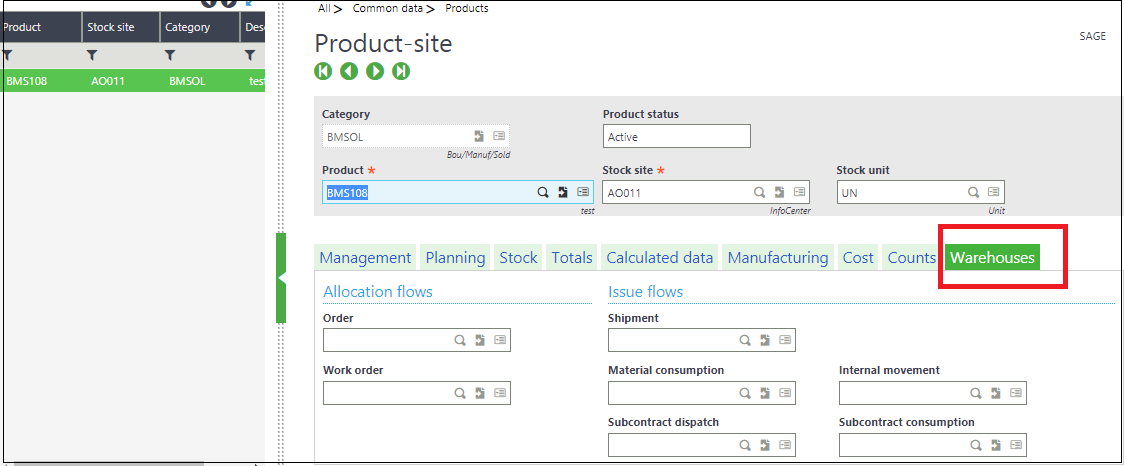
You can control the movement of products by defining the receipt and issue flows to specific warehouses. By assigning your warehouse to the Material Consumption flow, you can ensure that warehouse auto-populates production tracking at the warehouse field. For even tighter control, you can setup the transaction for Single Warehouse. This makes the warehouse entry mandatory on product sites.

Fig1.3: Product Site -> Warehouse

Hope this Help!!!

About Us
Greytrix – a globally recognized Premier Sage Gold Development Partner is a one-stop solution provider for Sage ERP and Sage CRM needs. Being recognized and rewarded for multi-man years of experience, we bring complete end-to-end assistance for your technical consultations, product customizations, data migration, system integrations, third-party add-on development and implementation expertise.

Greytrix caters to a wide range of Sage Enterprise Management (Sage X3) offerings – a Sage Business Cloud Solution. Our unique GUMU™ integrations include Sage X3 for Sage CRMSalesforce.com and Magento eCommerce along with Implementation and Technical Support worldwide for Sage X3 (Sage Enterprise Management). Currently we are Sage X3 Implementation Partner in East Africa, Middles East, Australia, Asia. We also offer best-in-class Sage X3 customization and development services, integrated applications such as POS | WMS | Payment Gateway | Shipping System | Business Intelligence | eCommerce and have developed add-ons such as Catch – Weight  and Letter of Credit for Sage X3 to Sage business partners, end users and Sage PSG worldwide.

Greytrix is a recognized Sage Rockstar ISV Partner for GUMU™ Sage X3 – Sage CRM integration also listed on Sage Marketplace; GUMU™ integration for Sage X3 – Salesforce is a 5-star app listed on Salesforce AppExchange.

For more information on Sage X3 Integration and Services, please contact us at x3@greytrix.com. We will be glad to assist you.

How to use and setup the functionality of early discount / late charges in Supplier Invoice in Sage X3 version 12

$
0
0

Do the setup as per the requirement by entering early discount/ late charges in days and its rate in percentage. For doing the setup navigate to below paths.

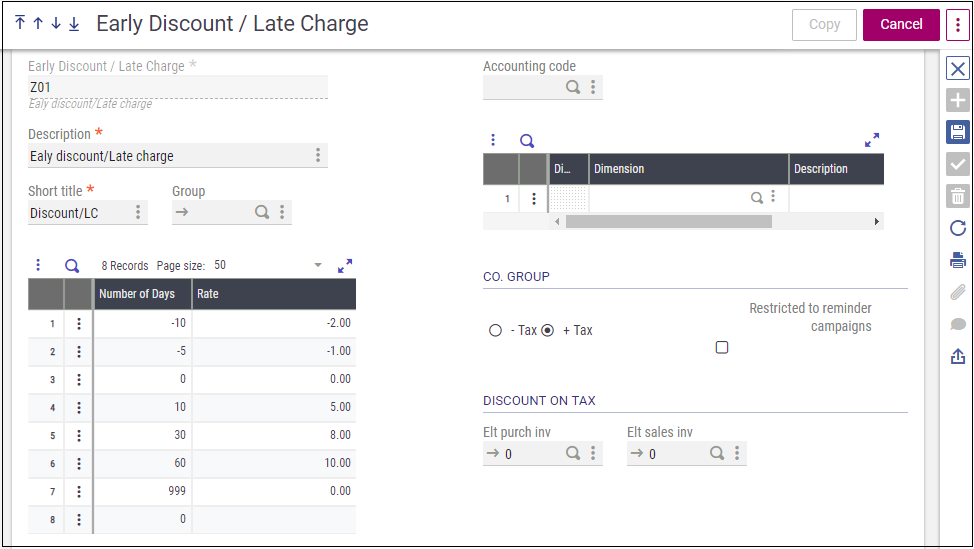
Navigate to: Common data → BP tables → Early discount/late charge

Fig1.1: BP Table -> Early Discount / Late Charge

As in the above Image –

  1. – (minus) in rates indicates discount while rest are charges.
  2. For 0 to – 4 days, the system will consider no discount
  3. For – 5 to – 09 days, the system will consider – 1% discount
  4. For – 10 and above days, the system will consider – 10% discount
  5. Whereas 0 to 9 days, the system will not consider any discount or charges, because it is set to 0
  6. 10 to 29, days system will consider 5% late charges
  7. 30 to 59 days, the system will consider 8 % late charges
  8. And 60 and above, system will consider 10 % late charges.

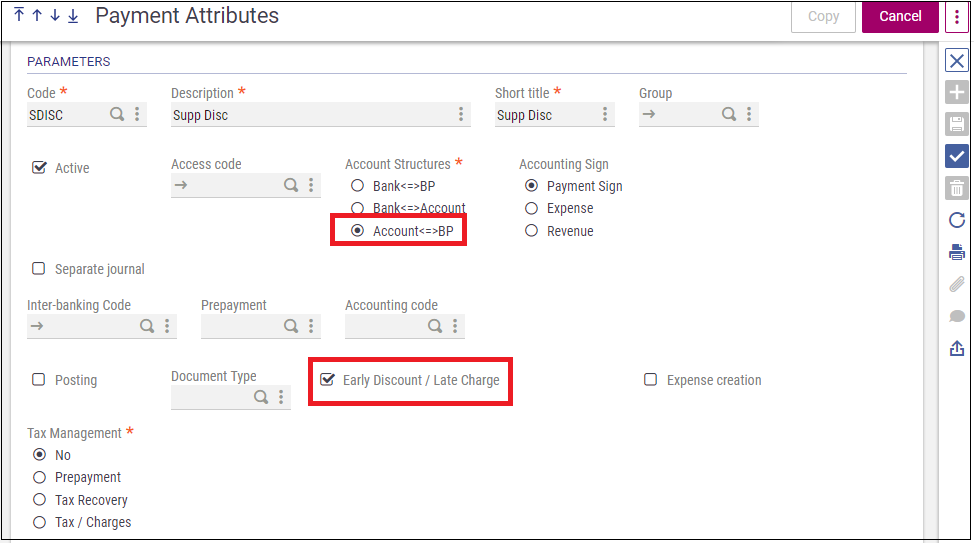
Now, Navigate to: Parameter –> A/P-A/R accounting –> Payment attributes
Make sure that it has to be Account<=> BP and marked as early discount

Fig1.2: Payment Attributes -> Account<=>BP -> Early Discount/Late Charge

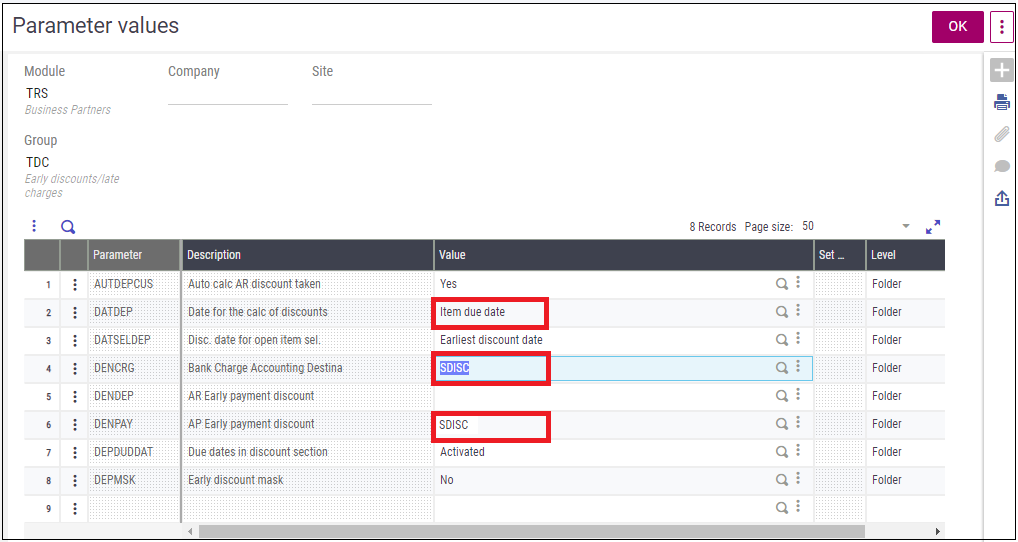
Now, Navigate to: Parameter → General parameters → Parameter values → Business Partners (TRS) → Early Disc (TDC)
Right click and go to detail, and enter the default Payment attributes against the line no 4 and 6, which you have created above.

Also, select the due date for the calculation of Discounts / Charges. The possible values are – Open item due date and Invoice date.

Fig1.3: General Parameters -> TRS

Don’t forget to tag account against discount or late charges. To add the same, Navigate to:
Parameter → Financials → Accounting interface → Accounting codes → Payment
Enter the desired location for loss and profit.

Now go to payment terms and define the payment term. Please note that based on Payment term date and Due date basis (Open item or Invoice date) system will consider the Due date.
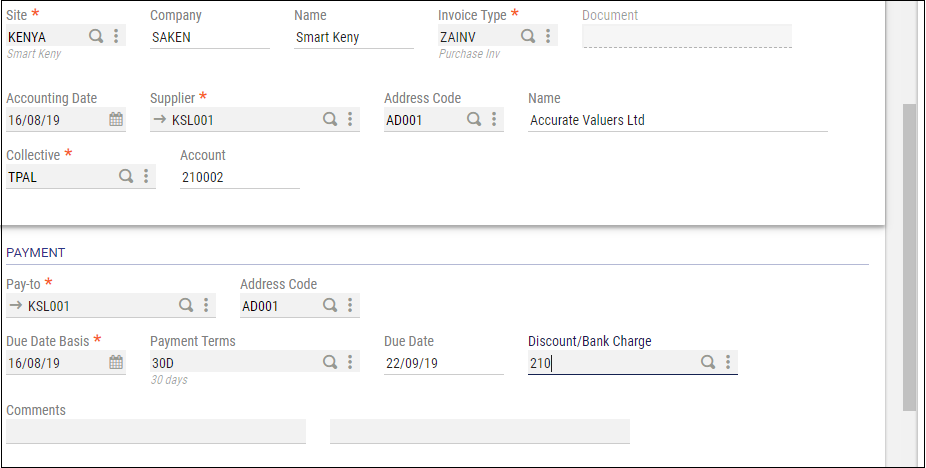
Now to check, if this is working as per setup, navigate to A/P-A/R accounting → Invoicing → Supplier BP Invoice

Fig1.4: A/P-A/R accounting-> Supplier BP Invoice

Create a new Invoice and select Early Discount / Late charge, which you have created above.
Here due date basis and Accounting date is 08/16/19 and the due date is 09/22/19 – Refer above image i.e(Fig1.4)

After posting Invoice go to A/P-A/R accounting → Payments → Payment/receipt entry
Create a Payment entry for the created Invoice. Please make sure that you are creating payment either Backdated or on a future date to avail the early discount / late charges.
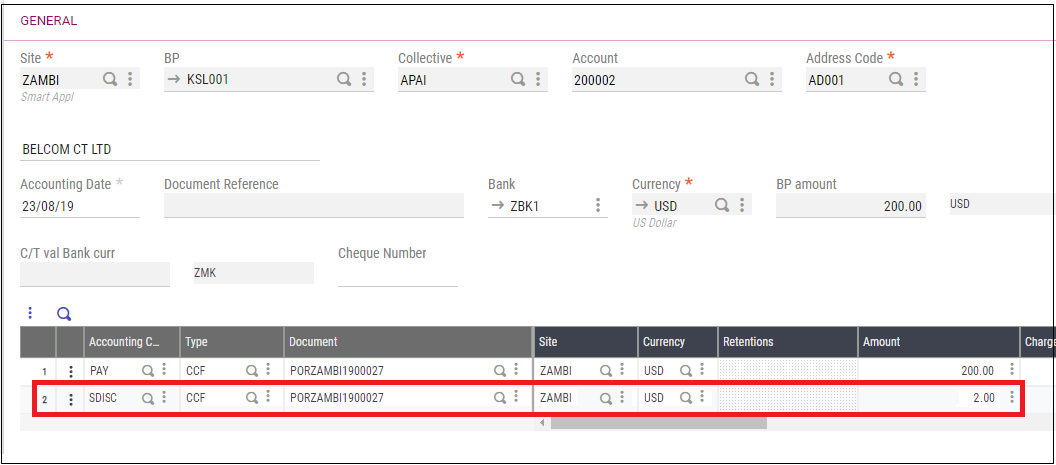
As soon as you will select Invoice no, the system will auto calculate Discount/Charges. Refer below screen shot.

Fig1.5: A/P-A/R accounting -> Payment/ Receipt Entry

As you can see the system has granted 2% early discount.

Hope this help!!!

About Us
Greytrix – a globally recognized Premier Sage Gold Development Partner is a one-stop solution provider for Sage ERP and Sage CRM needs. Being recognized and rewarded for multi-man years of experience, we bring complete end-to-end assistance for your technical consultations, product customizations, data migration, system integrations, third-party add-on development and implementation expertise.

Greytrix caters to a wide range of Sage Enterprise Management (Sage X3) offerings – a Sage Business Cloud Solution. Our unique GUMU™ integrations include Sage X3 for Sage CRMSalesforce.com and Magento eCommerce along with Implementation and Technical Support worldwide for Sage X3 (Sage Enterprise Management). Currently we are Sage X3 Implementation Partner in East Africa, Middles East, Australia, Asia. We also offer best-in-class Sage X3 customization and development services, integrated applications such as POS | WMS | Payment Gateway | Shipping System | Business Intelligence | eCommerce and have developed add-ons such as Catch – Weight  and Letter of Credit for Sage X3 to Sage business partners, end users and Sage PSG worldwide.

Greytrix is a recognized Sage Rockstar ISV Partner for GUMU™ Sage X3 – Sage CRM integration also listed on Sage Marketplace; GUMU™ integration for Sage X3 – Salesforce is a 5-star app listed on Salesforce AppExchange.

For more information on Sage X3 Integration and Services, please contact us at x3@greytrix.com. We will be glad to assist you.

License Plate Numbers – New in Sage X3 –Version 12

$
0
0

New feature introduced in Sage X3; License Plate Numbering (LPN) helps you to track information for a group of items within a container.

A single number allows to track the inventory within a container throughout the system at every stage of the supply chain.

The intention of the blog here is to ensure readers have a basic idea of not only what’s License Plate but also have some idea on process of configuring License Plate in Sage X3.

Benefits:

  • It allows to track various products attached to a license plates.
  • The Inventory is allowed for all the internal stock movements easily using the license plate
  • Sage X3 has allowed an option of using Pallet Numbers fields in earlier version which was consumed to achieve LP fundamental, but the new version has added LP as new feature itself.

Steps:

Container Creation: The process will be initiated with the creation of new container in the system. Kindly refer the screenshot below for the same.

Navigate To:Common data>Manufacturing table>Container

Container

Enabling Container Management: We need to ensure the container management is enabled for the Product we need to assign the License Plate Number.

Refer the screenshot below:

Navigate To:Common data >Products>Products>Product-sites>Management

Product-sites screen

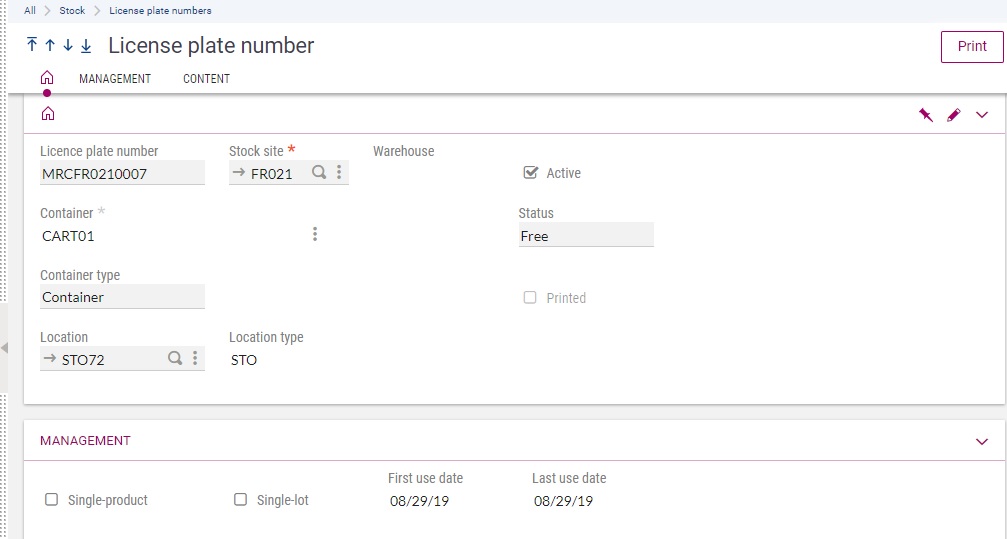
License Plate Creation:  The LP number will be generated based on the Site/Location, the system also allows the bulk creation of License Plate Numbers.

Navigate To: Stock> License Plate Numbers

License plate number

Post the configuration of Masters, we can commence with any Transactions which affect the stock, may be Purchase Receipt/Miscellaneous Receipt/Production.

We will be showing the Assignment of the LP with the example of Miscellaneous Receipt. If you could check the below receipt for the Product RAW340 is received at Location STO72.

Misc.Receipt

License Plate Number Assignment

The License Plate number is assigned to the Stock Lines allocated to the respective location.

Navigate To:Stock>License Plate Numbers

License Plate Creation

License Plate Operations

  • The container is segregated as one or several stock lines. The grouping of several containers into a destination container. The grouping necessarily impacts all the stock lines of those containers being grouped.
  • The entire or partial splitting of a container onto one or several other containers.
  • Entirely or partly design one or several stock lines of a container.
License plate Operation

This completes the License Plate operation in the system.

About Us
Greytrix – a globally recognized Premier Sage Gold Development Partner is a one-stop solution provider for Sage ERP and Sage CRM needs. Being recognized and rewarded for multi-man years of experience, we bring complete end-to-end assistance for your technical consultations, product customizations, data migration, system integrations, third-party add-on development and implementation expertise.

Greytrix caters to a wide range of Sage Enterprise Management (Sage X3) offerings – a Sage Business Cloud Solution. Our unique GUMU™ integrations include Sage X3 for Sage CRMSalesforce.com and Magento eCommerce along with Implementation and Technical Support worldwide for Sage X3 (Sage Enterprise Management). Currently we are Sage X3 Implementation Partner in East Africa, Middles East, Australia, Asia. We also offer best-in-class Sage X3 customization and development services, integrated applications such as POS | WMS | Payment Gateway | Shipping System | Business Intelligence | eCommerce and have developed add-ons such as Catch – Weight  and Letter of Credit for Sage X3 to Sage business partners, end users and Sage PSG worldwide.

Greytrix is a recognized Sage Rockstar ISV Partner for GUMU™ Sage X3 – Sage CRM integration also listed on Sage Marketplace; GUMU™ integration for Sage X3 – Salesforce is a 5-star app listed on Salesforce AppExchange.

For more information on Sage X3 Integration and Services, please contact us at x3@greytrix.com. We will be glad to assist you.

How to search documents which are attached to employee records using Keyword?

$
0
0

Sage X3 people has a standard functionality for searching the documents using the keyword. This functionality allows the user to search attached document using the keyword. The keywords has been created against each attached document (Image, Text, PDF, and Excel) etc.

Attaching Files

Navigate to Personnel administration > Select employee > click Attachment icon on right hand side

It allows us to attach the following:-

1. Add Text

2. Add Image and

3. Add file (supports Image, Text, Word, PDF, Excel).

Against each document, the system allows you to set the 3 keywords which will be used while searching the documents.

Keyword Search:

Step: 1

Navigate to Personnel administration > click Keyword selection icon on right hand side

Step: 2

As shown in the below figure, click the lookup icon in keyword field to load the keywords which is already added while attaching the document. Select the keyword and click ok.

System will display the list of attachments according to the keyword selected.

Step: 3

Select the attachment from the list.

The system will automatically redirect to that employees profile where the document is attached.

About Us

Greytrix Africa is a leading Implementation, Reselling and Consulting partner for Sage X3 (Sage Enterprise Management), Sage 300, Sage Enterprise Management HR (Sage X3 People) & Sage CRM based out of Nairobi, Kenya in East Africa region catering to Tanzania, Ethopia, Middle East, Australia and Asia businesses.

Greytrix Africa offers professional services such as Implementation & configuration, Business Process Analysis, Project Management, Customization, Integrations & Migrations, Technical support and Onsite resource augmentation along with enhancements within Sage X3 (Sage Enterprise Management), Sage Enterprise Management HR (Sage X3 People), Sage CRM and Sage 300 (Accpac) across various industry verticals like Process Manufacturing (Food & Beverages, Chemical), Discrete manufacturing (Automotive, Textile & Apparel), Non Profit, Health-care Industry and Services Industry (Financial , Software & Engineering).

For more information on Sage X3 Consulting Services, please contact us at sales@greytrix.com.We will be glad to assist you.

8 Reasons How Sage X3 can Spice Up the Food and Beverage Industries in Africa

$
0
0

Food and beverage industry is slowly gaining strength in the regions of Africa making it one of the leading industries for attractive opportunities in terms of business. Africa has the most diverse food and cuisine structure on the planet. Its $ 313 billion food and beverage markets are projected to reach $ 1 trillion by 2030 which suggests a tremendous scope for the developing African economy.

A food and beverage industry should be well equipped to tackle the challenges of managing industry specific requirements like Orders, inventory and production while keeping the total cost of ownership low. Food companies also deal with some of the most volatile supply and demand in business because of the struggle to anticipate demand, leading to wasted stock or lost sales from understocking. Greytrix Africa with a track record of proven success with industry leaders, addresses the challenges of food and process manufacturing industries with Sage X3– an ERP software suite that includes integrated functionality for financial management, sales, customer service, distribution, inventory, manufacturing, and business intelligence.

Sage X3 Food and Beverage Industry Top 10 reasons Sage X3 can be a boon for your business
  • Lot traceability and Recall Management

Real time Lot traceability and Recall management is crucial for industries dealing with food and beverage due to the high risk of perishability. Sage X3 ensures a sustained flow of information concerning the sourcing, processing, transportation and storage of food products. It allows you to allocate and capture Lot numbers at the time of receiving, associated with the vendor numbers. Auto generating Lot numbers for finished goods ensures accurate Lot traceability and Recall management. It provides both forward and backward traceability across the supply chain with automated recall functions.

  • Pricing and Contract Management

Sage X3 includes enterprise specific functionalities such as pricing and contract management. A robust solution for advanced order fulfillment and inventory allocation, Sage X3 also has provisions for shipping and routing operations. This improves visibility and enhances management by standardizing the associated processes. It also increases the financial visibility through monitoring and controlling processes for tracking, forecasting, profitability and managing customer demands.

  • QA/ QC Processing

One of the most essential aspect of food and beverage industries is ensuring the quality of the final food products as it can impact the overall status of your business. Sage ERP X3 has strong quality control functionalities that allow for separation and inspection of products by providing quality rules by item or group within the system. All test results are recorded and maintained together with production history.

  • Procurement of Raw Materials

The advanced planning and control capabilities of Sage X3 provides real time and historical information for the procurement of raw materials to manage inventory levels, costs, reduce waste and shorten the final product development cycle. Sage X3 enables you to efficiently manage variability for continuous flow or batch process manufacturing. It helps you to predict anticipated yields by the comparison of planned inputs to the planned output and filling these specifications prior to initiating a production event.

  • Risk Assessment

Adhering to food and safety compliance is essential for running a successful food and beverage industry. Failure to comply by the rules can lead to serious financial and operational lowdown. Sage X3 equips users with a detailed overview of the enterprise operations to perform informed actions with regulatory protocols and enables automated compliance related tasks for swift supply chain processes.

  • Single and multi-site management

Sage X3 removes the complexity of running a business from different locations by unifying processes in one single instance. Since the food manufacturing industries cater to different locations and obtain resources from warehouses at different sites, Sage X3- is flexible with multiple entities, multiple sites, multiple legislations and currencies effectively which allows to manage intercompany site transfers, inter entity transactions and consolidated group accounting & reporting without hassles. It’s multi-tiered, scalable system ensures a single deployment for all locations without the need of additional technologies.

  • Workflow and Automation Alerts

Sage X3 streamlines processes by automating credit holds, purchase orders, support requests, invoices, and contracts. It allows you to move data between applications and create custom integrations for resource intensive manual processes. Reports can be scheduled and automated in the requested format, configure other reports to auto run according to the business priorities. 

  • Reporting and Business Analytics

Unlock key business insights with the simple and flexible reporting solution Sage X3. It provides businesses with meaningful key business insights by saving time and allowing control over business processes to meet the demand and supply needs of the food and beverage industries. The users obtain a detailed overview of the processes which provides them with added ability to easily drill down into the details thus, ensuring constant flow of information.

So, whether you are a business considering an upgrade to your existing ERP or planning to install your first ERP solution, your success will be highly dependent on identifying business management solutions that have a strong foundation of food and beverage processing industry and can meet your specific requirements with minimum customizations. Sage X3 ERP is a responsive, agile and flexible solution that provides critical business intelligence and management functionalities supporting transparency of processes. Greytrix Africa addresses the challenges faced by the Food and Beverage industries with detailed reports and charts by analyzing the industry pattern and chalking out a plan with the special ingredient for success. The latest technological standards in Sage X3 readily adapt to the regulatory norms and business priorities over the years thus, growing with you as your business flourishes with ease.

About Us

Greytrix Africa is a leading Implementation, Reselling and Consulting partner for Sage X3 (Sage Enterprise Management), Sage 300, Sage Enterprise Management HR (Sage X3 People) & Sage CRM based out of Nairobi, Kenya in East Africa region catering to Tanzania, Ethopia, Middle East, Australia and Asia businesses.

Greytrix Africa offers professional services such as Implementation & configuration, Business Process Analysis, Project Management, Customization, Integrations & Migrations, Technical support and Onsite resource augmentation along with enhancements within Sage X3 (Sage Enterprise Management), Sage Enterprise Management HR (Sage X3 People), Sage CRM and Sage 300 (Accpac) across various industry verticals like Process Manufacturing (Food & Beverages, Chemical), Discrete manufacturing (Automotive, Textile & Apparel), Non Profit, Health-care Industry and Services Industry (Financial , Software & Engineering).

For more information on Sage X3 Consulting Services, please contact us at sales@greytrix.com.We will be glad to assist you.


How to resolve “No product to adjust” error in Adjustment of stock shortages process

$
0
0

We may come across a scenario where we deliver a product to customer even though there is no stock in X3 system. We can adjust that stock in system after a while for that we can use Adjustment of stock shortages functionality which is available in Sage X3. Using this function we can adjust manually or automatically suspended shortages or movements. It can be launched in direct mode or batch mode.

All movements, including the ones specifying the lot, sub-lot and/or location and/or serial number can be adjusted.

Navigation Path:  All>>Stock>>Periodic processing>>Adjustment of stock shortages

Adjustment of stock shortages

Enter all the details and on click of OK button ‘Stock shortage adjustment’ pop up screen will get open where the stock details will be listed to select for adjustment.

Stock shortage adjustment

 Once you select the stock line and click on ‘Adjustment’ you may face an error “No product to adjust”.

Stock shortage adjustment Error

Follow the below setting to overcome this error message.

Click on the ‘Stock parameter’ options on the right side screen also you can find this screen at All>>Setup>>Stock>>Stock parameters

Stock Parameter
Stock Parameter

Below screen will get open, select the product-site and under ‘Back-order’ tab select ‘Suspended transactions’ as one of the Movement type priorities.

Stock Parameter setup
Stock Parameter Setup

Once this setting is done, again run the ‘Stock shortage adjustment’ and select the shortage stock details and you will find all the shortage gets adjusted now.

About Us
Greytrix – a globally recognized Premier Sage Gold Development Partner is a one-stop solution provider for Sage ERP and Sage CRM needs. Being recognized and rewarded for multi-man years of experience, we bring complete end-to-end assistance for your technical consultations, product customizations, data migration, system integrations, third-party add-on development and implementation expertise.

Greytrix caters to a wide range of Sage Enterprise Management (Sage X3) offerings – a Sage Business Cloud Solution. Our unique GUMU™ integrations include Sage X3 for Sage CRMSalesforce.com and Magento eCommerce along with Implementation and Technical Support worldwide for Sage X3 (Sage Enterprise Management). Currently we are Sage X3 Implementation Partner in East Africa, Middles East, Australia, Asia. We also offer best-in-class Sage X3 customization and development services, integrated applications such as POS | WMS | Payment Gateway | Shipping System | Business Intelligence | eCommerce and have developed add-ons such as Catch – Weight  and Letter of Credit for Sage X3 to Sage business partners, end users and Sage PSG worldwide.

Greytrix is a recognized Sage Rockstar ISV Partner for GUMU™ Sage X3 – Sage CRM integration also listed on Sage Marketplace; GUMU™ integration for Sage X3 – Salesforce is a 5-star app listed on Salesforce AppExchange.

For more information on Sage X3 Integration and Services, please contact us at x3@greytrix.com. We will be glad to assist you.

How to make the Function accessible in batch task

$
0
0

We may come across the scenario, where we need to make the customize function to be executed through the batch task. This process can be executed without manual intervention on the regular interval.

Solution:

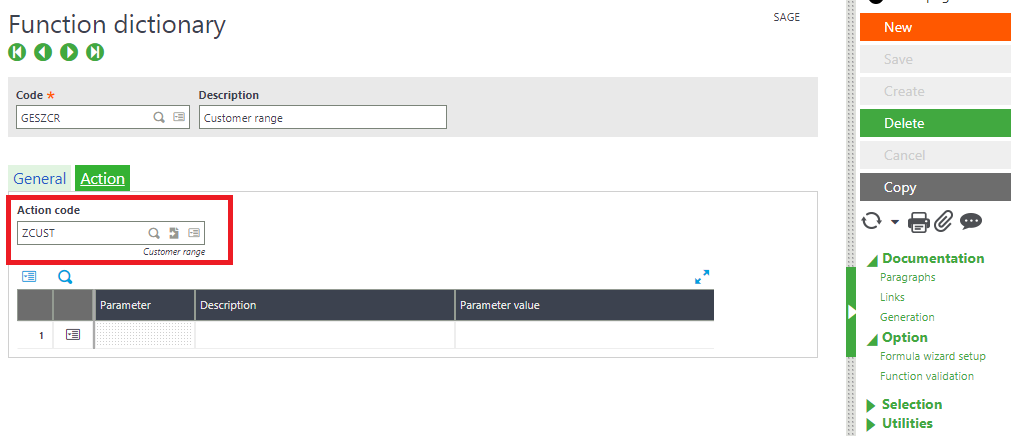
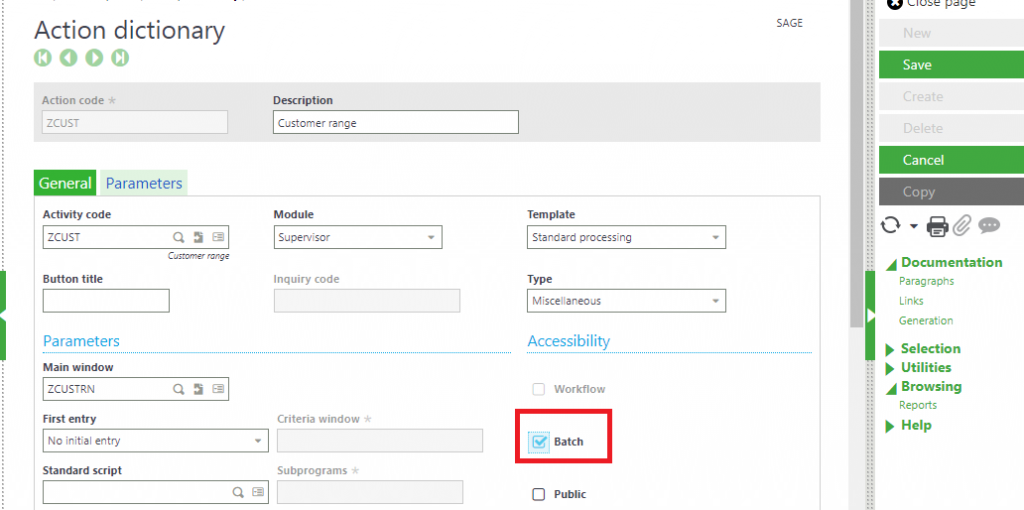
Step 1: When we make the function we need to attach the Action.

Screen of the Function

Step 2: The Action linked to the function should be marked as the Batch accessible as shown below

Action Screen
Action Screen

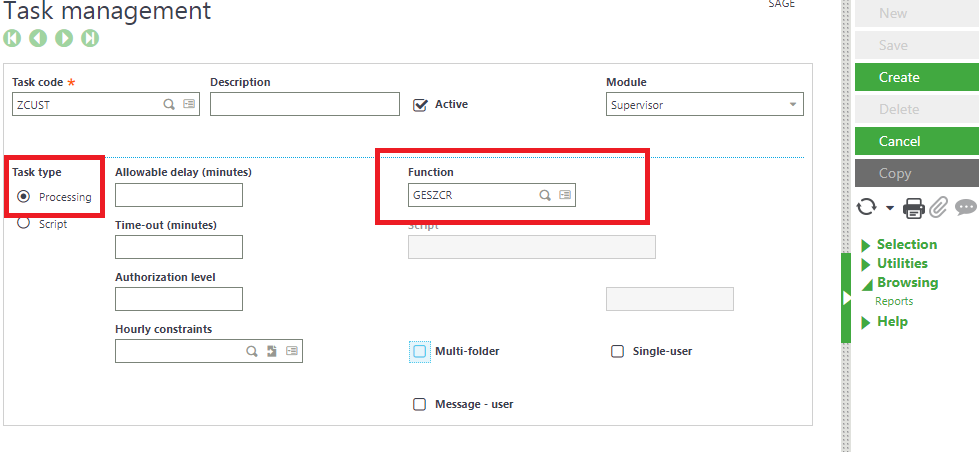
Step 3 : Once this done then you will be having this function available in the Function list of batch Task as shown below

Batch Task screen
Batch Task screen

In this way you will be able to execute the customize function through batch task and then transforming the batch task on the recurring basis which will execute on the specific interval.

About Us
Greytrix – a globally recognized Premier Sage Gold Development Partner is a one-stop solution provider for Sage ERP and Sage CRM needs. Being recognized and rewarded for multi-man years of experience, we bring complete end-to-end assistance for your technical consultations, product customizations, data migration, system integrations, third-party add-on development and implementation expertise.

Greytrix caters to a wide range of Sage Enterprise Management (Sage X3) offerings – a Sage Business Cloud Solution. Our unique GUMU™ integrations include Sage X3 for Sage CRMSalesforce.com and Magento eCommerce along with Implementation and Technical Support worldwide for Sage X3 (Sage Enterprise Management). Currently we are Sage X3 Implementation Partner in East Africa, Middles East, Australia, Asia. We also offer best-in-class Sage X3 customization and development services, integrated applications such as POS | WMS | Payment Gateway | Shipping System | Business Intelligence | eCommerce and have developed add-ons such as Catch – Weight  and Letter of Credit for Sage X3 to Sage business partners, end users and Sage PSG worldwide.

Greytrix is a recognized Sage Rockstar ISV Partner for GUMU™ Sage X3 – Sage CRM integration also listed on Sage Marketplace; GUMU™ integration for Sage X3 – Salesforce is a 5-star app listed on Salesforce AppExchange.

For more information on Sage X3 Integration and Services, please contact us at x3@greytrix.com. We will be glad to assist you.

How to add suppliers in the product-site level in Sage X3-Version 12

$
0
0

Sometimes we require to manage local suppliers to a specific site. There is an amendment made in Sage X3 version 12 where we can add suppliers at the product site level.

Benefits:

  • This functionality is useful for supplier product management rules by site.
  • These rules are used in the supply planning as well as on the document entry in the Purchase flows.

These regulations are compulsory if we define the supplier site parameter mandatory.

To set these rules mandate,

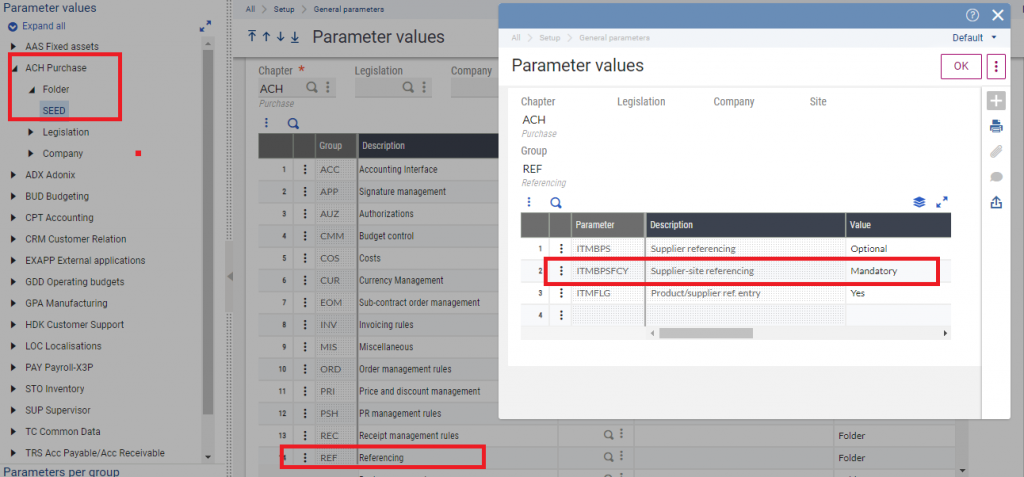
Navigate To: Setup>General parameters>Parameter Values>ACH Purchase>Referencing

Parameter Values
Parameter Values

Set the Supplier-site referencing (ITMBPSFCY) is “Mandatory”.

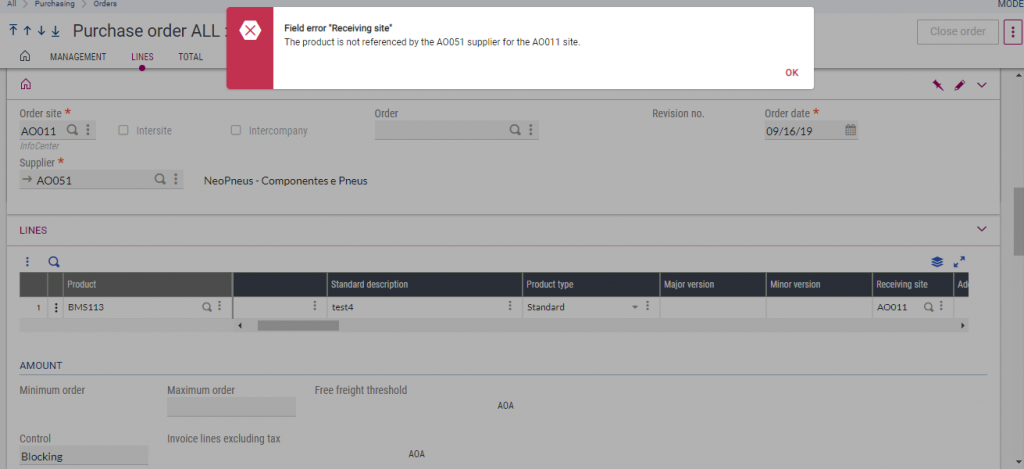
As we set the Supplier-site Mandatory, in the suppliers section of the Product-site record a line must exist for the supplier. Otherwise, we cannot be entered the product on purchase order for another supplier and receipt-site (Below blocking message will be displayed).

Purchase Order
Purchase Order

To enter the suppliers in product site, refer the below path

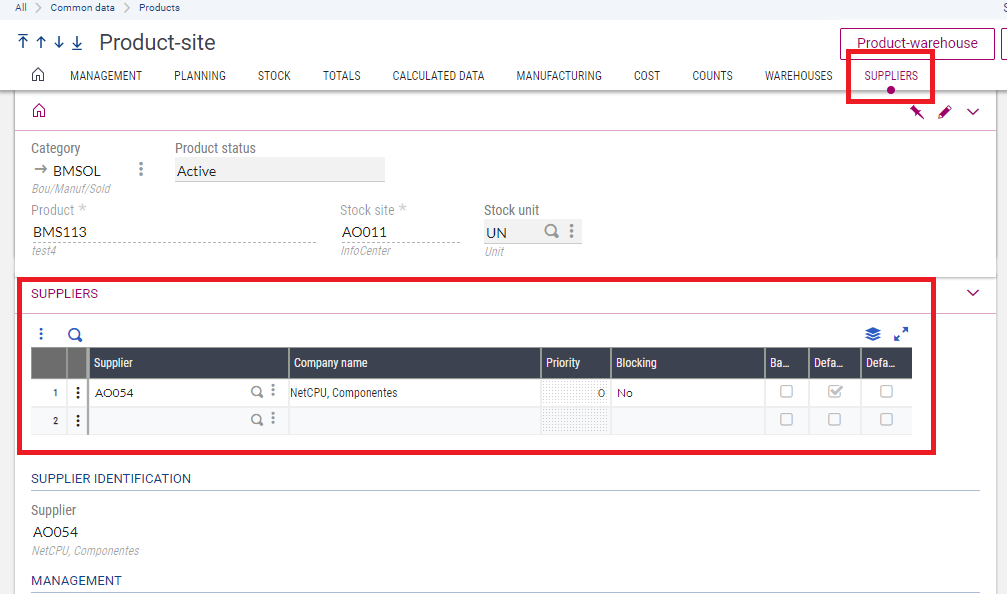
Navigate To: Common Data>Products>Products>Product-sites>Suppliers

Product-sites
Product-sites


Here we have added the supplier on product site-level. Only existing suppliers in the product-supplier level can add to the product site level. P

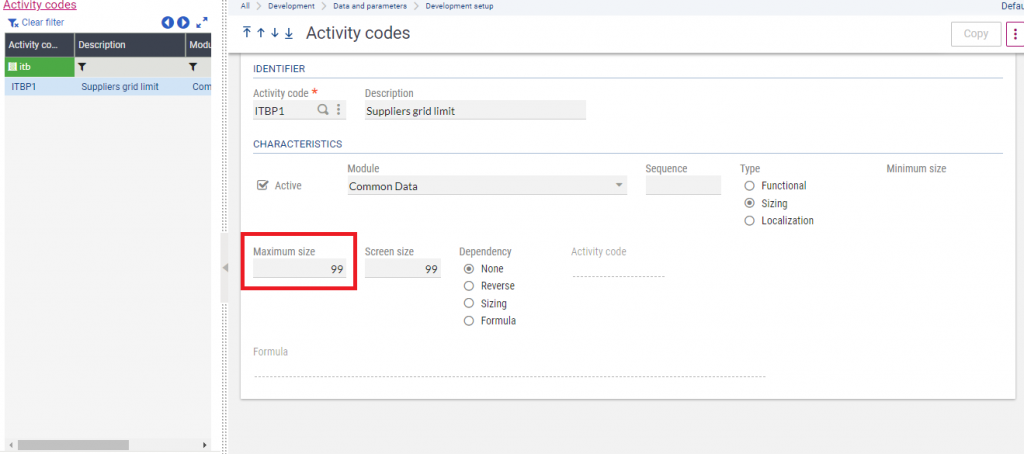
By applying a new activity code Supplier grid limit (ITBP1) the system allows to define a maximum 99 suppliers in the grid.

Activity Code
Activity Code

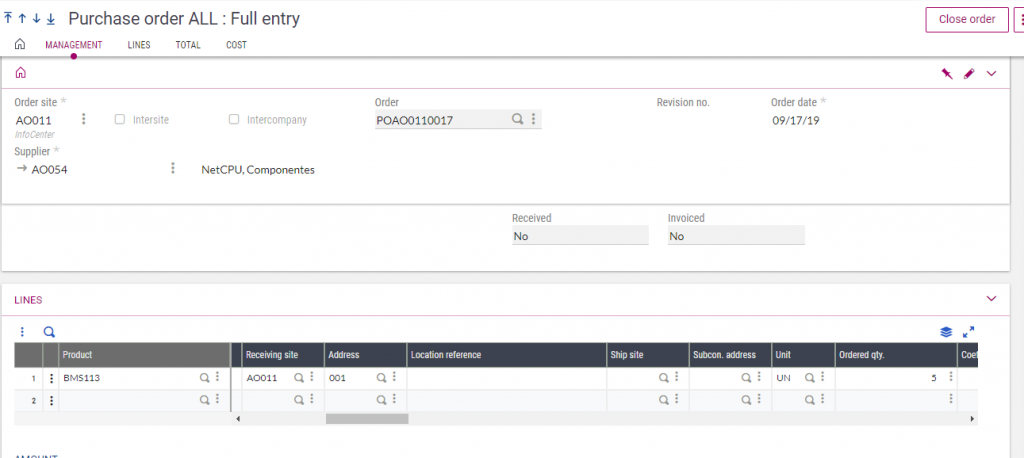
Now we can create the purchase order for product BMS113 and Receiving site AO011 by using the entered supplier AO054 on the product site level. Refer the below screen shot of purchase order.

Purchase Order
Purchase Order

This completes the Purchase order creation in version 12 by using the supplier entered on product-site.

This added feature will effect on Buyer plan, purchase request, Purchase order, Back to Back order and supply planning.

About Us
Greytrix – a globally recognized Premier Sage Gold Development Partner is a one-stop solution provider for Sage ERP and Sage CRM needs. Being recognized and rewarded for multi-man years of experience, we bring complete end-to-end assistance for your technical consultations, product customizations, data migration, system integrations, third-party add-on development and implementation expertise.

Greytrix caters to a wide range of Sage Enterprise Management (Sage X3) offerings – a Sage Business Cloud Solution. Our unique GUMU™ integrations include Sage X3 for Sage CRMSalesforce.com and Magento eCommerce along with Implementation and Technical Support worldwide for Sage X3 (Sage Enterprise Management). Currently we are Sage X3 Implementation Partner in East Africa, Middles East, Australia, Asia. We also offer best-in-class Sage X3 customization and development services, integrated applications such as POS | WMS | Payment Gateway | Shipping System | Business Intelligence | eCommerce and have developed add-ons such as Catch – Weight  and Letter of Credit for Sage X3 to Sage business partners, end users and Sage PSG worldwide.

Greytrix is a recognized Sage Rockstar ISV Partner for GUMU™ Sage X3 – Sage CRM integration also listed on Sage Marketplace; GUMU™ integration for Sage X3 – Salesforce is a 5-star app listed on Salesforce AppExchange.

For more information on Sage X3 Integration and Services, please contact us at x3@greytrix.com. We will be glad to assist you.

How to assign report Destination based on condition

$
0
0

We may come under a situation where we have to set different destination according to the user or we have to set a destination for a user based on a particular condition.

To set different destination based on user we can simply define this in :

All -> Setup -> Destination -> Destination by user

Now, to set destinations for a user based on a particular condition, follow the below steps:

  • Navigate to All -> Setup -> Destination -> Destination by user
  • Add a condition in ‘Additional information’ field as this field has the higest priority while printing.
  • This field is linked with the ‘Add info formula’ field which is present in Report code screen.
  • In this field, set the parameter which is associated with the value we have added in the ‘Additional information’ field.

For example :

  • We want to set ‘PREVIEW’ destination by default if the sales order site is ‘FR011’.
  • We have added the value of site in ‘Additional information’ field as shown in below.
Destinations by user screen.
Fig: Additional information’ field
  • Now we will define the parameter of this value in ‘Add info formula’ field which is present in Report code as shown below.
add info formula field
Fig: Setting parameter in ‘Add info formula’ field

General Parameter screen.
Fig: Destination modified
  • Hence, when we print the report in which the site is ‘FR011’. The system will use the ‘PREVIEW’ as destination as shown in the above figure.
Hope this works.
Enabling Field Value by Default in Capital in Sage X3

$
0
0

In some cases, we require the field text to be entered in capitals. If we enter values in small letters then it may cause problem in case the field has some customization. We can handle this type of conversion (capitals to small and vice versa) by writing code. But, to easily handle this type of problem Sage x3 provides special setup for fields in Screen dictionary. You need to set that particular field with certain option so that the value entered in this field will be displayed in capital format always.

Steps:

Follow the below steps to achieve the same.

  1. Navigate to : Development > Script dictionary > Screens
  2. Jump to the required field whose format need to be changed as capital letters.
  3. Go to column “Options” as in below screenshot.
Screen Dictionary
Fig: Screen Dictionary

4. Click on search option which will open below selection window.

Option Selection (A)
Fig: Option Selection

5. Select option “A”(capitals) and save the changes. Do all required validations of the respective screen and window.

Now, navigate to the transaction screen for which you made the changes.

You can see that once you tab after entering the values for respective field in small letter format, it will display the values in capitals.

Sales Order Reference
Fig: Sales Order

Thus, you can easily convert small letter text into capital without any coding.

Hope this works.

Viewing all 1528 articles
Browse latest View live


Latest Images

<script src="https://jsc.adskeeper.com/r/s/rssing.com.1596347.js" async> </script>