Quantcast
Channel: Sage X3 – Tips, Tricks and Components
Viewing all 1519 articles
Browse latest View live

Setup Price Code Priority

$
0
0

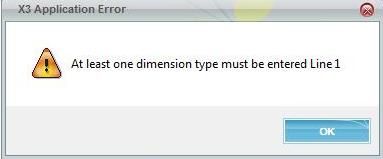
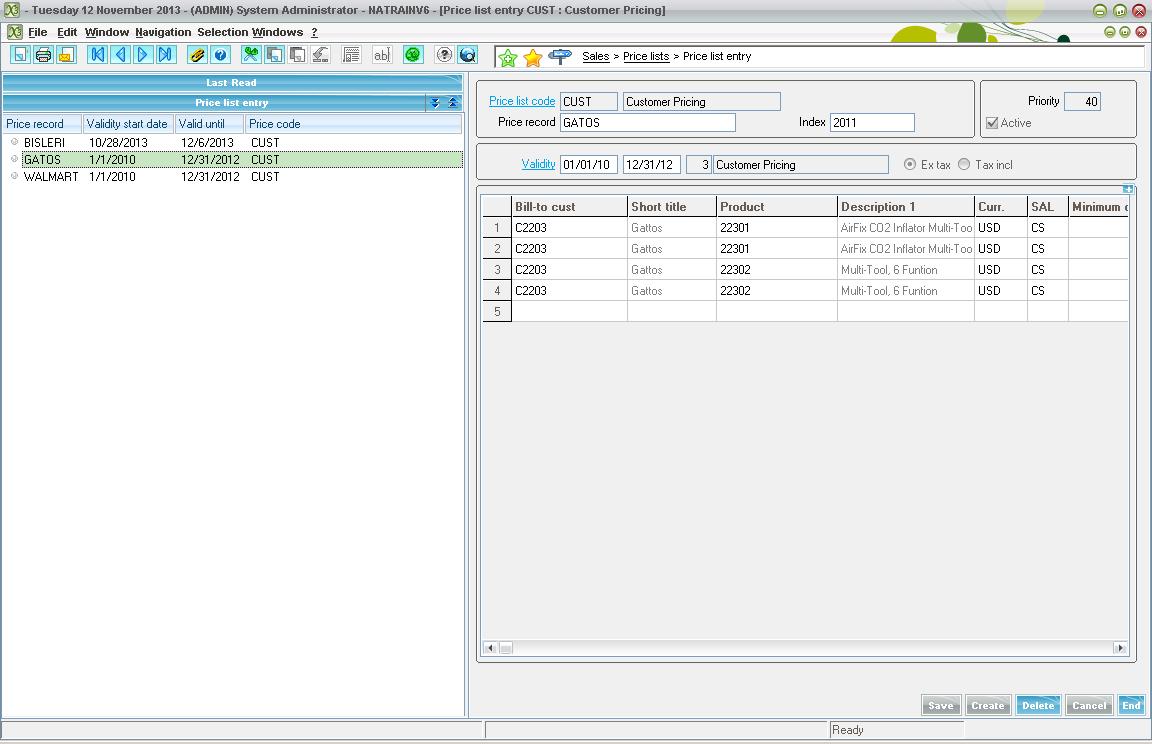
While working with Pricing or creating a new Price Code we can set its priority in order to increase or decrease its processing order. Priority Flag (highlighted in snap) is used to assign a priority to the price list in order to enable it to be classified in the search order. Price lists are processed in the increasing order. To setup your Price Code’s Priority check out below snapshot.

PriceCodePriority

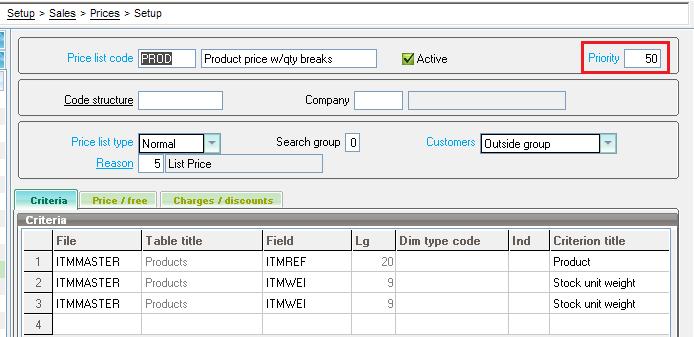
As screen shot mentioned above navigate to: Setup > Sales > Prices > Setup.

Set your priority accordingly. As mentioned above that price lists are processed in the increasing order i.e. higher the priority of price list, last it will be processed.

Alternatively, if you want to setup Priority of all of your price codes at once then just navigate to Setup > Sales > Prices > Activation and set the Priority for all of the Price Codes at once. Please refer below screenshot.

PriceCodePriority-1

Hope this helps!!


How to attach the Report to the Window in X3

$
0
0

In our last blog we have discussed that how we can add the crystal report in X3. After adding the report in X3 it is mandatory to print the report from the respective window. In this blog we will explain that how to attach the report to the window of sage X3.To achieve this functionality just follow the below step. 

  1. 1.       Go-to: Setup  >  Destination  >  Print Code
  2. Create an Internal Code for your report, and enter the Report name under the Print code column as shown in the below screen shot.

CallReport-1

3.  For Object Managed Window, If you want to print the Report from the window, Then add the internal code in Window‘s Object under the Print out field as shown in the below screen shot.

CallReport-2

4.  Go-to: Setup > Destination > Default value.
5.
Enter the function name, Report Name and the Parameter as shown in the below screen shot.

CallReport-3

Hope this help to print your Crystal report.

Dimensions check for the Ledgers in Sage X3

$
0
0

Ever ran into a situation where you are asked to enter dimensions (get the below screen shot) for a particular ledger account even if no Dimensions are set against the account. And you are not allowed to do the transaction unless you provide the dimensions to that Account

Dim-1

To create/perform transactions in Sage X3 without any dimensions just follow the below simple steps:

  1. Go to Setup -> Organizational Structure -> Ledgers

Dim-2

      2.  Uncheck the option ‘At least one dimension’ for type of ledgers for which you wish to not use any dimension on the transactions.

Based on this option ‘At least one dimension’ selection for the different ledgers setup, users in Sage X3 are asked for the dimensions when creating or performing any transactions.

Cost Transfer in Sage X3

$
0
0

The Sage X3 has come up with the interesting feature of Product Cost Transfer. The standard Cost Transfer (COPYCOUT) function under the costing module can be used to transfer the product cost.

Cost Transfer: Costing > Miscellaneous Processes > Cost Transfer (COPYCOUT).

Below is the standard screen of cost transfer:

CostXfer

  • This function is used to transfer the cost of the product from one site to another.
  • The header section contains the filter criteria of product either you can transfer the cost of all products, on selection basis or for specific product.
  • The coefficient specifies the coefficient of transferring the cost.
  • As we can see in the above Cost transfer screen there are two separate block to enter the Source and destination detail. In the source block specify the reference site details and in the Destination block specify the site detail to which you need to transfer the cost.

The standard cost transfer screen has the options of transferring the cost type Standard, Revised, Budget and Simulate.

What if you want transfer the average Cost?

As we know that the average cost of product is set/changed automatically when the receipt against that product is created. However in the standard Cost Transfer screen there is no option of transferring the average cost to any other cost type.

We have customized this functionality and we have added the options of transferring the average cost as well. We created the new function “Enhanced Cost Transfer” which is the replica of standard one. We have also added the some more product filter criteria.

Please refer to the below screen shot of newly created function “Enhanced Cost Transfer” in which we have added the option of average cost transfer.

CostXfer2

Hope this helps!

Executing a sql query using 4GL language

$
0
0

There are many a time when we need to get the aggregate or maximum function but 4GL Language do not offers a syntax for the same.
But we definitely have an option to use SQL queries in 4GL and this does the most of the job for us.

Just go through the statements mentioned below:

Format:

Local char REQSTR(250)(10)

For [Table name] where document no

REQSTR(0) = “SQL query ”

For fields_0 from Databasetyp Sql REQSTR(0…10) as tablename

Databasetyp: it is a database type for this we have create function so it will identify that current database uses by X3 server

 We have applied this with example.

 Local Char REQSTR(250)(10)

    For [Z3T] Where 1=1

     For [ZQRY] Where DOCNO = [F:Z3T]DOCNO

         REQSTR(0) = “SELECT DOCDATE_0, QRNO_0 FROM ZETIQUERY WHERE ROWID      =”+num$([F:ZQRY]       ROWID)+”"

                 For (Date DOCDATE, Char QRNO) From func GETDBTYP  Sql REQSTR(0..10) As [ZYOP]

                          Update [Z3T] Where DOCNO = [ZQRY]DOCNO With DOCDATE = [F:ZYOP]DOCDATE

                        Update [Z3T] Where DOCNO = [ZQRY]DOCNO With QRNO = [F:ZYOP]QRNO

                        Update [Z3T] Where DOCNO = [ZQRY]DOCNO With MARK = 2

                  Next        

     Next

  Next

Menu to Read Log file in X3

$
0
0

“Smallest factor affects the production”. I believed this saying when I stuck in a scenario where I have to track the changes made in my system after integrating a patch.

While integrating a patch in my system I got few of errors. I need to track those errors for creating a new patch from my system. But, I stuck as I was not having the error list and have closed the log file too. After exploring X3, I found a module which keeps the track of all my log files.

I navigated to: Reports > Log Reading

The below window appeared after the navigation.

ReadLog-1

Now here I just pressed F12 key in “File Name textbox” and a screen appeared (please refer below screen shot) giving me the details of all the log files I ever created in my system. I selected the latest log file created and I got the desired log file.


ReadLog-2

This feature will be most useful where we are accessing the X3 client connection and can’t access the server or a local system.

Hope this helps…

Assigning Sale Price for the Product

$
0
0

Sage X3 has a feature of setting the Sale Price of Product with different configuration. Price List Entry (GESSPL) function under the sales module can be used to set the sale price of the product.

  Sales>Price lists>Price list entry

This function is used to set the price of product according to :

  • Customer
  • Date Mentioned
  • Quantity.

How to set the Sale Price of the Product?

Step 1.

Navigate To :   Sales>Price lists>Price list entry

Select Transaction Type as “CUST Customer Pricing”

SalePrice-1

Step 2:

Create new Price List Entry, Enter the details in the screen such as validity date range, Customer ,Product ,Quantity, Price , and save.

You can add multiple customers for multiple products in the same Price list Entry.

SalePrice-2

After Creating the Price list Entry, this sales price of the product will reflect when any order or Invoice is generated.

 Hope this Helps  !

Import/Export Template

$
0
0

X3 provides the functionality of creating\updating the transactions using import\export template. A few days back we came across a scenario in which we need to create WO using import\Export template. After some findings we found it easy to do the same. You just need to follow the below mentioned steps for this.

Step 1: Navigate to Setup->Usage->Import/Export->Import/Export Template and create a new template using the object and enter the needed tables. On the fields tab enter the fields that you want to update through it.

Step 2: Make sure the “Update allowed” checkbox is marked else the update won’t work.

ImportExp

Step 3: The export\import generally works automatically but for importing the transactions we have to write the simple code (refer below screen shot). In the processing file add the action “AP_IMPORT” and in that action write the below code. Where GIMP (3) is “C” for creating the transaction and “M” for the modification of transaction.

 Step 4: After creating the template navigate to usage->import/export and select export for exporting and import for importing.

You can now create or update the transactions as per the requirement.

Hope this clarifies.


Update Gross Price of transactions while Save\Create

$
0
0

Most of the times while doing the customization for creating\updating the transactions, in which we are asked to update the Gross price of the product on click of save\create button, we came across a problem where we are able to updates the gross price but fails to update the others fields which are directly calculated on Gross Price.

On referring the below screen shot you will find that some fields like Net Price, Margin, Ex Tax total, tax etc. depends on the Gross Price of the products.

GROPR-1

We researched out and found that there is an action “AM_GROPRI” which is being called on change of each line that updates the Fields according to the entered gross Price and on calling the same from save\create button  was giving the errors.

While looking for a work around for this we found the solution for this. All we have to do is that we need to call the below mentioned actions:

Call CLCNETPRI([M]QTY(NOL), [M:SOH0]CUR, NOL) From TRTVENPRI

Call CLCPFM([M]DSTOFCY(NOL), [M:SOH1]PRITYP, [M]CHGTYP, [M:SOH0]ORDDAT, [M:SOH0]CUR, NOL, 1) From TRTVENPRI

Calling the above actions will automatically update the respective fields.

Hope this solves the problem.

How to Upgrade Runtime Server for Sage X3

$
0
0

Facing problems in applying platform updates after you apply Sage X3 standard patches. This blog will help you to upgrade your Runtime update in few quick steps.

Firstly extract your installable on your local system and run the exe.

runtime

If you are willing to create a new instance then run the setup till finish. If updating the existing instance then follow the below steps:

1)      Before running the exe stop the batch server in Sage X3

(Usage -> Batch server -> Server deactivation)

runtime-1

2)      Then stop all the accounting task in your Sage X3

runtime-2

3)      Stop the process server from the Sage X3 management console.

runtime-3

4)      Stop all the SageX3 services (Control panel -> Administrative Tools -> Services) if running under the task manager.


5)      Once the setup is completed through exe start all the Sage X3 services (Control panel -> Administrative Tools -> Services) and go to Sage X3 management console.


6)      Under the process server you will find a process with status ‘Update’.

Click on the configuration button to start updating the new runtime server from the Console management.

runtime-4

7)       Once configured the runtime server will be updated with the latest version.

runtime-5

That’s it, you have successfully updated your Runtime server with latest version.

For any queries please mail us on X3@greytrix.com


Data Integration In X3

$
0
0

In one of our last blog we explained about how to make back up of the data in SVG folder. Obviously many a time it is a need to restore the data in X3 tables as well. This time lets check this functionality about the restoring of the data in X3 tables.

Navigate to: Development > Utilities > Extraction/Integration > Data Integration

The window displayed in below screen shot will pop up.

Dataintg-1


  • Here first we need to select the respective folder.
  • Then after select the directory where the backup files are stored. By default it is SVG.
  • Select the table which you need to restore. Select ‘*’ for restoring all the tables.
  • Click the OK button.


On clicking the OK button, the files from “SVG” folder will be copied to your “FIL” folder, which is default folder for data Integration.


You will get a log file after the completion of process.


Hope this functionality helps!

Parcel Content in X3

$
0
0

Functional Path:Sales àInquiries àParcel Content

Parcel Content, the name is leading us to think about package … right..yes In sage X3, this functionality is used to see the details about package which is delivered to a site. This Inquiry helps in getting all the information of package such as “Picker”, “Package weight”, “Carrier” etc..

This inquiry works on different criterion any of the criterion gives the needed result.

How to search ?

Select site ,Package number and ship to customer name and click on search.

Package content get display along with shipment number .

parcel

Inquiry – Inactive Inventory

$
0
0

It is important in any business to know about the status of your inventory; in case if you are not aware of the Inventory status and reorder the inventory which may be inactive i.e. no transaction occurred for it.

Sage x3 has a special feature of knowing the Inactive Inventory. Inactive Inventory (CONSSDO) function under the Inventory module can be used to get the product which has no transactions from the date mentioned in the Screen.

This function is used to get the report of the product which was not used or inactive or any transaction from specific time in a site as well as the stock available in the site.

How to get the Inactive Inventory?

 Navigate To: Inventory> Inquiries> Inventory >Inactive Inventory

Select the Site and date to get the list of products which was having no transaction

You can also have filter of Empty inventory stock which was inactive, by checking the check box of Physical Empty stock

InactiveInv-1

 This report can also be exported in ‘.csv’ and ‘excel’ format

InactiveInv-2

Hope this helps.

Stock being counted in Sage X3

$
0
0

Sage X3 has an important feature to allow the counting of stock. The Stock be counted is the screen which allows the user to check the inventory which shows the list of stock which are counted.

Functional Path: Inventory àCounts àStock being counted.

This function is used to list the products in the process of a stock count for a site, for a given range of products. Only the products present in the stock count list and therefore where the count has not yet been validated are presented in this inquiry.

Select the site and insert the range of the product and click on search it will give the stock of products which is not validated yet.


Hope Stockbecount

Hope this helps.

Automatic Closing of purchase request in X3

$
0
0

Purchasing -> Purchase request -> Close Purchase request -> Automatic Closing

This function is used to close in bulk a selection of Purchase requests entered in the Purchase requests function.

Pre-requisite

An authorization can be granted for this function to limit the processes to a company or a site.

The following options can be activated or de-activated for each user:

  •   All requesters

The PRs to be processed are selected on the basis of the following criteria:

  • Company
  • Site
  • Requester (selection among the users)
  • Date range (PR creation date)
  • Range on the number of the PR to be processed

The log file flag is used, when checked, to obtain a summary of all the validated journals at the end of processing.

When the close function is launched, the pre-commitments generated by the PRs are reversed (in negative amounts).

ClosePR1

ClosePR2


Updating Price Reason with user defined value

$
0
0

While creating the transactions like sales order, sales quote etc. the price of the product can be standard, manual or the customized one. X3 provides the functionality through which user can find whether the price is list price, manual or customized.

After entering the transaction line right click on the particular line and select “Price Explanation” (refer below screen shot).

PrcExp-1

Clicking on “Price Explanation” will display the screen showing the reason of the price.

PrcExp-2

Clicking on “Price Explanation” will display the screen showing the reason of the price.


How to include crystal report with patch in x3

$
0
0

Whenever we develop any report in X3 and we need to include the same in patch. We would need to check for the objects which needs to be considered while creating the patch. We would like to help you in getting these objects, kindly refer the below points.

  • ARV: It is an object code for report to run the ETAT process.
    • ETAT:It is a standard process to print a crystal report

It includes a process such as :

  1. ALIMETAT: is called by a few processes associated to the reports to extract the information that can be printed repor tmore easily.
  2. PRINT : Can be used to modify the name of the report to be printed
  • ARX:It is a object code used for  report code
    • EXTCOD: It is a code or name of  a report

Please refer to the below screenshot, which will clarify the object need to be added in the patch for Crystal Reports:

Crystal

Protecting Customized Mod through Code

$
0
0

In one of our previous blog named “How to check ‘Active’ Activity Code” we discussed deactivation of the Activity Code. There we looked on for checking of the active Activity Code through global variables. We can implement the same logic directly through code also.

 There may be scenario when we write the code for different customization in single processing file and we have to deactivate one of the customization or else this may lead to crashing of code. We can protect our customized code through an Activity Code by using function as shown in below screen shot. Here ‘ZEINT’ is the Activity code that we are referring.

ActivityCode-1

Here we need to use a simple function ‘afnc’. It is used to define a function code of the software in order to be able to use it. The function codes, referenced in a dedicated table of the dictionary, can also be found via the tooltips on a user menu, or by looking at the value of the GFONCTION variable via the calculator, when connected to the function.

Hope this Helps!!

Customer Balances resynchronization in X3

$
0
0

 In sage x3 we can resynchronize the customer balance using the functionality ‘Customer Balance resynchro’. This functionality is to resynchronize the financial credit level of customers by company and by customers from documents by Sales Module.

 It also helps us to resynchronize by customer the last document created.

 Path to reach:Sales >> Utilities >> Customer Balances resynchro

 Enter the company and click on ok as per screen

resyn-1

resyn-2

Sub contract Transfer in X3

$
0
0

The function is to intervene on stock line or group of stock line to transfer to the Supplier location.

Functional Path: Inventory Receipt/issue Transaction>> Sub Contract Transfer

This functionality gets covered by selecting the stock of a product.

First we create a miscellaneous receipt for a product then in sub contract transfer screens stock selections appears in browser selection. Select Site and subcontractor and its location ,select product select the stock of product from browser selection, click on Lot ,then products allotted to  product get appeared in stock lines.

subcontract-1

Hope this helps.

Viewing all 1519 articles
Browse latest View live


<script src="https://jsc.adskeeper.com/r/s/rssing.com.1596347.js" async> </script>