Quantcast
Channel: Sage X3 – Tips, Tricks and Components
Viewing all 1520 articles
Browse latest View live

Headings, Variables and Totals in Sage X3 People

$
0
0

In Sage X3 People Headings, Variables and Totals plays an important role to Process Salary, Leave Life Cycle and to store the data as per the Employee.

HEADINGS:-

Headings are used to define payroll calculations. The Sequence of the calculations to be performed in the payroll run is defined on the heading. A total of 99,999 headings can be defined in payroll plan.

Sage provides a list of pre-defined headings in the payroll plan provided in the Reference folder.

Navigate to: Setup → Payroll Plan → Headings

heading in Sage X3 People

VARIABLES:-

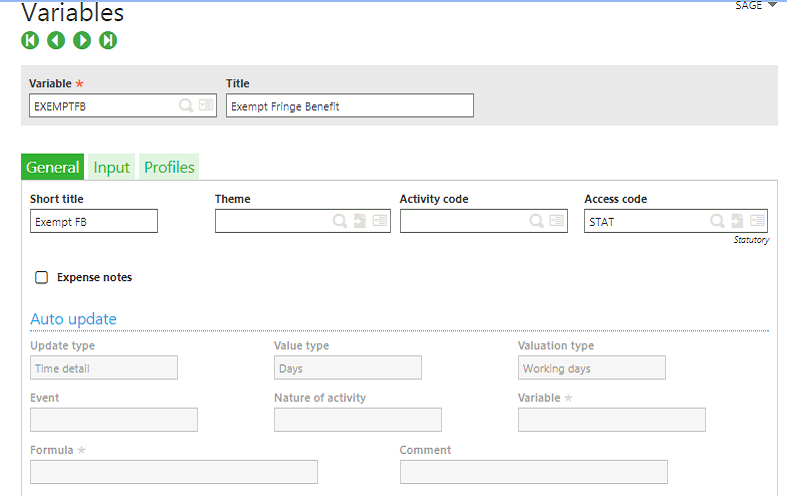
Variables must be defined for any input to be done for the payroll. Variables define input values that can be used in calculations defined on payroll headings.

Navigate to: Setup → Payroll Plan → Variables

Variables in Sage X3 People

TOTALS:- 

Totals are used to ensure that each heading has the correct effect on a payslip. Whether it is to increase or deduct or have no effect other than record keeping. Linking correct totals to a heading will be subject to your own scrutiny.

Navigate to: Setup → Payroll Plan → Totals


How to add report in any entry transaction

$
0
0

You may come across the situation where we have to add report any particular entry transaction and which will not be visible in any other entry transaction for example we want any report to get displayed in payment using cheque screen only,  to do so

Go to the set up >> Payment entry transaction >>

Select a transaction, in steps tab, print out section add report in this example its ZACHI which is for cheque Issued save and validate.


Top 10 Stories of Greytrix 2017

$
0
0

As 2017 nears its end, we take a moment to summarize, compile and bring to you the top stories that shaped Greytrix in the year 2017 making it not just a global ERP – CRM solutions provider but offering solutions that assist businesses in being a step closer to their customers. Greytrix with a transcending knowledge base has been providing tips and tutorials, insights on the various Sage accounting solutions such as Sage ERP – (Sage X3 | Sage 300 | Sage 100 | Sage 500) and customer relationship management solutions that include (Sage CRM | Salesforce), how businesses can gain a 360 degree view of their accounting, sales, marketing, operations by their very own bi-directional data integration framework – GUMU™.

Discover the 10 most popular articles that people visited over and over in the year 2017 to understand more about the expanse of Greytrix in the domain of ERP – CRM covering topics such as Sage Summit 2017, the newly developed Sage X3 add-ons: Catch Weight and Letter of Credit, the benefits of ERP CRM integration, and how businesses can make optimum use of the Sage CRM with Greytrix Business Manager.

1) Rockstar ISV

Greytrix on-boards the Sage Global Rockstar ISV Program for GUMU™ Sage CRM – Sage X3 Integration – the highest accolade for ISV partners from Sage making it easy for Sage partners, customers and employees to implement, access and support business with the powerful products by the ISV. Greytrix GUMU™ connector for Sage X3 – Sage CRM with the Rockstar status in Sage integration area provides seamless and 360° integrations for better business operations, customer acquisition, nurturing and retention. Read More

2) Greytrix Sage X3 v11

With competition intensifying the ERP software market, Sage has been persistent in offering versatile and multi-faceted tools that assist small, medium and large enterprises to effectively manage their business. What does the new version of Sage X3 – version 11 will bring to your business? Read More

3) Sage CRM 2017 Version

Customer Relationship Management (CRM) is amongst the most valuable systems that businesses can implement. Enterprises have realized that the fastest way to increase sales and profits is by investing in CRM and using it to put the customer at the heart of their business. Get insights on what does the new Sage CRM 2017 version has in store for your customers. Read More

4) Sage X3 Add-ons: Catch Weight | Letter of Credit

Sage X3 ERP – is the choice of next-generation enterprise’s to stay ahead of the competition. However, going beyond ERP and looking at the broader perspective of any business, understanding the reason and objective of an ERP for unique requirements of your business and aligning the best infrastructure of ERP application becomes the necessity. Explore the new additions in the Sage X3 segment, and get insights on the benefits of using Catch Weight and Letter of Credit to address specific business challenges with extended functionalities. Read More

5) Sage CRM Project Manager Compatible with the new Sage CRM 2017

This article focuses on consolidating business processes onto a single application i.e. Sage CRM, which already has capabilities to link your marketing automation, case management, and nurture leads. Sage CRM can also expand into different areas of the business to help acquire a new customer, cross-sell and engage with them to nurture and manage internal business operations. Read More

6) Sage Summit 2017

This year, Sage entrenched its roots wider and deeper by revamping into series of local events, by evolving their annual Sage Summit conference into multiple events, named as “Sage Summit Tour”. Greytrix took this opportunity to introduce our Reseller Partners and customers, the enhanced performance capabilities of our award winning GUMU™ framework crafted to empower your business. Read More

7) Sage Live Fixed Assets

With the recent listing in Sage Marketplace, Greytrix Fixed Assets add-on for Sage Live is the first unique add-on developed to simplify asset accounting by seamlessly integrating it with your Sage Live accounting software. Read More

8) Sage CRM Business Manager

This article focuses on consolidating business processes onto a single application i.e. Sage CRM, which already has capabilities to link your marketing automation, case management, and nurture leads. Sage CRM can also expand into different areas of the business to help acquire a new customer, cross-sell and engage with them to nurture and manage internal business operations. Read More

9) The Benefits of ERP – CRM Integration

Today, businesses desire agility to address customer needs. To capitalize on the speed to fulfill customer’s growing needs, enterprises are moving beyond traditional business models and looking forward to engrain integration intelligence into their IT systems. Businesses use various management systems such as ERP, CRM, HCM, Sales, HRMS and email for smooth business operations. However, due to their distinctive architecture, they are widely used as independent systems which lead to the biggest blockade to an agile business – Storage and Data flow. How can businesses advance further with GUMU™ integrated ERP – CRM system? Read More

10) Playlist for GUMU™ Installation and Configuration for Sage X3 – Sage CRM

Taking a step further in addressing the installation and configuration needs for Sage X3 and Sage CRM, Greytrix has come up with a playlist that covers all the important parameters and requirements for installing the GUMU™ connector and its configuration at both the Sage CRM side and the Sage X3 side. Click here to watch the installation and configuration video of GUMU™ connector for Sage CRM and Sage X3.

How to Fetch Data Quickly From Tables

$
0
0

While coding in any programming language, we often use loops like for,while etc. Basically, loops are performed in two cases:

* Read loops on database tables or joins.
* Loops on index values or on a list of values.

Sage X3 provides two special key words to fetch the required data more quickly. Two of them are as follows:

1. First : It is used as a read or update option to define the first record in the key order.

For eg., Below Sales order ‘SONDE0110031’ has three lines. We have fetched first line.

Kindly refer fig. FirstRecordOut for the same.

Fetch Data Quickly From Tables

fig. FirstRecord       

Output:

First Record Output

2. Last :  It is used as a read or update option to define the Last record in the key order.

For eg., Here, we have fetched the last record from the same sales order as above.

Last Record

Output:

Last Record output

Thus, we can fetch the very first and last record from the table using respective key words.

Hope this helps!


About Us

Greytrix is a one stop solution provider for Sage ERP and Sage CRM needs. We provide complete end-to-end assistance for your technical consultations, product customizations, data migration, system integrations, third party add-on development and implementation expertise.

Greytrix has some unique solutions of Sage X3 integration with Sage CRMSalesforce.com and Magento eCommerce along with Sage X3 migration from Sage 50 US, Sage Pro and QuickBooks.  We also offer best-in-class Sage X3 customization and development services to Sage business partners, end users and Sage PSG worldwide.

For more information on Sage X3 Integration and Services, please contact us at x3@greytrix.com. We will be glad to assist you.

How to know current function by its internal number

$
0
0

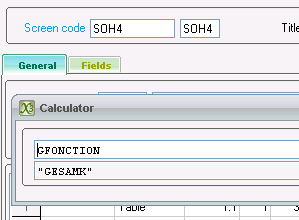
In Sage X3, GFONCTION returns the name of the current function. Menchoix returns the internal number of that function.
“Menchoix” identifies the current function by its internal number. This variable is only used by the supervisor.
Whenever you exit menu management via the ONevent ITM_MENU instruction, the menchoix variable is loaded by the function selected.

menchoix value in calculator

Img 1: menchoix value in calculator

GFONCTION value  in calculator

Img 2: GFONCTION value  in calculator

Hope this helps.


About Us

Greytrix is a one stop solution provider for Sage ERP and Sage CRM needs. We provide complete end-to-end assistance for your technical consultations, product customizations, data migration, system integrations, third party add-on development and implementation expertise.

Greytrix has some unique solutions of Sage X3 integration with Sage CRMSalesforce.com and Magento eCommerce along with Sage X3 migration from Sage 50 US, Sage Pro and QuickBooks.  We also offer best-in-class Sage X3 customization and development services to Sage business partners, end users and Sage PSG worldwide.

For more information on Sage X3 Integration and Services, please contact us at x3@greytrix.com. We will be glad to assist you.

How to allow transferred of product text to the sales related documents

$
0
0

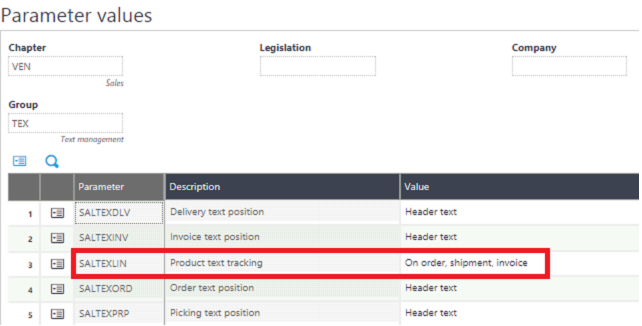
In Sage X3, we have functionality to add the comment and some product text at the detail level. Product text parameter (SALTEXLIN) allow to transferred text to the sales related documents.

  1. The sales text – This text is displayed on each document line. It will be printed on those documents to be sent to the customers.
  1. The Picking ticket text – This text is only present on the deliveries. It is only to be used internally to specify the preparation instructions for a product. This text will be printed on the picking tickets.

The Sales or Picking tickets texts are defined either globally on the product or by customer product.

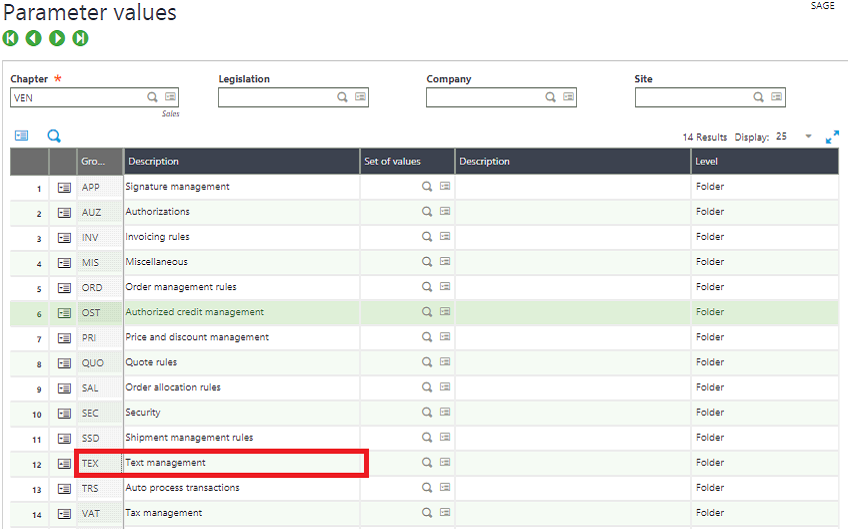
Navigation :  Setup > General Parameters > Parameters Values

Parameter values Screen

      Fig.Parameter values Screen

Parameter values detail Screen

Fig.Parameter values detail Screen


About Us

Greytrix is a one stop solution provider for Sage ERP and Sage CRM needs. We provide complete end-to-end assistance for your technical consultations, product customizations, data migration, system integrations, third party add-on development and implementation expertise.

Greytrix has some unique solutions of Sage X3 integration with Sage CRMSalesforce.com and Magento eCommerce along with Sage X3 migration from Sage 50 US, Sage Pro and QuickBooks.  We also offer best-in-class Sage X3 customization and development services to Sage business partners, end users and Sage PSG worldwide.

For more information on Sage X3 Integration and Services, please contact us at x3@greytrix.com. We will be glad to assist you.

How to Validate Customer addresses in bulk in Sage X3

$
0
0

In Sage X3 we can enter the addresses of entities as Company, Site and all the BP entities (BP, Prospect, Customer, Supplier, Carrier and Sales rep).

In Sage X3, we can validate the entered addresses by verifying with ‘Sage Sales Tax’ by using the utility ‘Address validation’ to validate all or a range of sites and business partner addresses.

This utility will send the address validation to Sage Sales Tax (SST) only if the country is assigned to the LTA activity code.

Follow the below steps to enable this validation.

  1. Assign the country for which you want to verify the Addresses to the LTA activity code.
  2. Navigate to: All > Common data > BPs > Utilities > Address validation

Address validation screen

  1. Select the checkbox to select particular values in the selection criteria.
  2. Select site
  3. Select customers
  4. Select prospect
  5. Select leads
  6. Select check box ‘Log file’, if you want to generate a log. Refer above screenshot.
  7. Click on OK
  8. A log will be generated to show all the addresses which got validated.

Hope this blog helps!


About Us

Greytrix is a one stop solution provider for Sage ERP and Sage CRM needs. We provide complete end-to-end assistance for your technical consultations, product customizations, data migration, system integrations, third party add-on development and implementation expertise.

Greytrix has some unique solutions of Sage X3 integration with Sage CRMSalesforce.com and Magento eCommerce along with Sage X3 migration from Sage 50 US, Sage Pro and QuickBooks.  We also offer best-in-class Sage X3 customization and development services to Sage business partners, end users and Sage PSG worldwide.

For more information on Sage X3 Integration and Services, please contact us at x3@greytrix.com. We will be glad to assist you.


How to create back to back orders in bulk

$
0
0

In some industries the supply is totally depends on the demand for selective products. For these products whenever the sales order is created, the user creates a purchase order to fulfill the sales order. In such scenarios, the product is not stocked in-advance but purchased on demand and sold simultaneously. As soon as the product is received, it is delivered to the customer.

This process can be easily done by using the ‘Back-to-back’ functionality of Sage X3. Refer below link for the blog on the same.

Back-to-back-order or Drop Shipment Setup in Sage ERP X3

Now in this process, suppose if you have created more than one back-to-back type of sales orders and now you want to create the purchase orders on them then follow below steps-

  1. Check that Sales order product source is ‘PO – Direct to customer’

Sales order screen

  1. Navigate to : Purchasing >> orders >> Back-to-back orders

back to back order in bulk

  1. On the screen , enter sales order numbers for processing , you can also use other filters such as Customer , Site
  2. There is also an option to print the orders.

Back to back orders screen

  1. Now, if the Purchase orders are successfully created, then it can be also seen in the generated log.

Log screen

  1. Note that if the sales orders are identical with same supplier, site and product then only one purchase order is created with all the appended lines.

Hope this helps!

About Us

Greytrix is a one stop solution provider for Sage ERP and Sage CRM needs. We provide complete end-to-end assistance for your technical consultations, product customizations, data migration, system integrations, third party add-on development and implementation expertise.

Greytrix has some unique solutions of Sage X3 integration with Sage CRMSalesforce.com and Magento eCommerce along with Sage X3 migration from Sage 50 US, Sage Pro and QuickBooks.  We also offer best-in-class Sage X3 customization and development services to Sage business partners, end users and Sage PSG worldwide.

For more information on Sage X3 Integration and Services, please contact us at x3@greytrix.com. We will be glad to assist you.


How to find the status of any cheque

$
0
0

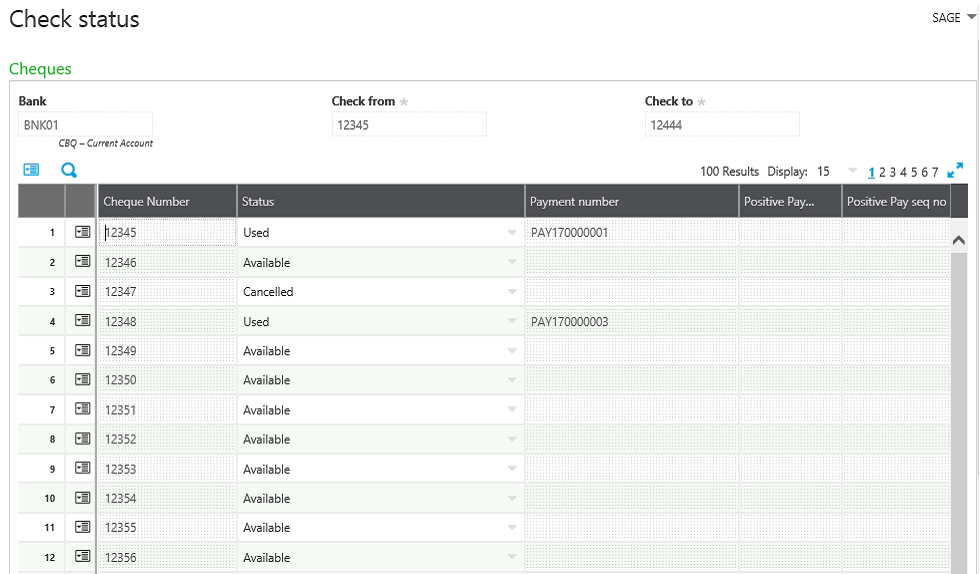
While printing any cheque you may come across the situation where you need to find out the status of the cheque number whether it’s available to use or not.

To find the status of cheque number go to common data>>Bank Account

Go to Cheque tab, click on check book after this click on the action button and click check status

cheque tab

As shown is below screen shot we can view the status of cheque Used available or cancelled.

Check Status Screen

About Us

Greytrix is a one stop solution provider for Sage ERP and Sage CRM needs. We provide complete end-to-end assistance for your technical consultations, product customizations, data migration, system integrations, third party add-on development and implementation expertise.

Greytrix has some unique solutions of Sage X3 integration with Sage CRMSalesforce.com and Magento eCommerce along with Sage X3 migration from Sage 50 US, Sage Pro and QuickBooks.  We also offer best-in-class Sage X3 customization and development services to Sage business partners, end users and Sage PSG worldwide.

For more information on Sage X3 Integration and Services, please contact us at x3@greytrix.com. We will be glad to assist you.


How to find the username of the current user

$
0
0

In Sage X3,You may come across a scenario where you have to use the user name of the current user logged in,standard stores the name of the current user name in a global variable ‘GNOMUSER’.

This global variable can be used in the code file if we have to use the name of the user and store it in table.

As shown is below screen shot we can check the username in calculator.

Display of username in calculator

Hope this blog helps!

About Us

Greytrix is a one stop solution provider for Sage ERP and Sage CRM needs. We provide complete end-to-end assistance for your technical consultations, product customizations, data migration, system integrations, third party add-on development and implementation expertise.

Greytrix has some unique solutions of Sage X3 integration with Sage CRMSalesforce.com and Magento eCommerce along with Sage X3 migration from Sage 50 US, Sage Pro and QuickBooks.  We also offer best-in-class Sage X3 customization and development services to Sage business partners, end users and Sage PSG worldwide.

For more information on Sage X3 Integration and Services, please contact us at x3@greytrix.com. We will be glad to assist you.

How to enable the attachment for Expenses and Leave

$
0
0

Go to Administration function within the portal the put ADDPJ as “True”.

enable the attachment for Expenses and Leave

For expenses

enable the attachment for Expenses and Leave

After that, you will be able to attach document if you have save you document as a draft.

About Us:

Greytrix Africa– Sage Premier Gold Development Partner is a one-stop solution provider for all your Sage ERP and Sage CRM needs. Greytrix Africa is a consulting company that offers solutions across verticals which include accounting and business management, financial reporting, ERP, CRM, HRMS and EDI.

As one of the leading Sage certified X3 Partner, we have a strong sales and implementation industry presence. We offer scalable software development resource for customizations and enhancements within Sage X3. In addition to the Sage X3 development services which we provide to our end customers; our Channel Partners considered us as “Go-To” resource for custom Sage X3 solutions. Thereby, enabling Greytrix to rapidly introduce new products and solutions to the market.

For more information on Sage X3 Consulting Services, please contact us at consulting@greytrix.com .We will be glad to assist you.

How to find Database size of your folder

$
0
0

You may come across the situation where you would like to know the database size of the folder or amount of space utilized by the folder in the database. Sage x3 has a special feature of getting database size of particular folder in the screen.

New StuffHow to define filter criterion on database query in Sage X3

Just navigate to Developments>Utilities>Verifications>Database> Table reports

As shown in the below Image

Table report screen

          IMG 1.1  Table report screen

And then click “Ok” button.

On Click of ok button At the bottom of the screen you will get the calculated databse size of your folder. As shown in below image.

Table report screen

          IMG 1.2  Table report screen

Hope this Helps!

About Us

Greytrix is a one stop solution provider for Sage ERP and Sage CRM needs. We provide complete end-to-end assistance for your technical consultations, product customizations, data migration, system integrations, third party add-on development and implementation expertise.

Greytrix has some unique solutions of Sage X3 integration with Sage CRMSalesforce.com and Magento eCommerce along with Sage X3 migration from Sage 50 US, Sage Pro and QuickBooks.  We also offer best-in-class Sage X3 customization and development services to Sage business partners, end users and Sage PSG worldwide.

For more information on Sage X3 Integration and Services, please contact us at x3@greytrix.com. We will be glad to assist you.

How to attach Totals to Heading (Sage X3 People)

$
0
0

In our recent blog “Headings, Variables and Totals in Sage X3 People”  we have discussed about Headings, Variables and Totals. Now we are going to see How to Attach Totals to Heading.

TOTALS:-

Totals are used to ensure that each heading has the correct effect on a payslip. Whether it is to increase or deduct or have no effect other than record keeping. Linking correct totals to a heading will be subject to your own scrutiny.

“Generally Totals are use to Store, Deduct or Sum the Amounts calculated as per the Heading.”

Navigate to: Setup → Payroll Plan → Headings → Amounts → Totals.

Totals to Heading in Sage X3

Fig. Attached Total To Heading

sage x3 totals to headings

Fig. RTZ(+,-)

+Employee’s share:- To Add the Amounts in the Total calculated as per the Heading.

-Employee’s share:- To Deduct the Amounts in the Total calculated as per the Heading.

About Us

Greytrix is a one stop solution provider for Sage ERP and Sage CRM needs. We provide complete end-to-end assistance for your technical consultations, product customizations, data migration, system integrations, third party add-on development and implementation expertise.

Greytrix has some unique solutions of Sage X3 integration with Sage CRMSalesforce.com and Magento eCommerce along with Sage X3 migration from Sage 50 US, Sage Pro and QuickBooks.  We also offer best-in-class Sage X3 customization and development services to Sage business partners, end users and Sage PSG worldwide.

For more information on Sage X3 Integration and Services, please contact us at x3@greytrix.com. We will be glad to assist you.

How to enable LOT field in the purchase receipt screen

$
0
0
In Sage X3, we may come across a scenario where we want to enter data manually in the Lot field. To solve this functionality: Step1: Navigate to: Common Data → Products → Products Category → Receipts Now, in the Management Rules set the Lot entry as ‘Free’ in the Supplier Receipt type. Refer Below screen… Read More »

How to add comments for a product line in PO

$
0
0

We have came across the scenario where we need to add detail comment to a purchase order product. For which Sage has provided a default functionality known as line TEXT.

product line in PO

Img: Purchase – Orders – Order

Click on Text to add comments to purchase order product. These can be formatted using the functionalities provided in the header bar of product line Text.

add comments in PO

 Img: Purchase – Orders – Order – Text

Hope this Helps.

About Us

Greytrix is a one stop solution provider for Sage ERP and Sage CRM needs. We provide complete end-to-end assistance for your technical consultations, product customizations, data migration, system integrations, third party add-on development and implementation expertise.

Greytrix has some unique solutions of Sage X3 integration with Sage CRMSalesforce.com and Magento eCommerce along with Sage X3 migration from Sage 50 US, Sage Pro and QuickBooks.  We also offer best-in-class Sage X3 customization and development services to Sage business partners, end users and Sage PSG worldwide.

For more information on Sage X3 Integration and Services, please contact us at x3@greytrix.com. We will be glad to assist you.


How to configure portal expense claims

$
0
0

1. Setup variable to be updated.

configure portal expense claims

Note: Uncheck Expense notes

2. Setup Variable for a portal default value as well as the maximum allowable value to be claimed via the portal.

These can be configured as separate variables or can comprise the same variable.

Setup Variable for a portal default value

company or folder level inputs

3. Input the default and maximum values.

Access either folder values or company values and input the default and the max values

Input the default and maximum values

4. Create an Expense code.

This will be the option available to the employee to select from via the portal.

Create an Expense code

expense codes

Validity- If you intend to only allow this claim during a certain date.

Default Value- Default Portal Value must be linked to the variable created. If this is left blank there will be no default

Cap- Maximum Value must be linked to the variable created for this purpose. If this is left blank there will be no maximum applied (very dangerous to ignore!)

5. Add a Pay Preparation Variable.

This is required so as to advise X3 which already configured pay plan variables are available for use as portal expense claim variables.

Pay Preparation Variable

Pay list of variables

Note: Select LISEXS and click Variables tab. Add the variables to be updated hear.

6. Configure expense note transfer

This is required to link the applicable variables to the expense codes and also to advise which column in the portal updates the variable (eg. Quantity or Amount)

expense note transfer

Configure expense note transfer

Note: In services select the code and In Variable code select the applicable variable. Only variables defined as pay preparation variables in the previous step will be available for selection here.

update the variable in X3

Note: The data in Amount element column is displaying here. This tells X3 which value in the portal must update the variable in X3.

configure portal expense claims

About Us

Greytrix Africa– Sage Premier Gold Development Partner is a one-stop solution provider for all your Sage ERP and Sage CRM needs. Greytrix Africa is a consulting company that offers solutions across verticals which include accounting and business management, financial reporting, ERP, CRM, HRMS and EDI.

As one of the leading Sage certified X3 Partner, we have a strong sales and implementation industry presence. We offer scalable software development resource for customizations and enhancements within Sage X3. In addition to the Sage X3 development services which we provide to our end customers; our Channel Partners considered us as “Go-To” resource for custom Sage X3 solutions. Thereby, enabling Greytrix to rapidly introduce new products and solutions to the market.

For more information on Sage X3 Consulting Services, please contact us at sales@greytrix.com .We will be glad to assist you.

Adding Graphical requester in Interactive Dashboard

$
0
0

To create Graphical Requester, follow below steps.

Step 1: Create graphical requester.

Set up → Usage → Report → Graphical Query tool

Graphical requester screen

1.1 Graphical requester screen

Step 2 : Create Menu Item.

Navigate to Administration → Authoring → Pages → Menu

Menu item screen

1.2 Menu item screen

As shown in above screenshot, we have created menu item with Link type as ‘QUERY’ and select Graphical requester query in i.e. ‘ZCUST’ in Query name field.

Step 3 : Create home page.

Navigate to Administration → Authoring → Pages → Home pages

1.3 Home page screen

As shown in above screen shot we have created home page ‘CUSTOMER_DETAILS’ and selected menu item ‘ZCUSTOMER’ in Gadgets field.

Step 4 : Create  New Landing page.

select landing page

1.4 Select landing page

Select option Queries as shown in below screenshot.

New Gadget- Query selection screen

1.5 New Gadget- Query selection screen

Select gadget as shown in below screenshot.

Add new gadgets screen

1.6 Add new gadgets screen

sage x3 integration services

How to assigns a default format to each type of field

$
0
0

In this blog, we will look how to assign a default format to each type of field and allows you to modify them. Adxfmt is an Adonix system variable of the table of 8 Char of 255 characters, which provides a default format according to the type of field of the file managed.

Syntax:  [S]adxfmt(255)(8)Char

Example: #Replace it with floating digits

[S]adxfmt(5) = “15F”

Below are the various indexes of asxfmt and the default value to initialize.

Index Field Type Value
0 Description ##
1 Short Integer 5#
2 Long Integer 10#
3 Decimal 9.2
4 Floating 5.2
5 Dual Precision 9.2
6 Alphanumeric X
7 Date DD2

Note:

 adxfm is usually set by one of the processes called  “APL” that is launched when you start up the application. Otherwise, the default values will be saved.

About Us

Greytrix is a one stop solution provider for Sage ERP and Sage CRM needs. We provide complete end-to-end assistance for your technical consultations, product customizations, data migration, system integrations, third party add-on development and implementation expertise.

Greytrix has some unique solutions of Sage X3 integration with Sage CRMSalesforce.com and Magento eCommerce along with Sage X3 migration from Sage 50 US, Sage Pro and QuickBooks.  We also offer best-in-class Sage X3 customization and development services to Sage business partners, end users and Sage PSG worldwide.

For more information on Sage X3 Integration and Services, please contact us at x3@greytrix.com. We will be glad to assist you.

How to change the standard Module name?

$
0
0

Have you came across a scenario where you want to change the name of  “Module and Sub Module”.

Module and Sub Module

Image 1: Home Page

Navigate To: Administrator>Authering>Navigation Page

standard Module name

Image 2: Pages

Now Edit the Home Page content.

change the standard module name

Image 3

Edit module name like “Orders to sales orders”.

Orders to sales orders

Image 4: Navigation Pages

Now, you can check the names of Module and sub module.

Navigation Pages

Image 5: Navigation Pages

Hope this helps.

About Us

Greytrix is a one stop solution provider for Sage ERP and Sage CRM needs. We provide complete end-to-end assistance for your technical consultations, product customizations, data migration, system integrations, third party add-on development and implementation expertise.

Greytrix has some unique solutions of Sage X3 integration with Sage CRMSalesforce.com and Magento eCommerce along with Sage X3 migration from Sage 50 US, Sage Pro and QuickBooks.  We also offer best-in-class Sage X3 customization and development services to Sage business partners, end users and Sage PSG worldwide.

For more information on Sage X3 Integration and Services, please contact us at x3@greytrix.com. We will be glad to assist you.

How to secure MongoDb in Sage X3

$
0
0

We may came across a scenario where we want to secure a mongodb service. We can achieve this functionality by using below steps:

Uninstall mongodb service.now re-install MongoDB with SSL certificate checkbox checked. This will generate “client.pem” file to secure MongoDB access.

Secure MongoDb

Re-install MongoDB service

After re-installation of MongoDB, “Client.pem” file will generate in D:\Sage\Syracuse\syracuse\certs\mongodb(In this case I have install mongodb in D drive)

Path of client.pem file

Path of client.pem file

Now to secure mongodb download and install Robomongo tool.

After installation below screen will display.Go to file > Connect.

Connect to robomongo

Connect to robomongo

After click on create button MongoDb connection screen will display.Click on create button.

After click on create button below screen will display.create a connection by using required details.(refer below screenshot).

Robomongo set-up screen

Robomongo set-up screen

Select a client.pem file which we have generated before and enter the passphrase of syracuse user. Then click on test button. If all the data user have entered is correct then below window will pop-up.

Test connection screen

Test connection screen

Now click on save button and then click on connect button.After user click on create button click on create button it will ask for passphrase (Enter the passphrase of syracuse user).It will ask everytime whenever user tries to connect.(Refer below screenshot)

secure MangoDb

This way you have secured MongoDb service.

Hope this helps.

About Us

Greytrix is a one stop solution provider for Sage ERP and Sage CRM needs. We provide complete end-to-end assistance for your technical consultations, product customizations, data migration, system integrations, third party add-on development and implementation expertise.

Greytrix has some unique solutions of Sage X3 integration with Sage CRMSalesforce.com and Magento eCommerce along with Sage X3 migration from Sage 50 US, Sage Pro and QuickBooks.  We also offer best-in-class Sage X3 customization and development services to Sage business partners, end users and Sage PSG worldwide.

For more information on Sage X3 Integration and Services, please contact us at x3@greytrix.com. We will be glad to assist you.

Viewing all 1520 articles
Browse latest View live


<script src="https://jsc.adskeeper.com/r/s/rssing.com.1596347.js" async> </script>