Quantcast
Channel: Sage X3 – Tips, Tricks and Components
Viewing all 1524 articles
Browse latest View live

How to assign Lot No in Shipment level Packages

$
0
0

If we want to enable the Lot No in packages screen we need to perform below setup.
In the Product → Product site → Management tab we have option packaging stock which needs checked.

Lot No in Shipment level Packages

After performing the above flag option we will be able to view allocated Lot no in packaging screen which is present in the Shipment Detail line.
Below is the Shipment screen in which lot is allocated for the product.

lot no Shipment screen

When creation is complete we will be able to view the lot allocation in the packaging screen as below.

lot allocation in the packaging screen

If we will not set flag of stock, we will not be able to view the allocated lot in the packaging screen.


Hope this helps.

About Us:

Greytrix is one stop solution provider for Sage ERP and Sage CRM needs. We provide complete end-to-end assistance for your technical consultations, product customizations, data migration, system integrations, third party add-on development and implementation expertise.

Greytrix have some unique solutions of Sage X3’s integration with Sage CRMSalesforce.com and Magento eCommerce. It also offers best-in-class Sage X3 customization and development services to Sage business partners, end users, and Sage PSG worldwide.

For more information on Sage X3 Integration and Services, please contact us at x3@greytrix.com .We will be glad to assist you.

Also read:


Webinar Invite: Time to move your store loyalty online using GUMU™ Integration for Magento with Sage X3

$
0
0

The online eCommerce business is surging while complimenting the traditional brick and mortar stores. This growth in the online storefront has necessitated enterprises to integrate their web store with business management systems like Sage X3 that take care of accounting, orders, inventories, sales etc.

At Greytrix we recognize that our GUMU™ integration for Magento with Sage X3 can offer you matchless potential by providing your online store with 360⁰ customer interaction and interfaces for seamless operations of Sage X3 – ERP and web store activities. We design, build, host and support B2B and B2C e-commerce websites that integrate with Sage X3 ERP and also provide you with number of optional enterprise-class upgrades and customizations for your Magento platform.

You can now curb the challenges of redundant manual data entry errors, streamlining inventory synchronization, increase customer satisfaction and improve productivity by integrating your Magento webstore with Sage X3 ERP using GUMU™ connector. Join our webinar on 18th January 2017 between from 1:00 – 1:30 PM US EST and make your Business “Always-Available!”

Register Now


Date – Wednesday, 18th January 2017 | Time: 1:00 – 1:30 PM US Eastern Time

magento and sage x3 integration

Webpage | Blog

See you in the Webinar!

Banking Position Inquiry in Sage X3

$
0
0

We may come across a scenario where we want to know Balance of a company by the Bank filter. In Sage X3 this functionality can be achieved by the “Banking Position” Inquiry Screen, which includes Accounting, Sales and Purchase cash forecast management.

This Inquiry screen displays Initial balance, the previous open items and all types of cash forecast.

Navigate:- A/P-A/R accounting – Inquiries – Banking Position

Select Company

Banking Position Inquiry in Sage X3
Select Bank for Inquiry

Banking Inquiry in Sage X3

Click on Search

Click on search banking position inquiry

Search result is displayed in Consolidated format as below

Sage X3 Banking Position Inquiry resultsThis Search result can also be seen in Graphical format

Tick Graph Checkbox

Banking Position Inquiry Graphical format

Banking Position Inquiry Graphical format

Hope this helps!


About Us:

Greytrix is one stop solution provider for Sage ERP and Sage CRM needs. We provide complete end-to-end assistance for your technical consultations, product customizations, data migration, system integrations, third party add-on development and implementation expertise.

Greytrix have some unique solutions of Sage X3’s integration with Sage CRMSalesforce.com and Magento eCommerce. It also offers best-in-class Sage X3 customization and development services to Sage business partners, end users, and Sage PSG worldwide.

For more information on Sage X3 Integration and Services, please contact us at x3@greytrix.com .We will be glad to assist you.


Also Read:

Folder Validation Using Batch Process

$
0
0

You may have come accross a situation where Folder Validation gets interrupted due to user/browser timeout. For achieving uninterrupted folder validation, batch process can be used.

Example:

Let us assume that a Folder named “SEED” needs to be validated.

Now, to validate the folder using batch process, follow the following Steps:

1. Go to Usage>Batch Server.

2. Click on Query Submission.

3. Select the folder that needs to be validated; in our case, the folder is SEED.

4. In the Task Code field, select VALDOS.

5. Select the date and time when the folder validation needs to be initiated.

6. Click on Validation.

Folder Validation Using Batch Process

Hope this helps.


About Us:

Greytrix is one stop solution provider for Sage ERP and Sage CRM needs. We provide complete end-to-end assistance for your technical consultations, product customizations, data migration, system integrations, third party add-on development and implementation expertise.

Greytrix have some unique solutions of Sage X3’s integration with Sage CRMSalesforce.com and Magento eCommerce. It also offers best-in-class Sage X3 customization and development services to Sage business partners, end users, and Sage PSG worldwide.

For more information on Sage X3 Integration and Services, please contact us at x3@greytrix.com .We will be glad to assist you.


Also read: 

Change the theme in Sage X3

$
0
0

Sage X3 Version 9 provides an additional feature to change the theme. To successfully bring this functionality follow below steps:

Step no 1 – Navigate to open welcome panel.
Step no 2 – Select the Regional preference as per requirement.

Refer below Image:

Change the theme in Sage X3

Hope this helps!


About Us:

Greytrix is one stop solution provider for Sage ERP and Sage CRM needs. We provide complete end-to-end assistance for your technical consultations, product customizations, data migration, system integrations, third party add-on development and implementation expertise.

Greytrix have some unique solutions of Sage X3’s integration with Sage CRMSalesforce.com and Magento eCommerce. It also offers best-in-class Sage X3 customization and development services to Sage business partners, end users, and Sage PSG worldwide.

For more information on Sage X3 Integration and Services, please contact us at x3@greytrix.com .We will be glad to assist you.


Also Read:

How to set default import parameters in Sage X3

$
0
0

In Sage X3, you may come across a scenario where you may need to set the fixed path for archival and error directories of import files.

Generally, in Sage X3, data is imported using template functionality. It behaves in below two ways:

– If you import proper data file, then it will move to Final directory specified in parameter.

– If you import error data file, then it will move to Final directory and .err file of the same will be created in Error directory.


Sage X3 provides functionality  to set the default path for import/export:

Navigate to: Setup > Usage > Imports/Exports > Import / Export parameters

– Select directories as per your requirements.

– Refer the below screenshot for default import parameters:

parameters in Sage X3

Where,

Default directory: It is the default path from where the files will be imported.

Temporary directory: It contains the temporary import file during import process and deletes is after processing.

Final directory: All the import files will be copied to this path after process completion.

Error directory: It contains all the erroneous import files.


Hope this helps!
About Us:

Greytrix is one stop solution provider for Sage ERP and Sage CRM needs. We provide complete end-to-end assistance for your technical consultations, product customizations, data migration, system integrations, third party add-on development and implementation expertise.

Greytrix have some unique solutions of Sage X3’s integration with Sage CRMSalesforce.com and Magento eCommerce. It also offers best-in-class Sage X3 customization and development services to Sage business partners, end users, and Sage PSG worldwide.

For more information on Sage X3 Integration and Services, please contact us at x3@greytrix.com .We will be glad to assist you.

Also Read:

Quick Order Entry Add-On in Sage X3

$
0
0

Many a times in the various industries such as Manufacturing, Food & Beverage etc., we come across a situation where we are selling the same products to the same customers over a period of time wherein if you have an option to quickly create a Sales order and automatic creation of Delivery and Invoice, it will save time and efforts. To address this requirement, Greytrix has come up with the solution by adding a new screen for “Quick Order Entry”, Greytrix has come up with the solution by adding a new screen for “Quick Order Entry”


The benefits of Quick order entry are-

– Faster and efficient Sales order fulfillment by shortening time of delivery.

– Reducing time of Sales process.

– Reducing cost by improved cash flow.

– Resulting in less efforts, therefore more staff time for other activities such as customer support.

– Happier customers.


Below is the screenshot of the new screen introduced in Sage X3.

Quick order entry


The features of Quick order entry screen are-

– Order creation in 4 steps only.

– Visible inventory details of the product.

– Automatic Order line product capture.

– Automatic Delivery creation on order.

– Automatic Invoice creation on order.

– User friendly screen.

– Access to Payment option on the screen.


Following are the steps for Quick order entry

Navigate: Sales >> Orders >> Quick order entry

1. Select Site.

2. Select Customer.

3. Enter Product.

4. Enter Ordered Quantity.

5. Click on Create.


The Sales Delivery and Sales Invoice will be automatically created.

Sales Delivery and Sales Invoice

Hope this helps!


About Us:

Greytrix is one stop solution provider for Sage ERP and Sage CRM needs. We provide complete end-to-end assistance for your technical consultations, product customizations, data migration, system integrations, third party add-on development and implementation expertise.

Greytrix have some unique solutions of Sage X3’s integration with Sage CRMSalesforce.com and Magento eCommerce. It also offers best-in-class Sage X3 customization and development services to Sage business partners, end users, and Sage PSG worldwide.

For more information on Sage X3 Integration and Services, please contact us at x3@greytrix.com .We will be glad to assist you.

Sage X3–From regulatory compliances to offering quality assurances for Food & Beverage Industry

$
0
0

Food and Beverages Industry essentially produces products with short shelf life. This gets particularly challenging for the manufacturers, as it is mandatory for them to comply with stringent regulatory policies, maintain product consistency and quality assurance. In addition to these bottlenecks, manufacturers also have to combat recipe management, traceability with recall management, inventory management, packaging and brand integrity.

Greytrix Africa identifies these industry challenges and offers Sage X3 – ERP a versatile business management solution that eliminates the gaps in Food and Beverages industry. Greytrix – as one of the leading Sage certified X3 Partner, have a strong sales and implementation industry presence in African regions of Kenya, Tanzania, Rwanda, Ethiopia, and Uganda. We offer scalable software development resource for customizations and enhancements within Sage X3 especially required for Food and Beverages Industry. Greytrix has 16+ years of association with Sage. With a team of highly experienced and certified Sage X3 Techno- functional consultants, we ensure that customer requirements are always met.

With Sage X3, your industry can balance other important factors, minimizing maintenance costs, ease in auditing trials for inspection quality thus managing your bottom-line.

Sage X3 for Food and Beverage Industry in East Africa


sage x3 for food and baverage insustry

The features of Sage X3 for your Food & Beverage industry include:

  • Accurate procurement of raw materials
  • Packaging of products
  • Precise pricing and contract management
  • Expiry and shelf life management
  • Quality control of products from production, processing to finished products
  • Risk assessment of food products for its compliance under stringent food safety regulations
  • Fully integrated quality control
  • Specific gravity and weight calculations
  • Import Tracking
  • Finite Capacity scheduling to avoid cross-contamination


Benefits of using Sage X3 in your Food and Beverage industry:

  • Gives a holistic view of integrated aspects of your food and beverages business
  • Efficiently manages your recipes and formulation
  • Improves operational performance and bottom line costs
  • Optimum utilization of your inventories and offers streamlined operations within the organization
  • Manages packaging requirements
  • Introduces data consistency
  • Frees employees from routine tasks
  • Superior quality with compliance of regulations

To know more about Greytrix Kenya Sage X3 for Food and Beverage industry, write to us at:

sales@greytrix.com


How to define base quantity of Finished goods in Production BOM

$
0
0

Navigate: Common data>>BOMs>> Production BOM

1. Select a Parent product

2.Enter the mandatory fields’ details.

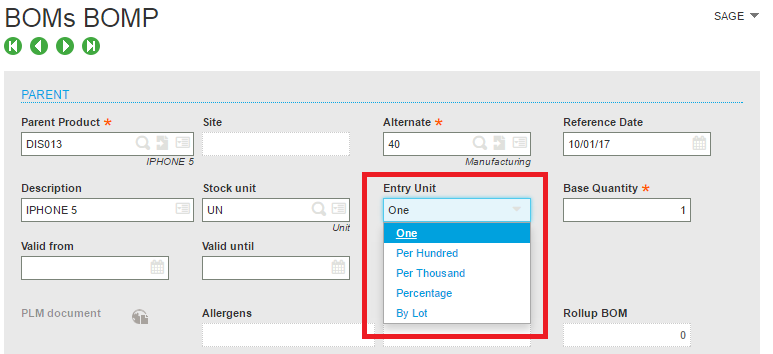
3.Select the entry unit.

define base quantity of Finished goods

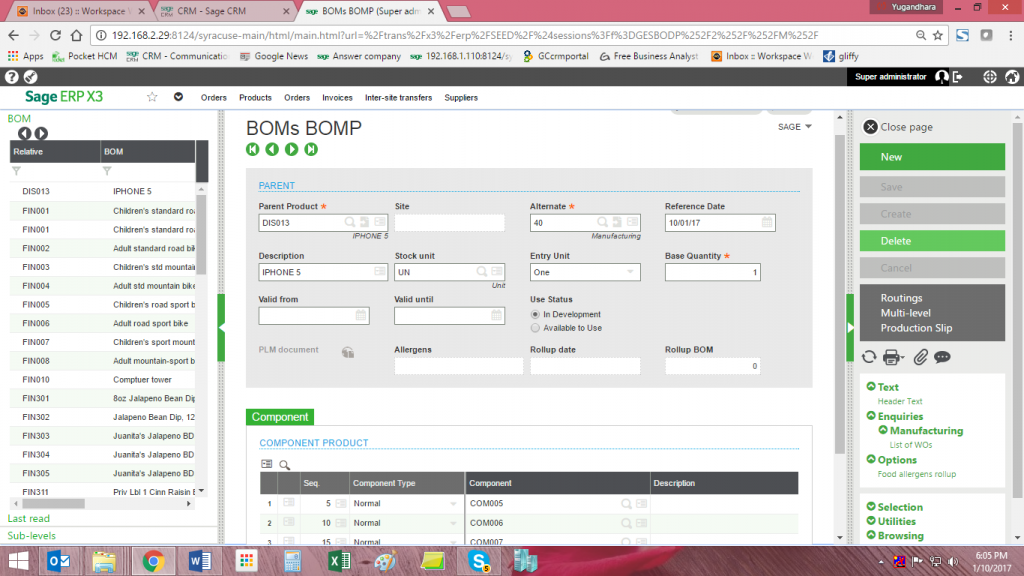
4.The base quantity will get updated as per the selected unit.

define base quantity

5.In this example the COM005 & COM006 will be used to produce Quantity of DIS013

6.Therefore in Work order the FG will be produced on the selected base quantity


About Us:

Greytrix is one stop solution provider for Sage ERP and Sage CRM needs. We provide complete end-to-end assistance for your technical consultations, product customizations, data migration, system integrations, third party add-on development and implementation expertise.

Greytrix have some unique solutions of Sage X3’s integration with Sage CRMSalesforce.com and Magento eCommerce. It also offers best-in-class Sage X3 customization and development services to Sage business partners, end users, and Sage PSG worldwide.

For more information on Sage X3 Integration and Services, please contact us at x3@greytrix.com .We will be glad to assist you.

How to delete Supplier Intercompany Invoice

$
0
0

We may come across scenarios where we want to delete Supplier Intercompany Invoice. To achieve this functionality follow below steps:

Navigate to General Parameter>Parameter values>TC Common Data>Folder>INV Group>SIVSUP parameter.

delete Supplier Intercompany Invoice

You will see that parameter value of SIVSUP is set as No, change it to yes.

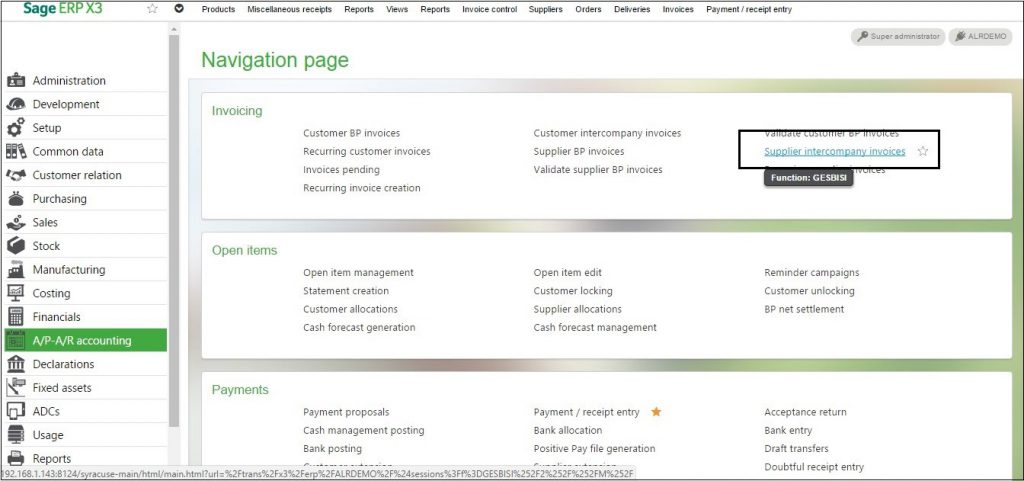
Now navigate to A/P-A/R Accounting>Invoicing>Supplier Intercompany Invoices.

Supplier Intercompany Invoices

In above screenshot you will see that delete button is enable.

Now you can delete the Supplier Intercompany Invoices.

Note: This functionality is not useful for previously created invoices.

Hope this helps.


About Us:

Greytrix is one stop solution provider for Sage ERP and Sage CRM needs. We provide complete end-to-end assistance for your technical consultations, product customizations, data migration, system integrations, third party add-on development and implementation expertise.

Greytrix have some unique solutions of Sage X3’s integration with Sage CRMSalesforce.com and Magento eCommerce. It also offers best-in-class Sage X3 customization and development services to Sage business partners, end users, and Sage PSG worldwide.

For more information on Sage X3 Integration and Services, please contact us at x3@greytrix.com .We will be glad to assist you.


Also Read:

How to Use a not-usable Component in Work Order

$
0
0

In Sage ERP X3, there is a feature where you can check whether the component used in a product is non-usable or not while creating a work order. This can be achieved by following below steps:-

Navigate to Setup → General Parameters → Parameters values

Under Module → GPA Manufacturing and Group → Work Order management, there is a parameter “CMPUSBCTR” which has two values –

No = If a component in the BOM is not usable, the Work Order will be created without this component.

Yes = If a component in the BOM is not usable, it will be impossible to create the Work Order.

Use not-usable component

not-usable component parameter value


Creation of Work Order with  CMPUSBCTR set as “NO”:-

Creation of Work Order

Work Order with CMPUSBCTR

In the above screenshot , the system displays warning message for Not usable component but allows to create the work order without this component.


Creation of Work Order with  CMPUSBCTR set as “YES”:-

Work Order with CMPUSBCTR set as YES

In the above screenshot, the system displays warning message for Not usable component and also prevents the creation of work order.

Hope this helps.


About Us:

Greytrix is one stop solution provider for Sage ERP and Sage CRM needs. We provide complete end-to-end assistance for your technical consultations, product customizations, data migration, system integrations, third party add-on development and implementation expertise.

Greytrix have some unique solutions of Sage X3’s integration with Sage CRM, Salesforce.com and Magento eCommerce. It also offers best-in-class Sage X3 customization and development services to Sage business partners, end users, and Sage PSG worldwide.

For more information on Sage X3 Integration and Services, please contact us at x3@greytrix.com .We will be glad to assist you.


Also Read:

How to get Name of the Program where the Error occurred

$
0
0

Errp returns the name of the script where an error occurred. It can be used in the error handling routine set by Onerrgo.

Syntax :

errp

 Examples :

  # Let’s trigger an error (division by zero)

Funprog DIV_BY_ZERO

Local Integer ZERO, ONE, RESULT

Local Char ERROR_MESSAGE(250)

ONE=1 : ZERO=0

Onerrgo ERR_HANDLE

RESULT = ONE / ZERO

End ERROR_MESSAGE

$ERR_HANDLE

ERROR_MESSAGE=”Error”-num$(errn)-“raised on line”-num$(errl)-“in script”-errp-“Message:”-errmes$(errn)

&                -“Additional details:”-errm

Resume

Description:

 errp returns a script name. The result type is Char.
Errp has only a significant value in the error handling routine.
About Us:

Greytrix is one stop solution provider for Sage ERP and Sage CRM needs. We provide complete end-to-end assistance for your technical consultations, product customizations, data migration, system integrations, third party add-on development and implementation expertise.

Greytrix have some unique solutions of Sage X3’s integration with Sage CRM, Salesforce.com and Magento eCommerce. It also offers best-in-class Sage X3 customization and development services to Sage business partners, end users, and Sage PSG worldwide.

For more information on Sage X3 Integration and Services, please contact us at x3@greytrix.com .We will be glad to assist you.


Also Read:

How to Identify Version for Sage X3

$
0
0

You may come across the situation where you want to know the version of Sage X3.Then you may probably use a ver$ keyword function to get the version value.

ver$ is used to identify the version number and the Adonix or Adonix application license or else a string characterizing each Adonix application used.

Syntax :

ver$( exp_num )

Kindly refer to the below snippet of code for better understanding.

#########################################################

Infbox “Adonix : version number “-num$(ver$(0))

###################################################

Identify Version for Sage X3

– if it is null, a version number and Adonix licence number under the form equivalent to : 4.1 A #2406400000000654321 (the first 4 characters, i.e. 4.1 A in the example, are the version number and the number that follows is the licence number).

– if it is 1, a licence number is obtained for the application in the form of a 19 figure number (in the case of a none licensed application returns an empty string “”).

– if it is 2, a string of 242 character string is obtained belonging to each Adonix used. This string is logically sub-divided into 6 sub-strings of 42 characters; the first three are displayed in an automatic fashion on starting up Adonix as well as at the display of each sub-menu.

The result type is Char.

Hope this helps.


About Us:

Greytrix is one stop solution provider for Sage ERP and Sage CRM needs. We provide complete end-to-end assistance for your technical consultations, product customizations, data migration, system integrations, third party add-on development and implementation expertise.

Greytrix have some unique solutions of Sage X3’s integration with Sage CRM, Salesforce.com and Magento eCommerce. It also offers best-in-class Sage X3 customization and development services to Sage business partners, end users, and Sage PSG worldwide.

For more information on Sage X3 Integration and Services, please contact us at x3@greytrix.com .We will be glad to assist you.


Also Read:


Range Validation between Two Fields

$
0
0

Generally, we have come across a situation in Sage X3 in Inquiries or Invoice screen where we need filter the data as per their ranges. In such condition we need to add some validations such as End range should be less than start range. It can also be done by using action CTLALPVALW.

CTLALPVALW is the action which we need to add at the CONTROL event of the End range field and give reference of the Start range field in the parameters.

Syntax:-
Let us consider two fields:-
1. ZCONTYPDEB (Start range field)
2. ZCONTYPFIN (End range field)

Let us add control action on ZCONTYPFIN field

range validation in two fields

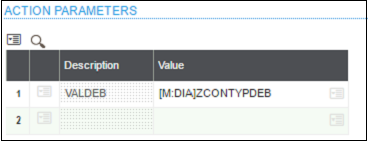
Now we will give the reference of Start range field i.e.  ZCONTYPDEB in the parameters.

range validation between two fields

Output:- 

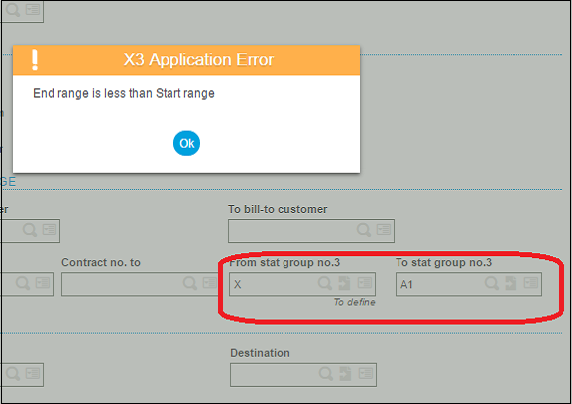
If we enter the lower range in ZCONTYPFIN field compare to ZCONTYPDEB

It will throw following message:-

Range Validation output

About Us: 
Greytrix is one stop solution provider for Sage ERP and Sage CRM needs. We provide complete end-to-end assistance for your technical consultations, product customizations, data migration, system integrations, third-party add-on development and implementation expertise.

Greytrix have some unique solutions of Sage X3’s integration with Sage CRM, Salesforce.com and Magento eCommerce. It also offers best-in-class Sage X3 customization and development services to Sage business partners, end users, and Sage PSG worldwide.

For more information on Sage X3 Integration and Services, please contact us at x3@greytrix.com.We will be glad to assist you.

Also Read:

Enable Deprec.total field in Fixed Assets master in order to capture accumulated depreciable value

$
0
0

Navigate to: Setup –> Parameter Value –> AAS – FAS – PRVSITUPD

Deprec.total field in Fixed Assets

Set PRVSITUPD=”Yes “After setting this parameter to “Yes “this will allow the user to enter accumulated depreciable value under the Deprec.total (Refer below image).

capture accumulated depreciable value

If an asset was purchased in 1st Jan 2013 and it’s deprecation start date was also same.

Asset purchase value include tax 60000 and current is 1st Jan 2017.

Now in order to capture the accumulated depreciable value till 31st dec2016 which are 48000?

We can set above parameter from “No” to “Yes”.

With this way, the system will then calculate the deprecation value only on 1200 for the remaining periods.


About Us:

Greytrix is one stop solution provider for Sage ERP and Sage CRM needs. We provide complete end-to-end assistance for your technical consultations, product customizations, data migration, system integrations, third-party add-on development and implementation expertise.

Greytrix have some unique solutions of Sage X3’s integration with Sage CRM, Salesforce.com and Magento eCommerce. It also offers best-in-class Sage X3 customization and development services to Sage business partners, end users, and Sage PSG worldwide.

For more information on Sage X3 Integration and Services, please contact us at x3@greytrix.com .We will be glad to assist you.


Read more:-


Automatic Work order Allocation

$
0
0

In order to automatically allocate work order. Sage X3 provide a feature to automatically allocate work order in global or detailed manner.

To successfully bring this functionality follow below steps

Navigate to: Set up >> Manufacturing >> Entry transactions>>work orders

Select Allocation method in parameters tab.

Allocation method in parameters tab


About Us:

Greytrix is one stop solution provider for Sage ERP and Sage CRM needs. We provide complete end-to-end assistance for your technical consultations, product customizations, data migration, system integrations, third-party add-on development and implementation expertise.

Greytrix have some unique solutions of Sage X3’s integration with Sage CRM, Salesforce.com and Magento eCommerce. It also offers best-in-class Sage X3 customization and development services to Sage business partners, end users, and Sage PSG worldwide.

For more information on Sage X3 Integration and Services, please contact us at x3@greytrix.com.We will be glad to assist you.


Also read:

Perform Supplier Intercompany Invoice

$
0
0

We may come across scenarios where we want to issue a Supplier Intercompany Invoice. This functionality can be achieved by the following step:

Navigate to A/P-A/R accounting>Invoicing>Supplier Intercompany Invoice.

Perform Supplier Intercompany Invoice

When Supplier Intercompany Invoice screen open it will show below error message:

Supplier Intercompany Invoice

To overcome this error message navigate to Set up>General Parameters>Parameter values>TRS Business partner>Folder>INV Group(Invoicing rules)

Supplier Intercompany Invoice parameter value

You will see that value of the Intercompany Invoices is set as No. Change it to Yes.
Now Navigate to A/P-A/R accounting>Invoicing>Supplier Intercompany Invoice

Click on New.

If selected site is not financial site then you will see below error message:

error message if site is not financial site
To solve this error Navigate to Set up>Organizational structure>Sites>Accounting tab

Give a check mark to the Financial site and click on save.

See below screenshot:

Perform Supplier Intercompany Invoice
Now Navigate to A/P-A/R accounting>Invoicing>Supplier Intercompany Invoice

Click on New.

Now you will be able to create Supplier Intercompany Invoices.

Hope this helps.

About Us:

Greytrix is one stop solution provider for Sage ERP and Sage CRM needs. We provide complete end-to-end assistance for your technical consultations, product customizations, data migration, system integrations, third-party add-on development and implementation expertise.

Greytrix have some unique solutions of Sage X3’s integration with Sage CRM, Salesforce.com and Magento eCommerce. It also offers best-in-class Sage X3 customization and development services to Sage business partners, end users, and Sage PSG worldwide.

For more information on Sage X3 Integration and Services, please contact us at x3@greytrix.com.We will be glad to assist you.

Also Read:-

Find the Number of Days passed between Years

$
0
0

One of the date function which will return the number of days passed between 1/1/1600 and the parameter date.

Syntax :     nday(date_exp)

Parameters:    date_exp –   date expression

Example :   X = nday(date$)

Description :

The nday function allows us to go from a date to a number of days. We may replace nday(DATE) with DATE – [01/01/1600].

The result type is Integer.

number of days passed between years

number of days between years

Hope this blog helps!


About Us

Greytrix is one stop solution provider for Sage ERP and Sage CRM needs. We provide complete end-to-end assistance for your technical consultations, product customizations, data migration, system integrations, third-party add-on development and implementation expertise.

Greytrix have some unique solutions of Sage X3’s integration with Sage CRM, Salesforce.com and Magento eCommerce. It also offers best-in-class Sage X3 customization and development services to Sage business partners, end users, and Sage PSG worldwide.

For more information on Sage X3 Integration and Services, please contact us at x3@greytrix.com.We will be glad to assist you.

Also Read:

How to Lock Folder in Sage X3

$
0
0

We may come across a scenario where we want to lock the folder in Sage X3. Sage X3 have a special feature to achieve this functionality. Follow below steps to achieve this feature:

Click on Welcome Panel.

welcome panel in sage x3

Select Sage X3 folder (Refer below screenshot).

Sage X3 folder

Now navigate to Development > Utilities > Folders > Folder lock

navigate to Development to lock folder

Select the folder we want to lock.

For e.g.

If a user wants to lock the seed folder, select “seed” folder and click on “OK”.

Refer Below screenshot:

Lock Folder Sage X3

Now “seed” folder is no longer accessible.

If a user tries to access the “seed” folder then Sage X3 will give below error.

sage x3 seed folder error

This way we can temporarily put a folder into a lock state. In this, no other connection can be made.

Hope this helps.


About Us:

Greytrix is one stop solution provider for Sage ERP and Sage CRM needs. We provide complete end-to-end assistance for your technical consultations, product customizations, data migration, system integrations, third-party add-on development and implementation expertise.

Greytrix have some unique solutions of Sage X3’s integration with Sage CRM, Salesforce.com and Magento eCommerce. It also offers best-in-class Sage X3 customization and development services to Sage business partners, end users, and Sage PSG worldwide.

For more information on Sage X3 Integration and Services, please contact us at x3@greytrix.com.We will be glad to assist you.


Also Read:

How to Validate Postal code Field in Sage x3

$
0
0

In Sage X3 we can enter the Postal code on the addresses of entities as Company, Site and all the BP entities (BP, Prospect, Customer, Supplier, Carrier and Sales rep). In Sage X3, we can manage the entered postal code by verifying with existing postal code. Kindly follow the below steps to enable this validation.

  1. Navigate to: Common data > Common tables > Countries
  2. Select the country for which you want to verify the Postal code.
  3. Select the checkbox “Postal code control”. Refer below screenshot.

Validate Postal code Field

• Postal code control

This field is used to manage the community code and to verify the existence of the postal code.
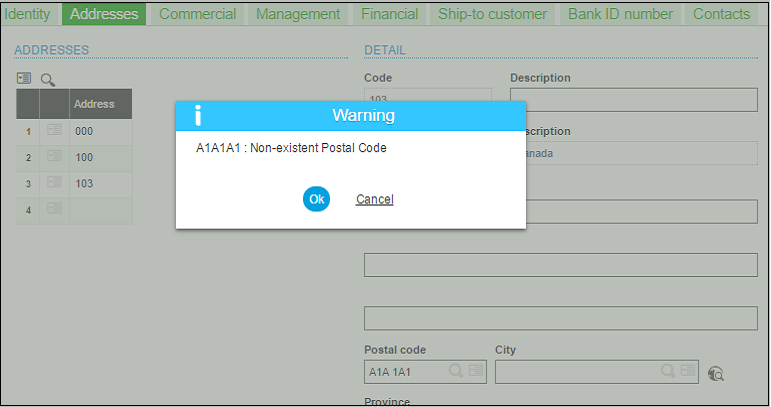
If the user enters the postal code which is not defined in X3 then it will show a message stating ‘Non-existent Postal Code’ refer to the below screen shot.

Postal code control

Hope this blog helps!


About Us:

Greytrix is one stop solution provider for Sage ERP and Sage CRM needs. We provide complete end-to-end assistance for your technical consultations, product customizations, data migration, system integrations, third-party add-on development and implementation expertise.

Greytrix have some unique solutions of Sage X3’s integration with Sage CRM, Salesforce.com and Magento eCommerce. It also offers best-in-class Sage X3 customization and development services to Sage business partners, end users, and Sage PSG worldwide.

For more information on Sage X3 Integration and Services, please contact us at x3@greytrix.com.We will be glad to assist you.


Also Read:

Viewing all 1524 articles
Browse latest View live


<script src="https://jsc.adskeeper.com/r/s/rssing.com.1596347.js" async> </script>