Quantcast
Channel: Sage X3 – Tips, Tricks and Components
Viewing all 1516 articles
Browse latest View live

How to Know Number of Fields Defined in a Screen?

$
0
0

In Sage X3, if you come across a scenario where you want to know count of fields defined in a particular screen, Sage X3 provides an inbuilt function to know number of fields defined within a particular screen.

You can use this function if and only if the screen is open.

Syntax:

masknbf(<class|num_exp>)

Where,

class – description of a screen

num_exp – numeric expression that describes a screen

Refer the below screenshot for better understanding.

Number of Fields Defined in a Screen


Hope this helps.

About Us


Greytrix is one stop solution provider for Sage ERP and Sage CRM needs. We provide complete end-to-end assistance for your technical consultations, product customizations, data migration, system integrations, third party add-on development and implementation expertise.

Greytrix have some unique solutions of Sage X3’s integration with Sage CRMSalesforce.com and Magento eCommerce. It also offers best-in-class Sage X3 customization and development services to Sage business partners, end users, and Sage PSG worldwide.

For more information on Sage X3 Integration and Services, please contact us at x3@greytrix.com .We will be glad to assist you.

Other Related Blogs:

– How to know a Mask Variable is Initialized or not?

– How to get the sum of Mask column in Sage ERP X3?

– How to know current open mask in Sage ERP X3?

– How to check mask which is opened in backend?

– Commands to Mask fields or values in Sage X3?


How to Restrict the Users to Access Multiple Banks?

$
0
0

One of our clients’ came up with new requirement, where they wanted to allow only few banks access to the users. Sage X3 has functionality where you can restrict the users to access multiple banks.

Follow the below steps

  1. Add the Row level permission.

Navigate To: Set up >Users>Row Level Permission.

Restrict the Users to Access Multiple Banks

  1. Assign the Row level permission to the users and add the bank code in Key column.

Navigate To: Set up>Users>Users>Organization tab.

Row level permission to the users


Now when user trying to access the banks, it will get the added banks account only.

Hope this helps.

About Us


Greytrix is one stop solution provider for Sage ERP and Sage CRM needs. We provide complete end-to-end assistance for your technical consultations, product customizations, data migration, system integrations, third party add-on development and implementation expertise.

Greytrix have some unique solutions of Sage X3’s integration with Sage CRMSalesforce.com and Magento eCommerce. It also offers best-in-class Sage X3 customization and development services to Sage business partners, end users, and Sage PSG worldwide.

For more information on Sage X3 Integration and Services, please contact us at x3@greytrix.com .We will be glad to assist you.

Other Related Blogs:

How to Get Parameter Value by User?

– User Security Levels in Sage X3

– How to Restrict User from Creating SO for Price below Minimum Sales Price.

– How to put Profile Picture for a user in Sage X3?

– How to enable the User authorization in Sage X3?


How to Roundup Decimal Number to the next Nearest Number.

$
0
0

While dealing with arithmetic operations, you may want to roundup the calculation result to the next nearest number. Sage X3 has a special function to achieve this.

ARR : rounds a number to the next nearest number.

ARR ( exp_num1, exp_num2 )

Parameter details: 

exp_num1: Decimal number that will pass to “arr” function.

exp_num2: if value ‘1’ is passed then it will round to the next nearest number.

Kindly refer to the below screen shot.

Roundup Decimal Number


Hope this helps.

About Us


Greytrix is one stop solution provider for Sage ERP and Sage CRM needs. We provide complete end-to-end assistance for your technical consultations, product customizations, data migration, system integrations, third party add-on development and implementation expertise.

Greytrix have some unique solutions of Sage X3’s integration with Sage CRMSalesforce.com and Magento eCommerce. It also offers best-in-class Sage X3 customization and development services to Sage business partners, end users, and Sage PSG worldwide.

For more information on Sage X3 Integration and Services, please contact us at x3@greytrix.com .We will be glad to assist you.

Other Related Blogs:

– How to roundup decimal number to two decimal places

– How to round quantity in purchase order

– Rounding of net unit price in purchase order

– Rounding off Net Unit Price in Sales Order

How to Solve “expression too large” error in Sage X3

$
0
0

You may come across the scenario where you get an “expression too large” as below.

expression too large error

This is may be due to number of expressions reached to its limit. The cause to the problem is as follow.

Cause –

Sage X3 has a limitation when number of code files increases. The error comes not because of the code files as the error will remain same if we will remove all commented lines.

Solution –

Solution to this problem is simply move the particular code and paste it in some other code file and call that action in that code file.

Hope this helps.

About Us

Greytrix is one stop solution provider for Sage ERP and Sage CRM needs. We provide complete end-to-end assistance for your technical consultations, product customizations, data migration, system integrations, third party add-on development and implementation expertise.

Greytrix have some unique solutions of Sage X3’s integration with Sage CRMSalesforce.com and Magento eCommerce. It also offers best-in-class Sage X3 customization and development services to Sage business partners, end users, and Sage PSG worldwide.

For more information on Sage X3 Integration and Services, please contact us at x3@greytrix.com .We will be glad to assist you.

Other Related Blogs:

– How to handle the errors in Sage X3 with custom message?

– How to display serious error message box

– How to overcome the ‘table full’ error in sage x3 while importing the file.

– How to solve validation error while creating import/export template of XML file type

– How to resolve “Too many published fields” web service publication error?

How to Update Database Mass using “Update transaction” Utility

$
0
0

We may come across a scenario where we want to replace the old value of field with new one, In that case Sage X3 has the Utility through which user can achieve this feature.

For Example: If User wants to update the package field of all the products from old value “C01” to new value “CB1”.

Update Database Mass

Then navigate to Development > Script Dictionary > Update transactions and follow the below steps:

  • Create New Database mass update.
  • Enter New Database mass update code.
  • Enter the table name.
  • Add the two (old and new) parameters (Data type of the field for which we are updating the value).
  • Click on the validation

Database Mass Update

  • Click on “Exec.” button.
  • A pop up window will appear. Enter the old and new value in the parameter. And click on ok button.

Database Mass Update-sage x3

  • This will replace the all value with new one for all the products.

Log Reading

Hope this helps.

About Us

Greytrix is one stop solution provider for Sage ERP and Sage CRM needs. We provide complete end-to-end assistance for your technical consultations, product customizations, data migration, system integrations, third party add-on development and implementation expertise.

Greytrix have some unique solutions of Sage X3’s integration with Sage CRMSalesforce.com and Magento eCommerce. It also offers best-in-class Sage X3 customization and development services to Sage business partners, end users, and Sage PSG worldwide.

For more information on Sage X3 Integration and Services, please contact us at x3@greytrix.com .We will be glad to assist you.

Other Related Blogs:

– How to update multi-dimensional values via Import Template in X3?

– Entry Point to Update Custom Fields of STOJOU (Stock journal) table

– Update read only field using import utility

– How to conditionally restrict the Import update!

– How to get the number of records modified by Update Command

How to Upload the JAR file in the JAVA Bridge Server

$
0
0

We use the external resource like JAR file to execute our certain functionality, for which we need to upload the JAR file in the JAVA Bridge server and then we can access the same with 4GL code.

Below are the steps to upload the JAR file in JAVA Bridge Server.

Login into the JAVA bridge server through browser and browse URL.

 URL: localhost:27880/infos/index.jsp

upload the JAR file

Firstly we need to log into JAVA Bridge server with the relevant credential (User name and

Password) of server, to upload the JAR File)

upload the JAR file-sage x3

After successful login into the JAVA Bridge Server, now we can access the JAR file through the Extends menu where we can attach or detach the JAR file for processing.

To attach the JAR file we need to navigate as follow:

EXTENSION –> Submit a bundle.

Upload the JAR file in java

Clicking on the “Submit A Bundle” we will be able to view the above screen where we need to browse where JAR is located and upload the same.

Upload the JAR file in java bridge

After uploading of the JAR file we can view the uploaded JAR in EXTENSION–>The Extension bundles, with the time of upload when it is uploaded.

We need to restart the JAVA Bridge server from “Run – Services.msc” and restart the JAVA Bridge services.

Upload the JAR file in java server

Note: On the safer side it will be better to restart the JAVA Bridge server to reflect the changes.

Hope this helps.

About Us

Greytrix is one stop solution provider for Sage ERP and Sage CRM needs. We provide complete end-to-end assistance for your technical consultations, product customizations, data migration, system integrations, third party add-on development and implementation expertise.

Greytrix have some unique solutions of Sage X3’s integration with Sage CRMSalesforce.com and Magento eCommerce. It also offers best-in-class Sage X3 customization and development services to Sage business partners, end users, and Sage PSG worldwide.

For more information on Sage X3 Integration and Services, please contact us at x3@greytrix.com .We will be glad to assist you.

Other Related Blogs:

– How to open the JAVA bridge Connection through code

– How to install the JAVA Bridge Server

– Use of “nomap” variable in Sage X3

– How to know a Mask Variable is Initialized or not?

How to Make Invoice Number Field Editable for any Invoice?

$
0
0

In Sage X3, we may come across a scenario where we want to create invoice with any ID/number of our choice. By default, every time we create a new transaction, Sage X3 itself generates the next sequence number and assigns it to the newly created invoice.

To overcome this, kindly refer to the below steps

Step 1 : Navigate to: Setup > General Parameter > Sequence number definition > Assignment

Step 2 : Select the “Purchasing” module for purchase invoice (for sales invoice select ‘Sales’ module) with respective legislation. Set the manual entry value to “Yes”.

Make Invoice Number Field


Step 3 : Navigate to: Setup > Purchasing >Documents types> Invoice Types (for sales invoice Navigate to: Setup > Sales >Documents types> Invoice Types)

Step 4 : Click on action button of ‘Entry type’ field and select Document type option. (Refer below screenshot)

action button of Entry type fieldStep 5 : Select “Manual numbers” checkbox. (Refer below screenshot)

Manual numbers in sage x3


Step 6 : Do the entry transaction validation.

Now the invoice number field will be editable!

Hope this helps.

About Us


Greytrix is one stop solution provider for Sage ERP and Sage CRM needs. We provide complete end-to-end assistance for your technical consultations, product customizations, data migration, system integrations, third party add-on development and implementation expertise.

Greytrix have some unique solutions of Sage X3’s integration with Sage CRMSalesforce.com and Magento eCommerce. It also offers best-in-class Sage X3 customization and development services to Sage business partners, end users, and Sage PSG worldwide.

For more information on Sage X3 Integration and Services, please contact us at x3@greytrix.com .We will be glad to assist you.

Other Related Blogs:

– How to Modify the Posting Date of Sage X3 Transactions?

– Handling the Customized Fields Using Entry Transaction in Sage X3

– How to enable the identifier fields for a particular transaction

– How to set the entry condition in the Sage X3?

– How to change Entry Transaction without exiting the screen

How to Create Manual Transaction Number for Purchase Order and Purchase Receipt?

$
0
0

In Sage X3, we may come across a scenario where we want to create transactions with any ID of any choice. By default, every time we create a new transaction, Sage X3 itself generates the next sequence number and assign it to the newly created transaction.

But, it is difficult to remember this auto generated numbers. To overcome this, Sage X3 provides the facility to create your own transaction ids.

To achieve this, we have to do following setup:

Step 1 : Navigate to: Setup > General Parameter > Sequence number definition > Assignment

Step 2 : Select the record having module as “Purchasing” and appropriate legislation.

Step 3 : Set the manual entry value to “Yes”.

(Refer the below screenshot where the manual entry for document types  “Standard order”  and “Receipt” is set to “Yes”.)

Create Manual Transaction Number

Step 4 : Create Manual Transaction Number

Hope this helps.

About Us


Greytrix is one stop solution provider for Sage ERP and Sage CRM needs. We provide complete end-to-end assistance for your technical consultations, product customizations, data migration, system integrations, third party add-on development and implementation expertise.

Greytrix have some unique solutions of Sage X3’s integration with Sage CRMSalesforce.com and Magento eCommerce. It also offers best-in-class Sage X3 customization and development services to Sage business partners, end users, and Sage PSG worldwide.

For more information on Sage X3 Integration and Services, please contact us at x3@greytrix.com .We will be glad to assist you.

Other Related Blogs:

– How to Modify the Posting Date of Sage X3 Transactions?

– Handling the Customized Fields Using Entry Transaction in Sage X3

– How to enable the identifier fields for a particular transaction

– How to set the entry condition in the Sage X3?

– How to change Entry Transaction without exiting the screen


How to Delete Element from an Array?

$
0
0

Dela – Dela is used to delete elements from single-sized arrays, from a given index.

Dela deletes the given index element and adds blank value or zero to the end, we need to know the index to use Dela

Syntax – Dela Start Array List

where, Start : Index element  & Array list :  list of array variable separated by comma.

Delete Element

This will delete second element from the array and will add zero to the end of an integer array and blank to the end of String array.

Hope this helps.

About Us


Greytrix is one stop solution provider for Sage ERP and Sage CRM needs. We provide complete end-to-end assistance for your technical consultations, product customizations, data migration, system integrations, third party add-on development and implementation expertise.

Greytrix have some unique solutions of Sage X3’s integration with Sage CRMSalesforce.com and Magento eCommerce. It also offers best-in-class Sage X3 customization and development services to Sage business partners, end users, and Sage PSG worldwide.

For more information on Sage X3 Integration and Services, please contact us at x3@greytrix.com .We will be glad to assist you.

Other Related Blogs:

– How to Delete particular row and reset Grid?

– How to filter the table with user defined conditions inSageX3

– How to know current open mask in Sage ERP X3

– How to Find the Number of Records in a Table?

– How to get the number of records modified by Update Command

How to Enable EU VAT no. field.

$
0
0

If we come across a scenario where we want to find EU VAT no. field of the companies’ disabled then Sage x3 provides a standard functionality to enable the field.

Enable EU VAT no field

Steps to enable this functionality:

Navigation:

Common Data – Common Table – Countries.

Navigate to the respective country for which EU VAT no. field has to be enabled.

Enable EU VAT

Check the highlighted check box to enable the EU VAT no. field for their respective companies.

EU VAT no. field of the company

Hope this helps.

About Us


Greytrix is one stop solution provider for Sage ERP and Sage CRM needs. We provide complete end-to-end assistance for your technical consultations, product customizations, data migration, system integrations, third party add-on development and implementation expertise.

Greytrix have some unique solutions of Sage X3’s integration with Sage CRMSalesforce.com and Magento eCommerce. It also offers best-in-class Sage X3 customization and development services to Sage business partners, end users, and Sage PSG worldwide.

For more information on Sage X3 Integration and Services, please contact us at x3@greytrix.com .We will be glad to assist you.

Other Related Blogs:

– Using the Grouping of companies function for reporting

– How to define the component sequence no in Bill of Material

– How to get the last sequence number through code?

– Control Max Decimals of Currency in Sage X3

– Use of Multiple Ledger Currency in Transactions in Sage ERP X3

How to Increase the Number of Signature in the workflow?

$
0
0

In a workflow the number of signatures results into creation of same number of users, those users are authorized to approve the request.

You get an option to assign number of signatures in:

Navigate: Setup > Workflow > User rules of assignment

Increase the Number of Signature

In the above example 4 users are created and conditions can be defined in the column.

Based on the condition the mail will be send to particular user as defined in the below screen shot.

Signature in the workflow

But sometime it may happen you get the below error message.

error message

This is a folder level set up and can be resolved by following the below steps:

Step 1 – Navigate: Setup > General parameters > Folders

Step 2 – Go to the SCREENS tab and change value of Number of signature to any number you want.

NOTE: The screen dim value cannot exceed 10.

SCREENS tab

Hope this helps.

About Us


Greytrix is one stop solution provider for Sage ERP and Sage CRM needs. We provide complete end-to-end assistance for your technical consultations, product customizations, data migration, system integrations, third party add-on development and implementation expertise.

Greytrix have some unique solutions of Sage X3’s integration with Sage CRMSalesforce.com and Magento eCommerce. It also offers best-in-class Sage X3 customization and development services to Sage business partners, end users, and Sage PSG worldwide.

For more information on Sage X3 Integration and Services, please contact us at x3@greytrix.com .We will be glad to assist you.

Other Related Blogs:

– How to Find the Number of Fields Defined in a Screen?

– How to Restrict the Users to Access Multiple Banks?

– Get Year in a Date for Sage X3 version 7

– How to Find the Number of Records in a Table?

– How to Concatenate Two Strings

How to Disable the Post Button in Invoice for the Particular User?

$
0
0

Sage X3 provide feature to disable the post button for the particular user. To successfully bring this functionality follow below steps.

Step 1: Go to the Functional profile

Step 2: Navigate to: Setup>Users>Functional profile

Step 3: Remove the BPSVAL function of the profile code for which particular user is linked.

Disable the Post Button

Hope this helps.

About Us


Greytrix is one stop solution provider for Sage ERP and Sage CRM needs. We provide complete end-to-end assistance for your technical consultations, product customizations, data migration, system integrations, third party add-on development and implementation expertise.

Greytrix have some unique solutions of Sage X3’s integration with Sage CRMSalesforce.com and Magento eCommerce. It also offers best-in-class Sage X3 customization and development services to Sage business partners, end users, and Sage PSG worldwide.

For more information on Sage X3 Integration and Services, please contact us at x3@greytrix.com .We will be glad to assist you.

Other Related Blogs:

– How to Restrict the Users to Access Multiple Banks?

– How to restrict users from modifying the X3 connection date

– Create users and assign their rights in V7

– Find number of users logged in Sage ERP X3

– How to use Adxuid to control multiple users in Sage ERP

How to allow Manual Generation of Transaction ID for Sales Order?

$
0
0

In Sage X3, we may come across a scenario where we want to allow manual generation of transaction Id for sales order then Sage X3 provides a standard functionality Manual sequence no.

Set Manual sequence no to “Yes” in sales order types for which manual generation of transaction Id should be allowed.

Set up – Sales – Order type

order types


Hope this helps.

About Us


Greytrix is one stop solution provider for Sage ERP and Sage CRM needs. We provide complete end-to-end assistance for your technical consultations, product customizations, data migration, system integrations, third party add-on development and implementation expertise.

Greytrix have some unique solutions of Sage X3’s integration with Sage CRMSalesforce.com and Magento eCommerce. It also offers best-in-class Sage X3 customization and development services to Sage business partners, end users, and Sage PSG worldwide.

For more information on Sage X3 Integration and Services, please contact us at x3@greytrix.com .We will be glad to assist you.

Other Related Blogs:

– How to get the last sequence number through code?

– Handling the Customized Fields Using Entry Transaction in Sage X3

– How to enable the identifier fields for a particular transaction

– How to set the entry condition in the Sage X3?

– How to change Entry Transaction without exiting the screen

WAS Web service

$
0
0

In Sage X3, sometimes we need to expand the functionality of the core Sage X3 solution with the required customizations to reach the desired goal. These customised new products are known as Add-ons. WAS web service is an add-on, which comes with a number of extra features, other than the normal web services.

KEY POINTS:

-Broadly, an interface is mainly used for “Generated access to Table” and “Generated access to view” type.

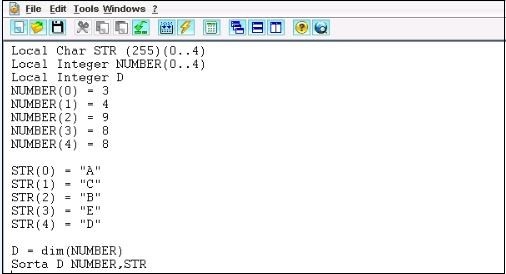
-It gives us the ability to sort the desired fields, which is not possible in the normal web services.

-The filter can be applied on the resulted columns of the web service.

-Here we get the total number of records.

 To create a WAS web service, perform the following steps:

1. Creation of Website:

The first step is to create a new website for the particular web service. To do so, navigate to:

DEVELOPMENT-> SAFE X3 WAS -> WEBSITES-> WEBSITES

Creatie Website

NOTE: You can also use an existing website if required.

To select the desired website, navigate to:

DEVELOPMENT-> SAFE X3 WAS -> WEBSITES-> SELECT

WAS

2. Creation of Interface.

1) Create an interface, and enter the name in the Interface Code field.

WAS interface

2) Choose the type of interface from the selection Interface type.

3) Fill the Table Code field as per the interface type selected. Since we have used Generated access to Table in the above example, we have entered the table required in the Table Code field.

4) In the SUB Program section, the Processing and Sub-program fields will automatically be populated based on the entries.

5) Publication name field in the PUBLICATION section is editable, and this will be the name of your web service.

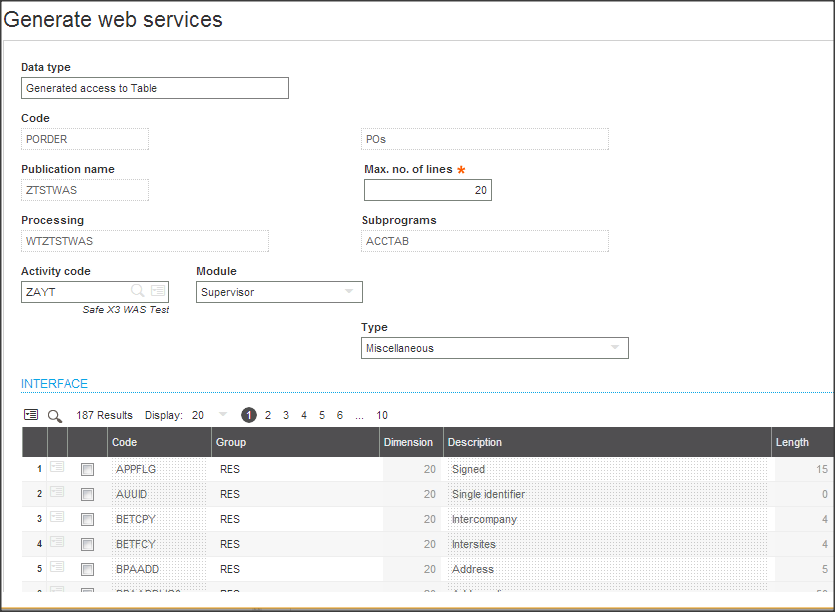
6) On creation, the Generate access button gets enabled.

generate web service
It gets access to set max no of lines. (NOTE: cannot exceed 9999)

7) The interface column now displays a list of the fields. These fields are based on the table fields entered by you earlier. You can choose the ones for which you want the outcome of the web services.

8) Validate the interface

Go to the respective web service:

1) Go to mapping tab, there we will find 10 new fields other than the ones we have selected in the Interface.

Fields with their descriptions are given below:

SETUP GROUP DESCRIPTION
AXPARCOD AX_PAR X3 context variable code
AXPARVAL AX_PAR X3 context variable value
AXWHRLFTBRK AX_WHR Level of opening brackets
AXWHRCOD AX_WHR Name of the selection criteria
AXWHROPE AX_WHR Comparison operator
AXWHRCODVAL AX_WHR Value of the selection criteria
AXWHRRGTBRK AX_WHR Level of closing brackets
AXWHRANDOR AX_WHR Sequence logical operator
AXORDCOD AX_ORD Name of the sort criteria
AXORDTYP AX_ORD Value of the sort criteria
FIELD1 RES Fields for the recordings returned by the web service
FIELD2 RES Fields for the recordings returned by the web service

Now once we have done the creation, WAS web service is ready to be tested.

Hope this blog helps!

About Us

Greytrix is one stop solution provider for Sage ERP and Sage CRM needs. We provide complete end-to-end assistance for your technical consultations, produc, system integrations, third party add-on development and implementation expertise.

Greytrix have some unique solutions of Sage X3’s integration with Sage CRMSalesforce.com and Magento eCommerce. It also offers best-in-class Sage X3 customization and development services to Sage business partners, end users, and Sage PSG worldwide.

For more information on Sage X3 Integration and Services, please contact us at x3@greytrix.com .We will be glad to assist you.

Other Related Blogs:

– Access Sage X3 data from external applications through Web services

– Create Web Service Pool for Integration with Sage X3

– Publishing the Web Service via Patch

– Create Sales Orders using Web services in Sage X3

– Maximum size for a Pool in X3

How to Open a Screen, when Single Object is bound with Multiple Screens?

$
0
0

If we want a particular screen to open among several screens, where single object is bound with the multiple screens then Sage X3 provides a functionality for the same.

To access screen using Code check below link:

– http://www.greytrix.com/blogs/sagex3/2014/01/30/how-to-access-screen-using-code/

Now, let’s see how we will get the required screen based on certain conditions. If you have variable R1 and based on its value, you want to open an object based screen, where object is bound with multiple screens. E.g. take object as BOD which is bound with Commercial BOMs and Production BOMs.

Let’s say we want to open the Commercial BOMs screen when R1=1 else open Production BOMs screen.

Here is code:

If R1 =1

    Local Char PARBOUT(250)(1..20)

    Local Integer FLGEXE : FLGEXE = 1

    PARBOUT(1) = “”

    PARBOUT(2) = “BOD”

    PARBOUT(3) = “”

    GACTION = “GOBJETC1″

    GFONCTION = “GESBODC”

    GFONBOD=”BOMC”

    GDATEREF=date$

    Call OBJET_CHAR(PARBOUT(1),PARBOUT(2) ,PARBOUT(3)) From GOBJET

  Else

    Local Char PARBOUT(250)(1..20)

    Local Integer FLGEXE : FLGEXE = 1

    PARBOUT(1) = “”

    PARBOUT(2) = “BOD”

    PARBOUT(3) = “”

    GACTION = “GOBJETC1″

    GFONCTION = “GESBODP”

    GFONBOD=”BOMP”

    GDATEREF=date$

    Call OBJET_CHAR(PARBOUT(1),PARBOUT(2) ,PARBOUT(3)) From GOBJET

  Endif

Explanation: If we noticed the code is same as opening the normal screen except few additional parameter where set is GFONCTION, GFONBOD, GDATEREF.

Setup:

1) GFONCTION: In GFONCTION, set the function code of the screen which supposed to open, Say function code for opening the production screen is “GESBODP”.

2) GFONBOD: GFONBOD is a global variable, which is generally included in the variable section of the function and its value varies. GFONBOD variable is just name, you may create your own variable and use that variable in different functions, usually we create such variable to link a set of screen which we are supposed to open based on function code and variable value.

GFONBOD set


Say GFONBOD value for opening the production screen is “BOMP”.

3) GDATEREF: It’s just another global variable where we have to set its value to the current date.

4) PARBOUT(2):  It consists of an object code, which may bound with set of screens.

Hope this blog helps!

About Us


Greytrix is one stop solution provider for Sage ERP and Sage CRM needs. We provide complete end-to-end assistance for your technical consultations, produc, system integrations, third party add-on development and implementation expertise.

Greytrix have some unique solutions of Sage X3’s integration with Sage CRMSalesforce.com and Magento eCommerce. It also offers best-in-class Sage X3 customization and development services to Sage business partners, end users, and Sage PSG worldwide.

For more information on Sage X3 Integration and Services, please contact us at x3@greytrix.com .We will be glad to assist you.

Other Related Blogs:

– How to open the object managed screen via code?

– How to access screen using Code?

– Passing Parameters to your Pop Up Window in Sage X3

– How to open Sage ERP X3 Code file in eclipse folder in version 7


Mass Generation of Purchase Order

$
0
0

You may come across a situation where you want to create Purchase order for many suppliers and products.

Sage X3 provides a feature in which mass generation of Purchase Order can be done at once. To achieve this functionality, navigate to Purchasing → Orders → Buyers plan.

Follow the below steps:-

STEP 1

Mass Generation of Purchase Order

STEP 2 –

Mass Generation

STEP 3 –

Sage X3 Mass Generation

STEP 4 –

The Purchase Orders that got created will be accessible in purchase receipts screens so that user can create purchase receipts for the generated Orders.

Sage X3 Mass Generation of Purchase Order

This function is used to prepare a series of orders for different suppliers, by taking into account the requirements issued by the different services in the form of purchase requests or the suggestions generated by the MRP calculation or the reorder calculation functions.

 When the products to buy are distributed among various buyers, this function makes it possible, for each buyer, to process only the products concerning him in his planning workbench.

 Hope this helps.

About Us

Greytrix is one stop solution provider for Sage ERP and Sage CRM needs. We provide complete end-to-end assistance for your technical consultations, produc, system integrations, third party add-on development and implementation expertise.

Greytrix have some unique solutions of Sage X3’s integration with Sage CRMSalesforce.com and Magento eCommerce. It also offers best-in-class Sage X3 customization and development services to Sage business partners, end users, and Sage PSG worldwide.

For more information on Sage X3 Integration and Services, please contact us at x3@greytrix.com .We will be glad to assist you.

Other Related Blogs:

– Product purchase restriction based on buyer.

– How to Create Manual Transaction Number for Purchase Order and Purchase Receipt?

– How to Create Contract Purchase Order in Sage X3?

– Services Where-used

– Work order Grouping-For Different Products

How to Disable the Print Option in Invoice for the Particular User

$
0
0

If we want to disable the print option for the particular user then Sage X3 provides feature to disable the print option for the particular user.

To successfully bring this functionality follow below steps:

Navigate to: Setup>Users>Functional profile> Report Tab

  • Select the profile code of the user.
  • Set external document to Yes

print option in invoice


Hope this helps.

About Us

Greytrix is one stop solution provider for Sage ERP and Sage CRM needs. We provide complete end-to-end assistance for your technical consultations, produc, system integrations, third party add-on development and implementation expertise.

Greytrix have some unique solutions of Sage X3’s integration with Sage CRMSalesforce.com and Magento eCommerce. It also offers best-in-class Sage X3 customization and development services to Sage business partners, end users, and Sage PSG worldwide.

For more information on Sage X3 Integration and Services, please contact us at x3@greytrix.com .We will be glad to assist you.

Other Related Blogs:

– How to Disable the Post Button in Invoice for the Particular User?

– How to restrict users from modifying the X3 connection date.

– Create users and assign their rights in V7

– Find number of users logged in Sage ERP X3

– How to use Adxuid to control multiple users in Sage ERP

How to Sort Array in Ascending and Descending Order

$
0
0

Sorta-is used to sort arrays of single-dimensioned variables.

Sorta, sorts the array in ascending order by default, to sort the array in descending we need to use Desc keyword.

Syntax –

Ascending and Descending Order

Where,

Sorta – Number Array List

Number – number is length of an array or up to which number we want to sort

Array List – list of array variable separated by comma


In this example we are having two arrays, sorta command is sorting array NUMBER in ascending order and also STR array


To sort these arrays according to STR array –

Sorta 4 STR NUMBER or

Sorta 4 STR


To sort in descending order –

Sorta 4 STR NUMBER  Desc

Hope this helps.

About Us

Greytrix is one stop solution provider for Sage ERP and Sage CRM needs. We provide complete end-to-end assistance for your technical consultations, produc, system integrations, third party add-on development and implementation expertise.

Greytrix have some unique solutions of Sage X3’s integration with Sage CRMSalesforce.com and Magento eCommerce. It also offers best-in-class Sage X3 customization and development services to Sage business partners, end users, and Sage PSG worldwide.

For more information on Sage X3 Integration and Services, please contact us at x3@greytrix.com .We will be glad to assist you.

Other Related Blogs:

How to get the number of records modified by Update Command

List the files from the directory

How to overcome the ‘table full’ error in sage x3 while importing the file

How to link and order by with different tables in 4GL

Error while importing folder in Sage X3

How to Find the DAY of the Week

$
0
0

This function is one of the date function which will return the DAY number of the week from which we will be able to perform the other functionality.

Function

dayn(Date): The “dayn” function excepts one parameter which we need to pass the date for which we need to find the weekday number.

Example:

Day of week

Output:

These function will return you the integer value which lies between 1(Monday)-7(Sunday)

We executed the above code on the monday which takes the current date (i.e. Date$)

get day of week

These functionality will help us to find the position of day in the week, which will helps us to calculate the other expressions.

Hope this helps.

About Us


Greytrix is one stop solution provider for Sage ERP and Sage CRM needs. We provide complete end-to-end assistance for your technical consultations, produc, system integrations, third party add-on development and implementation expertise.

Greytrix have some unique solutions of Sage X3’s integration with Sage CRMSalesforce.com and Magento eCommerce. It also offers best-in-class Sage X3 customization and development services to Sage business partners, end users, and Sage PSG worldwide.

For more information on Sage X3 Integration and Services, please contact us at x3@greytrix.com .We will be glad to assist you.

Other Related Blogs:

– How to know Month name from the given date?

– How to get number of day and name from the date?

– How to know the start date of week of any year ?

– How to restrict users from modifying the X3 connection date?

– How to Modify the Posting Date of Sage X3 Transactions?

How to Import Customized Tab Fields Using Import Template

$
0
0

In Sage ERP – X3, most of the time, we come across a scenario where we want to import the customized tab fields. For e.g., if you have added new tab on the Customer Master screen and you want to import these tab fields using import template. By simply adding the fields in Customer import template will not make this work.

We can achieve this by following steps:

Consider Customer import template YBPC for better understanding.

  • The first step is creating required import template with mandatory and the customized fields.
  • Navigate to the specified object of the import template. (Refer below screenshot)

Import Customized Tab Fields

  • Navigate to Environment tab > Import section and add the customized screen and its reference table in the grid. (Refer below screenshot)

customized screen

Now, you can create and update the customer with the customized tab fields.

Hope this helps!

About Us

Greytrix is one stop solution provider for Sage ERP and Sage CRM needs. We provide complete end-to-end assistance for your technical consultations, product, system integrations, third party add-on development and implementation expertise.

Greytrix have some unique solutions of Sage X3’s integration with Sage CRMSalesforce.com and Magento eCommerce. It also offers best-in-class Sage X3 customization and development services to Sage business partners, end users, and Sage PSG worldwide.

For more information on Sage X3 Integration and Services, please contact us at x3@greytrix.com .We will be glad to assist you.

Other Related Blogs:

– How to set the structure of import template to import Data and CSV file?

– How to update multi-dimensional values via Import Template in X3…?

– How to use record separator of import/export template in Sage ERP X3

– How to execute import utility using code

– How to solve validation error while creating import/export template of XML file type

Viewing all 1516 articles
Browse latest View live


<script src="https://jsc.adskeeper.com/r/s/rssing.com.1596347.js" async> </script>