Quantcast
Channel: Sage X3 – Tips, Tricks and Components
Viewing all 1515 articles
Browse latest View live

Restrict Sales Order for the Product which has a Life Start Date

$
0
0

If you come across a scenario where you want to restrict sales order for the product which has a service start date then Sage X3 provides a standard functionality “Product start-of-life date”.

Product start-of-life date: it is not possible to enter sales orders for this product before its start-of-life date.

To set up this functionality:

Navigation:

Common data – Products – Products – Identification Tab.

Restrict Sales Order

Now sales order can only be created for products which have Product start-of-life date less than or equal to SO date.

Product start-of-life date

Hope this blog helps!

Sage X3 Consulting

Powerful Capabilities and Flexibility

About Us

Greytrix is one stop solution provider for Sage ERP and Sage CRM needs. We provide complete end-to-end assistance for your technical consultations, product customizations, data migration, system integrations, third party add-on development and implementation expertise.

Greytrix have some unique solutions of Sage X3’s integration with Sage CRMSalesforce.com and Magento eCommerce. It also offers best-in-class Sage X3 customization and development services to Sage business partners, end users, and Sage PSG worldwide.

For more information on Sage X3 Integration and Services, please contact us at x3@greytrix.com .We will be glad to assist you.

Other Related Blogs:

– How to search product price list

– How to change the currency of all the BPs?

– Check the Price in different Currency Rates.

– Control Max Decimals of Currency in Sage X3

– Use of Multiple Ledger Currency in Transactions in Sage ERP X3


How to Modify the Posting Date of Sage X3 Transactions?

$
0
0

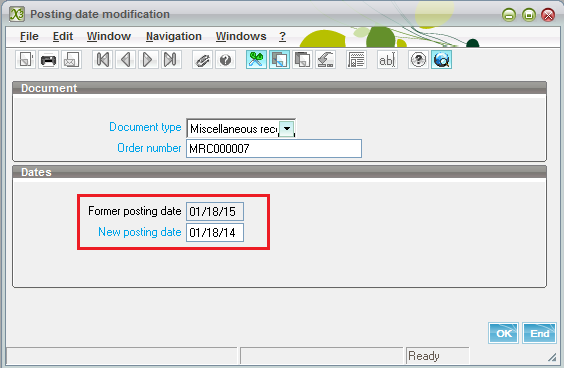
Sage X3 provides a way to change the posting date of the transaction later after creation.

Function: FUNIPTD (Posting date modification)

Navigation: Inventory > Utilities > Valuation > Posting date modification

Description:

Function allow user to changes the posting date of the truncation created in Sage X3.

Modify the Posting Date of Sage X3

Kindly refer to the below steps:

Step 1: Select a document type

Step 2: After selecting the document type, filter the related records in the Order number selection. Select the record for which you want to update the posting date.

Step 3: After selection of the record, it will auto-populate the original posting date in the Former positing date field. Enter the new posting date and click ok.

Step 4: System will update the new posting date, you can verify the same in the log generated.

Sage X3 Posting Date Modifications

Hope this blog helps!

About Us

Greytrix is one stop solution provider for Sage ERP and Sage CRM needs. We provide complete end-to-end assistance for your technical consultations, product customizations, data migration, system integrations, third party add-on development and implementation expertise.

Greytrix have some unique solutions of Sage X3’s integration with Sage CRMSalesforce.com and Magento eCommerce. It also offers best-in-class Sage X3 customization and development services to Sage business partners, end users, and Sage PSG worldwide.

For more information on Sage X3 Integration and Services, please contact us at x3@greytrix.com .We will be glad to assist you.

Related Blogs:

– How to make the Invoice Printing mandatory before posting?

– How to enable Posting button, if it is disabled in PO-Invoice

– Greytrix Sage X3 Blog 500+ posts and still getting bigger and better

– Automatic posting of Invoice

– How to avoid Non-existent postal code alert

How to Get Parameter Value by User?

$
0
0

It is easy to get the parameter value when the value is defined at folder level. But what if we need the parameter value by User?

Well! This blog will help you to get the parameter value by site with the help of the standard subprogram which is present in SUBAUS.src file.

Below is the code to get the parameter value by site.

Call PARAMUTIL(PARAM,VALEUR,USER,””) From SUBAUS

Here,

1. SITE = Local variable defined to store site.

2. PARAM= Parameter defined

3. VALEUR= Parameter Value in the String

4. USER= USER in Sage x3

Below is the snipplet for better understanding.

Parameter Value by User

Hope this blog helps!

About Us

Greytrix is one stop solution provider for Sage ERP and Sage CRM needs. We provide complete end-to-end assistance for your technical consultations, product customizations, data migration, system integrations, third party add-on development and implementation expertise.

Greytrix have some unique solutions of Sage X3’s integration with Sage CRMSalesforce.com and Magento eCommerce. It also offers best-in-class Sage X3 customization and development services to Sage business partners, end users, and Sage PSG worldwide.

For more information on Sage X3 Integration and Services, please contact us at x3@greytrix.com .We will be glad to assist you.

Related Blogs:

– How to set aggregate criteria of accounting interface parameters?

– How to copy Parameter Values from one folder to another..?

– Creating Parameter Values in Sage X3

– Setting Parameters in Actions function in Sage X3

– Setting Parameters in Recurring Task

How to enable/disable Statement Creation for Invoice in Sage X3?

$
0
0

We may come across the situation, where we want to enable/disable statement creation for particular invoice. Follow the below instructions to enable/Disable statement creation for invoice.

Step1: Go to Setup–>Sales–>Invoices–>Invoices

You will find the Invoice window and create a new invoice as shown below.

Mask Variable Initialization


Step2: After creating invoice, click the Open items button in order to enable/disable statement creation for invoice as shown below.

creation for invoice

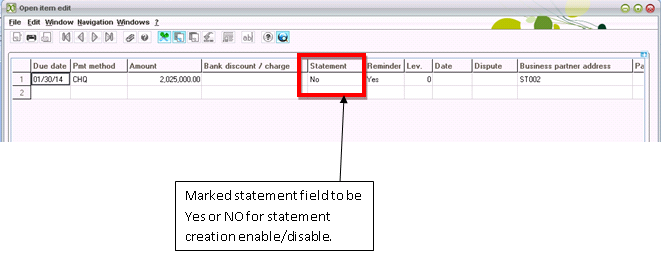
Step3: After above step, you will find the open items window. In the Open items window, you will find the statement field and in that we can enable/disable statement creation for the respective invoice as shown below.

Invoice statement creation

Note: You can enable/disable statement creation for the respective invoice before or after invoice posting.

Hope this blog helps!

About Us


Greytrix is one stop solution provider for Sage ERP and Sage CRM needs. We provide complete end-to-end assistance for your technical consultations, product customizations, data migration, system integrations, third party add-on development and implementation expertise.

Greytrix have some unique solutions of Sage X3’s integration with Sage CRMSalesforce.com and Magento eCommerce. It also offers best-in-class Sage X3 customization and development services to Sage business partners, end users, and Sage PSG worldwide.

For more information on Sage X3 Integration and Services, please contact us at x3@greytrix.com .We will be glad to assist you.

Related Blogs:

– How to make the Invoice Printing mandatory before posting?

– Emailing Customer Statement and Invoice as per customer preference.

– How to restrict purchase invoice creation without purchase receipt?

– How to use and setup the functionality of early discount / late charges in Supplier Invoice

How to Overcome “Product not managed in stock” error in Sage X3?

$
0
0

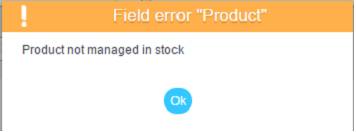
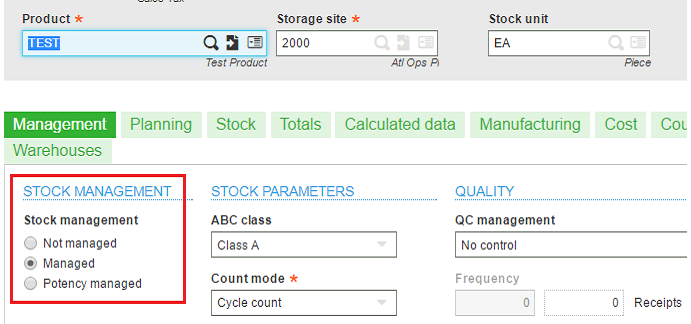
While creating any transaction in Sage X3, we will often get an error “Product not managed in stock“.

Particularly, this error is generated for the products which are not managed in stock. We can overcome this by managing the stock of that particular product.

For e.g., We may get this error while creating a miscellaneous receipt. Below is the screenshot of “Product not managed in stock” error.

Product not managed in stock

We can overcome this by following steps:

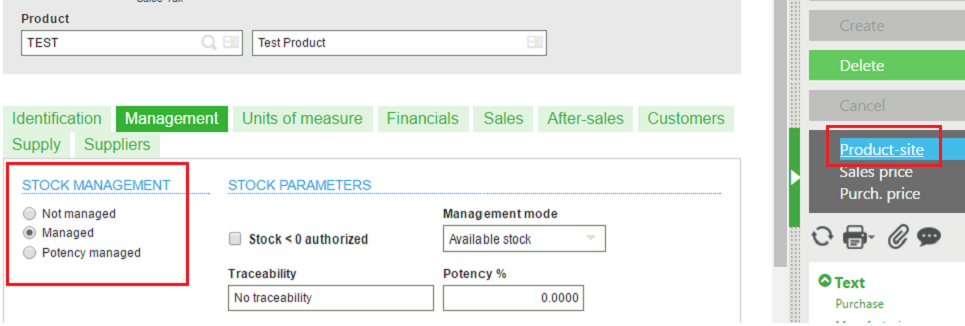
1. Navigate to: Common data > Products > Products

2. Go to Management tab > Stock Management.

3. Select values as Managed and click on Save

4. Go to Product-site option (on the right hand side).

Product not managed

On Product-site screen, perform below steps:

1. Go to Management tab > Stock Management.

2. Select values as Managed and click on Save

Product not managed in stock error

Hope this blog helps!

About Us


Greytrix is one stop solution provider for Sage ERP and Sage CRM needs. We provide complete end-to-end assistance for your technical consultations, product customizations, data migration, system integrations, third party add-on development and implementation expertise.

Greytrix have some unique solutions of Sage X3’s integration with Sage CRMSalesforce.com and Magento eCommerce. It also offers best-in-class Sage X3 customization and development services to Sage business partners, end users, and Sage PSG worldwide.

For more information on Sage X3 Integration and Services, please contact us at x3@greytrix.com .We will be glad to assist you.

Related Blogs:

– Filtering product selection list on the descriptions in Sage X3

– Product purchase restriction based on buyer.

– How to search product price list

– How to set the default price reason

– Check the Price in different Currency Rates.

How to resolve ‘Service Temporarily Unavailable’ while accessing Web Service in Sage X3?

$
0
0

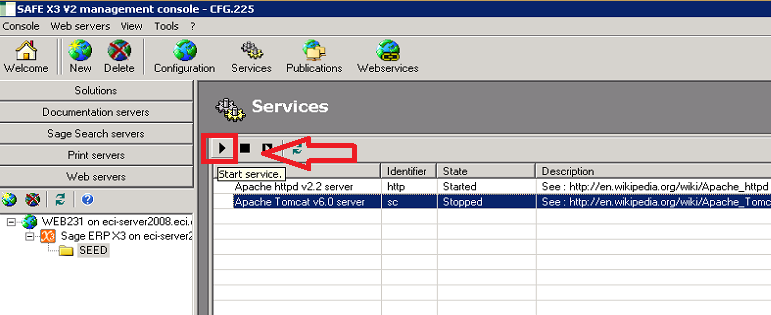
While accessing web services in Sage x3 you may get an error message ‘Service Temporarily Unavailable’. This error is related to services- not being started. To overcome this error open Sage X3 Management console and follow the below instructions:

– Click on the Web server tab from the left menu.

– Select the folder and then select the ‘Services’ icon from the top menu. Then start both ‘Apache httpd v2.2 server’ and ‘Apache Tomcat v6.0 server’ services (Refer to the below screen shot)

Service Temporarily Unavailable in Sage X3


Once you have started both the services, Log in again/refresh the web page to access the web service requester page.

Hope this blog helps!

Click here for Sage X3 Integration: GUMU for Salesforce – Sage X3 Integration


About Us


Greytrix is one stop solution provider for Sage ERP and Sage CRM needs. We provide complete end-to-end assistance for your technical consultations, product customizations, data migration, system integrations, third party add-on development and implementation expertise.

Greytrix have some unique solutions of Sage X3’s integration with Sage CRMSalesforce.com and Magento eCommerce. It also offers best-in-class Sage X3 customization and development services to Sage business partners, end users, and Sage PSG worldwide.


For more information on Sage X3 Integration and Services, please contact us at x3@greytrix.com .We will be glad to assist you.

Related Blogs:

– Add Multiple Web service for same X3 folder

– Create Web Service Pool for Integration with Sage X3
– Publishing the Web Service via Patch
– Maximum size for a Pool in X3
– Create Web Service Pool for Integration with Sage X3

Sage Summit 2016– The Time of the year has come!

$
0
0

That’s right, Sage Summit is getting bigger & better year on year. Sage Summit – 2015 at New Orleans was a grand event with over 33,151 total attendees that created a massive traffic for the SMEs. This included celebrity speakers, business experts, tech innovators, mentors, customers, sponsors, guests and partners making Sage Summit a peerless networking event.

Stage is now being set for the most awaited event of the year – Sage Summit 2016 at Chicago – McCormick Place themed “Ignite Your Passion”. It is ready to kick-start on July 25, 2016. A bigger stage with 55,000 registrations coming from over 80 countries. Event of this scale will be attended by President, CFO’s and Controllers across the varied sectors and Customer’s from – Finance, Manufacturing, Construction, Retail, Services and Other Industries are scheduled to attend.

Sage Summit 2016


SMEs of different verticals across the globe face similar business challenges. With Sage Summit and its well – connected Sage community, you create an opportunity to have one – on – one interaction with the people who have reaped benefits using Sage Software. You can explore technologies and tools required to improve the efficiency of your business. You can hear the real world stories and groundbreaking ideas from professionals and tycoons of your field who can enlighten the vision of your business. You’ll get all the hands-on product training and support you need to run and grow your business. By Sage Summit, you can connect with your peers and broaden your networking circle.

Greytrix marked its presence last year and we are returning this time as well!


ABOUT GREYTRIX


To introduce ourselves, we are Greytrix – Sage Gold Development Partner since 2008. We offer best-in-class Sage X3 Services to Sage X3 business partners worldwide. With an award winning GUMU™ framework, we provide integration solutions with your ERP, CRM and eCommerce systems. We bag expertise in the following solutions all with our GUMU™ framework:

  1. Salesforce integration with Sage X3 / Sage 300 / Sage 100
  2. eCommerce Magento integration with Sage X3 / Sage 300
  3. Sage CRM integration with Sage X3 / Sage 100 / Sage 300 / Sage 500
  4. Development Services for Sage X3 / Salesforce / Sage CRM / Sage 300/ Migrations

Greytrix is the one-stop-solution provider for all your Sage X3 needs. With integrated solutions, we make sure that business investments are not squandered allowing you to focus on core operations. With our services we deliver trust and our support as and when you require.

Think Greytrix, Grow Big!!

What’s inside the Greytrix Box at Sage Summit ‘16?

$
0
0

Well, you are hardly able to contain your excitement about What’s inside the Greytrix Box at Sage Summit ‘16? Good to see you again!

If you had ever been a visitor to our Greytrix booth in any of the Sage Summits you might be well aware of the “Greytrix Box”. But don’t you worry if you are planning to visit us at Booth No: 1203 and you will eventually know about it.

Greytrix has been a part of Sage Summit for years now – the largest conference for SME’s worldwide. It’s an event where knowledge meets experience and attendees like yourself, serious about business join every year to network, learn and discover how new technologies will boost success.

Better yet, each year the gifts inside the Greytrix Box is a total surprise and we take immense love and pleasure in gifting you.

Visit us at Booth #1203  Sage Summit 2016 at Chicago


Sage Summit 2016, Booth Gift Number 1203


In 2012, we had come up with an innovative “Stress Ball” as the element of the Greytrix Box. We understand the complexities of your business environment as you plan to flourish and offer business management solutions for Sage ERP and CRM that will efficiently relieve you just as the Stress ball relieves you from the stress.

A year after, in Sage Summit 2013, we brought to you a talisman for your business – “Wind Chimes”. A novel idea about the Wind Chimes is the positive impact that will bring happiness and luck to your business. Concurrently, we at Greytrix remain stalwart with our Sage ERP and CRM needs according to your business requirements.

Growing larger and prodigious year on year in our line of business, in 2014, we presented an “Elephant”, a national heritage animal of India. The elephant invoked the vastness that we as a software solutions provider have developed for your business. We are the largest Sage ERP and CRM Gold Development Partner and our offerings limit not only to integrations but also to consulting and development services.

In 2015 signified our decade long experience in Sage CRM and ERP offerings. It was a year of experience, great learnings and we wanted to express longevity for your business. “Tortoise” an ancient wisdom seeker brings knowledge, longevity, and prosperity at home. Similarly, Greytrix aspired to bring to your organization its decade-long experience for your business growth, stability, and profitability.

So what’s special this year in the Greytrix Box at Sage Summit? This year we have for you another artistic marvel for its perfection with an explicit relevance for your organization.

Well, turn the wheel of fortune to explore What’s inside the Greytrix Box by visiting our Booth No: 1203 at Sage Summit – 2016 between 25th & 28th July 2016 in McCormick Place at Chicago, Illinois.

ABOUT GREYTRIX


To introduce ourselves, we are Greytrix – Sage Gold Development Partner since 2008. We offer best-in-class Sage X3 Services to Sage X3 business partners worldwide. With an award winning GUMU™ framework, we provide integration solutions with your ERP, CRM and eCommerce systems. We bag expertise in the following solutions all with our GUMU™ framework:

– Salesforce integration with Sage X3 / Sage 300 / Sage 100

– eCommerce Magento integration with Sage X3 / Sage 300

– Sage CRM integration with Sage X3 / Sage 100 / Sage 300 / Sage 500

– Development Services for Sage X3 / Salesforce / Sage CRM / Sage 300/ Migrations

Greytrix is the one-stop-solution provider for all your Sage X3 needs. With integrated solutions, we make sure that business investments are not squandered allowing you to focus on core operations. With our services we deliver trust and our support as and when you require.

Think Greytrix, Grow Big!


How to assign a default Lot number in Receipt as supplier Lot or Document number?

$
0
0

Navigate: Common data -> Product -> Product categories

  1. Go to Management tab

In Lot management section, select Lot management option as Optional lot/Mandatory lot/Lot and sublot.

  1. Go to Receipt tab

In MANAGEMENT RULES grid,

  • Go to supplier Receipt
  • Select ‘Lot entry’ as Free/New Lot
  • Select ‘Lot by default’ as Supplier Lot/Document number

Lot number in Receipt

  1. Click on Save
  1. If Lot by default is Supplier lot, the system then copies supplier lot number entered in the lot number, as the default lot number value.
  1. If Lot by default is Document number, the system then proposes the number of the document that triggered the receipt into stock, as the default lot number value.
About Us


Greytrix is one stop solution provider for Sage ERP and Sage CRM needs. We provide complete end-to-end assistance for your technical consultations, product customizations, data migration, system integrations, third party add-on development and implementation expertise.

Greytrix have some unique solutions of Sage X3’s integration with Sage CRMSalesforce.com and Magento eCommerce. It also offers best-in-class Sage X3 customization and development services to Sage business partners, end users, and Sage PSG worldwide.

For more information on Sage X3 Integration and Services, please contact us at x3@greytrix.com .We will be glad to assist you.

Related Blogs:

Using Lot Re-Numbering in Sage X3
Managing Inventory at the Sub-Lot level in X3
Characteristic Level of LOT in Sage X3
How to Disable Inventory Shortage generation in Transactions and Inquiries
Purge Null Lots

How to Setup commitments for a Particular Ledger?

$
0
0

If you come across a scenario where you want to setup automatic generation of commitments then Sage X3 provides a functionality “Commitments” in the Ledger.

To set up this functionality:

Step 1:

Navigation:

Set up – Organizational Structure – Ledger

Step 2:

Check the Commitments in the Type of accounting of ledger.


Setup commitments for a ledger

Now whenever we create a PO for the particular ledger, a commitment is automatically generated for the same.

About Us

Greytrix is one stop solution provider for Sage ERP and Sage CRM needs. We provide complete end-to-end assistance for your technical consultations, product customizations, data migration, system integrations, third party add-on development and implementation expertise.

Greytrix have some unique solutions of Sage X3’s integration with Sage CRMSalesforce.com and Magento eCommerce. It also offers best-in-class Sage X3 customization and development services to Sage business partners, end users, and Sage PSG worldwide.

For more information on Sage X3 Integration and Services, please contact us at x3@greytrix.com .We will be glad to assist you.

Related Blogs:

– Check the Price in different Currency Rates.

– How to define the component sequence no in Bill of Material

– How to get the last sequence number through code?

– Control Max Decimals of Currency in Sage X3

– Use of Multiple Ledger Currency in Transactions in Sage ERP X3

How to create the Pre-commitment on Purchase Request?

$
0
0

Have you came across a scenario where you want to create the pre-commitment on purchase request after declaration of budget sage ERP? Sage X3 has a standard feature where we can create the pre-commitment in sage x3.

Follow the below steps

1. Navigate To: Set up>Parameters>Parameters values>ACH purchase

pre-commitment on purchase request

Set the parameter CMM(Budget control)>PURCMM=”Yes”

2. Navigate To: Set up>Parameters>Parameters values>BUD Budgeting>CMM

Parameter Values CMM


1) Set BUDCMMPRP=”Yes”
2) Set BUDCTLPSH=”Yes”
3) Set BUDCTLPSL=”Yes”

3. Navigate To:Set up>Parameters>Parameters values>ACH Purchase>APP

APP in ACH Purchase


Set PSHCMMLEV=”Upon Craetion”.

Create the purchase request and chekc the pre-commitments

purchase request

Hope this blog helps!
About Us

Greytrix is one stop solution provider for Sage ERP and Sage CRM needs. We provide complete end-to-end assistance for your technical consultations, product customizations, data migration, system integrations, third party add-on development and implementation expertise.

Greytrix have some unique solutions of Sage X3’s integration with Sage CRMSalesforce.com and Magento eCommerce. It also offers best-in-class Sage X3 customization and development services to Sage business partners, end users, and Sage PSG worldwide.

For more information on Sage X3 Integration and Services, please contact us at x3@greytrix.com .We will be glad to assist you.

Related Blogs:

– How to Overcome “Product not managed in stock” error in Sage X3?

– How to enable/disable Statement Creation for Invoice in Sage X3?

– How to Get Parameter Value by User?

– Set Criteria for Sales Order Line Closing using Delivery Tolerance %

– How to Test Web Service in Sage X3 version 9

How to Create a Stock Count in Sage X3?

$
0
0

Stock count is a process of counting inventory on a periodic basis throughout the year.

This is a two-step process as explained below-

  1. A stock count session is generated to select the products and /or locations to be counted along with other parameters and selection criteria.
  2. A Count screen is used to check the count.


To generate stock count sessions

Navigate: Stock > Counts > Stock count sessions

  1. Enter the site in which product is present and enter the name of the session.
  2. Enter several parameters to define the stock count conditions which are- Count by product or by location, Count mode The sorting criteria for lists, The processing type, The number of products in each class to be counted, Sizing information of the stock count lists etc.
  3. Enter selection criteria to select the products based on Product range, lot range, product category range, buyer range, location types, location, Business partner etc.
  4. Click on create button.
  5. Once created, a session can be immediately created, by clicking on Generate button.
  6. Or a simulation of the session can be created by clicking on Simulation button.
    • The system will calculate the number of lists, respective stock lines and number of products.
    • To match the result of this simulation, the filters can be modified in order to adjust the products to be counted.
  7. The Generation button is used to generate the stock count list(s) which are then displayed in the grid of session tab Lists.
    • Once lists are generated, the session filters will freeze, all the buttons at the bottom of the screen become inactive except for the Delete and End buttons.
    • Delete button can be used to delete all the generated lists. The selection criteria then become active again.

To check the count of the product

Navigate: Stock > Counts > Counts

  1. Select the worksheet under the left list of Stock count function and proceed the counting of the selected stock.
  2. A stock count list can have one of the following statuses,
    • To be counted: The list has been generated, but is not yet counted or is only partially counted.
    • Validated or partially validated: The count of all or a part of the stock count lines have been made and validated, the stock count variance movements have been posted therefore the validated lines can no longer be modified, only new stock count lines can be added to the list.
    • Closed: the counting process is complete, all stock count lines have been validated, and the [Close] button can be used to close the stock count list to prohibit the addition of any new stock count line.

    Stock Count


  1. Enter the counted quantity for a line either in packing units or in stock units i.e. the stock on ‘Stock STK’ field and the stock count on ‘Counted stock PAC’ fields
  2. The entry of a null stock can be entered using the “zero stock” indicator for the line concerned.
  3. If the product is serial numbers managed, the quantity for each stock count line is automatically set to 1, and cannot be modified.
  4. During the stock count, if a product, or a lot, sub-lot etc. is found physically in stock whilst it is non-existent in the theoretic stock, then the count for this stock can be added using following ways

a) By the entry of a new line during the count entry in the detail window

Stock Count Detail

b) By right-clicking on a grouping line to use the ‘Insert line(s)’ function.

Stock Count snapshot

c) Or also by entry of a new line directly at the level of the group screen.

  1. After checking the quantity click on ‘Save’
  2. Click on the ‘Validation’ button to validate the stock count
  3. The stock count will be updated in the system.

Note:

  • The stock count lines are valued according to the rule assigned for issue valuations in the product record.
  • The variance movements for a stock count are valued according to the rule retained in the product valuation method

Hope this blog helps!

About Us

Greytrix is one stop solution provider for Sage ERP and Sage CRM needs. We provide complete end-to-end assistance for your technical consultations, product customizations, data migration, system integrations, third party add-on development and implementation expertise.

Greytrix have some unique solutions of Sage X3’s integration with Sage CRMSalesforce.com and Magento eCommerce. It also offers best-in-class Sage X3 customization and development services to Sage business partners, end users, and Sage PSG worldwide.

For more information on Sage X3 Integration and Services, please contact us at x3@greytrix.com .We will be glad to assist you.

Other Related Blogs:

  1. Stock being counted in Sage X3
  2. How to Reserve the Stock for Particular Customer?
  3. How to Overcome “Product not managed in stock” error in Sage X3?
  4. Entry Point to Update Custom Fields of STOJOU (Stock journal) table
  5. How to Reserve the Stock for Particular Customer?

How to Copy Multi-level BOM?

$
0
0

We may come across a scenario where you need to copy a BOM which may have same usage with different BOM Code.

Sage X3 has a feature in which you can create copy of BOM. Several types of BOM copies are necessary to facilitate the management of the technical data:


– First level BOM copy of a parent product to another parent product,

– First level BOM copy of the selected parent product to the other selected parent product,

– Multi-level BOM copy of the selected parent product to the other selected parent product,

The first mentioned functionality is provided by the BOM management, by duplication or fusion.


The two other functionalities are possible via the BOM copy menu that is used to copy a source alternative to a destination alternative.

This feature can be achieved by following below steps:-

Navigate to Common Data -> BOMs -> Copy BOM.


In the below screen shot, processing mode is 1st Level. In this case, the copy of parent product is created with destination BOM Code and same number of components.

Copy Multi-level BOM

Sage ERP X3 Multi-level BOM

Now if we select Processing mode as “Multi-Level”, the copy of parent product will be created along with all the components of parent product as well as sub-BOMs.

Copy BOM

As you can see in the below screen-shot, the sub level BOM is also displayed while creation.

Sage X3 BOM

The parent product got created and also its component which was also parent product of some other components also got created at once.

Sage X3 Copy BOM

This method saves our time and effort in creating a copy of multi – level BOM.


Hope this blog helps!

About Us

Greytrix is one stop solution provider for Sage ERP and Sage CRM needs. We provide complete end-to-end assistance for your technical consultations, product customizations, data migration, system integrations, third party add-on development and implementation expertise.

Greytrix have some unique solutions of Sage X3’s integration with Sage CRMSalesforce.com and Magento eCommerce. It also offers best-in-class Sage X3 customization and development services to Sage business partners, end users, and Sage PSG worldwide.

For more information on Sage X3 Integration and Services, please contact us at x3@greytrix.com .We will be glad to assist you.

Other Related Blogs:

1. How to replace components in several BOM parents?

2. How to define the routing sequence no?

3. How to do component requirement calculation?

4. How to define the component sequence no in the bill of material?

5. Components where used

How to Increase the Address Lines for a Customer?

$
0
0

Increase the Address Lines

Sage X3 has a feature in which we can increase the address lines for a customer.  This feature can be achieved by following below steps:-

Navigate to Set up → General parameters → Folders → SEED

Under screens tab, there are various activity codes which are used for functional sizing of the screens. To increase the address lines for customers, Go to activity code –

Change the size and tab out. Click on Save button.

Sage X3 Address Lines


Now go to Sage X3 Folder and in the same path (Set up → General parameters → Folders → SEED)

Click on Validation button to validate the screen.


Sage ERP X3 Folder Generation


If we make changes in any folder, perform validation in Sage X3 folder as it is the base folder.

Hope this helps.


About Us

Greytrix is one stop solution provider for Sage ERP and Sage CRM needs. We provide complete end-to-end assistance for your technical consultations, product customizations, data migration, system integrations, third party add-on development and implementation expertise.

Greytrix have some unique solutions of Sage X3’s integration with Sage CRMSalesforce.com and Magento eCommerce. It also offers best-in-class Sage X3 customization and development services to Sage business partners, end users, and Sage PSG worldwide.

For more information on Sage X3 Integration and Services, please contact us at x3@greytrix.com .We will be glad to assist you.

Other Related Blogs:

1. How to restrict to modify the delivery address on the detail line

2. How to restrict to modify the Sales representative on the detail line

3. How to delete Detail(Product)lines from Sales order via Import template ?

4. How to add an additional invoicing element on the line items

5. How to give different color to the line in the grid

How to Find the Number of Fields Defined in a Screen?

$
0
0

We may come across a situation where we would like to know the number of fields in a Screen if it is open.  Sage X3 has a special feature of getting number of fields in a screen with the help of “masknbf” keyword which will return the value in integer.

Syntax:    masknbf(<class | num_exp>)

Parameter:  

1. Class: Description of a screen (The class must exist.)

2. num_exp: Numeric expression that describes a screen (num_exp >= 0)

Example:

If we want to know how many fields does the Product Header screen (ITM0) contain then refer to the below snippet of code for better understanding.

Number of Fields in a Screen

Hope this helps.

Connect with Us on


 facebookFacebook


twitterTwitter


google-plusGoogle+


Greytrix linkedinLinkedIn


Greytrix YoutubeYouTube


About Us


Greytrix is one stop solution provider for Sage ERP and Sage CRM needs. We provide complete end-to-end assistance for your technical consultations, product customizations, data migration, system integrations, third party add-on development and implementation expertise.

Greytrix have some unique solutions of Sage X3’s integration with Sage CRMSalesforce.com and Magento eCommerce. It also offers best-in-class Sage X3 customization and development services to Sage business partners, end users, and Sage PSG worldwide.

For more information on Sage X3 Integration and Services, please contact us at x3@greytrix.com .We will be glad to assist you.

Other Related Blogs:

1. Getting number of fields in table

2. How to Find a Factorial of Any Integer Number in Sage X3?

3. How to find fields of the table

4. How to roundup decimal number to two decimal places

5. Hiding fields in Screen Dynamically


How to Create Contract Purchase Order in Sage X3?

$
0
0

A contract order is a long term commitment with a supplier concerning one or more products, for a global quantity and value to be delivered. The contract order is further divided in shipment requests that are made as a function of the contract. A contract can also be intercompany or site transfer. These shipment requests are processed via Receipts.

A contract order is made up of a Contract details in header, product details in lines of product, and a delivery schedule.

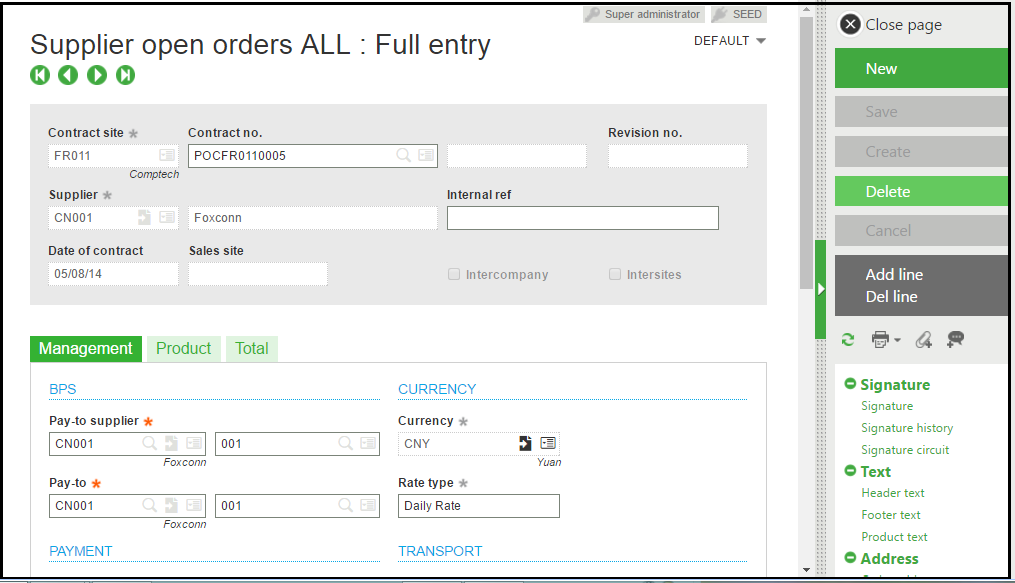
To create a Contract Purchase order, Navigate: Purchasing -> Orders -> Open Orders (GESPOC)

  1. Enter the mandatory fields’ contract site, supplier details (address, rate type), receiving site, and payment details.
  2. A contract validity defines the period for which contract is valid e.g. 05/08/15 to 05/08/16.
  3. You can also add transportation details like Delivery mode, Carrier etc.
  4. If this contract has cost center or project dimensions etc., this can be entered in the Analytical grid.

Contract Purchase Order in Sage X3

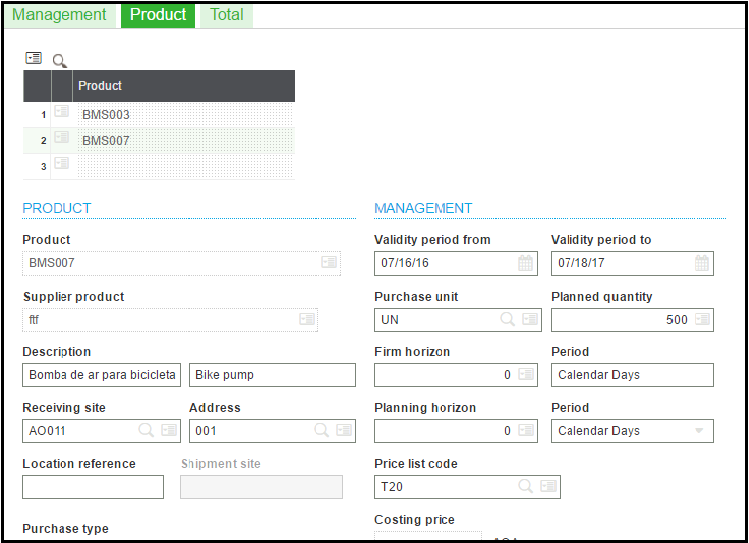
  1. In the product tab, one or more products can be entered for the contract along with its validity and global quantity in the Planned quantity e.g. 10000 units for the contract.
  2. The price of the product can be defined in the pricelist along with its effective date, therefore one or more pricelists can be defined in the contract.
  3. You can define a Firm Horizon, then by default delivery requests will be Firm.
  4. Firm Horizon is defined in Calendar Days i.e. Can be Distributed over days of the week (from Monday to Sunday)
  5. You can define a Planning Horizon, then by default, delivery requests will be planned.
  6. Planning Horizon is defined in Calendar Days, Work Days, Weeks, Fortnights or Months i.e. Can be Distributed over 5 weeks.

Purchase Order

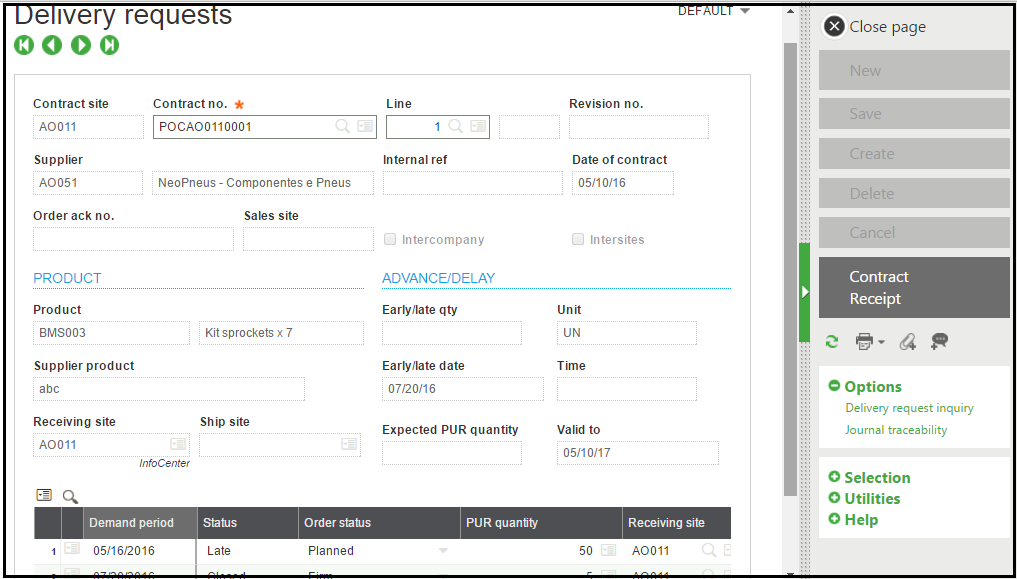
To create Delivery requests for Contract, Navigate:  Purchasing > Orders > Shipment Requests (Gespod)

  1. A Delivery request creates a Purchase Order
    1. As Planned, if order status is Planned
    2. As Firm, if order status is Firm
  2. From a Delivery request, it is possible to access to :
    1. A Delivery Request Inquiry (GESPOV) , a Journal traceability from menu Options
    2. The original contract (GESPOC) from button Contract
    3. Last receipts from button Receipt
  3. Demand period can be entered in 3 formats
    1. Date, Week, Month
  4. A Delivery request can be printed (list or record)

Delivery Request

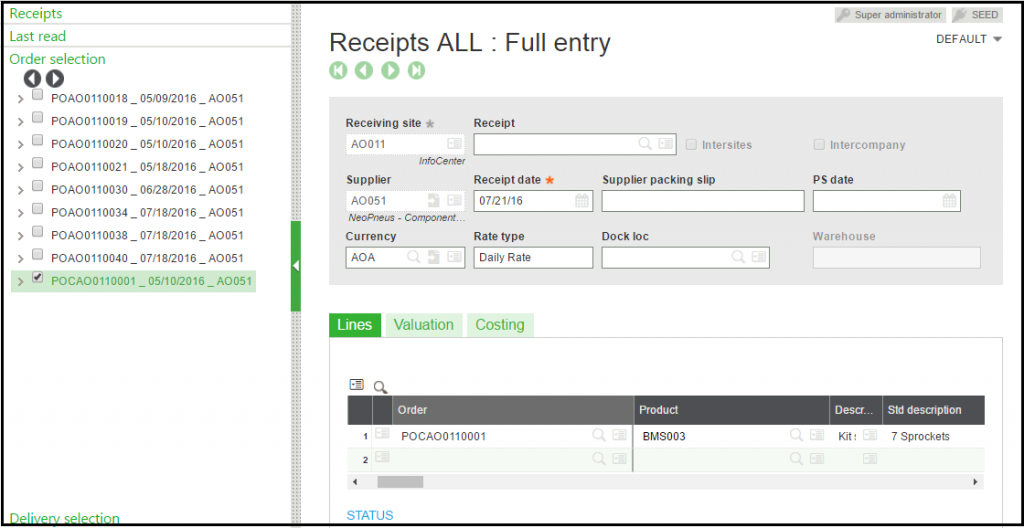
To create receipts for Contract, Navigate:  Purchasing > Receipts > Receipts (GESPTH2)

  1. Receipts are used to receive firm ordered quantities.
  2. When the firm Delivery request is created, the contract Order can be selected from ‘Order selection’ in left list of receipt.
  3. This way receipts can be created for all the delivery requests within the contract.
  4. Therefore all the receipts have same contract Purchase order reference.

Receipts all Entry in Sage X3


About Us


Greytrix is one stop solution provider for Sage ERP and Sage CRM needs. We provide complete end-to-end assistance for your technical consultations, product customizations, data migration, system integrations, third party add-on development and implementation expertise.

Greytrix have some unique solutions of Sage X3’s integration with Sage CRMSalesforce.com and Magento eCommerce. It also offers best-in-class Sage X3 customization and development services to Sage business partners, end users, and Sage PSG worldwide.

For more information on Sage X3 Integration and Services, please contact us at x3@greytrix.com .We will be glad to assist you.

Automatic Remittance Generation through Batch

$
0
0

In the business process we may need a process wherein the Remittance will be created automatically on daily basis. In Sage X3 we can do this in simple way by using the Batch process. Refer to below steps for the same.

Step 1: Create the task follow the below steps for the same:

  • Navigate to Usage > Batch server >
  • “Ctrl+n” for new task entry. Enter the task code “YREMITNCE”
  • Mark Active checkbox
  • Enter the function name GENBORREM
  • Refer to below screen shot for more clarification.

Automatic Remittance Generation

Step 2: Create the Recurring task, follow the below steps:

  • Navigate to Usage > Batch server > Recurring task management
  • “Ctrl+n” for new task entry. Enter the Recurring task code “YREMITNCE”
  • Enter the Task code “YREMITNCE”
  • Mark Active checkbox
  • Enter the recurrence set up field as per your requirement

Recurring Task Management

  • Click on Parameter definition button
  • Set the Remittance generation parameter in the screen

Automatic Remittance Creation

  • Now the remittance generation function will automatically call in the batch task as per the set up.
  • You can monitor the batch execution in the below function

Navigate to Usage > Batch server > Request management

Hope this helps.

Connect with Us on


facebookFacebook


twitterTwitter


google-plusGoogle+


Greytrix linkedinLinkedIn


Greytrix YoutubeYouTube


About Us


Greytrix is one stop solution provider for Sage ERP and Sage CRM needs. We provide complete end-to-end assistance for your technical consultations, product customizations, data migration, system integrations, third party add-on development and implementation expertise.

Greytrix have some unique solutions of Sage X3’s integration with Sage CRMSalesforce.com and Magento eCommerce. It also offers best-in-class Sage X3 customization and development services to Sage business partners, end users, and Sage PSG worldwide.

For more information on Sage X3 Integration and Services, please contact us at x3@greytrix.com .We will be glad to assist you.

Other Related Blogs:

– How to enable the ‘Use of batch files’ in Sage X3?

– Set Batch Server to auto on mode in Sage ERP X3

– Integrating a Batch Task Patch in X3

– Making Bank Payments using the ACH NACHA Bank files from Sage X3

– How to display Progress window in X3

How to Concatenate Two Strings

$
0
0

You may come across the situation, where you want to concatenate a char or CLOB value to a char or CLOB variable. Sage X3 has a special Keyword named APPEND to perform the concatenation of two or more string values.

From a functional point of view, Append Field1, Field2 is equivalent to Field1+= Field2.  if ‘Field1’ and ‘Field2′ are strings or CLOBs. Execution is fast using Append keyword especially if you build long strings stored in CLOBs.

concatenate two strings

The output of the above code is following:

sage X3-concatenate two strings

Also Read:

– Determine Record Size of Tables in X3

– How to get Row count in Sage X3?

– How to get the number of records which is deleted by Delete Command

– How to get the number of records modified by Update Command

– How to determine if a mask variable can be entered or is displayed..?

How to Find the Number of Records in a Table?

$
0
0

Sage X3 has a solution which is used to find the number of records in a table with the help of keyword “nbrecord” along condition.

 In order to know the number of records in the table, perform the below query.

Number of records in a table

The output will be number of the clients available against the corresponding table.

number of the clients


About Us


Greytrix is one stop solution provider for Sage ERP and Sage CRM needs. We provide complete end-to-end assistance for your technical consultations, product customizations, data migration, system integrations, third party add-on development and implementation expertise.

Greytrix have some unique solutions of Sage X3’s integration with Sage CRMSalesforce.com and Magento eCommerce. It also offers best-in-class Sage X3 customization and development services to Sage business partners, end users, and Sage PSG worldwide.

For more information on Sage X3 Integration and Services, please contact us at x3@greytrix.com .We will be glad to assist you.

Other Related Blogs:

– Determine Record Size of Tables in X3

– How to get Rowcount in Sage X3?

– How to get the number of records which is deleted by Delete Command

– How to get the number of records modified by Update Command

Get Year in a Date for Sage X3 version 7

$
0
0

You may come across the situation where you want year from particular date. Then you may probably use a format$ keyword function to get the year value. But in Sage x3 version 7 you can use another Keyword i.e. “year”. The type of result is Integer.

year: year returns the day number of a valid date, including the century.

Syntax:

year(DATE_EXPR)

Parameter details:

– DATE_EXPR is an expression returning a date.

Kindly refer to the below snippet of code for better understanding.

Get Year in a Date for Sage x3


Hope this helps.

About Us


Greytrix is one stop solution provider for Sage ERP and Sage CRM needs. We provide complete end-to-end assistance for your technical consultations, product customizations, data migration, system integrations, third party add-on development and implementation expertise.

Greytrix have some unique solutions of Sage X3’s integration with Sage CRMSalesforce.com and Magento eCommerce. It also offers best-in-class Sage X3 customization and development services to Sage business partners, end users, and Sage PSG worldwide.

For more information on Sage X3 Integration and Services, please contact us at x3@greytrix.com .We will be glad to assist you.

Other Related Blogs:

– Fiscal Year End Process in Sage X3

– How to Know Start date of Week of any Year?

– How to handle two digit year in date

– Open a Closed Fiscal Period in Sage X3

Viewing all 1515 articles
Browse latest View live


<script src="https://jsc.adskeeper.com/r/s/rssing.com.1596347.js" async> </script>