Quantcast
Channel: Sage X3 – Tips, Tricks and Components
Viewing all 1519 articles
Browse latest View live

Managing Inventory at the Sub-Lot level in X3

$
0
0

Sage X3 allows user to maintain Sub-Lot for products. In Order to manage Inventory at a sub-lot level you need to activate the “SLT” Code at the Folder Level. 

Kindly select ‘General Parameters’ under ‘Parameters’ Section and then select the ‘Folders’ option.

Parameters -> General Parameters -> Folders (GESADS)

Then you need to change the ‘Active’ option to Yes for the ‘SLT’ code as displayed in the above screenshot.

Click on OK then logout and Login to the X3 folder and perform the Folder validation from the above screen (GESADS).

Now you are all set to maintain your inventory at Sublot Level. Create a new Product or assign a Sublot to the existing Products by selecting ‘lot and Sublot’ radio button in the ‘Control’ tab under lot management section of the Product Master Screen.

Hope this helps.


Inventory Counts through ADC

$
0
0

As we know ADC is a module in Sage X3 available for Radio Frequency terminals. One of the features in the ADC allows you to manually enter the Inventory counts through Radio Frequency terminal.

 Below are the steps for updating the Inventory Counts through ADC Screen:

  1. Navigate via ADCs->Inventory->Counts
  2. Enter Count Session No. (as defined in Inventory sessions screen)
  3. Enter the Line No. of the Item to be updated.
  4. Enter the New count you want to update in the “Counted” field as shown below.


Note: Below the pre-requisites before using the ADC Count function.

  1. Ensure if “ADC” activity code is activated on both Folder level as well as Activity code level.
  2. Ensure if Site is selected via. ADCs->Set Site

Also, you can open the ADC Count screen through Web Server.

Below are the steps for the same:

  1. Login into Web Server via http://localhost:28880/root/ and click on Terminal Server tab.
  2. Click on Connection.
  3. A java panel would ask to select Sage X3 Folder
  4. Enter the credentials for Sage X3 login.
  5. Navigate via ADCs->Inventory->Count and follow the same procedure as above.

 Below is the screenshot of the ADC Count screen through Terminal Server in Web Server.

Note: In addition to the above notes, below the pre-requisites before using the ADC Count feature using Web Server.

  1. Ensure if the Web Server is setup in the Sage X3 Server.
  2. Ensure if ADC Module is added in the User Menu Profile.

Stock Quantitative Update with Direct Invoice

$
0
0

I came across a scenario where I needed to create a direct Invoice in Sage X3 [i.e. one without a Sales Order or Delivery]. But after the Invoice creation, to my surprise the stock quantity still remains unaffected even after posting the Invoice.
After some findings and research I found a solution which solved my problem. So I thought of sharing the same with the people out there, who are looking for X3 tips and tricks.

All you need to do on the Sales Invoice screen is:

1)      Set the “Stock transaction” to “Yes”. This option allows changing the Stock availability. If set to “No” will have no effect on the stock availability.

2)      Set the “Shipment site”. This is the location where the actual change in the stock will take place.

The above 2 steps will solve the problem.

Entry transaction Validation via Patch

$
0
0

Whenever any changes are performed on the order, shipment or any other screens, the Entry Transaction validation becomes must. But whenever we need to deploy these changes on the clients end we create a patch.

But after deploying it happens that we need to manually validate the transactions, isn’t this seems to be truly not a programmer job.
Thus we found a method which will automatically validate these transactions while the patch is deployed.

To undergo this we need to add the object “EXE” in patch while creating it.
Suppose we need to validate the Sales Order Entry Transactions, as seen in the below screen shot the CODE for the sales order = SLC.

While creating patch includes this code with prefix SUB i.e. ‘SUBSLC’ under object name with type ‘EXE’. This will automatically validate the sales order entry transaction.

Hope this clarifies.

Check BP Credit Limit in X3

$
0
0

Sage ERP X3 has come up with an interesting feature through which we can easily handle the credit holds functionality. There are 3 option buttons provided on Customer screen in Management tab check, no check and hold with the help of this button we can easily manage the Credit Check of the customer.

  • Check – If “Check” option is selected then the system taps up all the customers while the delivery is made, there will be a check whether Authorized Credit is greater than Credit Level Total or not. If the Authorized Credit is found greater than or equal to Credit Level Total the shipment is allowed else an error message pops up “Undeliverable Order : Customer Held”.
  •   No Check – The “No Check” option as name suggests no check is done while the shipment is performed irrespective of the authorized credit and the credit level total.
  •    Hold – If we want to put customers on Hold we can easily do this by selecting “Hold” option. If the customer is on hold then it will not allow shipment of any of his order it will give an error message as “Undeliverable Order: Customer Held”.


ReOpen Closed Purchase Orders

$
0
0

Sage X3 provides the feature of Re-opening the Closed Purchase order to add additional line or edit the existing one.

The function which provides this feature is “Close and Re-Open orders”. To navigate through this screen we need to go to Purchasing > Orders > Close and Re-Open Orders (Process name is FUNCLEAR). You will get the below screen. Enter the selection criteria and click Ok.

Once we click ok you will get the below screen. The grid below contains the list of purchase orders, you need to just change its Processing value to Cancel and then click on OK. The Purchase Order status will be reopened and now you can add new lines to it or can edit the existing lines.

While editing the Re-Opened purchase order first it will give below message.

If we select Yes then only it will allow us to edit the existing lines otherwise whenever you try to edit the existing lines, it will give the below error message.

And also while changing the quantity of the existing lines it will not allow you to enter the quantity less than the previous one.

Now if you go for creating the receipt against this purchase order, it will only consider the incremented quantity of the existing lines as shown in below screen.

This information was very helpful to me and I hope the same will be for you as well.

Determine Position of Invoicing Element

$
0
0

In X3 we have different invoicing elements like Freight Charges, Discount %, Discount $ etc. that are used for applying the discount/charges on the orders/shipment lines (Refer below screen shot).

Now if we are updating these freight elements from third party system via integration we use modes like  web services and for this we need to know the line number/position of the freight element in the sales order to update right element with right value. For this we just have to create the Global Variable that holds the value of these freight elements.

Navigate through Development -> Data and parameters -> Development Setup -> Parameter definitions

Here you have to create the global variable (here GFRENUM) that holds the value of the line number of invoicing element in sales order or shipment screens.

This Global variable can be used in coding to update Invoicing elements.

Hope this clarifies!

Periodic Processing of Inventory Valuation

$
0
0

There are scenarios where user is doing Inventory movements with various Inventory transactions but cannot trace the same in the accounting journals even after all the transactions are posted. This blog explains how the various stock movements such as Sales, Purchase, Receipt, etc. can be seen posted to accounting.

When user creates a Sales Invoice for particular product in Sage X3 and has posted it successfully then the journal that’s getting created in Accounting Financials is for that particular Sales Invoice only i.e. only the Customer’s  Account and Sales account gets reflected, there won’t be any journals with Inventory account or Cost of Goods Sold[COGS] account.

So in this scenario where the one needs to get the Stock Journals to be created after doing any transactions in Sage X3 you just need to follow the below few steps:

1)      First navigate to Inventory -> Periodic Processing -> Valuation -> Account. Interface

2)      Enter the Processing Date with which the user needs to process the transactions that are posted till this date.

3)      Enter Financial Site for which the user needs to process the transactions. If it is blank then transactions for all the sites are considered.

4)      Click on OK button.

There you go and check the financials where you can find thw inventory affect.


How to perform an Inter-Site Transfers

$
0
0

The Inter-site transfers function is used to intervene on a stock line or a group of stock lines so as to transfer stock from one site to another for the one or several companies.

The Inter-Site Transfer screen can be accessed by navigating through Inventory->Receipt/Issue transactions->Inter-Site Transfers (Process name: GESSIS)

The Inter-Site transfer will transfer only an already created receipt (The receipt can be a Purchase Order Receipt or a Manual Inventory Receipt) to different destination Site. Note that you cannot manually create a new receipt from one location to another. So if you need to create a stock transfer, say from location D22 to P21 then firstly, you will have to create either a manual Stock Receipt from Inventory or a Receipt from purchasing module at location D22.

Once you have created a receipt for your desired product at location D22, open the inter-site transfer screen and enter the source and the destination site (which would be D22 and P21 in our example). The ‘Site’ field acts as the Source site and the field ‘Destination Site’ acts as the Destination Site. You then need to enter the product for which you are creating an Inter-Site Transfer in the field Product.

Note that in the Inter-Site Transfer screen we cannot add an item by double clicking in the Product field displayed in the grid.

Once you have entered the Product code click on ‘Stock Selection’ in the Left Browser. You will be able to see all the receipts that were made at Location D22 for the Product that you have selected in the Screen. Select the receipts that you wish to transfer by the clicking on the receipt line from the Left Browser. The selected receipt line will get populated in the Stock Lines Grid. You can also edit the quantities in the line if required.

Click on ‘Create’ Button to transfer the selected quantities from location D22 to P21. And there you go. You have successfully created your Inter-Site Transfer.   


How to Allow Specific Processing without Folder Validation

$
0
0

Whenever the folder is not marked as a “Specific Folder”, all the specific processes (TRT\ADX) will not be installed in the folder. But just marking it as specific does not serves the purpose we need to go for the folder Validation.

But the validation takes a longer time and thus if we need to do the task on urgent basis it becomes difficult to spare so much time. Thus we have got a solution which will truly mark the folder as ‘Specific’ but without validation.

Here is a tip for enabling the vertical/specific processing without validating the folder:

 1.  Navigate through Setup->General Parameter->Folders and tick the ‘Specific Folder’ box and save the folder record. Do not validate.

2. Select Development > Data and Parameters > Development Setup > Parameter Definition

3. Select parameter SPECIF

4.   Make it “Changeable” (tick the box)

5. Navigate through Parameters > General Parameters > Parameter Value and select the SUP chapter. _Group FDR

6.Locate the SPECIF parameter, set it to ‘Yes’.

7. Log off, log back in.

Hope this helps.

How to setup tax rates for different companies

$
0
0

I was creating a transaction in X3 and was stuck as the Tax was not getting calculated. I was just wondering the reason for the tax not getting calculated.

I can say that “I discovered’ that In order to calculate the tax you need to add the company code to the specific tax rate codes.

Below are the steps for adding the company code against the tax rate:

1. Navigate through Common Data -> Common Tables-> Tax rate

2. Select the tax rate and the select the company in the Grid and save the tax code.

Now if you use this tax rate for creating X3 Transactions then the tax rate will automatically be calculated as per the rate setup for the company.

Accounting Task in X3

$
0
0

There are several times when user has posted any Invoice, Receipt or Payment and is not able to find the journal entry regarding the same, though the transaction is marked as validated.

We found that the X3 works on the batch server fundamentals which needs to be activated for these transactions to get reflected in the accounting journals. User just needs to follow the below simple steps.

1)      Go to Usage -> Batch Server -> Server activation – User will be prompted for Server activation. Click on “yes”

2) Sage X3 will start the server and will prompt with the server activation number.


3) Once the server is activated go to Usage -> Batch server -> Accounting tasks.
Here the task status will be “Inactive” and the Journals on hold will have the count of all that transactions that were posted but did not created the journal entry since the server was not active.


4) Start the accounting task by clicking “Run now”. It will prompt to start the accounting tasks. Click on “Yes”
5) Once the accounting task has been started, click on Update button that will create all the journals that were on hold and will change the task status from “Inactive” to “Active” and will make the count of Journals on hold to ‘0’


That’s it; all the transactions that were posted by the user can now be seen in the journal entry of the financials part of the Sage X3.

Publishing the Web Service via Patch

$
0
0

In our previous blog i.e. “Entry transaction Validation via Patch “we explained how to validate entry transactions through patch. Usually when we talk about integration the web service becomes an important mediator between the 2 systems.

Then it becomes self-explanatory that we wish that these should also be getting published through the patch.

To achieve it we write a small program and include it in the patch with type EXE which will publish the web services.

Below is the snippet of the code which does the publishing of the WS. You need to include this in your code.

Call PUBLIWS(APPLI,[F:AWE]PUBLI) From SUBAWE

 Where APPLI is X3 folder name and PUBLI will be the name of webservices name.

This will publish the web Services. After this we just have to restart the pool from web service tester. For this we have to follow the below steps:

Follow the link: http://localhost:28880/root/ and under the Web Service sever just stop the group and restart it. (Refer the below screen shot).

Hope this clarifies.

Create Web Service Pool for Integration with Sage X3

$
0
0

** We have experience in all flavors of integration having an experienced team of over 10+ years in Sage Product Lines. Contact us on x3@greytrix.com to discuss more about integrations with X3 and how this can be done effectively, quickly and in a cost effective manner **

Currently we find people are looking for integrating X3 with their third party applications. But to connect any of this application we need to use web services of X3 as a data transmitter but the first and foremost requirement for this is to create the Web Service pool which is helpful in movement of data between the two systems.

Also Read : Integration options in Sage ERP X3

This can be created by using the below steps:

  1. Open Sage X3 Console
  2. Click the “Web Servers” Button and select the Web Server Solution:

3.    Click the “Web Services” Button:

4.  In the Web Services Window expand the solution and select folder icons like so and click add button.

5. Enter the following information into the data grid:

  1. Alias = Alias name given to the Web service pool
  2. Language = Language to use for the web service in most cases this will be “ENG”
  3. Userid = Sage ERP X3 user for the web service to use
  4. Password = Password for the Sage ERP X3 user
  5. Osuserid = Operating System User ID for the  web service pool to use
  6. Ospassword = Password for User ID supplied
  7. Maxsize = Maximum number of connections available to the pool
  8. Initsize = Initial number of connections for the pool

6.    Click the Apply Button:

7.    The web service pool will be created.  Close out of any windows and the Sage X3 Management Console once completed.

Once this pool is created, you can use this to move the data between the two systems.

Re-Order Feature in Sage X3

$
0
0

The Re-Order Level in any ERP plays a significant role in checking up the Inventory Levels and manages the inventory.

All this data statistics is handled using Location in X3, this location is assigned to Sites. The Location has an option to assign the Reorder Level point for every location. Lets understand it with an example:

  • Reorder threshold: 30 STK (stocking unit)
  • Maximum Qty: 120 STK
  • Reorder PAC (packing unit) Box of 10
  • Economic Qty: 5 Boxes
  • For a location stock of 20 STK, the system will create a requirement of 2*5 boxes = 100 STK.
  • The location stock will be 120 STK (= Maximum quantity)
  • For a location stock of 25 STK, the system will create a requirement of 1*5 boxes = 50 STK.
  • The stock in the location will be 75 STK (< Max qty).

Note:

In order to manage the replenishment of shortages, it is impossible to define a threshold and a maximum quantity of 0. In this way the replenishment will only be proposed in the case of a shortage at the location (this can be of use in the replacement of sub-contractors). It is the only case where the economic quantity can be greater than the maximum quantity.

Hope this helps in understanding Reorder fundamentals.


Implementing Parent and Child Company in X3

$
0
0

Sage ERP X3 has come up with an interesting feature through which we can easily achieve feature of assigning Parent and Child Company.

The Customers in Sage X3 has a feature termed as Bill To and Pay-By which we have explained below and this can be made to use as Parent and Child Company.

  1. Bill-to: This field allows us to select the customer against whom the invoice should be generated. From the above screen shot for customer “C1101” I have selected the “C1102” as Bill-to customer. Now whenever we create any order against the “C1101” customer, the invoice balance will be raised against the “C1102”, and after the Invoice is posted the invoice journal will be created against Bill-to customer only.
  2. Pay-by: This field allows us to select the different Pay-By customer for a particular customer. From the above screen shot for customer “C1101” I have selected the “C1103” as Pay-by customer. Now whenever we go for the payment of invoice it will create the receipt entry against the Pay-by customer i.e. “C1103” and when we post the receipt journal will be created against Pay-by customer only.

 Here we can consider C1101 as Child Company and C1102 as parent company.

Calling Screens from Dashboard

$
0
0

Sage ERP X3 has interesting feature which support the Dashboard. We can call any of X3 screen’s through the Dashboard.

Follow the below steps to call screen from Dashboard:

  1. To open the Dashboard Processes screen navigate through – Setup > Interactive dashboard > Processes
  2. Create any new process or you can edit the existing one as per the requirement.
  3. You will get the below screen. Here we can see the Dashboard screen view in Drawing tab. Please refer to the below screen shot.

Call Dashboard

    4.    Here first we have to add the object when clicked the screen should be called. There were lots of objects             available like geometric shapes, buttons, icons, photos etc.

     5.   After adding the object we have to link it. The link option is available on the toolbar present at the upper site. Here you will find number of link options we can link the object with function, query, reports or inquiry screen.

    6.     Then specify the correct function or query name as per the “Link to” option selected as shown in below screen shot and click Ok the object will get linked with the specified function.

Call Dashboard2

Hope this helps.

How to Setup Quote Signature Management

$
0
0

Do your Sales quotes require an approval process before being allowed to be used in Sales order Creation? Well X3 provides you with a precise way of approving Sales Quotes before using them to create a Sales Order.  This feature is referred to as “Quote Signature Management”. Let me explain on how to setup and use the Quote Signature.

  1. Navigate through Setup->General Parameter-> Parameter values
  2. Select VEN (Sales) in the left browser and then select then DEMO folder.
  3. Change the APPQH parameter value to Yes Mandatory and save.

Now that you have activated the Quote management process it’s time to add Approvers who will approve your Quotes. You can add Approvers by navigating through Setup->Workflow-> User Assignment

Make sure you select the Correct Assignment rule here (i.e. SQHSIG for Sales Quotes). The User Code is the Approver who will have the right to approve the Sales Quote. You can also enter different approvers

for different companies by entering the company name in the company field.

Now whenever a Quote is created by any user other than the Approver it will require the Approver’s Signature before being converted to sales order. You can view/approve/reject the quotes waiting for the approval in the Workflow Control screen (Usage-> Workflow Control).


You can also approve the individual Quotes from the Signature Menu option available in the Quotes Screen.

QuoteSignature-2

Hope this helped you in setting up the Quote Approval Process in your X3.

Creating a Return Purchase Order against a receipt

$
0
0

A Purchase Order return can be generated in X3 against an already received Purchase Order. This can be achieved from the Return management screen in the Purchasing Module (Purchasing->Return->return management.

CreatePOagainst REturn-1

A purchase receipt that has been created will be available for selection in the left browser if a correct corresponding Site/Supplier combination is entered in the Transaction screen. You can select multiple receipts against the same Site/ Supplier Combination.

Then change the status field of the Product lines to “R” (R status means that the line has been rejected and this line can be used to issue out the rejected inventory)

CreatePOagainst REturn-2

Click on the create button to Complete the process of Creating a Return Purchase Order.

Grow your online business with Magento Integration for Sage ERP X3

$
0
0

We are glad to present another integration under our “GUMU” brand. This time we bring together the two most leading names in their respective domains to get you improved business productivity and tremendous cost savings.

Magento integration for your Sage ERP X3. Let’s not spend much time on introduction and directly jump on to see how its beneficial for your business

If you are already a Magneto customer, then you need not doing anything. Our integration link does not require any customizations in Magneto. After install, it just picks-it up and starts synchronizing data.

Let’s have a brief at the features that will be available in the link:

1)      Products: Synchronize Sage ERP X3 Products along with pricing, category and images into Magento.

2)      Customers: Synchronize Sage ERP X3 customers with Magento customers and vice-a-versa.

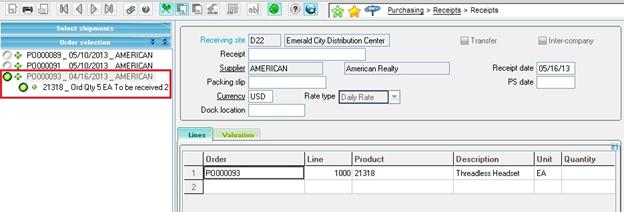
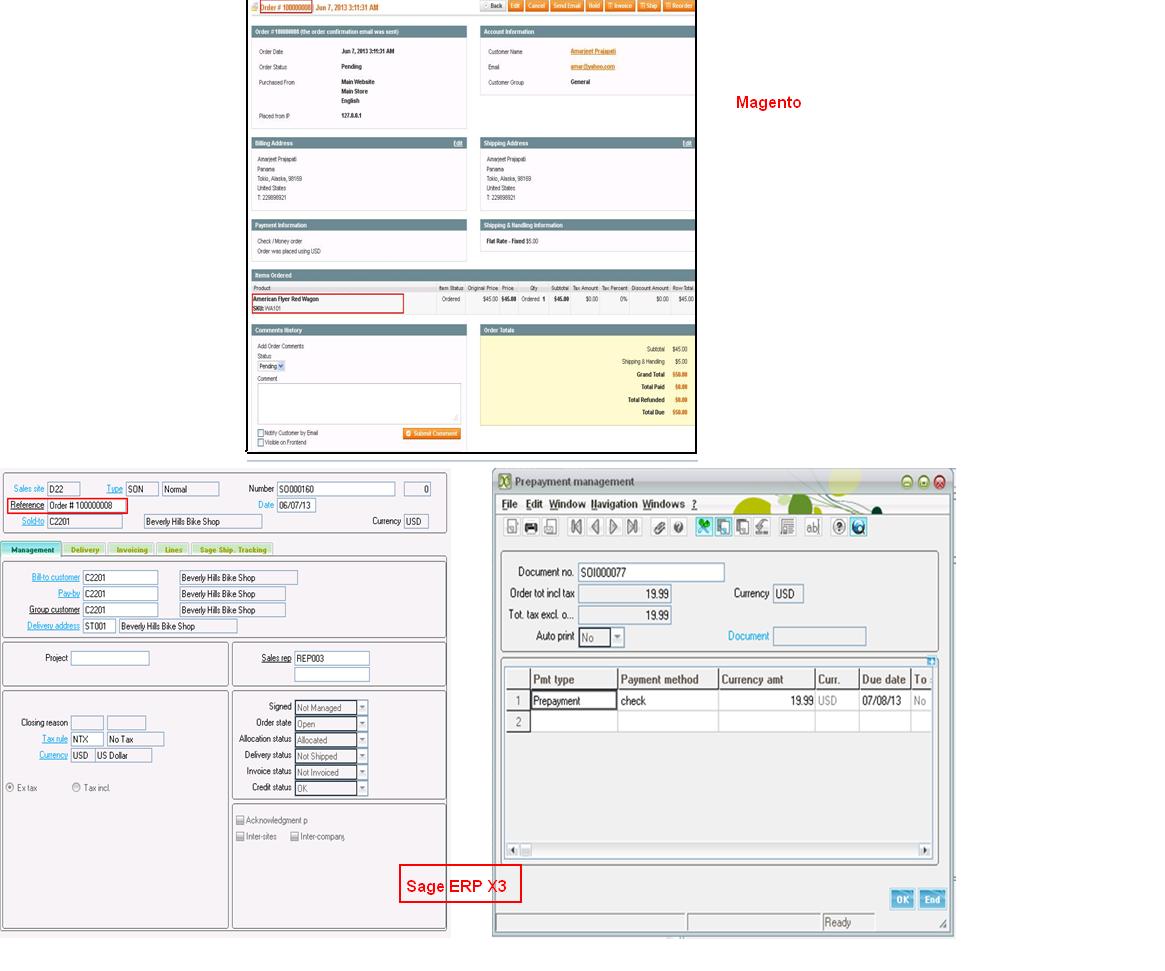
3)      Sales Orders: Imports Magento Sales Orders into Sage ERP X3 along with the payment details.

4)      Payments: Online payments done against the Sales Order will be brought in as Pre-payments.

5)      Shipments:  Updates Magento Sales Orders status to Shipped as soon as it is shipped from Sage ERP X3.

6)      Invoices: Integration link automatically picks-up the invoice created from the Magento Sales Order from the Sage ERP and accordingly updates them into Magento database.

Just check out how the integration flows for a Sales Order: SO

The synchronization of data between Sage ERP X3 and Magento can be done on-demand (manually by user) as and when required and can be scheduled to be executed after specific time intervals or a specific time. The Integration Service runs as a windows service and executes the synchronization process on the scheduled time.

Note: Users can use both or either of the options.

This was just a brief introduction, in our coming blogs nuggets; we will go through each provided feature. For More information contact us on x3@greytrix.com.

Viewing all 1519 articles
Browse latest View live


<script src="https://jsc.adskeeper.com/r/s/rssing.com.1596347.js" async> </script>