Quantcast
Channel: Sage X3 – Tips, Tricks and Components
Viewing all 1515 articles
Browse latest View live

Commands to Mask fields or values in Sage X3

$
0
0

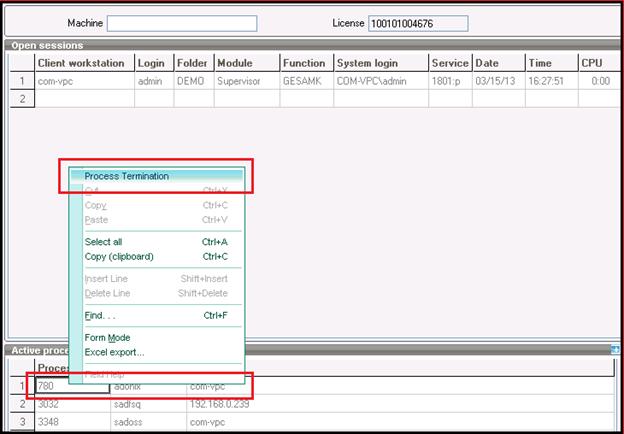
While we are doing some customization or any add-on development there are requirements where we need to Enable/Grey out or Refresh or Delete the values of the fields on the screen.

To achieve this Sage X3 provides some keywords which are the topics of discussion within this blog.

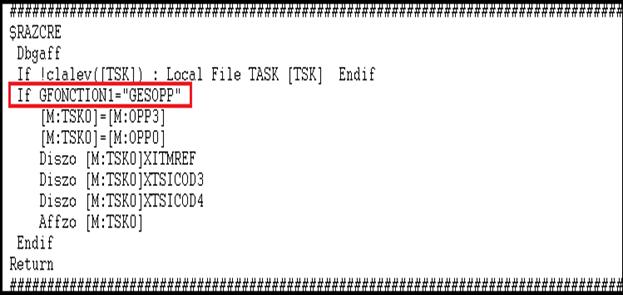
1)      Diszo: Diszo is used to grey out or disable the fields within the mask.
2)      Actzo: Actzo is used to make the fields enable or enable the entire mask.
3)      Affzo: Affzo is used to refresh the values within some or all of the zones in a mask.
4)      Effzo: Effzo is used to delete the values of the fields in the mask.
5)      Raz: Raz will clear the mask or a single field/section within the Mask.

For e.g we want to execute the Commands mentioned above on the field “TEST” available on the screen “MTEST”, please check the code samples mentioned below:

Code:

Disable the field:

If <Condition>
Diszo [M: MTEST] TEST
Endif

Enable the field:

If <Condition>
Actzo [M: MTEST] TEST
Endif

Refresh the field/mask:

Affzo [M: MTEST] TEST
Affzo [M:MTEST]

Delete the Field:

Effzo [M: MTEST] TEST

Clear the Field/Mask:

Raz [M: MTEST] TEST
Raz [M:MTEST]

- Related Posts -
1) Diagnostic/Debugging tool in Sage X3
2) “Source Verification Utility” – Best friend of a Safe X3 developer
3) Activate Crystal Debugger in Sage ERP X3
4) Activating Debugger for Specific Files in Sage X3


Setting Parameters in Actions function in Sage X3

$
0
0

During development it happens often that we need to call a screen from another screen and pass some fields to the called screen from the caller. In Sage X3 to meet this requirement we need to use the Action option.

But what if we need to call the same screen from multiple numbers of screens and every time the caller screen is different and thus writing code to fetch the values from every caller screen will be cumbersome. In such case X3 provides an important feature which allows passing parameters to the Action.

Below is the simple example for defining, initializing and passing parameters for the action.

Step 1- Defining the parameters for the action. In below screen shot you can see parameters have been defined for the action.

Step 2- Add the button under the “Buttons/Menu” of the window of the caller screens and then add the action defined above against the button. Check the screen shot below. 

Step -3 Since we have added the action for the button the action parameters will be seen in the Grid listed on Window screen. Below screen shot shows the parameters which are automatically added by system. Now here we can initialize the values for it. 

Step 4 – Now similarly for every window we just need to add the button and change the Parameters Value needed from the particular window.

How to Unlock your Process in Sage X3

$
0
0

In SAGE X3 whenever we are working on any screen and suddenly we get disconnected from the X3 system due to reasons such as Power Failure or network failure. When we relogin we see that the we cannot do any modification on the screen as it is locked and to recognize the locked file by seeing the lock icon at bottom-left corner.

Also Read : Data Backup and Restore in Sage ERP X3

Sage X3 provides the way to unlock the locked procedures. The below mentioned steps will help you to unlock the procedures –

* Navigate through Development > Utilities > Verification > Locks > Locked Processes. Here you can see the procedures which are locked.

* To unlock the locked procedures first navigate through Development > Utilities > Verification > Locks > Locked Symbols. You will get the below screen, in that Right Click to the record and select User Monitor option.

* When you click on User Monitor you will get the below screen. In the second grid you can see the no of active processes, right click the particular process and click on Process Termination, the process will get unlocked. 

Now you can continue you work.

Follow us on Twitter @greytrix for more tips.

Filtering the Selection List in Sage X3

$
0
0

Almost all the X3 developers are aware of the concept of miscellaneous tables; which are nothing but the inbuilt tables of X3. But theses Miscellaneous tables have a very convincing feature called “Dependent Table”. This feature is applied when we need to create a selection field which will be dependent on another parent selection field.

Also Read : Using Miscellaneous Tables in Sage ERP X3

Considering an Example if we have a Look up with a list of few values, and another Lookup which has its selection dependent on the 1st Lookup. We have come up with interesting facts regarding these dependent tables. Let me explain you with an e.g.

Step 1: Suppose we have created 2 miscellaneous tables; refer the screen shot below 6506 and 6507. The 6507 is dependent table on the misc table 6506.

Step 2: To achieve the task technically we need to create a single field but with 2 dimensions and assign the data type ADI to it. Next assign the miscellaneous table number as a parameter of the ADI data type.

We have to keep in mind that the table number should be consecutively placed.

Step 3: Now lastly assign the TABDIV parameter of ADI with the dependent table, please refer below screen shot.

Validate Return Entry in Sage X3

$
0
0

There are scenarios when we need to create the return entry against the receipt and validate return entry to proceed with the Credit Notes creation for Invoices.

Sometimes it happens that the validation fails with an error message “No Lines to Process”. This error occurs if the Lot defined is not having any inventory against it and system is not configured for negative entry.

In that case we will just follow few simple steps and achieve the same, check the below screen where we have faced the X3 Application error while validating the return entry.

Solution: Go to Common data ->Products ->Products and select that product for which you want to validate return entry & mark Allow sups. trans as true(refer below screen shot)

Generate Sequence Number through code

$
0
0

More often than not we may want to generate the sequence code for custom objects or entries. In this blog we are going to explore the useful functionality of generating the sequence number through code.

First of all we need to define the Sequence Structure:

The sequence number is generated by the subprogram NUMERO. Following is the list of some of the vital parameters of NUMERO:

Here’s the code that would do the action:

This would give you the sequence number as per the structure defined before.

Determine Calling Screen in Sage X3

$
0
0

There are several occasions where one screen calls up another screen. For e.g. if we call the Project screen from Task Screen, in this case the source screen is “TASK” and the destination screen is “PROJECT”.

Now but when we think of any technical parameter or variable which will be storing this value , we find X3 has a variable called “GFONCTION” and “GFONCTION1”. These are global variables which stores the Calling and Called screen function names.

Also Read : Call Screens through Code in Sage X3

Now moving to an example which will give a better picture of this variable requirement: As you may know the PROJECT screen can be called from TASK Screen and APPOINTMENT Screen as well. If we wish to check which is the Calling Screen we just need to monitor the “GFONCTION1” variable.

Just for your ready reference we are jotting down the code; which will give you an idea of how the GFONCTION1 is used. The code checks the GFONCTION1 variable is equal to the “GESOPP” and further actions are performed.

Allowing Limited Access in Sage X3

$
0
0

Whenever we access X3 the Connection Box pops up. This connection box can be used to change the connection setting,  select different folders, login to different application server.

But there can be scenario where we do not want the user to have the access to the Connection Box so that he will not be having any option for selection of Folders/Changing the connection details. In such case X3 offers the feature to hide the connection box and allow direct login to folder needed.

Below are the steps to hide connection box.

Click on the menu “Tools” present at the top and select “Options”.

* You will get the below screen. Uncheck the “Display Connection Box” option.

Now whenever we login to the system, connection box will not displayed.


Creating Parameter Values in Sage X3

$
0
0

I need to add another Parameter to the Parameter Value available under General Parameters. There are few quick steps to add the parameter, as mentioned below:

Also Read: Setting Parameters in Actions function in Sage X3

Go to Development> Data and Parameters> Development Setup> Parameter Definition;

Also ReadAssigning Workflow Parameters in Sage X3

* Select the Module where we need to assign the parameters.
* Enter the Name of the Parameters within the Text Characters.
* Select the Definition Level of the Parameter which can be “Folder”, “Company”, ”Site”, “User” and “Legislation”.
* Select the Value Type [i.e. Data Type] for the Parameter.

These steps will add a parameter in General Parameters>Parameter Values>

Creating Left Selection List in Sage X3

$
0
0

During development it happens often that we need to create a left Selection List so as to select the content in the screen i.e. suppose we want to add a selection list in which we need to display the list of product on the basis of selected site. In Sage X3 to meet this requirement we need to use the Object.

Also Read : Manipulation Of Selection List/Window – Part II

Below is a simple example for creating and adding the object to the screen.

Step 1:Navigate through “Development->Processes->Objects” and create an object and assign it a table to Link.

Step 2: Navigate through “Development->Processes->Windows” and add this object to the required window under tab “Browser” as shown below.

Also Read: How to override Stock Management rules in Sage X3

Step 3:You can now add your Logic to the specific files to apply the filter to the table so as to display the required records.

Deactivating the Standard Field Action in Sage X3

$
0
0

During customizations in Sage X3  there may be the case where we need to add an action on the screen field but along with this we are also looking to deactivate the Standard Action processing. Sage X3 provides the feature to deactivate the standard code action with a minor setting in the Field Action definition.

Also Read : Setting Parameters in Actions function in Sage X3

Let start with an example, Check the below screen shot where the CONBPC field has a standard action defined against it “After Change” and now we need to override this action with specific action code i.e. we don’t want the standard action to get executed.

To achieve this as seen in the screen shot I have added another After Change action for specific processing file.

While adding the SPE action I marked the Deactivation field with “Standard”. That’s it and we are done with the deactivation of the standard functionality. 

Using the Dependent Miscellaneous Tables in Sage X3

$
0
0

In one of our blogs we have talked about creating the dependency Misc. Tables but during one of our development acquaintances we have come up with another alternative solution as well and are really excited to post it here.

Also ReadUsing Miscellaneous Tables in Sage ERP X3

For achieving the above functionality we need to follow below mentioned steps:

1) Define miscellaneous table for each field and give the name of dependent table as defined in below screen shot:

2) Now add the fields on the screen. The type of the field will be ‘ADI’. Right click on the type and select Parameters (refer below screen shot)

3) Now give the table name in ADI and the name of the field on which the value of current field has to depend (refer below screen shot). 

Auditing Tables in Sage ERP X3

$
0
0

Sage ERP X3 has come up with an interesting feature through which users can now easily Monitor or Audit any changes in X3 Table. For example, if the user wants to Audit new additions into BP Customer table between a selected date ranges then they just have to activate the Audit conditions in the Customer Table.

Also Read:  Auditing Fields in Sage ERP X3

Below is the procedure to activate the Audit table feature for any X3 table.

1. Navigate via Development->Data and Parameters->Tables->Tables and select the Table on which auditing has to be done.

2. Go to “Audit” tab and select the “Type of Audit” as according to your Auditing need, i.e. In case the user wants to audit table whenever a new entry is made in the Table then “Creation” has to be selected; If audit needed for any change in Table entry then select “Modification” and if while Deleting any entry then “Deletion” has to be selected.

3. In order to monitor any Workflow execution associated with the Table, the Workflow checkbox has to be checked.

4. In order to monitor the Table through its Index then the Index Key has to be selected under Tracking Key section.

Below is the screenshot of the Audit tab under Table Maintenance screen

After making changes in the Table to adapt Auditing, any of the changes made in the table would be reflected in the Audit Table screen whenever the Auditing criterion is met. “Audit Table” screen can be opened via Navigating Usage->Audit->Tables where you can select the criteria for check the Audited entries i.e. Data range or/and Table, etc.

Below is the screenshot of the Audit Table screen

“ATABLE” is the table to maintain Audited entries in Sage X3.

Please Note few points,

1. To avail the feature of auditing in your Sage ERP X3, the “AUDIT” activity code has to be made Active.

2. In order to audit Workflow, the “Trigger tracking” checkbox has to be checked under Workflow Rules.

Hope this post is useful…

Auditing Fields in Sage ERP X3

$
0
0

This is in continuation to our last post Auditing Tables in Sage ERP X3. In addition to Auditing the changes in X3 Tables, you can now easily audit specific fields of any Table. For example, if the user wants to Audit the entries in Customer screen whose ABC Class has been modified to “Class A” then the user has to just activate the Audit conditions in the Customer Table and choose the Class Field condition for Audit.

Below is the procedure to enter the Audit condition specific to any Field of an X3 table.

1. Navigate via Development->Data and Parameters->Tables->Tables and select the Table on which auditing has to be done.

2. Go to the “Audit” tab and select the header selections i.e. “Type of Audit”, “Functions” and “Tracking Key” as according to your Auditing need.

3. The “Fields audited” is the section where the audit condition for fields are selected.

Below is the screenshot which shows the “Fields Audited” section along with the condition for “ABC Class” which set to “= Class A”.

Considering the above condition, whenever the ABC Class of any customer is changed to “Class A”, the customer would be saved in Auditing table (ATABLE).

To view all the Audited Field entries, please navigate via Usage->Audit->Fields and select the selection criteria in the Header viz. Date Period and/or table, etc.

Please refer the below screenshot displaying the selected Audit field records based on above condition on BPCUSTOMER table.

Note - To avail the feature of auditing in your Sage ERP X3, the “AUDIT” activity code has to be made Active.

Create Menu Tree Structure in Sage X3

$
0
0

User Menu Profile in X3 allows a user to create a menu tree structure to access the various functions of the X3 based on two additional setups: Profile Type and Start Menu

Also Read: Adding new option/Button in Menus in Sage X3

Parameters -> Users -> Menu Profile (GESAPN) 

User Menu Profile: This is a unique code that identifies the current record.

Profile Type: It is a local menu that is used to give a category (Normal, Administrator, Developer) to the users, with a goal of limiting the simultaneous number of connections by category.

Start menu: This specifies the code of the first menu that will be viewed at the time user connects in to Sage ERP X3.

When we assign the above created User menu profile to a user then based on the menu profile the user will be provided with that tree view only when connecting Sage ERP X3.

Note: A menu profile code does not define access rights, but only a browsing tree structure. 


Adjusting Folder Memory Setting To Avoid Memory Errors

$
0
0

In Sage ERP X3 Versions 5 and 6, when you attempt to process a task such as executing the Accounting Interface, posting a purchase order or sales invoice, you may receive the following or a similar message: No more memory available@X3.CPTAUTO (xxx):
When a process executes, multiple screens and tables are opened in the Sage ERP X3 engines in order to process the task. Sometimes, a session of Sage ERP X3 does not have enough memory allocated to complete the task. To bypass this error message, allocate more memory to a session by adjusting the folder memory setting.

 To adjust the folder memory setting follow the below steps:

  • Navigate through Parameters > General Parameters > Folders.
  • Select the folder where you are receiving the error.
  • Go to the Miscellaneous tab, you will get the below screen.


  • Adjust the Engine Process Memory value.
  • Make only minor adjustments to this value and save the record.
  • Start a new session of Sage ERP X3 for that folder in order for the changes to take effect.

How to check “Active” Activity Code

$
0
0

In X3 we do many customizations and for each customization we assign a unique activity code. The problem arrives when we write the code for different customization in single processing file and we have to deactivate one of the customization.
In that case we need to look for a hook which will restrict the processing of the code related to a particular specific customization.

To overcome the above problem X3 provides the feature of Global variable to deactivate the Activity Code. To achieve this we need to do the following changes.

Navigate through Development->Data and Parameters->Development setup->Global variable

Create a new global variable that you want to use for the activity Code (refer below screen shot) and enter the formula for the activity code as:

func AFNC.ACTIV(“ACTCODE”)      (where ACTCODE is the Activity code that you are referring.)

Now within the coding part we can check if this Global variable is true the code should process else not.

Hope this clarifies.

INTRODUCTION TO CRM ACTIVITY

$
0
0

The CRM Activity module for Sage ERP X3 enables the user to improve management of customer relations. The marketing function can use it to organize and monitor marketing campaigns, manage direct mailing and telemarketing, and set up trade shows and press campaigns. This module can be used on a daily basis to monitor jobs and organize tasks.

CRM Activity module of Sage ERP X3 has a sub tree:

  • Tasks (Customer relation > CRM Activity > Tasks):

The Tasks management groups all the commercial actions. Task feature of Sage ERP X3 allows us to keep the track of task done and also to schedule the future task as well. They offer characteristics and simplified behavior in order to take into account the widest range of different actions.

We can synchronized the task with the Outlook, when tasks are synchronized with outlook the x3 tables get updated in parallel on creation or modification of records concerned and stored the information coming from the Outlook tasks.

  • Calls (Customer relation > CRM Activity > Calls):

Calls help us to scheduling of calls to be carried out and to save a summary of those which are carried out. We can save the details of calls like contact person, priority of call, date and time, call objective, call duration etc.

The call management takes the control of two types of actions carried out on a daily basis:

         >> Incoming calls record
         >> The scheduling of calls to be carried out

Unlike tasks we also can synchronize the Calls with Outlook. Its works same as that for the Tasks.

  • 3. Appointment (Customer relation > CRM Activity > Appointment):

The management of appointments has as its objective the scheduling of appointments and meetings to be carried out and to save a summary of those carried out. We can save the various details related to appoint like meeting date, time, contact person, location, key persons of the meeting etc. It stored the all the details of appointment.

Unlike Tasks and Call we also can synchronized the Appointment with Outlook.

This blog will help you in guiding yourself through the CRM Activities, we will be bringing some more important topics on CRM Activities on our blogs.

How to Intercept Standard Sage X3 functions

$
0
0

Ever wondered, how wonderful it would be if you could intercept the standard processing of Sage X3 and make your process work along/instead of it. This can be done through Entry Points.

In this blog we will see how we can setup entry points and use them in the processing. Our focus would be to quickly use and run an entry point and we can explore the details and technicalities in our upcoming blogs on this interesting topic:

Entry point can be setup from:

Development > Processing dictionary > Processings > Entry points

There are certain number of predefined Entry points for a given function or process. One can use these entry points by following the below mentioned steps:

  1. Enter the name of the desired Entry point in standard processing column.
  2. Enter the specific processing that would have the code to be triggered when the desired action of the entry point occurs. It is a good practice to have a general specific code file here and then route the actions to the project or add-on specific code file.
  3. Add Activity code if required.

The processing file should look something like this:

Here “REPORT” and “FILPAT” are the actions triggered in the Entry Point AWRK. You can find extensive information on all available entry points in standard Sage X3 help file.

Hope this helps and you enjoy using Entry points as much as I did.

How apply access rights at field level

$
0
0

More than often one faces the need to apply field level access rights on a particular transaction or Master screen. For example you won’t want your procurement team to edit the gross price of an Item in a Purchase order. Well, such scenarios can be well managed by using the “Access Codes” in Sage X3.

First of all define an element in Access Code function:

Setup à Users à Access Codes

The access codes are the codes that are used to protect the information or the functions, in read, write and execution mode (when the context permits it). In this case, these codes act a bit like a lock placed on a field in a screen, in a transaction, in a report or in a database record. Following on from this, by defining for each user, it is possible to access protected information in this way (thus they have the key available allowing them to open the lock).

 Now you can use these access codes in transaction screens as shown in the figure:

Viewing all 1515 articles
Browse latest View live


<script src="https://jsc.adskeeper.com/r/s/rssing.com.1596347.js" async> </script>