Quantcast
Channel: Sage X3 – Tips, Tricks and Components
Viewing all 1515 articles
Browse latest View live

How to add Entry Point to the Patch File?

$
0
0

You may come across the situation, where you may want to add Entry Point to the Patch file in Sage X3. Sage X3 has a feature to add Entry Point to the Patch File. Follow the below steps,

New stuff: How to do component requirement calculation?

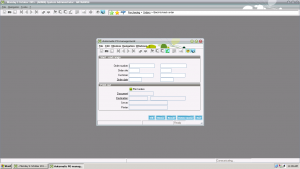
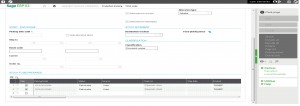
Step 1: Kindly navigate to Development > Utilities > Patches > Patch Creation

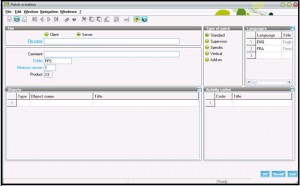
Then you will get the below screen.

b14

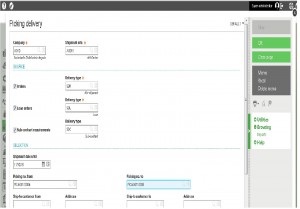
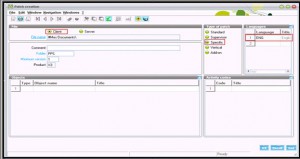
Step 2: Click on Client Radio button, then select the Type of Patch is “Specific” as shown below.

b15

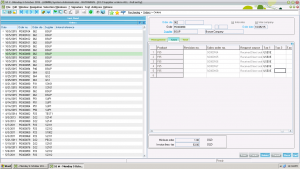
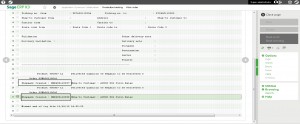
Step 3: Add the entry point as shown in below screenshot.

b16

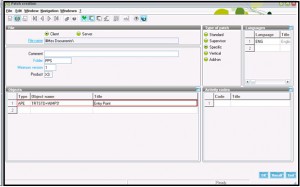
Type: “APE” (APE is type through which we can add the entry point.)
Object name: “TRTSTD” is the field and “AIMP3” is entry point that we want to add.

Step 4: After all above activity, click on OK button. After creation of the patch, you will get the dialog box to save the file to appropriate place. Now you can integrate this entry point through this newly generated Patch file.

Also read:

1. How to change Entry Transaction without exiting the screen
2. Fetch the Entry Transaction value via Customized Code
3. Entry Transaction in X3
4. Entry transaction Validation via Patch
5. How to change Category in Journal Entry if required (Journals Prohibited message comes


How to change the Analytical dimension Product/Customer/Supplier?

$
0
0

You may come across the scenario where you want to change the analytical dimension of Product/Customer/Supplier. Please follow the below step to change the dimension-

New stuff:How to pre load the Patch kept on client in V7

Step1:- Navigate to Setup->Organizational structure->Default dimension types .

Step2:-Change the dimension of Product/Customer/Supplier as per your requirement.

Here we are changing the dimension of “Product”. Please refer the below screen shot-

b18

b19

Also read:

1. How to add additional filter criteria to shipment validation function
2. How to execute workflow through function?
3.  How to display VT functions (Menu’s) in Telnet?
4. Purchase Request Signature
5. How to Assign Default Values to Crystal Reports

How to enable dimensions on Sales Order detail?

$
0
0

You may come across the scenario where you want to enable to dimensions on Sales order detail. Please follow the below step to enable the dimensions-

New stuff: How to change the Analytical dimension Product/Customer/Supplier?

Step 1:- Navigate to Setup->Sales->Entry transactions->Orders

Step 2:- Enter the dimensions .Save and validate the transaction. Refer below screen shot

b20

Step 3:- Nevigate to Common data->Products->Products. Go to Financials tab and enter the dimension value as shown below-

b21

Go to Sales order entry screen and enter the product. Now you are able to see the dimension field on detail line.

b22

Also read:

1. How to add additional filter criteria to shipment validation function
2. How to execute workflow through function?
3. How to display VT functions (Menu’s) in Telnet?
4. Purchase Request Signature
5.  How to Assign Default Values to Crystal Reports

How to enable dimensions on Sales Header?

$
0
0

In our previous blog we have explained how to enable dimension in sales order detail. Here we are explaining how to enable in dimension in sales order header. Please follow the below step to enable the dimension-

New stuff: How to enable dimensions on Sales Order detail?

Step 1:- Navigate to Setup->Sales->Entry transactions->Orders

Step 2:- Change the Header dimensions to “Entered”. Save and validate the transaction.   Refer below screen shot- 

b23

Step 3:- Nevigate to Setup>Organizational structure>Ledgers. Enter the dimension as shown below-

b24

Go to Sales order entry screen. Now you are able to see the dimension on Sales order.

Also read:

1.  How to add additional filter criteria to shipment validation function
2. How to execute workflow through function?
3. How to display VT functions (Menu’s) in Telnet?
4. Purchase Request Signature
5. How to Assign Default Values to Crystal Reports

How to auto populate the dimensions on Sales Order detail?

$
0
0

In our previous blog we have explained how to enable dimension in sales order detail. Here we are describing how to auto populate dimension on SO detail? Please follow the below step to auto populate the dimension-

New stuff: How to enable dimensions on Sales Header?

Step 1:- Navigate to Setup->Sales->Entry transactions->Orders

Step 2:- Enter the dimension .Save and validate the transaction. Refer below screen shot- 

b26


Step 3:- Nevigate to Common data->Products->Products. Go to Financials tab and enter the dimension as shown below-

b27

Step 4:- Nevigate to Setup->financial->Accounting interface->default dimension. Select SOP code and set the dimension as shown below-

b28

Go to Sales order entry screen and enter product. Now you are able to see the default dimension field on detail line.

Also read:

1. How to add additional filter criteria to shipment validation function
2. How to execute workflow through function?
3.  How to display VT functions (Menu’s) in Telnet?
4. Purchase Request Signature
5. How to Assign Default Values to Crystal Reports

How to define the routing sequence no?

$
0
0

Sage X3 provide feature to define increment step that will be proposed by default for the definition of the routing operations.

New Stuff:How to auto populate the dimensions on Sales Order detail?
The operation numbers proposed in this way can be modified during the definition of the routings.
The value is used to create several links with the same sequence number in order to materialize the various operating phases.
To successfully bring this functionality follow below steps.
Navigate to: Setup>General parameters>Parameter values>TC Common Data> BOM’s

blog
Select the Routing Sequence Increment No.

blog

Hope this helps.
Also Read:

1)How to use Product Lines?

2)Simplify product creation using Configurator in Sage X3

3)Allow Tracking of Work Order for Material Short.

4)Work order Grouping-For Different Products

5)Automatic Deletion of Work Order in X3

How to create one purchase order for multiple sales orders?

$
0
0

Sage X3 has a feature in which you can create a purchase order for a set of sales orders using back to back functionality.

New Stuff:How to auto populate the dimensions on Sales Order detail?

This feature can be achieved by following below steps:-

Create n number of sales order with Delivery for source as ‘PO-Recv and ship’

Navigate to Purchase order -> orders -> back – to – back orders.

In order number field, enter the lower range and upper range of sales order.

Click on ok button.

A purchase order is generated.

blog

Now go to purchase order and check the order that is generated.

blog

Also Read:

1)Back-to-back-order or Drop Shipment Setup in Sage ERP X3

2)How to freeze columns in Sales Order Line?

3)How to stop the Automatic allocation in Sage X3?

4)How to avoid Copy Confirmation Box in Sage ERP X3

5)Purchase Request Signature

How to change port of Apache server in Sage X3 Management Console

$
0
0

In last blog How to change port of Apache services we saw how to change the port of Apache server from the installation path of the Apache tomcat. But that change won’t be reflected in Sage X3 Web servers, but the apache server will be up and running.

New Stuff:How to add Entry Point to the Patch File?

To change this port for Sage X3 Web server, go to Sage X3 Management console and follow the below instructions:

Also this screen is non editable i.e. user cannot manually change the values in this screen.
blog

  • To change the port, first select the solutions of the management console and select the solution for which you need to change the web server port. Then Click on Web Publicationblogblogblog

Also Read:

1)How to use Product Lines?

2)Simplify product creation using Configurator in Sage X3

3)Allow Tracking of Work Order for Material Short.

4)Work order Grouping-For Different Products

5)Automatic Deletion of Work Order in X3


How to get number of day and name from date

$
0
0

Sage X3 provide you inbuilt function to retrieve the number of day and name of day from given particular date. You just need to write one line of code as mentioned below.

New Stuff:How to auto populate the dimensions on Sales Order detail?

Syntax:

day(exp_date) :  day extracts the day (number) from a date.

day$(date_exp): day$ returns the string that contains the name of the day in the current language.

day$ extracts the name of the day corresponding to a valid date. Its parameter can also be a numeric expression corresponding to the row of a day in the week. In this case, its value must be between one (1), Monday and seven (7), Sunday. If it is not, it is converted to the integer of the interval [1, 7] that is congruent to it.

The result type is Char.

blog

blog

Also read:

1)Pattern Matching in Sage X3

2)How to execute workflow through function?

3)How to use Hierarchical List functionality in Object browser

4)Create functions without screens in Sage ERP X3

5)How to display VT functions (Menu’s) in Telnet?

Test Sage X3 – Salesforce Cloud CRM integration, the easy way

$
0
0

In our last post we read a quick introduction of our Salesforce – Sage X3 integration and how we can get done more in less time.

Next step would obviously be to see how is the overall experience of integrating your Sage X3 with Salesforce Cloud CRM. We have been regularly organizing live demos and webinars for our Clients and Partners globally, here is a YouTube Video Recording of one of our recent webinars which will give you insights how integrating both can change the way Customer Service is managed. If you would like to have a live demo of any of our Salesforce integrations with Sage X3, Sage 100 or Sage 300, please feel free to email us on salesforce@greytrix.com.

During our demos and discussions we often come across requests for a trial to get hands-on, on the integration experience. Its possible now, the easy way..

Test Sage X3 Salesforce with our Salesforce Org – This is like a no effort option where you can use our Demo Salesforce Org where we have setup our Pro version integration into one demo Salesforce Org and connected with our test Sage X3 system, you just need to follow the below mentioned steps

(Before you start, email us for password on salesforce@greytrix.com. For verification you can either follow the email verification process or send us your IP address)


i) Login to Demo Salesforce Org https:\\login.salesforce.com
ii) Enter username as demouser01@greytrix.com
iii) Enter password as sent to you via email from Greytrix
iv) Once you are logged into demo Salesforce Org you are ready to test the integration features.

Note – If you are logging into Salesforce for the first time. For security reasons Salesforce will ask you to provide verification code. This is how it works.

i) After entering user id and password to login from your computer/device it will ask you to provide verification Code for security reason

ii) Click on the “Email me a verification code” button and associated email will be sent to us with verification code. After that, you can close your browser. (Verification code will be valid for next 24 hours to activate Salesforce Org from your device)

iii) Please email at salesforce@greytrix.com for verification code and we will revert back to you with verification code as soon as possible. (The verification code will work even if you have closed or want to use a different browser. You just need to ensure you are using the same device/IP)

iv) Once you have the verification code you are all set to login and try the integration

As always, for a live demo/trial or any queries/ feedback/suggestions please email salesforce@greytrix.com

How to interrupt a running process in X3…?

$
0
0

There can be occasions when you want to allow user to interrupt a running X3 process/loops. Here we are describing how to achieve the same via combination of keys.

New Stuff: How to create multiple shipments by passing sales order range in Sage X3?

In X3 if you want to interrupt a process during execution you need use Inter 1 command in your code. This command tells Adonix that this part of process can be interrupted by hitting sequence of keys, which is called a “soft interruption sequence.” You will use the sequence of <CTRL> + <ALT> + <Q> keys together for this purpose. The <Q> key is defined by default in the X3.ini configuration file and it can be modified.

When you hit this key, a question box displays the following message: “Execution interrupted on line N … Do you wish to stop (Y/N)?” If you answer “No” to this question, the process will continue as before. Otherwise, it is interrupted.

Also you can write your own code which will trapped when interruption occur. You can achieve the same by writing your own label using the Onintgo instruction. In this case, no message is displayed by Adonix, but the subroutine defined on the label is executed with a possible return to the process.

Below is the code I have written on creation event of Inter-site transfer:

img1

Also Read:
1. Sleep Command Feature in 4GL
2. How to set minimum Purchase Order Quantity
3. Data Maintenance in Sage X3
4. Simplify processing of your online orders
5. Sage X3 for Food Processing Industry

Product purchase restriction based on buyer.

$
0
0

If you come across a scenario where you want to restrict product purchase to a certain buyer then Sage X3 provides a standard functionality ‘filter by buyer’.

New Stuff:How to restrict users from modifying the X3 connection date.

To set up this functionality:

Step 1:

Navigation:

Set up – Parameter Value – Purchase – Authorizations – Filter by buyer – Set as ‘Yes’.

blog4

Step 2:

Set the Buyer at the Product’s – Product site – Management Tab

blog4a

To check this functionality create a Purchase Order for the same Product and Product site but with different buyer.

blog4b

Also Read:

1)How to apply Group price search in Purchase Order?

2)Behind the scene- Magento – Sage ERP Integration

3)Back-to-back-order or Drop Shipment Setup in Sage ERP X3

4)Control Max Decimals of Currency in Sage X3

5)Use of Multiple Ledger Currency in Transactions in Sage ERP X3


How to access only files from directory

$
0
0

In our previous blog “List the files from the directory” we have showed you how to find List the files from the directory. In this blog we are describing how to find only files name from directory or path.
Sage X3 has a special function filinfo which is used to find all the properties of a “physical” file given in the argument.

New Stuff: How to create multiple shipments by passing sales order range in Sage X3?
Syntax:  filinfo ( path_fil, arg_ent )
Parameter:
1. path_fil : Char type expression for the file path to be tested.
2. arg_ent: Integer expression specifying the property to be found.

Kindly refer to the below snippet of code for better understanding.

n1


n2

Example: filinfo(DIR+”\”+FILELIST(I),7)>0
Here we have used “7” as arg_ent (Second parameter) of filinfo function which gives size of file in octets.
Note:
1: Represent Files
0: Represent Folder
-1: Represent File which is non existing.

Also Read:

1. List the files from the directory
2. Copying processing files from one folder to another
3. Activating Debugger for Specific Files in Sage X3
4. How to Print an Attachment in Sage ERP X3
5. Rename a file in X3 version 7


How to perform mass generation of Delivery using picking ticket?

$
0
0

Sage X3 provides a feature in which you can perform mass generation of Delivery using picking ticket.

New Stuff :- How to access only files from directory

This feature can be achieved by following below steps:-

Create as many order as you want with invoicing elements ‘one/order’. Go to preparation plan. Enter the range of order no that you created and create picking tickets. The picking tickets must have the “Deliverable” status so click on “Deliverable”.

Below Example is for two orders but you can create deliveries for many orders at once based on picking ticket.

Navigate to Set up -> Sales -> Deliveries->picking ticket generation

1

Enter the picking ticket range in ‘picking no from’ and ‘picking no to’ and click OK.

2

The log generated shows different shipment created for different orders.

3

Also Read:

1. Automatic Data Collection(ADC) in Sage X3

2. How to create Sales Delivery from Sales Order by programmatically?

3. How to validate Sales Delivery via Import Template in X3?

4. Set user defined Shipment date on Delivery from Sales Order

5. How  to validate shipment through code?

Rounding of net unit price in purchase order

$
0
0

In a Purchase order, while dealing with pricing you may want to round up net price up-to the nearest decimal place. Sage X3 provides a parameter where you can set whether you want to round the price or not. PURRND parameter will be help full when the pricing value will be in decimal.

New Stuff: How to perform mass generation of Delivery using picking ticket?

This parameter stipulates if a rounding must be applied to the net unit price.

The list of possible values is: No, Yes.

  • No: The net unit price will be rounded to four decimals.
  • Yes : The net unit price will be rounded based on the transaction currency

Kindly follow the below steps to change the parameter value:

Navigate to Setup>General parameters>Parameter values under ‘ACH’ chapter right click on it and select ‘Detail’

blog2

Then below screen will pop, now set the value to ‘YES’ or ‘NO’ as per your requirement for the PURRND parameter,

blog3

Hope this Helps!

Also Read:

1)How to round quantity in purchase order?

2)How to apply Group price search in Purchase Order?

3)How to set the Price by default Standard cost?

4)How to roundup decimal number to two decimal places?

5)How to set the default price reason?


Set default bank globally in Sage ERP X3

$
0
0

You may come across the situation, where you want to set the default Bank globally in Sage ERP X3.

New Stuff: Rounding of net unit price in purchase order


Sage X3 has special settings to set the default bank globally with help of General Parameters.

To set the default country, follow the steps:

Step 1: Go to, Setup General Parameters Parameter value


blog5

Step 2: Go To Acc Payable/Acc Receivable and then Folder sub node and your respected folder. And go to Default Values Option as shown below.

blog6

Step 3: Right click on Default Values option and right click on that option then go to Detail menu. You will find one parameter window. Then change the “Default bank (BANKDEF)” value to “XXX” as shown below,

blog7

After the above activity, press ok and save the data. Close the X3 and again open to effect the changes.

Also Read:

1)How to define centrally attachment path globally?

2)How to set call completed by default to Yes globally?

3)Steps to Automate Sage X3 Backups

4)Modify Data of Tables in X3

5)Setting up procurement system using Tolerance in Sage X3

Profiling X3 code for performance

$
0
0

Profiling the Sage ERP X3 script code is important to obtain the best possible performance. It localizes time consuming programs and measures how often certain code sections are called. This is possible by using a dedicated library.This is a two step process to get the profiling of X3 code (i.e Start and stop of profiling process)

New Stuff: Set default bank globally in Sage ERP X3

1. Starting the profile process

This is performed by using the function ASYRTIMING.START

STAT=func ASYRTIMING.START("",1)

This function includes two parameters:

a. A string character value that defines the temporary file name without an extension and path, where the calls and timestamps are written. If an empty value is given, the name will be generated  .

b. An additional integer is set to ‘0’ by default. Its value will be modified to ‘1’ if the code called by Gosub needs to be analyzed.

2. Ending the profile process

This is performed by using the function ASYRTIMING.STOP

STAT=func ASYRTIMING.STOP(GACTX,"",1,WFICTRACE)

This function includes four parameters:

a. A pointer on the current context.

b. The temporary file name where the calls and timestamps have been written. If the file name is not provided, the same algorithm will be used to generate it .

c. The same integer value to know if Gosub must be analyzed.

d. A string variable that returns the generated detailed log file.

For Example:

# Start the profile

Local integer STAT

STAT=func ASYRTIMING.START("",1)

# The X3 code

...

# End the profile

Local char WFICTRACE

STAT=func ASYRTIMING.STOP(GACTX,"",1,WFICTRACE)

You get the log generated when the function stops which can be read by you in log reading.

Below is the snipplet of the log genrated by the profiling process.

blog8

Hope this Helps!

Also Read :

1)How to call specific file of an action through code?

2)How to open the object managed screen via code?

3)How to use the Presentation Style through code?

4)How to validate shipment through code…?

5)How to get the last sequence number through code?

How to enable search engine in Sage X3 V8

$
0
0

To unlock the full potential of Sage X3 Search, it must first be initialized and then updated from time to time. Depending on the size of your organisation and the volume of data, the update can be done more than once a day.

New Stuff: Profiling X3 code for performance

To initialize Sage X3 Search for the first time, the ‘Search Index Management’ function has to be set up and then executed. This function is located at:

Administration > Usage > Search Index Management (code: searchAdmins) –V8

The layout of the web page is as below:

blog9

The parameters you need to set up are:

  • Endpoint- Defines the folder Sage Search will run.
  • Entities- If empty it will run for all Entities, but it can run just specific parts.
  • Locales- The languages that need update
  • Delete index before update- When ticked, this option allows you to delete the index for the specified endpoint. It is particularly important when we want to reconstruct the index.
  • Update modified records only-When ticked, this option allows you to update modified records since the last index update. It will not update deleted records

Regarding the other buttons in this function we have the option to:

  • Update index- When executed it will pick up the defined setting and carry the update of Sage Search index. A window will pop up on the top screen to allow tracking.

blog11

  • Delete index When executed it will completely delete the index.
  • Delete all index– It will delete the index, but an indexation on the administration endpoint will be necessary to rebuild the index.
  • Schedule index update– It will allow you to append Update Index to a batch process.

Hope this helps!!

Also Read:

1)How to Allow Specific Processing without Folder Validation?

2)Revalidate database objects using activity code.

3)Entry transaction Validation via Patch

4)Deferred Validation In X3

5)Transaction Generation – Validate your changes in Sage X3

Locking a record for specific time

$
0
0

Lockwait sets the number of seconds that each attempt will last at locking a record, file, or symbol.

New Stuff: How to enable search engine in Sage X3 V8

Please check out below code snippet for how to Limit the length of the lock attempts to five seconds.

###################################################

lockwait = 5

Trbegin

Lock COMPTEUR

If fstat

BADLOCK = 1

Rollback

Else

[C]COMPTEUR += 1

Commit

Endif

###################################################

This code will lock the record COMPUTER for five seconds and will release it automatically.

Lockwait is an Adonix system variable of the Integer type, which allows you to set the maximum of seconds that each lock attempt will last via the Lock and Readlock instructions.

Lockwait can have all values from 2^31 -1 to 2^31. If its value is negative, the attempt time will be unlimited. If its value is null, a single attempt will be made.

The Lock (or Readlock) syntax With lockwait = allows you to assign this variable for a short while.

This instruction is not interruptible – even if the program is (by Inter).

Lockwait is not taken into account by the For, With, Lock, and Update instructions. A single attempt will be made for these instructions.

Hope this helps!!

Also Read:

1)How to check if the transaction is being locked in another workstation?

2)How to block order if Prepayment is not done?

3)How to Unlock your Process in Sage X3

4)How to enable search engine in Sage X3 V8

5)How to restrict purchase invoice creation without purchase receipt?


How to display serious error message box

$
0
0

Sometimes you come across where you want to display error message with high severity. So here Endbox displays a serious error box.

New Stuffs: Locking a record for specific time

Syntax: Endbox(“Write message body here”)

Endbox is used to declare a box serving to display a serious error message.

At both the technical level and the interface level, the Endbox is based on the same principle as the Errbox instruction, with a differing pictogram (red cross in the place of the yellow triangle).

It is necessary to reserve it for the case of blocking errors.

Kindly refer below attached screen for the same

blog12Hope this helps!

Also Read:

1)Adding Message Boxes in X3

2)Folder modifications in progress message in Sage X3

3)No Memory Available Message in Sage X3

4)How to display Wait Message in Sage ERP X3

5)How to display Progress window in X3

Viewing all 1515 articles
Browse latest View live


<script src="https://jsc.adskeeper.com/r/s/rssing.com.1596347.js" async> </script>