Quantcast
Channel: Sage X3 – Tips, Tricks and Components
Viewing all 1515 articles
Browse latest View live

Sage X3 for Vehicle Refurbishing companies

$
0
0

Growing automotive industry has ensured growth of peripheral businesses for new and used car dealerships, spare and add on parts’ manufacturing and sales, etc.. One such niche peripheral business is running a Vehicle refurbishing company which caters to new vehicle customization, used vehicle refurbishment and accident repair. This is a booming lucrative business with multiple patrons of customized cars with advanced features and customized interiors and exteriors.

Like all businesses, they need to stay profitable, maintain a reputation and a brand image. It is also critical to control costs, manage raw-material, reduce turnaround times, reduce re-work and rejection and eliminate waste. In the rapidly changing business dynamics many vehicle customization and re-furbishing requirements are received offshore and are agreed upon via emails and web-sites.

Sage X3 ERP encompasses a comprehensive list of features which ensures that it is well equipped to set-up a system that would replicate the generic physical process of any vehicle refurbishing company. This along with minimum customization is a recipe for successful customer engagement and extraordinary/exceptional service experience.

Vehicle

Some functionalities of successfully implemented vehicle refurbishing company’s custom life-cycle with a combination of inherent Sage X3 ERP features along with add-on customizations are as follows:

Generation of a Quote: Standard Sage X3 ERP provides the necessary functionality to generate Quotes based of certain parameters. It provides ability to customize this feature by capturing specific parameters and enabling automated quote calculation. This can further generate Quotes that will be explored for specific business process requirements.

Recording Sales Orders: Standard Sage X3 ERP enables recording of orders either as an extension of the Quote or as a standalone Sale.

Setting up Approval Workflows: Sage X3 ERP workflow feature can be used to setup reviews and approvals by relevant personnel as part of the Sales and Implementation process.

Allocation and tracking of work progress: Customized Workflows can be created to enable allocation of work to specific personnel and track the progress of work.

Configuring Production instructions: Defining and selecting of BOM along with routing information will enable the system to understand the list of processes that needs to be executed for a particular order vis-à-vis another order and calculating the associated cost for the same.

Job-production and Production packing: Sage X3 ERP Production tracking functionality can be used to track the production output and consumption of raw-material.

Generating Installation and Shipping Notifications, Quality Assurance, Packaging, Shipping: Sage X3 ERP standard workflow, QC, Packaging and Delivery creation functionality maps directly to these functionalities.

Invoicing and Payments: Sage X3 ERP has inherent features to generate and track the invoices along with payments made. Both pre-payments and payments against invoices via all forms like Credit Cards, Bank transfers, cash etc. can be recorded.

Sage X3 ERP is the tool that enables the extended automotive industry businesses to meet the needs of a demanding market. Reduction in inventory costs, elimination of scrap and waste, and at the same time ensuring optimum utilization of the smaller specialized workforce can be handled with Sage X3 ERP for Vehicle Refurbishing companies

If you are looking for tailor made features to enhance your Sage ERP X3 functionality and experience , Greytrix is your right choice.

Greytrix have some unique solutions of Sage ERP X3’s integration with Sage CRMSalesforce.com and Magento Ecommerce. It also offers best-in-class Sage ERP X3 customization and development services to Sage ERP X3 business partners, end users, and Sage PSG worldwide.

For more information on Sage ERP X3 Integration and Services, please contact us at x3@greytrix.com .We will be glad to assist you.


Automatic Data Collection (ADC) in Sage X3

$
0
0

What is ADC?
ADC i.e. Automated Data Collection is used for instant and automatic capturing of various data and information from sources such as barcodes, license Plates and handwritten documents.

Why do we need ADC?

Automatically collected data can improve your business in important ways. In most cases, the data is collected manually and entered into the system by a human operator. The common problems with manually collected data are non-timeliness, inaccuracy, and bias. Considering that this data forms the basis for all important decisions, based on the reports – any problems with the initial data collection can start a ripple effect that results in a negative impact on your business.

ADC in Sage X3

In Sage X3, Data Collection is a robust and automated data collection solution that communicates directly with Sage X3 manufacturing, distribution, and accounting functions for the seamless and secure processing of a broad array of production and warehouse business transactions. It combines powerful software and data collection hardware to allow businesses to become more efficient, productive, and profitable.

This approach allows businesses to collect and utilize data end to end across their operational areas automatically. It takes data directly from automated input devices, verifies its accuracy, and passes the data to Sage X3 for immediate update. It also manages the entire network of collection devices, including all user input prompts.

Sage X3 Data Collection supports the following production and warehouse transactions:

Production Transactions

-Production

-Production Picking/Staging

-Material Issue

-Labor Reporting

Production Reporting

-Receiving

-Put away

-Cycle Counting

-Warehouse Location Changes

-Miscellaneous Issues and Receipts

-Picking

-Location Replenishment

-Subcontract Transfer

-Inter-site Transfer

Benefits of ADC in Sage X3

With Sage X3 Data Collection, companies can benefit as mentioned below:
• Increased productivity through faster put away and picking times
• Accurate & Timely information from warehouse without keying errors
• Verifying data before it is posted into Sage X3
• More accurate inventory counts resulting in lower carrying costs, cost reductions from tracking down fewer inventory errors
• Reduced overhead by accommodating higher data volumes with fewer errors.

If you are looking for tailor made features to enhance your Sage ERP X3 functionality and experience , Greytrix is your right choice.

Greytrix have some unique solutions of Sage ERP X3’s integration with Sage CRMSalesforce.com and Magento Ecommerce. It also offers best-in-class Sage ERP X3 customization and development services to Sage ERP X3 business partners, end users, and Sage PSG worldwide.

For more information on Sage ERP X3 Integration and Services, please contact us at x3@greytrix.com .We will be glad to assist you.


How to restrict products by assigning to a particular location.

$
0
0

In a business scenario you may want to restrict some products being added to a particular location. Sage X3 has a feature to handle this scenario. We can set up this in Location type of that location.

New Stuff: How to setup Auto Quality Control generation on Purchase Receipt

Navigate to Common data>Product tables>Location types

And check the ‘Dedicated’ flag, refer to the below screen shot.

How to restrict a products by assigning to a particular location-1


Now click on the “Assign locn” button and navigate to ‘Assignment’ tab and assign the product which you want to allow and all the remaining products will be restricted to this location type..

restrict a product2

And click on ‘Add’ button and then click on ‘Save’ button to save it.

Hope this blog helps!

Also Read:

1. How to do Location change of specific document through code…?
2. How to save attachments centrally at one location?
3. How to stop the Automatic allocation in Sage X3?
4. How to setup default location for the product?
5. How to track the product details in Service Request?

How to know the status of the last executed sql statement

$
0
0

In our development we rarely execute the Sql statement using Exesql instruction. But how will you come to know that your statement has executed successfully or not. To check the status of your last executed sql statement we will use Adxsqlrec keyword in our code soon after executing Exesql instruction.

New Stuff: How to restrict products by assigning to a particular location.

The type of result is Integer.

Adxsqlrec: This function returns the number of records processed by the last ExecSql instruction.

Syntax:

Adxsqlrec

Parameter Details:

  • Result: Result of type integer.

Kindly refer to the below snippet of code for better understanding the addmonth function

sql1

Hope this Helps!

Also Read:

1. How to get the number of records modified by Update Command
2. Executing a sql query using 4GL language
3. How to get the number of records which is deleted by Delete Command
4. Find earliest date from range of dates
5. Open a Closed Fiscal Period in Sage X3

How to search product price list

$
0
0

Sage X3 has a special feature for search product price list before ordering a product from a customer, or even for checking reasons, it is possible to check which price list will be applied at a given date, for a given currency, for given sites and finally a given quantity, for the product-customer pair.

New Stuff: How to know the status of the last executed sql statement

The price list inquiry function is thus used to perform a real time and real data simulation of the active price lists applicable to a sales transaction.

This inquiry can only take place on normal price lists (price lists on the line). Grouped price lists, that involve several transaction lines, are not taken into account in the simulation.

Please follow below navigation for the same.

Sales   Prices   Price search

Untitled

Also read:

1. How to set the default price reason
2. Price List Configuration – I
3. Price List configuration-II
4. How to make Gross Field Editable/Non-Editable using Price list
5. Updating Price Reason with user defined value

How to Set Cursor to a given edit box via Code in X3…?

$
0
0

There can be occasions when you want to Move focus/cursor to a particular tab, edit box or drop down programatically.

In a custom development we have come across the above scenario where in we need to move cursor to second tab automatically when user enters valid sales order number in first tab.

New Stuff: How to search product price list

To do this we need to set zonsui = “<fieldname>” at end of the after change of Sales Order number field.

<fieldname> is screen’s mask name of the destination field. Please refer  below code for more detail.

cursor


Also Read:
1. How to remove a particular order from credit status hold
2. How to add Sales Invoice elements in X3?
3. Simplify product creation using Configurator in Sage X3
4. Automate product creation using Configurator
5. How to get the number of records which is deleted by Delete Command


How to add navigation buttons in left list in version 7

$
0
0

There is no limit of creating records in ERP. The main task is to navigate and find the record. Left list in Sage X3 holds and display all the records/transactions. We can add/remove the navigation buttons in left list of windows of Sage X3.

In Windows under Browser tab, set the “Pointers” options to “Yes” which will add the navigation buttons from left list in Sage X3.

New Stuff:How to search product price list

Please refer below screenshot.

sharat1

Hope this helps!

Also Read:

1. How to know current open mask in Sage ERP X3

2.  Commands to Mask fields or values in Sage X3

3. Revalidate database objects using activity code

4. How to check mask which is opened in backend
5. How to Disable All Predefined windows button in single line of code

How to setup Auto Quality Control generation on Purchase Receipt

$
0
0

There might be a scenario where you would like to create auto Quality Control against Purchase Receipt, you can do the setup as follows

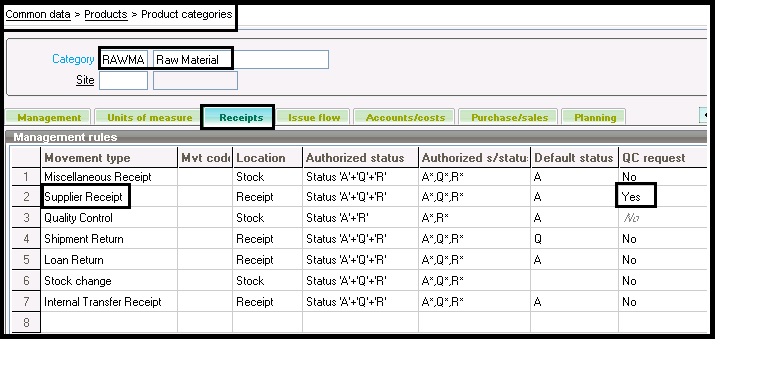
Go to the said path Common data > Products > Product categories

New Stuff:How to add navigation buttons in left list in version 7

Select the category from the right list for which you would like to create auto QC Analysis Request.

Click on tab Receipts

Auto1

Select Movement type as Supplier Receipt from the list.

auto2

Say Yes under Column QC request

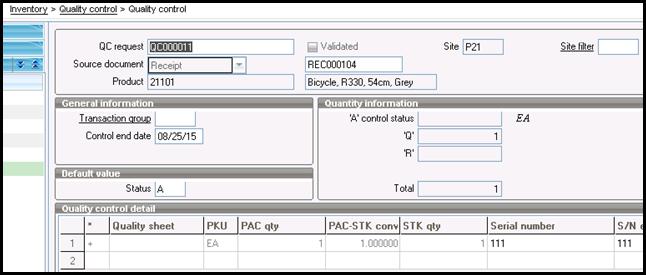
With the above setup system will create Quality Control as soon as one will do the Purchase or Direct Receipt for the defined Category and QC status is set as “Q”.

Check the same under Inventory–) Quality Control–) Quality Control

Auto3

Note-The same setup can be applied against all other Receipts related entry where QC is required.

Hope this helps!

Also read :

  1. How to employ multi-stage quality control in Sage ERP X3
  2. Workflow of Quality Control Process in X3
  3. How to Delete Complete Purchase Order via Code in X3…?
  4. How to round quantity in Purchase Order?
  5. Reopen Closed Purchase orders


How to get Rowcount in Sage X3?

$
0
0

In this blog, we will look how to get the number of records in the current table. Sage X3 has the solution to know with the help of keyword ‘rowcount’ along condition.

New Stuff: How to setup Auto Quality Control generation on Purchase Receipt

In order to know the total number of records in the table, just perform the below query.

row1

In order to know the exact no of records available in the table after filter the table, just perform the condition on where clause.

row2

The output will be no of the product available against the product name ‘XHPK’. If the output is more 1, we have duplicated product.


Also Read:

1. How to remove a particular order from credit status hold

2. How to add Sales Invoice elements in X3?

3. Simplify product creation using Configurator in Sage X3

4. Automate product creation using Configurator

5. How to get the number of records which is deleted by Delete Command


How to Disable Inventory Shortage generation in Transactions and Inquiries

$
0
0

In current scenario, if there is no adequate quantity for any product in the existing Inventory then during Sales transactions such Sales Order the shortage column is updated.

What if the user does not want to show there are shortages in the system? For this there is a provision in Sage X3 where the user can disable the shortages during the allocation i.e. even if there are shortages for the product then transaction will just display the Ordered Qty and not the shortages one.

New Stuff:How to get Rowcount in Sage X3?


Inventoryshortage1 This option will also disable the shortages in the product inquiries screen as well.

Inventoryshortage2


To bring this option into effect just follow the below steps:

  1. Go to ‘Setup -> General parameters -> Parameter values’
  2. Select STO Inventory from the left list.
  3. Select Miscellaneous and go to detail
  4. Set the ‘Generate shortages’ to No

Inventoryshortage3

Also Read:

  1.  Disallow shipments when Short of quantities in Sage ERP X3
  2. Blocked inventory which is in process of put-away?
  3. Inquiry – Inactive Inventory
  4. Managing Inventory at the Sub-Lot level in X3
  5. How to setup Auto Quality Control generation on Purchase Receipt


How to mandate Dimension Types in any transaction wherever required at company level

$
0
0

You may come across a scenario where you would like to mandate Dimension Types at transaction level, you can do the same with the following setups.

Go to- Setup> Organizational Structure > Companies

New Stuff:How to Disable Inventory Shortage generation in Transactions and Inquiries

Select Company for which you would like to impose the same

d1

Click on tab Acct and Select the Dimension Type for which you would like to do the setting.

Go to Mandatory column and say yes from the list.

Finally save.

We will take an example of Supplier BP Invoice.

Go to – A/P-A/R accounting> Invoicing>Supplier BP invoices

d2

Create AP/AR- Supplier invoice and go to Tab Lines, fill all the required details and try to skip the field Department(which is a Type of a Dimension).

System will give you above said message.

Hope this helps!

Also Read:

  1. Dimensions check for the Ledgers in SageX3
  2. Set Default Dimension for Invoicing Elements in Sage X3
  3. How to change dimension of Statistical Group on screen level…?
  4. Checking the Existence of variable
  5. Adding selection window for any action

Integrating Loyalty program with Sage X3 system

$
0
0

Customer Retention is the important business sense for the growth of an organization. We have to keep our customers engaged and interested in our products and services. With some improvement in service quality and loyalty incentives, it is easier to retain the existing customer base and keep them happy.

The 3 pronged approach to retaining customers is –

1)            Providing Excellent Customer Service.

2)            Providing Value for money products and Services.

3)            Providing incentives to customers for returning.

Loyalty

Companies are now utilizing loyalty programs more often than ever before. These organizations understand the importance of retaining existing customers and choose to implement a system directed specifically at building customer loyalty. Businesses like Airline, Hotel Industry are already using Customer Loyalty programs to retain customers in their highly competitive market.

A loyalty program is a marketing method of a business to rewards our purchasing, thus increasing the customer’s urge to stay loyal to an organization. A loyalty program may offer convenience, store credit, prizes, discounts or any other benefit that would entice the loyalty of a customer. Loyalty programs which provides store credit allows the customer to earn points on purchases. After accumulation of a certain number of points, the customer is allowed to redeem those points on their subsequent purchases.

A well-crafted loyalty program requires IT resources that will be allocated towards other endeavour. As loyalty programs come into vogue, the need for software to record and maintain the incentives offered is increased. There are a large number of off the shelf products available in the market to cater to this requirement. Software managing Loyalty program is the backbone of our loyalty marketing efforts, giving you the tools to run your entire loyalty program from it.

We can achieve loyalty program functionality in Sage X3 with just a quick and easy customization of the Sales Order. This will allow us to address the growing marketing needs of customer Retention by recording and maintaining Customer Loyalty incentives being offered.

This customization will allow Sage X3 user to record / define and maintain below line items

  • Membership number of the Customer / group of Customers.
  • Points against every product that the user can earn on purchase.
  • Points can be automatically recorded against a particular Customer on creation of Sales order and subsequent payment.
  • Points against every product which a user can use to purchase the product.
  • Maintenance screen to view and maintain the loyalty points earned and redeemed by the Customer.
  • Loyalty point statement can be generated to view the entire history of the customer.

Hence a small customization is a great way to incorporate loyalty program into your existing Sage X3 to handles complex data and integrations so you can focus on member communications.

If you are looking for such customization to enhance your Sage X3 functionality and experience, Greytrix is your right choice.

Greytrix have some unique solutions of Sage X3’s integration with Sage CRM, Salesforce.com and Magento Ecommerce. It also offers best-in-class Sage X3 customization and development services to Sage X3 business partners, end users, and Sage PSG worldwide.

For more information on Sage ERP X3 Integration and Services, please contact us at x3@greytrix.com .We will be glad to assist you.

Workflow in Sage X3

$
0
0

The word “Workflow” in an ERP system is defined for all business processes and procedures that are involved in running a successful Organization. Typically, workflow is a trail of any business process from bring to end involving lot of complicated steps. Workflow automation is a way in which these steps can be automated into one single process. All this leads to saving time, pacing up any business process and proper utilization of resources which is one of the biggest benefit of Business Unit involved in ERP system.

erp

Sage X3 offers many time-saving features one of them is workflow notifications. To understand what workflow notification is let’s take a simple example, suppose we need to get an approval for a purchase order. Workflow Notification will trigger a mail to the authorized person to approve the purchase order. Authorized person can approve the order on the mail itself and the purchase order status will be approved now. Thus, helping in automating the process.

Different processes which can be configured through Workflow are:

  • Approval action on a prior notification.
  • Triggering any action while the creation/modification is executed.
  • Displaying notification in Planning Workbench
  • Sending of messages by email systems

The different methods where we can technically setup the workflows are:

  • Update data in your Sage X3 database
  • Execute a batch task or an import
  • Print a report
  • Set signature circuits

This is the way how the workflow processes enhances through notification and approval in Sage X3.

If you are looking for tailor made features to enhance your Sage X3 functionality and experience , Greytrix is your right choice.

Greytrix have some unique solutions of Sage X3’s integration with Sage CRMSalesforce.com and Magento eCommerce. It also offers best-in-class Sage X3 customization and development services to Sage X3 business partners, end users, and Sage PSG worldwide.

For more information on Sage X3 Integration and Services, please contact us at x3@greytrix.com .We will be glad to assist you.

How to enable Posting button, if it is disabled in PO-Invoice

$
0
0

You may come across a scenario where you may find that posting button is disabled in PO-Invoice, and you are not allowed to post the Invoice. By following below mentioned steps one can enable and post the Invoice.

New Stuff:How to define days for Expected Issue date calculation of Prepayment

Go to – Purchasing > Invoices > Invoice Control.

Create PO Invoice against Receipt.

21

In the above screen as you can see Post button is disabled.

Go to tab- Control and check whether Tax details has been entered properly.

Refer below print screen. In this you can see Invoice-Tax, Total Tax, Tax Incl total has not been entered

22

After updating Tax details properly, as shown in below print screen posting button will become active.

23

Now one can post the Po-Invoice.

Hope this helps.

Also Read:

1. Automatic posting of Invoice

2. How to Create Recurring Customer BP Invoices

3. How to round quantity in purchase order

4. How to Delete Complete Purchase Order via Code in X3…?

5. How to Delete particular row and reset Grid

How to define the component sequence no in Bill of Material

$
0
0

Sage X3 provide feature to define the incrementation step proposed by default to calculate the sequence numbers of the BOM links.

New Stuff:How to overcome the ‘table full’ error in sage x3 while importing the file

The operation numbers proposed in this way can be modified during the definition of the BOMs.

The value is used to create several links with the same sequence number in order to materialize the various operating phases.

To successfully bring this functionality follow below steps.

Navigate to: Setup>General parameters>Parameter values>TC Common Data> BOM’s

blog


Select the Component Sequence Increment No.

blog

Hope this helps.

Also Read:

1)How to replace components in several BOM Parents?

2)How to Delete Complete Sales Order via Code in X3…?

3)Components Where-used

4)Services Where-used

5)Including ‘Non Managed’ Products in Work Orders


How to receive a quantity larger than the ordered quantity.

$
0
0

There might be a scenario where you have to receive a quantity larger than the ordered quantity.

Sage X3 provide feature to receive a quantity larger than the ordered quantity.

New Stuff:How to Login into different folders of Sage X3?

To successfully bring this functionality follow below steps.

Navigate to: Setup>General parameters>Parameter values>Purchase> Back Orders

blog

Set the Allow over receipts to “Yes”

blog

Hope this helps.

Also Read:

1)How to setup Auto Quality Control generation on Purchase Receipt.

2)How to create direct receipt in X3

3)How to open the posted Payments or Receipts

4)How to open a Closed Purchase Receipts in X3

5)How to mandate Dimension Types in any transaction wherever required at company level

How to set default sales unit for particular customer?

$
0
0

You may come across the scenario where you need to populate default sales unit while creation of sales order for a particular customer. To achieve this, you need to set the sales unit in customer tab  of product for particular customer. Please refer the below screen shot –

New Stuff:How to mandate Dimension Types in any transaction wherever required at company level

blog

blog

blog

Also read:

1)How to add additional filter criteria to shipment validation function

2)How to execute workflow through function?

3)How to display VT functions (Menu’s) in Telnet?

4)Purchase Request Signature

5)How to Assign Default Values to Crystal Reports

How to enable the identifier fields for a particular transaction

$
0
0

The Identifier 1(PALNUM) and Identifier 2(CTRNUM) fields are free fields used to manage the additional stock information in the stock line. To control the access to these fields in transaction level kindly follow the below step.

New Stuff:How to receive a quantity larger than the ordered quantity.

Consider we have to control the access in purchase receipts level.

Kindly navigate to Setup>Purchasing>Entry transactions>Receipts and change the value of Identifier fields as desired and do the entry transaction validation. Refer to the below screen shot.

31

Hope this blog helps!

Also Read :

1. How to change Entry Transaction without exiting the screen

2. Fetch the Entry Transaction value via Customized Code

3. Entry Transaction in X3

4. Entry transaction Validation via Patch

5. How to set the entry condition in the Sage X3?

How to use Hierarchical List functionality in Object browser

$
0
0

Sage X3 provides us left Selection List functionality so as to select the content in the screen. The data displayed on the left list are always a single record irrespective of number of detail lines; this is achieved by attaching the header table to the object.

New Stuff:How to mandate Dimension Types in any transaction wherever required at company level

But, there may be certain scenarios where we refer the “detail” table in the object and still want to display one record in the left list even if there are more than one details line exist for that record. To achieve this follow the below steps,

  1. Navigate to Development > Script dictionary > Objects. In ‘Selection’ tab, select a field having unique value for a particular transaction and enter the condition in “Option Condition”.
  2. Set Selection options as “Code” value and check “Hierarchical list” checkbox. Kindly refer to the below screenshot.
  3. blogThen, Navigate to Development > Script dictionary > Windows. Under the ‘Browser’ tab, set “List type” as “Hierarchical”. Refer the below screenshot.

blog

Hope this helps.

Also read:

  1. Re-size Selection Window at run-time in Sage ERP X3
  2. Adding selection window for any action
  3. Creation of Dynamic Selection list in Sage X3
  4. How to Deactivate Selections values in Dropdown List
  5. Filtering the Selection List in Sage X3

How to freeze columns in Sales Order Line?

$
0
0

Sage X3 has a feature in which you can freeze any number of columns in Line tab while creating sales order.

New Stuff:How to enable the identifier fields for a particular transaction

This feature can be achieved by following below steps:-

Navigate to Set up -> Sales -> Entry transactions ->Orders

In the Line1 tab, there is field no. of fixed columns.

Enter the no of columns in the textbox that you want to freeze.

411

Now Go to Sales -> Orders -> Orders

Under Line tab, click on scroll bar

Observe the columns that are moving.

If you have entered 2 columns to freeze in ‘field no. of fixed columns’ then the first two columns of the line tab will not move as you click on the scroll bar.

422

Hope this helps.

Also Read:

1. How to restrict to modify the delivery address on the detail line

2. How to restrict to modify the Sales representative on the detail line

3. How to delete Detail(Product)lines from Sales order via Import template ?

4. How to add an additional invoicing element on the line items

5. How to give different color to the line in the grid


Viewing all 1515 articles
Browse latest View live


<script src="https://jsc.adskeeper.com/r/s/rssing.com.1596347.js" async> </script>