Quantcast
Channel: Sage X3 – Tips, Tricks and Components
Viewing all 1519 articles
Browse latest View live

How to add city, state and country fields in a new screen

$
0
0

In Sage X3, we had a requirement to add city and county fields with filters in a custom screen. In this blog we will see how to add county and city fields on a screen.

For addition of State field in the screen refer the blog: Define State field in BP Master.

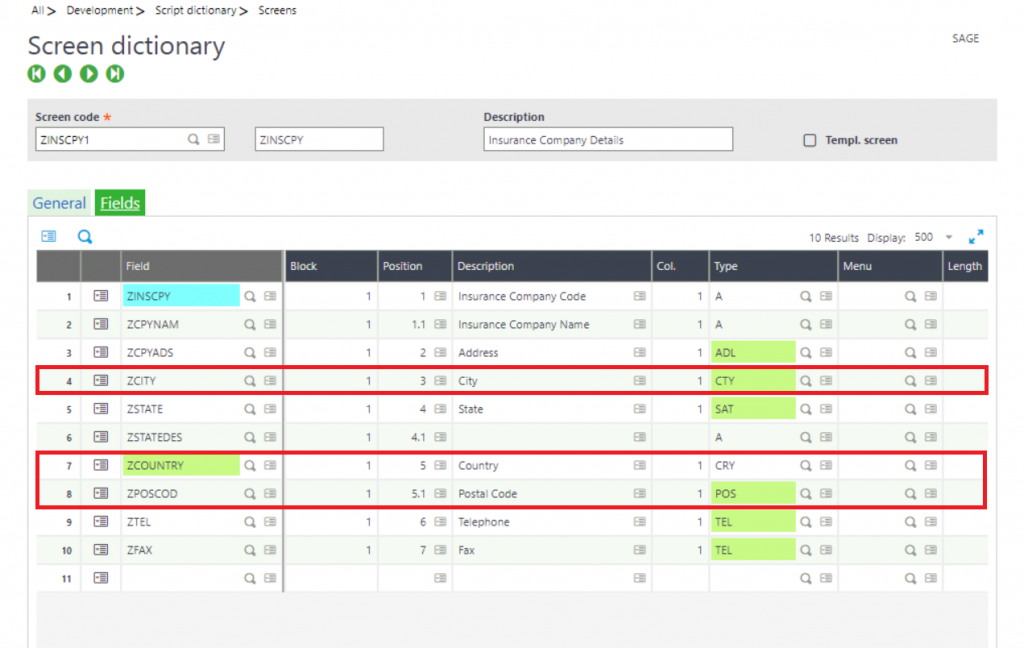
Step 1: Create your custom fields on the screen, here we have given ZCITY for city and ZCOUNTRY for country.

For the City we need to assign Data Type as CTY and postal code has to be passed as parameter so we have created another field ZPOSCOD.
For Country we will take Data Type of CRY and for Postal code, Data Type will be POS.

New Stuff: Discount warning message on Sales Order based on the “Allowed Discount” field

Screen dictionary
Screen dictionary

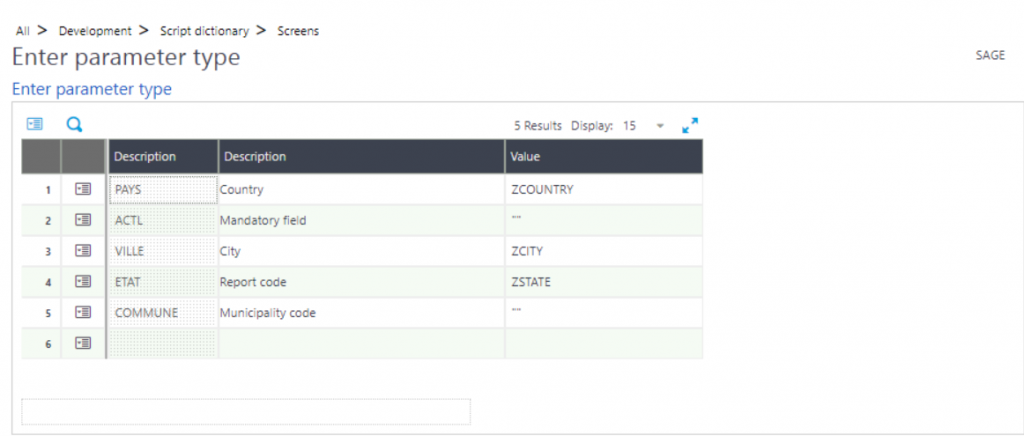
Step 2: For City (ZCITY) we will have to give the below parameter.

City parameters
City parameters

Step 3: For Postal Code the following parameters should be given.

Postal code parameter

Step 4: Validate the screen and Global Validate the windows.

Step 5: Now you can check the screen, and you’ll find the fields.

Screen Output
Screen Output

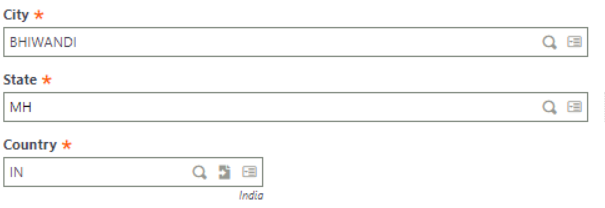
Hence, this way we can add Country, City and State fields in the screen.

About Us

Greytrix – a globally recognized and one of the oldest Sage Development Partner is a one-stop solution provider for Sage ERP and Sage CRM organizational needs. Being acknowledged and rewarded for multi-man years of experience, we bring complete end-to-end assistance for your technical consultations, product customizations, data migration, system integrations, third-party add-on development and implementation competence. 

Greytrix caters to a wide range of Sage X3, a Sage Business Cloud Solution, offerings. Our unique GUMU™ integrations include Sage X3 for Sage CRMSalesforce.com, Dynamics 365 CRM and Magento eCommerce along with Implementation and Technical Support worldwide for Sage X3. Currently we are Sage X3 Implementation Partner in East Africa, Middle East, Australia, Asia, US, UK. We also offer best-in-class Sage X3 customization and development services, integrated applications such as POS | WMS | Payment Gateway | Shipping System | Business Intelligence | eCommerce and have developed add-ons such as Catch – Weight  and Letter of Credit and India Legislation for Sage X3 to Sage business partners, end users and Sage PSG worldwide. Greytrix Sales Commission App for Sage X3 simplifies commission calculations and postings on sales transactions.

The GUMU™ Cloud framework by Greytrix forms the backbone of cloud integrations that are managed in real-time for processing and execution of application programs at the click of a button.

Greytrix is a recognized Sage champion ISV Partner for GUMU™ Sage X3 – Sage CRM integration also listed on Sage Marketplace; GUMU™ integration for Sage X3 – Salesforce is a 5-star rated app listed on Salesforce AppExchange and GUMU™ integration for Dynamics 365 CRM – Sage ERP listed on Microsoft AppSource.

For more information on Sage X3 Integration and Services, please contact us at x3@greytrix.com, We would like to hear from you.


Functionality of Phantom Products in Sage X3

$
0
0

Phantoms are also used if you want to set up a flow line for a product where you are building to a specific time and need all the components available at the correct place.

In the Manufacturing process, it becomes a very heavy task to create multiple Manufacturing Order on a daily basis for some manufacturing scenarios especially when a finished product consists of a multi-level Bill of Material.

For an example, if a company manufactures the product A and has products B, C and D as semi-finished materials and hence these semi-finished materials are composed with child components and instruct further manufacturing orders to be produced as such.

A phantom BOM is used when you want to structure a BOM so that it is easy to understand, but don’t want to create too many manufacturing orders.

In Sage X3, we have manufacturing module which eases the manufacturing process and present a solution to create one Manufacturing order for finished product only and semi-finished product’s components are compiled automatically in the manufacturing process.

We need to define each semi-finished Bill of Material type as Phantom and when we will create Manufacturing Order for Finished Product the system will automatically consider the semi-finished product’s components to be processed for semi-finished material.

In order to gain this functionality, user has to define every semi-finished item BOM as a type of “Phantom”  and when a WO is created (if there no stock available) the phantom is replaced by its own components.

In simple words, if any Phantom product will have stock in their respective site. Then when user creates the Work Order at that time phantom product will not get replaced with its own components. If there will be not stock then it (phantom product) will get replaced with its own component.

Kindly refer below screen shot , where user can see how user can identify the phantom products.

Basically phantoms are indicated on the product category. There is the check box called as ‘Phantom’ and user needs to check that check box.

Just navigate to : All -> Common Data -> Products -> Product Category

Fig01: Product Category

Now whatever products gets defined under this category that products will get consider as phantom products on the BOM.

Hence this explains the functionality of phantom products on Work Order in Sage X3.

Use of SOHAPPOST and SOHAPPCLE parameters

$
0
0

Sage X3 provide us multiple functions that can be triggered through signature management workflow. Here we will see some of them which are useful on sales order. As we know once we create a sales order the credit limit of customer gets updated. There can be a business requirement where user wants the credit limit of customer to be updated once the order is completely verified, i.e. once the order is completely signed. We will check how this can be done in sage X3 version 12.

SOHAPPOST

If we want to update the credit limit of customer after all the level of users have approved the user we need to follow the below steps.

Navigate: Setup ->General parameter -> parameter values -> VEN sales

Jump to details of ‘APP’ group and check the parameter ‘SOHAPPOST’.

Fig 01: Location of parameter SOHAPPOST

If we set this parameter ‘YES’, the credit limit of customer will be updated on the order creation. Though the workflow is on and no user have approved the sales order, still standard will update the credit limit of the customer.If workflow is turned off the credit limit will get updated on the order creation itself.

If we set this parameter ‘NO’, the credit limit of the customer will not be modified on the order creation or the order is partly signed. It will get updated only when the sales order is completely signed.

As standard has declared the action of updating on the workflow rules itself therefore we can modify the working of this action. Which means if we want to update the credit limit on a signature of particular user but here the user is not last signer i.e. on partly signed. To perform this modification follow the below steps.

Navigate: Setup -> Workflow -> workflow rules.

Select SOHSIGVAL workflow code and click on action tab. Here, DIVSOHOST is the action which updates the credit limit after the user approves the order. Make the changes to its execution condition as per the requirement so that it can be triggered while a specific user approves the workflow.

Fig 02: Location of action in workflow rule

SOHAPPCLE

Another functionality that can meet a business requirement in sales order workflow is closing an order completely if the order is rejected i.e. not approved. To enable this functionality we need to follow the below steps.

Fig 03: location of actions

Navigate: Setup -> General parameter -> parameter values -> VEN sales

Jump to details of ‘APP’ group and check the parameter ‘SOHAPPCLE’.

Fig 04: Parameter Values

If we turn on this parameter by setting it to ‘YES’ we can enable the functionality i.e. closing the order if any of the user rejects the workflow. Standard has placed this action in ‘SOHSIGREJ’ workflow rule. In the action tab ‘DIVSOHCLE’ is the action declared to close the order if it is rejected by any reason. We can change the execution condition as required.

Hence this two functions sage X3 provide us in sales order signature management workflow.

About Us

Greytrix – a globally recognized and one of the oldest Sage Development Partner is a one-stop solution provider for Sage ERP and Sage CRM organizational needs. Being acknowledged and rewarded for multi-man years of experience, we bring complete end-to-end assistance for your technical consultations, product customizations, data migration, system integrations, third-party add-on development and implementation competence. 

Greytrix caters to a wide range of Sage X3, a Sage Business Cloud Solution, offerings. Our unique GUMU™ integrations include Sage X3 for Sage CRMSalesforce.com, Dynamics 365 CRM and Magento eCommerce along with Implementation and Technical Support worldwide for Sage X3. Currently we are Sage X3 Implementation Partner in East Africa, Middle East, Australia, Asia, US, UK. We also offer best-in-class Sage X3 customization and development services, integrated applications such as POS | WMS | Payment Gateway | Shipping System | Business Intelligence | eCommerce and have developed add-ons such as Catch – Weight  and Letter of Credit and India Legislation for Sage X3 to Sage business partners, end users and Sage PSG worldwide. Greytrix Sales Commission App for Sage X3 simplifies commission calculations and postings on sales transactions.

The GUMU™ Cloud framework by Greytrix forms the backbone of cloud integrations that are managed in real-time for processing and execution of application programs at the click of a button.

Greytrix is a recognized Sage champion ISV Partner for GUMU™ Sage X3 – Sage CRM integration also listed on Sage Marketplace; GUMU™ integration for Sage X3 – Salesforce is a 5-star rated app listed on Salesforce AppExchange and GUMU™ integration for Dynamics 365 CRM – Sage ERP listed on Microsoft AppSource.

For more information on Sage X3 Integration and Services, please contact us at x3@greytrix.com, We would like to hear from you.

How to block creation of purchase order from partially signed PR

$
0
0

Purchase request is a document detailing required items, the number required and when they will be required. Once approved it becomes a purchase order. A purchase request is an unapproved purchase order. The purchase request details what items and services are required, the quantity, supplier, and associated costs.

A purchase order (PO) is a commercial document and first official offer issued by a buyer to a seller indicating types, quantities, and agreed prices for products or services. It is used to control the purchasing of products and services from external suppliers.

In Sage X3, there is a parameter with the help of the same user can restrict the creation of purchase order from partially signed purchase request.

Follow the below steps for the same:

Step 1:

Navigate To: Setup > General Parameters > Parameters values

  1. Select ACH parameter from left hand side.
  2. Go to in details of PSH group as shown in below figure.
Fig 1 : Parameter values

3. Set value of PSHPRTORD parameter as a ‘No’ as shown in below figure,

Fig 2 : Parameter values

Navigate To : Purchasing > Purchase requests > Purchase requests

  1. Create a Purchase request with 2 lines
  2. Do signature of line no.1
  3. Now create Purchase order from the same purchase request.

It will not allow to create purchase order from the purchase request which is partially signed. Also Order button will get disabled after creation of purchase request, as shown in below figure,

Fig 3 : Purchase request

Now, we will see if the user set parameter as a ‘Yes’.

Navigate To : Purchasing > Purchase requests > Purchase requests

  1. Create a Purchase request with 2 lines
  2. Do signature of line no.1
  3. Now create Purchase order from the same purchase request.

It will allow to create purchase order from the purchase request which is partially signed. Also Order button will get unable after creation of purchase request, as shown in below figure.

Fig 4 : Purchase request

With the help of above setup user can restrict the creation of purchase order from partially signed PR.

About Us

Greytrix – a globally recognized and one of the oldest Sage Development Partner is a one-stop solution provider for Sage ERP and Sage CRM organizational needs. Being acknowledged and rewarded for multi-man years of experience, we bring complete end-to-end assistance for your technical consultations, product customizations, data migration, system integrations, third-party add-on development and implementation competence. 

Greytrix caters to a wide range of Sage X3, a Sage Business Cloud Solution, offerings. Our unique GUMU™ integrations include Sage X3 for Sage CRMSalesforce.com, Dynamics 365 CRM and Magento eCommerce along with Implementation and Technical Support worldwide for Sage X3. Currently we are Sage X3 Implementation Partner in East Africa, Middle East, Australia, Asia, US, UK. We also offer best-in-class Sage X3 customization and development services, integrated applications such as POS | WMS | Payment Gateway | Shipping System | Business Intelligence | eCommerce and have developed add-ons such as Catch – Weight  and Letter of Credit and India Legislation for Sage X3 to Sage business partners, end users and Sage PSG worldwide. Greytrix Sales Commission App for Sage X3 simplifies commission calculations and postings on sales transactions.

The GUMU™ Cloud framework by Greytrix forms the backbone of cloud integrations that are managed in real-time for processing and execution of application programs at the click of a button.

Greytrix is a recognized Sage champion ISV Partner for GUMU™ Sage X3 – Sage CRM integration also listed on Sage Marketplace; GUMU™ integration for Sage X3 – Salesforce is a 5-star rated app listed on Salesforce AppExchange and GUMU™ integration for Dynamics 365 CRM – Sage ERP listed on Microsoft AppSource.

For more information on Sage X3 Integration and Services, please contact us at x3@greytrix.com, We would like to hear from you.

Use of ‘Solutions’ in customer support service in Sage X3

$
0
0

In Sage X3, we know that there are two major functions as Service request and service response referring to customer support.  The service request can concern the advice to carry out certain task or asking for additional explanation about specific object or it can be a request to solve malfunctioning problem occurred in any product. In X3, while closing service request you have to enter details of the solution implemented against that request. So you can create a new solution against particular request.

 Also, Sage X3 provides a repository for such solutions to be used as a knowledge database for a customer support service. Each solution describes ideas, tricks or process followed by technician to resolve the problem. As earlier said, after closing service request there are some automated process which will aid you to create solution for the same. Or you can create a solution directly from Solution function by entering all the details required.

The header part of ‘Solutions’ screen contains solution number and respective service request number. Below are the list of tabs present on ‘Solutions’ screen.

  1. General: It contains solution category and skill group to be entered if required. The ‘Title’ field is mandatory to help in understanding which kind of problem is solved by the solution. The ‘description’ should contain detailed explanation of the route of the problem.
  2. Solution: This tab contains the summarized description of the solution implemented to solve the problem.
  3. Keywords: The keywords used in problem and solution descriptions can be used to search the solution. But, there are chances of getting duplicate keywords entered for the records. In order to prevent this, you can use ‘Existing keywords’ action from action button: a window with list of similar words gets pop up. You can check and select equivalent word so that “false” duplicates can be reduced.
  4. Associated solutions: Use this tab to combine solution records:
  • relative to a similar application field for the current solution,
  • Sharing specific characteristics with the current solution.
Fig a : Request details
Fig b : Solution details
Fig c : Existing keywords

Also, you can see two options on the right top corner as below.

  • View the request: This option will direct you to the corresponding request of the currently opened solution.
  • Solution search: This functionality will help you find out required solutions with the help of below filters:
  1. keywords: the significant keywords related to solution      
  2. skill groups
  3. solution overview: the significant words associated with solution details
  4. titles: the significant words contained in the title
  5. employees/editors of solution record
  6. creation date of a solution
Fig d: Action options

Thus, the solutions make up a knowledge database for a customer support service.

About Us

Greytrix – a globally recognized and one of the oldest Sage Development Partner is a one-stop solution provider for Sage ERP and Sage CRM organizational needs. Being acknowledged and rewarded for multi-man years of experience, we bring complete end-to-end assistance for your technical consultations, product customizations, data migration, system integrations, third-party add-on development and implementation competence. 

Greytrix caters to a wide range of Sage X3, a Sage Business Cloud Solution, offerings. Our unique GUMU™ integrations include Sage X3 for Sage CRMSalesforce.com, Dynamics 365 CRM and Magento eCommerce along with Implementation and Technical Support worldwide for Sage X3. Currently we are Sage X3 Implementation Partner in East Africa, Middle East, Australia, Asia, US, UK. We also offer best-in-class Sage X3 customization and development services, integrated applications such as POS | WMS | Payment Gateway | Shipping System | Business Intelligence | eCommerce and have developed add-ons such as Catch – Weight  and Letter of Credit and India Legislation for Sage X3 to Sage business partners, end users and Sage PSG worldwide. Greytrix Sales Commission App for Sage X3 simplifies commission calculations and postings on sales transactions.

The GUMU™ Cloud framework by Greytrix forms the backbone of cloud integrations that are managed in real-time for processing and execution of application programs at the click of a button.

Greytrix is a recognized Sage champion ISV Partner for GUMU™ Sage X3 – Sage CRM integration also listed on Sage Marketplace; GUMU™ integration for Sage X3 – Salesforce is a 5-star rated app listed on Salesforce AppExchange and GUMU™ integration for Dynamics 365 CRM – Sage ERP listed on Microsoft AppSource.

For more information on Sage X3 Integration and Services, please contact us at x3@greytrix.com, We would like to hear from you.

How to set parameter to accumulate components of work order while creating tracking

$
0
0

In a normal business scenario, work order plays an important role as it can be for both products or services.

In a manufacturing environment, a work order is converted from a sales order to show that work is about to begin on the manufacture, building or engineering of the products requested by the customer. In a service environment, a work order can be equivalent to a service order where the WO records the location, date and time the service is carried out and the nature of work that is done. The type of personnel (e.g. job position) may also be listed on the WO. A rate (e.g. $/hr, $/week) and also the total number of hours worked and total value is also shown on the work order.  

A work order may be a maintenance or repair request from students, faculty or staff in a university.

Contractors may use a single job work order and invoice form that contains the customer information, describes the work performed, lists charges for material and labour, and can be given to the customer as an invoice.

Production tracking is the next part of work order where a work order can be tracked and converted into production tracking.

Production tracking is a strategy used to measure, analyse, and improve visibility throughout the manufacturing process. From the sourcing of raw materials to the shipping of final products, production tracking allows businesses to monitor the performance of each production step and improve their processes using aggregate data.

In some scenarios, there might be a BOM product which can have the same product multiple times on its component list. So, when we create a work order for the same BOM product then by default it’s component list will appear as it is listed and the same way production tracking gets created. However, we can merge the similar product multiple lines into a single line with quantity being added while creating a tracking for the same.

So in this blog we will see how we can set a parameter which can merge the multiple lines of the same product into a single line with added quantity while creating tracking transactions for a work order.

Steps to follow:

 Suppose we have a work order which has the same product multiple times on its list of components and the same way tracking also gets created for the same.

 So, in order to accumulate similar product multiple lines into single line, we need to navigate to All -> Setup -> General Parameters and open ‘WOM’ group (i.e., Work order management) of the ‘Manufacturing’ chapter. Kindly refer below screenshot for the same.

Fig 1 : Parameter group

After opening ‘WOM’ group of ‘Manufacturing’ chapter, just change parameter CUMMAT (i.e., Material accumulation mode) from ‘No accumulation’ to ‘Accumulation upon tracking’. Kindly refer below screenshot for the same.

Fig 2 : Parameter values

So this parameter can be set to either folder wise or legislation wise or company wise whichever way is preferred we can set the same.

Use this parameter to control how components that appear multiple times in the list of components for a work order are displayed.

The parameter has three values ‘No accumulation’, ‘Accumulation upon release’ and ‘Accumulation upon tracking’ and below is the use of the same.

No accumulation – This is the default value for this parameter. List every individual component of a bill of materials (BOM) on a work order. Do not consolidate components that appear multiple times.

Accumulation upon release –  If a component of a BOM is listed multiple times on a work order, consolidate the component and its associated quantities onto a single line when the work order is released.

Accumulation upon tracking –  If a component of a BOM is listed multiple times on a work order, consolidate the component and its associated quantities onto a single line when production activity is first recorded for the work order. This is referred to as “tracking”.

By the help of the above blog, we can accumulate multiple lines of the same product into a single line with added quantity.

About Us

Greytrix – a globally recognized and one of the oldest Sage Development Partner is a one-stop solution provider for Sage ERP and Sage CRM organizational needs. Being acknowledged and rewarded for multi-man years of experience, we bring complete end-to-end assistance for your technical consultations, product customizations, data migration, system integrations, third-party add-on development and implementation competence. 

Greytrix caters to a wide range of Sage X3, a Sage Business Cloud Solution, offerings. Our unique GUMU™ integrations include Sage X3 for Sage CRMSalesforce.com, Dynamics 365 CRM and Magento eCommerce along with Implementation and Technical Support worldwide for Sage X3. Currently we are Sage X3 Implementation Partner in East Africa, Middle East, Australia, Asia, US, UK. We also offer best-in-class Sage X3 customization and development services, integrated applications such as POS | WMS | Payment Gateway | Shipping System | Business Intelligence | eCommerce and have developed add-ons such as Catch – Weight  and Letter of Credit and India Legislation for Sage X3 to Sage business partners, end users and Sage PSG worldwide. Greytrix Sales Commission App for Sage X3 simplifies commission calculations and postings on sales transactions.

The GUMU™ Cloud framework by Greytrix forms the backbone of cloud integrations that are managed in real-time for processing and execution of application programs at the click of a button.

Greytrix is a recognized Sage champion ISV Partner for GUMU™ Sage X3 – Sage CRM integration also listed on Sage Marketplace; GUMU™ integration for Sage X3 – Salesforce is a 5-star rated app listed on Salesforce AppExchange and GUMU™ integration for Dynamics 365 CRM – Sage ERP listed on Microsoft AppSource.

For more information on Sage X3 Integration and Services, please contact us at x3@greytrix.com, We would like to hear from you.

How unit of operation is different from unit of stock in Sage X3

$
0
0

Operation tracking for work orders can be tracked by using the stock unit of the produced good or by setting the operations unit. This can be set by default in entry transactions of production tracking.

Depending on how the tracking transaction was created, an operation tracking can be performed in either the operation unit or the stock unit of the release product. One of these two units will be offered by default, depending on how the tracking transaction is configured.

For configuration of tracking transaction we need to navigate to :

All -> Setup -> Manufacturing ->Entry transactions -> Production tracking

Here we can set the default unit in the operations/Manufacturing tab. You can enable the default unit selections by checking the “Unit can be modified” checkbox. Then, you can select either “Unit of operation” or “Unit of stock” as shown in figure 1.

Fig 1 : Production tracking

According to the setup of the chosen tracking transaction, it is possible to carry out an operation tracking either in the operation unit or in the stock unit of the release product: one of these two units is proposed by default, based on how the transaction was set up.

By setting the default operation to “unit of operation”, you can define an operation unit that is different from the product being produced by the routing.

For Example:

Three operations are performed on the unit-managed product, but none of them produce intermediate stock:

  • operation 10: Mix with some time for a 500 kg lot
  • operation 20: Extrusion with a rate in meters per hour,
  • operation 30: Breakdown with a time by unit.

As each operation is handled by a different unit, there is no need to produce semi-finished products for each phase of production.

The operation unit of operation 10 is the kilogram, that of operation 20 is the meter and that of operation 30 is the unit. If the unit chosen is different to that of the product in the routing header, it is necessary to enter a conversion coefficient between the stock unit for this product and the operation unit (OPE).

Production tracking transaction set default unit as unit of operation as shown in figure 1. Set up production BOM with one component line as shown in figure 2.

Fig 2 : BOM

After setting up a production BOM click on the Routing button and create routing for the same product and the same site having 2 operations with different UOM and a coefficient as shown in below figures.

Fig 3 : Form mode routings
Fig 4 : Form mode routings

Here, we selected different Operation UOM as PAL and LB for operation 10 and 20 as shown in figure 2 and 3. Then create Work order for released quantity 20 LB. and in work order operations tab, planned quantity expressed in operational unit.

Here in figure 5, Operation 10: 13000 LB (650*20)

                               Operation 20: 20 PAL (1* 20)

Fig 5 : Work order

Generate production tracking using STD Complete tracking and quantity is showing as shown in above figure. And now change the default unit as a unit of stock in production tracking entry transactions. And generate new work order and track the quantity. Here we found that quantity will be the same to both operations as shown in below figure 6.

Fig 6 : Work order

Here both the operations have 20 UN quantities for the finished product.

Hope this will help you when you have operations with different measures of units.

About Us

Greytrix – a globally recognized and one of the oldest Sage Development Partner is a one-stop solution provider for Sage ERP and Sage CRM organizational needs. Being acknowledged and rewarded for multi-man years of experience, we bring complete end-to-end assistance for your technical consultations, product customizations, data migration, system integrations, third-party add-on development and implementation competence. 

Greytrix caters to a wide range of Sage X3, a Sage Business Cloud Solution, offerings. Our unique GUMU™ integrations include Sage X3 for Sage CRMSalesforce.com, Dynamics 365 CRM and Magento eCommerce along with Implementation and Technical Support worldwide for Sage X3. Currently we are Sage X3 Implementation Partner in East Africa, Middle East, Australia, Asia, US, UK. We also offer best-in-class Sage X3 customization and development services, integrated applications such as POS | WMS | Payment Gateway | Shipping System | Business Intelligence | eCommerce and have developed add-ons such as Catch – Weight  and Letter of Credit and India Legislation for Sage X3 to Sage business partners, end users and Sage PSG worldwide. Greytrix Sales Commission App for Sage X3 simplifies commission calculations and postings on sales transactions.

The GUMU™ Cloud framework by Greytrix forms the backbone of cloud integrations that are managed in real-time for processing and execution of application programs at the click of a button.

Greytrix is a recognized Sage champion ISV Partner for GUMU™ Sage X3 – Sage CRM integration also listed on Sage Marketplace; GUMU™ integration for Sage X3 – Salesforce is a 5-star rated app listed on Salesforce AppExchange and GUMU™ integration for Dynamics 365 CRM – Sage ERP listed on Microsoft AppSource.

For more information on Sage X3 Integration and Services, please contact us at x3@greytrix.com, We would like to hear from you.

Simulated Cost calculation in Sage X3

$
0
0

Sage X3 has a function that will compute the simulated cost of a product, a group of goods, or all products at a site depending on the cost type routing alternative, BOM with or without immediate update, and create a report that summarizes or details the results.

Simulations of the cost are often used to estimate the price of a project as a function of its specifications (new BOM, new component, new route).

Simulated cost calculations are based on routing data time and valuation dimension data for the work centers associated with the route during processing.

As part of the calculation for raw materials, the process attempts to figure out the receipt overheads for each raw material.

To find Simulated Cost Calculation, navigate to:

All>>Costing>>Simulated Cost Calculation

Navigation page
Fig01: Navigation to Simulated cost calculation

Steps:

Several options are available for the user to determine a simulated cost, including: a selection of calculation quantities, a selection of raw material valuation, overheads, a valuation dimension rate selection, and a posting method for fixed costs.

Whenever a cost calculation includes a multi-level BOM or encompasses several products, the process is exclusive to a particular site, so another user cannot launch a cost calculation at the same time.

The system examines selected products in decreasing order of the lowest level of codes if a selection of products is requested.

The calculation of a BOM with or without the lower levels consists of reading the component costs at the first level and transferring them to the cost of the parent product.

When using BOM split, the computation takes into account component costs at the top level, as well as all components in decreasing order of the codes at the bottom level.

When the costs of the sub-levels have already been estimated, a calculation ignoring the lower BOM is warranted for an update.

parameters
Fig 2.1: Cost Calculation Parameters
parameters
Fig2.2: Cost calculation parameters

Notes on the cost of materials and subcontractors:

Materials:

A material does not have a component by definition. When the cost is defined as “calculated” rather than “input,” the “Material cost selection” field is utilized to decide how the cost is computed.

Subcontract:

The following is an example of how to value a subcontract service in a production context:

  •  If the operation has a reference price, it is taken into account.
  •  If the valuation method is on the product site, the price of the valuation method is taken into account.
  •  Locate a price list.

If a price list cannot be identified, the standard cost might be used if the PURPRICE – Standard cost default price list option is set to 1. Yes.

The calculation procedure is systematically based on the validity start date of the cost to search the subcontracting service without Work Order and the provided material list prices offered by the subcontractor and to search the material list price and the choice of Bill Of Material components.

After the successful run of the Cost Simulation process the report ITMCOST will be printed that summarizes or details the results.

Reports
Fig03: Report (ITMCOST) summarizing results of Cost Simulation

About Us

Greytrix – a globally recognized and one of the oldest Sage Development Partner is a one-stop solution provider for Sage ERP and Sage CRM organizational needs. Being acknowledged and rewarded for multi-man years of experience, we bring complete end-to-end assistance for your technical consultations, product customizations, data migration, system integrations, third-party add-on development and implementation competence. 

Greytrix caters to a wide range of Sage X3, a Sage Business Cloud Solution, offerings. Our unique GUMU™ integrations include Sage X3 for Sage CRMSalesforce.com, Dynamics 365 CRM and Magento eCommerce along with Implementation and Technical Support worldwide for Sage X3. Currently we are Sage X3 Implementation Partner in East Africa, Middle East, Australia, Asia, US, UK. We also offer best-in-class Sage X3 customization and development services, integrated applications such as POS | WMS | Payment Gateway | Shipping System | Business Intelligence | eCommerce and have developed add-ons such as Catch – Weight  and Letter of Credit and India Legislation for Sage X3 to Sage business partners, end users and Sage PSG worldwide. Greytrix Sales Commission App for Sage X3 simplifies commission calculations and postings on sales transactions.

The GUMU™ Cloud framework by Greytrix forms the backbone of cloud integrations that are managed in real-time for processing and execution of application programs at the click of a button.

Greytrix is a recognized Sage champion ISV Partner for GUMU™ Sage X3 – Sage CRM integration also listed on Sage Marketplace; GUMU™ integration for Sage X3 – Salesforce is a 5-star rated app listed on Salesforce AppExchange and GUMU™ integration for Dynamics 365 CRM – Sage ERP listed on Microsoft AppSource.

For more information on Sage X3 Integration and Services, please contact us at x3@greytrix.com, We would like to hear from you.


Default Dimensions associated with manufacturing in Sage X3

$
0
0

In Sage X3, for the entry of documents requiring analytical dimensions, a default dimensions function specifies how to enter these dimensions by default. Strictly speaking, they are not accounting documents (most of them are generated outside the Financials module), but they can generate postings. These setups are useful to enter the analytical allocations in all the movements where they are stored.

        The main principle is to define for each dimension type an order of priority when searching a default dimension, by providing a list of tables where to search for these dimensions.

E.g.:

        To enter the order lines and for a given dimension type, it is possible to specify that the default value be searched in the product record, then (if the field is not assigned at this level) in the customer record and then, by default, in the order header. Later one, the places (usually tables) where the dimensions can be searched are referred to as Identifiers.

        The identifiers that can be used are the following: Product, Customer, Supplier, Sales executive, Buyer, Fixed asset, Bank, Company, Site, Currency, Tax, Payment, Journal (it is the header of the journal being entered, and which can be used to initialize the lines), Sales footer, early discount, Account, Miscellaneous BP, Valuation dimensions, Overheads, Original document, Previous dimensions.

Fig01: Default Dimensions

Here, we will discuss about the dimesion that are used in Manufacturing whether creating a work order manually or automatically, creating the production, closing, and costing the work order.

The three default dimensions for standard work order are:

        MFI: Released products

        MFO: Operations

        MFM: Components

        If the work order is automatically created within the plans (Enterprise planning, Planning workbench, Grouping), the default dimensions are:

        MFIAUT: Auto Released products

MFOAUT: Auto Operations

        MFMAUT: Auto Components

        When a production tracking is manually created, these are the dimensions used:

        MKI: Tracking of released products

        MKO: Operations tracking (principal work center)

        MKOLAB: Operations tracking (secondary work center)

        MKM: Material tracking

        When tracking is created using a Time tracking plan, the dimensions are:

        MKIAUT: Auto tracking of released products

        MKOB: Auto operations tracking (principal work center)

        MKOLABB: Auto operations tracking (secondary work center)

        MKMAUT: Auto material tracking

        When using the Production plan to create a tracking, the dimensions are:

        MKIB: Released products tracking plan and MKMAUT: Auto material tracking.

        If using a Material tracking plan, the used default is MKMB: Material tracking plan.

        When the work order is completed and closed, these are the dimensions used:

        MKOAUT: Auto operations tracking (Principal WC)

        MKOLABAUT: Auto operations tracking (Secondary WC)

        MKMAUT: Auto material tracking        

Finally, when the work order is costed, MWIF: Balance/Close Works Order variance default dimension is used in Parameter values, TC common data, Accounting Interface.

Fig02: Parameter Values

This blog helps to understand what are the default dimensions associated with manufacturing in Sage X3.

About Us

Greytrix – a globally recognized and one of the oldest Sage Development Partner is a one-stop solution provider for Sage ERP and Sage CRM organizational needs. Being acknowledged and rewarded for multi-man years of experience, we bring complete end-to-end assistance for your technical consultations, product customizations, data migration, system integrations, third-party add-on development and implementation competence. 

Greytrix caters to a wide range of Sage X3, a Sage Business Cloud Solution, offerings. Our unique GUMU™ integrations include Sage X3 for Sage CRMSalesforce.com, Dynamics 365 CRM and Magento eCommerce along with Implementation and Technical Support worldwide for Sage X3. Currently we are Sage X3 Implementation Partner in East Africa, Middle East, Australia, Asia, US, UK. We also offer best-in-class Sage X3 customization and development services, integrated applications such as POS | WMS | Payment Gateway | Shipping System | Business Intelligence | eCommerce and have developed add-ons such as Catch – Weight  and Letter of Credit and India Legislation for Sage X3 to Sage business partners, end users and Sage PSG worldwide. Greytrix Sales Commission App for Sage X3 simplifies commission calculations and postings on sales transactions.

The GUMU™ Cloud framework by Greytrix forms the backbone of cloud integrations that are managed in real-time for processing and execution of application programs at the click of a button.

Greytrix is a recognized Sage champion ISV Partner for GUMU™ Sage X3 – Sage CRM integration also listed on Sage Marketplace; GUMU™ integration for Sage X3 – Salesforce is a 5-star rated app listed on Salesforce AppExchange and GUMU™ integration for Dynamics 365 CRM – Sage ERP listed on Microsoft AppSource.

For more information on Sage X3 Integration and Services, please contact us at x3@greytrix.com, We would like to hear from you.

Database Optimization Function in Sage X3

$
0
0

In sage x3, we have a function called database optimization which is used to track or create custom index. This function help us for easy reapplication when updating or migrating data set. It is useful  to create the indexes in order to achieve a specific optimization (for example in a report or to optimize a complex inquiry). A typical example of this is the addition of an index to a large table to accelerate the creation of data in an inquiry created by the requestor, or the use of a dedicated index in the object setup, to use a specific order in a left list.

Database Optimization function comes  under the Setup module and therefore  it is folder specific. There is a copy function to allow you to copy custom indexes to other endpoint folders. Make sure you select the proper folder.

Follow the below steps:

Navigate to > Set up > Usage > Data > Database Optimization

  • Table: In this column, we will enter the table code of the table in which you want to add custom index.
  • Index: In this column, we have to label the index starting with SPE_ then whatever else you want to label it as. It must start with SPE_ or else the index will not add.
  • Index Descriptor: The third column is the index descriptor which is the organizing field columns in which you want to use. Here we have to enter the field based on which you need to add index. For the column separator you must use minus (-) or plus (+).
  • Active: The Active column is a simple yes/no for if the index is active or not.
  • Comments: Lastly the Comments column is just a text field for you to leave yourself comments about the index.

Here we are using ZTEMP table and are adding the “ZITMREF+ZSTOFCY ” as index descriptors and will keep this as active.

Now click on save. Once we have saved we have to click on RUN button to apply the index. This will create an index for the table ZTEMP. Refer the below screen shot.

Fig01: Database optimization screen

Note, it will apply all indexes marked as active.

If users are in the system the the below warning message will pop up and  the index will not be applied.

Fig02: Warning Message

If there will be no pop up msg then everything is successful.

We cant able to see the custom index through table dictionary. Custom indexes applied from the Database Optimization function are written directly to SQL. You will have to log into SQL Server to verify that the index was applied. Refer the below screenshot.

Fig03: SQL Server

It is also possible to remove the custom index. If you want to remove a custom index, change the active column from yes to no and click the run button again to remove the index.

Fig04: Database Optimization

You can verify the same by logging into SQL.

Fig05: SQL

In this way we can add or remove custom index from table by using database optimization function.

About Us

Greytrix – a globally recognized and one of the oldest Sage Development Partner is a one-stop solution provider for Sage ERP and Sage CRM organizational needs. Being acknowledged and rewarded for multi-man years of experience, we bring complete end-to-end assistance for your technical consultations, product customizations, data migration, system integrations, third-party add-on development and implementation competence. 

Greytrix caters to a wide range of Sage X3, a Sage Business Cloud Solution, offerings. Our unique GUMU™ integrations include Sage X3 for Sage CRMSalesforce.com, Dynamics 365 CRM and Magento eCommerce along with Implementation and Technical Support worldwide for Sage X3. Currently we are Sage X3 Implementation Partner in East Africa, Middle East, Australia, Asia, US, UK. We also offer best-in-class Sage X3 customization and development services, integrated applications such as POS | WMS | Payment Gateway | Shipping System | Business Intelligence | eCommerce and have developed add-ons such as Catch – Weight  and Letter of Credit and India Legislation for Sage X3 to Sage business partners, end users and Sage PSG worldwide. Greytrix Sales Commission App for Sage X3 simplifies commission calculations and postings on sales transactions.

The GUMU™ Cloud framework by Greytrix forms the backbone of cloud integrations that are managed in real-time for processing and execution of application programs at the click of a button.

Greytrix is a recognized Sage champion ISV Partner for GUMU™ Sage X3 – Sage CRM integration also listed on Sage Marketplace; GUMU™ integration for Sage X3 – Salesforce is a 5-star rated app listed on Salesforce AppExchange and GUMU™ integration for Dynamics 365 CRM – Sage ERP listed on Microsoft AppSource.

For more information on Sage X3 Integration and Services, please contact us at x3@greytrix.com, We would like to hear from you.

Managing Open order’s delivery request

$
0
0

In Sage X3, we can create Sales open order as a long term commitment with a customer. The fundamental purpose of this screen is to manage the open order contracts against customer. The creation of each sales open order (Contract order) is used to manage the delivery schedule as a next step. This delivery schedule is firmed up in the form of the delivery request, and finally Delivery is created against open order and shipped to the customer.

Let’s see in detail working of Sales open order and Delivery request.

The Sales open order management is constrained over two-screen, the first brings together the general information. You can create, modify, delete, and view open order. An open order mainly includes line header and delivery schedule.

An open order can have multiple lines with different products irrespective of stock status (i.e. managed and not managed).

Navigate to: Sales > Orders > Open orders

• User has to enter all the mandatory fields like the customer, sales site, validity date and commercial details and create open order by clicking on Create button. (Refer to below screenshot)

• Below are the important fields:

1. Customer and commercial details.

2. Validate start and end dates of order.

3. List of products with global quantity, price and validity dates.

Fig a: Open order header

Once open order is created, you have to enter product details to complete the order. On the Second screen information related to the open order lines are entered. It can be accessed by clicking on the Products button.

Fig b : Product button

You have to enter the necessary product details here. As earlier said, you can enter multiple lines for an open order (Refer to below screenshots)

The expected quantity field indicates the planned Quantity in the sales unit. This Quantity is used upon price list search.

Fig c : Product details
Fig d : Product price details

Creating Delivery request:

Now, in order to make Delivery of this open order, you must create delivery request with the firm products with respective quantities that is to be delivered. You can create delivery request by clicking on the “Delivery request” button on the top right corner of the screen.

The delivery request will get created for this open order. However, you cannot make shipment until you enter product line with firm Quantity (Refer below screenshot).

Fig e : Delivery request

To enter a delivery request, it is necessary to select contract line from the left list on the screen, of which the delivery request must be created. The main information concerning the contract line is displayed in the top section and the entry must be made in the grid.

Creating Sales delivery:

Once the delivery request is created User can navigate to the Sales delivery screen and select the sales open order number from the Open order selection left list also, User can also modify the details likes Quantity and price before creating Sales delivery.

Suppose the quantity entered in the Sales delivery quantity is lesser than the delivery request’s Quantity. In that case, a new line is added in the delivery request’s line for the remaining delivery quantity. 

This blog will help you to manage long term commitment with a customer by using open order’s delivery requests and creating Contract based shipment for the customer.

About Us

Greytrix – a globally recognized and one of the oldest Sage Development Partner is a one-stop solution provider for Sage ERP and Sage CRM organizational needs. Being acknowledged and rewarded for multi-man years of experience, we bring complete end-to-end assistance for your technical consultations, product customizations, data migration, system integrations, third-party add-on development and implementation competence. 

Greytrix caters to a wide range of Sage X3, a Sage Business Cloud Solution, offerings. Our unique GUMU™ integrations include Sage X3 for Sage CRMSalesforce.com, Dynamics 365 CRM and Magento eCommerce along with Implementation and Technical Support worldwide for Sage X3. Currently we are Sage X3 Implementation Partner in East Africa, Middle East, Australia, Asia, US, UK. We also offer best-in-class Sage X3 customization and development services, integrated applications such as POS | WMS | Payment Gateway | Shipping System | Business Intelligence | eCommerce and have developed add-ons such as Catch – Weight  and Letter of Credit and India Legislation for Sage X3 to Sage business partners, end users and Sage PSG worldwide. Greytrix Sales Commission App for Sage X3 simplifies commission calculations and postings on sales transactions.

The GUMU™ Cloud framework by Greytrix forms the backbone of cloud integrations that are managed in real-time for processing and execution of application programs at the click of a button.

Greytrix is a recognized Sage champion ISV Partner for GUMU™ Sage X3 – Sage CRM integration also listed on Sage Marketplace; GUMU™ integration for Sage X3 – Salesforce is a 5-star rated app listed on Salesforce AppExchange and GUMU™ integration for Dynamics 365 CRM – Sage ERP listed on Microsoft AppSource.

For more information on Sage X3 Integration and Services, please contact us at x3@greytrix.com, We would like to hear from you.

How to export and import landing pages in Sage X3 V12

$
0
0

Sage X3 provides an excellent feature called landing pages or home pages which are very useful for the end-users to set up visual process flows, a visual representation of data for various screens and processes.

The data represented on the landing pages helps the user see the overall performance of functionalities and customizations with real-time data or for analytical purposes.

The landing page (or home page) component cannot get added in the patch as X3 does not allow this during patch creation. If there are many landing pages, it would be difficult to create them manually in the client’s environment. This can be solved using Export and Import of home pages. Consider a Test landing page with a few test data of sales invoice fields as shown below.

Fig 01 : Sample landing page

This landing page is created using graphical query tool and can be created in many ways such as using statistical parameters, SQL query tool, using views, etc.

So, to export this landing page,

Navigate to All -> Administration -> Utilities -> Exports -> Customization management

Click on “Action” button in top right corner of screen and click on “New Customization” option and create a new customization of code “ZCMTEST”. Select check box “Export home pages”. In “Home pages section”, enter the “page name” (here it “Test”) of that landing page and click on “Action” button in the top right corner of the screen and save as shown below.

Click on “Export customization” option present just below the save of customization.

Fig 02 : Export customization screen

This will export the landing page which cannot be included in patch.

After clicking on “Export customization” button, the below screen appears.

Fig 03 : Download path selection

Select Target type as “Direct download” (where the file will get downloaded) and tick the checkbox of “Beautify output”.

After clicking on “OK” button, the below screen appears, click on the download button as shown in below figure.

Fig 04 : Download button

The “JSON” file for the landing page will get downloaded.

It can be imported in the system after the integration of the project in which the landing page or home page was needed to be added but cannot get included in the patch file.

Navigate to All -> Administration -> Utilities -> Imports -> Import tool

Select the source as “Client JSON file”, select the downloaded “JSON” file in client file option and click on “Action” button in top right corner of the screen and then click on “Import” option as shown in below figure.

Fig 05 : Import screen

After clicking on “Import” button, the landing page or home page will get added into X3 as designed in the existing system.

This blog helps us to solve problem when landing page or home page cannot be included in the patch and the user does not need to create the landing page manually, we can add that landing page using above steps.

About Us

Greytrix – a globally recognized and one of the oldest Sage Development Partner is a one-stop solution provider for Sage ERP and Sage CRM organizational needs. Being acknowledged and rewarded for multi-man years of experience, we bring complete end-to-end assistance for your technical consultations, product customizations, data migration, system integrations, third-party add-on development and implementation competence. 

Greytrix caters to a wide range of Sage X3, a Sage Business Cloud Solution, offerings. Our unique GUMU™ integrations include Sage X3 for Sage CRMSalesforce.com, Dynamics 365 CRM and Magento eCommerce along with Implementation and Technical Support worldwide for Sage X3. Currently we are Sage X3 Implementation Partner in East Africa, Middle East, Australia, Asia, US, UK. We also offer best-in-class Sage X3 customization and development services, integrated applications such as POS | WMS | Payment Gateway | Shipping System | Business Intelligence | eCommerce and have developed add-ons such as Catch – Weight  and Letter of Credit and India Legislation for Sage X3 to Sage business partners, end users and Sage PSG worldwide. Greytrix Sales Commission App for Sage X3 simplifies commission calculations and postings on sales transactions.

The GUMU™ Cloud framework by Greytrix forms the backbone of cloud integrations that are managed in real-time for processing and execution of application programs at the click of a button.

Greytrix is a recognized Sage champion ISV Partner for GUMU™ Sage X3 – Sage CRM integration also listed on Sage Marketplace; GUMU™ integration for Sage X3 – Salesforce is a 5-star rated app listed on Salesforce AppExchange and GUMU™ integration for Dynamics 365 CRM – Sage ERP listed on Microsoft AppSource.

For more information on Sage X3 Integration and Services, please contact us at x3@greytrix.com, We would like to hear from you.

Locking of delivery date and shipment date on the creation of Work Order against Sales Order

$
0
0

Recently we had a requirement from one of our client to lock the delivery date and shipment date fields in the sales order screen in such a way that once the work order is created against sales order then it will not allow the user to change/modify delivery date and shipment date fields in sales order screen.

As per standard functionality, when a sales delivery of the sales order is created, no modification can be done in the delivery date and shipment date fields.Similarly, we have added a customization in such a way that these fields will get locked, once the work order is created.

Navigate to : Sales > Orders > Order

New stuff: How to export and import landing pages in Sage X3 V12

Sales order Screen
Sales order Screen

As shown in the above screen shot, we have created a sales order and in the detail line ”Work order” option is selected in the Product Source drop-down. User has to select Work Order option in Product source field then only work order of that sales order can be created.

Work Order screen
Work Order screen

Now, We had created Work Order against that particular Sales Order.

After that navigate to : Sales -> Orders -> Orders

In the right side of the Sales order screen, there is a “Work Order” option in the options section. After clicking on the work order option, Work Order screen will be opened which is created against that sales order and sales order data will be displayed in the work order screen.
After that, we can check the Date fields on the Sales Order screen.

Date in sales order screen

As shown in the above screenshot, in the delivery tab of the sales order screen, Delivery Date and Shipment Date fields are locked and cannot be modified because we have created work order against the same sales order.

In this way, we did the customization to lock, Delivery Date and Shipment Date fields of the Sales Order once Work Order has been created against that Sales Order.

About Us

Greytrix – a globally recognized and one of the oldest Sage Development Partner is a one-stop solution provider for Sage ERP and Sage CRM organizational needs. Being acknowledged and rewarded for multi-man years of experience, we bring complete end-to-end assistance for your technical consultations, product customizations, data migration, system integrations, third-party add-on development and implementation competence. 

Greytrix caters to a wide range of Sage X3, a Sage Business Cloud Solution, offerings. Our unique GUMU™ integrations include Sage X3 for Sage CRMSalesforce.com, Dynamics 365 CRM and Magento eCommerce along with Implementation and Technical Support worldwide for Sage X3. Currently we are Sage X3 Implementation Partner in East Africa, Middle East, Australia, Asia, US, UK. We also offer best-in-class Sage X3 customization and development services, integrated applications such as POS | WMS | Payment Gateway | Shipping System | Business Intelligence | eCommerce and have developed add-ons such as Catch – Weight  and Letter of Credit and India Legislation for Sage X3 to Sage business partners, end users and Sage PSG worldwide. Greytrix Sales Commission App for Sage X3 simplifies commission calculations and postings on sales transactions.

The GUMU™ Cloud framework by Greytrix forms the backbone of cloud integrations that are managed in real-time for processing and execution of application programs at the click of a button.

Greytrix is a recognized Sage champion ISV Partner for GUMU™ Sage X3 – Sage CRM integration also listed on Sage Marketplace; GUMU™ integration for Sage X3 – Salesforce is a 5-star rated app listed on Salesforce AppExchange and GUMU™ integration for Dynamics 365 CRM – Sage ERP listed on Microsoft AppSource.

For more information on Sage X3 Integration and Services, please contact us at x3@greytrix.com, We would like to hear from you.

How to control the Scrap percentage while we make the Production tracking in Sage X3

$
0
0

We do have request to control the scrap when the manufacturing of the product needs to be done. If as such control are not placed then the end user will not hold any control on the wastage while preparing the finished goods.

This setup can be done within the Sage X3 functionality toachieve the control on scrapping out the material while making the production tracking.

This setup can be done in the below way as follow:

  1. On the product site
  2. In Routing

On Product Site:

Fig01: Shrinkage Percentage

The maximum this percentage of the loss while manufacturing of finished goods. This shrinkage is most applied on the raw material,this shrinkage is carried to the routing as well.

This value will be in percentage and proportionate quantity of the produced quantity will be considered while considered.

Routing screen

We do have the screen on the routing which fetched the value from the master, but incase user wish to modify it from the screen then it can be modified.

The shrinkage on the routing can be assigned to the routing in the following way:

On the BOM Level we assign the component and each component has its own Operation, this operation code on the Component grid indicates that particular product is consumed in mentioned operation.

Fig02: Manufacturing BOM

Each operation has its own set of products that are consumed, during this consumption wastage or shrinkage can be taken place.

Fi03: Shrinkage Percentage in Routing tab

This shrinkage is then carried to Workorder and according to it the quantity is increased in Material tracking.

The above are the points which we need to do for the setup. Below are the reflection we can observe in the Work order.

On the work order, when we track finished goods according to the finished goods quantity the component are filled in raw material tab.

At the time when the raw material are tracked, quantities are being populated in the respective product and the quantities are increased according to shrinkage.

This increase in quantities help the user to allow the quantities to get perfectly allocated, so incase even if it is shrinked at the time  of the Production it should not affect the process of due to shortage.

Example:

The shrinkage on the finished goods is mentioned when the final product is produced:

Fig04: Work Order

This is the loss percentage consider in the assumption while we make the production tracking, and this loss percentage are being carried from the Product site as mentioned earlier.

The second setup which we have done in the Routing is being carried in the Component as shown below:

Fig05: Scrap according to operation

This is being carried from the second setup which we have done in the routing while we define the BOM. This will indicate the scrap that will be generated from this product.

About Us

Greytrix – a globally recognized and one of the oldest Sage Development Partner is a one-stop solution provider for Sage ERP and Sage CRM organizational needs. Being acknowledged and rewarded for multi-man years of experience, we bring complete end-to-end assistance for your technical consultations, product customizations, data migration, system integrations, third-party add-on development and implementation competence. 

Greytrix caters to a wide range of Sage X3, a Sage Business Cloud Solution, offerings. Our unique GUMU™ integrations include Sage X3 for Sage CRMSalesforce.com, Dynamics 365 CRM and Magento eCommerce along with Implementation and Technical Support worldwide for Sage X3. Currently we are Sage X3 Implementation Partner in East Africa, Middle East, Australia, Asia, US, UK. We also offer best-in-class Sage X3 customization and development services, integrated applications such as POS | WMS | Payment Gateway | Shipping System | Business Intelligence | eCommerce and have developed add-ons such as Catch – Weight  and Letter of Credit and India Legislation for Sage X3 to Sage business partners, end users and Sage PSG worldwide. Greytrix Sales Commission App for Sage X3 simplifies commission calculations and postings on sales transactions.

The GUMU™ Cloud framework by Greytrix forms the backbone of cloud integrations that are managed in real-time for processing and execution of application programs at the click of a button.

Greytrix is a recognized Sage champion ISV Partner for GUMU™ Sage X3 – Sage CRM integration also listed on Sage Marketplace; GUMU™ integration for Sage X3 – Salesforce is a 5-star rated app listed on Salesforce AppExchange and GUMU™ integration for Dynamics 365 CRM – Sage ERP listed on Microsoft AppSource.

For more information on Sage X3 Integration and Services, please contact us at x3@greytrix.com, We would like to hear from you.

Customization on Load WIP inquiry

$
0
0

Recently there was a requirement to flow the work center and it’s description from work center screen to Load WIP inquiry screen in Sage X3.

Navigate: Manufacturing -> Planning -> Work Order -> Operations

New Stuff: How to control the Scrap percentage while we make the Production tracking in Sage X3

Work Order Screen
Work Order Screen

Initially we have created new work order entry from the Manufacturing module and in the Header tab, we have selected the FG product and entered the quantity. Then components which are required for that FG product and work center are getting flown automatically in the Components and Operation tabs respectively.

Navigate: Manufacturing -> Technical data -> work center

Work Center Master
Work Center Master

After that in Work Center master, create a new work center and add description for that work center then , select the work center type and work center group as shown in the above screen shot, and click on the create button. New work center will be created. Add same work center for the FG Product in BOM screen. So that while creating work order, the same work center will be flown in the work order screen.

Navigate: Manufacturing -> Inquiries -> WIP -> Load in progress

Load WIP Inquiry Screen

Select the Manufacturing site, Work center group, Work center and Work center type in filter criteria. Click on the search button, the work center description will be flown from the Work Center to Load Inquiry screen as shown in the above screenshot.

In this way, we have flown the work center and it’s description from work center screen to Load WIP inquiry screen in sage X3.

About Us

Greytrix – a globally recognized and one of the oldest Sage Development Partner is a one-stop solution provider for Sage ERP and Sage CRM organizational needs. Being acknowledged and rewarded for multi-man years of experience, we bring complete end-to-end assistance for your technical consultations, product customizations, data migration, system integrations, third-party add-on development and implementation competence. 

Greytrix caters to a wide range of Sage X3, a Sage Business Cloud Solution, offerings. Our unique GUMU™ integrations include Sage X3 for Sage CRMSalesforce.com, Dynamics 365 CRM and Magento eCommerce along with Implementation and Technical Support worldwide for Sage X3. Currently we are Sage X3 Implementation Partner in East Africa, Middle East, Australia, Asia, US, UK. We also offer best-in-class Sage X3 customization and development services, integrated applications such as POS | WMS | Payment Gateway | Shipping System | Business Intelligence | eCommerce and have developed add-ons such as Catch – Weight  and Letter of Credit and India Legislation for Sage X3 to Sage business partners, end users and Sage PSG worldwide. Greytrix Sales Commission App for Sage X3 simplifies commission calculations and postings on sales transactions.

The GUMU™ Cloud framework by Greytrix forms the backbone of cloud integrations that are managed in real-time for processing and execution of application programs at the click of a button.

Greytrix is a recognized Sage champion ISV Partner for GUMU™ Sage X3 – Sage CRM integration also listed on Sage Marketplace; GUMU™ integration for Sage X3 – Salesforce is a 5-star rated app listed on Salesforce AppExchange and GUMU™ integration for Dynamics 365 CRM – Sage ERP listed on Microsoft AppSource.

For more information on Sage X3 Integration and Services, please contact us at x3@greytrix.com, We would like to hear from you.


How to Check Quantity in PCS on QC Screen

$
0
0

As we all know in Sage X3, whenever Purchase Receipt/ GRN is created with status “Q” then Quality Control entry of that Purchase Receipt/ GRN will be created automatically. So that user can enter the quantity which is Accepted, rejected or still remains in Quality.

Recently we had a requirement from one of our client to check how many PCS of quantity are rejected, accepted and in quality control. As per standard functionality, in Purchase Receipt screen, there is one quantity field in detail line but for this client we have added one more quantity field i.e. Quantity in PCS. So according to this requirement, we have added three fields on the quality control screen beside Accepted, Rejected and Quality Control status quantity which will show the Quantity in PCS for accepted,rejected and quality control status

We will see the functionality in detail:

Navigate to : Purchasing -> Receipts -> Receipts Screen

New Stuff: Customization on Load WIP inquiry

[Calculation of Qty in PCS]
[Calculation of Qty in PCS]

Initially we created a Purchase Receipt as shown in the above screenshot, in which quantity in the detail line is 100 and Quntity in PCS/NOS is 100. To calculate the quanity(X) we will use formula: X value = [Qty in PCS/NOS] / [Quantity]. which means Qty in PCS/NOS will be divided by the Quantity.
If we considered the above example then 100/100 =1 i.e. X=1. So we will get X value ‘1’.

After that navigate to : Stock -> Quality Control -> Quality Control Screen

[Accepted Qty in PCS]
[Accepted Qty in PCS]

As shown in the above Screenshot, we can see the standard field for Accepted control status which displays the overall Accepted Quantity and beside that there is a newly added field ‘A’(PCS) which will display the Accepted Quantity in PCS

Now we will check how to calculate the quantity in PCS:

If we divide the quantity of the standard ‘A’ control status field by the above particular value “X” which we have calculated using the formula – [Quantity in PCS/Quantity] then we will get the number of stocks in PCS for status “A” i.e. A(PCS) = [Quantity in ‘A’ control status / X ]. So in our example, A(PCS) = [30/1]. According to this logic A(PCS) is 30 and we can see the field marked in yellow in the above screenshot, ’30’ is getting displayed in A(PCS) field.

[Quality and Rejected Qty in PCS]
[Quality and Rejected Qty in PCS]

Similarly, we will apply the same logic for the Quality of PCS ‘Q’(PCS) and Rejected quantity of PCS ‘R’(PCS) fields, Refer above screenshot.

In this way we can check the Quantity in PCS for Accepted, Rejected and Quality control status fields on the basis of control status fields (M2).

About Us

Greytrix – a globally recognized and one of the oldest Sage Development Partner is a one-stop solution provider for Sage ERP and Sage CRM organizational needs. Being acknowledged and rewarded for multi-man years of experience, we bring complete end-to-end assistance for your technical consultations, product customizations, data migration, system integrations, third-party add-on development and implementation competence. 

Greytrix caters to a wide range of Sage X3, a Sage Business Cloud Solution, offerings. Our unique GUMU™ integrations include Sage X3 for Sage CRMSalesforce.com, Dynamics 365 CRM and Magento eCommerce along with Implementation and Technical Support worldwide for Sage X3. Currently we are Sage X3 Implementation Partner in East Africa, Middle East, Australia, Asia, US, UK. We also offer best-in-class Sage X3 customization and development services, integrated applications such as POS | WMS | Payment Gateway | Shipping System | Business Intelligence | eCommerce and have developed add-ons such as Catch – Weight  and Letter of Credit and India Legislation for Sage X3 to Sage business partners, end users and Sage PSG worldwide. Greytrix Sales Commission App for Sage X3 simplifies commission calculations and postings on sales transactions.

The GUMU™ Cloud framework by Greytrix forms the backbone of cloud integrations that are managed in real-time for processing and execution of application programs at the click of a button.

Greytrix is a recognized Sage champion ISV Partner for GUMU™ Sage X3 – Sage CRM integration also listed on Sage Marketplace; GUMU™ integration for Sage X3 – Salesforce is a 5-star rated app listed on Salesforce AppExchange and GUMU™ integration for Dynamics 365 CRM – Sage ERP listed on Microsoft AppSource.

For more information on Sage X3 Integration and Services, please contact us at x3@greytrix.com, We would like to hear from you.

How to trigger a mail to the respective supplier against whom the RFQs has been created

$
0
0

In Sage X3, we recently had a requirement to configure an email to be triggered to the respective supplier against whom the RFQ has been created.

So let’s see how we can create and configure an email.

New Stuff: How to Check Quantity in PCS on QC Screen

Step 1: Deploy the report.

Step 2: Create the report code for the report and set the destination as Email and tick the Mandatory check box.

Report dictionary
Report dictionary

Step 3: Create default values and print code for the report.

Step 4: Now we need to write a script to get the mail address of each supplier and to do so we will write a script on the creation action to fetch the supplier’s mail and store it in a global variable.

Now let’s create a workflow for this report.

Step 5: To create a workflow go to Setup->Workflow->Workflow Rules.
Set the event code to ARP and in the Conditions tab, select Type as Header and in the conditions, [F:ARP]RPTCOD=”Report code”

Workflow Rules
Workflow Rules

Step 6: Now in the Recipient put the Global variable that contains the mail id of the user. Here in our case the Global variable was ZSUPPMAIL1

Workflow Rules Recipient

Now, once an RFQ is created a mail will be triggered that will send the report to all the suppliers in the RFQ. Hence, this way we can trigger an email to all the suppliers in an RFQ entry.

About Us

Greytrix – a globally recognized and one of the oldest Sage Development Partner is a one-stop solution provider for Sage ERP and Sage CRM organizational needs. Being acknowledged and rewarded for multi-man years of experience, we bring complete end-to-end assistance for your technical consultations, product customizations, data migration, system integrations, third-party add-on development and implementation competence. 

Greytrix caters to a wide range of Sage X3, a Sage Business Cloud Solution, offerings. Our unique GUMU™ integrations include Sage X3 for Sage CRMSalesforce.com, Dynamics 365 CRM and Magento eCommerce along with Implementation and Technical Support worldwide for Sage X3. Currently we are Sage X3 Implementation Partner in East Africa, Middle East, Australia, Asia, US, UK. We also offer best-in-class Sage X3 customization and development services, integrated applications such as POS | WMS | Payment Gateway | Shipping System | Business Intelligence | eCommerce and have developed add-ons such as Catch – Weight  and Letter of Credit and India Legislation for Sage X3 to Sage business partners, end users and Sage PSG worldwide. Greytrix Sales Commission App for Sage X3 simplifies commission calculations and postings on sales transactions.

The GUMU™ Cloud framework by Greytrix forms the backbone of cloud integrations that are managed in real-time for processing and execution of application programs at the click of a button.

Greytrix is a recognized Sage champion ISV Partner for GUMU™ Sage X3 – Sage CRM integration also listed on Sage Marketplace; GUMU™ integration for Sage X3 – Salesforce is a 5-star rated app listed on Salesforce AppExchange and GUMU™ integration for Dynamics 365 CRM – Sage ERP listed on Microsoft AppSource.

For more information on Sage X3 Integration and Services, please contact us at x3@greytrix.com, We would like to hear from you.

How to add an existing purchase request to an existing PO

$
0
0

A purchase request is a document detailing required items, the number required and when they will be required. Once approved it becomes a purchase order. A purchase request is an unapproved purchase order. The purchase request details what items and services are required, the quantity, supplier, and associated costs.

A purchase order is used by a buyer to place an order and is issued before delivery. An invoice is issued by a seller using invoicing software after an order is delivered. It defines the amount the buyer owes for the purchased goods and the date by which the buyer needs to pay.

In  Sage X3, We can manage purchase requirements of different departments, or sites of a company in purchasing, purchase requests, purchase requests. Here you can create, modify, delete, copy, view, and print purchase requests.

Follow the below steps:

Navigate To : Purchasing > Requests > Requests

1. Create Purchase request

Navigate To : Purchasing > Orders > orders

1. Create Purchase order

We have entered three purchase requests and we can view them in Enterprise Planning workbench under Purchasing, Supply. Select the site and the product to view the requirements.

As you can see three purchase requests (POPs) selected in green (PRQNA0230009 to PRQNA0230011) and one POF in orange for the item RAW066.

Next in Purchasing Orders select the ALL Full entry transaction, note “requirements considered” flag is selected for this entry transaction.

Fig 1 : Enterprise Planning

Now, select the firm POs listed above and, on the lines, enter the product reference, and tab out of the product field. You will be prompted with a “requirements to consider” screen.

In the requirements to consider screen you can leave the default selections and click on the grid where the start date end date section is, and it will list all the requirements for that product and supplier selection. Refer the below screenshot for the same.

Fig 2 : Requirements to consider

 Now, use the “Quantity selected” field to enter the quantity and click ‘OK’.

Fig 3: Quantity Selected

Once the PO line is complete, click the save button to save the purchase order.Now use the “View consumed purchase requests” menu on the line to view the selected purchase requests.

Fig 4 : Purchase order

Once the purchase requests are ordered, the status of those purchase requests are set to “Closed” and “Ordered”.

Fig 5 : Purchase order

With the help of above steps user can add the existing Purchase request to an existing purchase order.

About Us

Greytrix – a globally recognized and one of the oldest Sage Development Partner is a one-stop solution provider for Sage ERP and Sage CRM organizational needs. Being acknowledged and rewarded for multi-man years of experience, we bring complete end-to-end assistance for your technical consultations, product customizations, data migration, system integrations, third-party add-on development and implementation competence. 

Greytrix caters to a wide range of Sage X3, a Sage Business Cloud Solution, offerings. Our unique GUMU™ integrations include Sage X3 for Sage CRMSalesforce.com, Dynamics 365 CRM and Magento eCommerce along with Implementation and Technical Support worldwide for Sage X3. Currently we are Sage X3 Implementation Partner in East Africa, Middle East, Australia, Asia, US, UK. We also offer best-in-class Sage X3 customization and development services, integrated applications such as POS | WMS | Payment Gateway | Shipping System | Business Intelligence | eCommerce and have developed add-ons such as Catch – Weight  and Letter of Credit and India Legislation for Sage X3 to Sage business partners, end users and Sage PSG worldwide. Greytrix Sales Commission App for Sage X3 simplifies commission calculations and postings on sales transactions.

The GUMU™ Cloud framework by Greytrix forms the backbone of cloud integrations that are managed in real-time for processing and execution of application programs at the click of a button.

Greytrix is a recognized Sage champion ISV Partner for GUMU™ Sage X3 – Sage CRM integration also listed on Sage Marketplace; GUMU™ integration for Sage X3 – Salesforce is a 5-star rated app listed on Salesforce AppExchange and GUMU™ integration for Dynamics 365 CRM – Sage ERP listed on Microsoft AppSource.

For more information on Sage X3 Integration and Services, please contact us at x3@greytrix.com, We would like to hear from you.

Work order from Enterprise planning using SO transactions in Sage X3

$
0
0

A Work order is an order to make one or more products. Conventionally, the work order uses a bill of materials (BOM) to create a list of materials to be issued, and a routing to make a list of operations to be performed on work centers.

You can create both planned work orders and firm production works orders for a single, or multiple BOMs. Planned orders cannot be allocated, printed or tracked.

Enterprise planning is a tool that show you these WIP records. If you choose “ALL (Full entry)”, the system would show you ALL the WIP records, which is rather useless. However, through Enterprise planning entry transaction setup, you can filter these WIP records. The typical way to do this is to create different Enterprise Planning entries, each targeting different job function. So maybe you can create one that only shows MRP purchase suggestions for buyers, and another one that only shows MRP work order suggestions for Production planners. In our planning process, the Enterprise Planning works like a to-do list for our buyers/planners.

In Sage X3 there is a functionality to create a work order from enterprise planning. Please follow below steps for the same. As there are various ways to create work order from enterpise screen. Lets see two of them:

  1. Direct creation of work order from Enterprise screen (Enterprise planning -> Work Order)
  2. From Sales Order -> Enterprise planning -> Work Order
  1. Enterprise planning to Work Order:

Navigate to : Manufacturing-> Planning -> Enterprise planning

  1. Enter site and product
  2. Now go to on the right panel . There you will see Manufacturing button. Just click on that. Refer below screen shot:
Enterprise planning screen
Fig01: Manufacturing Button

c. After clicking on above button. One window will get open and under that window just enter the qty, dates and select the routing code with which work order will get created. Refer below screen shot:

Manufacturing screen
Fig02: Manufacturing screen
  1. d. Now click on the Plan or Release button.
  2. e. Once user clicked on the above button, work order will get generated.
  3. f. To see the generated work order, just go to the enterprise planning screen search for the product. On the lines grid you will see the newly generated work order for that particular product. Refer below screen shot:
Data in lines grid
Fig03: Enterprise planning lines grid
  1. Sales Order -> Enterprise planning -> Work Order
  2. First navigate to Sales -> Orders -> Orders
  3. Create new trasaction keeping product source as ‘Work Order‘ on line level. Refer below screen shot.

Note: Product should be BOM product.

  • Now, navigate to:  Manufacturing > Planning > Enterprise planning
  • Enter site and product.
  • Click on Search button.
  • After clicking on search button, all the data comes under that criteria will get filter out on the grid level.
  • Now select the above Sales order transaction present in the grid level and click on the lines action button -> Plan /Initiate button.
Plan\Initiate button
Fig04: Plan\Initiate Plan
  1. h. After click on plan/initiate button, one window will get open.
  2. i. After that just click on the Plan or Release button in that screen.
  3. j. As you can see in the below screen shot, Sales Order’s work order got created from Enterprise Planning screen.
WO creation
Fig05: Work Order creation in Enterprise Planning

k) Also you can see its reference on the Sales order screen as well. Refer below screen shot.

WO number in SO screen
Fig06: Sales Order screen

Hence by doing above process in Sage X3, we can create work order from enterprise planning screen.

About Us

Greytrix – a globally recognized and one of the oldest Sage Development Partner is a one-stop solution provider for Sage ERP and Sage CRM organizational needs. Being acknowledged and rewarded for multi-man years of experience, we bring complete end-to-end assistance for your technical consultations, product customizations, data migration, system integrations, third-party add-on development and implementation competence. 

Greytrix caters to a wide range of Sage X3, a Sage Business Cloud Solution, offerings. Our unique GUMU™ integrations include Sage X3 for Sage CRMSalesforce.com, Dynamics 365 CRM and Magento eCommerce along with Implementation and Technical Support worldwide for Sage X3. Currently we are Sage X3 Implementation Partner in East Africa, Middle East, Australia, Asia, US, UK. We also offer best-in-class Sage X3 customization and development services, integrated applications such as POS | WMS | Payment Gateway | Shipping System | Business Intelligence | eCommerce and have developed add-ons such as Catch – Weight  and Letter of Credit and India Legislation for Sage X3 to Sage business partners, end users and Sage PSG worldwide. Greytrix Sales Commission App for Sage X3 simplifies commission calculations and postings on sales transactions.

The GUMU™ Cloud framework by Greytrix forms the backbone of cloud integrations that are managed in real-time for processing and execution of application programs at the click of a button.

Greytrix is a recognized Sage champion ISV Partner for GUMU™ Sage X3 – Sage CRM integration also listed on Sage Marketplace; GUMU™ integration for Sage X3 – Salesforce is a 5-star rated app listed on Salesforce AppExchange and GUMU™ integration for Dynamics 365 CRM – Sage ERP listed on Microsoft AppSource.

For more information on Sage X3 Integration and Services, please contact us at x3@greytrix.com, We would like to hear from you.

HOW TO CONFIGURE ZPL PRINTING IN SAGE X3

$
0
0

Sage X3 provides us a functionality to print labels and barcodes using ZPL printer. ZPL stands for zebra programming language and using this language we can design the layouts of labels and embedded barcodes. In this blog we will see how the ZPL setup is configured in Sage X3. Below are steps to configure ZPL.

Steps:

Create a layout of document (.pat file) using zebra programming language.X3 Zebra Printing uses a ZPL Pattern file to determine the layout of the output. The information can be plain text, static text, formula based on X3 fields, barcode based on X3 fields or the data of X3 fields.

After creating this .pat file, locate it to PAT sub-directory of sage X3. For example if we are configuring in SEED folder (D:\Sage\X3V12\folders\SEED\PAT).

PAT directory path
Fig01: PAT directory path

Navigate: Development -> Script dictionary -> ZPL reports.

Enter the setup code and description. Enter the ‘file template’ field, here we have to enter the name of .pat file which is placed in PAT folder. To import the contents of the .PAT file, click on the File template’s Actions icon and select “New model version” – the Version number will be displayed and the internal counter will be incremented so the next import will have a distinct Version Number.

Template file
Fig02: Template File

Please note that the Pattern will not be used until the ZPL Definition has been Saved, so make a small change to the Description such as adding a space so that the Save action is available – if an earlier Version exists, that will be used instead.

The runtime selection criteria set up in Report Parameters, as described later, are used to select the data to be included in the Report.

Criteria
Fig03: Criteria

In the above case, ARZIMP.PARAM(“commandedeb”)  function provides a link the value specified in that Parameter at run-time – in this case, as defined in Report Parameters within Dictionary > Script dictionary > Reports

ZPL Patterns have three main sections, Header, Detail/Line and Footer/Tail.

Structure of template
Fig04: Structure of Template

Please check that the .PAT has been imported correctly. Click the Action icon of the Template file field and select “View template” action. Check that Header, Lines and Base have ZPL commands in them – if all three tabs are not populated, this implies that the sections are not defined properly and should be reviewed.

There is an ‘expression’ tab in ZPL report screen. As shown below here we can add the execution condition and the expression as required.

Fig05: Expression

Creating a ZPL Report

After setting up the ZPL Printer to hold the ZPL Pattern, an X3 Report should be set up to run the ZPL Printer Report. This is done in Development > Script Dictionary > Reports.

This is where the ZPL Printer is associated with an X3 Report, the ZPLPRINTER Destination and Report Parameters which select the data to be output.On ticking the “ZPL printer” field, the “Parameter Code” field becomes active and this is where the ZPL Printer’s Code is entered.

Specify the Zebra Printer’s Code in the “Destination” field.

ZPL report
Fig06: ZPL Report

On the Parameter definitions tab, specify the parameters which will be used by the ZPL Printer.

Parameter
Fig07: Parameter grid

Hence after creating the ZPL report when we will print our ZPL report we will get the output as the layout is designed with ZPL language.

About Us

Greytrix – a globally recognized and one of the oldest Sage Development Partner is a one-stop solution provider for Sage ERP and Sage CRM organizational needs. Being acknowledged and rewarded for multi-man years of experience, we bring complete end-to-end assistance for your technical consultations, product customizations, data migration, system integrations, third-party add-on development and implementation competence. 

Greytrix caters to a wide range of Sage X3, a Sage Business Cloud Solution, offerings. Our unique GUMU™ integrations include Sage X3 for Sage CRMSalesforce.com, Dynamics 365 CRM and Magento eCommerce along with Implementation and Technical Support worldwide for Sage X3. Currently we are Sage X3 Implementation Partner in East Africa, Middle East, Australia, Asia, US, UK. We also offer best-in-class Sage X3 customization and development services, integrated applications such as POS | WMS | Payment Gateway | Shipping System | Business Intelligence | eCommerce and have developed add-ons such as Catch – Weight  and Letter of Credit and India Legislation for Sage X3 to Sage business partners, end users and Sage PSG worldwide. Greytrix Sales Commission App for Sage X3 simplifies commission calculations and postings on sales transactions.

The GUMU™ Cloud framework by Greytrix forms the backbone of cloud integrations that are managed in real-time for processing and execution of application programs at the click of a button.

Greytrix is a recognized Sage champion ISV Partner for GUMU™ Sage X3 – Sage CRM integration also listed on Sage Marketplace; GUMU™ integration for Sage X3 – Salesforce is a 5-star rated app listed on Salesforce AppExchange and GUMU™ integration for Dynamics 365 CRM – Sage ERP listed on Microsoft AppSource.

For more information on Sage X3 Integration and Services, please contact us at x3@greytrix.com, We would like to hear from you.

Viewing all 1519 articles
Browse latest View live


<script src="https://jsc.adskeeper.com/r/s/rssing.com.1596347.js" async> </script>