Quantcast
Channel: Sage X3 – Tips, Tricks and Components
Viewing all 1519 articles
Browse latest View live

Financial snapshots in Project management

$
0
0

Projects Module is used to manage the elements often denominated under different terms: Business, Projects, and Opportunities. These translate to the same basic concept. Their objective is to manage the characteristics and stages in a sales cycle. Financial snapshots function is used to obtain a real-time top-level financial overview, a snapshot, of a project at a specific point in time.

A financial snapshot is based on the actual financial status of a project relative to its budgets. It provides similar figures to those provided for a project financial overview.

Navigate to All > Project > Snapshot> Financial snapshots

Fig : Financial snapshot

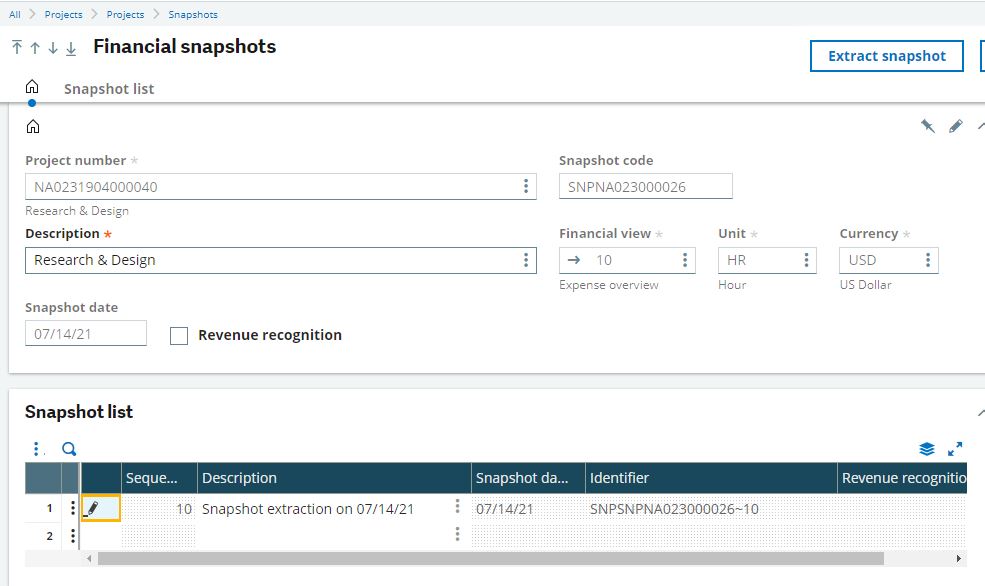
The Financial snapshots function contains a Home section in which you define a “snapshot header” with a Snapshot list section that contains a table of all extracted snapshots.

A snapshot header sets the parameters for a financial extraction. It is a prerequisite to running a snapshot. The snapshot header comprises the project code, the financial view to be extracted, and the unit and currency to be used each time the data extraction is requested.

Once you have created a snapshot header you can use the Extract snapshot Button to extract data for the project as, and when required.

Once use click on the Extract snapshot action to obtain a real-time top-level overview, a snapshot, of the selected project. The snapshot data is added to the list of snapshots in the Snapshot list section.

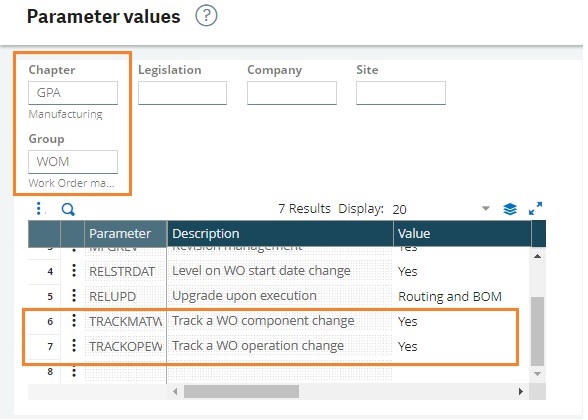
Each time you extract snapshot data the Financial status sections of the associated project and the cost structure is synchronized with the extracted data, if the FINOVERSYN – Updated fin. status/snapshot parameter (TC chapter, PJM group) is set to Yes and the Revenue recognition check box (REVRECFLG field) is selected for this snapshot header. If the ESTPRGSYNC – Updated est. progress/snapshot parameter (TC chapter, PJM group) is set to Yes the estimated progress percentage of the project, the project budget and the operational task (Estimated progress (%) fields) are updated.

Snapshot list section is used to view the list of snapshots that have been extracted for this snapshot header. As each extracted snapshot is unique it is allocated an automatic identifier to effectively timestamp the extraction. The most recent snapshot is always the first snapshot in the list, by default. You can view the actual snapshot data using the View action from the Actions icon.

Following are the few limitation

  • You cannot use this function to consolidate data for different projects.
  • You cannot change the time unit or currency once the snapshot header has been created. You can, however, choose to display just time or amount values.
  • Access to project financial expense detail at the cost type level is blocked.

Hope this blog helps you in tracking your financial status more efficiently.

About Us

Greytrix – a globally recognized and one of the oldest Sage Development Partner is a one-stop solution provider for Sage ERP and Sage CRM organizational needs. Being acknowledged and rewarded for multi-man years of experience, we bring complete end-to-end assistance for your technical consultations, product customizations, data migration, system integrations, third-party add-on development and implementation competence.

Greytrix caters to a wide range of Sage X3, a Sage Business Cloud Solution, offerings. Our unique GUMU™ integrations include Sage X3 for Sage CRMSalesforce.com, Dynamics 365 CRM and Magento eCommerce along with Implementation and Technical Support worldwide for Sage X3. Currently we are Sage X3 Implementation Partner in East Africa, Middle East, Australia, Asia, US, UK. We also offer best-in-class Sage X3 customization and development services, integrated applications such as POS | WMS | Payment Gateway | Shipping System | Business Intelligence | eCommerce and have developed add-ons such as Catch – Weight  and Letter of Credit and India Legislation for Sage X3 to Sage business partners, end users and Sage PSG worldwide.

Greytrix is a recognized Sage champion ISV Partner for GUMU™ Sage X3 – Sage CRM integration also listed on Sage Marketplace; GUMU™ integration for Sage X3 – Salesforce is a 5-star rated app listed on Salesforce AppExchange and GUMU™ integration for Dynamics 365 CRM – Sage ERP listed on Microsoft AppSource.

For more information on Sage X3 Integration and Services, please contact us at x3@greytrix.com, We will like to hear from you.


How to print a field once which is repeating in Sage X3 report

$
0
0

In Sage X3, developer has freedom to develop their own reports in Crystal reports as per their client requirement. So we have also developed one of the report in India pack report called as Vendor transaction/Ledger report. This report display all the vendor transactions for selected parameter range. In this report, there is section where opening balance needs to be shown then vendor transactions and then closing balance. Here the opening balance section needs to be printed only once rather than printing for each record. This can be achieved easily by using “suppress if duplicated” option in crystal report, if our report is in PDF format, but in our case report prints in an excel so we come up with another solution.

To handle this, follow the below steps:

Step 1 :
Open report in crystal report
Right click on opening balance field -> format field -> click on against “Suppress“ label X-2

New Stuff: Restrict Purchase Order based on Open SO amount

format field
format field

Step 2 :
Write the condition given below on the formula workshop screen as shown in the below screenshot
{FIELD}=previous({FIELD })

Condition
Condition

Step 3 :
Save this report, deploy the RPT file on respective folder location and print from Sage X3 screen

Output
Output

The above screenshot is output of the Report after applying the above mentioned changes in crystal report. Now, we can see here in opening balance column values is getting printed in only first row for the same vendor and rest of the rows are blank.

In this way, we can suppress the values if any field has same value repeating again and again.

About Us

Greytrix – a globally recognized and one of the oldest Sage Development Partner is a one-stop solution provider for Sage ERP and Sage CRM organizational needs. Being acknowledged and rewarded for multi-man years of experience, we bring complete end-to-end assistance for your technical consultations, product customizations, data migration, system integrations, third-party add-on development and implementation competence.

Greytrix caters to a wide range of Sage X3, a Sage Business Cloud Solution, offerings. Our unique GUMU™ integrations include Sage X3 for Sage CRMSalesforce.com, Dynamics 365 CRM and Magento eCommerce along with Implementation and Technical Support worldwide for Sage X3. Currently we are Sage X3 Implementation Partner in East Africa, Middle East, Australia, Asia, US, UK. We also offer best-in-class Sage X3 customization and development services, integrated applications such as POS | WMS | Payment Gateway | Shipping System | Business Intelligence | eCommerce and have developed add-ons such as Catch – Weight  and Letter of Credit and India Legislation for Sage X3 to Sage business partners, end users and Sage PSG worldwide.

Greytrix is a recognized Sage champion ISV Partner for GUMU™ Sage X3 – Sage CRM integration also listed on Sage Marketplace; GUMU™ integration for Sage X3 – Salesforce is a 5-star rated app listed on Salesforce AppExchange and GUMU™ integration for Dynamics 365 CRM – Sage ERP listed on Microsoft AppSource.

For more information on Sage X3 Integration and Services, please contact us at x3@greytrix.com, We will like to hear from you.

Control table feature in Sage X3

$
0
0

In Sage X3, most of the times you need to deal with the screens during development. Either you require to create new screens or to add required customization to the existing fields of screens.

We aware that Sage X3 provides different features at screen level such as entry condition – where you can set a particular condition in order to enter value in a that field, mandatory field, graphic object – to set graphical object of a field, style – to set formatting of a field etc. Similar to this, there exists one more feature that is “Control table”.

For this, Navigate to: Development > Screens > Screens

Below is the screenshot of screen “OPP3” (Project –> Before sales tab)

Fig : Screen field

The control tables are a very simple method to create validity controls that can be set up for certain entry fields. These control tables are used to define the coherence controls on the data being entered. These controls are an addition to the carried out standard controls. These are generally used in the definition of screens, to add controls on report parameters or in the definition of accounting transactions.

Each table is characterized by a 10-character alphanumeric code, and by associated control parameters. Up to three simultaneous controls can be defined; they can be of different types and are checked successively:

  • mandatory value entry if a condition is met.
  • presence in a value list.
  • exclusion from a value list.
  • presence in a table.
  • inclusion in an interval.
  • check of a calculation formula.

If you want to make a field mandatory on certain conditions then you can do it by creating new control table and assigning it to that field.

For example, we created a control table ‘YRENCON’ in order to make the “Reason” field on “Project > Before sales tab” to be mandatory if “Step” field is selected as “FPE” or “CNTQ”.

Refer below screenshot of the setup in control table.

Fig : Control table

Now,

  1. Navigate to: Customer relation > CRM activity > Projects
  2. Go to ‘Before-sales tab’ and insert new line by selecting date.
  3. Select the checkbox ‘Phase end’.
  4. Select step as “FPE” or “CNTQ”. The system will ask you to enter reason as a mandatory field.
Fig : Project – reason setup

Thus, control table can be helpful to setup additional controls on screen fields along with standard controls.

About Us

Greytrix – a globally recognized and one of the oldest Sage Development Partner is a one-stop solution provider for Sage ERP and Sage CRM organizational needs. Being acknowledged and rewarded for multi-man years of experience, we bring complete end-to-end assistance for your technical consultations, product customizations, data migration, system integrations, third-party add-on development and implementation competence.

Greytrix caters to a wide range of Sage X3, a Sage Business Cloud Solution, offerings. Our unique GUMU™ integrations include Sage X3 for Sage CRMSalesforce.com, Dynamics 365 CRM and Magento eCommerce along with Implementation and Technical Support worldwide for Sage X3. Currently we are Sage X3 Implementation Partner in East Africa, Middle East, Australia, Asia, US, UK. We also offer best-in-class Sage X3 customization and development services, integrated applications such as POS | WMS | Payment Gateway | Shipping System | Business Intelligence | eCommerce and have developed add-ons such as Catch – Weight  and Letter of Credit and India Legislation for Sage X3 to Sage business partners, end users and Sage PSG worldwide.

Greytrix is a recognized Sage champion ISV Partner for GUMU™ Sage X3 – Sage CRM integration also listed on Sage Marketplace; GUMU™ integration for Sage X3 – Salesforce is a 5-star rated app listed on Salesforce AppExchange and GUMU™ integration for Dynamics 365 CRM – Sage ERP listed on Microsoft AppSource.

For more information on Sage X3 Integration and Services, please contact us at x3@greytrix.com, We will like to hear from you.

Shortcut Keys in Sage X3

$
0
0

Combination of keys pressed to give a specific command are known as shortcut keys. Generally shortcut keys are combination of two or more than two keys. As everyone likes a quick way of getting things done, Sage X3 has introduced some shortcut keys to get things done quickly and also results in saving time for a user.

Below is the list of shortcut keys introduced by Sage X3 in version 12.

Shortcut keys:

ESC + N : To start new record.

ESC + B : To save the current record.

ESC + C : To create a record.

ESC + D : To delete a record.

ESC + E : To cancel modification.

Fig : Shortcut keys for save, create ,delete and cancel

ESC + ALT + U : To refresh the page.

ESC + ALT + C: To add comments.

ESC + ALT + A: To add attachment.

Fig : Short keys for refresh, attachment and comment

ESC + CTRL + P : To print a report (Record).

ESC + CTRL + L : To print a report (List).

Fig : Shortcut for Print

ESC + ALT + CTRL + K : To open calculator.

Fig : Shortcut for calculator

ESC + L  or ESC + F12 : To display the selection list of a field (magnifying glass, calendar, dropdown list etc)

ESC + G + H : To jump on home screen of sage X3.

ESC + G + N : To open navigation bar of sage X3.

ESC + G + B : To add a bookmark

Fig : Shortcut for home button & navigation

ESC + SHIFT + J : It selects the first record.

ESC + J : it select next record.

ESC + SHIFT + K : It selects the last record.

ESC + K : It select previous record.

Fig : Shortcut for first, last, next and previous record

ESC + 1 : Jump to 1st tab of a window.

ESC + 2 : Jump to 2nd tab of a window.

ESC + 3 : Jump to 4th tab of a window.

ESC + 4 : Jump to 5th tab of a window.

Fig : Shortcut for selecting tab on window

ESC + F1 : to get the field help.

ESC + DEL : To delete a line of a grid.

ESC + R : To expand or shrink the columns of grid.

ESC + F11 : To hide left panel.

ESC + T : selects current date in calendar.

Hence by practicing the above shortcut keys we can do thing in quick time and can save time.

About Us

Greytrix – a globally recognized and one of the oldest Sage Development Partner is a one-stop solution provider for Sage ERP and Sage CRM organizational needs. Being acknowledged and rewarded for multi-man years of experience, we bring complete end-to-end assistance for your technical consultations, product customizations, data migration, system integrations, third-party add-on development and implementation competence.

Greytrix caters to a wide range of Sage X3, a Sage Business Cloud Solution, offerings. Our unique GUMU™ integrations include Sage X3 for Sage CRMSalesforce.com, Dynamics 365 CRM and Magento eCommerce along with Implementation and Technical Support worldwide for Sage X3. Currently we are Sage X3 Implementation Partner in East Africa, Middle East, Australia, Asia, US, UK. We also offer best-in-class Sage X3 customization and development services, integrated applications such as POS | WMS | Payment Gateway | Shipping System | Business Intelligence | eCommerce and have developed add-ons such as Catch – Weight  and Letter of Credit and India Legislation for Sage X3 to Sage business partners, end users and Sage PSG worldwide.

Greytrix is a recognized Sage champion ISV Partner for GUMU™ Sage X3 – Sage CRM integration also listed on Sage Marketplace; GUMU™ integration for Sage X3 – Salesforce is a 5-star rated app listed on Salesforce AppExchange and GUMU™ integration for Dynamics 365 CRM – Sage ERP listed on Microsoft AppSource.

For more information on Sage X3 Integration and Services, please contact us at x3@greytrix.com, We will like to hear from you.

How to add dynamic currency symbol in Sage X3 report

$
0
0

In Sage X3, one of our client requested to add the currency symbol before the amount in the Purchase Order report according to the currency field in Purchase Order screen.

New Stuff: How to print a field once which is repeating in Sage X3 report

Currency Field
Currency Field

Follow the below steps to achieve the above requirement :

Step 1:
Place the number field you’re adding the currency symbol to on your report,
Right-click on the number field and select “Format Object”.

Format Field
Format Field

Step 2:
Select the “Number” tab in the “Format Editor” window, if it’s not already selected.

Step 3:
Click on the “Customize” button.

Customize
Customize

Step 4:
Select the “Currency Symbol” tab in the popup window.

Currency Symbol
Currency Symbol

Step 5:
Check the “Enable Currency Symbol” check box.

There are two options as Fixed & Floating:

  • Fixed: When we choose this option, it leaves extra space between the currency symbol and the value if the field is justified to the right.
  • Floating: When we choose this option, it never leaves any extra spaces between the currency symbol and the amount.

Step 6:
Click on the formula button to the right of “Currency Symbol” and enter a formula like this:

If {myTable.CurrencyType} = “USD” then “$” else …(one if for each symbol) as per below screenshot:

Currency symbol formula

Click on “Save and Close“ and change the position of symbol using Position drop-down list.

In this way, we can add the currency symbol for different currencies in Crystal Report.

About Us

Greytrix – a globally recognized and one of the oldest Sage Development Partner is a one-stop solution provider for Sage ERP and Sage CRM organizational needs. Being acknowledged and rewarded for multi-man years of experience, we bring complete end-to-end assistance for your technical consultations, product customizations, data migration, system integrations, third-party add-on development and implementation competence.

Greytrix caters to a wide range of Sage X3, a Sage Business Cloud Solution, offerings. Our unique GUMU™ integrations include Sage X3 for Sage CRMSalesforce.com, Dynamics 365 CRM and Magento eCommerce along with Implementation and Technical Support worldwide for Sage X3. Currently we are Sage X3 Implementation Partner in East Africa, Middle East, Australia, Asia, US, UK. We also offer best-in-class Sage X3 customization and development services, integrated applications such as POS | WMS | Payment Gateway | Shipping System | Business Intelligence | eCommerce and have developed add-ons such as Catch – Weight  and Letter of Credit and India Legislation for Sage X3 to Sage business partners, end users and Sage PSG worldwide.

Greytrix is a recognized Sage champion ISV Partner for GUMU™ Sage X3 – Sage CRM integration also listed on Sage Marketplace; GUMU™ integration for Sage X3 – Salesforce is a 5-star rated app listed on Salesforce AppExchange and GUMU™ integration for Dynamics 365 CRM – Sage ERP listed on Microsoft AppSource.

For more information on Sage X3 Integration and Services, please contact us at x3@greytrix.com, We will like to hear from you.

Dashboard feature of sales commission module.

$
0
0

In Sage X3, commission module provides enhancement of existing commission feature of Sage X3. It helps in overcoming challenges such as accuracy in sales commission calculation, timely payment to sales representatives, track of commissions of sales representatives, etc.

For any organization, sales play’s an important role in the success of the business. Sales representatives are the ones who generate the revenue for the organization and play a key role in the growth of business in any organization.

Sage X3 provides various types of representations for displaying records in the forms such as grid, graph, pie charts, etc. using features such as SQL query tool, graphical query tool, statistical parameters, etc. which makes it more responsive for a user environment.

Sometimes there might be a requirement of displaying data on user login. Sage X3 allows one feature of displaying such data which can be called as landing pages or dashboard. 

Dashboard in sales commission module helps in motivating sales representatives and their teams by providing them visibility and vision on their sales target and on potential commission that they can earn during the defined period and win their trust by building transparency.

It helps in encouraging the sales representatives to achieve their pending targets. Also, it will help in comparing sales representative’s achievements for more progressive business decisions for a sales manager.

Sales commission module provides a feature of sales group which allows a particular sales representative to be defined as “Sales manager” using the ”Employee type” field and rest others to be its subordinates or just sales representatives during target setup in commission module as shown in below figure.

Sales Manager setup
Sales Manager setup

There can be multiple sales group in which a particular sales rep can be defined as manager for different set of sales representatives. The dashboard will display all the sales representatives for a particular user who is manager with all the records present in the system from all sales group where the user’s employee type is “Sales manager”.

Consider an example where one sales representative is of employee type “Sales manager” and have few sales representative under it. When the manager logins to the system, the dashboard shows the manager sum of targets defined, targets achieved and how much the target is pending in its team for particular sales representative which will help in encouraging the sales representatives to earn their potential commission to achieve their pending targets in the particular span of time and will lead to growth in sales of the organization.

Dashboard
Dashboard

The dashboard includes three tabs which represent data records for span of a month, quarter or a year. In the monthly commission tab, the data will be displayed of the month of the current date. In the quarterly commission tab, the data will be displayed of the quarter as per current date falls in it and in yearly commission tab the data will be displayed of the year as per current date.

About Us

Greytrix – a globally recognized and one of the oldest Sage Development Partner is a one-stop solution provider for Sage ERP and Sage CRM organizational needs. Being acknowledged and rewarded for multi-man years of experience, we bring complete end-to-end assistance for your technical consultations, product customizations, data migration, system integrations, third-party add-on development and implementation competence.

Greytrix caters to a wide range of Sage X3, a Sage Business Cloud Solution, offerings. Our unique GUMU™ integrations include Sage X3 for Sage CRMSalesforce.com, Dynamics 365 CRM and Magento eCommerce along with Implementation and Technical Support worldwide for Sage X3. Currently we are Sage X3 Implementation Partner in East Africa, Middle East, Australia, Asia, US, UK. We also offer best-in-class Sage X3 customization and development services, integrated applications such as POS | WMS | Payment Gateway | Shipping System | Business Intelligence | eCommerce and have developed add-ons such as Catch – Weight  and Letter of Credit and India Legislation for Sage X3 to Sage business partners, end users and Sage PSG worldwide.

Greytrix is a recognized Sage champion ISV Partner for GUMU™ Sage X3 – Sage CRM integration also listed on Sage Marketplace; GUMU™ integration for Sage X3 – Salesforce is a 5-star rated app listed on Salesforce AppExchange and GUMU™ integration for Dynamics 365 CRM – Sage ERP listed on Microsoft AppSource.

For more information on Sage X3 Integration and Services, please contact us at x3@greytrix.com, We will like to hear from you.

How to handle un-applied payments in Sage X3

$
0
0

On a regular basis, our customer’s bank account gets replenished with wire transfers from their customers, which have no references to invoices. Accounting practices and bank reconciliation call for entering the payments steps below as soon as they are received.

STEP 1: Enter the wire transfer in the Payment/Receipt entry

Navigate to All -> A/P-A/R Accounting->Payment/Receipt entry

Fig1.1: Navigation to Payment Receipt Entry

This function is used to:

  • Enter a payment and associate it with an invoice/order,
  • To view all the entered payments, by payment transaction,
  • To Generate a journal by payment entered, or to know the grouping/posting stages that remain to be carried out,
  • To view all the payment journals already generated with respect to this payment.

Select RECWT Transaction

Fig 1.2 Payment Transaction Selection

It is important to note that it is only possible to enter one payment at a time: The payment can include several payment attributes (cash collection, payment differences, discounts, charges, etc.) and be allocated to several open items.

STEP 2: Wire Transfers Receipts

Fig 2.1 Wire Transfer Receipts

Select Attribute PPRNT – Prepayment Receipts

Select type: CSDIR -Customer Direct Invoice

Step 3: Open Item

An open item is a group of data related to the operation that it represents: the original document number, the document due date, its payment method, the currency, the amount, etc.

The managing open items makes it possible to facilitate the tracking operations recorded for a BP (via the Purchasing, Sales, A/P-A/R accounting or accounting modules) under a document type set up according to this function.

After these operations are completely processed by payment (provisional or final) or posted as “In bank” (matched entries), it is no longer possible to manage the items, except for the possibility to place an item on a statement or to associate a dispute code with it.

The items partially processed in payment remain modifiable.

Use this function is used to:

  • View all the open items related to a company, a site, a BP, etc. (according to the definition level in the selection).
  • Modify these open items at several levels:
  • The due date
  • The payment method for this open item
  • A split the open item amount over N distinct open items
  • Specify a possible dispute
  • The reminder management (activate or deactivate)
  • The “Payment approval” level
  • The pay-by or pay-to BP
  • The early discount/late charge code
  • Provisional Payment
  • Payment Total

Open Item of Invoice before Transaction

Fig 3.1 Open item of Invoice before wire transfer receipt

Open Item of Invoice after Transaction

Fig 3.1 Open item of Invoice after wire transfer receipt

This blog helps us to understand how to handle un-applied payments and understanding of open items on invoices.

About Us

Greytrix – a globally recognized and one of the oldest Sage Development Partner is a one-stop solution provider for Sage ERP and Sage CRM organizational needs. Being acknowledged and rewarded for multi-man years of experience, we bring complete end-to-end assistance for your technical consultations, product customizations, data migration, system integrations, third-party add-on development and implementation competence.

Greytrix caters to a wide range of Sage X3, a Sage Business Cloud Solution, offerings. Our unique GUMU™ integrations include Sage X3 for Sage CRMSalesforce.com, Dynamics 365 CRM and Magento eCommerce along with Implementation and Technical Support worldwide for Sage X3. Currently we are Sage X3 Implementation Partner in East Africa, Middle East, Australia, Asia, US, UK. We also offer best-in-class Sage X3 customization and development services, integrated applications such as POS | WMS | Payment Gateway | Shipping System | Business Intelligence | eCommerce and have developed add-ons such as Catch – Weight  and Letter of Credit and India Legislation for Sage X3 to Sage business partners, end users and Sage PSG worldwide.

Greytrix is a recognized Sage champion ISV Partner for GUMU™ Sage X3 – Sage CRM integration also listed on Sage Marketplace; GUMU™ integration for Sage X3 – Salesforce is a 5-star rated app listed on Salesforce AppExchange and GUMU™ integration for Dynamics 365 CRM – Sage ERP listed on Microsoft AppSource.

For more information on Sage X3 Integration and Services, please contact us at x3@greytrix.com, We will like to hear from you.

Installation and steps to use the Patch Finder

$
0
0

In the each new levels of patch, Sage do bring the new changes and hot fixes that needs to be identified and needs to be monitored that might hamper the existing customization when the upgrade patch is executed.

To avoid this we should need to understand what new changes or hot fixes sage has deployed in the newer patch level. According if that clashes with the existing customization then we need to handle it prior deploying the patch.

When the each new version is released the Sage do provide release notes that needs to gone through. But rather than going through each patch level, now sage has provided the new independent utility as Patch finder.

The Patch finder is the new component present in the installable which needs to be installed by the below steps:

There is the zip file which holds the patch finder exe as shown below:

Fig : Path

Once the folder is unzipped we will be able to see the X3 Patch finder exe in that particular folder.

Fig : Path

We need to run the exe, that will land you to the below independent utility as shown below:

Fig : Patch finder

In the above UI we need to select the Product and release: From release and the destination release. The next filter we can manage is Modules on which we need to monitor.

Next set of filter can be applied is at the level of changes brought in version as follow:

Type of filter

This filtration would be applied on the do we need to consider the Bugs in the reports, new enhancement brought that might bring the table level or architecture changes. Do need to consider Entry points that newly introduced or any other changes that are brought.

Fig : Patch finder

Search fields and criteria:

Search field filtration would help to understand the changes related to Object, Key or all fields needs to highlight in the upgrade the version.

We can put filtration on the specific object filtration also.

Once we are all set for to filter the data, we would need to hit on the Search button.

Fig : Patch finder

Below is the report will help you identify the component and holds the below column.

Key:  We will identify the key that fix will identified, each fix has its own key to identify the issue.

Type: Enhancemenyt/ Bug

Summary: Explanation of the fix.

Product area: Module on which modification is present.

Object: modification on TRT,tables screen or any other if present. If we go to the TRT and search the Key we will be able to trace the modification easily.

Release: In which release the fix is been applied.

This will help us to understand the in which the medication is done. We can expo-rt the data in the CSV, PDF, EXCEL or print as per the button on the tops.

We can also copy the entire data and paste on the notepad.

About Us

Greytrix – a globally recognized and one of the oldest Sage Development Partner is a one-stop solution provider for Sage ERP and Sage CRM organizational needs. Being acknowledged and rewarded for multi-man years of experience, we bring complete end-to-end assistance for your technical consultations, product customizations, data migration, system integrations, third-party add-on development and implementation competence.

Greytrix caters to a wide range of Sage X3, a Sage Business Cloud Solution, offerings. Our unique GUMU™ integrations include Sage X3 for Sage CRMSalesforce.com, Dynamics 365 CRM and Magento eCommerce along with Implementation and Technical Support worldwide for Sage X3. Currently we are Sage X3 Implementation Partner in East Africa, Middle East, Australia, Asia, US, UK. We also offer best-in-class Sage X3 customization and development services, integrated applications such as POS | WMS | Payment Gateway | Shipping System | Business Intelligence | eCommerce and have developed add-ons such as Catch – Weight  and Letter of Credit and India Legislation for Sage X3 to Sage business partners, end users and Sage PSG worldwide.

Greytrix is a recognized Sage champion ISV Partner for GUMU™ Sage X3 – Sage CRM integration also listed on Sage Marketplace; GUMU™ integration for Sage X3 – Salesforce is a 5-star rated app listed on Salesforce AppExchange and GUMU™ integration for Dynamics 365 CRM – Sage ERP listed on Microsoft AppSource.

For more information on Sage X3 Integration and Services, please contact us at x3@greytrix.com, We will like to hear from you.


How to setup sales targets in Sales Commission Module

$
0
0

In Sage X3, commission module provides enhancement of existing commission feature of Sage X3.

In this blog we will learn how to setup sales rep target for different combinations such as customer category, product category, sales site, shipment site, state group, etc. in sales commission module.

Navigate to All -> Commission -> Setup -> Sales rep target setup

Below screen will appear.

Fig 01 : Sales target setup screen

The sales target setup screen contains fields such as sales rep, company, sales site, shipment site, state group, customer category, product category, beginning date, ending date and sales target fields. The target can be set for multiple combinations of above mentioned fields where sales rep and company are mandatory fields. Target setup is enabled from “Commission On” field of main setup screen which is needed to be selected as “Sales Target” option otherwise it will work for individual sales invoices. Also, target can be calculated in three ways as defined in ”Target” field of main setup screen in Commission Module as shown in below figure.

Fig 02 : Target field

If Selected “Year” option then “Fiscal year” and “Year Description” field will get visible as shown below.

Fig 03 : If selected “Year”

If selected “Period” option then “Fiscal year”, “From period” and “To period” fields will get visible as shown below.

Fig 04 : If Selected “Period”

If selected “Date range” then “Beginning date” and “Ending date” fields will come in enterable mode as shown below and for rest options both will be in display mode.

Fig 05 : If Selected “Date range”

The target setup works when for a particular sales rep’s target is defined and if the multiplication of quantity and margin of a product in line level of sales invoices exceeds or reaches that target, then it will look the commission amount defined in the commission rate setup screen for that combination of customer category, product category, sales site, shipment site, etc. and if found then only the commission will be given to the sales rep and if the sales rep does not meet the targeted amount value, then “No commission” will be given to that particular sales rep.

Fig 06 : Target setup

Consider an example where target is selected as period in main setup screen and in target setup sales rep defined is “NA101”. During calculation of sales commission, if sum of multiplication of quantity and margin of lines in sales invoice for that sales rep meets the targeted amount value, then only it is eligible for commission and the system will look for that particular combination defined in sales rep target whether it is present in the commission rate setup screen or not, if found then the commission amount will be given to that sales rep otherwise commission value be given zero.

By using above steps we can we can setup targets for sales rep in sales commission module for any combination of fields of target setup screen.

This blog helps us in creating a target setup for sales rep in Sales Commission Module of Sage X3.

About Us

Greytrix – a globally recognized and one of the oldest Sage Development Partner is a one-stop solution provider for Sage ERP and Sage CRM organizational needs. Being acknowledged and rewarded for multi-man years of experience, we bring complete end-to-end assistance for your technical consultations, product customizations, data migration, system integrations, third-party add-on development and implementation competence.

Greytrix caters to a wide range of Sage X3, a Sage Business Cloud Solution, offerings. Our unique GUMU™ integrations include Sage X3 for Sage CRMSalesforce.com, Dynamics 365 CRM and Magento eCommerce along with Implementation and Technical Support worldwide for Sage X3. Currently we are Sage X3 Implementation Partner in East Africa, Middle East, Australia, Asia, US, UK. We also offer best-in-class Sage X3 customization and development services, integrated applications such as POS | WMS | Payment Gateway | Shipping System | Business Intelligence | eCommerce and have developed add-ons such as Catch – Weight  and Letter of Credit and India Legislation for Sage X3 to Sage business partners, end users and Sage PSG worldwide.

Greytrix is a recognized Sage champion ISV Partner for GUMU™ Sage X3 – Sage CRM integration also listed on Sage Marketplace; GUMU™ integration for Sage X3 – Salesforce is a 5-star rated app listed on Salesforce AppExchange and GUMU™ integration for Dynamics 365 CRM – Sage ERP listed on Microsoft AppSource.

For more information on Sage X3 Integration and Services, please contact us at x3@greytrix.com, We will like to hear from you.

Data flow from AP/AR Payment screen to Journal entry on Posting using Automatic Journal

$
0
0

In Sage X3, Users can create Payment vouchers based on Purchase/Sales invoices and can see specific data being flowed from invoice screens to the respective payment screens. And can follow up by creating the Journal entry for the posted payments automatically. But what if the user wants specific data to be flowed on the Journal entry on Payment being posted, that is, on Journal entry creation from payment.

In this, we’ll show how to flow the “Description” field present on the General tab of AR/AP Payment screen header to the “Default description” field present on the Header tab of Journal Entry screen as well as the “Description” column present at the lines level on the same screen. All this will be done with the use of Automatic Journals, which creates the Journal data based on Posting of a Payment.

New Stuff: How to setup sales targets in Sales Commission Module

First, to navigate on the following screens below are the steps:

Payment/Receipt screen: All > A/P-A/R accounting > Payment/Receipt entry
Journal Entry: All > Financials > Journal Entry
Automatic Journals: All > Setup > Automatic Journals

For the purpose of making things a bit more clear visually, below are the screenshots fields locations on their respective screens:

Description field on Formula section in Automatic Journals screen
Default Desc. field on Journal Entry screen
Line description fields on Journal Entry screen

Now once we’re familiar with the screens, we’ll first find out the Automatic journal code used for the posted Payment. Follow the below mentioned steps:

Step 1: Check on the respective payment entry whether it’s posted or not. You can do that by checking the POST button (on the right top side on version 12 Sage X3) being enabled or hidden. If it’s hidden the Payment is posted and it’s Journal entry is already created, if not then please post it first.

Step 2: Jump onto its respective Journal entry screen via Accounting document button as shown below.

Accounting document on Payment screen

Step 3: Once on the Journal Entry screen, scroll below to find the Source tab in that look for Source field which’ll show “Automatic generation” and next to it will be Source transaction field showing “PRINC”. This is the Automatic Journal code we’re looking for.

Automatic Journal code on Journal Entry scree

Now that we’ve noted the Automatic Journal code, next steps involve us flowing the data.

Step 4: Now in a new tab, open Automatic Journal and on the left-list search for PRINC. Scroll below to the formula section on screen and check below for the Description and Journal Reference fields as shown:

Description field on Formula section in Automatic Journals screen

Step 5: The Description field shows from where the data will be flowing to the Default Description field on the Journal Entry screen.
Now we’ve to use Description field data from Payment screen to flow on Default description and Lines description fields on Journal Entry. For this, we need to check where in PAYMENTH table it is storing:

PAYMENTH table in Table dictionary

Step 6: So use [F:PYH]DES in the Description field as shown in fig. On Step 4.
Note: Before making any change on the Automatic Journal formula field, keep a backup of the existing value present on the fields in case of mistake.

Step 7: Now the data will flow to the Default description field on Journal entry, so to flow the same data on the Lines description as well. Open Lines located on top right on screen as shown:

Lines button on Automatic Journals screen

Step 8: In Lines scroll down to the Formula section and in that look for Description field, here use the same [F:PYH]DES to flow the data. However, if you check on the left-list there are many lines so you need to check which ones will work, for this particular step we used line no. 10 and 18 to make the change.

Line no. 10 & 18 having Description field on Automatic Journals(lines)

Step 9: Once the changes are done Save the Automatic Journal and perform a restart of the application, this is necessary to take effect.

Step 10: After restart, open the Payment screen and first cancel the previously posted entry using the Accounting cancellation option below the Accounting document as shown in Step 2. Give some time and then repost the Payment, and jump to the Journal Entry screen to see if the data is flowing properly.

Data on Description on Payment screen
Data Flowed to Default description field on Journal Entry screen
Data flowed over to Description fields on Journal Entry screen

In this way, we can make use of the Automatic Journals module to flow data without making changes in Specific scripts.

About Us

Greytrix – a globally recognized and one of the oldest Sage Development Partner is a one-stop solution provider for Sage ERP and Sage CRM organizational needs. Being acknowledged and rewarded for multi-man years of experience, we bring complete end-to-end assistance for your technical consultations, product customizations, data migration, system integrations, third-party add-on development and implementation competence.

Greytrix caters to a wide range of Sage X3, a Sage Business Cloud Solution, offerings. Our unique GUMU™ integrations include Sage X3 for Sage CRMSalesforce.com, Dynamics 365 CRM and Magento eCommerce along with Implementation and Technical Support worldwide for Sage X3. Currently we are Sage X3 Implementation Partner in East Africa, Middle East, Australia, Asia, US, UK. We also offer best-in-class Sage X3 customization and development services, integrated applications such as POS | WMS | Payment Gateway | Shipping System | Business Intelligence | eCommerce and have developed add-ons such as Catch – Weight  and Letter of Credit and India Legislation for Sage X3 to Sage business partners, end users and Sage PSG worldwide.

Greytrix is a recognized Sage champion ISV Partner for GUMU™ Sage X3 – Sage CRM integration also listed on Sage Marketplace; GUMU™ integration for Sage X3 – Salesforce is a 5-star rated app listed on Salesforce AppExchange and GUMU™ integration for Dynamics 365 CRM – Sage ERP listed on Microsoft AppSource.

For more information on Sage X3 Integration and Services, please contact us at x3@greytrix.com, We will like to hear from you.

Supplier Invoice Number validation on Purchase Invoice Screen

$
0
0

In Sage X3, Supplier Document Number Field is available on purchase invoice screen in management tab. It is a mandatory field which means while creating entry we can’t skip this field. We have to enter data in this field then only we can proceed further.

We had a requirement from client that data entered in supplier document field should not be repeated in current fiscal year and also we have to handle this with upper case and lower case letter condition. Fiscal year will be calculated on the basis of “supplier inv. Date”.

Ex, suppose for Supplier A user created 1st entry and entered “TEST1” as supplier document number. After that user is creating 2nd entry for the same supplier and trying to enter “test1” as supplier document no. then it should not allow user to create the entry as the document no is same, doesn’t matter it is in lower case or upper case.

New Stuff: Data flow from AP/AR Payment screen to Journal entry on Posting using Automatic Journal

BPRVCR(Supplier doc No.)
Purchase Invoice - 1st Entry
Purchase Invoice – 1st Entry

For the 1st entry, Supplier is SD0014 and the user entered “sd08” in Supplier Doc no and fiscal year is 2021-2022.

For the 2nd entry, Supplier is SD0014 and the user entered “SD08” in supplier doc no and fiscal year is 2021-2022.

Purchase Invoice - 2nd Entry
Purchase Invoice – 2nd Entry

Then the system will not allow to create this entry. And pop-up message will be generated “This Supplier document number SD08 already entered” as shown in the below screenshot.

Pop-up Message
Pop-up Message

For this purpose, we did a customization on Purchase Invoice screen. Refer below code:

IF [M:PIH1]BPRVCR<>””
Local Char REQUEST1(255)(8)
REQUEST1(0) = ” SELECT NUM_0 FROM “+nomap+”.PINVOICE P “
REQUEST1(1) = ” WHERE P.BPR_0='”+[PIH0]BPR+”‘ AND UPPER(P.BPRVCR_0)=UPPER(‘”+[PIH1]BPRVCR+”‘) and “
REQUEST1(2) = ” P.BPRDAT_0 BETWEEN DateFromParts((CASE WHEN MONTH(‘”+[M:PIH1]BPRDAT+”‘) IN(1,2,3) THEN (YEAR(‘”+[M:PIH1]BPRDAT+”‘)-1) ELSE YEAR(‘”+[M:PIH1]BPRDAT+”‘) END),04,01) “
REQUEST1(3) = ” and DateFromParts((CASE WHEN MONTH(‘”+[M:PIH1]BPRDAT+”‘) NOT IN(1,2,3) THEN (YEAR(‘”+[M:PIH1]BPRDAT+”‘)+1) ELSE YEAR(‘”+[M:PIH1]BPRDAT+”‘) END),03,31)”

FOR (Char DTEXTE_0) FROM “5” Sql REQUEST1 As [YCHD]
IF [M:PIH0]NUM =[YCHD]DTEXTE_0
ELSE
INFBOX “This Supplier Document number ” +num$([M:PIH1]BPRVCR)+” already enteredon invoice “+[YCHD]DTEXTE_0
OK =0
GOK = 0
GPE = 1
ENDIF
NEXT
ENDIF

and add above code on VERIF_CRE and VERIF_MOD in SPEPIH script. Validated the script.

Now, if the user tries to create another new entry for same supplier and same fiscal year but diffrent supplier document no. then only system will allow to create entry.

In this way, we have added the validation on Supplier Document No in Purchase Invoice screen for the current fiscal year.

About Us

Greytrix – a globally recognized and one of the oldest Sage Development Partner is a one-stop solution provider for Sage ERP and Sage CRM organizational needs. Being acknowledged and rewarded for multi-man years of experience, we bring complete end-to-end assistance for your technical consultations, product customizations, data migration, system integrations, third-party add-on development and implementation competence.

Greytrix caters to a wide range of Sage X3, a Sage Business Cloud Solution, offerings. Our unique GUMU™ integrations include Sage X3 for Sage CRMSalesforce.com, Dynamics 365 CRM and Magento eCommerce along with Implementation and Technical Support worldwide for Sage X3. Currently we are Sage X3 Implementation Partner in East Africa, Middle East, Australia, Asia, US, UK. We also offer best-in-class Sage X3 customization and development services, integrated applications such as POS | WMS | Payment Gateway | Shipping System | Business Intelligence | eCommerce and have developed add-ons such as Catch – Weight  and Letter of Credit and India Legislation for Sage X3 to Sage business partners, end users and Sage PSG worldwide.

Greytrix is a recognized Sage champion ISV Partner for GUMU™ Sage X3 – Sage CRM integration also listed on Sage Marketplace; GUMU™ integration for Sage X3 – Salesforce is a 5-star rated app listed on Salesforce AppExchange and GUMU™ integration for Dynamics 365 CRM – Sage ERP listed on Microsoft AppSource.

For more information on Sage X3 Integration and Services, please contact us at x3@greytrix.com, We will like to hear from you.

How to do setup and process for loaned products in Sage X3

$
0
0

Loan orders are for products that shipped to customers that may return the product by a defined return date or may keep the product and be invoiced for it later. For example, an equipment might be loaned to a Business Partner for a special event and they will return it when the event is over. When working with loan orders, it is important to identify specific loan information in regards to transaction entry types, locations, and customer and product information.

To enter orders corresponding to the loaning of products, we must have at least one order type defined with the Loan category. The Loan order type is defined through the Sales order types function please navigate to: Setup > Sales > Document type > Order types

Fig 1 : Sales order types screen

Defining the order type as a loan type, the system will allow to assign a sequence number counter (Setup > General parameters > Sequence number definition > Structures) to loans different from normal orders. In addition to defining a Loan order type, we need to define entry transactions for orders and shipments that are defined with a category and delivery type of Loan or All Categories/All Types.

Entry transactions are created in below path.                      

 Navigate to: Setup> Sales> Entry transactions> Orders for the loan orders and Deliveries for the loan deliveries.

Fig 2 : Sales order transaction

The setup will be same for Delivery transaction as shown in above fig for order transaction.

When delivering a loan order, the internal stock is moved to a BP location. It is therefore necessary to define at least one Customer location. This can be setup in Common data, Product tables, Location types. Then after defining the customer location type, clicking the Create location button will create a new location for the location type specified.

Fig 3 : Location type

When creating products and customers, there are specific settings to be defined in order to manage loans correctly for the products and customers. In the Product function, the Loan authorized check box under the Sales tab needs to be checked.

Fig 4 : Product

In Product-site, Management tab, Location management needs to be checked.

In Product-site, Management tab, Location management needs to be checked.

In the Customer record, Commercial tab, Loan authorized box needs to be checked and the Ship-to customer must have a loan location in it.

Fig 5 : Customer
Fig 6 : Customer

When processing a loan order using the GESSOH function, a normal order can be entered but the type must be a loan type. The OSTLND general parameter specifies whether the loan order total is included in the customer’s order total, which can impact the customer credit limit. Also, when allocating the product, it must be allocated from an internal location. Then once processing the delivery, the type must be a loan type.

Fig 7 : Sales order

Create a delivery against above sales order. When the delivery is validated, the product leaves the Internal location to the Loan location.

When the loaned product is returned, a new loan return can be processed to move the product from the loan location to the internal location.     

With the help of above setup user can successfully do the process for the same.

About Us

Greytrix – a globally recognized and one of the oldest Sage Development Partner is a one-stop solution provider for Sage ERP and Sage CRM organizational needs. Being acknowledged and rewarded for multi-man years of experience, we bring complete end-to-end assistance for your technical consultations, product customizations, data migration, system integrations, third-party add-on development and implementation competence.

Greytrix caters to a wide range of Sage X3, a Sage Business Cloud Solution, offerings. Our unique GUMU™ integrations include Sage X3 for Sage CRMSalesforce.com, Dynamics 365 CRM and Magento eCommerce along with Implementation and Technical Support worldwide for Sage X3. Currently we are Sage X3 Implementation Partner in East Africa, Middle East, Australia, Asia, US, UK. We also offer best-in-class Sage X3 customization and development services, integrated applications such as POS | WMS | Payment Gateway | Shipping System | Business Intelligence | eCommerce and have developed add-ons such as Catch – Weight  and Letter of Credit and India Legislation for Sage X3 to Sage business partners, end users and Sage PSG worldwide.

Greytrix is a recognized Sage champion ISV Partner for GUMU™ Sage X3 – Sage CRM integration also listed on Sage Marketplace; GUMU™ integration for Sage X3 – Salesforce is a 5-star rated app listed on Salesforce AppExchange and GUMU™ integration for Dynamics 365 CRM – Sage ERP listed on Microsoft AppSource.

For more information on Sage X3 Integration and Services, please contact us at x3@greytrix.com, We will like to hear from you.

Mailing label from the Crystal Report

$
0
0

In Sage X3, we have created a new custom screen name as “Barcode Generation”, from this screen user can print the barcode report. To print the report, we have create the filter parameter of “From Site” and “To Site”, “From Asset and “To Asset”, “From Physical Asset” and “To Physical Asset” from which user can filters the list of Barcode according to the selected range of the parameters.

New Stuff: How to do setup and process for loaned products in Sage X3

Barcode Generation Screen

In this blog, we will see how to print the Barcode Labels by using the Crystal Reports. This report get prints all the labels as per the selected parameter range given by the user. This can be handle by using the “Mailing label report wizard” option which is available in the crystal report.

Follow the steps below:

Step 1: Open the Crystal Reports

Step 2: Select the “Mailing label report wizard” option, refer the below screenshot:

Home Screen
Home Screen

Step 3: Go to File -> Page Setup -> Page Option and adjust the size of the page like Margins, Horizontal and Vertical size according to the size of the label paper.
For Example, let’s assume the size of a label sheet is 4 x 1 inches, with 0 margins (left, right, top & bottom) as shown in the below screenshot:

Page Setup
Page Setup

Step 4: We have to adjust the detail line too, according to the size of the single label and give a gap between the labels. Here let’s assume the size of a single label will be 1.985 X 0.983 in.
To Adjust the size of the detail line: Right click on the Section->Section Expert->Layout.
We can adjust the size of the detail line from the “Detail Size” section and to adjust the gap we have to use the section “Gap Between Details”.
We can also give the printing direction from “Printing Direction” section.
If we want the labels to be printed sideways first and then downwards, then we need to select “Across then Down” radio button and if we want the labels to be printed downwards first and then sideways then we need to select “Down then Across” radio button.

Section Expert
Section Expert

Step 5: On the LHS is where we create the desired format for the Barcode, and the same will be displayed on the RHS.

Design
Design

Step 6: Create a group by on the field that gives the barcode, so that each barcode will get printed on a new page. Here we have created a group by based on PHYREF_0 and then created the barcode of the same field.

To get the Barcode of a field, place the field inside the formula like ‘‘ & {your field} & ‘‘ and drag and drop it on the design page.

Formula Editor
Formula Editor

After that right click on the formula field -> Format Editor, Go to Font section and change the text font to “Code39AzaleaRegular3”. By using this, we will get the field which is converted to the barcode. Refer below screenshot:

Format Editor
Format Editor

Step 7: Once done with the above steps from the crystal report, we have to save the report and deploy the report in the respective folder and then print this report from the screen.

Output
Output

As you can see from the above report output, the barcode is getting printed in “Across then Down” fashion with the help of Mailing Label option from the crystal report.

About Us

Greytrix – a globally recognized and one of the oldest Sage Development Partner is a one-stop solution provider for Sage ERP and Sage CRM organizational needs. Being acknowledged and rewarded for multi-man years of experience, we bring complete end-to-end assistance for your technical consultations, product customizations, data migration, system integrations, third-party add-on development and implementation competence.

Greytrix caters to a wide range of Sage X3, a Sage Business Cloud Solution, offerings. Our unique GUMU™ integrations include Sage X3 for Sage CRMSalesforce.com, Dynamics 365 CRM and Magento eCommerce along with Implementation and Technical Support worldwide for Sage X3. Currently we are Sage X3 Implementation Partner in East Africa, Middle East, Australia, Asia, US, UK. We also offer best-in-class Sage X3 customization and development services, integrated applications such as POS | WMS | Payment Gateway | Shipping System | Business Intelligence | eCommerce and have developed add-ons such as Catch – Weight  and Letter of Credit and India Legislation for Sage X3 to Sage business partners, end users and Sage PSG worldwide.

Greytrix is a recognized Sage champion ISV Partner for GUMU™ Sage X3 – Sage CRM integration also listed on Sage Marketplace; GUMU™ integration for Sage X3 – Salesforce is a 5-star rated app listed on Salesforce AppExchange and GUMU™ integration for Dynamics 365 CRM – Sage ERP listed on Microsoft AppSource.

For more information on Sage X3 Integration and Services, please contact us at x3@greytrix.com, We will like to hear from you.

How to give user specific access to general parameters in Sage X3

$
0
0

Sometimes we might want to give user specific access for the general parameters.

User Access Control ensures access to specific assigned functions is given to users based on their roles and functions performed in the organization. This setup thus prevents users from accessing sensitive information not intended for them. Therefore, it becomes easier to have user specific parameter values instead of default values for all the users. This is one of the many functions that make Sage X3 so flexible and convenient to configure – this feature, among others, really empowers users to make the solution theirs.

There is a function in Sage X3 that gives you access to all user-centric parameter values.

Fig 1 : User choice

As a reminder, parameter values are parameters that can be managed at multiple levels (folder, legislation, company, user) to drive the behavior of the application. For example, depending on parameter values, users will see a default entry transaction screen in the journal entry function.

Some other behavioral changes will be related to how the system uses default journal codes when running through end-of-month processes.

target=”_blank” rel=”noopener noreferrer”>

Steps for personalizing general parameters in Sage X3:

Fig 2: CLO parameter
Fig 3: Parameter values

Instead of having all user-level parameters maintained by the system administrators at the folder level, there’s a function that allows users to change and modify some of those values based on their preferences. So that you can changes the parameters and values accordingly on your preference and needs instead of having same default values for all the parameters and all the users.

One of the great things about these parameter values is that the selected ones are very safe. Doing this does require some training, but once it’s made clear how to navigate those screens, it will be easier to navigate and find menus.

Since this is its own dedicated function, you’ll be able to give or deny access based on security rights.

Fig 4: Personalization

Once in, you can scroll through the different pages and find the ones you need.

Fig 5 : User choice parameter setup

For the above user, you can see that no entry transaction is defined as the default entry transaction when getting into the journal entry screen; if the user repeatedly uses the same entry transaction, selecting one as a default will save a step in the process.
If you need something to be defaulted, chances are you’ll find it in the parameter values; this is one of the many functions that make Sage X3 so flexible and convenient to configure – this feature, among others, really empowers users to make the solution theirs.

About Us

Greytrix – a globally recognized and one of the oldest Sage Development Partner is a one-stop solution provider for Sage ERP and Sage CRM organizational needs. Being acknowledged and rewarded for multi-man years of experience, we bring complete end-to-end assistance for your technical consultations, product customizations, data migration, system integrations, third-party add-on development and implementation competence.

Greytrix caters to a wide range of Sage X3, a Sage Business Cloud Solution, offerings. Our unique GUMU™ integrations include Sage X3 for Sage CRMSalesforce.com, Dynamics 365 CRM and Magento eCommerce along with Implementation and Technical Support worldwide for Sage X3. Currently we are Sage X3 Implementation Partner in East Africa, Middle East, Australia, Asia, US, UK. We also offer best-in-class Sage X3 customization and development services, integrated applications such as POS | WMS | Payment Gateway | Shipping System | Business Intelligence | eCommerce and have developed add-ons such as Catch – Weight  and Letter of Credit and India Legislation for Sage X3 to Sage business partners, end users and Sage PSG worldwide.

Greytrix is a recognized Sage champion ISV Partner for GUMU™ Sage X3 – Sage CRM integration also listed on Sage Marketplace; GUMU™ integration for Sage X3 – Salesforce is a 5-star rated app listed on Salesforce AppExchange and GUMU™ integration for Dynamics 365 CRM – Sage ERP listed on Microsoft AppSource.

For more information on Sage X3 Integration and Services, please contact us at x3@greytrix.com, We will like to hear from you.

Manual Commission feature of Sales commission add on .

$
0
0

In Sage X3, commission module provides enhancement of existing commission feature of Sage X3. It helps in overcoming challenges such as accuracy in sales commission calculation, timely payment to sales representatives, track of commissions of sales representatives, etc.

Sales commission module provides a feature of manual commission which overcomes the existing standard commission feature of sage X3. If the user wants to give commission on particular invoice separately, using this feature the commission to the sales representatives can be given manually other than commission rate defined.

To Know about Sales Commission add on, kindly follow below link.

Sage X3 Sales Commission add on

Navigate to All-> Commission -> Processes -> Manual Commission

Manual commission screen

It consists of fields such manual commission id, customer, date, invoice type, document number, document line number, base amount, sales group, commission rate, total commission and commission status.

  • Manual commission id : Generated after creation of one transaction.
  • Customer : For a particular customer (mandatory field).
  • Date : Manual Commission Transaction date(mandatory field).
  • Invoice type : It provides a drop down of two types of invoices i.e. Sales Invoice and Customer BP invoice.
  • Document number : This field provides selection of invoice number based on invoice type from the drop down selected and customer selected in header.
  • Document Line number : It provides selection of Line number of invoice selected in document number field.
  • Base Amount : It gets populated based on line number field entered, if line number selected then it populates product of quantity and net price of that line number. If line number not selected then it get populated by total invoice amount of selected invoice in document number field.
  • Sales Group : It provides a selection of sales group.
  • Commission rate : User can define its commission rate here.
  • Total Commission : It gets populated based on base amount and rate entered.
  • Commission status : It shows whether commission is pending, calculated & posted or not.

After entering the customer, the sales group field in the header gets filled as defined in customer screen and detail grid gets automatically populated from the sales group screen as shown below.

Grid population
Grid population

If the user wants to select a different sales group, it can be changed after populating too as per user required and the grid data will change as per the new sales group selected.

After creating the manual commission transaction, the calculate button gets enabled in the top right corner of screen and once we click on calculate button the commission it gets disabled and for each sales rep commission gets calculated according to their “Commission PCT” field at line level as shown in below figure.

Calculate button
Calculate button

Once the manual commission gets calculated, the screen does not allow to modify any field values and the commission status is changed from “Pending” to “Calculated”. If the user wants to change any commission value after calculated manual commission, then it can be done in “Adjust Commission” screen of Commission module.

This is how the manual commission screen works in Commission module.

About Us

Greytrix – a globally recognized and one of the oldest Sage Development Partner is a one-stop solution provider for Sage ERP and Sage CRM organizational needs. Being acknowledged and rewarded for multi-man years of experience, we bring complete end-to-end assistance for your technical consultations, product customizations, data migration, system integrations, third-party add-on development and implementation competence.

Greytrix caters to a wide range of Sage X3, a Sage Business Cloud Solution, offerings. Our unique GUMU™ integrations include Sage X3 for Sage CRMSalesforce.com, Dynamics 365 CRM and Magento eCommerce along with Implementation and Technical Support worldwide for Sage X3. Currently we are Sage X3 Implementation Partner in East Africa, Middle East, Australia, Asia, US, UK. We also offer best-in-class Sage X3 customization and development services, integrated applications such as POS | WMS | Payment Gateway | Shipping System | Business Intelligence | eCommerce and have developed add-ons such as Catch – Weight  and Letter of Credit and India Legislation for Sage X3 to Sage business partners, end users and Sage PSG worldwide.

Greytrix is a recognized Sage champion ISV Partner for GUMU™ Sage X3 – Sage CRM integration also listed on Sage Marketplace; GUMU™ integration for Sage X3 – Salesforce is a 5-star rated app listed on Salesforce AppExchange and GUMU™ integration for Dynamics 365 CRM – Sage ERP listed on Microsoft AppSource.

For more information on Sage X3 Integration and Services, please contact us at x3@greytrix.com, We will like to hear from you.


Revision history on Work order

$
0
0

Sage X3 provide us functionality where we can keep a track on the modification done on existing work order. If any of an operation or component is modified we will be able to track the critical changes. We will be able to check which field is modified and the reason of modification done by user.  Not only it tracks the modifications, it also tracks if any of the components is added to the existing work order. Sage X3 highlights the modified fields and those fields or line appears in red. This tracking history is very useful and time saving incase where user needs to know what changes are made to the existing work order.

To enable the tracking history of components and operations of work order we need to follow the below steps.

Navigate: SETUP -> GENARAL PARAMETER -> PARAMETER VALUES

Select the GPA chapter and go to the details of WOM (work order management) group. You will able to find a screen as shown in below screen shot.

Here you will find two parameters i.e. TRACKMATWO and TRACKOPEWO which we need to set on yes.

Fig 1: Parameter values

When these two parameters are set to “Yes” and changes are made to a component or an operation on a work order, the changes are recorded to the following two tables:
MFGMATREV this is work order materials audit table and MFGOPEREV is for work order operations audit table.
When making changes to a component or an operation line, a “Revision reason” can be entered manually but this revision reason is not mandatory, and it can be left blank. This ‘revision reason’ field helps other users to know for what reason the work order is modified.
Once a change is made, the revision can be viewed by using the Revision history action from the Actions icon on the component or operation line as shown in the below screen shot.

Fig 2 : Revision history on action button

The revision history for the changes made to an operation or a component will be available after saving the changes. For example, if a new component is added, the “Revision code = Add” will show that a new component was added. However, it is not mandatory to add a revision reason for changes to components on non-versioned products. After saving the changes, the revision code changes to “Modify” and the new revision line displays the changes in red.
Refer the below screenshot.

Fig 3: Revision history

The top line in the revision history always reflects the current values of the changed fields in the component line. The revision history is displayed in reverse chronological order from newest to oldest.
Hence by following all the above steps we can keep a track on modification of operation and components of a work order.

About Us

Greytrix – a globally recognized and one of the oldest Sage Development Partner is a one-stop solution provider for Sage ERP and Sage CRM organizational needs. Being acknowledged and rewarded for multi-man years of experience, we bring complete end-to-end assistance for your technical consultations, product customizations, data migration, system integrations, third-party add-on development and implementation competence.

Greytrix caters to a wide range of Sage X3, a Sage Business Cloud Solution, offerings. Our unique GUMU™ integrations include Sage X3 for Sage CRMSalesforce.com, Dynamics 365 CRM and Magento eCommerce along with Implementation and Technical Support worldwide for Sage X3. Currently we are Sage X3 Implementation Partner in East Africa, Middle East, Australia, Asia, US, UK. We also offer best-in-class Sage X3 customization and development services, integrated applications such as POS | WMS | Payment Gateway | Shipping System | Business Intelligence | eCommerce and have developed add-ons such as Catch – Weight  and Letter of Credit and India Legislation for Sage X3 to Sage business partners, end users and Sage PSG worldwide.

Greytrix is a recognized Sage champion ISV Partner for GUMU™ Sage X3 – Sage CRM integration also listed on Sage Marketplace; GUMU™ integration for Sage X3 – Salesforce is a 5-star rated app listed on Salesforce AppExchange and GUMU™ integration for Dynamics 365 CRM – Sage ERP listed on Microsoft AppSource.

For more information on Sage X3 Integration and Services, please contact us at x3@greytrix.com, We will like to hear from you.

Email Commission statement feature of Sales commission add on

$
0
0

As we informed in our previous blog that we have developed the Sales commission add on in sage X3. Sales commission module provides enhancement of existing commission feature of Sage X3 which helps in overcoming challenges as commission calculation, maintain commission statement, payment to sale rep etc.

To check information related to the sales commission add on you can follow below link.

Sage X3 Sales Commission add on

Today we are going to talk about the additional feature of sales commission add on i.e. Email sales commission statement directly to the respective sale rep through sales commission add on itself.

For any organization, sales play’s an important role in the success of the business. Sales representatives are the ones who generate the revenue for the organization and play a key role in the growth of business. As we know the sales commission module is developed to calculate the commission earn by sales representative.

In Sage X3, commission module provides enhancement of existing commission feature of Sage X3. It helps in overcoming challenges such as accuracy in sales commission calculation, timely payment to sales representatives and track of commissions of sales representatives. In additional we have added feature of sending the statement of sales representative to the respective sales rep through email so that each sales rep will get idea about the commission calculated for themselves.

Email commission statement feature allows to send an email with attached commission statement to individual sales person. We have developed this feature in such way that it will automatically send an email with the attached commission statement to sales reps using batch processes.

We have provided separate screen naming as “Email Commission Statement” you can see below screen shot for the same.

Email Commission Statement Screen

You can send the statement according to the date criteria, for individual sales rep or you can also select / filter multiple sales representative to send the statement.

Also, provided the Sort By option which will helps to sort statement according to the value select in the criteria.  There is also additional criteria provided as “Email sent for” like statement generate and sent for paid and unpaid commission or only for paid commission. There is a provision to send the copy of statement to other email id as on header level we have added additional email id filed where you can mention the email id to which user want to send the copy of statement.

Commission statement will be sent with attachment and in the below format.

Generated Report
Generated Report

This email commission statement will help to maintain the privacy of targets and all the commission calculation so that only respective sales rep can see the statement of his/her work. This statement is also contains the information of invoice number, customer number, paid commission for sales rep, adjusted commission etc.

This is how the greytrix sales commission module is contains the multiple features and email sales commission statement is one of them useful feature.

About Us

Greytrix – a globally recognized and one of the oldest Sage Development Partner is a one-stop solution provider for Sage ERP and Sage CRM organizational needs. Being acknowledged and rewarded for multi-man years of experience, we bring complete end-to-end assistance for your technical consultations, product customizations, data migration, system integrations, third-party add-on development and implementation competence.

Greytrix caters to a wide range of Sage X3, a Sage Business Cloud Solution, offerings. Our unique GUMU™ integrations include Sage X3 for Sage CRMSalesforce.com, Dynamics 365 CRM and Magento eCommerce along with Implementation and Technical Support worldwide for Sage X3. Currently we are Sage X3 Implementation Partner in East Africa, Middle East, Australia, Asia, US, UK. We also offer best-in-class Sage X3 customization and development services, integrated applications such as POS | WMS | Payment Gateway | Shipping System | Business Intelligence | eCommerce and have developed add-ons such as Catch – Weight  and Letter of Credit and India Legislation for Sage X3 to Sage business partners, end users and Sage PSG worldwide.

Greytrix is a recognized Sage champion ISV Partner for GUMU™ Sage X3 – Sage CRM integration also listed on Sage Marketplace; GUMU™ integration for Sage X3 – Salesforce is a 5-star rated app listed on Salesforce AppExchange and GUMU™ integration for Dynamics 365 CRM – Sage ERP listed on Microsoft AppSource.

For more information on Sage X3 Integration and Services, please contact us at x3@greytrix.com, We will like to hear from you.

How to enable cheque printing on payment in Sage X3

$
0
0

Payment is the transfer of money or goods and services in exchange for a product or service. A payment can be made in the form of cash, check, credit card and debit card.

Payments can be done against invoices that are generated from sales invoice or purchase invoice and Customer/Supplier BP invoice from the AP-AR accounting module. Payments transactions are created bank-wise as per the selected supplier/vendor. Payments are also done against multiple invoices and users can create the remittance entry against multiple payments. The purpose of Remittance entry is to provide the payment transactions to a particular bank in proper format with cash settlement, bill exchange issues, collections, check payments, discounts, etc.

As payment is created we can print the cheque for that specific payment .To print checks, the CHQMG – Check management activity code must be active and the following parameters must be set to Yes:

USACHK – US/CAN Check printing

CHQCT – Check controls

Steps to be followed:

Navigate to:> Parameter > General Parameter > Parameter values

Go to chapter TRS(Business partner) > Go to group BNK (Bank and reconciliation)

Set the value of parameter CHQCT (Check controls) to yes and save it. Refer the below screenshot.

Fig 1 : Parameter values screen

Now,

Navigate to: > Common data > BP Accounting tables > Cheques

The code identifies a bank account. Select a bank account used on payment for which we need to enable a cheque printing. Here we are using a bank AO2KZ.

Check number: In this field enter the first check number for the checkbook received from the Bank.

Number of checks: Here enter the total number of checks in the checkbook received from the bank.

If the first check number is 1001 and the total number of checks is 100, the check record with check numbers 1001 to 1100 is created. Refer the below screenshot.

Fig 2 : Cheques

After creating a cheque for the particular bank go to bank account.

Navigate to: > Common data > BP Accounting tables > Bank accounts

Select the bank account. Here we will select AO2KZ bank. On the Cheque tab, there is a field named next check number. This field is only active when the CHQCT – Check controls  parameter is set to Yes.

Next check: Enter the cheque number which we have entered on while creating cheque.

Check status: Through this we can check the status of the cheque.

Here we have entered 1001 for the bank account AO2KZ.Click save. Refer the below screenshot.

Fig 3 : Bank Account

Now, we can print cheque for the payment having the bank account as AO2KZ.

The above blog help us to enable cheque printing for payment.

About Us

Greytrix – a globally recognized and one of the oldest Sage Development Partner is a one-stop solution provider for Sage ERP and Sage CRM organizational needs. Being acknowledged and rewarded for multi-man years of experience, we bring complete end-to-end assistance for your technical consultations, product customizations, data migration, system integrations, third-party add-on development and implementation competence.

Greytrix caters to a wide range of Sage X3, a Sage Business Cloud Solution, offerings. Our unique GUMU™ integrations include Sage X3 for Sage CRMSalesforce.com, Dynamics 365 CRM and Magento eCommerce along with Implementation and Technical Support worldwide for Sage X3. Currently we are Sage X3 Implementation Partner in East Africa, Middle East, Australia, Asia, US, UK. We also offer best-in-class Sage X3 customization and development services, integrated applications such as POS | WMS | Payment Gateway | Shipping System | Business Intelligence | eCommerce and have developed add-ons such as Catch – Weight  and Letter of Credit and India Legislation for Sage X3 to Sage business partners, end users and Sage PSG worldwide.

Greytrix is a recognized Sage champion ISV Partner for GUMU™ Sage X3 – Sage CRM integration also listed on Sage Marketplace; GUMU™ integration for Sage X3 – Salesforce is a 5-star rated app listed on Salesforce AppExchange and GUMU™ integration for Dynamics 365 CRM – Sage ERP listed on Microsoft AppSource.

For more information on Sage X3 Integration and Services, please contact us at x3@greytrix.com, We will like to hear from you.

Attachment Migration in Sage X3

$
0
0

In sage X3, you can add an attachment to entities like product, site, company and also you can add to transactions like sales order, delivery etc. Sage x3 provides functionality to maintain the attachment in an organized folder (Volume).

The attachment management function uses volumes, i.e. folders which already been added in X3. For each file, the path of an attachment is expressed with the following mandatory syntax: [VOL]/path, where VOL is a volume name, and path is the file path in the volume.

When you run Attachment management for the first time, it runs a check on the attachment tables. Once this analysis is done, a screen with two grids displays:

First grid: Files

The first grid lists the results of the AOBJTXT analysis. The first column displays either of the three following messages:

Anomalies: This message displays the reason for the error. The most common is “path starting with #”. This means that local attachments have been encountered. The number of files in this situation is displayed.

Validated: This message displays the number of files already assigned to volumes.

Volume doesn’t exist: This message displays directory paths that are not assigned to a volume. The number of attachments is displayed.

The total number of attachments is displayed at the bottom of the grid. Click Detail next to a result to create a log that gives you details regarding the corresponding results.

Second grid: Volumes

The second grid allows you to define actions for each result.

The first part of the grid displays the list of directories that are not assigned to a volume yet. Below are the option available:

Create:

If set to “Yes”, a volume is created with the name given, and assigned to a path that can be modified if a shorter path needs to be used. If set to “No”, no volume is created.

Modify:

This can be set to “Yes” only if Create was set to “No”. You can then enter an existing volume name, and the corresponding attachments will be renamed with the corresponding volume, according to the document definition.

The code corresponds to the name of the volume to be used or created. The path corresponds to the volume to be created. It can only be entered if Create was set to “Yes”.

Click Validation to run the creation or modification. Triggers the updates according to the date entered in the second grid. When the operation is finished, the page displays with all issues that remain in the first grid.

Fig : Attachment

The following actions are available in the right-hand panel:

Refresh: Re-launches the analysis for the existing attachments and displays the results. It can be helpful if manual modifications have been performed at the attachment level.

Log: Displays the log file describing the operations done after validating changes.

Control files: Checks if the attachments can be physically found at their intended locations.

A recodification tool was created to help you replace all the existing operating system paths with a normalized path, based on a volume.

Hope this blog helps you in managing attachment.

About Us

Greytrix – a globally recognized and one of the oldest Sage Development Partner is a one-stop solution provider for Sage ERP and Sage CRM organizational needs. Being acknowledged and rewarded for multi-man years of experience, we bring complete end-to-end assistance for your technical consultations, product customizations, data migration, system integrations, third-party add-on development and implementation competence.

Greytrix caters to a wide range of Sage X3, a Sage Business Cloud Solution, offerings. Our unique GUMU™ integrations include Sage X3 for Sage CRMSalesforce.com, Dynamics 365 CRM and Magento eCommerce along with Implementation and Technical Support worldwide for Sage X3. Currently we are Sage X3 Implementation Partner in East Africa, Middle East, Australia, Asia, US, UK. We also offer best-in-class Sage X3 customization and development services, integrated applications such as POS | WMS | Payment Gateway | Shipping System | Business Intelligence | eCommerce and have developed add-ons such as Catch – Weight  and Letter of Credit and India Legislation for Sage X3 to Sage business partners, end users and Sage PSG worldwide.

Greytrix is a recognized Sage champion ISV Partner for GUMU™ Sage X3 – Sage CRM integration also listed on Sage Marketplace; GUMU™ integration for Sage X3 – Salesforce is a 5-star rated app listed on Salesforce AppExchange and GUMU™ integration for Dynamics 365 CRM – Sage ERP listed on Microsoft AppSource.

For more information on Sage X3 Integration and Services, please contact us at x3@greytrix.com, We will like to hear from you.

How to hold an order for a customer that has exceeded their credit limit in Sage X3

$
0
0

A sales order specifies the details about products ordered by a specific customer along with the price, quantity and terms and conditions.

Customer: In sales, commerce and economics, a customer which sometimes are a clients, buyer or purchaser or is the recipient of a good, service , product or an idea obtained from a seller, vendor or supplier via a financial transaction or exchange for money or some other valuable consideration.

 As there are three option buttons provided on Customer screen in Management tab check, no check and hold with the help of this button we can easily manage the Credit Check of the customer.

In Sage ERP X3, credit limit control is assigned in the Customer screen, on the Management tab (Common Data / BPs / Customer).  In the Credit section, either the Check, No Check or Hold options are available.

Check : Check means that a credit limit check will be done when during shipment processing.

No Check : The “No Check” option as name suggests no check is done while the shipment is performed irrespective of the authorized credit and the credit level total.

Hold : If we want to put customers on Hold we can easily do this by selecting “Hold” option. If the customer is on hold then it will not allow shipment of any of his order it will give an error message as “Undeliverable Order: Customer Held”.

In Sage X3 there is a setup/ functionality to hold an order when customer limits exceeded. Please follow below steps for the setup.

Sage X3 can designate whether users are able to allocate or process a delivery for an order if the credit limit has been exceeded.

  1. This can be set by navigating to:  Setup -> Users ->  Users.
  2. Click on the user for which we want to restrict it.
  3. Click on the Parameter tab.
  4. Search the Chapter: Sales , Group : AUZ in the grid
  5. Now click on the above fields action button and again click on details button: Refer below screen shot.
Fig : User Screen
  1. Now under this find the SCDTUNL parameter and change the setting as needed:
  2. The SCDTUNL parameter is used to set the authorization level for users. It determines if a credit hold can be unlocked on an order and authorizes the allocation, delivery, and the invoicing of an order.
  3. The options for setting up this parameter are as follows:

 b.1) No – The user cannot unlock the credit hold and cannot allocate, delivery, or invoice the order when the bill-to customer has exceeded their authorized credit level.

b.2) Yes – The user can unlock the credit hold and can allocate, deliver, or invoice the order when the bill-to customer has exceeded their authorized credit level.

Refer below screen shot for the same:

Fig 2 : User Parameters

Hence by doing above setting in Sage X3, we can easily restrict the order when customer’s credit limit is exceeded.

About Us

Greytrix – a globally recognized and one of the oldest Sage Development Partner is a one-stop solution provider for Sage ERP and Sage CRM organizational needs. Being acknowledged and rewarded for multi-man years of experience, we bring complete end-to-end assistance for your technical consultations, product customizations, data migration, system integrations, third-party add-on development and implementation competence.

Greytrix caters to a wide range of Sage X3, a Sage Business Cloud Solution, offerings. Our unique GUMU™ integrations include Sage X3 for Sage CRMSalesforce.com, Dynamics 365 CRM and Magento eCommerce along with Implementation and Technical Support worldwide for Sage X3. Currently we are Sage X3 Implementation Partner in East Africa, Middle East, Australia, Asia, US, UK. We also offer best-in-class Sage X3 customization and development services, integrated applications such as POS | WMS | Payment Gateway | Shipping System | Business Intelligence | eCommerce and have developed add-ons such as Catch – Weight  and Letter of Credit and India Legislation for Sage X3 to Sage business partners, end users and Sage PSG worldwide.

Greytrix is a recognized Sage champion ISV Partner for GUMU™ Sage X3 – Sage CRM integration also listed on Sage Marketplace; GUMU™ integration for Sage X3 – Salesforce is a 5-star rated app listed on Salesforce AppExchange and GUMU™ integration for Dynamics 365 CRM – Sage ERP listed on Microsoft AppSource.

For more information on Sage X3 Integration and Services, please contact us at x3@greytrix.com, We will like to hear from you.

Viewing all 1519 articles
Browse latest View live


<script src="https://jsc.adskeeper.com/r/s/rssing.com.1596347.js" async> </script>