Quantcast
Channel: Sage X3 – Tips, Tricks and Components
Viewing all 1515 articles
Browse latest View live

How to add a string in a new Line in Sage X3?

$
0
0

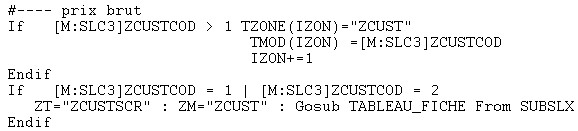
We may come across a scenario where we want to display message in new line, X3 has a function to achieve this.”chr$” function converts a numerical value in an ascii character, syntax as below.

Syntax:

chr$( exp_ent ).

“chr$” returns a character whose ascii code corresponds to the argument (if there is a corresponding ascii code).It is the converse function of function ascii. The result type is Char.

Chr$(13) is the carriage return (Newline), It is closely associated with line feed and newline.
Below is the snippet for the same.

Hope this blog helps!

About Us

Greytrix is one stop solution provider for Sage ERP and Sage CRM needs. We provide complete end-to-end assistance for your technical consultations, product customizations, data migration, system integrations, third party add-on development and implementation expertise.

Greytrix have some unique solutions of Sage X3’s integration with Sage CRMSalesforce.com and Magento eCommerce. It also offers best-in-class Sage X3 customization and development services to Sage business partners, end users, and Sage PSG worldwide.

For more information on Sage X3 Integration and Services, please contact us at x3@greytrix.com .We will be glad to assist you.

Other Related Blogs


How to assign the technical sheet for each operation of work order in Sage X3?

$
0
0

You may come across a situation where you want to attach the Technical sheet to every operation of work order? Sage x3 has standard feature where you can attach the technical sheet.

Follow the below steps to attach the technical sheet entry

  • Navigate: Manufacturing ->Planning->Work order->Operations tab

steps to attach the technical sheet entry

  • Click on actions of any operation select operation detail.

Operation Details in Sage X3

  • In management tab attach the technical sheet.

Production Tracking ST1 in Sage X3

  • While doing the production tracking you can give the responses of attached technical sheet. Refer the below screen shot.

Enter Quality Record in Sage X3

Hope this blog helps!

About Us

Greytrix is one stop solution provider for Sage ERP and Sage CRM needs. We provide complete end-to-end assistance for your technical consultations, product customizations, data migration, system integrations, third party add-on development and implementation expertise.

Greytrix have some unique solutions of Sage X3’s integration with Sage CRMSalesforce.com and Magento eCommerce. It also offers best-in-class Sage X3 customization and development services to Sage business partners, end users, and Sage PSG worldwide.

For more information on Sage X3 Integration and Services, please contact us at x3@greytrix.com .We will be glad to assist you.

Other Related Blogs:

  1. How to automatically allocate the work order
  2. How to restrict production tracking only for allocated work order.
  3. Allow Tracking of Work Order for Material Short.
  4. Work order Grouping-For Different Products.
  5. Automatic Deletion of Work Order in X3.

How to enable or disable new button in window?

$
0
0

We may come across the situation, where we want to enable or disable NEW button in window.

Sage X3 has a special function to enable or disable new button in window.

To enable new button, use the below syntax.

Syntax:

Enable GSTACRE

Parameter details:

Enable: Enable is the function that is used to enable the button.

GSTACRE: This is the button code of the new button to enable.

To disable new button, use the below syntax.

Syntax:

Disable GSTACRE

Parameter details:

Disable: Disable is the function that is used to disable the button.

GSTACRE: This is the button code of the new button to disable.

Hope this blog helps!

About Us

Greytrix is one stop solution provider for Sage ERP and Sage CRM needs. We provide complete end-to-end assistance for your technical consultations, product customizations, data migration, system integrations, third party add-on development and implementation expertise.

Greytrix have some unique solutions of Sage X3’s integration with Sage CRMSalesforce.com and Magento eCommerce. It also offers best-in-class Sage X3 customization and development services to Sage business partners, end users, and Sage PSG worldwide.

For more information on Sage X3 Integration and Services, please contact us at x3@greytrix.com .We will be glad to assist you.

Other Related Blogs:

How to Find a Factorial of Any Integer Number in Sage X3?

$
0
0

We may come across a situation, where we need to calculate a factorial of any integer. Sage X3 provides built-in function ‘fac’ to calculate the same.

Fac: It calculates a factorial of any integer value.

Syntax:

fac(integer)

To better understand this, refer the below snippet of code:

fac(integer) code snippet in Sage X3

Output:

factorial in Sage X3

Hope this blog helps!

About Us

Greytrix is one stop solution provider for Sage ERP and Sage CRM needs. We provide complete end-to-end assistance for your technical consultations, product customizations, data migration, system integrations, third party add-on development and implementation expertise.

Greytrix have some unique solutions of Sage X3’s integration with Sage CRMSalesforce.com and Magento eCommerce. It also offers best-in-class Sage X3 customization and development services to Sage business partners, end users, and Sage PSG worldwide.

For more information on Sage X3 Integration and Services, please contact us at x3@greytrix.com .We will be glad to assist you.

Other Related Blogs:

“GTE Error in Field Evaluation” error while running accounting interface

$
0
0

GTE Error in Sage X3

  • Go to Set up →General Parameters →Formulas
  • Expand Automatic Journal

Formulas-Expand  Automatic Journal in Sage X3

  • Search “SKG” and cross check if formula for SKG has been defined or not, if formula is not present, kindly copy the same from SEED Folder and paste the same.

Search “SKG” and cross check its formula

  • If there folder is multi-legislation, one needs to define legislation wise formula – refer SEED folder
  • In few cases one needs to even define Document type as per formula – Refer below Image

PAYMT marked with RED in Sage X3

  • As you can see in above image PAYMT marked with RED, has been defined under document type- refer below image

PAYMT defined under document in Sage X3

  • Now one can run Accounting Interface without error.

Hope this blog helps!

About Us

Greytrix is one stop solution provider for Sage ERP and Sage CRM needs. We provide complete end-to-end assistance for your technical consultations, product customizations, data migration, system integrations, third party add-on development and implementation expertise.

Greytrix have some unique solutions of Sage X3’s integration with Sage CRMSalesforce.com and Magento eCommerce. It also offers best-in-class Sage X3 customization and development services to Sage business partners, end users, and Sage PSG worldwide.

For more information on Sage X3 Integration and Services, please contact us at x3@greytrix.com .We will be glad to assist you.

Other Related Blogs:

Check Validity of an Accounting Period in Sage ERP X3

How to check for Accounting Codes in X3

How to set aggregate criteria of accounting interface parameters?

Configure Interface User in Sage ERP X3

How to enable new added dimension in Sage X3?

$
0
0

Earlier we have explained how to enable the dimension on header and line level and also explained how to populate it with default value. Now here we are explaining how to enable the new added dimension. See below example-

  1. Navigate to entry transaction and add enter new dimension.
  2. Navigate to Setup >Organizational structure>Default dimension types. And enter the dimension on product.
  3. Now Navigate to Setup >Organizational structure>Ledgers and add the new dimension. See below screen shot. Here we have added new dimension on Purchase order line-

NA Legal Ledger

Form Mode

Hope this blog helps!

About Us

Greytrix is one stop solution provider for Sage ERP and Sage CRM needs. We provide complete end-to-end assistance for your technical consultations, product customizations, data migration, system integrations, third party add-on development and implementation expertise.

Greytrix have some unique solutions of Sage X3’s integration with Sage CRMSalesforce.com and Magento eCommerce. It also offers best-in-class Sage X3 customization and development services to Sage business partners, end users, and Sage PSG worldwide.

For more information on Sage X3 Integration and Services, please contact us at x3@greytrix.com .We will be glad to assist you.

Other Related Blogs:

How to extract a substring from the leftmost end in Sage X3?

$
0
0

Sage X3 has a function, which helps us to extract a substring from the leftmost end of a string.

The function used to extract the substring is Left$().

Syntax: Left$(String, nb_string)

Refer the following example for the same:

truncating the string from left

truncating in Sage X3

In the above exmaple we use left$() for the extraction from the string, upto 16 characters.

Hope this blog helps!

About Us

Greytrix is one stop solution provider for Sage ERP and Sage CRM needs. We provide complete end-to-end assistance for your technical consultations, product customizations, data migration, system integrations, third party add-on development and implementation expertise.

Greytrix have some unique solutions of Sage X3’s integration with Sage CRMSalesforce.com and Magento eCommerce. It also offers best-in-class Sage X3 customization and development services to Sage business partners, end users, and Sage PSG worldwide.

For more information on Sage X3 Integration and Services, please contact us at x3@greytrix.com .We will be glad to assist you.

Other Related Blogs:

How to add a string in a new line in sage X3?

How to do a case sensitive string comparison in sage X3?

How to replace the character in the string?

How to extract a sub-string from a string given?

How to remove spaces from string?

How to give space between string by coding in Sage X3?

$
0
0

How to give space between string by coding

You may come across a scenario were you need to provide the space  between string.X3 has a function “space$(n)” which  returns a string with n spaces, Syntax as below.

Syntax:

space$(nb_esp)

space$(nb_esp) returns a string comprising nb_esp spaces(ascii code 32). This function is thus equivalent to string$(nb_esp, 32).The result is a Char type. As shown  below, space$(20) which specify the 20 spaces between string.

space

Hope this blog helps!

About Us

Greytrix is one stop solution provider for Sage ERP and Sage CRM needs. We provide complete end-to-end assistance for your technical consultations, product customizations, data migration, system integrations, third party add-on development and implementation expertise.

Greytrix have some unique solutions of Sage X3’s integration with Sage CRMSalesforce.com and Magento eCommerce. It also offers best-in-class Sage X3 customization and development services to Sage business partners, end users, and Sage PSG worldwide.

For more information on Sage X3 Integration and Services, please contact us at x3@greytrix.com .We will be glad to assist you.

Other Related Blogs:


Handling the Customized Fields Using Entry Transaction in Sage X3

$
0
0

In Sage X3, whenever we do any change on transaction screens like order, shipment, receipts or any other screens, we need to validate Entry Transaction. But, we may come across a scenario where user wants the modifications to behave differently depending on the transaction selections.

For e.g., A customized field on Sales Order is to be enterable in transaction ALL but, to be displayed in another transaction ZALL. If we do so and later, user wants the Customer field input set to be as displayed in ALL transaction then performing the modifications on SO screen again, takes significant time. We can avoid these steps by using entry transaction screen.

Perform following steps to achieve the same:

Steps:

  1. Navigate to: Setup > Sales > Entry Transactions > Order
  2. Navigate to: Development > Processing dictionary > Screens > Screens
  3. Add field on Entry Transaction screen. Refer the screenshot below for the same:

Add field on Entry Transaction screen4. Set the values of Input (Entry/Displayed/Hidden) and Mode (Form/Table/Form & Table) as per requirement.

Refer the below screenshot for the same.

Set the values of Input and Mode as per requirement.

Set the values of Mode as per requirement.

5. Refer following snippet of code to make this functionality work:

snippet of code to make this functionality work

6.Perform Entry Transaction validation.

Hope this blog helps!

About Us

Greytrix is one stop solution provider for Sage ERP and Sage CRM needs. We provide complete end-to-end assistance for your technical consultations, product customizations, data migration, system integrations, third party add-on development and implementation expertise.

Greytrix have some unique solutions of Sage X3’s integration with Sage CRMSalesforce.com and Magento eCommerce. It also offers best-in-class Sage X3 customization and development services to Sage business partners, end users, and Sage PSG worldwide.

For more information on Sage X3 Integration and Services, please contact us at x3@greytrix.com .We will be glad to assist you.

Other Related Blogs:

  1. Entry transaction Validation via Patch
  2. How to add Entry Point to the Patch File?
  3. How to set the entry condition in the Sage X3?
  4. How to change Entry Transaction without exiting the screen
  5. Entry Transaction in X3

How to Setup packaging in Version 8 of Sage X3

$
0
0

If we come across a scenario where we want to setup packaging in version 8 of Sage X3 then It provides a standard functionality ‘Packaging’.

To set up this functionality:

Navigation:

Common Data – Products – Product Categories

Common Data – Products – Product Categories

Check the packaging field.

Now for products in which product categories have packaging checked will be allowed to create packaging in Sage X3 version 8.

Hope this blog helps!

About Us

Greytrix is one stop solution provider for Sage ERP and Sage CRM needs. We provide complete end-to-end assistance for your technical consultations, product customizations, data migration, system integrations, third party add-on development and implementation expertise.

Greytrix have some unique solutions of Sage X3’s integration with Sage CRMSalesforce.com and Magento eCommerce. It also offers best-in-class Sage X3 customization and development services to Sage business partners, end users, and Sage PSG worldwide.

For more information on Sage X3 Integration and Services, please contact us at x3@greytrix.com .We will be glad to assist you.

Other Related Blogs:

How to add Conditional styles to a Patch File in Sage X3?

$
0
0

We may come across a situation, where we want to add Entry Point to Patch file in Sage X3.

Follow the below steps:

Step 1: Kindly navigate to Development > Utilities > Patches > Patch Creation

Then we will get the below screen.

Development > Utilities > Patches > Patch Creation

Step 2: Click on Client Radio button, then select Type of Patch as “Specific” shown in the image below.

Client Radio button

Step 3:Add entry point as shown in below screenshot.

ASL is type through which we can add the Conditional styles

Type: “ASL” (ASL is type through which we can add the Conditional styles.)
Object name: “YSTL”  is conditional style code that we want to add.

Step 4: After all above activity, click on OK button. After creation of a patch, we will get a dialog box to save the file to appropriate place. Now we can integrate this entry point through this newly generated Patch file.

Hope this blog helps!

About Us

Greytrix is one stop solution provider for Sage ERP and Sage CRM needs. We provide complete end-to-end assistance for your technical consultations, product customizations, data migration, system integrations, third party add-on development and implementation expertise.

Greytrix have some unique solutions of Sage X3’s integration with Sage CRMSalesforce.com and Magento eCommerce. It also offers best-in-class Sage X3 customization and development services to Sage business partners, end users, and Sage PSG worldwide.

For more information on Sage X3 Integration and Services, please contact us at x3@greytrix.com .We will be glad to assist you.

Other Related Blogs:

How to enable the ‘Use of batch files’ in Sage X3?

$
0
0

In this blog, we will look how to change use of batch files access for batch server.  Batch server has ability to take files and run it automatically as per the setup. Initially the batch server parameter does not enable ‘Use of batch files’ which is needed in Sage X3’s batch server.

Batch server Parameters

To enable ‘Use of batch files’, follow steps and screenshot for the same:

Navigation: Setup->General parameters->Parameter values

  1. Select the chapter-SUP (Supervisor)
  2. Select the group AUZ (Authorizations) and right click on Action
  3. Go to the details
  4. Set ‘Yes’ for EXTBATCH (Batch file management)
  5. Click on OK button
  6. And Save the screen

Parameter Values

After setting has been done, we are able to enter directory information for batch server parameters:

Batch server Parameters default


Hope this blog helps!

About Us

Greytrix is one stop solution provider for Sage ERP and Sage CRM needs. We provide complete end-to-end assistance for your technical consultations, product customizations, data migration, system integrations, third party add-on development and implementation expertise.

Greytrix have some unique solutions of Sage X3’s integration with Sage CRMSalesforce.com and Magento eCommerce. It also offers best-in-class Sage X3 customization and development services to Sage business partners, end users, and Sage PSG worldwide.

For more information on Sage X3 Integration and Services, please contact us at x3@greytrix.com .We will be glad to assist you.

Other Related Blogs:


How to enable the User authorization in Sage X3?

$
0
0

In this blog, we will look how to authorize a user to access core record in Sage X3. It is holding the authentication layer to modify Sage X3 records. Usually user can edit or delete a record through ‘table maintenance’. In case if a user enables authorization, Sage X3 will prompt user to enter password before modify the record.

To enable authorization, follow below steps and refer screenshot mentioned,

Navigation: Setup->General parameters->Parameter values

  1. Select the chapter-SUP (Supervisor)
  2. Select the group AUZ (Authorizations) and right click on Action
  3. Go to the details
  4. Set ‘Yes’ for ASIGMNT (Maintenance and transactions)
  5. Click on OK button
  6. And Save the screen

Maintennace and Transactions

After the setup, the authorization window will pop up whenever the user does the change in the X3 table record through table maintenance.

Maintennace access control

Authorization is works for the below screens as well.

Development->Utilities->Maintenances->In columns

Development->Utilities->Maintenances->In lines

Hope this blog helps!

About Us

Greytrix is one stop solution provider for Sage ERP and Sage CRM needs. We provide complete end-to-end assistance for your technical consultations, product customizations, data migration, system integrations, third party add-on development and implementation expertise.

Greytrix have some unique solutions of Sage X3’s integration with Sage CRMSalesforce.com and Magento eCommerce. It also offers best-in-class Sage X3 customization and development services to Sage business partners, end users, and Sage PSG worldwide.

For more information on Sage X3 Integration and Services, please contact us at x3@greytrix.com .We will be glad to assist you.

Other Related Blogs:

How to get the value of the current variable/field in Sage X3?

$
0
0

ZC contains the value of the current variable (in input, initialization, check, selection and help mode).

Class, Type and Dimension:

Type of zc depends on context that corresponds to type of variable being entered (at the time of check or help is executed) or being initialized.

[s]zc

Examples:

# In a routine associated with a mask, test to see if
# zc >= 100. If not, 100 is assigned to zc.
CTRL_ZONE              :# Label called from the mask
if zc < 100
zc = 100
Endif
End                             : # Return to mask

Description:

zc gives access to “current zone” for a variable defined. A current zone exists in following cases:

  • Formula or routine called from a mask in validity control zone. zc then represents value entered by user and it may be reassigned by verification routine,
  • Formula or routine called from a mask as default value. If zc has been modified, its value is then copied to variable corresponding to mask,
  • Routine called from a mask by the help key. zc also represents the variable being entered and it may similarly be reassigned,
  • During a calculation, zc corresponds to the zone being entered.

Hope this blog helps!

About Us

Greytrix is one stop solution provider for Sage ERP and Sage CRM needs. We provide complete end-to-end assistance for your technical consultations, product customizations, data migration, system integrations, third party add-on development and implementation expertise.

Greytrix have some unique solutions of Sage X3’s integration with Sage CRMSalesforce.com and Magento eCommerce. It also offers best-in-class Sage X3 customization and development services to Sage business partners, end users, and Sage PSG worldwide.

For more information on Sage X3 Integration and Services, please contact us at x3@greytrix.com .We will be glad to assist you.

Other Related Blogs:

How to put Profile Picture for a user in Sage X3?

$
0
0

Sage X3 has a feature in which we can assign profile picture to users in Sage X3.

This feature can be achieved by following below steps:-

 Navigate to Administration → Administration → Users

Click on Edit.

Navigate to Administration → Administration → Users

Now select any picture that you wish to make your profile picture by selecting the file as shown in below

Screenshots:-

Select the file

file name to be selected

Profile picture to represent yourself

In this way , we can choose any profile picture to represent yourself in front of others.

Hope this blog helps!

About Us

Greytrix is one stop solution provider for Sage ERP and Sage CRM needs. We provide complete end-to-end assistance for your technical consultations, product customizations, data migration, system integrations, third party add-on development and implementation expertise.

Greytrix have some unique solutions of Sage X3’s integration with Sage CRMSalesforce.com and Magento eCommerce. It also offers best-in-class Sage X3 customization and development services to Sage business partners, end users, and Sage PSG worldwide.

For more information on Sage X3 Integration and Services, please contact us at x3@greytrix.com .We will be glad to assist you.

Other Related Blogs:


Re-instate Order Allocations in Sage X3

$
0
0

If we come across a scenario where we want the system to prompt user to reallocate the allocated quantities on original orders. In such a case Sage X3 has a standard Re-instate Order Allocation functionality.

This feature can be achieved by following below steps:-

Navigate to Setup → General parameters → Parameter Values.

Select “On Request” option.

No-Yes-On Request

Go to Sales Order. Now create an order and observe the allocation status. It will display “Allocated” status as shown below:-

create an order and observe the allocation status

Now click on delivery button at right hand side to create a delivery and then click on delete button to delete a delivery.

 System asks user whether to reallocate orders to origin of the delivery i.e. sales order.

System asks user whether to reallocate orders to origin of the delivery

If user clicks on No , order is not reallocated and allocation status is changed to “Not Allocated”.

allocation status is changed to Not Allocated

Similarly you can select other values to automatically re-allocate quantities to the sales orders.

Values possible for this parameter are:

  • No: If a delivery is deleted or modified there is no re-allocation in order of original allocated quantities.
  • Yes: If a delivery is deleted or modified, system automatically re-allocates quantities that were originally allocated on the order.
  • On Request: If a delivery is deleted or modified, system asks operator if quantities that were originally allocated on the order must be re-allocated.

Hope this blog helps!

About Us

Greytrix is one stop solution provider for Sage ERP and Sage CRM needs. We provide complete end-to-end assistance for your technical consultations, product customizations, data migration, system integrations, third party add-on development and implementation expertise.

Greytrix have some unique solutions of Sage X3’s integration with Sage CRMSalesforce.com and Magento eCommerce. It also offers best-in-class Sage X3 customization and development services to Sage business partners, end users, and Sage PSG worldwide.

For more information on Sage X3 Integration and Services, please contact us at x3@greytrix.com .We will be glad to assist you.

Other Related Blogs:

Evaluate Challenges of ERP integration and It’s Right Solution

$
0
0

Biggest challenges after implementation with ERP is to integrate it with other business applications or third party solutions. ERP Integration with other application is important because ERP is involved with almost every part of an organization. Hence, it should be able to exchange data and interoperate with every application running in organization. But there are lot of hindrances in the process of ERP integration with other application.

Greytrix a decade old Sage Premier Gold Development Partner and one stop solution provider for all your ERP and CRM needs. We provide complete end-to-end assistance for your technical consultations, product customizations, data migration, system integrations, third party add-on development and implementation expertise.

Let’s discuss the challenges of ERP Integration and how Greytrix GUMUTM solution can overcome those challenges:

Challenges of ERP Integration


For more information on ERP Integration and Services, please contact us at na.sales@greytrix.com.We will be glad to assist you.

Getting the List of Accessible Classes in the Current Application

$
0
0

We may encounter a scenario where we want to know the names of the classes that are accessible in a current application. For this, CLANAM function can be used.

The CLANAM function is basically used for acquiring the list of classes accessible to the current application.
CLANAM function returns the Char type.

Syntax :

clanam(< Class | num_exp >)

List of accessible classes

Hope this blog helps!

About Us

Greytrix is one stop solution provider for Sage ERP and Sage CRM needs. We provide complete end-to-end assistance for your technical consultations, product customizations, data migration, system integrations, third party add-on development and implementation expertise.

Greytrix have some unique solutions of Sage X3’s integration with Sage CRMSalesforce.com and Magento eCommerce. It also offers best-in-class Sage X3 customization and development services to Sage business partners, end users, and Sage PSG worldwide.

For more information on Sage X3 Integration and Services, please contact us at x3@greytrix.com .We will be glad to assist you.

Other Related Blogs:

How to use Local Menu Message through Coding?

$
0
0

In Sage X3, we may have to display a particular message for several times based on the certain condition. We can define such frequently used messages in a local menu and can access them through coding.

To access the message defined in a local menu in coding, Sage X3 provides an inbuilt function:

mess(exp_num, exp_chap, exp_lan)

where,

exp_num: Number of the message in the section.

exp_chap: Integer expression giving the number of the message section.

exp_lan: Integer expression indicating which message file should be used.

mess: Gives access to Adonix service messages or those which may have been specifically defined for the application. Message files are arranged in sections with a group of messages for each chapter.

– The value 0 will be given to exp_lan to access the Adonix message file and value 1 otherwise; this argument is optional and is set 0 by default. The text of the message depends on the language used.

– The result is a Char type.

For e.g,

  1. Display message ‘Please wait, printing in progress’
    Infbox mess (24, 2)

It will display title of the second section, defined in the file.

Local Menu Display Message

  1. Application message (for a set of texts this will be the list of input characters)
    Infbox mess (2, 0, 1)

Local Menu Application message

Hope this blog helps!

About Us

Greytrix is one stop solution provider for Sage ERP and Sage CRM needs. We provide complete end-to-end assistance for your technical consultations, product customizations, data migration, system integrations, third party add-on development and implementation expertise.

Greytrix have some unique solutions of Sage X3’s integration with Sage CRMSalesforce.com and Magento eCommerce. It also offers best-in-class Sage X3 customization and development services to Sage business partners, end users, and Sage PSG worldwide.

For more information on Sage X3 Integration and Services, please contact us at x3@greytrix.com .We will be glad to assist you.

Other Related Blogs:

How to Restrict Purchase Order for the Product having Expiry Date?

$
0
0

If you come across a scenario where you want to restrict purchase order for the product which has an expiry date then Sage X3 provides a standard functionality called “Product end-of-life date”.

Product end-of-life date: when this date is exceeded, it is not possible to enter orders to the supplier.

To set up this functionality:

Navigation: Common data – Products – Products – Identification Tab.

Sage X3 Purchase Order Navigation

Now purchase order can only be created for products which have Product end-of-life date greater than PO date.

Sage X3- Restrict Purchase order

Hope this blog helps!

About Us

Greytrix is one stop solution provider for Sage ERP and Sage CRM needs. We provide complete end-to-end assistance for your technical consultations, product customizations, data migration, system integrations, third party add-on development and implementation expertise.

Greytrix have some unique solutions of Sage X3’s integration with Sage CRMSalesforce.com and Magento eCommerce. It also offers best-in-class Sage X3 customization and development services to Sage business partners, end users, and Sage PSG worldwide.

For more information on Sage X3 Integration and Services, please contact us at x3@greytrix.com .We will be glad to assist you.

Other Related Blogs:


Viewing all 1515 articles
Browse latest View live


<script src="https://jsc.adskeeper.com/r/s/rssing.com.1596347.js" async> </script>