Quantcast
Channel: Sage X3 – Tips, Tricks and Components
Viewing all 1519 articles
Browse latest View live

Set Rule in sales orders if prepayment is not received in Sage ERP X3

$
0
0

In our previous blog you saw the how to do pre-payment of a particular sales order? In this blog you will see the how to do the delivery of an order if prepayment is not received.  Sage ERP X3 has provided a feature for that.

New Stuff : Find number of users logged in Sage ERP X3

1. First Go To: Setup>General parameters>parameters values>Order Rule

1


2. Set the order blocked if no prepayment equal to “NO”.

1

It will applicable only for those sales orders which are created after above settings.

Hope This Help!

Also Read:
1.Prepayment in Sage X3
2.Supplier pre-payment settlement in Sage X3
3.How to block order if Prepayment is not done
4.How to remove a particular order from credit status hold
5.How to add Sales Invoice elements in X3?


Sage ERP X3 integration with Sage CRM – Troubleshooting Tips

$
0
0

Recently, we released, GUMU for Sage CRM – Sage ERP X3 integration. Our GUMU for Sage CRM – Sage ERP X3 is a real time, bidirectional link. In this blog, we will go through an Error message which user may face while using integration and it’s possible solution.

New Stuff :GUMU Sage ERP X3 integration with the new Sage CRM v 7.3

Error Message : “Error while reading webservices description. Please contact your system administrator for more details.”

In Sage CRM system integrated with Sage ERP X3 using GUMU™ integration, while accessing GUMU tabs or using any other GUMU functionality user may come across this error message.

image001


Reason: In GUMU™ integration, we have used Sage ERP web services to connect to ERP X3. While connecting to ERP, there could be a possibility that the Sage ERP X3 web service pool which is used in configuration is stopped.

Solution: To resolve this issue, user will need to check below points.

a.Check if your webservice pool is started or not, follow below steps for the same:

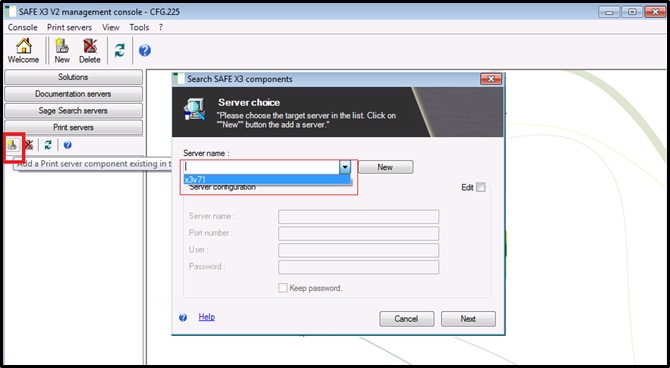
- In your Sage ERP X3 server’s Internet explorer browser, go to below URL http://localhost:28880/root/
- Click on “Webservice server” tab.
- This will show you, the XML with list of web service pool started. Check for the web service pool you configured with Sage CRM for GUMU integration. You will find status for the pool in “statelib” attribute of this XML.
- If it is “stopped”, click on Start button (Please refer below screenshot for the same) to start the pool.

image002
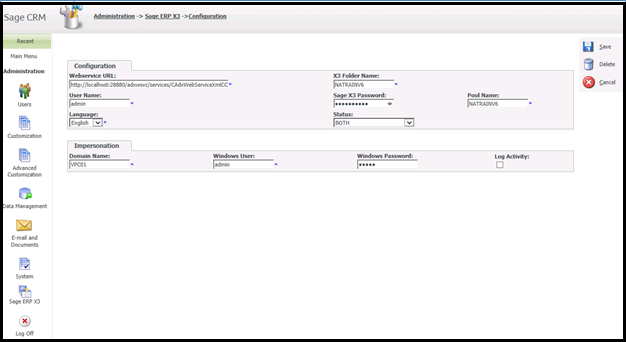
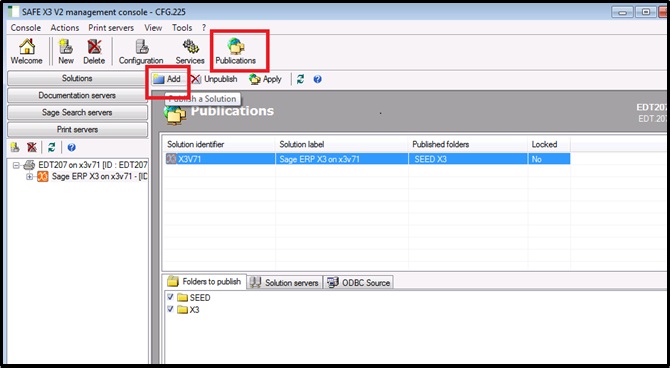
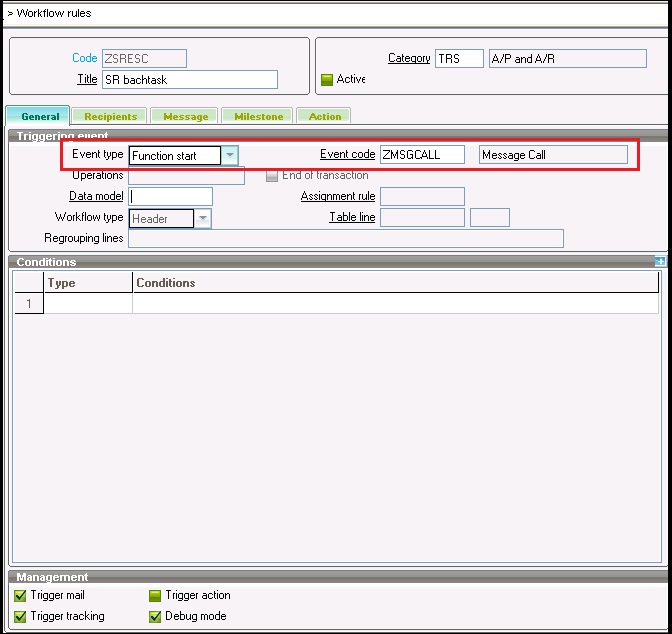
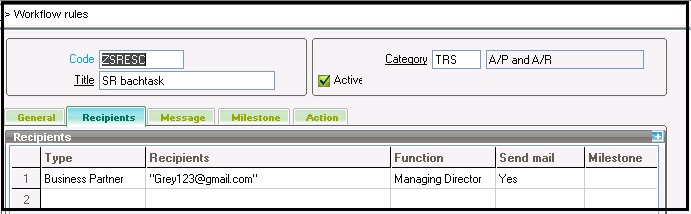
b. If the configured pool is started already then please check whether the webservice URL, User name and Password entered in GUMU Configuration screen is correct.

- Go to Administration -> Sage ERP X3 -> Configuration.

image003

This should solve the problem. In any case, you can always contact us for GUMU support at Sage@Greytrix.com.

Also Read:
1. Promote Sage CRM Orders to Sage ERP X3 with GUMU Integration
2. GUMU for Sage CRM- Sage ERP X3 – Sage ERP X3 Side Configuration
3. Default quote expiration/Delivery date setting in Sage CRM
4. Synchronization Setting in GUMU for Sage CRM – Sage ERP X3
5. GUMU for Sage CRM – ERP X3 – GUMU Sage CRM side Configuration


How to solve validation error while creating import/export template of XML file type

$
0
0

While creating or modifying the template of xml file type you may come across some validation errors, this blog will guide you to overcome this error. While creating the template you may get the error as ‘indicator is mandatory’ to resolve this error you have to add the table in the ‘Identifiers’ tab.

New Stuff: How to use UPC code to scan Product

Kindly refer to the below screen shot.

3

Since an advantage of using the XML file type is that it names the fields of the table and its value so that you can easily check the data in the file so you may change the existing templates file type to ‘XML’. While doing so you may get the error stating ‘Separator/incorrect for this type of model’. To resolve this remove all the character / (slash) means that a group indicator from the Fields tab.

Kindly refer to the below screen shot.

4

Hope this blog helps in overcoming the errors!

Also Read:
1.How to use record separator of import/export template in Sage ERP X3
2.Import/Export Template
3.How to execute Import utility using code
4.Set Rule in sales orders if prepayment is not received in Sage ERP X3
5.Find number of users logged in Sage ERP X3

Blocked inventory which is in process of put-away?

$
0
0

In a business process one can come across scenario where they don’t want to allow the dock stock to get issued. In Sage X3 there is a folder level parameter available where we can set up this option.

New Stuff: How to solve validation error while creating import/export template of XML file type

To block the inventory which is in process of put-away follow the below steps.

1. Navigate through Setup > General Parameters > Parameter values. Below screen will be displayed.

img1

2. Select the STO Inventory chapter and choose the folder. Right click the Miscellaneous line and select Detail as shown in above screen shot.

3. It will show the below screen. Set the value for WIPSTOLCK to Yes as shown in below screen shot.

img2

  • YES: the issue movement is not authorized but a global allocation can be realized.
  • NO: the stock waiting to be put away and taken into account in the put-away list can be used and, in particular, allocated. As a consequence, the stock to be put away is then updated.

        Note: By default, this setup is set to NO in the referenced folder.

4. Now system will not issue the stock which is in process put away.

Also Read:

1. Inquiry – Inactive Inventory
2. Periodic Processing of Inventory Valuation
3. Inventory Counts through ADC
4. Managing Inventory at the Sub-Lot level in X3
5. Disallow shipments when Short of quantities in Sage ERP X3

How to use Product Lines?

$
0
0

Configurator simplifies the process of creation or selection of products, BOMs and routing. In this article we see an overview of the product lines for Configurator (excluding the technical nitty gritties of the process). Once you are aware of the basic facts you can easily use the Configurator on your own with the help of technical documentation available for this subject or we may take you through the detailed process in our upcoming blogs and refer the related post to understand the configurator.

New Stuff: Blocked inventory which is in process of put-away?

First of all, We need to set a configurator symbols with help of some basic parameters

A)        Symbol:
5
Symbol type is a question or variable that is used while using the Configurator.
Now each symbol has an answer or responses (set of possible values).
B)        Product Lines:
With the help of Product line we set the attributes like size, color and brand to the product as per our need
6

C)          Products:
Here we will select the product line for the product with following the screen shot which help to save the size, color and brand.7

Product Lines8
Config. data

9
Finally, click ok and save the product. Now we did set the color, size and brand for the product successfully. There is no restriction to use colour,size and brand only. We can set any symbols and product lines.
Also Read:
1.Simplify product creation using Configurator in Sage X3
2.Automate product creation using Configurator
3.How to remove a particular order from credit status hold
4.How to add Sales Invoice elements in X3?
5.Sell a group of products using Fixed Kit in Sage ERP X3


How to save attachments centrally at one location?

$
0
0

We have the ability to attach documents to our transactions by using attachment feature in Sage X3. But have you faced a situation where you moved your server and then it’s a bit difficult to manage the attachments? To overcome this situation we can define some centralized path for all the attachments as demonstrated below.

New Stuff: How to use Product Lines?

  • Navigate to Common Setup ->General Parameters -> Parameter Values
  • Click on ADX Adonix -> Folder -> Select your folder.
  • Right click on INT group to get details.
  • Define a common location (may be shared or network) for parameter ‘Attachment directory’
  • Save

img5

Now when user will attach a file to a records e.g. Sales order or Vendor or customer while defining the path for document user will enter % as shown in below screenshot.

(Assumption: The attachment documents are moved to common folder defined in DIRPCE path.)

Enter document name as ‘%filename.doc’. Then X3 would automatically translate % to common path set in DIRPCE parameter.

img6

Also Read:

1. Document Management in X3
2. Document Scanning in Sage X3
3. Control Document Numbering in Sage X3
4. What is simulation process in Sage ERP X3
5. How to create direct receipt in X3

How to do the print server configuration in X3?

$
0
0

Have you ever came a scenario where you want to print the reports in version 7 but you were not able to print? To print the reports we have to do the print server configuration. Before configure the print server we have to install the safex3-print server-installer. Here below are the steps to configure the print server.

 New Stuff: How to save attachments centrally at one location?

1. Navigate: Safe x3 console>Print servers

Click on ‘ADD’ and select the server name and click on next button, choose the components and click on OK button.

img1

After add the print server do the configuration by clicking configuration also publish the folders.

2. Click on Publications then click on Add and double click on X3V71.Select the folders and click on Apply.

img2

Here we have configured the print server.

Also Read:

1. Safe X3 JAVA Server installation and Configuration – I
2. Multi-Tier Installation of Sage ERP X3
3. How to reconfigure Sage X3 solution after changing the computer name/domain
4. Set Batch Server to auto on mode in Sage ERP X3
5. Safe X3 JAVA Server installation and Configuration – II

How to add Module and Sub module in SageX3 Version 7?

$
0
0

We have described in our earlier blog how to add menu item in Version 7 . Now proceeding further, we are describing here how to add Module and Sub-module in V7? Please follow below

New Stuff: How to do the print server configuration in X3?

  • Navigate to Administration->Navigation Pages.
  • Click on Administration dashboard.

11d

  • Now click on Edit page content.
  •  Now click on New from MODULES and select code, title. Now select this module and click New from SUBODULES and select code and title for sub module.

7

8


  • Now select this Sub module and select Menu item for this sub module and save it. Now you can see your new module and new sub module on Navigation page.

8

Hope this helps!

Also Read:

1. Import Menu Items in Sage ERP X3 Version 7
 2.How to use export to Excel functionality in version 7
3.How to create a storage area in Sage ERP X3 Version 7
4.How to know patch level in Sage X3 version 7
5.How to open Sage ERP X3 Code file in eclipse folder in version 7


Create users and assign their rights in V7

$
0
0

Before using any system users should sign in with proper roles, below are the steps to create users and assigning roles in Sage X3 V7.

 New Stuff: How to add Module and Sub module in SageX3 Version 7?

Step 1:

  •  Navigate to: Administration > Administration >Groups
  • Crate new Group.

Step 2:
Navigate to: Administration > Administration >Users

3

Then click on the ‘+Create User button present in the right panel of screen. The below screen will appear.

4

Put the information’s mandatory as shown in above screen shot where
Groups: is the field provides a list of groups the user is a member of.
Endpoints login: The list of endpoints a user can connect to be defined at the group level. When a group grants access to an endpoint, any member of the group can have access to the endpoint.

Step 3:
Navigate to: Setup > Users > Users.

5

Each user must identify themselves by a code when using the software. This menu profile code enables the definition of the tree structure proposed by default to the user. This function profile code is used to define the user’s authorizations, function by function, or in bulk. These authorizations are complemented by the user’s roles, the user parameter values and the access codes allowed for said user. This information is entered in the tabs of the user record.
Step 4:
Navigate to: Administration > Administration >Role.
Assign roles to user.

Also Read:

1.Find number of users logged in Sage ERP X3
2.Control user access to menu in Sage ERP X3
3.Import Menu Items in Sage ERP X3 Version 7
4.Check the users connected to X3
5.Restricting a user to a specific site

Automatic posting of Invoice

$
0
0

Sage X3 provides a feature to generate the automatic posting of the invoices to be issued arising from the validated and not invoiced customer shipments. The shipments that are not considered are the inter-site shipments, the sub-contractor shipments, the loan shipments where the return date is not exceeded and the totally returned shipments. To successfully bring this functionality follow below steps.

New Stuff: Create users and assign their rights in V7

Navigate to: Financials > Closing processing’s > Invoices to be issued

2

This function for the invoices to be issued is executed at the end of the month and is used to generate the recurrent invoices to be issued. If a shipment has been posted at the end of month N and it has not yet been invoiced for the N+1 month, a new invoice to be issued will then be generated at the end of the month N+1 for this shipment. In fact this process considers the non-posted shipments (not having been the object of an Invoice to be issued) and not invoiced or posted non-invoices shipments where the reversal date of the associated invoice to be issued is less than the new generation date. It should be noted that the invoices to be issued from the non-invoiced shipments take into account any invoicing elements and which regroup the shipments within these documents following the same grouping rules as the grouping of shipments on invoice with the exception of certain differences.

Hope this helps.

Also Read:

1.Mandate Sales Invoice printing before posting in Sage X3

2.Disable Accounting Cancellation on Customer BP Invoice.

3.How to Re-Open Posted/Paid Customer Invoices in Sage X3

4.Allocate Invoices to Posted Pre-Payments in Sage X3

5.Stock Quantitative Update with Direct Invoice

How to execute workflow through function?

$
0
0

The Workflow rules are used to define the execution of a number of actions when specific events occur within the Sage ERP X3 software.

The possible actions are:

  • The sending of messages by the e-mail system
  • The display of notifications in planning workbenches

 New Stuff: Automatic posting of Invoice

We can execute the workflow manually. But what if you want to execute the workflow through Function?

In this blog we will guide you on how to call or execute the workflow by function.

1. Create a function:

Development > Processing dictionary > Functions

img1

2. Add the created function in workflow rule:

Setup > workflow > workflow rules

img2

3. Assign the recipients Mail Id in Recipients tab.

img3

4. To call the workflow refer to the below snippet of code:

img4

Also Read:

1. How to execute workflow programmatically in Sage ERP X3
2. Workflow of Quality Control Process in X3
3. Workflow Monitor in Sage X3
4. Assigning Workflow Parameters in Sage X3
5. How to Restrict the Modification of gross price/Discounts/Charges for Transaction

Greytrix HQ Relocating – Taking the Big Leap

$
0
0

Greytrix is growing bigger and better year on year. As a part of our overall expansion plan, our HQ is shifting to a new location to a bigger place with advanced infrastructure. With the aim to become you a single vendor channel for all your development needs, the headquarters of Greytrix is now equipped to accommodate all your present and future needs all under one roof.


IMPORTANT

Please bear with us on 27th, 30th and 31st of March as we may experience interim interruptions in phone services while the lines are being switched over to our new location.

Greytrix HQ

NOTE: All our contact information such as Phone numbers, Toll free numbers, E-mail addresses and Fax Numbers remain the same.

New HQ Address: B/ 301, Everest Nirvara Infotech Park, MIDC, Turbhe, Navi Mumbai – 400 705.

We Thank You for your business and support and we look forward to serve you with a better rewarding partner experience with our new move.


Webinar Invite – Sage ERP X3 Integration with Sage CRM ver 7.3 on 8th April 2015 at 1 pm US ET

$
0
0

GUMUTM is now compatible with Sage CRM v7.3. Keeping your ERP on current version you can upgrade Sage CRM to latest ver 7.3. GUMU supports Sage ERP X3 v7 or v6.5 with Sage CRM v7.3 or 7.2.

This integration is real-time, bi-directional and gives your sales team access to accurate and real-time information on customers; allowing them to view orders, invoices and financial management information and also promote sales orders to the ERP on the go. Thereby optimizing your investments in Sage ERPs along with Sage CRM.

Attend this webinar to see GUMUTM integration with latest CRM version.

Register Now

Date –8th April 2015 | Time: 1:00 PM US Eastern Time

Webinar - Sage ERP X3 integration with with Sage CRM ver 7.3

GUMU Sage ERP Integrations with Sage CRM ver 7.3 available for download

Sage ERP X3 | Sage 100 (MAS 90) ERP | Sage 500 (MAS 500) ERP

See you there!

Pick Your Piece of Innovation at Sage ERP X3 Sales Conference 2015, Istanbul – Meet us at Stand # 13

$
0
0

Sage ERP X3 Conference #SageSC is about to begin in a month’s time (Take a Sneak – Peek). We are already excited and all geared up to be showcasing our Sage ERP X3 offerings at the event. Don’t miss this, a lot of new and exciting announcements pertaining to Sage ERP X3 are expected this year.

Mobility and Cloud being the technology trends driving growth and innovation in business has allowed us to access data anywhere anytime. This changing trend has encouraged ERP users to integrate with a Cloud CRM so that their Sales People can fetch and deliver Real-time information on the go.

During the conference we will be offering Freedom of Choice to Sage ERP X3 users to pick one of our well known GUMU CRM solutions which integrates Sage ERP X3 with On-premise or Cloud CRM so you can have the best of both worlds. The first one being Sage ERP X3 integration with on-premise Sage CRM. Using this you can access your ERP data from within Sage CRM over the web, mobile and tablet devices. For those looking for a pure cloud solution for their ERP, we have built a common framework to integrate Sage ERP’s with Salesforce Cloud CRM (Feature list). We have released Salesforce integration with Sage 100 (MAS90) ERP and Sage ERP X3 on the Salesforce App Exchange and will be extending to other Sage ERP’s namely Sage 300 (Accpac) and Sage 500 (MAS500) accordingly.

Greytrix also provides a host of Offshore Development and Consulting Services. With a host of products and services focused on Sage ERP X3, we aim to become a one stop provider for all your Sage ERP X3 needs.

Imp LinksEvent Website | Registrations | Agenda for Business Partners | Agenda for Customers

Have any Qs about Sage GC? Get your answers hereHow may we help you?

blog crm

About Greytrix

Our Sage ERP X3 Integration Solutions:-

Sage ERP X3 – Sage CRM Integration: A Real – Time, Bi-Directional Link built on GUMUTM framework.

Sage ERP X3 – eCommerce (Magento) Integration: A complete B2B as well as B2C solution.

Sage ERP X3 – Salesforce.com Integration : Real – Time, Bi – Directional Cloud Integration.

Meet us at the convention to talk more about our Sage ERP X3 Outsourced Development and Consulting Services: Work with us for services that are Low Cost, High Quality and give a Quick Turnaround time.

See you in Istanbul Soon!!

Automatically Generate Invoices Receivable In Sage ERP X3

$
0
0

Many a times, it is possible that the Purchase Receipt has been created, but the Purchase Invoice for the same is yet to be created till the end of the month.

There is a function to automatically generate accounting entries for the non – invoiced purchase receipts. These entries are then reversed on the first day of the next month and are used mainly for the correct portrayal of accounts at the end of the month.

New Release: Salesforce Integration with Sage ERP X3 – An Introduction

It may be noted here that:

  1. These Invoice Receivables do not take into account the purchase footers
  2. The tax rule is that of the order from which the receipt arises. Otherwise, it will take the default tax rule applied on the supplier screen

Steps:

  • Go to Financial > Closing Processing > Invoices Receivable
  • A new screen will open as shown below:img1
  • Enter the company code for which you want to run the same.
  • The All Sites flag can be kept enabled. But if you want to run for specific sites, then remove the check and enter the site code.
  • If you want any Supplier filter, you can enter the same.
  • In the “Until” field, enter the upper range of the receipt date up to which you want the records to be selected.
  • In the “Generation Type”, we use the category of the journal to be generated
  1. The Actual Journal can be viewed and printed. This document is integrated in the balance when the same is saved.
  2. Simulation Journals are not visible in Inquiries and print –outs. They need to be saved and converted into a Actual Journal for the same.
  • Keep the “Entry Status” as Temporary, so that you are able to change the entry as and when required.
  • Keep the Entry Type and Journal as default.
  • Keep the Entry Date as the last date of the current period which you are closing and the reversal date as the starting date of the next period.
  • Enable the “Log File” Flag and click on OK
  • A log file will be generated which will give us the details of the journal entries which will are generated and also the reversal entries for the same.
  • Check the same and do the Final Validation.

Also Read:

1. What is a Simulation Jounal
2. Fiscal Year End Process in Sage
3. How to re-open a closed period
4. How to Post Check Receipts into Bank
5. How to create direct receipt in X3


Steps to move reports within Sage ERP X3 folders

$
0
0

RPT is an output file created by Crystal Reports. When you copy any report from one folder to another folderRPT file does not automatically move to destination folder. You can use below steps in Sage ERP X3 to copy RPT file one folder to another folder.

New Release: Salesforce Integration with Sage ERP X3 – An Introduction

Step’s: Development > Utilities > Dictionary >Copies >Reports
1
This function is used to copy a Crystal Report report (.rpt file) from one folder to another.
The file is located in the REPORT/ directory of the folder of origin and the copied file is located in the same directory of the destination folder i.e. The directory corresponding to the language code entered.

Also read:

1.  How to pass dynamic data in Crystal reports from X3
2. Calling of Report through code
3. How to Assign Default Values to Crystal Reports
4. How to attach the Report to the Window in X3
5. Adding Crystal Report In X3

Create purchase order by using Purchase Request and RFQs

$
0
0

If user wants to create purchase order by using different responses from different suppliers sage erp x3 has provided a standard feature to create the purchase order by using the RFQ and responses. Below are the steps.

New Release: Salesforce Integration with Sage ERP X3 – An Introduction

1) First create the Purchase request
Navigation: Purchasing>Purchase requests>Purchase requests

2

2) Create the RFQ and give the line by line responses by using the RFQs.
Navigation: Purchasing>RFQs>Responses

3
3) Now create the purchase order by using the RFQs
Purchasing>Orders>Orders>Right click on line and select the RFQs menu.
And create the purchase order.

4

Also Read:

1. How to set minimum Purchase Order Quantity.
2. ReOpen Closed Purchase Orders.
3. How to open a Closed Purchase Receipts in X3.
4. Purchase Request Signature
5. Automatic Closing of purchase request in X3

How to link and order by with different tables in 4GL

$
0
0

You may come across a situation, where you may want to link or ‘order by‘ with different tables. X3 has the solution for the scenario and it will help us to get the value from linked tables and able to sort by descending and ascending order on each field. Please refer the below screen shot to get better understanding,

New stuff: How to setup timeout in X3 and stop executing the code when timeout occur…?

5

Description of Screen shot:
• STO1 is alias of First table
• TLO1 is alias of Second table
• Link the both tables with proper Key/Index with alias name [STO2]
Link [STO1] With [TLO1]TLO0=STOFCY;LOCTYP As [STO2]
• Now use the where clause to filter the First table include the order by clause too
Filter [STO2] Where ITMREF=’33301′ & STOFCY= ‘P33′ Order By [TLO1]LOCTYP Asc;[STO1]LOC Desc
• Please note here, we should mention the actual table name with field in the order by clause, so it will not conflict the ambiguous column name.
• Finally we got the data from both tables after filtered and sorted,
Infbox num$([F:STO1]STOCOU) # data comes from First table
Infbox num$([F:TLO1]LOCTYP) # data comes from Second table

Also read:
1. Creating a directory Programmatically in X3
2. ‘Identify’ in x3
3. Multi-Tier Installation of Sage ERP X3
4. Error while importing folder in Sage X3
5. How to change User Login without exiting from the current session

Setup timeout in X3 to stop executing the code when timeout occurs

$
0
0

There can be an situation when you want to stop executing a function programmatically when timeout occurs without waiting for user to close it manually.

New Release: Salesforce Integration with Sage ERP X3 – An Introduction

During development in Sage ERP X3 we have come across the above scenario where in we have to launch an external executable from X3 and then wait for user to close that external application before moving further. But in between network issue arises and external application fails to flag X3 and the X3 screen remains still and user gets a timeout message.

To prevent X3 from waiting long time we have implemented Timeout in the code file. Please refer to the below snippet of code.

img1

Also Read:

1. How to get the number of sessions opened in the X3 application
2. How to change User Login without exiting from the current session
3. Check client type of the X3 session
4. Setup Disconnection Time of Secondary Session in X3
5. How to get the random decimal number between 0 to particular digit

Re-size Selection Window at run-time in Sage ERP X3

$
0
0

You may come across a situation, where you may want to change size of selection window at run-time in Sage X3. Sage ERP X3 has a global variable through which you can define the size of the selection window at run-time.

Below are the global variables used to change the size of selection window at run-time.

New stuff: How to do the inter-site transfer of balances?

SIZLIG:This variable is used to define the height of the selection window. This height is calculated in the form of no. of lines assigned to the variable.

eg.

SIZLIG = 10, This means height of the selection window is 10 lines.

SIZCOL: This variable is used to define the width of the selection window. This width is calculated in the form of no. of columns assigned to the variable.

eg.

SIZCOL = 6, This means width of the selection window is 6 columns.

Also read:

1)Adding selection window for any action
2)Creating a Dynamic Selection Window in Sage ERP X3
3)Manipulation Of Selection List/Window – Part II
4)Manipulation Of Selection List/Window – Part I
5)Filtering the Selection List in Sage X3 without object

Viewing all 1519 articles
Browse latest View live


<script src="https://jsc.adskeeper.com/r/s/rssing.com.1596347.js" async> </script>