Quantcast
Channel: Sage X3 – Tips, Tricks and Components

How to update the fields in the signature history table for a custom workflow.

$
0
0

In Sage X3, workflows are used to automate and streamline business processes by defining a sequence of tasks that need to be performed in a specific order. These tasks can involve approvals, reviews, or other actions necessary for the completion of a business process. Workflows in Sage X3 help organizations enforce consistency, reduce manual intervention, and improve efficiency.

In Sage X3, you can assign multiple signatures in a workflow on different objects to implement a multi-level approval process. This allows for more complex and controlled workflows, where different users or groups need to review and approve various stages of a business process. But when we create the custome workflow the signature history is not getting the proper flow the flags are not updated.

Here’s a step-by-step description of how to update the fields in the signature history table for a custom workflow in Sage X3:

STEP 1:-

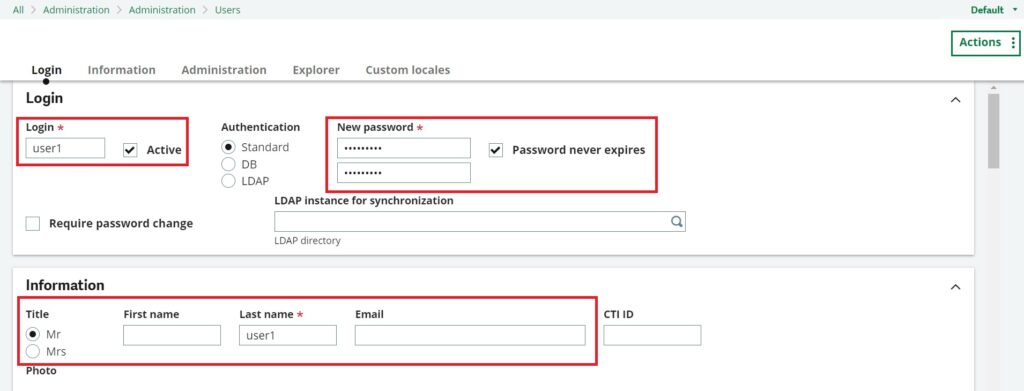
Workflow Setup:  First, you need to define the workflow itself. Go to the –>>”Workflow Setup” screen in Sage X3,  where you can create and configure the workflow according to your business requirements.

Specify the objects for which you want to implement the workflow, such as purchase orders, sales orders, or expense reports.

STEP2:

After clicking on workflow rules,

Jump to: Assignment Rule: Create a New Assignment Rule

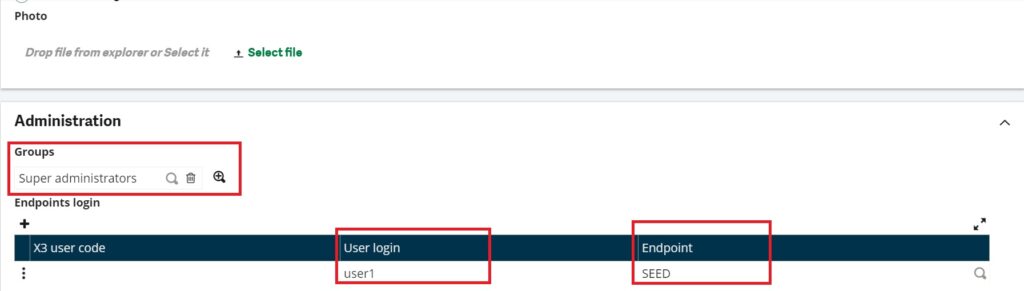
Signature Assignment: Once you have defined the signature levels, you can assign the relevant users or user groups to each level. This is done based on the roles and responsibilities of the users in your organization. Sage X3 allows you to easily select the appropriate users or groups from your system’s user database

STEP 3:-

-After clicking on the Assignment Rule display below the

-Enter the name of the assignment rule, the data model, and Number of ignatures.

-The “number of signatures” field specifies how many signatures will be used throughout the approval process.

Fig 1. Assignment Rules

STEP 4:-

After all the creation processes Save and validate the assignment rule and workflow rule.

                                                Fig 2. Signature History

STEP 5:-

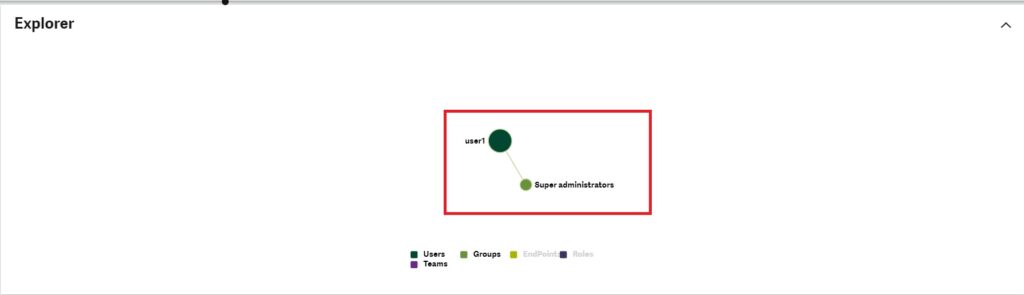
After completing all the creation processes and successfully triggering the workflow to the next user, such as ‘TEST2,’ we observed in the signature history, as shown in Figure 4, that the signed flag was updated to ‘To sign.’ However, when the user modified the order and saved it, the workflow was triggered again with the updated order, and the signed flag was updated to ‘Cancelled,’ and the reason flag was updated to ‘Document modified.’ However, for the custom workflow, the signatures history table is not updated automatically, as is the case with the standard workflow. Therefore, we need to manually update the flag in the table.

   Fig 3. Store requisition

                                                Fig 4. Signature History

STEP 6:-

The signatures history data is stored in the ‘AWRKPARF’ workflow rules (signature) table. Therefore, we need to write code to update the flag during the modification process. After writing the code, the ‘Signed’ and ‘Reason’ flags are updated successfully. Refer to the below Figure 6.

     Fig 5. Table dictionary

   Fig 6. Signature History

This blog help us to know about the use By implementing multiple signatures in workflows on different objects, Sage X3 enables you to create sophisticated approval processes that align with your organization’s specific requirements. This promotes better control, compliance, and efficiency in handling critical business operations an how to update the signature history table flags for the custom workflow .

About Us

Greytrix – a globally recognized Premier Sage Gold Development Partner is a one-stop solution provider for Sage ERP and Sage CRM needs. Being recognized and rewarded for multi-man years of experience, we bring complete end-to-end assistance for your technical consultations, product customizations, data migration, system integrations, third-party add-on development and implementation expertise.

Greytrix caters to a wide range of Sage X3 (Sage Enterprise Management) offerings – a Sage Business Cloud Solution. Our unique GUMU™ integrations include Sage X3 for Sage CRMSalesforce.com and Magento eCommerce along with Implementation and Technical Support worldwide for Sage X3 (Sage Enterprise Management). Currently we are Sage X3 Implementation Partner in East Africa, Middles East, Australia, Asia. We also offer best-in-class Sage X3 customization and development services, integrated applications such as POS | WMS | Payment Gateway | Shipping System | Business Intelligence | eCommerce and have developed add-ons such as Catch – Weight  and Letter of Credit for Sage X3 to Sage business partners, end users and Sage PSG worldwide.

Greytrix is a recognized Sage Rockstar ISV Partner for GUMU™ Sage X3 – Sage CRM integration also listed on Sage Marketplace; GUMU™ integration for Sage X3 – Salesforce is a 5-star app listed on Salesforce AppExchange.

For more information on Sage X3 Integration and Services, please contact us at x3@greytrix.com. We will be glad to assist you.


Pegging history in Sage X3

$
0
0

The “Pegging History” tool allows the history elements to be shown both upstream (what does the order cover?) and downstream (what covers the order?) from a “pivotal” order. In the second grid, under the multi-level option, the list of coverages is suggested if the selected “pivot” is of the required type.

The “Pegging History” functionality tries to meet the following requirements:

Memorization of the connections between resources and requirements, the effects of resource changes on the requirements they cover, and the renewal of the planned quantities.

The following functions are concerned for the moment:

Workbench, groupings, automatic release, direct order, automatic deletion and WO management.

Navigate to: Manufacturing –> Utilities –> Pegging history. (Refer to the below fig)

Figure 1: Navigation Menu

Pegging in an ERP context typically refers to the ability to trace the relationship between supply and demand. It helps in understanding how the demand for a particular product is met by the supply of raw materials or components. However, the specific features and capabilities of ERP systems can evolve with updates and new releases.

Following fields are present on the screen. (Refer to the below fig.)

Figure 2: Pegging history

Storage site (field STOFCY)
Enter or select the storage site where the selected product is active.
The Selection icon (magnifying glass) only suggests products that are referenced in the products-sites table.

Product (field ITMREF)
This field specifies the reference of the product to process.

Stock unit (field STU)
This field typically refers to the unit of measure in which the quantity of an item is managed or recorded in the system for stock or inventory purposes.

Type (field VCRTYP)
Enter the document type to select.

Entry (field VCRNUM)
The document type, the document number and the document line number are used to identify the origin of the stock movement:

  1. Supplier receipt
  2. Customer delivery
  3. Work order
  4. Receipt movement

Line (field VCRLIN)
The number of journal lines to process.

Sequence (field VCRSEQ)
The sequence number of the document to process.

After entering all the required details click on the Search button and we will get the data which we are looking for.(Refer to the below fig.)

Figure 3: Result

The “Pegging History” screen in Sage X3 allows users to view the historical and current pegging relationships associated with a specific item.

In conclusion, the Pegging History screen in Sage X3 plays a crucial role in providing transparency and insights into the relationships between different transactions, helping users manage and optimize their supply chain and order fulfillment processes.

About Us

Greytrix – a globally recognized Premier Sage Gold Development Partner is a one-stop solution provider for Sage ERP and Sage CRM needs. Being recognized and rewarded for multi-man years of experience, we bring complete end-to-end assistance for your technical consultations, product customizations, data migration, system integrations, third-party add-on development and implementation expertise.

Greytrix caters to a wide range of Sage X3 (Sage Enterprise Management) offerings – a Sage Business Cloud Solution. Our unique GUMU™ integrations include Sage X3 for Sage CRMSalesforce.com and Magento eCommerce along with Implementation and Technical Support worldwide for Sage X3 (Sage Enterprise Management). Currently we are Sage X3 Implementation Partner in East Africa, Middles East, Australia, Asia. We also offer best-in-class Sage X3 customization and development services, integrated applications such as POS | WMS | Payment Gateway | Shipping System | Business Intelligence | eCommerce and have developed add-ons such as Catch – Weight  and Letter of Credit for Sage X3 to Sage business partners, end users and Sage PSG worldwide.

Greytrix is a recognized Sage Rockstar ISV Partner for GUMU™ Sage X3 – Sage CRM integration also listed on Sage Marketplace; GUMU™ integration for Sage X3 – Salesforce is a 5-star app listed on Salesforce AppExchange.

For more information on Sage X3 Integration and Services, please contact us at x3@greytrix.com. We will be glad to assist you.

Time management and Inquiry Screen (Load and Capacity)

$
0
0

To equip its end user Sage X3 now has a Load and capacity screen to judge the work put in by a particular user on ERP.

The view offers a graphical representation of time spent by a user with respect to different  time periods that can be years , hours , minutes and months.

  • To navigate to the screen follow the following steps

Projects > Time Management > Inquiries > Load and Capacity

Fig 1.  Navigation Page Load and Capacity

This enables its end  to have a multi-project view related to the user  and additional selection criteria upto a selection period for viewing the detailed graph.

The required access control values in the Functional authorization function for the function code have been applied to the Project billing overview function.

The screen consist of a view that enables the viewer  him to choose the company which the employee is working with.This is to be chosen through the company’s unique code by selection.

Fig 2. Load and capacity Screen

Furthermore the user has to choose a site that must be an employee’s working site; however it is not mandatory to fill all the fields next to it( Role) .

Employee  code in the next field has to be entered that will fetch the hourly/monthly/yearly workload and time spent  data according to that employee.

Start and end date filtered data as stated between these dates.

Group by field classifies data segregation unit .

Fig 3.  Filtering data for Employee PJIMR

As per the above screen shot the data to be brought to screen should only have an employee as filter and represent the graphical overview of workload on that employee between the dates above in days.

We can include the site and company where that employee is to be or is listed.

Fig 4. Graphical Representation

The graph has capacity on Y axis and dates on X axis respectively in dictating the workload and attended dates of following workload.

About Us

Greytrix – a globally recognized Premier Sage Gold Development Partner is a one-stop solution provider for Sage ERP and Sage CRM needs. Being recognized and rewarded for multi-man years of experience, we bring complete end-to-end assistance for your technical consultations, product customizations, data migration, system integrations, third-party add-on development and implementation expertise.

Greytrix caters to a wide range of Sage X3 (Sage Enterprise Management) offerings – a Sage Business Cloud Solution. Our unique GUMU™ integrations include Sage X3 for Sage CRMSalesforce.com and Magento eCommerce along with Implementation and Technical Support worldwide for Sage X3 (Sage Enterprise Management). Currently we are Sage X3 Implementation Partner in East Africa, Middles East, Australia, Asia. We also offer best-in-class Sage X3 customization and development services, integrated applications such as POS | WMS | Payment Gateway | Shipping System | Business Intelligence | eCommerce and have developed add-ons such as Catch – Weight  and Letter of Credit for Sage X3 to Sage business partners, end users and Sage PSG worldwide.

Greytrix is a recognized Sage Rockstar ISV Partner for GUMU™ Sage X3 – Sage CRM integration also listed on Sage Marketplace; GUMU™ integration for Sage X3 – Salesforce is a 5-star app listed on Salesforce AppExchange.

For more information on Sage X3 Integration and Services, please contact us at x3@greytrix.com. We will be glad to assist you.

How to create a new User Login in Sage X3

$
0
0

Creating a new user login in Sage X3 is a simple process. Begin by accessing the Users section within the Administration module via All -> Administration -> Administration -> Users. Click on “Actions” and select “New User.” When you choose “New User” in Sage X3, a new screen appears. In the “Login” section, fill in all the mandatory details like the login name, activate the user by ticking “Active,” and set a new password with options like “Password never expires” or “Required password change.” Move to the “Information” section to pick a title, and enter the user’s name, last name, and email. For a personal touch, you can add a photo by selecting a file. In the “Administration” section, choose groups like “Super Administration” for user customization. Specify login endpoints like “SEED” and optionally add Oauth2 login and Oauth2 servers. Check user roles and permissions in the “Explorer” tab. In the “Custom Locales” tab, add the language code (e.g., “en-GB”) for preferences; the system fills in date and time formats automatically. Save the setup, log out, and test the new user login by entering the username and password, gaining access to Sage X3.

Here are the step-by-step instructions for creating a new user login in Sage X3:

Step 1: Navigate to User Creation

  • Go to All -> Administration -> Administration -> Users.
  • Click on the “Actions” button and then select “New User.”

Fig1: Users–Action

Step 2: Access New User Interface

  • After selecting “New User,” a new interface will appear, as displayed in the provided image.

Fig 2: Users—New User

Step 3: Login Tab Details

  • In the “Login” tab, enter mandatory information.
  • Specify the login name and activate the user by checking the “Active” checkbox.
  • Set a new password and configure options like “Password never expires” or “Required password change.”
  • In the “Information” tab, select the desired title (e.g., “Mr/Mrs”), and enter the user’s name, last name, and email.

Fig 3: Administrator–login

Fig 4.1: Administrator

Step 4: Additional Settings

  • Optionally, add a photo by selecting a file.
  • In the “Administration” tab, choose groups like “Super Administration” for user customization.
  • Add endpoints for login, specifying the desired login (e.g., “user1”) and endpoints (e.g., “SEED”).
  • Optionally, include Oauth2 login and Oauth2 servers.

Fig 4.2: Administrator

Step 5: Explorer Tab and Custom Locales

  • In the “Explorer” tab, review assigned user roles and permissions.
  • In the “Custom Locales” tab, add the defined locale code (e.g., “en-GB”) for language preferences.
  • The system will automatically populate details like date format and time format.
  • Save the configuration, log out, and test the new user login by entering the specified username and password, granting access to Sage X3.Refer below image ”fig.5 and fig.6”.

Fig 5: Explorer

Fig 6: Custom locales

Sage X3 makes it easy for administrators to add new users to the system. It’s simple yet powerful, allowing customization for roles and permissions. This helps users navigate and use Sage X3 efficiently. The step-by-step instructions ensure a smooth setup, making it secure and giving users confidence when logging in to Sage.

Sage X3 Workflow Auditing Streamlining Transparency Across Operations

$
0
0

In Sage X3, workflow auditing involves tracking and recording the changes made to any documents as they progress through the workflow. This is useful for maintaining transparency, ensuring compliance, and identifying any discrepancies or issues in the process. Below are general steps to set up and perform workflow auditing on sales orders in Sage X3

*Note: We will be using the “Sales Orders” table (SORDER) in this example, but you can apply these methods to any table/fields you choose.

Access Rights: Ensure that users involved in the sales order workflow have appropriate access rights to view and edit sales orders. This includes access to the workflow and relevant screens.

Define Workflow: Define the sales order workflow in Sage X3. This involves specifying the different stages through which a sales order passes.

Set up workflow rules and conditions to determine how the sales order should progress through each stage.

Audit Configuration: In Sage X3, configure audit settings to capture changes made to sales orders. This may include changes to order status, quantities, prices, customer details, and other relevant information.

Audit tab
Fig01: Audit tab

Audit configuration settings can usually be found in the Administration module.

Enable Audit Trails: Activate audit trails for sales orders. This is typically done in the parameters or settings related to auditing within Sage X3.

Define which specific fields or actions you want to track in the sales order audit trail.

Audit Reports: Utilize Sage X3’s reporting capabilities to generate audit reports for sales orders. These reports should provide a comprehensive view of all changes made to sales orders within the specified timeframe.

Common audit reports may include details such as user activity, date and time of changes, and the nature of the modifications.

Monitoring and Alerts: Set up monitoring and alert systems to notify relevant users or administrators of significant changes or actions within the sales order workflow.

Alerts can be configured based on specific criteria, such as the approval of high-value orders or changes to critical order information.

About Us

Greytrix – a globally recognized Premier Sage Gold Development Partner is a one-stop solution provider for Sage ERP and Sage CRM needs. Being recognized and rewarded for multi-man years of experience, we bring complete end-to-end assistance for your technical consultations, product customizations, data migration, system integrations, third-party add-on development and implementation expertise.

Greytrix caters to a wide range of Sage X3 (Sage Enterprise Management) offerings – a Sage Business Cloud Solution. Our unique GUMU™ integrations include Sage X3 for Sage CRMSalesforce.com and Magento eCommerce along with Implementation and Technical Support worldwide for Sage X3 (Sage Enterprise Management). Currently we are Sage X3 Implementation Partner in East Africa, Middles East, Australia, Asia. We also offer best-in-class Sage X3 customization and development services, integrated applications such as POS | WMS | Payment Gateway | Shipping System | Business Intelligence | eCommerce and have developed add-ons such as Catch – Weight  and Letter of Credit for Sage X3 to Sage business partners, end users and Sage PSG worldwide.

Greytrix is a recognized Sage Rockstar ISV Partner for GUMU™ Sage X3 – Sage CRM integration also listed on Sage Marketplace; GUMU™ integration for Sage X3 – Salesforce is a 5-star app listed on Salesforce AppExchange.

For more information on Sage X3 Integration and Services, please contact us at x3@greytrix.com. We will be glad to assist you.

Exporting Navigation page in Sage X3

$
0
0

In the previous blog, we learned how to export menu items using customization management. In this blog, we will learn how to export a navigation page using customization management. Which we can import into the desired environment.

Follow the below steps to achieve this functionality:

  1. Create Customization management:

Follow the below patch to access ‘Customization Management’:

Navigation page > Administration > Utilities > Exports > Customizations management.

Create new code, description and select the navigation page checkbox options export as shown in the below screenshot.

Creating Customization management
Fig01: Creating Customization management
Navigation Pages
Fig02: Select Navigation pages

Fill in the filters as desired.

  1. Export the customization

After creation of the Customization, Click the below shown button and Select ‘Export Customization’.

Export Customization
Fig03: Export Customizations

Choose the format of export and click ‘OK’

After successfully creating the customization, proceed to click the designated button and select ‘Export Customization.’

Choose the desired export format and confirm your selection by clicking ‘OK.’ Once the export process is complete, download the generated file by clicking on the download icon, as illustrated in the accompanying screenshot.

Download file
Fig04: Download the file

This file encapsulates the navigation page ready for seamless transfer.

In conclusion, the two blogs provide a comprehensive guide on how to use customization management in exporting, Menu items and navigation pages. This process is crucial as it allows these elements to be seamlessly imported into the desired environment, Ensuring consistency and efficiency.

About Us

Greytrix – a globally recognized Premier Sage Gold Development Partner is a one-stop solution provider for Sage ERP and Sage CRM needs. Being recognized and rewarded for multi-man years of experience, we bring complete end-to-end assistance for your technical consultations, product customizations, data migration, system integrations, third-party add-on development and implementation expertise.

Greytrix caters to a wide range of Sage X3 (Sage Enterprise Management) offerings – a Sage Business Cloud Solution. Our unique GUMU™ integrations include Sage X3 for Sage CRMSalesforce.com and Magento eCommerce along with Implementation and Technical Support worldwide for Sage X3 (Sage Enterprise Management). Currently we are Sage X3 Implementation Partner in East Africa, Middles East, Australia, Asia. We also offer best-in-class Sage X3 customization and development services, integrated applications such as POS | WMS | Payment Gateway | Shipping System | Business Intelligence | eCommerce and have developed add-ons such as Catch – Weight  and Letter of Credit for Sage X3 to Sage business partners, end users and Sage PSG worldwide.

Greytrix is a recognized Sage Rockstar ISV Partner for GUMU™ Sage X3 – Sage CRM integration also listed on Sage Marketplace; GUMU™ integration for Sage X3 – Salesforce is a 5-star app listed on Salesforce AppExchange.

For more information on Sage X3 Integration and Services, please contact us at x3@greytrix.com. We will be glad to assist you.

Understanding Class Management in Sage X3

$
0
0

Have you ever wondered how software systems like Sage X3 efficiently manage data entities, such as customers, products, and sales orders? The answer lies in the concept of classes, a crucial component of the Sage X3 ecosystem. In this blog, we will explore the intricacies of class management within Sage X3 and how it plays a pivotal role in structuring and handling data entities.

Introduction:

At the heart of Sage X3’s data management lies the concept of classes. A class serves as a blueprint for managing various entities, ranging from customers to general ledger entries, products, sales orders, and more. In this blog, we will delve into the details of class management, its components, and its significance within Sage X3.

Class Essentials:

In Sage X3, classes are essential for structuring and managing data entities. The information within a class is organized into distinct sections, each serving a specific purpose. These sections include:

1. Header Information:

   – Contains details for identifying the class, including header code, description, and type.

2. General Section:

   – Describes the primary information related to the class, including management mode, type, and more.

3. Main Table:

   – Defines the primary database table used when the class is persistent and details about the main index.

4. Additional Information:

   – Includes activity codes, technical module associations, cache settings, search-ability, and more.

5. Collection:

   – Describes class collections, their attributes, and settings.

6. Scripts:

   – Adding custom code related to supervisor events, especially for CRUD (Create, Read, Update, Delete) management.

7. Methods Section:

   – Defines additional methods and operations available for the class, distinguishing between operations and methods.

8. Standard Methods Section:

   – Describes the availability of standard CRUD methods and other methods supported by the supervisor layer on the class.

9. Properties Section:

   – Lists and defines the properties associated with the class, including data types, menus, control tables, and more.

10. Mapping Section:

    – Specifies how CRUD operations are linked to the database tables, including the main table and child classes.

11. Miscellaneous Section:

    – Contains additional information for access rights, filters, history, and linked objects.

Class Management:

Class management in Sage X3 involves configuring the class to ensure data integrity, optimize performance, and enable seamless data interactions. This section covers settings like reading, creation, modification, deletion, filters, and more.

Validation:

One of the critical aspects of class management is validation, where the class description is checked for global consistency. During validation, code generation occurs, creating scripts and business logic associated with CRUD operations. It’s important to note that any generated program should not be modified, as it will be automatically recreated during validation.

Hierarchy:

The hierarchy feature offers a visual representation of class relationships. This is particularly useful for understanding how classes are connected and how data flows within Sage X3.

In the world of Sage X3, class management is the backbone of data entity handling. Understanding the intricacies of classes and their various components is essential for optimizing data management, maintaining data integrity, and ensuring efficient data interactions within your Sage X3 system.

As you venture further into the world of Sage X3, a strong grasp of class management will empower you to harness the full potential of this powerful enterprise resource planning (ERP) solution. Whether you’re configuring classes for customers, products, or other data entities, the knowledge shared in this blog will serve as your guiding light.

About Us

Greytrix – a globally recognized Premier Sage Gold Development Partner is a one-stop solution provider for Sage ERP and Sage CRM needs. Being recognized and rewarded for multi-man years of experience, we bring complete end-to-end assistance for your technical consultations, product customizations, data migration, system integrations, third-party add-on development and implementation expertise.

Greytrix caters to a wide range of Sage X3 (Sage Enterprise Management) offerings – a Sage Business Cloud Solution. Our unique GUMU™ integrations include Sage X3 for Sage CRMSalesforce.com and Magento eCommerce along with Implementation and Technical Support worldwide for Sage X3 (Sage Enterprise Management). Currently we are Sage X3 Implementation Partner in East Africa, Middles East, Australia, Asia. We also offer best-in-class Sage X3 customization and development services, integrated applications such as POS | WMS | Payment Gateway | Shipping System | Business Intelligence | eCommerce and have developed add-ons such as Catch – Weight  and Letter of Credit for Sage X3 to Sage business partners, end users and Sage PSG worldwide.

Greytrix is a recognized Sage Rockstar ISV Partner for GUMU™ Sage X3 – Sage CRM integration also listed on Sage Marketplace; GUMU™ integration for Sage X3 – Salesforce is a 5-star app listed on Salesforce AppExchange.

For more information on Sage X3 Integration and Services, please contact us at x3@greytrix.com. We will be glad to assist you.

Roadmap to Key Sage X3 Implementation Phases

$
0
0

In today’s dynamic business environment, organizations face ongoing challenges in maintaining operational alignment, simplifying processes, and fostering sustainable growth. Regardless of size or scale, selecting an appropriate enterprise resource planning system (ERP) is pivotal in achieving desired outcomes. The quest for an impactful ERP solution, such as Sage X3, is driven by the need to enhance operational efficiency and business effectiveness.

As Greytrix, a reputable provider of comprehensive business management solutions, we recognize the significance of addressing these challenges. Serving as a certified Sage X3 Consulting & Implementation Partner, our mission is to support businesses in optimizing system performance and refining Sage X3 functionalities to drive optimal outcomes.

But wait before you start; let’s discuss how to make your Sage X3 Implementation journey a breeze.

We’ll discuss your business needs and aspirations to chart a clear path forward. Once these are clarified, the first step is to develop a solid project plan. We’ll sit with your team, assess requirements, define objectives, and ensure everyone is aligned and committed to the journey ahead.

Now that we have a concrete plan, we’ll see how to customize your Sage X3 and fit it like a glove. Our expert team will fine-tune settings, configure modules, and ensure seamless integration. Like a bespoke suit, Sage X3 will be tailored precisely to your specifications, enhancing functionality and efficiency.

We’ll thoroughly evaluate Sage X3 to guarantee optimal performance. We’ll simulate various scenarios, meticulously check all functionalities, and address any issues promptly. We aim to eliminate any potential surprises down the line, ensuring a smooth and reliable system.

With everything in place, it’s time to launch Sage X3 across your organization. We’ll oversee a seamless implementation process and provide comprehensive training to ensure your team feels confident and proficient with the new system.

Congratulations on reaching this milestone! However, the journey continues. We’ll continue to monitor performance, make necessary adjustments, and provide ongoing support to maximize Sage X3’s benefits.

Our expertise and commitment drive transformative results for your organization with Sage X3. So, why wait? Let’s start this journey together and make the most of Sage X3!

About Greyrtix:

Greytrix is a leading provider of best business management solutions. As your Sage X3 consulting and implementation partner, we can help you achieve seamless automation, higher productivity, and efficiency with our industry-driven solutions.


How to solve the error@“Period not defined or processing prohibited on this date” while validating the sales delivery.

$
0
0

Sage X3 is enterprise resource planning (ERP) product which help organization to manage all the operation of organization and database into a single software solution. Sage X3 contains list of modules like sales, purchase, inventory, project, financial and many more.

One of our clients is encountering an error “Period not defined or processing prohibited on this date” when trying to validating the sales delivery transaction, as shown in the screenshot below :

New Stuff: Roadmap to Key Sage X3 Implementation Phases

Fig01: Error on sales delivery screen

To overcome this error, please follow the steps below:

Step 1 : Please follow this path: All > Common data > General accounting tables > Periods

We identified the error and found that the Period Status is ‘open,’ but the stock status is ‘closed’ for the same month in which the sales delivery was created, as shown in the below figure.

Fig02: Fiscal year period screen(1)

Step 2 : Set the Stock Status to “open” and click on “save,” as shown in the below figure.

Fig03: Fiscal year period screen(2)

By following the above steps, we have successfully resolved the error encountered during the validation of the sales delivery transaction.

About Us

Greytrix – a globally recognized Premier Sage Gold Development Partner is a one-stop solution provider for Sage ERP and Sage CRM needs. Being recognized and rewarded for multi-man years of experience, we bring complete end-to-end assistance for your technical consultations, product customizations, data migration, system integrations, third-party add-on development and implementation expertise.

Greytrix caters to a wide range of Sage X3 (Sage Enterprise Management) offerings – a Sage Business Cloud Solution. Our unique GUMU™ integrations include Sage X3 for Sage CRM, Salesforce.com and Magento eCommerce along with Implementation and Technical Support worldwide for Sage X3 (Sage Enterprise Management). Currently we are Sage X3 Implementation Partner in East Africa, Middles East, Australia, Asia. We also offer best-in-class Sage X3 customization and development services, integrated applications such as POS | WMS | Payment Gateway | Shipping System | Business Intelligence | eCommerce and have developed add-ons such as Catch – Weight and Letter of Credit for Sage X3 to Sage business partners, end users and Sage PSG worldwide.

Greytrix is a recognized Sage Rockstar ISV Partner for GUMU™ Sage X3 – Sage CRM integration also listed on Sage Marketplace; GUMU™ integration for Sage X3 – Salesforce is a 5-star app listed on Salesforce AppExchange.

For more information on Sage X3 Integration and Services, please contact us at x3@greytrix.com. We will be glad to assist you.

Carry-forward of commitments functionality in sage X3

$
0
0

Carrying forward commitments in Sage X3 typically refers to the process of transferring or rolling over outstanding commitments from one accounting period to the next. Commitments often represent planned or anticipated expenses that have not been realized or invoiced yet.

The commitment carryforward feature transfers commitments associated with a sales order from the final period of one fiscal year to the initial period of the subsequent year.

This feature is utilized to postpone unresolved pre-commitments and commitments from the fiscal year that concludes to the beginning of the next fiscal year.

To access this function navigate to :

Financials -> Financials -> Budgets -> Carryforward of commitments

Figure 1: Navigation page

The procedure is executed through a company-specific query (BUOCMMREP) designed to identify purchase request and order lines currently in progress, not yet reconciled for a fiscal year, to carry them forward to the next fiscal year under “Operating budgets/Budget closing/Commitments deferring.”

Figure 2: Selection criteria

The header information on the screen is utilized to define the primary selection criteria: the Company and the fiscal year for which the entry manages the start and end dates. It also governs the update of the receiving fiscal year along with its start and end dates.

To refine the selection and limit the objects to be examined, additional criteria can be applied:

  1. Site Ranges: Only the sites linked to the specified company are visible in the selection.
  2. Document types: The selection can be narrowed down to either purchase orders or orders only. By default, both documents meeting the criteria are displayed.

Activating the “Display/Refresh” key reveals the list of budget envelopes corresponding to the selection in the table.

The selection is capped at a maximum of 500 lines. If this limit is exceeded, a “full grid” message signals that the selection surpasses the authorized 500 lines. Clicking “OK” displays the initial 500 lines. To reduce the selection, utilize additional criteria such as Sites and Document Types.

Figure 3: Commitments

After inputting the chosen criteria and triggering the “Display/Actualize” function, the designated purchase lines are presented in a grid, which may or may not be utilized for initiating the carry-forward process.

The displayed columns serve an informative purpose, presenting details such as document type, document number, date, commitments, envelope, entity, account, amount to defer, currency, and budget. Modification of these columns is not permitted, with the exception of the following:

  1. Defer Column: The selection of all displayed purchase lines can be executed in a single operation by clicking on “Check/Uncheck all.” This selection can be reversed using the same button.
  2. Detail column: The magnifying glass icon facilitates direct access to the purchase request or order.

Contextual buttons, accessible through a right-click and selection within the list, serve the following purposes:

  • Sorting purchase lines by document number, envelope number, entity, and account budget.
  • Accessing details related to the order, envelope, and pre-commitments or commitment.

Figure 4: Carryforward commitments

At the conclusion of a fiscal year, certain purchase requests (those not yet ordered or only partially ordered) and some orders that haven’t been invoiced or are only partially invoiced will be either ordered or invoiced in the subsequent fiscal year. To accommodate this, purchase requests and orders that have become obsolete and were closed before the fiscal year-end, along with any remaining pre-commitments and commitments, need to be deferred to the new fiscal year. This ensures the ability to:

1.Place an order based on a purchase request from the prior fiscal year,

2.Issue an invoice based on an order from the prior fiscal year, and

3.Include the corresponding budget in the budget lines of the new fiscal year.

The carry-forward process for outstanding pre-commitments and commitments involves two steps:

1.Choose the purchase lines to carry forward using the BUOCMMREP function (Operating budgets/Budget closing/Carry-forward of commitments),

2.Display the selection result in a grid, allowing the budget manager to select the pre-commitments and commitments to process.

The deferral of pre-commitments and commitments represents the third or fourth stage of budget closing, and the fiscal year-end process for GRNI can be performed either before or after the deferral of outstanding pre-commitments and commitments.

The carry forward of commitments is a vital function that facilitates the seamless transition of outstanding purchase lines from one fiscal year to the next in Sage X3. By allowing users to select and defer commitments through a user-friendly interface, this feature ensures accurate financial planning and tracking across different fiscal periods. The detailed grid display and interactive options, such as checking/unchecking all and accessing detailed information, enhance the efficiency of the carry forward process, contributing to a more streamlined and transparent budget management system.

About Us

Greytrix – a globally recognized Premier Sage Gold Development Partner is a one-stop solution provider for Sage ERP and Sage CRM needs. Being recognized and rewarded for multi-man years of experience, we bring complete end-to-end assistance for your technical consultations, product customizations, data migration, system integrations, third-party add-on development and implementation expertise.

Greytrix caters to a wide range of Sage X3 (Sage Enterprise Management) offerings – a Sage Business Cloud Solution. Our unique GUMU™ integrations include Sage X3 for Sage CRM, Salesforce.com and Magento eCommerce along with Implementation and Technical Support worldwide for Sage X3 (Sage Enterprise Management). Currently we are Sage X3 Implementation Partner in East Africa, Middles East, Australia, Asia. We also offer best-in-class Sage X3 customization and development services, integrated applications such as POS | WMS | Payment Gateway | Shipping System | Business Intelligence | eCommerce and have developed add-ons such as Catch – Weight and Letter of Credit for Sage X3 to Sage business partners, end users and Sage PSG worldwide.

Greytrix is a recognized Sage Rockstar ISV Partner for GUMU™ Sage X3 – Sage CRM integration also listed on Sage Marketplace; GUMU™ integration for Sage X3 – Salesforce is a 5-star app listed on Salesforce AppExchange.

For more information on Sage X3 Integration and Services, please contact us at x3@greytrix.com. We will be glad to assist you.


Latest Images